基礎管理命令
- 基礎命令
- kubectl get命令
- kubectl create命令
- kubectl apply命令
- kubectl delete命令
- kubectl describe命令
- kubectl explain命令
- kubectl run命令
- kubectl cp命令
- kubectl edit命令
- kubectl logs命令
- kubectl exec命令
- kubectl port-forward命令
- kubectl patch命令
- 集群管理命令
- kubectl cordon命令
- kubectl uncordon命令
- kubectl drain命令
- kubectl top命令
- kubectl taint命令
- kubectl label命令
實驗環境:基于Ubuntu2404搭建的k8s1.32版本集群
root@master:~# kubectl get nodes
NAME       STATUS   ROLES           AGE   VERSION
master     Ready    control-plane   58d   v1.32.1
worker01   Ready    <none>          58d   v1.32.1
root@master:~# kubectl get pods -A
NAMESPACE        NAME                                                    READY   STATUS    RESTARTS      AGE
kube-dashboard   kubernetes-dashboard-api-66648d89bc-fsmbc               1/1     Running   0             58d
kube-dashboard   kubernetes-dashboard-auth-dd6758c7b-b2r5d               1/1     Running   0             58d
kube-dashboard   kubernetes-dashboard-kong-68c6566956-fd6xn              1/1     Running   0             58d
kube-dashboard   kubernetes-dashboard-metrics-scraper-55cc88cbcb-d5682   1/1     Running   0             58d
kube-dashboard   kubernetes-dashboard-web-6779d576bb-t7ph2               1/1     Running   0             58d
kube-system      calico-kube-controllers-77969b7d87-jsndm                1/1     Running   0             58d
kube-system      calico-node-smkh7                                       1/1     Running   0             58d
kube-system      calico-node-tjpg8                                       1/1     Running   0             58d
kube-system      coredns-69767bd799-9wtv2                                1/1     Running   0             58d
kube-system      coredns-69767bd799-qtpsk                                1/1     Running   0             58d
kube-system      etcd-master                                             1/1     Running   0             58d
kube-system      kube-apiserver-master                                   1/1     Running   0             58d
kube-system      kube-controller-manager-master                          1/1     Running   2 (58d ago)   58d
kube-system      kube-proxy-c8frl                                        1/1     Running   0             58d
kube-system      kube-proxy-rtwtr                                        1/1     Running   0             58d
kube-system      kube-scheduler-master                                   1/1     Running   2 (58d ago)   58d
基礎命令
kubectl get命令
kubectl 是 Kubernetes集群的命令行工具,通過它能對 Kubernetes 集群進行管理和操作
kubectl get 是 Kubernetes 中最基礎且最常用的命令之一,用于查看集群中的各種資源對象
基本語法
kubectl get [資源類型] [資源名稱] [選項]
- 常用資源類型
| 資源類型 | 縮寫 | 描述 |
|---|---|---|
| pods | po | 查看 Pod |
| services | svc | 查看 Service |
| deployments | deploy | 查看 Deployment |
| replicasets | rs | 查看 ReplicaSet |
| statefulsets | sts | 查看 StatefulSet |
| daemonsets | ds | 查看 DaemonSet |
| jobs | - | 查看 Job |
| cronjobs | cj | 查看 CronJob |
| nodes | no | 查看節點 |
| namespaces | ns | 查看命名空間 |
| persistentvolumes | pv | 查看持久卷 |
| persistentvolumeclaims | pvc | 查看持久卷聲明 |
| configmaps | cm | 查看 ConfigMap |
| secrets | - | 查看 Secret |
| ingresses | ing | 查看 Ingress |
| endpoints | ep | 查看 Endpoints |
- 示例:查看命名空間
root@master:~# kubectl get ns
NAME                   STATUS   AGE
default                Active   58d
kube-dashboard         Active   58d
kube-node-lease        Active   58d
kube-public            Active   58d
kube-system            Active   58d
kubernetes-dashboard   Active   58d
root@master:~# kubectl get po
No resources found in default namespace.
root@master:~#
- 常用選項參數
| 參數 | 縮寫 | 描述 | 示例 |
|---|---|---|---|
| –all-namespaces | -A | 查看所有命名空間的資源 | kubectl get pods -A |
| –namespace | -n | 指定命名空間 | kubectl get pods -n kube-system |
| –output | -o | 輸出格式 (json, yaml, wide, name等) | kubectl get pods -o wide |
| –selector | -l | 根據標簽選擇器篩選 | kubectl get pods -l app=nginx |
| –show-labels | - | 顯示資源的標簽 | kubectl get pods --show-labels |
| –watch | -w | 監視資源變化 | kubectl get pods -w |
| –field-selector | - | 根據字段選擇器篩選 | kubectl get pods --field-selector=status.phase=Running |
| –ignore-not-found | - | 忽略未找到的錯誤 | kubectl get pod not-exist --ignore-not-found |
| –sort-by | - | 按指定字段排序 | kubectl get pods --sort-by=.metadata.creationTimestamp |
| –no-headers | - | 不顯示標題行 | kubectl get pods --no-headers |
| –chunk-size | - | 批量獲取的大小 | kubectl get pods --chunk-size=50 |
| –server-print | - | 服務器端打印 | kubectl get pods --server-print=true |
- 示例
root@master:~# kubectl get node -o wide
NAME       STATUS   ROLES           AGE   VERSION   INTERNAL-IP       EXTERNAL-IP   OS-IMAGE           KERNEL-VERSION     CONTAINER-RUNTIME
master     Ready    control-plane   58d   v1.32.1   192.168.200.160   <none>        Ubuntu 24.04 LTS   6.8.0-31-generic   containerd://2.0.2
worker01   Ready    <none>          58d   v1.32.1   192.168.200.161   <none>        Ubuntu 24.04 LTS   6.8.0-31-generic   containerd://2.0.2
root@master:~# kubectl get pods -n kube-system
NAME                                       READY   STATUS    RESTARTS      AGE
calico-kube-controllers-77969b7d87-jsndm   1/1     Running   0             58d
calico-node-smkh7                          1/1     Running   0             58d
calico-node-tjpg8                          1/1     Running   0             58d
coredns-69767bd799-9wtv2                   1/1     Running   0             58d
coredns-69767bd799-qtpsk                   1/1     Running   0             58d
etcd-master                                1/1     Running   0             58d
kube-apiserver-master                      1/1     Running   0             58d
kube-controller-manager-master             1/1     Running   2 (58d ago)   58d
kube-proxy-c8frl                           1/1     Running   0             58d
kube-proxy-rtwtr                           1/1     Running   0             58d
kube-scheduler-master                      1/1     Running   2 (58d ago)   58d
- 輸出格式選項
| 格式 | 描述 | 示例 |
|---|---|---|
| wide | 顯示額外信息 | kubectl get pods -o wide |
| json | JSON格式輸出 | kubectl get pods -o json |
| yaml | YAML格式輸出 | kubectl get pods -o yaml |
| name | 僅顯示資源名稱 | kubectl get pods -o name |
| custom-columns | 自定義列 | kubectl get pods -o custom-columns=NAME:.metadata.name,STATUS:.status.phase |
| jsonpath | 使用JSONPath表達式 | kubectl get pods -o jsonpath=‘{.items[*].metadata.name}’ |
- 示例
root@master:~# kubectl get node -o wide
NAME       STATUS   ROLES           AGE   VERSION   INTERNAL-IP       EXTERNAL-IP   OS-IMAGE           KERNEL-VERSION     CONTAINER-RUNTIME
master     Ready    control-plane   58d   v1.32.1   192.168.200.160   <none>        Ubuntu 24.04 LTS   6.8.0-31-generic   containerd://2.0.2
worker01   Ready    <none>          58d   v1.32.1   192.168.200.161   <none>        Ubuntu 24.04 LTS   6.8.0-31-generic   containerd://2.0.2
root@master:~# kubectl get node -o yaml
apiVersion: v1
items:
- apiVersion: v1kind: Nodemetadata:annotations:kubeadm.alpha.kubernetes.io/cri-socket: unix:///var/run/containerd/containerd.socknode.alpha.kubernetes.io/ttl: "0"projectcalico.org/IPv4Address: 192.168.200.170/24projectcalico.org/IPv4IPIPTunnelAddr: 172.17.219.64volumes.kubernetes.io/controller-managed-attach-detach: "true"creationTimestamp: "2025-02-10T07:22:41Z"labels:beta.kubernetes.io/arch: amd64beta.kubernetes.io/os: linuxkubernetes.io/arch: amd64kubernetes.io/hostname: masterkubernetes.io/os: linuxnode-role.kubernetes.io/control-plane: ""node.kubernetes.io/exclude-from-external-load-balancers: ""name: master
----------architecture: amd64bootID: 80363416-61dd-4a1d-adb1-04d30be5f786containerRuntimeVersion: containerd://2.0.2kernelVersion: 6.8.0-31-generickubeProxyVersion: v1.32.1kubeletVersion: v1.32.1machineID: c8a9b7f5efae45c5bc6a260f67e2100doperatingSystem: linuxosImage: Ubuntu 24.04 LTSsystemUUID: 047c4d56-3c6b-8139-5e48-ae05a3e0e337runtimeHandlers:- features:recursiveReadOnlyMounts: trueuserNamespaces: truename: runc- features:recursiveReadOnlyMounts: trueuserNamespaces: truename: ""
kind: List
metadata:resourceVersion: ""
kubectl create命令
kubectl create 用于從文件或標準輸入創建新的 Kubernetes 資源
基本語法
kubectl create -f <filename>
kubectl create <resource-type> <resource-name> [flags]
- 常用子命令和參數
| 子命令/參數 | 描述 | 示例 |
|---|---|---|
| -f, --filename | 指定要使用的文件 | kubectl create -f pod.yaml |
| –dry-run | 試運行,不實際創建 | kubectl create -f pod.yaml --dry-run=client |
| –edit | 在創建前編輯對象 | kubectl create -f pod.yaml --edit |
| –save-config | 將當前配置保存到注解 | kubectl create -f pod.yaml --save-config |
| –validate | 驗證配置 | kubectl create -f pod.yaml --validate=true |
| –from | 從現有資源創建 | kubectl create secret generic my-secret --from-file=./password.txt |
- 示例
創建一個nginx deployment副本,使用試運行命令最后生成一個yaml文件
root@master:~# kubectl create deployment nginx --image=nginx --replicas=3 --dry-run=client -o yaml > nginx.yaml
root@master:~# cat nginx.yaml
apiVersion: apps/v1
kind: Deployment
metadata:creationTimestamp: nulllabels:app: nginxname: nginx
spec:replicas: 3selector:matchLabels:app: nginxstrategy: {}template:metadata:creationTimestamp: nulllabels:app: nginxspec:containers:- image: nginxname: nginxresources: {}
status: {}
root@master:~# kubectl create -f nginx.yaml
deployment.apps/nginx created
root@master:~# kubectl get deployments.apps
NAME    READY   UP-TO-DATE   AVAILABLE   AGE
nginx   0/3     3            0           11s
root@master:~# kubectl get pod
NAME                     READY   STATUS    RESTARTS   AGE
nginx-5869d7778c-79ffh   1/1     Running   0          48m
nginx-5869d7778c-7pvfb   1/1     Running   0          48m
nginx-5869d7778c-vll79   1/1     Running   0          48m
- 常用資源創建命令
| 命令 | 描述 | 示例 |
|---|---|---|
| create deployment | 創建部署 | kubectl create deployment nginx --image=nginx |
| create namespace | 創建命名空間 | kubectl create namespace dev |
| create secret | 創建Secret | kubectl create secret generic my-secret --from-literal=key=value |
| create configmap | 創建ConfigMap | kubectl create configmap my-config --from-file=config.properties |
| create service | 創建Service | kubectl create service clusterip my-svc --tcp=80:8080 |
- 示例:創建命名空間
root@master:~# kubectl create ns test
namespace/test created
kubectl apply命令
kubectl apply 通過定義資源的配置文件來聲明式地管理應用,可以創建或更新資源。
基本語法
kubectl apply -f <filename>
- 常用參數
| 參數 | 描述 | 示例 |
|---|---|---|
| -f, --filename | 指定要使用的文件 | kubectl apply -f deployment.yaml |
| –dry-run | 試運行 | kubectl apply -f deploy.yaml --dry-run=client |
| –prune | 刪除不再需要的資源 | kubectl apply -f dir/ --prune -l app=nginx |
| –overwrite | 覆蓋現有配置 | kubectl apply -f config.yaml --overwrite=true |
| –record | 記錄當前命令 | kubectl apply -f deploy.yaml --record=true |
| –force | 強制替換資源 | kubectl apply -f deploy.yaml --force |
create vs apply 對比
| 特性 | kubectl create | kubectl apply |
|---|---|---|
| 類型 | 命令式 | 聲明式 |
| 資源存在時 | 報錯 | 更新資源 |
| 更新方式 | 需先 delete 再 create | 直接修改 YAML 后重新 apply |
| 冪等性 | 非冪等 | 冪等 |
| 適用場景 | 一次性創建 | 持續部署 |
| 版本控制 | 不支持 | 支持(通過注解) |
| 推薦使用 | 初始創建 | 日常管理 |
kubectl delete命令
kubectl delete 是用于刪除 Kubernetes 集群中各種資源對象的命令,是日常運維中的關鍵操作之一
基本語法
kubectl delete [資源類型]/[資源名稱] [選項]
kubectl delete -f [配置文件] [選項]
- 常用資源類型(支持縮寫)
| 資源類型 | 縮寫 | 示例命令格式 |
|---|---|---|
| pods | po | kubectl delete pod/[name] |
| deployments | deploy | kubectl delete deploy/[name] |
| services | svc | kubectl delete svc/[name] |
| replicasets | rs | kubectl delete rs/[name] |
| statefulsets | sts | kubectl delete sts/[name] |
| daemonsets | ds | kubectl delete ds/[name] |
| jobs | - k | ubectl delete job/[name] |
| cronjobs | cj | kubectl delete cj/[name] |
| configmaps | cm | kubectl delete cm/[name] |
| secrets | - | kubectl delete secret/[name] |
| persistentvolumes | pv | kubectl delete pv/[name] |
| persistentvolumeclaims | pvc | kubectl delete pvc/[name] |
- 刪除pod
root@master:~# kubectl get pod
NAME                     READY   STATUS              RESTARTS   AGE
nginx-5869d7778c-f9ws4   0/1     ContainerCreating   0          4s
nginx-5869d7778c-s492b   0/1     ContainerCreating   0          4s
nginx-5869d7778c-zp65q   1/1     Running             0          4s
root@master:~# kubectl delete pod nginx-5869d7778c-f9ws4
pod "nginx-5869d7778c-f9ws4" deleted
- 核心參數詳解
| 參數 | 縮寫 | 描述 | 示例 |
|---|---|---|---|
| –all | - | 刪除指定類型的所有資源 | kubectl delete pods --all |
| –all-namespaces | -A | 跨所有命名空間刪除 | kubectl delete pods -A |
| –cascade | - | 級聯刪除策略(默認true) | kubectl delete deploy/nginx --cascade=false |
| –force | - | 強制立即刪除(不等待優雅終止) | kubectl delete pod/nginx --force |
| –grace-period | - | 優雅刪除等待時間(秒,默認30) | kubectl delete pod/nginx --grace-period=0 |
| –ignore-not-found | - | 忽略不存在的資源錯誤 | kubectl delete pod/not-exist --ignore-not-found |
| –now | - | 相當于 | –grace-period=0 kubectl delete pod/nginx --now |
| –selector | -l | 根據標簽選擇器刪除 | kubectl delete pods -l app=nginx |
| –timeout | - | 刪除操作的超時時間 | kubectl delete deploy/nginx --timeout=60s |
| –wait | - | 等待資源完全刪除(默認true) | kubectl delete svc/nginx --wait=false |
- 基本刪除操作
# 刪除單個Pod
kubectl delete pod/nginx# 刪除指定命名空間的Deployment
kubectl delete deploy/nginx -n default# 通過配置文件刪除
root@master:~# kubectl get pod
NAME                     READY   STATUS    RESTARTS   AGE
nginx-5869d7778c-79ffh   1/1     Running   0          48m
nginx-5869d7778c-7pvfb   1/1     Running   0          48m
nginx-5869d7778c-vll79   1/1     Running   0          48m
root@master:~# kubectl delete -f nginx.yaml
deployment.apps "nginx" deleted
root@master:~# kubectl get pod
No resources found in default namespace.
root@master:~#
- 批量刪除操作
# 刪除所有Pod(當前命名空間)
kubectl delete pods --all# 刪除所有命名空間的指定資源
kubectl delete pods --all-namespaces# 根據標簽選擇器刪除
kubectl delete pods -l app=nginx# 刪除命名空間及其所有資源
kubectl delete namespace dev --cascade=true
- 特殊刪除場景
# 強制立即刪除Pod(跳過優雅終止)
# 默認30秒等待時間,可通過--grace-period調整
# 立即終止:--grace-period=0 --force
kubectl delete pod/nginx --grace-period=0 --force# 只刪除Pod不刪除關聯的Deployment
# 默認行為:刪除父資源(如Deployment)時會自動刪除子資源(如Pod)
# 禁用方法:--cascade=false
kubectl delete pod/nginx --cascade=false# 刪除PVC但保留PV
kubectl delete pvc/my-pvc --cascade=false# 試運行刪除(dry-run)
kubectl delete deploy/nginx --dry-run=client
kubectl describe命令
kubectl describe 是 Kubernetes 中用于查看資源詳細信息的強大命令,相比 kubectl get 提供更全面的資源狀態和關聯信息
基本語法
kubectl describe <資源類型>/<資源名稱> [選項]
kubectl describe <資源類型> [選項]
- 支持的資源類型(支持縮寫)
| 資源類型 | 縮寫 | 示例命令格式 |
|---|---|---|
| pods | po | kubectl describe po/nginx |
| nodes | no | kubectl describe no/node1 |
| deployments | deploy | kubectl describe deploy/nginx |
| services | svc | kubectl describe svc/nginx |
| replicasets | rs | kubectl describe rs/nginx |
| statefulsets | sts | kubectl describe sts/web |
| daemonsets | ds | kubectl describe ds/logging |
| configmaps | cm | kubectl describe cm/config |
| secrets | - | kubectl describe secret/db |
| namespaces | ns | kubectl describe ns/dev |
| persistentvolumes | pv | kubectl describe pv/pv1 |
| persistentvolumeclaims | pvc | kubectl describe pvc/claim1 |
| events | ev | kubectl describe ev |
- 查看pod詳細信息
root@master:~# kubectl describe pod nginx-5869d7778c-
nginx-5869d7778c-nd9df  nginx-5869d7778c-s492b  nginx-5869d7778c-zp65q
root@master:~# kubectl describe pod nginx-5869d7778c-nd9df
Name:             nginx-5869d7778c-nd9df
Namespace:        default
Priority:         0
Service Account:  default
---------
Conditions:Type                        StatusPodReadyToStartContainers   TrueInitialized                 TrueReady                       TrueContainersReady             TruePodScheduled                True
Volumes:kube-api-access-xgq2f:Type:                    Projected (a volume that contains injected data from multiple sources)TokenExpirationSeconds:  3607ConfigMapName:           kube-root-ca.crtConfigMapOptional:       <nil>DownwardAPI:             true
QoS Class:                   BestEffort
Node-Selectors:              <none>
Tolerations:                 node.kubernetes.io/not-ready:NoExecute op=Exists for 300snode.kubernetes.io/unreachable:NoExecute op=Exists for 300s
Events:Type    Reason     Age   From               Message----    ------     ----  ----               -------Normal  Scheduled  63s   default-scheduler  Successfully assigned default/nginx-5869d7778c-nd9df to worker01Normal  Pulling    62s   kubelet            Pulling image "nginx"Normal  Pulled     9s    kubelet            Successfully pulled image "nginx" in 22.856s (53.215s including waiting). Image size: 72207578 bytes.Normal  Created    9s    kubelet            Created container: nginxNormal  Started    9s    kubelet            Started container nginx
- 核心參數詳解
| 參數 | 描述 | 示例 |
|---|---|---|
| -A, --all-namespaces | 所有命名空間 | kubectl describe pods -A |
| -f, --filename | 通過文件指定資源 | kubectl describe -f pod.yaml |
| -k, --kustomize | 從kustomization目錄 | kubectl describe -k dir/ |
| -l, --selector | 標簽選擇器 | kubectl describe pods -l app=nginx |
| -n, --namespace | 指定命名空間 | kubectl describe po nginx -n dev |
| –recursive | 處理目錄遞歸 | kubectl describe -f manifests/ --recursive |
| –show-events | 顯示事件(默認true) | kubectl describe po nginx --show-events=false |
- 基礎查詢
# 查看Pod詳細信息
kubectl describe pod/nginx# 查看節點資源情況
kubectl describe node/node1
- 故障排查
# 查看Pod為什么無法啟動
kubectl describe pod/crash-loop-pod# 查看Service端點信息
kubectl describe svc/nginx
- 批量查詢
# 查看命名空間下所有Pod
kubectl describe pods -n dev# 按標簽選擇查看
kubectl describe pods -l app=nginx
kubectl explain命令
kubectl explain 是 Kubernetes 中用于查看資源定義和字段說明的內置文檔工具,能夠幫助用戶理解各種資源的 YAML/JSON 配置結構
基本語法
kubectl explain <資源類型>[.<字段路徑>] [選項]
- 查看資源類型文檔
root@master:~# kubectl explain pod
KIND:       Pod
VERSION:    v1DESCRIPTION:Pod is a collection of containers that can run on a host. This resource iscreated by clients and scheduled onto hosts.FIELDS:apiVersion    <string>APIVersion defines the versioned schema of this representation of an object.Servers should convert recognized schemas to the latest internal value, andmay reject unrecognized values. More info:https://git.k8s.io/community/contributors/devel/sig-architecture/api-conventions.md#resourceskind  <string>Kind is a string value representing the REST resource this objectrepresents. Servers may infer this from the endpoint the client submitsrequests to. Cannot be updated. In CamelCase. More info:https://git.k8s.io/community/contributors/devel/sig-architecture/api-conventions.md#types-kindsmetadata      <ObjectMeta>Standard object's metadata. More info:https://git.k8s.io/community/contributors/devel/sig-architecture/api-conventions.md#metadataspec  <PodSpec>Specification of the desired behavior of the pod. More info:https://git.k8s.io/community/contributors/devel/sig-architecture/api-conventions.md#spec-and-statusstatus        <PodStatus>Most recently observed status of the pod. This data may not be up to date.Populated by the system. Read-only. More info:https://git.k8s.io/community/contributors/devel/sig-architecture/api-conventions.md#spec-and-status
- 查看嵌套字段定義
kubectl explain pod.spec.containers
- 遞歸顯示所有字段
kubectl explain deployment --recursive
kubectl run命令
kubectl run 是 Kubernetes 中用于快速創建和運行容器的便捷命令,適合快速測試和臨時部署場景
基本語法
kubectl run <名稱> --image=<鏡像> [其他參數]
常用參數詳解
- 基本運行參數
| 參數 | 描述 | 示例 |
|---|---|---|
| –image | 指定容器鏡像(必需) | –image=nginx:1.19 |
| –port | 暴露容器端口 | –port=80 |
| –command | 覆蓋默認啟動命令 | –command – /bin/sh -c ‘sleep 3600’ |
| –restart | 重啟策略(Always/Never/OnFailure) | –restart=Never |
- 工作負載控制參數
| 參數 | 描述 | 示例 |
|---|---|---|
| –generator | 指定資源類型(已棄用) | –generator=run-pod/v1 |
| –replicas | 副本數(創建Deployment時) | –replicas=3 |
| –labels | 設置資源標簽 | -l app=test,env=dev |
- 環境與配置參數
| 參數 | 描述 | 示例 |
|---|---|---|
| –env | 設置環境變量 | –env=“KEY=VALUE” |
| –requests | 資源請求 | –requests=‘cpu=100m,memory=256Mi’ |
| –limits | 資源限制 | –limits=‘cpu=500m,memory=1Gi’ |
- 交互與調試參數
| 參數 | 描述 | 示例 |
|---|---|---|
| –rm | 退出后自動刪除(交互式Pod) | –rm -it --image=busybox |
| -it | 交互式終端 | -it --image=alpine |
| –overrides | JSON格式覆蓋配置 | –overrides=‘{…}’ |
- 基礎運行示例
運行單個Nginx Pod
root@master:~# kubectl run nginx --image=nginx:latest --port=80
pod/nginx created
root@master:~# kubectl get pod
NAME    READY   STATUS    RESTARTS   AGE
nginx   1/1     Running   0          34s
# 運行臨時調試容器(退出自動刪除)
kubectl run debug-tool --rm -it --image=alpine -- sh
- 創建Deployment
# 創建有3個副本的Nginx Deployment
kubectl run nginx --image=nginx --replicas=3
與kubectl create的區別
| 特性 | kubectl run | kubectl create |
|---|---|---|
| 設計目的 | 快速啟動容器 | 顯式創建資源 |
| YAML生成 | 支持–dry-run -o yaml輸出 | 需要明確指定文件 |
| 資源類型 | 主要創建Pod/Deployment | 支持所有資源類型 |
| 推薦場景 | 測試/臨時部署 | 生產環境部署 |
kubectl cp命令
kubectl cp 是 Kubernetes 中用于在本地文件系統和容器之間復制文件和目錄的命令,類似于傳統的 docker cp 命令
基本語法
# 從容器復制到本地
kubectl cp <namespace>/<pod-name>:<container-path> <local-path> [-c <container-name>]# 從本地復制到容器
kubectl cp <local-path> <namespace>/<pod-name>:<container-path> [-c <container-name>]
- 參數詳解
| 參數 | 描述 | 示例 |
|---|---|---|
| / | 指定命名空間(可選) | default/nginx-pod:/file |
| -c, --container | 指定容器名稱(多容器Pod必需) | -c app-container |
| –no-preserve | 不保留文件屬性 | –no-preserve |
| –retries | 重試次數(默認0) | –retries=3 |
- 基本文件復制
# 從Pod復制文件到本地
kubectl cp my-pod:/var/log/app.log ./app.log# 從本地復制文件到Pod
kubectl cp config.json my-pod:/etc/config.json
- 目錄復制
# 復制整個目錄到Pod
kubectl cp ./config/ my-pod:/etc/# 從Pod復制目錄到本地
kubectl cp my-pod:/var/log/ ./logs/
- 多容器Pod操作
# 指定容器名稱
kubectl cp my-pod:/data/file.txt ./file.txt -c sidecar
- 跨命名空間操作
# 指定命名空間
kubectl cp prod/nginx-pod:/etc/nginx/nginx.conf ./nginx.conf
kubectl edit命令
kubectl edit 是 Kubernetes 中用于直接編輯集群中資源對象的命令,它提供了一種快速修改資源配置的交互式方法。
基本語法
kubectl edit <資源類型>/<資源名稱> [選項]
kubectl edit <資源類型> [選項]
- 支持的資源類型(支持縮寫)
| 資源類型 | 縮寫 | 示例命令 |
|---|---|---|
| pods | po | kubectl edit po/nginx |
| deployments | deploy | kubectl edit deploy/nginx |
| services | svc | kubectl edit svc/nginx |
| configmaps | cm | kubectl edit cm/app-config |
| secrets | - | kubectl edit secret/db |
| ingress | ing | kubectl edit ing/web |
- 核心參數詳解
| 參數 | 描述 | 示例 |
|---|---|---|
| -f, --filename | 通過文件指定資源 | kubectl edit -f deploy.yaml |
| -k, --kustomize | 從kustomization目錄 | kubectl edit -k dir/ |
| -n, --namespace | 指定命名空間 | kubectl edit po nginx -n dev |
| –output | 輸出格式(yaml/json) | kubectl edit deploy/nginx -o json |
| –record | 記錄當前命令 | kubectl edit deploy/nginx --record=true |
- 示例
# 編輯Deployment
kubectl edit deploy/nginx# 編輯指定命名空間的ConfigMap
kubectl edit cm/app-config -n dev
kubectl logs命令
kubectl logs 是 Kubernetes 中用于查看 Pod 和容器日志的核心命令,相當于容器化環境的 tail 和 cat 命令組合
基本語法
kubectl logs <pod-name> [options]
kubectl logs -f <pod-name>  # 實時日志流
kubectl logs <pod-name> -c <container-name>  # 多容器Pod
- 核心參數詳解
| 參數 | 描述 | 示例 |
|---|---|---|
| -f, --follow | 實時流式日志 | kubectl logs -f nginx |
| –tail | 顯示最后N行 | kubectl logs --tail=100 |
| -c, --container | 指定容器名稱 | kubectl logs -c sidecar |
| -p, --previous | 查看前一個容器的日志(崩潰重啟時) | kubectl logs -p |
| –since | 顯示指定時間后的日志 | kubectl logs --since=1h |
| –timestamps | 顯示時間戳 | kubectl logs --timestamps |
| –prefix | 顯示Pod/容器前綴 | kubectl logs --prefix |
| -l, --selector | 按標簽選擇Pod | kubectl logs -l app=nginx |
- 基礎日志查看
# 查看Pod最新日志
kubectl logs my-pod# 查看指定容器日志
kubectl logs my-pod -c sidecar-container
- 實時日志監控
# 實時流式日志(類似tail -f)
kubectl logs -f my-pod# 帶時間戳的實時日志
kubectl logs -f my-pod --timestamps# 查看特定時間段的日志
kubectl logs --since-time="2023-01-01T12:00:00Z" \--until-time="2023-01-01T13:00:00Z" my-pod
- 歷史日志分析
# 查看最近100行
kubectl logs --tail=100 my-pod# 查看過去1小時的日志
kubectl logs --since=1h my-pod# 查看崩潰容器的前一次日志
kubectl logs -p my-pod
- 多Pod日志聚合
# 查看Deployment所有Pod日志
kubectl logs -l app=nginx --prefix# 實時監控多個Pod
kubectl logs -f -l app=nginx --max-log-requests=5
kubectl exec命令
kubectl exec 是 Kubernetes 中用于在容器內執行命令的核心命令,相當于容器化環境的 SSH 替代方案
基本語法
kubectl exec <pod-name> [options] -- <command> [args...]
- 核心參數詳解
| 參數 | 描述 | 示例 |
|---|---|---|
| -i, --stdin | 保持標準輸入打開 | kubectl exec -it |
| -t, --tty | 分配偽終端 | kubectl exec -it |
| -c, --container | 指定容器名稱 | kubectl exec -c sidecar |
| –privileged | 以特權模式執行 | kubectl exec --privileged |
| -q, --quie | t 只輸出命令結果 | kubectl exec -q |
| –shell | 指定shell路徑 | –shell=/bin/bash |
- 交互式會話
# 進入Pod的交互式Shell(最常用)
root@master:~# kubectl exec -it nginx-5869d7778c-79ffh -- /bin/sh
# ls
bin   dev                  docker-entrypoint.sh  home  lib64  mnt  proc  run   srv  tmp  var
boot  docker-entrypoint.d  etc                   lib   media  opt  root  sbin  sys  usr
#kubectl exec -it <pod-name> -- /bin/sh# 指定容器進入
kubectl exec -it <pod-name> -c <container> -- /bin/bash
- 單次命令執行
# 執行單條命令(非交互式)
kubectl exec <pod-name> -- ls /var/log# 獲取環境變量
kubectl exec <pod-name> -- env# 查看進程列表
kubectl exec <pod-name> -- ps aux
- 文件操作
# 查看文件內容
kubectl exec <pod-name> -- cat /etc/hosts# 壓縮日志目錄
kubectl exec <pod-name> -- tar czf /tmp/logs.tar.gz /var/log# 文件下載(需結合kubectl cp)
kubectl exec <pod-name> -- cat /path/file > local.file
kubectl port-forward命令
kubectl port-forward 是 Kubernetes 中用于建立本地與集群資源網絡隧道的命令,無需暴露 Service 即可直接訪問 Pod 或 Service
核心功能
- 本地直連 Pod:開發調試時訪問容器內服務
- 臨時測試 Service:不創建Ingress/NodePort的情況下訪問服務
- 安全內網訪問:通過API Server加密通道轉發流量
基本語法
# Pod端口轉發
kubectl port-forward <pod-name> [本地端口]:[容器端口] [選項]# Service端口轉發
kubectl port-forward svc/<service-name> [本地端口]:[服務端口] [選項]
- 核心參數詳解
| 參數 | 描述 | 示例 |
|---|---|---|
| –address | 綁定本地地址(默認127.0.0.1) | –address 0.0.0.0 |
| –pod-running-timeout | 等待Pod運行的超時 | –pod-running-timeout=1m |
| -n, --namespace | 指定命名空間 | -n dev |
| –ports | 多端口轉發(需v1.23+) | –ports=8080:80,8443:443 |
- 開發調試(常用)
# 轉發本地8080到Pod的80端口
root@master:~# kubectl port-forward nginx-5869d7778c-79ffh 8080:80
Forwarding from 127.0.0.1:8080 -> 80
Forwarding from [::1]:8080 -> 80
Handling connection for 8080# 瀏覽器訪問
root@master:~# curl localhost:8080
<!DOCTYPE html>
<html>
<head>
<title>Welcome to nginx!</title>
<style>
html { color-scheme: light dark; }
body { width: 35em; margin: 0 auto;
font-family: Tahoma, Verdana, Arial, sans-serif; }
</style>
</head>
<body>
<h1>Welcome to nginx!</h1>
<p>If you see this page, the nginx web server is successfully installed and
working. Further configuration is required.</p><p>For online documentation and support please refer to
<a href="http://nginx.org/">nginx.org</a>.<br/>
Commercial support is available at
<a href="http://nginx.com/">nginx.com</a>.</p><p><em>Thank you for using nginx.</em></p>
</body>
</html>
- 數據庫臨時訪問
# 轉發MySQL
kubectl port-forward pod/mysql 3306:3306# 客戶端連接
mysql -h 127.0.0.1 -P 3306 -u root -p
- Service調試
# 轉發Service端口
kubectl port-forward svc/redis 6379:6379# Redis客戶端連接
redis-cli -p 6379
- 多端口轉發
# 同時轉發HTTP和HTTPS
kubectl port-forward pod/nginx 8080:80 8443:443# 或使用--ports參數(v1.23+)
kubectl port-forward pod/nginx --ports=8080:80,8443:443
kubectl patch命令
kubectl patch 是 Kubernetes 中用于對集群資源進行部分更新的命令,相比 apply 或 edit 更適合自動化場景的精準修改
基本語法
kubectl patch <資源類型>/<名稱> --type=<策略> -p '<補丁內容>'
- 補丁策略對比
| 策略類型 | 參數值 | 特點 | 適用場景 |
|---|---|---|---|
| Strategic Merge Patch | strategic (默認) | 智能合并數組字段 | 修改Deployment、StatefulSet等 |
| JSON Merge | Patch merge | 簡單替換字段 | 簡單資源配置 |
| JSON Patch | json | 精確操作指令 | 需要精確控制時 |
- 基礎字段修改
# 修改Deployment的副本數(Strategic Merge)
kubectl patch deploy/nginx -p '{"spec":{"replicas":3}}'# 修改ConfigMap數據(JSON Merge)
kubectl patch cm/app-config --type merge -p '{"data":{"debug":"true"}}'
- 數組字段操作
# 添加容器環境變量(Strategic Merge)
kubectl patch deploy/nginx -p '{"spec":{"template":{"spec":{"containers":[{"name":"nginx","env":[{"name":"ENV", "value":"prod"}]}]}}}
}'
- JSON Patch精準操作
# 精確替換鏡像版本(JSON Patch)
kubectl patch pod/nginx --type json -p '[{"op":"replace", "path":"/spec/containers/0/image", "value":"nginx:1.23"}
集群管理命令
有時候會遇到這樣一個場景,一個節點需要升級,但是在該節點上又有許多運行的Pod,或者該節點已經癱瘓,需要保證業務功能的完善,則需要使用這組命令將該節點上運行的Pod調度到其他節點上
kubectl cordon命令
kubectl cordon 是 Kubernetes 中用于標記節點為不可調度的命令,是節點維護和集群管理的重要工具。
基本語法
kubectl cordon <節點名稱> [選項]
- 核心參數
| 參數 | 描述 | 示例 |
|---|---|---|
| –dry-run | 試運行,不實際執行 | kubectl cordon node1 --dry-run=client |
| –selector | 根據標簽選擇節點 | kubectl cordon -l node-role=worker |
- 基礎用法
# 標記單個節點不可調度
kubectl cordon node1# 驗證節點狀態
kubectl get nodes
# 輸出中節點狀態會顯示"SchedulingDisabled"
- 批量操作
# 標記所有worker節點不可調度
kubectl cordon -l node-role=worker# 標記除master外的所有節點
kubectl cordon $(kubectl get nodes -o name | grep -v master)
- 維護工作流
# 1. 首先標記節點不可調度
kubectl cordon node1# 2. 排空節點(可選)
kubectl drain node1 --ignore-daemonsets# 3. 維護完成后恢復
kubectl uncordon node1
和drain命令的區別
| 特性 | cordon | drain |
|---|---|---|
| 調度阻止 | ? | ? |
| 驅逐現有Pod | ? | ? |
| 優雅終止 | ? | ? |
kubectl uncordon命令
kubectl uncordon 是 Kubernetes 中用于將節點重新標記為可調度的命令,是節點維護流程中的關鍵步驟
基本語法
kubectl uncordon <節點名稱> [選項]
- 核心參數
| 參數 | 描述 | 示例 |
|---|---|---|
| –dry-run | 試運行,不實際執行 | kubectl uncordon node1 --dry-run=client |
| –selector | 根據標簽選擇節點 | kubectl uncordon -l node-role=worker |
- 基礎用法
# 恢復單個節點的調度能力
kubectl uncordon node1# 驗證節點狀態
kubectl get nodes
# STATUS列不再顯示"SchedulingDisabled"
- 批量操作
# 恢復所有worker節點
kubectl uncordon -l node-role=worker# 恢復多個指定節點
kubectl uncordon node{1..3}
- 標準維護流程
# 1. 維護前標記不可調度
kubectl cordon node1# 2. 執行維護操作...# 3. 維護完成后恢復調度
kubectl uncordon node1
kubectl drain命令
kubectl drain 是 Kubernetes 中用于安全排空節點的命令,是節點維護和集群縮容的核心操作。
基本語法
kubectl drain <節點名稱> [選項]
- 核心參數詳解
| 參數 | 描述 | 示例 |
|---|---|---|
| –ignore-daemonsets | 忽略DaemonSet Pod(必須指定) | –ignore-daemonsets=true |
| –delete-emptydir-data | 刪除EmptyDir數據 | –delete-emptydir-data=true |
| –force | 強制驅逐無控制器Pod | –force |
| –grace-period | 優雅終止等待時間(秒) | –grace-period=60 |
| –timeout | 命令超時時間 | –timeout=5m |
| –pod-selector | 按標簽選擇Pod | –pod-selector=app=nginx |
| –disable-eviction | 使用直接刪除代替驅逐(1.18+) | –disable-eviction=true |
- 標準節點維護
# 安全排空節點(保留DaemonSet)
kubectl drain node1 --ignore-daemonsets# 執行維護操作...# 恢復節點
kubectl uncordon node1
- 強制驅逐所有Pod
# 包括無控制器的裸Pod
kubectl drain node1 --ignore-daemonsets --force# 立即終止(跳過優雅等待)
kubectl drain node1 --grace-period=0 --force
- 帶超時控制的排空
# 限制在10分鐘內完成
kubectl drain node1 --timeout=10m
- 注意事項
-
驅逐策略
有控制器Pod:重建到其他節點
裸Pod:需要–force才會刪除
有本地存儲的Pod:需–delete-emptydir-data -
關鍵限制
DaemonSet Pod:默認會阻止drain(必須用–ignore-daemonsets)
PodDisruptionBudget:會檢查PDB限制
Finalizers:有finalizer的Pod可能阻塞
kubectl top命令
kubectl top 是 Kubernetes 中用于查看資源(節點和Pod)CPU/內存使用情況的命令,相當于 Kubernetes 的"任務管理器"
基本語法
# 查看節點資源使用
kubectl top nodes [節點名稱] [選項]# 查看Pod資源使用
kubectl top pods [Pod名稱] [選項]
- 核心參數詳解
| 參數 | 描述 | 示例 |
|---|---|---|
| -A, --all-namespaces | 所有命名空間 | kubectl top pods -A |
| –containers | 顯示容器級數據 | kubectl top pod --containers |
| -l, --selector | 按標簽篩選 | kubectl top pods -l app=nginx |
| –sort-by | 按指定字段排序 | kubectl top pods --sort-by=cpu |
| –no-headers | 不顯示標題行 | kubectl top nodes --no-headers |
| –use-protocol-buffers | 使用ProtoBuf格式 | (Metrics Server v0.6+) |
- 基礎監控
# 查看所有節點資源使用
kubectl top nodes# 查看默認命名空間的Pod資源使用
kubectl top pods# 查看kube-system命名空間的Pod
kubectl top pods -n kube-system
- 高級查詢
# 按CPU使用排序
kubectl top pods --sort-by=cpu# 按內存使用排序
kubectl top pods --sort-by=memory# 顯示容器級使用情況
kubectl top pod nginx --containers
- 結合標簽篩選
# 查看所有帶app=nginx標簽的Pod
kubectl top pods -l app=nginx# 查看生產環境的所有Pod
kubectl top pods -l env=production -A
如果報錯:則需要安裝error: Metrics Server
error: Metrics API not available
GitHub地址
- Metrics Server 可以直接通過 YAML 清單安裝,也可以通過官方Helm chart安裝。要從components.yaml清單安裝最新的 Metrics Server 版本,請運行以下命令。
kubectl apply -f https://github.com/kubernetes-sigs/metrics-server/releases/latest/download/components.yaml
- 版本支持如下
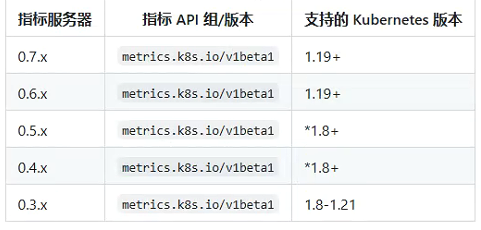
kubectl taint命令
kubectl taint 是 Kubernetes 中用于管理節點污點(Taint)的關鍵命令,通過污點機制可以控制Pod的調度行為。
核心概念
- 污點(Taint)組成
Key:標識符(必填)
Value:值(可選)
- Effect:影響效果(必填):
- NoSchedule:禁止調度(已有Pod不受影響)
- PreferNoSchedule:盡量避免調度
- NoExecute:禁止調度并驅逐現有Pod(除非有容忍)
- 污點與容忍(Toleration)
節點設置污點
Pod通過tolerations聲明容忍
基本語法
# 添加污點
kubectl taint nodes <node-name> <key>=<value>:<effect># 刪除污點
kubectl taint nodes <node-name> <key>[:<effect>]-# 查看污點
kubectl describe node <node-name> | grep Taints
- 參數詳解
| 參數 | 描述 | 示例 |
|---|---|---|
| –overwrite | 覆蓋已有污點 | –overwrite=true |
| –all | 操作所有節點 | kubectl taint nodes --all |
| –selector | 根據標簽選擇節點 | -l node-role=worker |
- 專用節點配置
# 標記GPU節點(禁止非GPU Pod調度)
kubectl taint nodes gpu-node1 gpu=true:NoSchedule# 對應Pod需要添加toleration
# spec.tolerations:
# - key: "gpu"
#   operator: "Equal"
#   value: "true"
#   effect: "NoSchedule"
- 節點維護
# 維護前標記并驅逐Pod
kubectl taint nodes node1 maintenance=true:NoExecute# 維護完成后刪除污點
kubectl taint nodes node1 maintenance=true:NoExecute-
- 生產環境隔離
# 標記生產專用節點
kubectl taint nodes prod-node1 env=prod:NoSchedule# 標記測試專用節點
kubectl taint nodes test-node1 env=test:NoSchedule
- 批量操作
# 為所有worker節點添加污點
kubectl taint nodes -l node-role=worker dedicated=worker:NoSchedule# 清除所有節點的某污點
kubectl taint nodes --all dedicated:NoSchedule-
- 復雜污點策略
# 多污點配置
kubectl taint nodes node1 key1=value1:NoSchedule key2=value2:NoExecute# 基于存在性的污點(不檢查value)
kubectl taint nodes node1 special:NoSchedule
# 對應容忍:
# - key: "special"
#   operator: "Exists"
#   effect: "NoSchedule"
kubectl label命令
kubectl label 是 Kubernetes 中用于管理資源標簽(Labels)的核心命令,標簽是 Kubernetes 中組織和選擇資源的關鍵機制
-
標簽特性
鍵值對:格式為 key=value
選擇器支持:可通過 -l 參數篩選資源
元數據:不直接影響系統邏輯,用于標識和分類 -
常見用途
環境標識(dev/stage/prod)
應用版本標記
組件分類(frontend/backend)
運維管理(owner/department)
基本語法
# 添加/更新標簽
kubectl label <資源類型> <資源名稱> <key>=<value># 刪除標簽
kubectl label <資源類型> <資源名稱> <key>-# 批量操作
kubectl label <資源類型> --all <key>=<value>
- 核心參數詳解
| 參數 | 描述 | 示例 |
|---|---|---|
| –overwrite | 強制覆蓋已有標簽 | –overwrite=true |
| –list | 顯示現有標簽 | kubectl get pods --show-labels |
| -l, --selector | 按標簽選擇資源 | -l env=prod |
| –all | 選擇所有資源 | –all |
| –resource-version | 指定資源版本 | –resource-version=12345 |
| –dry-run | 試運行 | –dry-run=client |
- 基礎標簽操作
# 給節點打標簽
kubectl label nodes node1 disktype=ssd# 給Pod打標簽
kubectl label pod/nginx app=web tier=frontend# 刪除標簽
kubectl label pod/nginx tier-
- 批量標簽管理
# 給所有Pod添加標簽
kubectl label pods --all version=v1.2.3# 按選擇器批量更新
kubectl label pods -l app=nginx deployed-at=$(date +%Y%m%d)# 命名空間下所有資源加標簽
kubectl label all -n dev env=development
- 高級選擇器操作
# 添加不存在的標簽(使用--overwrite)
kubectl label pods -l '!owner' owner=team-a --overwrite# 修改帶特殊字符的標簽
kubectl label ns/default 'cost-center=finance\ department'


含萬字文檔+運行說明文檔)


 - sql解析器(番外)- *號的處理)


)


)