前些天發現了一個巨牛的人工智能學習網站,通俗易懂,風趣幽默,忍不住分享一下給大家。點擊跳轉到教程。
使用mybatis可以逆向生成pojo和mapper文件有很多種方式,我以前用的是mybtais自帶的generator包來生成,連接如下:mybatis自己生成pojo
今天我用了IDEA上使用maven項目來生成pojo和mapper,具體步驟如下
1,先配置pom.xml文件,先配置插件plugin
配置文件如下
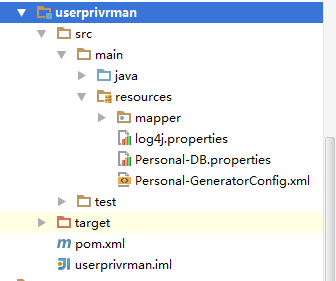
<build><plugins><!-- mybatis逆向工程 --><plugin><groupId>org.mybatis.generator</groupId><artifactId>mybatis-generator-maven-plugin</artifactId><version>1.3.2</version><configuration><!--配置文件的位置--><configurationFile>src/main/resources/Personal-GeneratorConfig.xml</configurationFile><verbose>true</verbose><overwrite>true</overwrite></configuration></plugin></plugins></build>2,項目中添加配置文件,如上面所示的配置文件目錄位置,在添加personal-generatorconfig.xml文件,然后添加配置文件personal-db.properties,位置結構如圖所示:
?
其中personal-generator.xml的代碼如下
<?xml version="1.0" encoding="UTF-8"?>
<!DOCTYPE generatorConfigurationPUBLIC "-//mybatis.org//DTD MyBatis Generator Configuration 1.0//EN""http://mybatis.org/dtd/mybatis-generator-config_1_0.dtd">
<generatorConfiguration><properties resource="Personal-DB.properties"></properties><classPathEntry location="${jdbc.driverLocation}" /><!--classPathEntry location="D:\zngkpt\m2\repository\mysql\mysql-connector-java\5.1.40\mysql-connector-java-5.1.40.jar" /--><context id="context1" targetRuntime="MyBatis3"><commentGenerator><!-- 去除自動生成的注釋 --><property name="suppressAllComments" value="true" /></commentGenerator><!-- 數據庫連接配置 --><jdbcConnection driverClass="${jdbc.driverClass}"connectionURL="${jdbc.connectionURL}"userId="${jdbc.userId}"password="${jdbc.password}" /><!--jdbcConnection driverClass="com.mysql.jdbc.Driver"connectionURL="jdbc:mysql://localhost:3306/test"userId="root"password="mysql" /--><!-- 非必需,類型處理器,在數據庫類型和java類型之間的轉換控制--><javaTypeResolver><property name="forceBigDecimals" value="false"/></javaTypeResolver><!--配置生成的實體包targetPackage:生成的實體包位置,默認存放在src目錄下targetProject:目標工程名--><javaModelGenerator targetPackage="com.unisits.zngkpt.common.userprivrman.pojo"targetProject="src/main/java" /><!-- 實體包對應映射文件位置及名稱,默認存放在src目錄下 --><sqlMapGenerator targetPackage="com.unisits.zngkpt.common.userprivrman.mapper" targetProject="src/main/java" /><!-- 配置表 schema:不用填寫tableName: 表名enableCountByExample、enableSelectByExample、enableDeleteByExample、enableUpdateByExample、selectByExampleQueryId:去除自動生成的例子--><table schema="" tableName="sys_role" enableCountByExample="false" enableSelectByExample="false"enableDeleteByExample="false" enableUpdateByExample="false" selectByExampleQueryId="false" ></table><table schema="" tableName="sys_permission" enableCountByExample="false" enableSelectByExample="false"enableDeleteByExample="false" enableUpdateByExample="false" selectByExampleQueryId="false" ></table><table schema="" tableName="sys_role_permission" enableCountByExample="false" enableSelectByExample="false"enableDeleteByExample="false" enableUpdateByExample="false" selectByExampleQueryId="false" ></table><table schema="" tableName="sys_user" enableCountByExample="false" enableSelectByExample="false"enableDeleteByExample="false" enableUpdateByExample="false" selectByExampleQueryId="false" ></table><table schema="" tableName="sys_user_role" enableCountByExample="false" enableSelectByExample="false"enableDeleteByExample="false" enableUpdateByExample="false" selectByExampleQueryId="false" ></table><table schema="" tableName="unit_info" enableCountByExample="false" enableSelectByExample="false"enableDeleteByExample="false" enableUpdateByExample="false" selectByExampleQueryId="false" ></table><table schema="" tableName="unit_type" enableCountByExample="false" enableSelectByExample="false"enableDeleteByExample="false" enableUpdateByExample="false" selectByExampleQueryId="false" ></table></context>
</generatorConfiguration>
personal-db.properties的代碼如下
jdbc.driverLocation=D:\\zngkpt\\m2\\repository\\com\\microsoft\\sqlserver\\sqljdbc4\\4.0\\sqljdbc4-4.0.jar
jdbc.driverClass=com.microsoft.sqlserver.jdbc.SQLServerDriver
jdbc.connectionURL=jdbc:sqlserver://127.0.0.1:1434;DatabaseName=db_zngkpt
jdbc.userId=sa
jdbc.password=123456
3,到現在為止,所有的mybatis配置工作已經結束了,開始配置idea來運行生成pojo吧
點擊菜單Run->Edit Configuration,然后在彈出窗體的左上角,點擊+->maven,會出現下面窗體
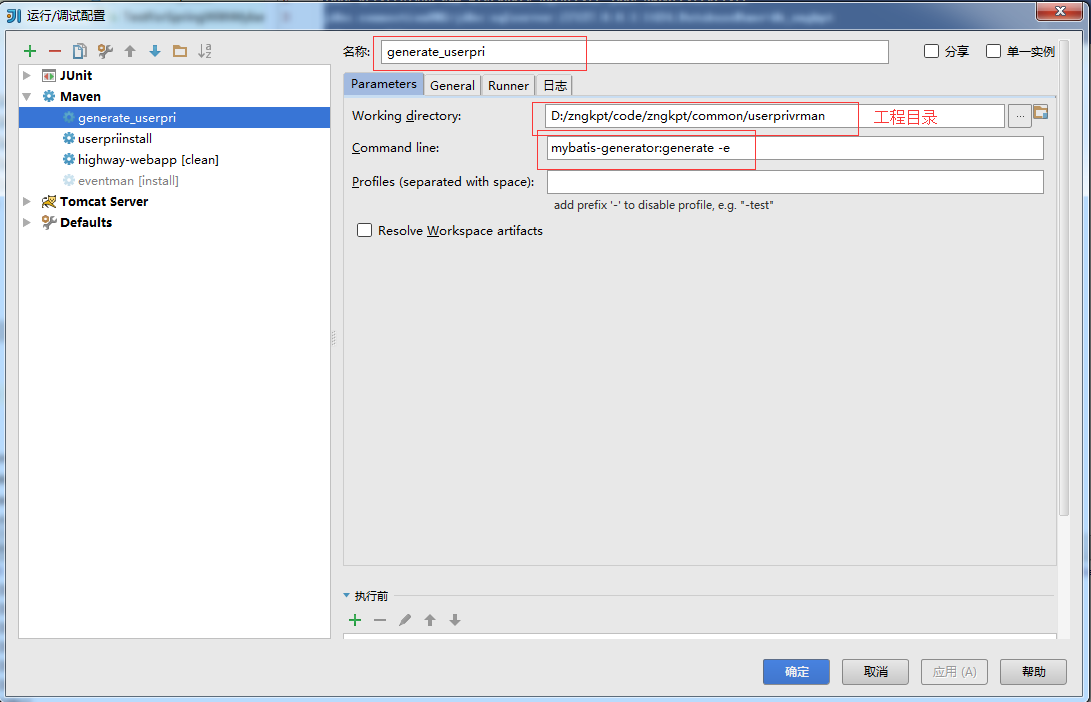
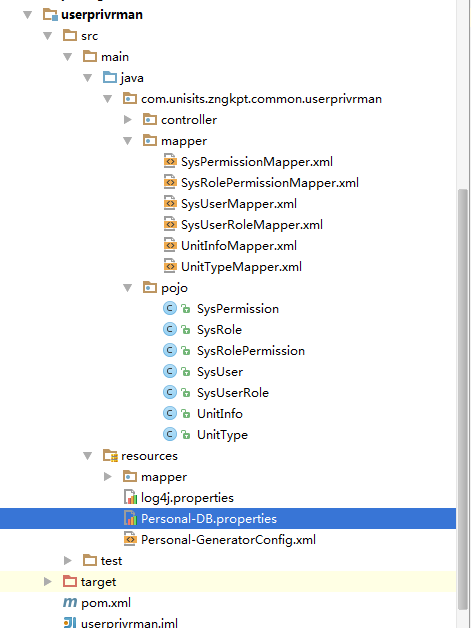
然后點擊apply,確定,然后run剛才新建的那個maven即可,最后生成的結構如下
?指令為:
mybatis-generator:generate -e
轉自:?https://www.cnblogs.com/ningheshutong/p/6376970.html
另:maven 運行命令:mvn mybatis-generator:generate?
?
?
)


