介紹
在微服務架構中,如何安全、高效地實現服務發布與流量管理是保障業務穩定性的核心挑戰。金絲雀發布(Canary Release)、灰度發布等策略通過精細化的流量控制,可有效降低新版本上線風險, Istio 作為主流的服務網格(Service Mesh)工具。
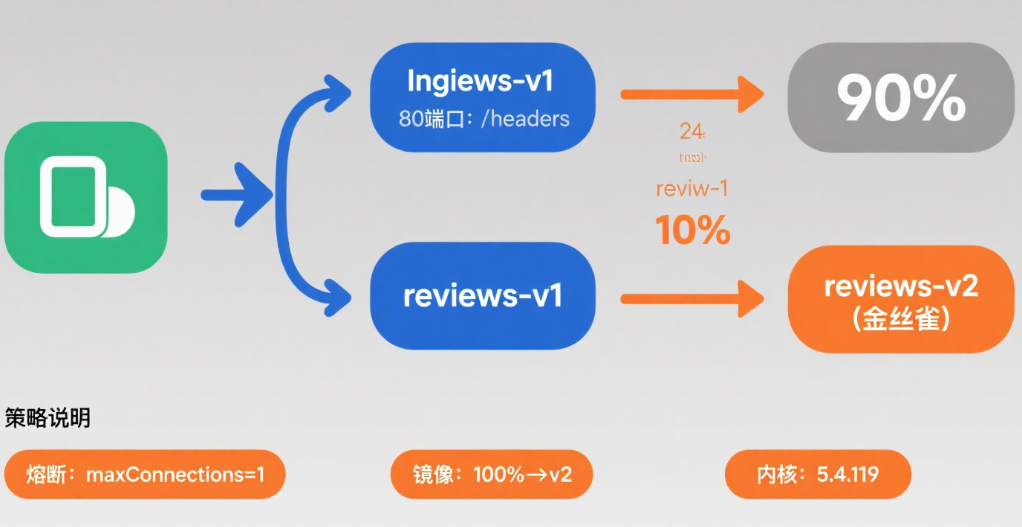
此次Istio 在 Kubernetes 集群中的實戰應用展開,從基礎環境準備(如系統內核升級以適配 IPVS 模塊)到 Istio 的完整部署流程,再到核心功能的實踐 —— 包括通過虛擬服務(VirtualService)和目標規則(DestinationRule)實現流量分配(如 10% 流量導向金絲雀版本)、配置熔斷機制保護服務穩定性、利用流量鏡像實現無感知測試、通過 Ingress Gateway 暴露服務并控制外部訪問路徑
1.金絲雀發布-安裝 Istio
由于 Kubernetes 使用的 IPVS 模塊需要系統內核版本支持,試使用提供的軟件包(Canary_v1.0.tar.gz 在 http 服務下)將系統內核進行升級,在 Kubernetes 集群上完成 Istio 的安裝,并將 default Namespace 設置自動注入。
升級內核
 設置 GRUB_DEFAULT=0,通過上面查詢顯示的編號為 0 的內核作為默認內核
 [root@master ~]# vi /etc/default/grub
 #GRUB_DEFAULT=0必須在GRUB_DEFAULT=saved下面,否則升級失敗(可能),放在首部內核升級失敗
 [root@master ~]# grub2-mkconfig -o /boot/grub2/grub.cfg
 [root@masater ~]#tar -zxvf Canary_v1.0.tar.gz
 [root@master]# cd kernel/
 [root@master kernel]# yum install -y kernel-lt-5.4.119-1.el7.elrepo.x86_64.rpm linux-firmware-20200421-80.git78c0348.el7_9.noarch.rpm
 #重啟
 reboot
 #驗證
 [root@master ~]# uname -r
 5.4.119-1.el7.elrepo.x86_64
安裝Istio
 #導入鏡像
 [root@masater ~]# cd images/
 #確保harbor啟動完成
 [root@masater images]# ./image_push.sh
 導入比較慢,多等等
 #istio環境配置
 [root@master ~]# mv istio-1.9.5/ /usr/local/bin/
 [root@master ~]# cat /etc/profile
 export istio=/usr/local/bin/istio-1.9.5
 export PATH=$PATH:$istio/bin
 [root@master ~]# source /etc/profile
 -------------------------
 檢查運行環境:
 [root@master istio-1.9.5]# istioctl x precheck
 #沒有報錯即可
 安裝istio的核心組件:
 #注意修改IP(采用demo的安裝方式)
 [root@master istio-1.9.5]# istioctl install -y --set profile=demo --set hub=192.168.30.10/library
 查看安裝的資源:
 [root@master istio-1.9.5]# kubectl -n istio-system get pods
 NAME                             READY    STATUS    RESTARTS   AGE
 istio-egressgateway-6f9f4ddc9c-rgtcl     1/1        Running     0          6m46s
 istio-ingressgateway-78b47bc88b-52fd2    1/1        Running     0          6m46s
 istiod-67dbfcd4dd-56n66                  1/1        Running     0          9m10s #將default Namespace設置自動注入(為資源設置標簽)
 [root@master istio-1.9.5]# kubectl label namespace default istio-injection=enabled
 namespace/default labeled
 #查看目前開啟自動注入的 Namespace:
 [root@master istio-1.9.5]# kubectl get ns --show-labels=true
2.金絲雀發布-流量控制
使用文件(istio-1.9.5/samples/helloworld/helloworld.yaml)在 default 命名空間下完成 hellworld 服務的部署,然后設置路由規則來控制流量分配,創建一個虛擬服務helloworld;再創建一個目標規則 helloworld,將 10%的流量發送到金絲雀版本(v2)。
 ?
 ?
 [root@master ~]# cd /usr/local/bin/istio-1.9.5/samples/
 [root@master samples]# kubectl apply -f helloworld/helloworld.yaml
 [root@master helloworld]# cat helloworld-route.yaml
 #創建一個虛擬服務helloworld
 apiVersion: networking.istio.io/v1alpha3
 kind: VirtualService     #針對指定服務的流量路由規則
 metadata:
   name: helloworld
 spec:
   hosts:        #必要字段:流量的目標主機
   - helloworld
   http:              #HTTP 流量規則的有序列表


)


(@pytest.mark.parametrize、@pytest.fixtures))
![[Python 基礎課程]繼承](http://pic.xiahunao.cn/[Python 基礎課程]繼承)
)


