1、概述
? ? ? ? 前面我們學習了并發包中的一些核心的基礎類,包括原子類、Lock 、以及線程間通信的一些工具類,相信你已經能夠正確的處理線程同步的問題了,今天我們繼續學習并發包下的工具類,我們本次主要學習線程池和異步計算框架相關的內容
2、線程池
2.1、Executor 接口
????????我們繼續看并發包中的內容,里面有個?Executor??接口,他的源碼如下
public interface Executor {/*** Executes the given command at some time in the future.  The command* may execute in a new thread, in a pooled thread, or in the calling* thread, at the discretion of the {@code Executor} implementation.** @param command the runnable task* @throws RejectedExecutionException if this task cannot be* accepted for execution* @throws NullPointerException if command is null*/void execute(Runnable command);
}
有且僅有一個方法 入參是一個 Runnable 接口,根據描述信息,他是如何工作的取決于他的具體實現類?。他還有一個子接口?ExecutorService,這個子接口在原來的基礎上擴展了一些方法,通常下 我們使用?ThreadPoolExecutor 這個實現類。
2.2、ThreadPoolExecutor
????????關于ThreadPoolExecutor 前幾年有個爛大街的面試問題,線程池的7大核心參數 不知道大家還有沒有印象,很顯然 這道題很low,看過源碼注釋的都知道。他的構造器(參數最全的一個)如下:
 /*** Creates a new {@code ThreadPoolExecutor} with the given initial* parameters.** @param corePoolSize the number of threads to keep in the pool, even*        if they are idle, unless {@code allowCoreThreadTimeOut} is set* @param maximumPoolSize the maximum number of threads to allow in the*        pool* @param keepAliveTime when the number of threads is greater than*        the core, this is the maximum time that excess idle threads*        will wait for new tasks before terminating.* @param unit the time unit for the {@code keepAliveTime} argument* @param workQueue the queue to use for holding tasks before they are*        executed.  This queue will hold only the {@code Runnable}*        tasks submitted by the {@code execute} method.* @param threadFactory the factory to use when the executor*        creates a new thread* @param handler the handler to use when execution is blocked*        because the thread bounds and queue capacities are reached* @throws IllegalArgumentException if one of the following holds:<br>*         {@code corePoolSize < 0}<br>*         {@code keepAliveTime < 0}<br>*         {@code maximumPoolSize <= 0}<br>*         {@code maximumPoolSize < corePoolSize}* @throws NullPointerException if {@code workQueue}*         or {@code threadFactory} or {@code handler} is null*/
public ThreadPoolExecutor(int corePoolSize,int maximumPoolSize,long keepAliveTime,TimeUnit unit,BlockingQueue<Runnable> workQueue,ThreadFactory threadFactory,RejectedExecutionHandler handler) {if (corePoolSize < 0 ||maximumPoolSize <= 0 ||maximumPoolSize < corePoolSize ||keepAliveTime < 0)throw new IllegalArgumentException();if (workQueue == null || threadFactory == null || handler == null)throw new NullPointerException();this.corePoolSize = corePoolSize;this.maximumPoolSize = maximumPoolSize;this.workQueue = workQueue;this.keepAliveTime = unit.toNanos(keepAliveTime);this.threadFactory = threadFactory;this.handler = handler;}
接下來我們看看他的用法,相關代碼如下
package org.wcan.juc.excutor;import java.util.concurrent.*;public class ThreadPoolExecutorDemo {public static void main(String[] args) {/*** @ClassName   核心線程數:4,保持核心線程存活即使閑置*              最大線程數:4,線程池允許的最大線程數*              空閑超時時長:60秒,非核心線程閑置超時后會被回收*              時間單位:秒,指定超時時間的單位*              任務隊列:無界LinkedBlockingQueue,用于暫存待執行任務*              線程工廠:默認工廠,生成基礎線程名稱的線程*              拒絕策略:CallerRunsPolicy,任務被提交者線程直接執行* @Description TODO* @Author wcan* @Date 2025/3/30 下午 17:07* @Version 1.0*/ThreadPoolExecutor executor = new ThreadPoolExecutor(4,4,60,TimeUnit.SECONDS,new LinkedBlockingQueue<Runnable>(),Executors.defaultThreadFactory(),new ThreadPoolExecutor.CallerRunsPolicy());// 提交任務到線程池for (int i = 0; i < 10; i++) {int taskId = i + 1;executor.submit(() -> {try {// 模擬任務的處理System.out.println("任務 " + taskId + " 正在執行,線程ID:" + Thread.currentThread().getName());Thread.sleep(2000); // 模擬耗時任務} catch (InterruptedException e) {Thread.currentThread().interrupt();}});}// 關閉線程池executor.shutdown();}
}
?有沒有發先這樣創建線程池很麻煩,需要配置7個參數。下面我們來看看一個線程池的工具類
2.3、Executors
? ? ? Executors 類封裝了一些和線程池操作有關的方法,我們可以直接使用它來創建線程池,下面我們來看看里面都有哪些方法
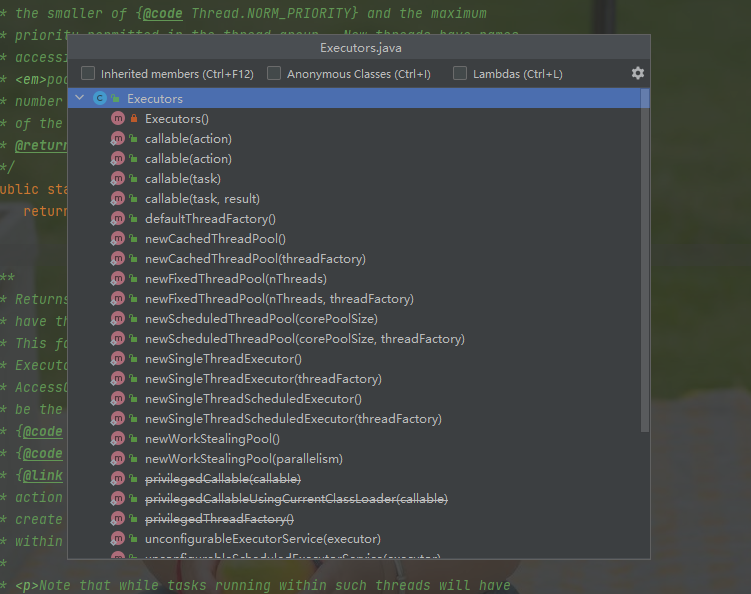
?????????我們可以使用?newFixedThreadPool 這個方法 傳入一個核心線程數的參數來創建一個線程池,同樣的還有支持周期執行的線程池、以及單線程池。每種線程池的創建我都編寫了一個案例,相關代碼如下:
package org.wcan.juc.excutor;import java.util.concurrent.ExecutorService;
import java.util.concurrent.Executors;
import java.util.concurrent.ScheduledExecutorService;
import java.util.concurrent.TimeUnit;/*** @Description* @Author wcan* @Date 2025/3/30 下午 19:56* @Version 1.0*/
public class ExecutorsDemo {public static void main(String[] args) {
//        newFixedThreadPool();
//        newCachedThreadPool();
//        newScheduledThreadPool();
//        newSingleThreadExecutor();}/*** @Description 創建一個支持定時任務的線程池,可以用于延時或周期性任務。* @Author wcan* @Date 2025/3/30 下午 20:07* @Version 1.0*/private static void newScheduledThreadPool() {ScheduledExecutorService executor = Executors.newScheduledThreadPool(2);for (int i = 0; i < 10; i++) {executor.schedule(() -> {System.out.println("Task executed after 1 second delay");}, 15, TimeUnit.SECONDS);}executor.shutdown();}/*** @Description 創建一個單線程的線程池,所有任務按提交順序執行,且始終由一個線程執行。* @Author wcan* @Date 2025/3/30 下午 20:07* @Version 1.0*/private static void newSingleThreadExecutor() {ExecutorService executor = Executors.newSingleThreadExecutor();for (int i = 0; i < 10; i++) {executor.submit(() -> {System.out.println("Task executed by thread " + Thread.currentThread().getName());});}executor.shutdown();}/*** @Description 創建一個可緩存的線程池,線程池中的線程數會根據需要自動增加,空閑的線程會在 60 秒后被回收。* @Author wcan* @Date 2025/3/30 下午 20:07* @Version 1.0*/private static void newCachedThreadPool() {ExecutorService executor = Executors.newCachedThreadPool();for (int i = 0; i < 10; i++) {executor.submit(() -> {System.out.println("Task executed by thread " + Thread.currentThread().getName());});}executor.shutdown();}/*** @Description 創建一個固定大小的線程池,所有提交的任務都會由固定數量的線程處理。如果任務數超過線程池的大小,任務將會被放入隊列中等待執行。* @Author wcan* @Date 2025/3/30 下午 20:07* @Version 1.0*/private static void newFixedThreadPool() {ExecutorService executor = Executors.newFixedThreadPool(2);for (int i = 0; i < 10; i++) {executor.submit(() -> System.out.println("Task executed by " + Thread.currentThread().getName()));}executor.shutdown();}
}
2.4、線程池的比對
?????????前面我們了解到了 五種常用的線程池,我將他們的特點以及應用場景都整理成了一張表格,如下所示
| 線程池類型 | 應用場景 | 特點 | 適用情況 |
|---|---|---|---|
| FixedThreadPool | 適用于任務數量固定且處理時間差不多的場景。常見的應用場景如處理固定數量的并發任務、數據庫連接池、IO密集型任務等。 | 1、固定線程池大小。2、 如果線程數已滿,新的任務會被放入隊列中,直到有線程可用。 | 1、任務數量大致固定且相對均勻時。2、 任務執行時間大致相等。 |
| CachedThreadPool | 適用于任務數不確定且任務執行時間較短的場景。可以用于實時請求處理、緩存池、任務臨時生成等場景,適合處理短時并發任務。 | 1、線程池大小會根據需求自動調整,空閑線程會被回收。 2、適用于處理大量短期任務。 | 1、任務數量變化大且任務較短時。 2、 需要頻繁創建銷毀線程的場景。 |
| SingleThreadExecutor | 適用于任務需要按順序執行的場景,如日志處理、消息處理隊列、任務調度等,確保任務按順序依次執行。 | 1、只有一個線程,所有任務按順序執行。2、如果一個任務執行失敗,后續任務不會執行。 | 1、任務必須按順序執行,且保證不同時有多個線程運行。 2、任務之間有依賴關系時。 |
| ScheduledThreadPool | 適用于定時任務、周期性任務、延遲執行等場景。如定時調度任務、定期清理任務、任務重試機制等。 | 1、 支持定時任務和周期性任務。 2、可以靈活調度任務的執行時間。 | 1、需要定時、延時或周期性執行任務。 2、不需要立即執行的場景。 |
| ThreadPoolExecutor | 適用于需要高度定制化的線程池,適合任務量大且線程池需要精細控制的場景,如復雜的并發任務、高并發的服務器應用、支持不同拒絕策略的復雜任務處理等。 | 1、可自定義核心線程池大小、最大線程池大小、線程空閑時間等。2、支持隊列類型、拒絕策略等靈活配置。 | 1、 需要精細化控制線程池參數的場景。 2、 高并發、大量任務時。 3、任務執行時間差異較大時。 |
3、Future?
????????Future接口也是并發包中很重要的一個接口之一,主要用于異步編程,是一個頂層接口
3.1、Future 詳解
????????我們點開Future 的源碼,可以看到里面只有5個方法,
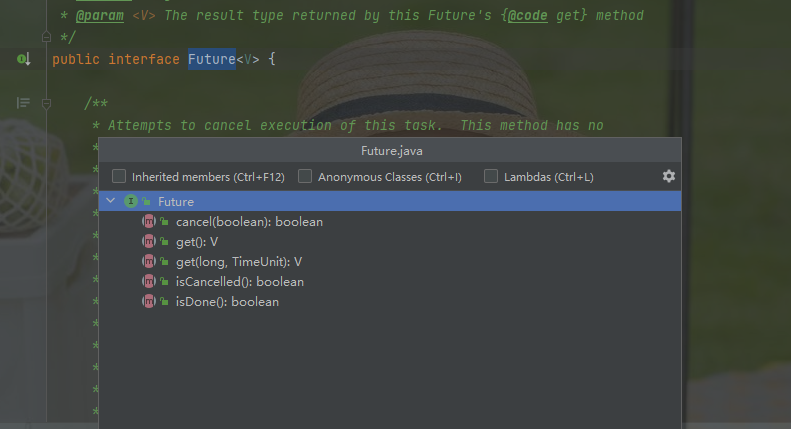
下面我整理了一份表格,總結了上述5個方法的作用
| 方法名 | 描述 | 返回值 | 異常 |
|---|---|---|---|
V get() | 阻塞當前線程,直到任務執行完成,獲取結果。 | 任務的執行結果(類型?V) | InterruptedException、ExecutionException |
V get(long timeout, TimeUnit unit) | 阻塞當前線程,直到任務執行完成,或超時。 | 任務的執行結果(類型?V) | InterruptedException、ExecutionException、TimeoutException |
boolean cancel(boolean mayInterruptIfRunning) | 嘗試取消任務的執行。如果任務正在執行且?mayInterruptIfRunning?為?true,則會中斷任務。 | true(任務成功取消)或?false(任務無法取消) | 無 |
boolean isCancelled() | 檢查任務是否已取消。 | true(任務已取消)或?false(任務未取消) | 無 |
boolean isDone() | 檢查任務是否已完成(無論是正常完成、異常完成,還是被取消)。 | true(任務已完成)或?false(任務未完成) | 無 |
?3.2、FutureTask 詳解
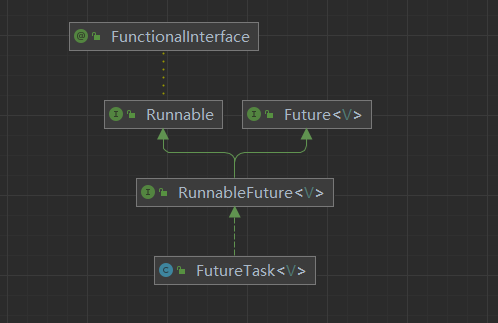
????????我們都知道?Runnable 接口中只有一個 run 方法,主要用于定義要執行的任務,并且是沒有返回值的,而 Future 接口主要是提供了, 在任務執行完畢后獲取結果,或者取消任務,或者檢查任務是否完成的能力。 我們可以在并發包中看到 有個接口 RunnableFuture 。分別繼承了他們兩。
package java.util.concurrent;/*** A {@link Future} that is {@link Runnable}. Successful execution of* the {@code run} method causes completion of the {@code Future}* and allows access to its results.* @see FutureTask* @see Executor* @since 1.6* @author Doug Lea* @param <V> The result type returned by this Future's {@code get} method*/
public interface RunnableFuture<V> extends Runnable, Future<V> {/*** Sets this Future to the result of its computation* unless it has been cancelled.*/void run();
}
????????可能你看著總感覺不太對的樣子,?Runnable ?接口中的方法是沒有返回值的,那 Future 獲取的結果又是從哪里來的呢。別慌,我們繼續看實現,RunnableFuture 接口 有很多實現類,其中有個叫FutureTask,我們就從他開始吧
?3.3、FurureTask 的使用
? ? ? ? FurureTask 主要有兩個構造器,分為有返回參數和沒有返回參數
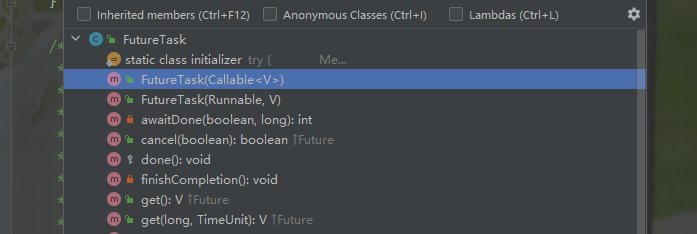
下面我給出這兩種類型的基本用法,相關代碼如下:?
package org.wcan.juc.excutor;import java.util.concurrent.Callable;
import java.util.concurrent.ExecutionException;
import java.util.concurrent.FutureTask;public class FutureTaskExample {public static void main(String[] args) throws Exception {//無返回值runnableTask();//有返回值callableTask();}private static void runnableTask() throws InterruptedException {// 創建 Runnable 任務Runnable task = () -> {System.out.println("Task is running...");};// 創建 FutureTaskFutureTask<Void> futureTask = new FutureTask<>(task, null);// 使用 Thread 執行任務Thread thread = new Thread(futureTask);thread.start();// 等待任務完成futureTask.get(); // 阻塞直到任務執行完畢System.out.println("Task has completed.");}private static void callableTask() throws InterruptedException, ExecutionException {// 創建 Callable 任務Callable<Integer> task = () -> {System.out.println("Task is running...");return 10 + 20;};// 創建 FutureTaskFutureTask<Integer> futureTask = new FutureTask<>(task);// 使用 Thread 執行任務Thread thread = new Thread(futureTask);thread.start();// 獲取任務結果Integer result = futureTask.get(); // 會阻塞直到任務執行完畢System.out.println("Task result: " + result);}
}
需要注意的是 FutureTask 還可以提交到線程池執行,代碼案例如下
private static void executorService() throws InterruptedException, ExecutionException {ExecutorService executor = Executors.newFixedThreadPool(1);// 創建 Callable 任務Callable<Integer> task = () -> {System.out.println("Task is running...");return 10 + 20;};// 創建 FutureTaskFutureTask<Integer> futureTask = new FutureTask<>(task);// 提交任務給線程池executor.submit(futureTask);// 獲取任務結果Integer result = futureTask.get(); // 阻塞直到任務執行完畢System.out.println("Task result: " + result);executor.shutdown(); // 關閉線程池}4、CompletableFuture
4.1、異步執行任務
????????CompletableFuture 是在Java8之后新加入的一個異步編程工具,主要的目的是簡化多任務編排和異步任務處理,他可以組合多個異步任務、支持鏈式調用,還具備靈活的異常處理機制。
我們先來上段代碼看看效果
package org.wcan.juc.excutor;import java.util.concurrent.*;/*** @Description* @Author wcan* @Date 2025/3/31 下午 15:21* @Version 1.0*/
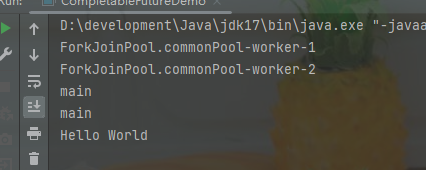
public class CompletableFutureDemo {public static void main(String[] args) throws ExecutionException, InterruptedException {ExecutorService executorService = Executors.newFixedThreadPool(2);CompletableFuture<String> future = CompletableFuture.supplyAsync(() -> {System.out.println(Thread.currentThread().getName());// 異步執行的邏輯(返回值)return "Hello";},executorService).thenApply(s -> {System.out.println(Thread.currentThread().getName());return s + " World";});String s = future.get();System.out.println(s);executorService.shutdown();}
}
上述代碼的運行結果是?
?4.2、異步獲取結果
??????????CompletableFuture 主要有兩個異步執行的方法
| 方法名 | 返回值 |
| runAsync | 異步執行無返回值 |
| supplyAsync | 異步執行有返回值 |
| get | 阻塞獲取結果 |
前面的案例我們使用了 有返回值的 supplyAsync 方法 ,但是我們使用了 get 方法去獲取結果的話 會造成阻塞,get方法會阻塞直到任務完成,獲取結果。于此對應的還有一種非阻塞的辦法,傳入一個回調函數,比如下面這段代碼
package org.wcan.juc.excutor;import java.util.concurrent.*;/*** @Description* @Author wcan* @Date 2025/3/31 下午 15:21* @Version 1.0*/
public class CompletableFutureDemo {public static void main(String[] args) throws ExecutionException, InterruptedException {ExecutorService executorService = Executors.newFixedThreadPool(2);CompletableFuture<String> future = CompletableFuture.supplyAsync(() -> {System.out.println(Thread.currentThread().getName());// 異步執行的邏輯(返回值)return "Hello";},executorService).thenApply(s -> {System.out.println(Thread.currentThread().getName());return s + " World";});future.thenAccept(s -> {System.out.println(Thread.currentThread().getName());System.out.println(s);});//        String s = future.get();
//        System.out.println(s);executorService.shutdown();}
}
?我們通過 thenAccept 方法 傳入一個回調方法,就可以實現異步獲取執行結果的功能了。
4.3、組合多個異步任務
????????CompletableFuture 還有一個強大的功能就是可以組合多個異步任務,我們先看代碼
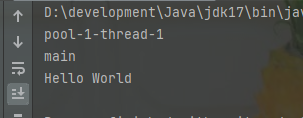
private static void combine() throws ExecutionException, InterruptedException {CompletableFuture<String> futureA = CompletableFuture.supplyAsync(() -> {System.out.println(Thread.currentThread().getName());return "Hello";});CompletableFuture<String> futureB = CompletableFuture.supplyAsync(() -> {System.out.println(Thread.currentThread().getName());return "World";});// thenCombine 合并兩個CompletableFutureCompletableFuture<String> resultFuture = futureA.thenCombine(futureB, (a, b) -> {System.out.println(Thread.currentThread().getName());return a + " " + b;});resultFuture.thenAccept(s -> {System.out.println(Thread.currentThread().getName());System.out.println(s);});}?上述代碼會將兩個異步任務并行執行,然后通過 thenCombine方法合并兩次的運行結果。運行結果如下圖示:
4.4、異常處理機制
? ? ? ?下面我們來看下異常處理機制,CompletableFuture 提供了?exceptionally 方法 用來捕獲異步任務執行過程中的異常信息,相關代碼如下:
private static void exceptionally() throws ExecutionException, InterruptedException {CompletableFuture<Integer> future = CompletableFuture.supplyAsync(() -> {if (true) throw new RuntimeException("出錯了!");return 42;}).exceptionally(ex -> {System.out.println("捕獲異常: " + ex.getMessage());return 0;});}?5、ForkJoin 框架
5.1、ForkJoin 設計思想
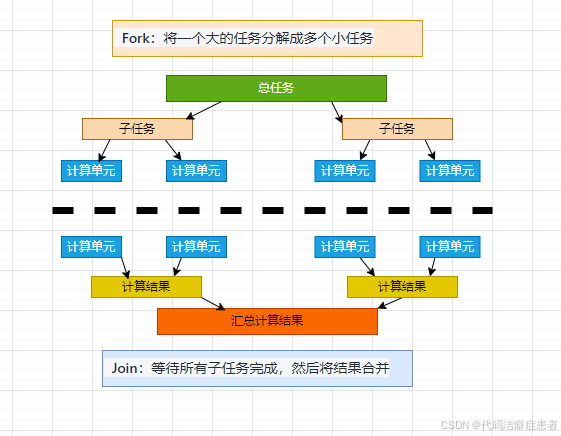
? ? ? 在Java 并發包中,還有一個強大的工具 -- ForkJoin,故名思意 這個工具設計思想就是 Fork 和 Join 兩個步驟,效果上 就如同 一個建議版本的MapReduce 。它的工作原理如下圖所示
5.2、ForkJoin 的基本使用
????????前面我們知道了ForkJoin 的設計原理,下面我們就來看看怎么用,我們可以在并發包下看到有個ForkJoinTask 的 抽象類 ,
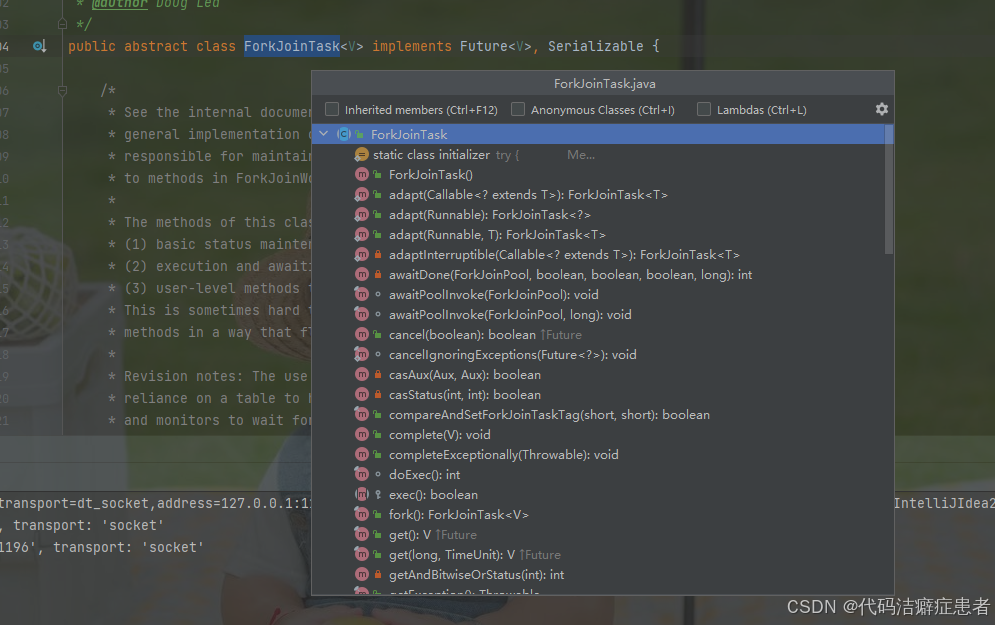
既然是抽象的,那么我們繼續尋找子類。?我們主要關注其中有兩個子類 :
RecursiveTask:返回一個結果的任務(通常用于有返回值的計算)。RecursiveAction:沒有返回值的任務。
?需要注意的是這兩個子類都是抽象類,所以我們在使用的時候需要重寫抽象類中的抽象方法
5.3、案例實戰
? ? ? ? 假設我們需要對一個長度是10000000的數組求和,這個時候我們就可以使用 ForkJoin 去并行計算了,因為需要返回值,所以我們選擇繼承 RecursiveTask。?實現代碼如下
package org.wcan.juc.excutor;import java.util.concurrent.RecursiveTask;public class SumTask extends RecursiveTask<Long> {public static final int INT = 10000;private final long[] arr;private final int start, end;// 構造函數接收數組和任務的起始、結束索引public SumTask(long[] arr, int start, int end) {this.arr = arr;this.start = start;this.end = end;}@Overrideprotected Long compute() {// 如果任務的大小小于或等于 INT,直接計算結果if (end - start <= INT) {long sum = 0;for (int i = start; i < end; i++) {sum += arr[i];}return sum;} else {// 否則分割任務int mid = (start + end) / 2;SumTask leftTask = new SumTask(arr, start, mid);SumTask rightTask = new SumTask(arr, mid, end);// fork任務leftTask.fork();rightTask.fork();// 等待任務完成并合并結果long leftResult = leftTask.join();long rightResult = rightTask.join();return leftResult + rightResult;  // 合并結果}}
}
上面是一個標準的寫法,通過遞歸的形式進行任務分解,當達到最小計算單元的閾值的時候 開始計算,所有的子任務計算完成后,進行結果匯總。測試類如下
package org.wcan.juc.excutor;import java.util.Arrays;
import java.util.concurrent.ForkJoinPool;public class ForkJoinDemo {public static void main(String[] args) {long[] array = new long[100_000_000];Arrays.fill(array, 9); //數組元素全為9// 創建 ForkJoin 線程池ForkJoinPool pool = new ForkJoinPool();SumTask task = new SumTask(array, 0, array.length);// 提交任務并獲取結果Long sum = pool.invoke(task);System.out.println("總和: " + sum); }
}
?我們運行上述代碼就能獲取到計算結果了,我們可以繼續做個實驗,證明一下這種處理方式效率高。
public static void main(String[] args) {long[] array = new long[100_000_000];Arrays.fill(array, 9); // 數組元素全為1long start = System.currentTimeMillis();Long sum = 0L;for (int i = 0; i < array.length; i++) {sum += array[i];}System.out.println("總和: " + sum); // 輸出 10000System.out.println("耗時: " + (System.currentTimeMillis() - start));}運行上述代碼,觀察控制臺輸出內容:?
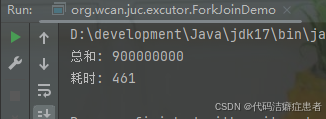
我們使用循環計算耗時 461毫秒,我們再統計下使用 ForkJoin 計算?
public static void main(String[] args) {long[] array = new long[100_000_000];Arrays.fill(array, 9); // 數組元素全為1long start = System.currentTimeMillis();// 創建 ForkJoin 線程池ForkJoinPool pool = new ForkJoinPool();SumTask task = new SumTask(array, 0, array.length);// 提交任務并獲取結果Long sum = pool.invoke(task);System.out.println("總和: " + sum); // 輸出 10000System.out.println("耗時: " + (System.currentTimeMillis() - start));}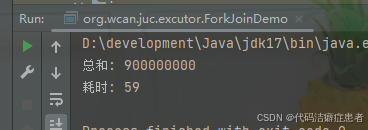
耗時 59 毫秒,完爆循環的計算效率。
5.4、最佳實踐
????????前面我們編寫了一個簡單的案例,演示了 ForkJoin 的基本使用,并且和普通的循環計算做了比對,發現效率接近提升了100倍,展現了 ForkJoin強大的計算能力。那么還有沒有繼續優化的點呢, 答案是肯定的。
我們想想前面代碼可能 存在的問題?
SumTask leftTask = new SumTask(arr, start, mid);SumTask rightTask = new SumTask(arr, mid, end);// fork任務leftTask.fork();rightTask.fork();// 等待任務完成并合并結果long leftResult = leftTask.join();long rightResult = rightTask.join();????????當前線程 其實做了兩件事,串行提交左任務和有任務,當兩個任務都提交了 在阻塞獲取這兩個任務的執行結果,這個過程其實是增加了兩次任務調度的開銷,那么我們可以怎么優化呢。
來看下面這種寫法
int mid = (start + end) / 2;SumPlusTask leftTask = new SumPlusTask(array, start, mid);SumPlusTask rightTask = new SumPlusTask(array, mid, end);// 提交左任務到隊列leftTask.fork();// 計算右任務并合并結果long rightResult = rightTask.compute();long leftResult = leftTask.join();????????這里 當前線程在提交左任務后 直接計算有任務,這接著阻塞獲取做任務的執行結果,這樣是不是就能更完美的解決前面的問題了。
這里我給出完整的代碼
package org.wcan.juc.excutor;import java.util.concurrent.RecursiveTask;public class SumPlusTask extends RecursiveTask<Long> {private final long[] array;private final int start;private final int end;private static final int THRESHOLD = 10000; // 拆分閾值public SumPlusTask(long[] array, int start, int end) {this.array = array;this.start = start;this.end = end;}@Overrideprotected Long compute() {// 如果任務足夠小,直接計算if (end - start <= THRESHOLD) {long sum = 0;for (int i = start; i < end; i++) sum += array[i];return sum;}// 拆分任務int mid = (start + end) / 2;SumPlusTask leftTask = new SumPlusTask(array, start, mid);SumPlusTask rightTask = new SumPlusTask(array, mid, end);// 提交左任務到隊列leftTask.fork();// 計算右任務并合并結果long rightResult = rightTask.compute();long leftResult = leftTask.join();return leftResult + rightResult;}
}
????????同樣的可以比對這兩種寫法,當處理的數據量在100000000 的時候 你就會感受到很明顯的區別了?。
?6、總結
????????本篇文章主要給大家介紹線程池的使用,以及異步處理任務的最佳實踐,希望對大家有所幫助,后續我們將會繼續給大家分享背后的實現細節以及底層原理。


)
—— 貪心)


 流提取運算符的重載和const成員)


