文章目錄
- Pinia
- 1.使用
- 2. pinia-計數器案例
- 3. getters實現
- 4. 異步action
- 5. storeToRefsx 數據解構保持響應式
- 6. pinia 調試
- 項目起步
- 1.項目初始化和git管理
- 2. 使用ElementPlus
- 3. ElementPlus 主題色定制
- 4. axios 基礎配置
- 5. 路由設計
- 6. 靜態資源初始化和 Error lens安裝
- 7.scss自動導入
- 8. Layout靜態模板結構搭建
- 9. Layout字體圖標引入
- 10.Layout一級導航渲染
- 11. layout - 吸頂導航
- 12. layout - Pinia優化重復請求
- 小結
Pinia
1.使用
vue專屬狀態管理庫,vuex的替代
優勢:
- 提供了更簡單的
API,去掉了mutation - 提供了組合式
API - 去掉了
modules,每個store都是獨立的模塊 - 搭配
TS一起使用提供可靠的類型判斷
Pinia添加到vue項目中:
- 創建一個新
vue項目:create init vue@latest,裝依賴,項目跑起來 - 打開
pinia官方文檔,是個小菠蘿。點擊開始,有個安裝選項
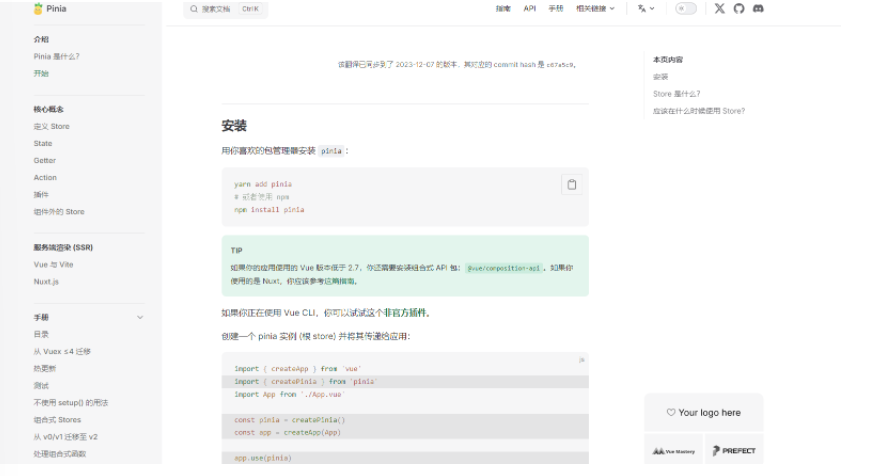
- 我是使用
npm安裝:npm install pinia
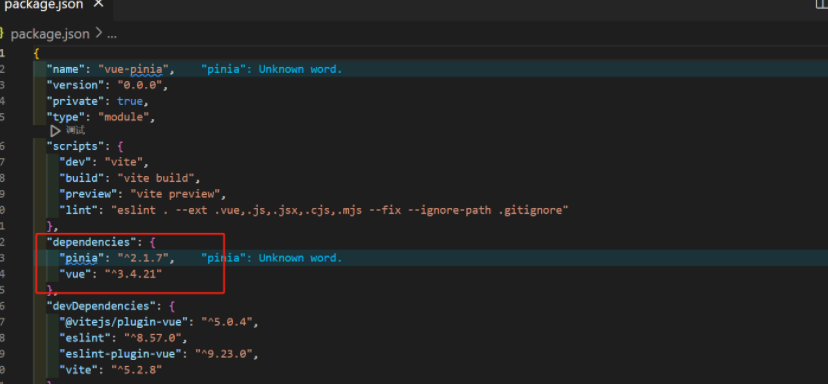
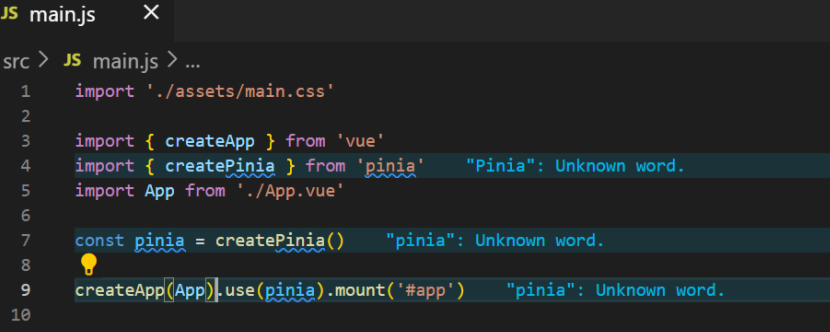
- 按照文檔使用 pinia

- 在項目中實際應用(記不住看文檔使用即可
2. pinia-計數器案例
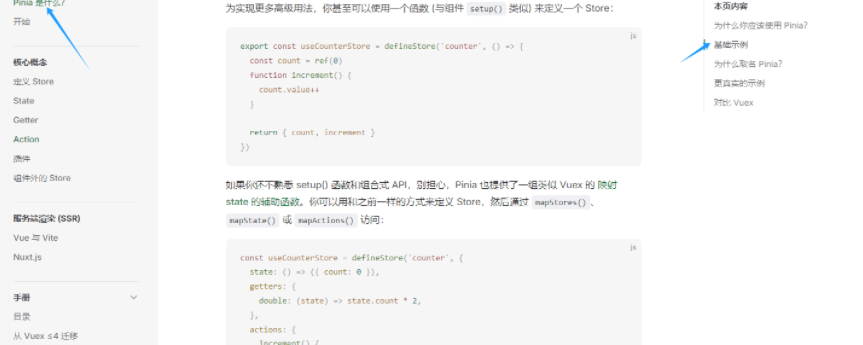
看官方文檔的基礎實例學習如何使用
找和vue3語法相似的語法進行使用
- 創建一個
store( state+action )
在src添加一個stores文件夾,新建文件counter.js
//counter.js
// 導入一個方法 defineStore
import { defineStore } from 'pinia'
import {ref} form 'vue'// 參數:標識 回調函數
//!!變量名字需保持規范:use+函數名
//useCounterStore是一個方法,需執行才能得到真是store實例對象
export const useCounterStore = defineStore('counter', () => {//1.定義數據stateconst count = ref(0)// 2.定義修改數據的方法(action 同步+異步)const increment = () => {count.value++}// 3.以對象的方式return供組件使用return {count,increment}
})- 組件使用
store
<script setup>
//1.導入use 打頭的方法
import { useCounterStore } from './stores/counter';
//2.執行方法獲得store實例對象
const counterStore = useCounterStore();
// console.log(counterStore)  打印看看里面是否有count和increment
</script><template><button @click="counterStore.increment">{{ counterStore.count }}</button>
</template>
3. getters實現
pinia中的getters直接使用computed函數進行模擬
//counter.js
// 導入一個方法 defineStore
import { defineStore } from 'pinia'
import { computed, ref } from 'vue'//定義并暴露一個函數useCounterStore 參數:標識 回調函數
export const useCounterStore = defineStore('counter', () => {//1.定義數據stateconst count = ref(0)// 2.定義修改數據的方法(action 同步+異步)const increment = () => {count.value++}// --  --  getters實現  --   --const doubleCount = computed(() => count.value * 2)// 3.以對象的方式return供組件使用return {count,increment,doubleCount}
})
這時useCountStore中就有了doubleCount這個方法了
<!--App.vue-->
<template><button @click="counterStore.increment">{{ counterStore.count }}</button>{{ counterStore.doubleCount }}
</template>

4. 異步action
action中實現異步和組件中定義數據和方法的風格完全一致
安裝axios: npm install axios
舉個獲取數據列表 的栗子,獲取數據接口地址:http://geek.itheima.net/v1_0/channels
//counter.jsconst list = ref([])  //存放列表數據
//異步actionconst getList = async () => {const res = await axios.get('http://geek.itheima.net/v1_0/channels');}//返回,讓組件可以拿到return{list,getList}
<script setup>
//1.導入use 打頭的方法
import { onMounted } from 'vue';
import { useCounterStore } from './stores/counter';
//2.執行方法獲得store實例對象
const counterStore = useCounterStore();
// console.log(counterStore)
onMounted(() => {//獲取數據counterStore.getList()
})
</script>
看一下網頁的網絡
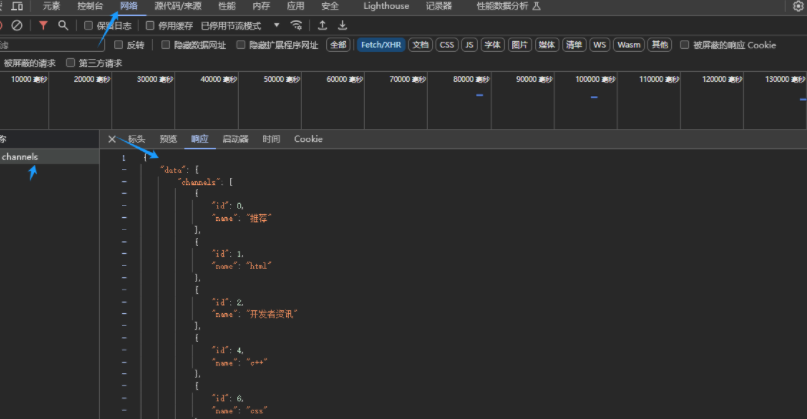
給list賦值
//異步actionconst getList = async () => {const res = await axios.get('http://geek.itheima.net/v1_0/channels');list.value = res.data.data.channels}
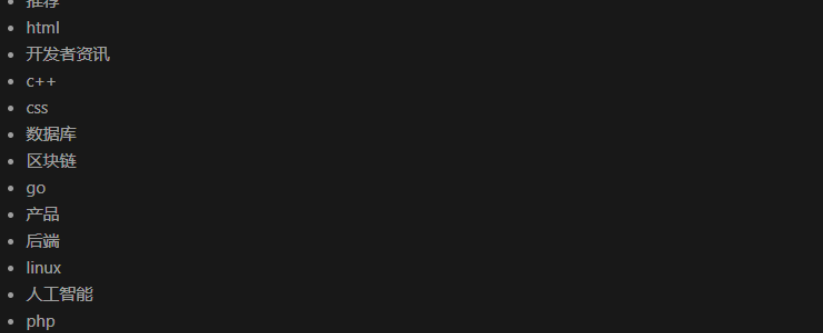
渲染在頁面上,使用v-for
<template><button @click="counterStore.increment">{{ counterStore.count }}</button>{{ counterStore.doubleCount }}<ul><li v-for="item in counterStore.list" :key="item.id">{{ item.name }}</li></ul>
</template>
效果:
5. storeToRefsx 數據解構保持響應式
輔助保持數據(state+getter)的響應式解構
方法可以正常解構賦值哈
const {count,doubleCount} = counterStore
這樣解構是不可以的,會造成響應式丟失,也就是數據變化頁面不會更新。
我們可以這樣寫:
const {count,doubleCount} = storeToRefs(counterStore);
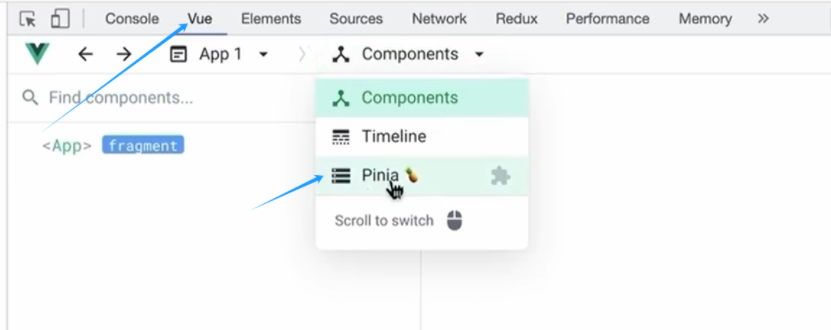
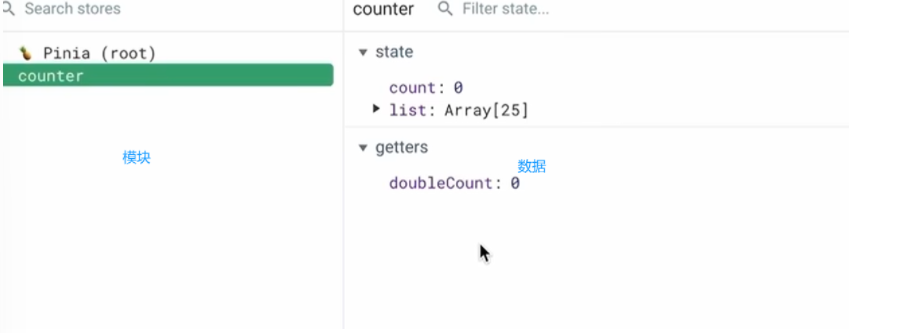
6. pinia 調試
使用之前使用的devtools調試工具
項目起步
1.項目初始化和git管理
創建并打開,將項目運行起來(按照綠色的來做):
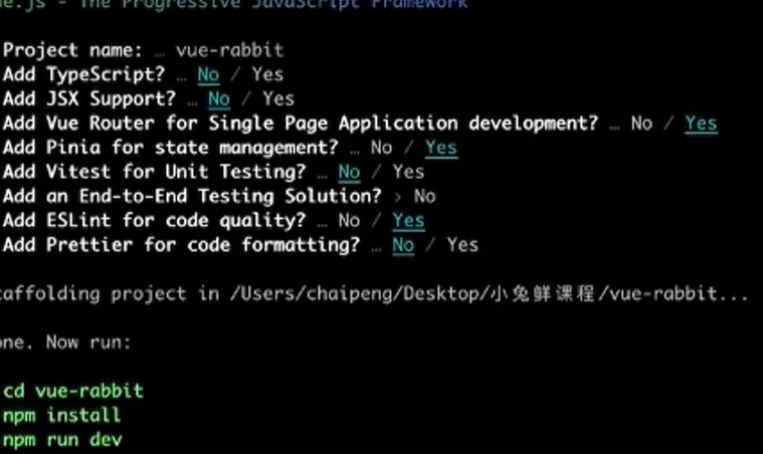
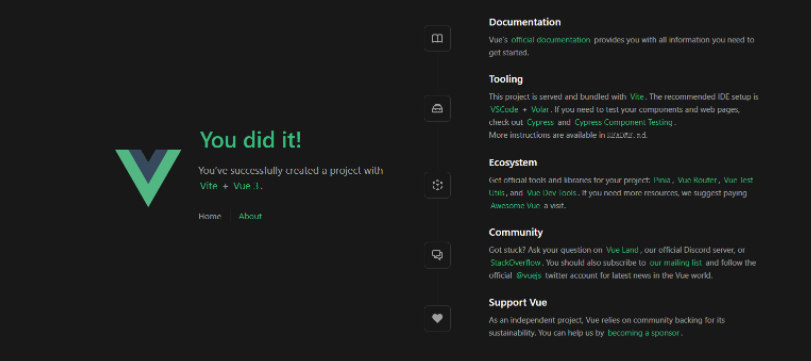
這樣說明成功
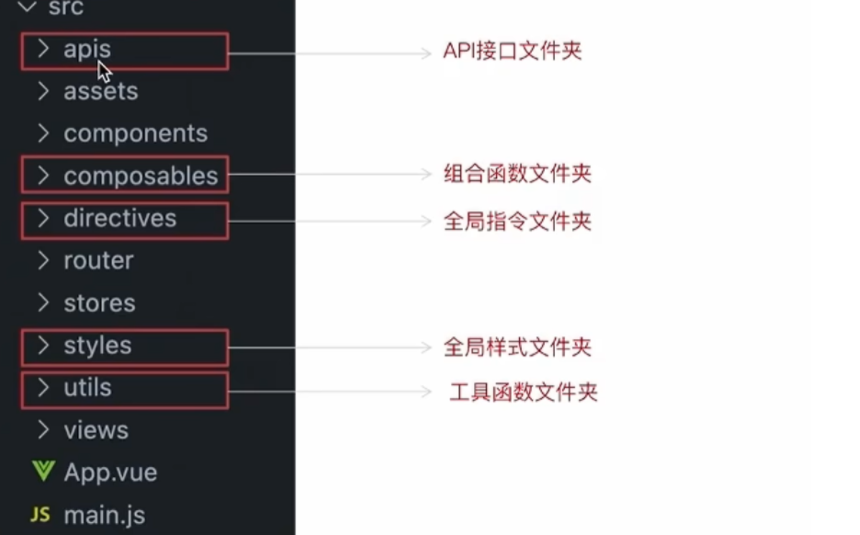
下面我們看一下 小兔鮮 需要哪些基礎目錄,
我們按照下面的圖片在剛創建好的項目中創建文件夾。
componsables組合函數文件夾:存放通用的函數
使用git管理項目,手動初始化
執行命令并完成手動提交
git init
git add .
git commit -m "init"
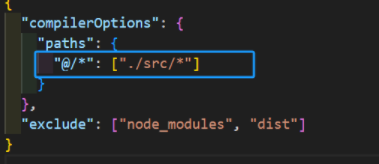
配置別名路徑聯想提示
編寫代碼,一旦輸入
@/,vscode會立刻聯想出src所有的子目錄和文件,統一文件路徑,不容易出錯。步驟:1.根目錄新增
jsconfig.json文件? 2.添加配置項
2. 使用ElementPlus
我們在這個項目中使用了通用性組件,由ElementPlus提供
步驟:安裝 - 按需引入 - 測試組件
看文檔
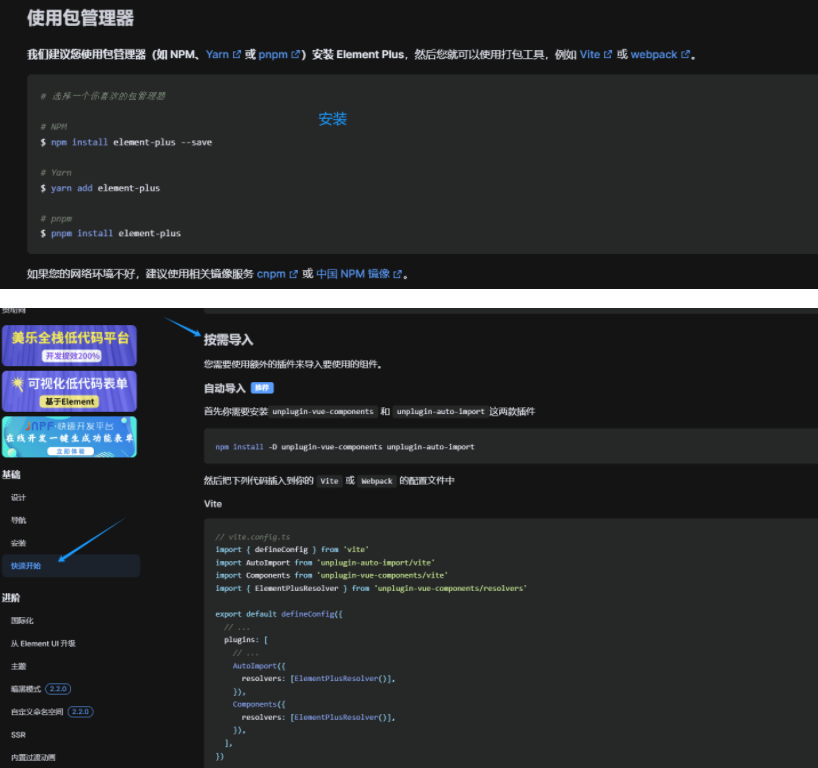
安裝elementPlus:npm install element-plus --save
安裝兩個插件:npm install -D unplugin-vue-components unplugin-auto-import
安裝之后我們來依照文檔配置這兩個插件
//vite.config.js//按需導入element Plus插件
import AutoImport from 'unplugin-auto-import/vite'
import Components from 'unplugin-vue-components/vite'
import { ElementPlusResolver } from 'unplugin-vue-components/resolvers'// https://vitejs.dev/config/
export default defineConfig({plugins: [  //插件配置文件vue(),//elementPlus插件AutoImport({resolvers: [ElementPlusResolver()],}),Components({resolvers: [ElementPlusResolver()],}),],
配置文件寫好后,重啟項目
做個測試,看看組件能不能使用
<template><el-button type="primary">elementPlus</el-button>
</template>

生效就OK
3. ElementPlus 主題色定制
小免鮮主題色和elementPlus默認的主題色存在沖突
通過定制主題讓elementPlus的主題色和小兔鮮項目保持一致
步驟:
-
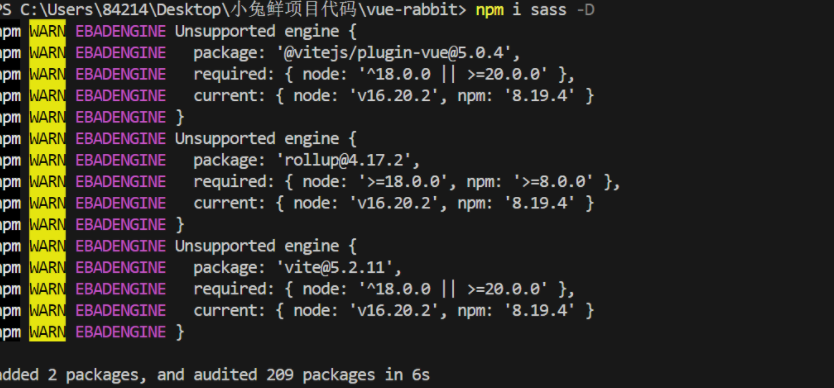
安裝sass:
npm i sass -D
-
準備定制文件 :
styles/element/index.scss
/* 只需要重寫你需要的即可 */
@forward 'element-plus/theme-chalk/src/common/var.scss' with ($colors: ('primary': (// 主色'base': #27ba9b,),'success': (// 成功色'base': #1dc779,),'warning': (// 警告色'base': #ffb302,),'danger': (// 危險色'base': #e26237,),'error': (// 錯誤色'base': #cf4444,),)
)
- 對
ElementPlus樣式進行覆蓋:通知Element使用scss語言,自動導入定制的scss文件覆蓋。
//vite.config.jsimport { fileURLToPath, URL } from 'node:url'import { defineConfig } from 'vite'
import vue from '@vitejs/plugin-vue'//按需導入element Plus插件
import AutoImport from 'unplugin-auto-import/vite'
import Components from 'unplugin-vue-components/vite'
import { ElementPlusResolver } from 'unplugin-vue-components/resolvers'// https://vitejs.dev/config/
export default defineConfig({plugins: [  //插件配置文件vue(),//elementPlus插件AutoImport({// 1.配置elementPlus采用sass樣式配色系統resolvers: [ElementPlusResolver()],}),Components({resolvers: [ElementPlusResolver({ importStyle: 'sass' })],}),],resolve: {alias: {'@': fileURLToPath(new URL('./src', import.meta.url))}},css: {preprocessorOptions: {scss: {//2.自動導入定制化樣式文件進行樣式覆蓋additionalData: `@use "@/styles/element/index.scss" as *;`}}}
})
4. axios 基礎配置
安裝:npm i axios
配置基礎實例(統一接口實例)

在utils創建一個http.js
//axios基礎封裝
import axios from "axios";const httpInstance = axios.create({baseURL: 'http://pcapi-xiaotuxian-front-devtest.itheima.net',timeout: '5000'           //5s
})//攔截器,默認先這樣寫著,后面有需求再配置
// axios請求攔截器
instance.interceptors.request.use(config => {return config
}, e => Promise.reject(e))// axios響應式攔截器
instance.interceptors.response.use(res => res.data, e => {return Promise.reject(e)
})export default httpInstance
擴展:如果項目里面不同的業務模塊需要的接口基地址不同,該如何來做?
答:
axios.create()方法可以執行多次,每次執行就會生成一個新
的實例const http1 = axios.create({baseURL:'url1'}) const http1 = axios.create({baseURL:'url2'})
5. 路由設計
-
設計首頁和登錄頁的路由(一級路由)
路由設計規則:找內容切換的區域,如果是頁面整體切換,則為一級路由
eslintrc.cjs配置,避免命名報錯:
/* eslint-env node */
module.exports = {root: true,'extends': ['plugin:vue/vue3-essential','eslint:recommended'],parserOptions: {ecmaVersion: 'latest'},rules: {'vue/multi-word-component-names':0, //不再強制要求組件命名}
}
刪除views文件夾下的組件,創建兩個新文件夾Login和Layout,分別創建一個index.vue文件,寫入一些代碼。
<template>
<h2>我是注冊頁/首頁</h2>
</template>
打開router文件夾的index.js,刪掉默認的代碼。導入login和layout組件,在routes中配置path、component屬性
import { createRouter, createWebHistory } from 'vue-router'
import Login from '@/views/Login/index.vue'
import Layout from '@/views/Layout/index.vue'
// createRouter:創建router實例對象
// createWebHistory:創建history模式的路由const router = createRouter({history: createWebHistory(import.meta.env.BASE_URL),routes: [{path: '/',component: Layout},{path: '
App.vue中寫入一級路由出口組件
<script setup>
import { RouterLink, RouterView } from 'vue-router'</script><template><!-- 一級路由出口組件 --><RouterView />
</template>
項目運行效果:

- 設計分類頁和默認
Home頁路由(二級路由)
路由設計原則:找內容切換的區域,如果是在一級路由頁的內部切換,則為二級路由
和上面一樣,在views新增兩個文件夾,一個Home,一個Category,分別創建一個index.vue,隨便寫點內容
//router index.js
import { createRouter, createWebHistory } from 'vue-router'
import Login from '@/views/Login/index.vue'
import Layout from '@/views/Layout/index.vue'
import Home from '@/views/Home/index.vue'
import Category from '@/views/Category/index.vue'
// createRouter:創建router實例對象
// createWebHistory:創建history模式的路由const router = createRouter({history: createWebHistory(import.meta.env.BASE_URL),routes: [{path: '/',component: Layout,children: [{path: '',component: Home},{path: 'category',component: Category}]},{path: '/login',component: Login}]
})export default router這兩個二級路由要在Layout組件里給準備路由出口
<!--Layout index.vue-->
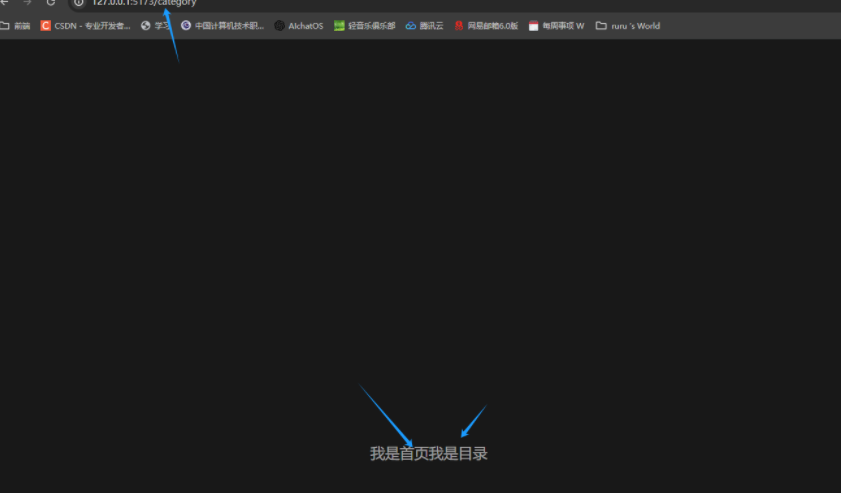
<template><h2>我是首頁</h2><!-- 二級路由出口 --><RouterView />
</template>
效果:
6. 靜態資源初始化和 Error lens安裝
圖片資源 - 把images文件夾放到assets目錄下
樣式資源 - 把common.scss文件放到styles目錄下(這個文件在資源里面,自己拿)。
在main.js中引入common.scss
//main.js
//引入初始化樣式文件
import '@/styles/common.scss'
error lens是一個實時提供錯誤警告信息的VScode插件,方便開發,在擴展程序里搜索然后安裝就可以了。
7.scss自動導入
在項目里一些組件共享的色值會以scss變量的方式統一放到一個名為var.scss 的文件中。
正常組件中使用,需要先導入scss文件,再使用內部的變量,比較繁瑣,自動導入可以免去手動導入的步驟,直接使用內部的變量。
配置步驟:
- 新增一個
var.scss文件,存入色值變量
$xtxColor: #27ba9b;
$helpColor: #e26237;
$sucColor: #1dc779;
$warnColor: #ffb302;
$priceColor: #cf4444;
- 通過
vite.config.js配置自動導入文件
css: {preprocessorOptions: {scss: {//2.自動導入定制化樣式文件進行樣式覆蓋additionalData: `@use "@/styles/element/index.scss" as *;@use "@/styles/var.scss" as *;`,}}}
8. Layout靜態模板結構搭建
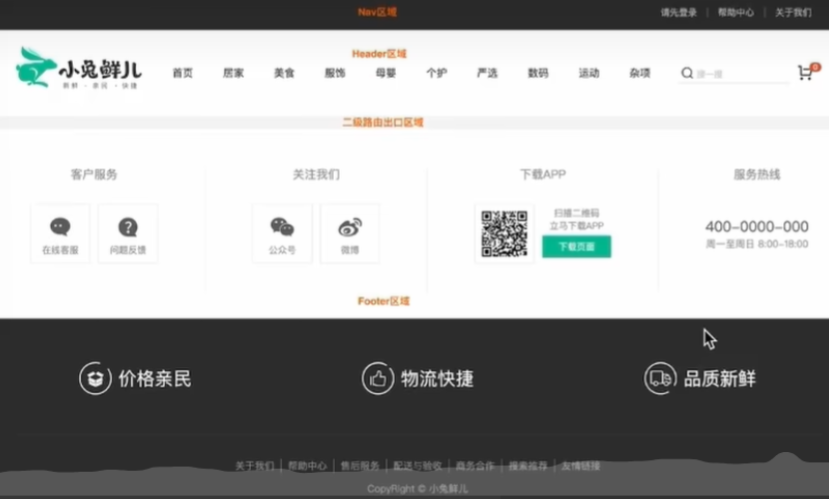
Layout文件夾創建一個components文件夾,創建LayoutFooter.vue、LayoutHeader.vue、LayoutNav.vue組件。
<!--LayoutNav.vue-->
<script setup></script><template><nav class="app-topnav"><div class="container"><ul><template v-if="true"><li><a href="javascript:;""><i class="iconfont icon-user"></i>周杰倫</a></li><li><el-popconfirm title="確認退出嗎?" confirm-button-text="確認" cancel-button-text="取消"><template #reference><a href="javascript:;">退出登錄</a></template></el-popconfirm></li><li><a href="javascript:;">我的訂單</a></li><li><a href="javascript:;">會員中心</a></li></template><template v-else><li><a href="javascript:;">請先登錄</a></li><li><a href="javascript:;">幫助中心</a></li><li><a href="javascript:;">關于我們</a></li></template></ul></div></nav>
</template><style scoped lang="scss">
.app-topnav {background: #333;ul {display: flex;height: 53px;justify-content: flex-end;align-items: center;li {a {padding: 0 15px;color: #cdcdcd;line-height: 1;display: inline-block;i {font-size: 14px;margin-right: 2px;}&:hover {color: $xtxColor;}}~li {a {border-left: 2px solid #666;}}}}
}
</style>
<!--LayoutHeader.vue-->
<script setup></script><template><header class='app-header'><div class="container"><h1 class="logo"><RouterLink to="/">小兔鮮</RouterLink></h1><ul class="app-header-nav"><li class="home"><RouterLink to="/">首頁</RouterLink></li><li> <RouterLink to="/">居家</RouterLink> </li><li> <RouterLink to="/">美食</RouterLink> </li><li> <RouterLink to="/">服飾</RouterLink> </li></ul><div class="search"><i class="iconfont icon-search"></i><input type="text" placeholder="搜一搜"></div><!-- 頭部購物車 --></div></header>
</template><style scoped lang='scss'>
.app-header {background: #fff;.container {display: flex;align-items: center;}.logo {width: 200px;a {display: block;height: 132px;width: 100%;text-indent: -9999px;background: url('@/assets/images/logo.png') no-repeat center 18px / contain;}}.app-header-nav {width: 820px;display: flex;padding-left: 40px;position: relative;z-index: 998;li {margin-right: 40px;width: 38px;text-align: center;a {font-size: 16px;line-height: 32px;height: 32px;display: inline-block;&:hover {color: $xtxColor;border-bottom: 1px solid $xtxColor;}}.active {color: $xtxColor;border-bottom: 1px solid $xtxColor;}}}.search {width: 170px;height: 32px;position: relative;border-bottom: 1px solid #e7e7e7;line-height: 32px;.icon-search {font-size: 18px;margin-left: 5px;}input {width: 140px;padding-left: 5px;color: #666;}}.cart {width: 50px;.curr {height: 32px;line-height: 32px;text-align: center;position: relative;display: block;.icon-cart {font-size: 22px;}em {font-style: normal;position: absolute;right: 0;top: 0;padding: 1px 6px;line-height: 1;background: $helpColor;color: #fff;font-size: 12px;border-radius: 10px;font-family: Arial;}}}
}
</style>
<!--LayoutFooter.vue-->
<template><footer class="app_footer"><!-- 聯系我們 --><div class="contact"><div class="container"><dl><dt>客戶服務</dt><dd><i class="iconfont icon-kefu"></i> 在線客服</dd><dd><i class="iconfont icon-question"></i> 問題反饋</dd></dl><dl><dt>關注我們</dt><dd><i class="iconfont icon-weixin"></i> 公眾號</dd><dd><i class="iconfont icon-weibo"></i> 微博</dd></dl><dl><dt>下載APP</dt><dd class="qrcode"><img src="@/assets/images/qrcode.jpg" /></dd><dd class="download"><span>掃描二維碼</span><span>立馬下載APP</span><a href="javascript:;">下載頁面</a></dd></dl><dl><dt>服務熱線</dt><dd class="hotline">400-0000-000 <small>周一至周日 8:00-18:00</small></dd></dl></div></div><!-- 其它 --><div class="extra"><div class="container"><div class="slogan"><a href="javascript:;"><i class="iconfont icon-footer01"></i><span>價格親民</span></a><a href="javascript:;"><i class="iconfont icon-footer02"></i><span>物流快捷</span></a><a href="javascript:;"><i class="iconfont icon-footer03"></i><span>品質新鮮</span></a></div><!-- 版權信息 --><div class="copyright"><p><a href="javascript:;">關于我們</a><a href="javascript:;">幫助中心</a><a href="javascript:;">售后服務</a><a href="javascript:;">配送與驗收</a><a href="javascript:;">商務合作</a><a href="javascript:;">搜索推薦</a><a href="javascript:;">友情鏈接</a></p><p>CopyRight ? 小兔鮮兒</p></div></div></div></footer>
</template><style scoped lang='scss'>
.app_footer {overflow: hidden;background-color: #f5f5f5;padding-top: 20px;.contact {background: #fff;.container {padding: 60px 0 40px 25px;display: flex;}dl {height: 190px;text-align: center;padding: 0 72px;border-right: 1px solid #f2f2f2;color: #999;&:first-child {padding-left: 0;}&:last-child {border-right: none;padding-right: 0;}}dt {line-height: 1;font-size: 18px;}dd {margin: 36px 12px 0 0;float: left;width: 92px;height: 92px;padding-top: 10px;border: 1px solid #ededed;.iconfont {font-size: 36px;display: block;color: #666;}&:hover {.iconfont {color: $xtxColor;}}&:last-child {margin-right: 0;}}.qrcode {width: 92px;height: 92px;padding: 7px;border: 1px solid #ededed;}.download {padding-top: 5px;font-size: 14px;width: auto;height: auto;border: none;span {display: block;}a {display: block;line-height: 1;padding: 10px 25px;margin-top: 5px;color: #fff;border-radius: 2px;background-color: $xtxColor;}}.hotline {padding-top: 20px;font-size: 22px;color: #666;width: auto;height: auto;border: none;small {display: block;font-size: 15px;color: #999;}}}.extra {background-color: #333;}.slogan {height: 178px;line-height: 58px;padding: 60px 100px;border-bottom: 1px solid #434343;display: flex;justify-content: space-between;a {height: 58px;line-height: 58px;color: #fff;font-size: 28px;i {font-size: 50px;vertical-align: middle;margin-right: 10px;font-weight: 100;}span {vertical-align: middle;text-shadow: 0 0 1px #333;}}}.copyright {height: 170px;padding-top: 40px;text-align: center;color: #999;font-size: 15px;p {line-height: 1;margin-bottom: 20px;}a {color: #999;line-height: 1;padding: 0 10px;border-right: 1px solid #999;&:last-child {border-right: none;}}}
}
</style>
修改一下Layout的index.vue
<script setup>
import LayoutNav from './components/LayoutNav.vue'
import LayoutHeader from './components/LayoutHeader.vue'
import LayoutFooter from './components/LayoutFooter.vue'
</script><template><LayoutNav /><LayoutHeader /><RouterView /><LayoutFooter />
</template>
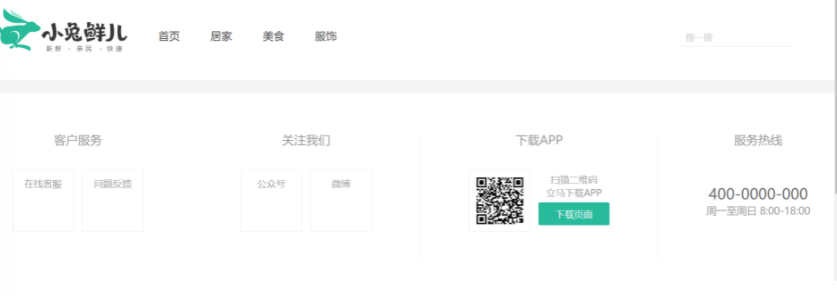
效果:
9. Layout字體圖標引入

這里的圖標沒有引入,我們使用的是阿里的字體圖標庫,使用 font-class 引用的方式
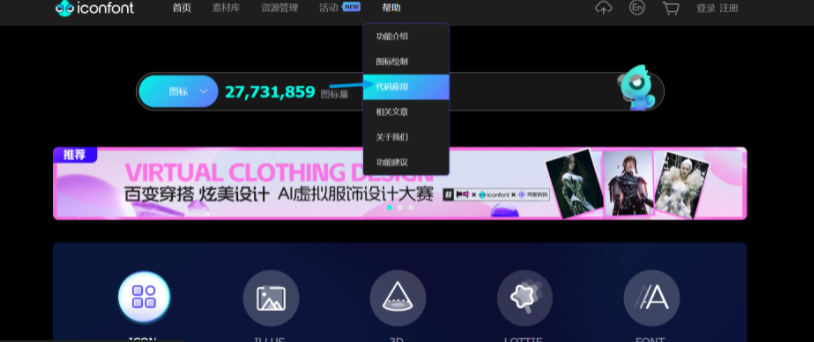
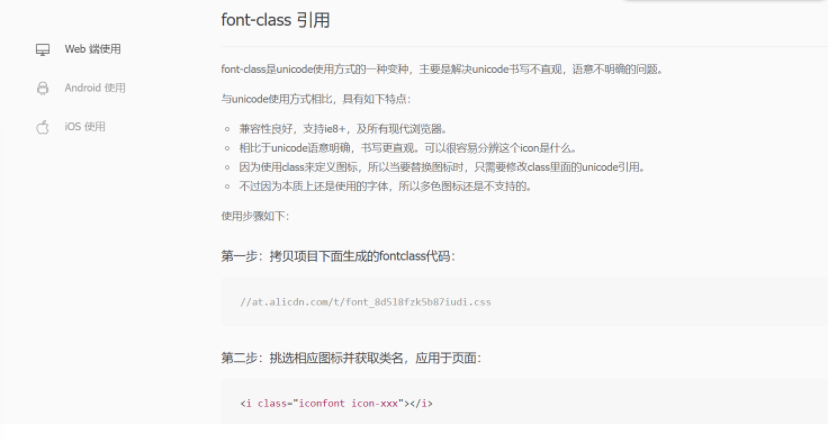
將這個加入到index.html文件中
<link rel="stylesheet" href="//at.alicdn.com/t/font_2143783_iq6z4ey5vu.css">
效果:

看下面這個周杰倫旁邊的小人兒
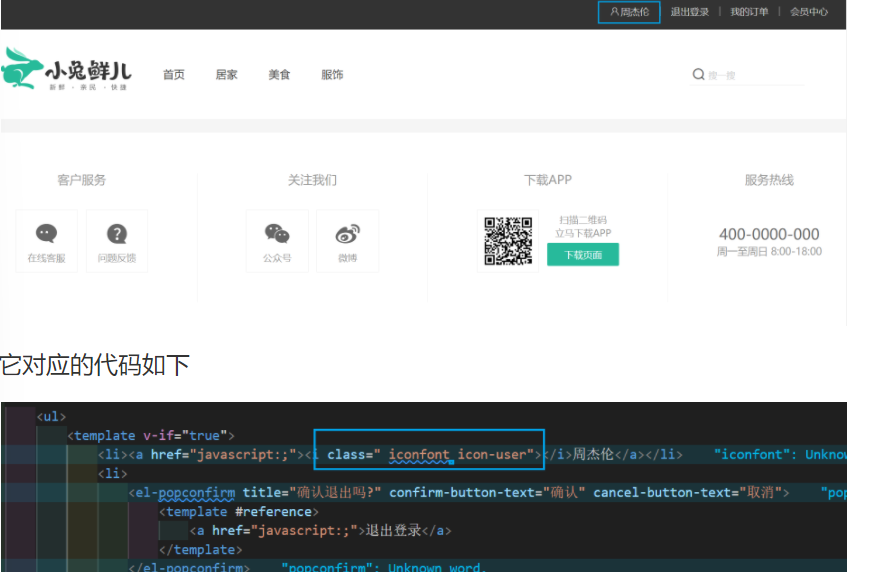
它對應的代碼如下
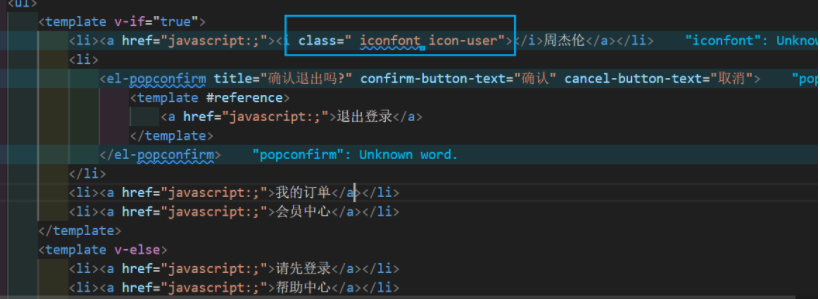
10.Layout一級導航渲染
靜態結構已經全部搭建好了,我們要使用后端接口渲染 渲染一級導航路由,也就是這:

實現步驟:
- 根據接口文檔封裝接口函數
- 發生請求獲取數據列表
v-for渲染頁面
在apis文件夾下創建layout.js文件,封裝接口
import httpInstance from '@/utils/http.js'//獲取目錄
export function getCategoryAPI() {return httpInstance({url: '/home/category/head'})
}來到LayoutHeader組件,引入接口
封裝一個函數getCategory,返回的是promise對象,使用async/await。
在掛載完成之后(onMounted)調用函數getCategory。
打印res看一下請求的數據,定義一個響應式空數組categoryList接收后臺傳入的數據。
將 請求 封裝進 函數 中是因為方便書寫請求前后的邏輯
<script setup>
import { getCategoryAPI } from '@/apis/layout'
import { onMounted, ref } from 'vue'const categoryList = ref([])
const getCategory = async () => {const res = await getCategoryAPI()categoryList.value = res.result// console.log(res)
}onMounted(() => getCategory())</script>
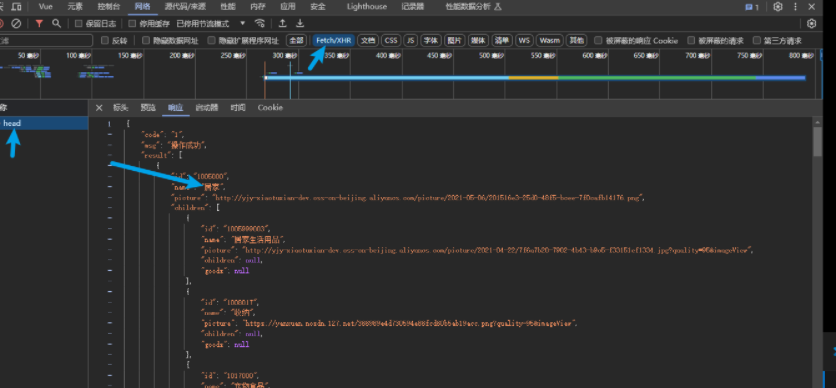
獲取數據成功之后,使用v-for渲染數據
<ul class="app-header-nav"><li class="home" v-for="item in categoryList" :key="item.id"><RouterLink to="/">{{ item.name }}</RouterLink></li></ul>
效果:
11. layout - 吸頂導航
需求:瀏覽器上下滾動過程中,如果距離頂部的滾動距離大于78px,吸頂導航顯示,小于78px隱藏
步驟:
- 準備吸頂導航組件
- 獲取滾動距離
- 滾動距離作判斷條件控制組件盒子展示或隱藏
吸頂導航組件
<script setup></script><template><div class="app-header-sticky"><div class="container"><RouterLink class="logo" to="/" /><!-- 導航區域 --><ul class="app-header-nav "><li class="home"><RouterLink to="/">首頁</RouterLink></li><li><RouterLink to="/">居家</RouterLink></li><li><RouterLink to="/">美食</RouterLink></li><li><RouterLink to="/">服飾</RouterLink></li><li><RouterLink to="/">母嬰</RouterLink></li><li><RouterLink to="/">個護</RouterLink></li><li><RouterLink to="/">嚴選</RouterLink></li><li><RouterLink to="/">數碼</RouterLink></li><li><RouterLink to="/">運動</RouterLink></li><li><RouterLink to="/">雜項</RouterLink></li></ul><div class="right"><RouterLink to="/">品牌</RouterLink><RouterLink to="/">專題</RouterLink></div></div></div>
</template><style scoped lang='scss'>
.app-header-sticky {width: 100%;height: 80px;position: fixed;left: 0;top: 0;z-index: 999;background-color: #fff;border-bottom: 1px solid #e4e4e4;// 此處為關鍵樣式!!!// 狀態一:往上平移自身高度 + 完全透明transform: translateY(-100%);opacity: 0;// 狀態二:移除平移 + 完全不透明&.show {transition: all 0.3s linear;transform: none;opacity: 1;}.container {display: flex;align-items: center;}.logo {width: 200px;height: 80px;background: url("@/assets/images/logo.png") no-repeat right 2px;background-size: 160px auto;}.right {width: 220px;display: flex;text-align: center;padding-left: 40px;border-left: 2px solid $xtxColor;a {width: 38px;margin-right: 40px;font-size: 16px;line-height: 1;&:hover {color: $xtxColor;}}}
}.app-header-nav {width: 820px;display: flex;padding-left: 40px;position: relative;z-index: 998;li {margin-right: 40px;width: 38px;text-align: center;a {font-size: 16px;line-height: 32px;height: 32px;display: inline-block;&:hover {color: $xtxColor;border-bottom: 1px solid $xtxColor;}}.active {color: $xtxColor;border-bottom: 1px solid $xtxColor;}}
}
</style>
在Layout文件夾下的index.vue中引入這個組件,使用起來
<script setup>
import LayoutNav from './components/LayoutNav.vue'
import LayoutHeader from './components/LayoutHeader.vue'
import LayoutFooter from './components/LayoutFooter.vue'
import LayoutFixed from './LayoutFixed.vue'
</script><template><LayoutNav /><LayoutHeader /><RouterView /><LayoutFooter /><LayoutFixed />
</template>
關鍵樣式(LayoutFixed中):
.app-header-sticky {width: 100%;height: 80px;position: fixed;left: 0;top: 0; //置頂z-index: 999;background-color: #fff;border-bottom: 1px solid #e4e4e4;// 此處為關鍵樣式!!!// 狀態一:往上平移自身高度 + 完全透明transform: translateY(-100%); //平移出頁面opacity: 0; //透明度為0// 狀態二:移除平移 + 完全不透明//想讓組件顯示出來只需要加上class = "show" 即可&.show { transition: all 0.3s linear;transform: none;opacity: 1; //完全不透明}
獲取滾動距離,不自己寫了,使用一個vueUse插件,安裝一下
安裝:npm i @vueuse/core
滾動使用的是useScroll,解構的這個y就是垂直方向滾動的距離。
import { useScroll } from '@vueuse/core'
const { y } = useScroll(window)
當y>78時,show生效,我們使用 vue 的動態類實現方式
<div class="app-header-sticky" :class="{ show: y > 78 }">
12. layout - Pinia優化重復請求

我們要把 吸頂導航 組件也轉化成數據動態獲取的,修改完后我們發現請求了兩次數據
<!-- LayoutFixed -->
<script setup>
import { useScroll } from '@vueuse/core'
import { getCategoryAPI } from '@/apis/layout'
import { onMounted, ref } from 'vue'const categoryList = ref([])  //目錄數據列表
const { y } = useScroll(window)  //獲取滾動距離
const getCategory = async () => {const res = await getCategoryAPI()categoryList.value = res.result// console.log(res)
}onMounted(() => getCategory())</script><template><div class="app-header-sticky" :class="{ show: y > 78 }"><div class="container"><RouterLink class="logo" to="/" /><!-- 導航區域 --><ul class="app-header-nav"><li class="home" v-for="item in categoryList" :key="item.id"><RouterLink to="/">{{ item.name }}</RouterLink></li></ul><div class="right"><RouterLink to="/">品牌</RouterLink><RouterLink to="/">專題</RouterLink></div></div></div>
</template><style scoped lang='scss'>
.app-header-sticky {width: 100%;height: 80px;position: fixed;left: 0;top: 0;z-index: 999;background-color: #fff;border-bottom: 1px solid #e4e4e4;// 此處為關鍵樣式!!!// 狀態一:往上平移自身高度 + 完全透明transform: translateY(-100%);opacity: 0;// 狀態二:移除平移 + 完全不透明&.show {transition: all 0.3s linear;transform: none;opacity: 1;}.container {display: flex;align-items: center;}.logo {width: 200px;height: 80px;background: url("@/assets/images/logo.png") no-repeat right 2px;background-size: 160px auto;}.right {width: 220px;display: flex;text-align: center;padding-left: 40px;border-left: 2px solid $xtxColor;a {width: 38px;margin-right: 40px;font-size: 16px;line-height: 1;&:hover {color: $xtxColor;}}}
}.app-header-nav {width: 820px;display: flex;padding-left: 40px;position: relative;z-index: 998;li {margin-right: 40px;width: 38px;text-align: center;a {font-size: 16px;line-height: 32px;height: 32px;display: inline-block;&:hover {color: $xtxColor;border-bottom: 1px solid $xtxColor;}}.active {color: $xtxColor;border-bottom: 1px solid $xtxColor;}}
}
</style>
<!-- LayoutHeader -->
<script setup>
import { getCategoryAPI } from '@/apis/layout'
import { onMounted, ref } from 'vue'const categoryList = ref([])
const getCategory = async () => {const res = await getCategoryAPI()categoryList.value = res.result// console.log(res)
}onMounted(() => getCategory())</script><template><header class='app-header'><div class="container"><h1 class="logo"><RouterLink to="/">小兔鮮~</RouterLink></h1><ul class="app-header-nav"><li class="home" v-for="item in categoryList" :key="item.id"><RouterLink to="/">{{ item.name }}</RouterLink></li></ul><div class="search"><i class="iconfont icon-search"></i><input type="text" placeholder="搜一搜"></div><!-- 頭部購物車 --></div></header>
</template>
<style scoped lang='scss'>
.app-header {background: #fff;.container {display: flex;align-items: center;}.logo {width: 200px;a {display: block;height: 132px;width: 100%;text-indent: -9999px;background: url('@/assets/images/logo.png') no-repeat center 18px / contain;}}.app-header-nav {width: 820px;display: flex;padding-left: 40px;position: relative;z-index: 998;li {margin-right: 40px;width: 38px;text-align: center;a {font-size: 16px;line-height: 32px;height: 32px;display: inline-block;&:hover {color: $xtxColor;border-bottom: 1px solid $xtxColor;}}.active {color: $xtxColor;border-bottom: 1px solid $xtxColor;}}}.search {width: 170px;height: 32px;position: relative;border-bottom: 1px solid #e7e7e7;line-height: 32px;.icon-search {font-size: 18px;margin-left: 5px;}input {width: 140px;padding-left: 5px;color: #666;}}.cart {width: 50px;.curr {height: 32px;line-height: 32px;text-align: center;position: relative;display: block;.icon-cart {font-size: 22px;}em {font-style: normal;position: absolute;right: 0;top: 0;padding: 1px 6px;line-height: 1;background: $helpColor;color: #fff;font-size: 12px;border-radius: 10px;font-family: Arial;}}}
}
</style>
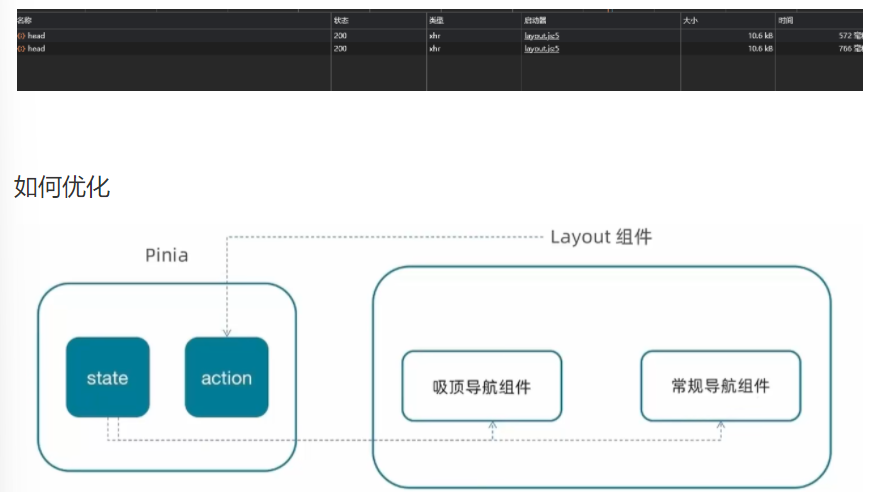
stores新增category.js
import { ref } from 'vue'
import { defineStore } from 'pinia'
import { getCategoryAPI } from '@/apis/layout'
export const useCategoryStore = defineStore('category', () => {// 導航列表的數據管理// state 導航列表數據const categoryList = ref([])// action 獲取導航數據的方法const getCategory = async () => {const res = await getCategoryAPI()categoryList.value = res.result}return {categoryList,getCategory}
})
使用:
Login文件夾的index.vue
<script setup>
//出發獲取導航列表的action
import { useCategoryStore } from '@/stores/category.js'
import { onMounted } from 'vue'const categoryStore = useCategoryStore()onMounted(() => categoryStore.getCategory())
</script>
刪掉(注釋)LoginFixed和LoginHeader中相關的代碼
<!-- LayoutFixed -->
<script setup>
import { useScroll } from '@vueuse/core'
// import { getCategoryAPI } from '@/apis/layout'
// import { onMounted, ref } from 'vue'// const categoryList = ref([])  //目錄數據列表
const { y } = useScroll(window)  //獲取滾動距離
// const getCategory = async () => {
//     const res = await getCategoryAPI()
//     categoryList.value = res.result
//     // console.log(res)
// }// onMounted(() => getCategory())// 使用pinia中的數據
import { useCategoryStore } from '@/stores/category.js'const categoryStore = useCategoryStore()</script>
<template><ul class="app-header-nav"><li class="home" v-for="item in categoryStore.categoryList" :key="item.id"><RouterLink to="/">{{ item.name }}</RouterLink></li></ul>
</template>
<script setup>
import { useCategoryStore } from '@/stores/category.js'
// import { getCategoryAPI } from '@/apis/layout'
// import { onMounted, ref } from 'vue'// const categoryList = ref([])
// const getCategory = async () => {
//     const res = await getCategoryAPI()
//     categoryList.value = res.result
//     // console.log(res)
// }// onMounted(() => getCategory())
const categoryStore = useCategoryStore()</script>
<template><ul class="app-header-nav"><li class="home" v-for="item in categoryStore.categoryList" :key="item.id"><RouterLink to="/">{{ item.name }}</RouterLink></li></ul>
</template>
OK,沒問題

小結
本篇文章,主要學習了Pinia管理數據,以及Layout的相關知識
私密馬賽,圖片有億點糊,我是在typra上面寫的,截到csdn上就糊掉了嗚嗚
祝大家學習順利!!


:網絡與信息安全基礎知識)


——設置狀態機解決跳躍問題)


)


)

)
