express框架
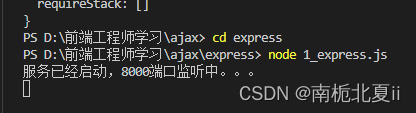
終端輸入
npm init --yes
npm i express
?請求報文/響應報文


// 1.引入express
const express = require('express');// 2.創建應用對象
const app = express();// 3.創建路由規則
// request:是對請求報文的封裝
// response:是對響應報文的封裝
app.get('/',(request,response) => {
// 設置響應response.send('hello express');
});// 4.監聽端口啟動服務
app.listen(8000,() => {console.log("服務已經啟動,8000端口監聽中。。。");
})
?Ajax-get請求
設置server.js服務端
// 1.引入express
const express = require('express');// 2.創建應用對象
const app = express();// 3.創建路由規則
// request:是對請求報文的封裝
// response:是對響應報文的封裝
app.get('/server',(request,response) => {
// 設置響應頭,設置允許跨域response.setHeader('Access-Control-Allow-Origin','*');// 設置響應體response.send("Hello ajax");});// 4.監聽端口啟動服務
app.listen(8000,() => {console.log("服務已經啟動,8000端口監聽中。。。");
})
1_get.html客戶端頁面
<!DOCTYPE html>
<html lang="en">
<head><meta charset="UTF-8"><meta http-equiv="X-UA-Compatible" content="IE=edge"><meta name="viewport" content="width=device-width, initial-scale=1.0"><title>get請求</title><style>#result {width: 200px;height: 100px;border: solid 1px #90b;}</style>
</head>
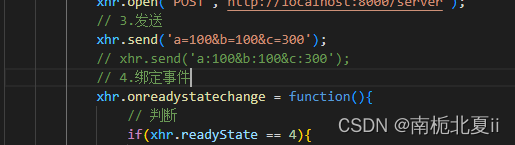
<body><button>點擊發送請求</button><div id="result"></div><script>const btn = document.getElementsByTagName('button')[0];const result = document.getElementById("result")// 綁定事件btn.onclick = function(){// ajax步驟// 1.創建對象const xhr = new XMLHttpRequest();// 2.初始化,設置請求方法和urlxhr.open("GET","http://localhost:8000/server");// 3.發送xhr.send();// 4.事件綁定,處理服務端返回的結果//on 當。。。的時候// readystate是xhr對象中的屬性,表示狀態0,1,2,3,4// change改變xhr.onreadystatechange = function(){// 判斷(服務端返回了所有的結果)if(xhr.readyState == 4){// 判斷響應狀態碼 200 404 403 401 500// 其中2xx,表示2開頭的都是表示成功if(xhr.status >= 200 && xhr.status < 300){// 處理結果,行 頭 空行 體// 1.響應行console.log(xhr.status);//狀態碼console.log(xhr.statusText);//狀態字符串console.log(xhr.getAllResponseHeaders());//所有響應頭console.log(xhr.response);//響應體// 設置result文本result.innerHTML = xhr.response;}else{}}}}</script>
</body>
</html>
ajax設置請求參數-get

?Ajax—post請求
設置server.js服務端,添加post請求
// 1.引入express
const express = require('express');// 2.創建應用對象
const app = express();// 3.創建路由規則
// request:是對請求報文的封裝
// response:是對響應報文的封裝
app.get('/server',(request,response) => {
// 設置響應頭,設置允許跨域response.setHeader('Access-Control-Allow-Origin','*');// 設置響應體response.send("Hello ajax");});app.post('/server',(request,response) => {// 設置響應頭,設置允許跨域response.setHeader('Access-Control-Allow-Origin','*');// 設置響應體response.send("Hello ajax post");});// 4.監聽端口啟動服務
app.listen(8000,() => {console.log("服務已經啟動,8000端口監聽中。。。");
})
1_post.html頁面
<!DOCTYPE html>
<html lang="en">
<head><meta charset="UTF-8"><meta http-equiv="X-UA-Compatible" content="IE=edge"><meta name="viewport" content="width=device-width, initial-scale=1.0"><title>post請求</title><style>#result {width: 200px;height: 100px;border: solid 1px #903;}</style>
</head>
<body><div id="result"></div><script>// 獲取元素對象const result = document.getElementById('result')// 綁定事件:表示只要鼠標經過就會出現ajax響應result.addEventListener('mouseover',function(){// 1.創建對象const xhr = new XMLHttpRequest();// 2.初始化,設置類型與urlxhr.open("POST",'http://localhost:8000/server');// 3.發送xhr.send();// 4.綁定事件xhr.onreadystatechange = function(){// 判斷if(xhr.readyState == 4){if(xhr.status >= 200 && xhr.status < 300){// 處理服務端返回的結果result.innerHTML = xhr.response;}}}})</script>
</body>
</html>
ajax設置請求參數-post
:對象To數組——轉換映射方式)
)


機器人柵格路徑規劃,輸出做短路徑圖和適應度曲線。)
)
:轉變思維方式,提升軟件質量)

詳解)
)
)

![BUUCTF[PWN]](http://pic.xiahunao.cn/BUUCTF[PWN])
![[Cmake Qt]找不到文件ui_xx.h的問題?有關Qt工程的問題,看這篇文章就行了。](http://pic.xiahunao.cn/[Cmake Qt]找不到文件ui_xx.h的問題?有關Qt工程的問題,看這篇文章就行了。)


