深度學習
- mlp弊端
- 卷積神經網絡
- 圖像卷積運算
- 卷積神經網絡的核心
- 池化層實現維度縮減
- 卷積神經網絡
- 卷積神經網絡兩大特點
- 卷積運算導致的兩個問題:
- 圖像填充(padding)
- 結構組合問題
- 經典CNN模型
- LeNet-5模型
- AlexNet模型
- VGG-16模型
- 經典的CNN模型用于新場景
- 實戰
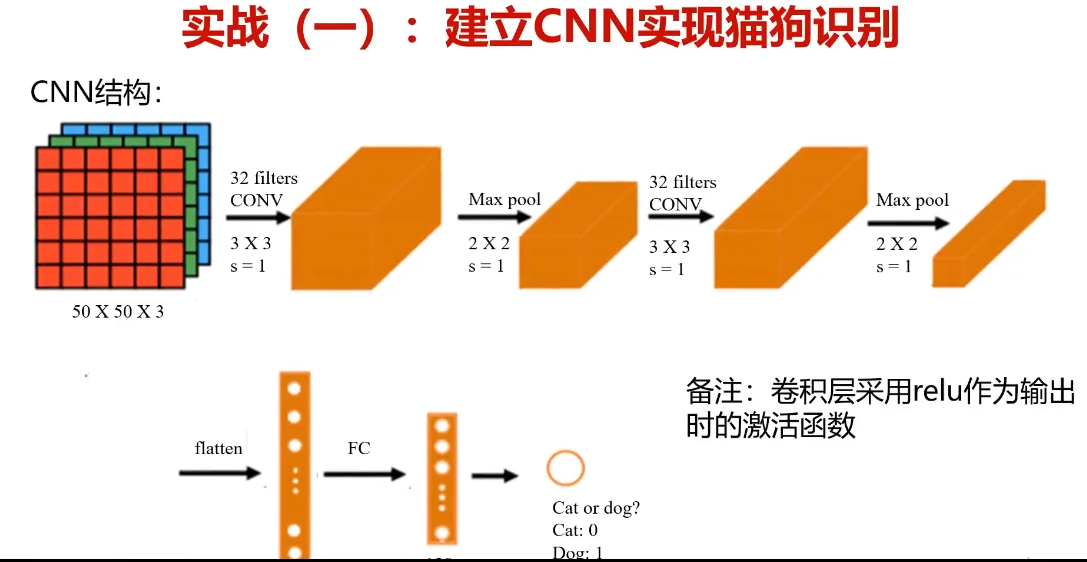
- 實戰(1):建立CNN實現貓狗識別
- 實戰(2):基于VGG16、結合mlp實現貓狗識別
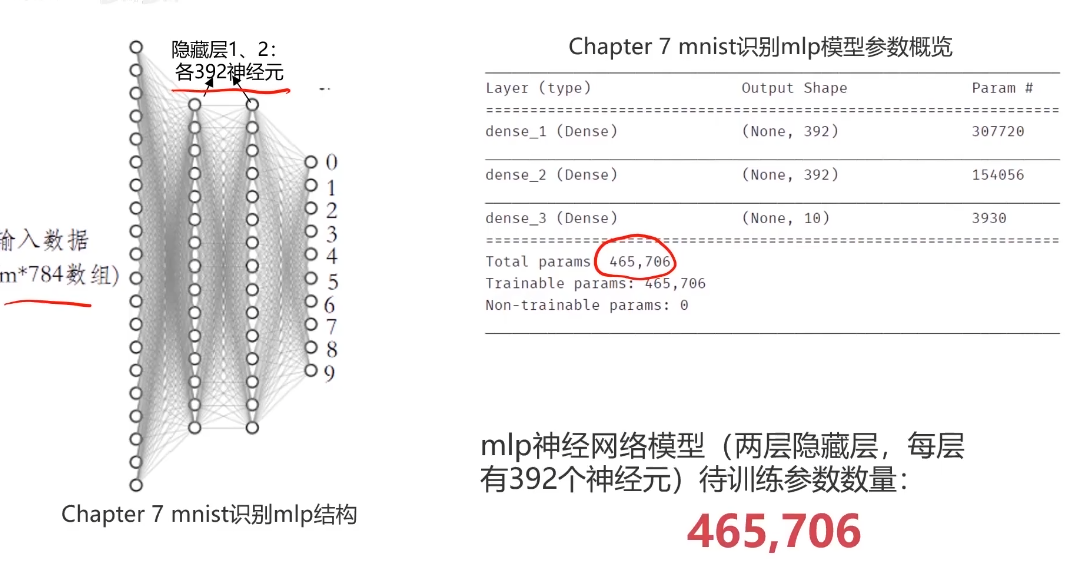
mlp弊端
mlp模型的弊端:圖片大時,參數也很多。
辦法:提取出圖像中的關鍵信息,再建立mlp模型進行訓練。
卷積神經網絡
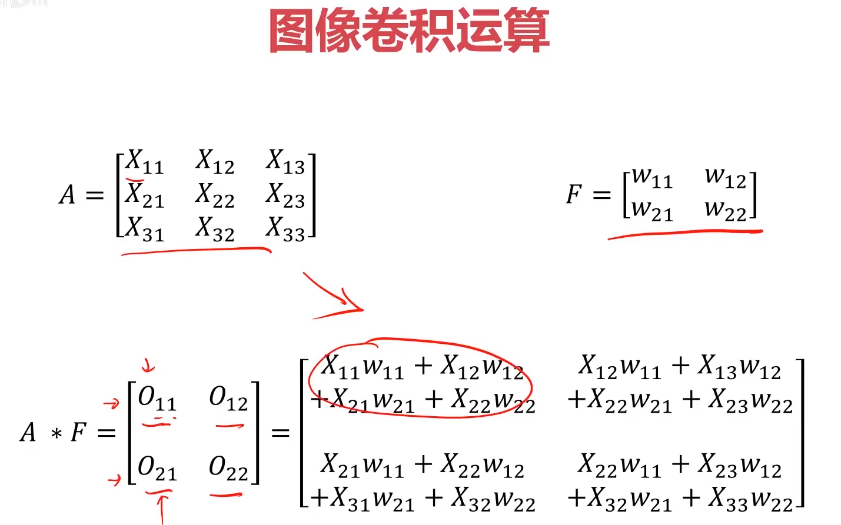
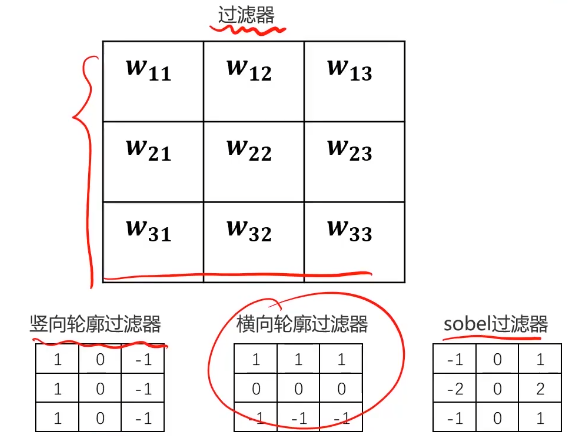
圖像卷積運算
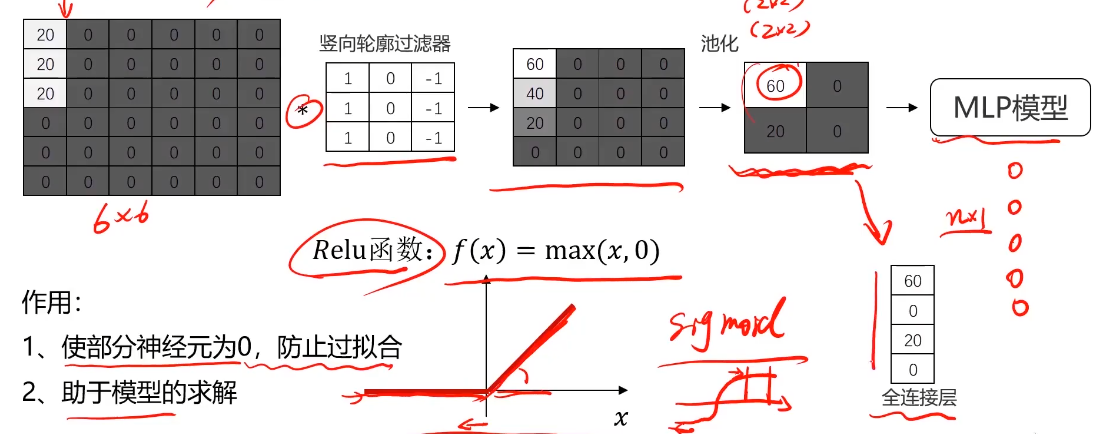
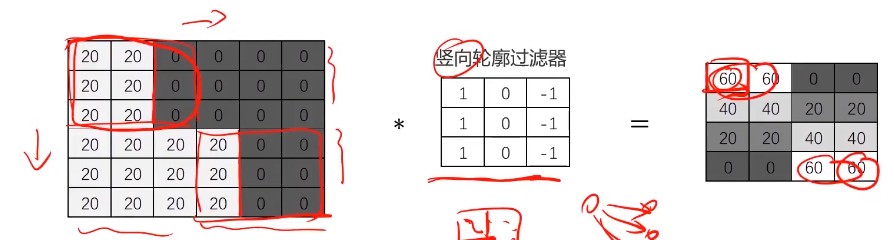
對圖像矩陣與濾波器矩陣進行對應相乘再求和運算,轉化得到新的矩陣。
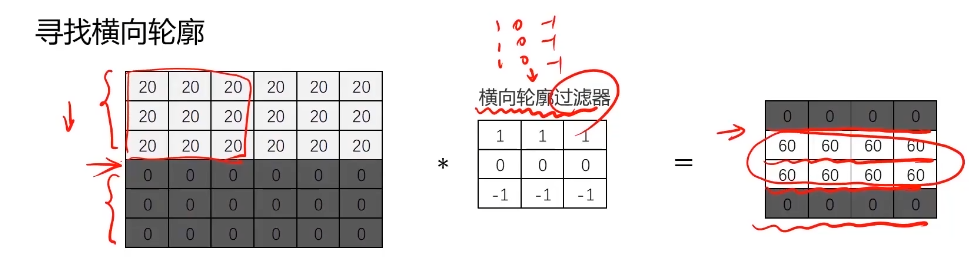
作用:快速定位圖像中某些邊緣特征
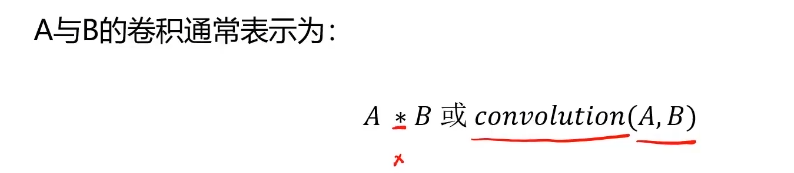
英文:convolution(卷積神經網絡:CNN)
將圖片與輪廓濾波器進行卷積運算,可快速定位固定輪廓特征的位置
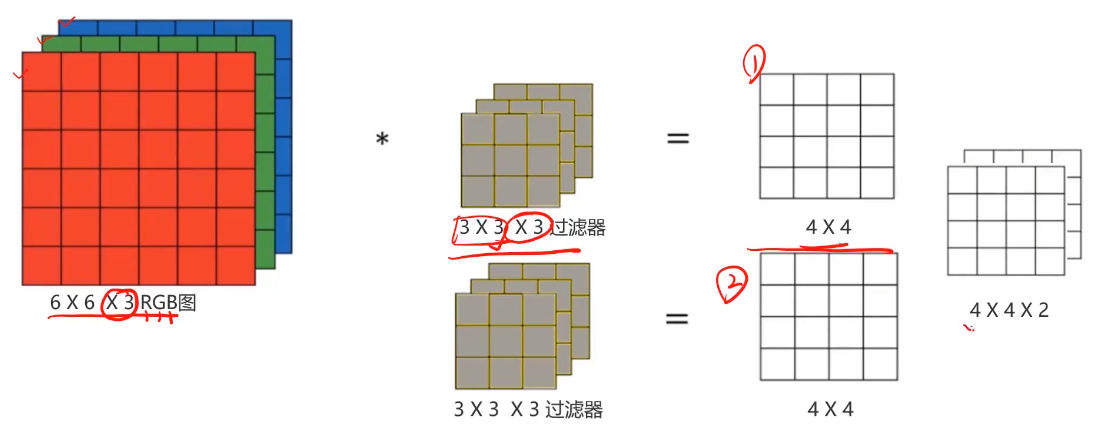
卷積神經網絡的核心
計算機根據樣本圖片,自動尋找合適的輪廓過濾器,對新圖片進行輪廓匹配
自動求解W,尋找合適的過濾器。一個過濾器不夠,需要尋找很多過濾器。
RGB圖像的卷積:對R/G/B三個通道分別求卷積再相加。(如圖,為兩個過濾器)
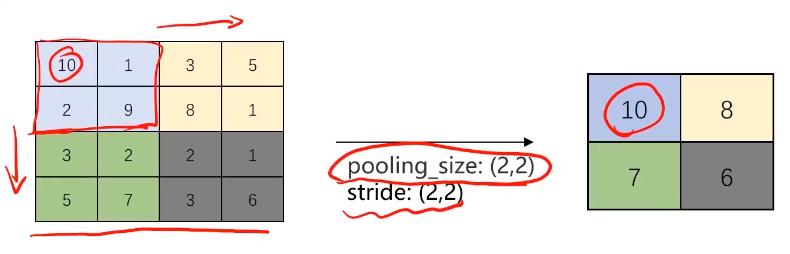
池化層實現維度縮減
池化:按照一個固定規則對圖像矩陣進行處理,將其轉換為更地維度的矩陣
Srtide為窗口滑動步長,用于池化、卷積的計算中。
保留核心信息的情況下,實現維度縮減。
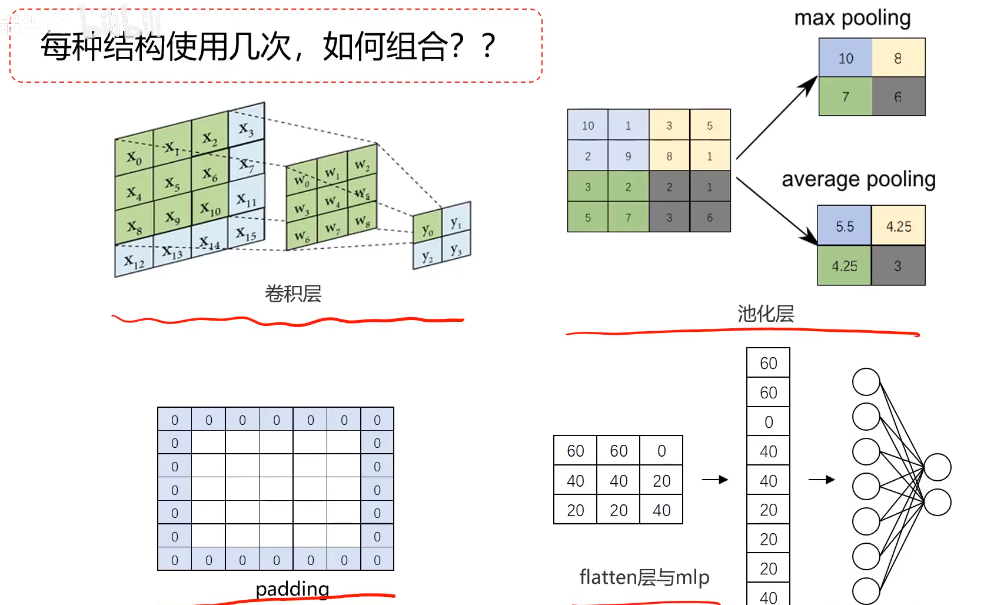
最大法池化(Max-pooling):
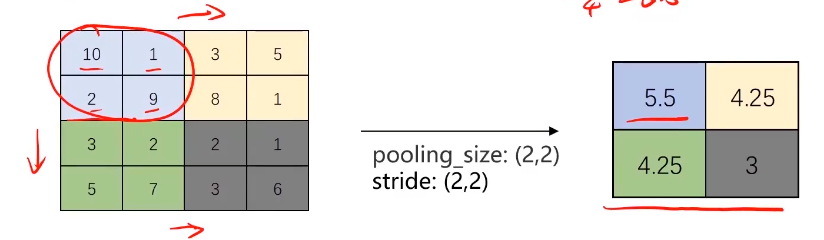
平均法池化(Avg-pooling):
卷積神經網絡
把卷積、池化、mlp先后連接在一起,組成卷積神經網絡
卷積神經網絡兩大特點
1、參數共享(parameter sharing):同一個特征過濾器可用于整張圖片
2、稀疏連接(sparsity of connections):生成的特征圖片每個節點只與原圖片中特定節點連接
卷積運算導致的兩個問題:
1、圖像被壓縮,信息丟失
2、邊緣信息使用少,容易被忽略
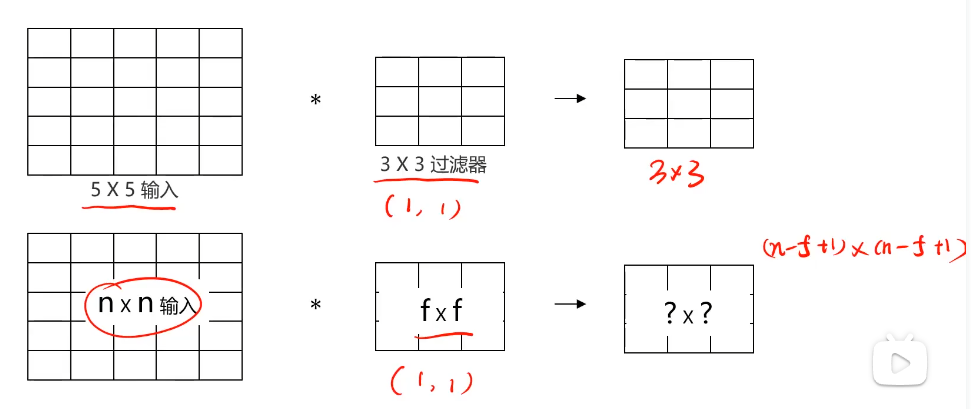
圖像填充(padding)
通過在圖像各邊添加像素,使其在進行卷積運算后維持原圖大小

通過padding增加像素的數量,由過濾器尺寸與stride決定
結構組合問題
經典CNN模型
1、參考經典CNN結構搭建新模型
2、使用經典CNN模型結構對圖像預處理,再建立MLP模型
經典CNN模型:
1、LeNet-5
2、AlexNet
3、VGG
LeNet-5模型
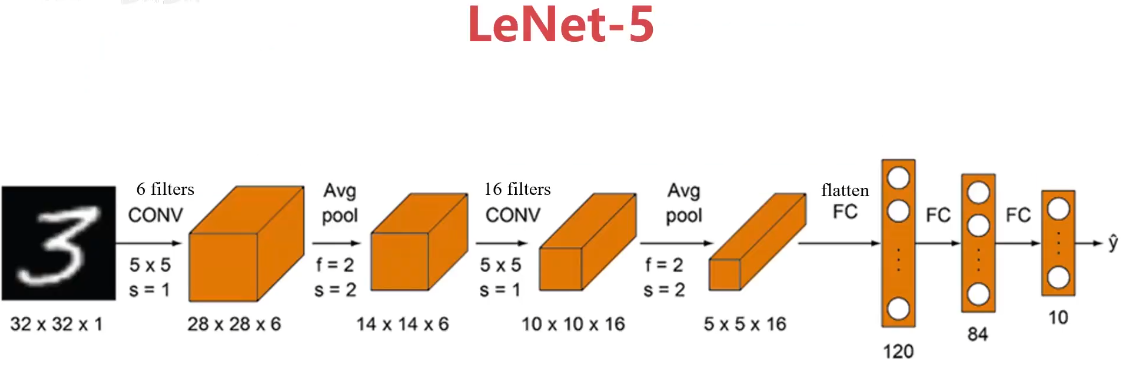
解析:第一次(32-5)/1+1=28,第二次(28-2)/2+1=14,第三次(14-5)/1+1=10,第四次(10-2)/2+1=5.
輸入圖像:32x32灰度圖,一個通道(channel)
訓練參數:約60000個
特點:
1、隨著網絡越深,圖像的高度和寬度在縮小,通道數在增加
2、卷積和池化先后成對使用
AlexNet模型
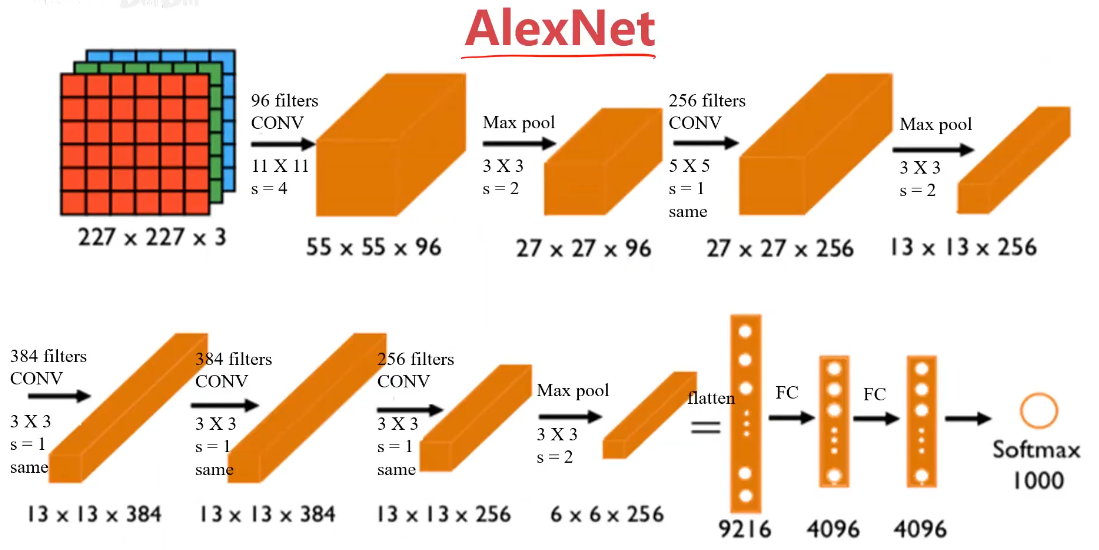
輸入圖像:227x227x3 RGB圖,3個通道
訓練參數:約60000000個
特點:
1、適用于識別較為復雜的彩色圖,可識別1000種類別
2、結構比LeNet更為復雜,使用Relu作為激活函數
結果:
學術界開始相信深度學習技術,在計算機視覺應用中可以得到很不錯的效果
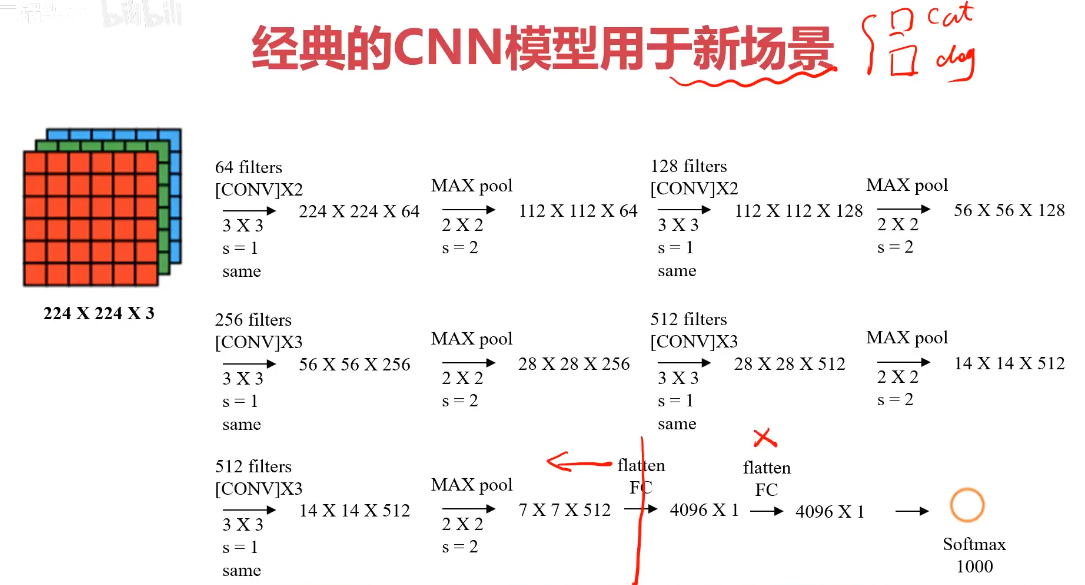
VGG-16模型

輸入圖像:227x227x3 RGB圖,3個通道
訓練參數:約138000000個
特點:
1、所有卷積層filter寬和高都是3,步長為1,padding都使用same convolution;
2、所有池化層的filter寬和高都是2,步長為2;
3、相比alexnet,有更多的filter用于提取輪廓信息,具有更高精準性;
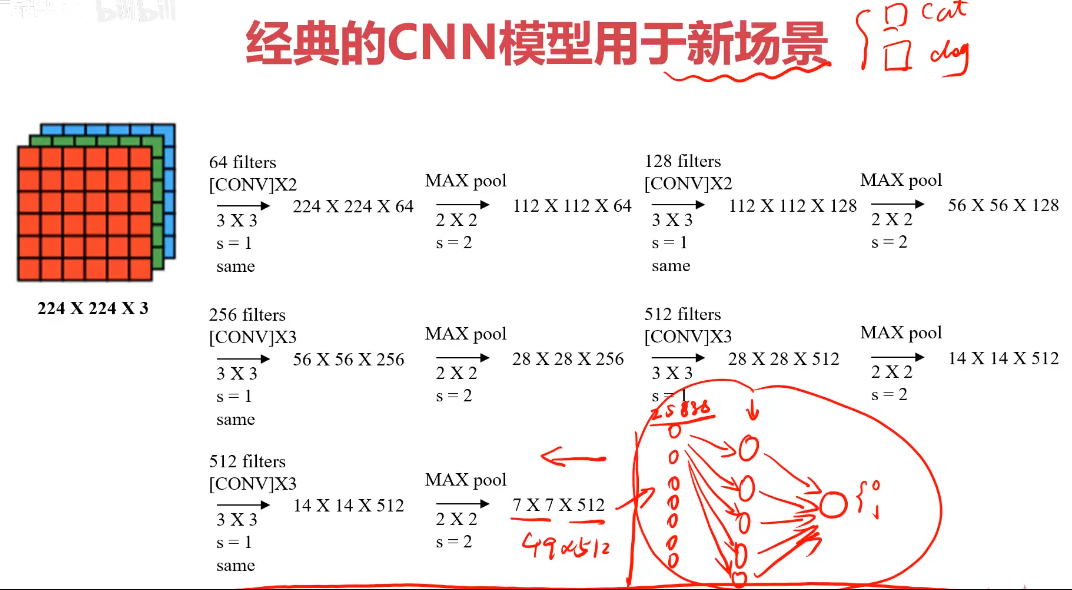
經典的CNN模型用于新場景
1、使用經典的CNN模型結構對圖像預處理,再建立MLP模型;
2、參考經典的CNN結構搭建新模型
1、加載經典的CNN模型,剝除其FC層,對圖像進行預處理
2、把預處理完成的數據作為輸入,分類結果為輸出,建立一個mlp模型
3、模型訓練
實戰
實戰(1):建立CNN實現貓狗識別
任務:基于dataset/training_set數據,根據提供的結構,建立CNN模型
1、識別圖片中的貓/狗、計算dataset/test_set測試數據預測準確率
2、從網站下載貓/狗圖片,對其進行預測
#load the data
from keras.preprocessing.image import ImageDataGenrator
train_datagen = ImageDataGenerator(rescale=1./255)
training_set = train_datagen.flow_from_directory('./dataset/training_set',target_size=(50,50),batch_size=32,class_mode='binary')#set up the cnn model
from keras.models import Sequential
form keras.layers import Conv2D, MaxPool2D, Flatten, Dense
model = Sequential()
#卷積層
model.add(Conv2D(32,(3,3),input_shape=(50,50,3),activation='relu'))
#池化層
model.add(MaxPool2D(pool_size=(2,2)))
#卷積層
model.add(Conv2D(32,(3,3),activation='relu'))
#池化層
model.add(MaxPool2D(pool_size=(2,2)))
#flattening layer
model.add(Flatten())
#FC layer
model.add(Dense(units=128,activation='relu'))
model.add(Dense(units=1,activation='sigmoid'))#configure the model
model.compile(optimizer='adam',loss='binary_crossentropy',metrics=['accuracy'])
model.summary()#train the model
model.fit_generator(training_set,epochs=25)
#accuracy on the training data
accuracy_train = model.evaluate_generator(training_set)
print(accuracy_train)
#accuracy on the test data
test_set = train_datagen.flow_from_directory('./dataset/test_set',target_size=(50,50),batch_size=32,class_mode='binary')
accuracy_test = model.evaluate_generator(test_set)
print(accuracy_test)#load single image
from keras.preprocessing.image import load_img, img_to_array
pic_dog = 'dog.jpg'
pic_dog = load_img(pic_dog,target_size=(50,50))
pic_dog = img_to_array(pic_dog)
pic_dog = pic_dog/255
pic_dog = pic_dog.reshape(1,50,50,3)
result = model.predict_classes(pic_dog)
print(result)pic_cat = 'cat.jpg'
pic_cat = load_img(pic_cat,target_size=(50,50))
pic_cat = img_to_array(pic_cat)
pic_cat = pic_cat/255
pic_cat = pic_cat.reshape(1,50,50,3)
result = model.predict_classes(pic_cat)
print(result)
#補充說明,以下方法可以查看輸出的數字是什么標簽,如'cat':0,'dogs':1
training_set.class_indices
#make prediction on multiple images
import matplotlib as mlp
font2 = {'family':'SomHei','weight':'normal','size': 20,}
mlp.rcParams['font.family'] = 'SimHei'
mlp.rcParams['axes.unicode_minus'] = False
from matplotlib import pyplot as plt
from matplotlib.image import imread
from keras.preprocessing.image import load_img
from keras.preprocessing.image import img_to_array
from keras.models import load_model
a = [i for range(1,10)]
fig = plt.figure(figsize=(10,10))
for i in a:img_name = str(i)+'.jpg'img_ori = load_img(img_name,target_size=(50,50))img = img_to_array(img_ori)img = img.astype('float32')/255img = img.reshape(1,50,50,3)result = model.predict_classes(img)img_ori = load_img(img_name, target_size=(250,250))plt.subplot(3,3,i)plt.imshow(img_ori)plt.title('預測為:狗狗' if result[0][0] == 1 else '預測為:貓咪')
plt.show()
實戰(2):基于VGG16、結合mlp實現貓狗識別
任務:使用VGG16的結構提取圖像特征,再根據特征建立mlp模型,實現貓狗圖像識別。訓練/測試數據:dataset\data_vgg
1、對數據進行分離、計算測試數據預測準確率
2、從網站下載貓/狗圖片,對其進行預測
備注:mlp模型只有一個隱藏層(10個神經元)
#load the data
from keras.preprocessing.image import load_img,img_to_array
img_path = '1.jpg'
img = load_img(img_path,target_size=(224,224))
img = img_to_array(img)
type(img)from karas.applications.vgg16 import VGG16
from keras.applications.vgg16 import preprocess_input
import numpy as nn
model_vgg = VGG16(weights='imagenet',include_top=False)
x = np.expand_dims(img,axis=0)
x = preprocess_input(x)
print(x.shape)#特征提取
features = model_vgg.predict(x)
print(features.shape)
#flatten
features = features.reshape(1,7*7*512)
print(features.shape)
#visualize the data
%matplotlib inline
from matplotlib import pyplot as plt
fig = plt.figure(figsize=(5,5))
img = load_img(img_path,target_size=(224,224))
plt.imshow(img)
#此處為批量處理
#load image and preprocess it with vgg16 structure
from keras.preprocessing.image import img_to_array,load_img
from keras.applications.vgg16 import VGG16
from keras.applications.vgg16 import preprocess_input
import numpy as npmodel_vgg = VGG16(weight='imagent',include_top=False)
#define a method to load and preprocess the image
def modelProcess(img_path,model):img = load_img(img_path, target_size=(224,224))img = img_to_array(img)x = np.expand_dims(img,axis=0)x = preprocess_input(x)x_vgg = model.predict(x)x_vgg = x_vgg.reshape(1,25088)return x_vgg#list file names of the training datasets
import os
folder = "dataset/data_vgg/cats"
dirs = os.listdir(folder)
#generate path for the images
img_path = []
for i in dirs:if os.path.splitext(i)[1] == ".jpg":img_path.append(i)
img_path = [folder+"//"+i for i in img_path]#preprocess multiple images
features1 = np.zeros([len(img_path),25088])
for i in range(len(img_path)):feature_i = modelProcess(img_path[i],model_vgg)print('preprocessed:',img_path[i])features1[i] = feature_ifolder = "dataset/data_vgg/dogs"
dirs = os.listdir(folder)
#generate path for the images
img_path = []
for i in dirs:if os.path.splitext(i)[1] == ".jpg":img_path.append(i)
img_path = [folder+"//"+i for i in img_path]
#preprocess multiple images
features2 = np.zeros([len(img_path),25088])
for i in range(len(img_path)):feature_i = modelProcess(img_path[i],model_vgg)print('preprocessed:',img_path[i])features2[i] = feature_i#label the results
print(features1.shape,features2.shape)
y1 = np.zeros(300)
y2 = np.ones(300)#generate the training data
X = np.concatenate((features1,features2),axis=0)
y = np.concatenate((y1,y2),axis=0)
y = y.reshape(-1,1)
print(X.shape,y.shape)#split the training and test data
from sklearn.model_selection import train_test_split
X_train,y_trian,X_test,y_test = train_test_split(X,y,test_size=0.3,random_state=50)
pirnt(X_train.shape,X_test.shape,X/shape)#set up the mlp model
from keras.models import Sequential
from keras.layers import Dense
model = Sequential()
model.add(Dense(units=10,activation='relu',input_dim=25088))
model.add(Dense(units=1,activation='sigmoid'))
model.summary()
#configure the model
model.compile(optimizer='adam',loss='binary_crossentropy',metric=['accuracy'])
#train the model
model.fit(X_train,y_train,epochs=50)from sklearn.metrics import accuracy_score
y_train_predict = model.predict_classes(X_train)
accuracy_train = accuracy_score(y_train,y_train_predict)
print(accuracy_train)#測試準確率
y_test_predict = model.predict_classes(X_test)
accuracy_test = accuracy_score(y_test,y_test_predict)
print(accuracy_test)# coding:utf-8 批量處理圖片
import matplotlib as mlp
font2 = { 'family' : 'SimHei','weight' : 'normal','size'   : 20,
}
mlp.rcParams['font.family'] = 'SimHei'
mlp.rcParams['axes.unicode_minus'] = False
from matplotlib import pyplot as plt
from matplotlib.image import imread
from keras.preprocessing.image import load_img
from keras.preprocessing.image import img_to_array
from keras.models import load_model
#from cv2 import load_img
a = [i for i in range(1,10)]
fig = plt.figure(figsize=(10,10))
for i in a:img_name = str(i)+'.jpg'img_path = img_nameimg = load_img(img_path, target_size=(224, 224))img = img_to_array(img)x = np.expand_dims(img,axis=0)x = preprocess_input(x)x_vgg = model_vgg.predict(x)x_vgg = x_vgg.reshape(4,25088)result = model.predict_classes(x_vgg)img_ori = load_img(img_name, target_size=(250, 250))plt.subplot(3,3,i)plt.imshow(img_ori)plt.title('預測為:狗狗' if result[0][0] == 1 else '預測為:貓咪')
plt.show()


)
)


(support))

)


 堆指令部件模塊實驗)
——閱讀版——仔細閱讀題)

-上下文壓縮與過濾)
