左側菜單導航
- 一、一級菜單
- 二、二級菜單
- 三、三級菜單
- 1、加入相關事件
- 四、菜單點擊跳轉
- 1. 創建新頁面
- 2. 配置路由
- 3. 菜單中加入路由配置
- 4、處理默認的Main窗口為空的情況
- 五、動態左側菜單導航
- 1、動態實現一級菜單
- 2、動態實現二級菜單
一、一級菜單
在之前的Aside.vue中去實現代碼,一級菜單其實非常的簡單,直接用el-menu 和el-menu-item 就行,Aside.vue代碼如下:
<template><el-menu><el-menu-item>一級菜單1</el-menu-item><el-menu-item>一級菜單2</el-menu-item><el-menu-item>一級菜單3</el-menu-item></el-menu>
</template><script>
export default {name: "Aside",
};
</script><style scoped>
</style>

- 設置菜單背景顏色和文字顏色
- 在el-menu中設置 background-color 和 text-color 屬性
- 設置選中后菜單文字顏色
- 設置 active-text-color 屬性,但是必須在需要生效的子菜單中設置index屬性,否則不生效,先不設置index
- 設置默認的選中菜單
- 設置default-active為對應的index值即可
- 比如我設置默認選中第2個菜單,第2個菜單的index為2,所以我們在el-menu中加入 default-active=“2”
- 在菜單中加入圖標
- 用 i 標簽即可,在菜單名前面加入
<i class=“el-icon-XXX”>,XXX是圖標的名稱。
- 用 i 標簽即可,在菜單名前面加入
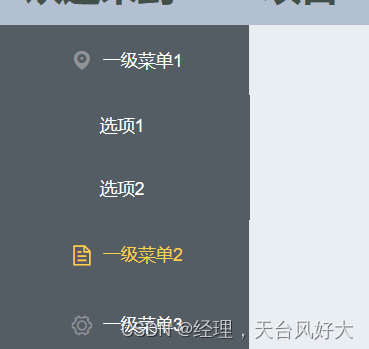
效果如圖所示:

一級菜單全部代碼
<template><el-menubackground-color="#545c64"text-color="#ffffff"active-text-color="#ffd04b"default-active="2"><el-menu-item index="1"><i class="el-icon-location"></i>一級菜單1</el-menu-item><el-menu-item index="2"><i class="el-icon-document"></i>一級菜單2</el-menu-item><el-menu-item index="3"><i class="el-icon-setting"></i>一級菜單3</el-menu-item></el-menu>
</template><script>
export default {name: "Aside",
};
</script><style scoped>
.el-icon-location,
.el-icon-document,
.el-icon-setting {display: inline-flex;align-items: center;justify-content: center;
}
</style>
二、二級菜單
<div><el-menu background-color="#545c64" text-color="#ffffff"active-text-color="#ffd04b" default-active="2" ><el-submenu index="1"><template slot="title"><i class="el-icon-location"></i><span>一級菜單1</span></template><el-menu-item index="1-1">選項1</el-menu-item><el-menu-item index="1-2">選項2</el-menu-item></el-submenu><el-menu-item index="2"><i class="el-icon-document"></i>一級菜單2</el-menu-item><el-menu-item index="3"><i class="el-icon-setting"></i>一級菜單3</el-menu-item></el-menu></div>
修改步驟:
- 將
el-menu修改為el-submenu - 按鈕名稱、圖標用
template標簽包裹,必須加入slot="title"屬性,否則菜單樣式不對。 - 加入新的兩個
el-menu-item。
參考代碼:
由于之前挖過一個坑,就是global.css里面的height,之前也提到過,所以要設置一下,
el-submenu的高度,具體的參考代碼
<template><div><el-menubackground-color="#545c64"text-color="#ffffff"active-text-color="#ffd04b"default-active="2"><el-submenu index="1"><template slot="title"><i class="el-icon-location"></i><span>一級菜單1</span></template><el-menu-item index="1-1">選項1</el-menu-item><el-menu-item index="1-2">選項2</el-menu-item></el-submenu><el-menu-item index="2"><i class="el-icon-document"></i>一級菜單2</el-menu-item><el-menu-item index="3"><i class="el-icon-setting"></i>一級菜單3</el-menu-item></el-menu></div>
</template><script>
export default {name: "Aside",
};
</script><style scoped>
.el-submenu {height: auto;
}
.el-icon-location,
.el-icon-document,
.el-icon-setting {display: inline-flex;align-items: center;justify-content: center;
}
</style>
三、三級菜單
跟二級菜單的修改方式是一樣的,就是多加一層
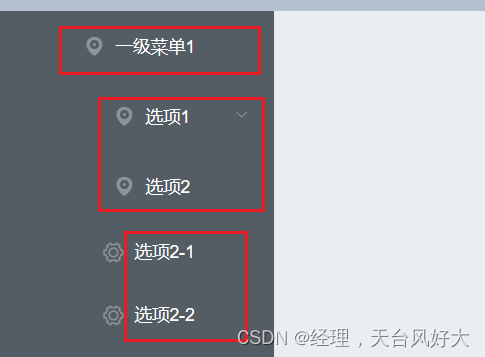
參考代碼:
<template><div><el-menubackground-color="#545c64"text-color="#ffffff"active-text-color="#ffd04b"default-active="2"><el-submenu index="1"><template slot="title"><i class="el-icon-location"></i><span>一級菜單1</span></template><el-submenu index="1-1"><template slot="title"><i class="el-icon-location"></i><span>選項1</span></template><el-menu-item index="1-1-1"><i class="el-icon-document"></i>選項1-1</el-menu-item><el-menu-item index="1-1-2"><i class="el-icon-document"></i>選項1-2</el-menu-item></el-submenu><el-submenu index="1-2"><template slot="title"><i class="el-icon-location"></i><span>選項2</span></template><el-menu-item index="1-2-1"><i class="el-icon-setting"></i>選項2-1</el-menu-item><el-menu-item index="1-2-2"><i class="el-icon-setting"></i>選項2-2</el-menu-item></el-submenu></el-submenu><el-menu-item index="2"><i class="el-icon-document"></i>一級菜單2</el-menu-item><el-menu-item index="3"><i class="el-icon-setting"></i>一級菜單3</el-menu-item></el-menu></div>
</template><script>
export default {name: "Aside",
};
</script><style scoped>
.el-submenu {height: auto;
}
.el-icon-location,
.el-icon-document,
.el-icon-setting {display: inline-flex;align-items: center;justify-content: center;
}
</style>
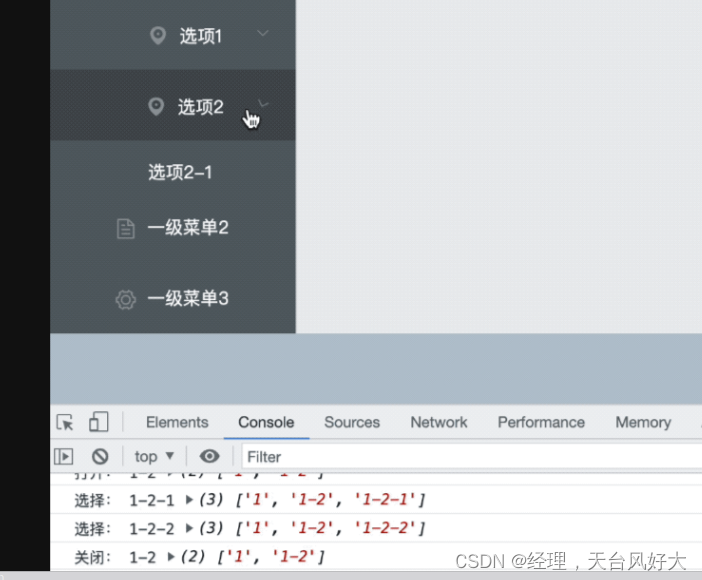
1、加入相關事件
打開open、關閉close、選擇select 3個事件
在el-menu中加入三個事件屬性,并編寫對應的method
全部參考代碼:
<template><div><el-menubackground-color="#545c64"text-color="#ffffff"active-text-color="#ffd04b"default-active="2"@open="handleOpen"@close="handleClose"@select="handSelect"><el-submenu index="1"><template slot="title"><i class="el-icon-location"></i><span>一級菜單1</span></template><el-submenu index="1-1"><template slot="title"><i class="el-icon-location"></i><span>選項1</span></template><el-menu-item index="1-1-1"><i class="el-icon-document"></i>選項1-1</el-menu-item><el-menu-item index="1-1-2"><i class="el-icon-document"></i>選項1-2</el-menu-item></el-submenu><el-submenu index="1-2"><template slot="title"><i class="el-icon-location"></i><span>選項2</span></template><el-menu-item index="1-2-1"><i class="el-icon-setting"></i>選項2-1</el-menu-item><el-menu-item index="1-2-2"><i class="el-icon-setting"></i>選項2-2</el-menu-item></el-submenu></el-submenu><el-menu-item index="2"><i class="el-icon-document"></i>一級菜單2</el-menu-item><el-menu-item index="3"><i class="el-icon-setting"></i>一級菜單3</el-menu-item></el-menu></div>
</template><script>
export default {name: "Aside",methods: {handleOpen(key, keyPath) {console.log("打開:", key, keyPath);},handleClose(key, keyPath) {console.log("關閉:", key, keyPath);},handSelect(key, keyPath) {console.log("選擇:", key, keyPath);},},
};
</script><style scoped>
.el-submenu {height: auto;
}
.el-icon-location,
.el-icon-document,
.el-icon-setting {display: inline-flex;align-items: center;justify-content: center;
}
</style>
四、菜單點擊跳轉
當點擊菜單項,能夠在右邊的Main窗口中顯示對應的頁面。
1. 創建新頁面
在 Main/ 文件夾下創建三個頁面,如圖所示

代碼如下:
<template><div>這是Main1</div>
</template><script>export default {name: "Main1"}
</script><style scoped>
</style>
2. 配置路由
- 安裝配置路由
- 在src下創建
router/index.js - 創建了主路由index,就是進入的主頁面
- 這3個index子路由,用來跳轉,分別對應 main1、main2、main3 幾個頁面。
- 子路由的跳轉位置為,index的Main位置,因為我們管理系統只需要Main位置發生改變,頭部、左邊導航、下方footer是不需要改變的。
安裝路由
npm install vue-router@3.5.2
注意:
- vue2搭配vue-router3
- vue3搭配vue-router4
在main.js中注冊router,讓路由生效
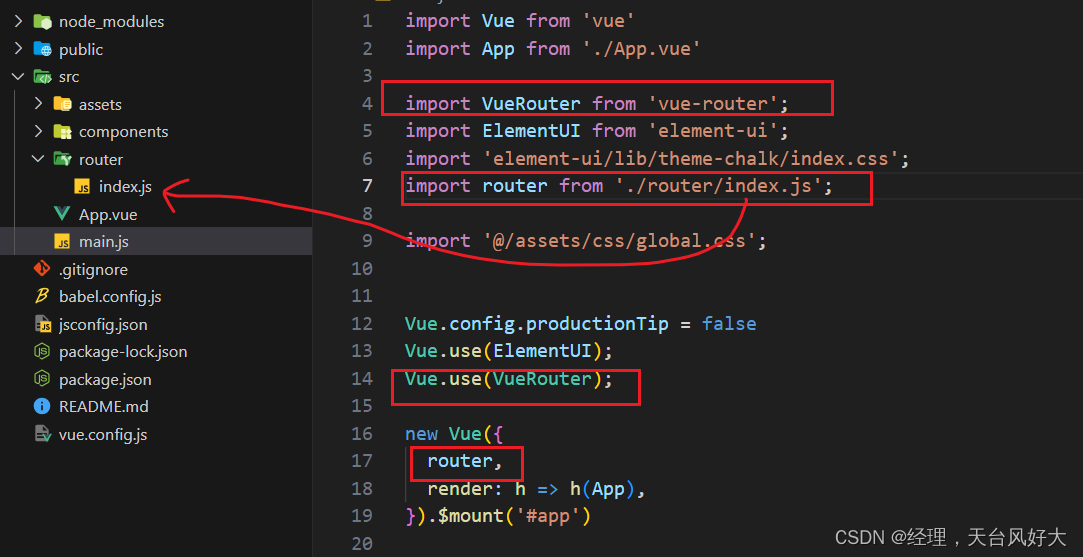
router/index.js代碼如下:
import VueRouter from "vue-router"
import Index from "@/components/Index";const routes = [//一級路由{path: '/index',name: 'index',component: Index,//路由嵌套children:[{path: '/index/menu1',component: () => import('@/components/Main/Main1.vue')},{path: '/index/menu2',component: () => import('@/components/Main/Main2.vue')},{path: '/index/menu3',component: () => import('@/components/Main/Main3.vue')}]}
]const router = new VueRouter({mode:'history',routes
})export  default router;
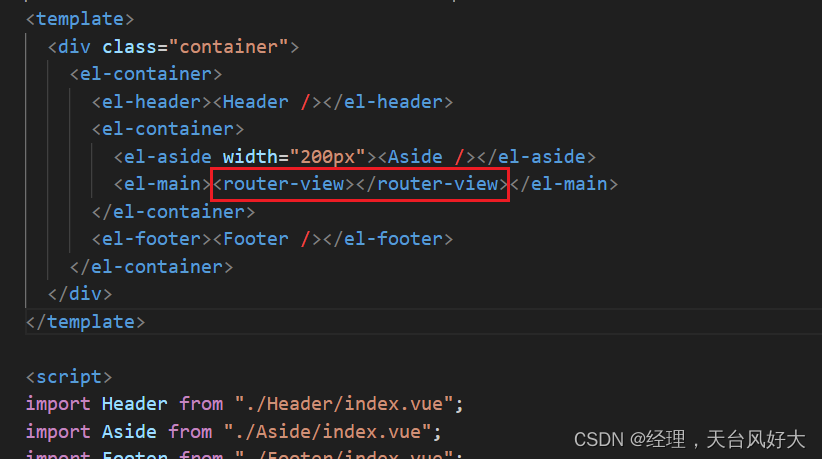
在原來的Index.vue頁面,設置路由跳轉位置,這里我們在原來的<Main />位置修改位 router-view即可。
3. 菜單中加入路由配置
- 這里我們使用一級菜單,簡單方便,修改
Aside/index.vue的代碼。 - 在
el-menu里面加入router屬性 - 在
el-menu-item的index,設置對應的子路由
代碼參考如下:
<template><div style="height: 100%"><el-menubackground-color="#545c64"text-color="#ffffff"active-text-color="#ffd04b"class="el-menu-vertical-demo"router><el-menu-item index="/index/menu1"><i class="el-icon-location"></i>一級菜單1</el-menu-item><el-menu-item index="/index/menu2"><i class="el-icon-document"></i>一級菜單2</el-menu-item><el-menu-item index="/index/menu3"><i class="el-icon-setting"></i>一級菜單3</el-menu-item></el-menu></div>
</template><script>
export default {name: "Aside",
};
</script><style scoped>
.el-icon-location,
.el-icon-document,
.el-icon-setting {display: inline-flex;align-items: center;justify-content: center;
}
</style>
我們進入index主路由,發現頁面是空的
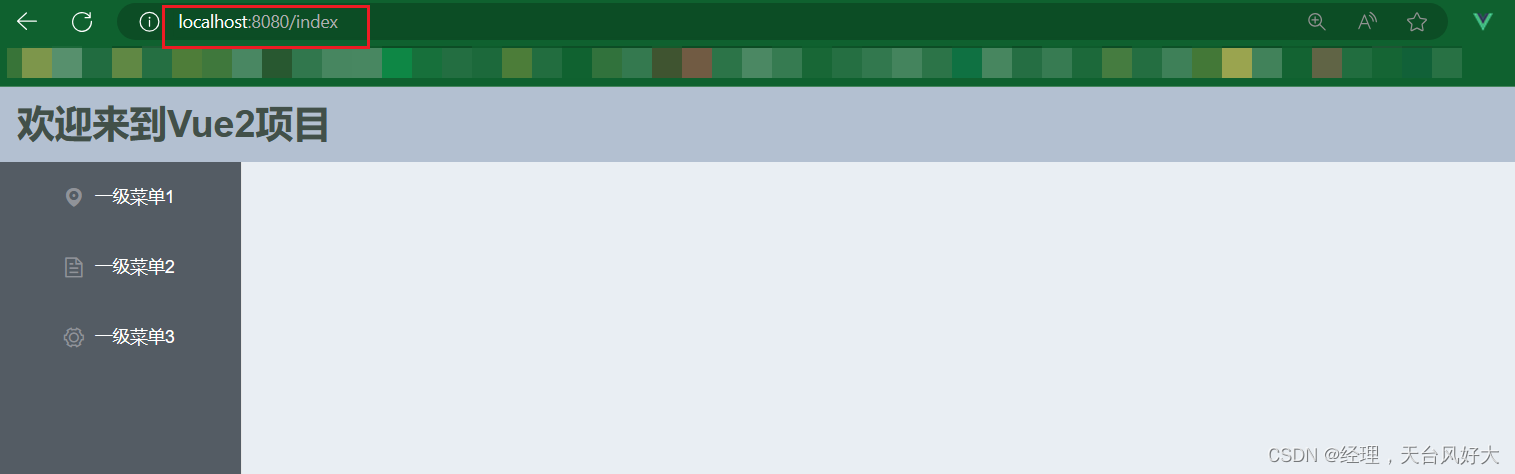
點擊左側導航菜單,就會有對應的頁面內容

4、處理默認的Main窗口為空的情況
設置默認的跳轉位置,設置如下:
- 在子路由中添加一個新的路由,用來默認跳轉
- 在主路由中配置redirect 值為這個子路由
router/index.js的代碼如下
import VueRouter from "vue-router"
import Index from "@/components/Index";const routes = [//一級路由{path: '/index',name: 'index',component: Index,redirect: 'index/Main',//路由嵌套children:[{path: '/index/Main',component: () => import('@/components/Main/index.vue')},{path: '/index/menu1',component: () => import('@/components/Main/Main1.vue')},{path: '/index/menu2',component: () => import('@/components/Main/Main2.vue')},{path: '/index/menu3',component: () => import('@/components/Main/Main3.vue')}]}
]const router = new VueRouter({mode:'history',routes
})export  default router;
其實就是一個重定向的操作,當直接輸入index路由時就會默認跳轉到Main路由里面,這樣就會有個默認的頁面了。
下方我們在地址欄只輸入到index,敲回車后,會在后面默認加上 “/Main”,直接重定向了,同時Main窗口的頁面也顯示了我們指定的頁面。

五、動態左側菜單導航
在項目中,比較多見的是會將菜單存儲到后臺的數據庫中,通過返回數據來決定菜單的模樣,并不是由前端來控制菜單的模樣,所以就來實現動態的菜單導航,根據后臺數據來生成菜單導航。

1、動態實現一級菜單
分析上述代碼,其中代碼
<el-menu-item index=“/index/menu1”>一級菜單1</el-menu-item>是比較相似的,不同的地方有3個:
- index 表示路由的path
- 圖標的名稱
- 菜單的名稱
基于以上幾個不同,我們可以考慮設置一個數組,數組的元素包含 路由路徑、圖標名、菜單名等幾個屬性,然后以循環的方式來輸出這個菜單。
實現代碼:
<template><div style="height: 100%"><el-menubackground-color="#545c64"text-color="#ffffff"active-text-color="#ffd04b"class="el-menu-vertical-demo"router><el-menu-item:index="item.path"v-for="item in menu_data":key="item.name"><i :class="item.icon"></i>{{ item.name }}</el-menu-item></el-menu></div>
</template><script>
export default {name: "Aside",data() {return {menu_data: [{name: "一級菜單1",icon: "el-icon-location",path: "/index/menu1",},{name: "一級菜單2",icon: "el-icon-document",path: "/index/menu2",},{name: "一級菜單3",icon: "el-icon-setting",path: "/index/menu3",},],};},
};
</script><style scoped>
.el-icon-location,
.el-icon-document,
.el-icon-setting {display: inline-flex;align-items: center;justify-content: center;
}
</style>
- 菜單數據menu_data包含3個元素,每個元素分別有name、icon和path屬性,這個三個屬性分別對應菜單名、圖標、路由的路徑。
- 使用v-for循環menu_data,填入對應的屬性就可。
2、動態實現二級菜單
在一級菜單的數據對象里面加入 child 屬性,這個屬性也是跟現在的菜單數據menu_data一樣的,
child也是一個數組,包含多個元素,每個元素分別有name、icon和path屬性,這個三個屬性分別對應菜單名、圖標、路由的路徑。

參考代碼:
<template><div style="height: 100%"><el-menubackground-color="#545c64"text-color="#ffffff"active-text-color="#ffd04b"class="el-menu-vertical-demo"router><el-submenu :index="item.path" v-for="item in menu_data" :key="item.name"><template slot="title"><i :class="item.icon"></i><span>{{ item.name }}</span></template><el-menu-item:index="child.path"v-for="child in item.child":key="child.name"><i :class="child.icon"></i>{{ child.name }}</el-menu-item></el-submenu></el-menu></div>
</template><script>
export default {name: "Aside",data() {return {menu_data: [{name: "一級菜單1",icon: "el-icon-location",path: "/index/menu1",child: [{name: "二級菜單1-1",icon: "el-icon-user",path: "/index/menu11",},{name: "二級菜單1-2",icon: "el-icon-user-solid",path: "/index/menu12",},],},{name: "一級菜單2",icon: "el-icon-document",path: "/index/menu2",child: [{name: "二級菜單2-1",icon: "el-icon-star-on",path: "/index/menu21",},{name: "二級菜單2-2",icon: "el-icon-star-off",path: "/index/menu22",},],},{name: "一級菜單3",icon: "el-icon-setting",path: "/index/menu3",child: [{name: "二級菜單3-1",icon: "el-icon-s-help",path: "/index/menu31",},{name: "二級菜單3-2",icon: "el-icon-help",path: "/index/menu32",},],},],};},
};
</script><style scoped>
.el-submenu{height: auto;
}.el-icon-help,
.el-icon-s-help,
.el-icon-star-off,
.el-icon-star-on,
.el-icon-user-solid,
.el-icon-user,
.el-icon-location,
.el-icon-document,
.el-icon-setting {display: inline-flex;align-items: center;justify-content: center;
}
</style>

)


)
python小高組決賽真題)


)
