文章目錄
- 概要
- 通用配置
- 不考慮間隔代碼實現
- 考慮間隔代碼實現
- 小結
概要
概要:
拼圖效果是一種將圖像切割為相鄰正方形并重新排列的藝術效果。在生成拼圖效果時,可以考慮不同的模式,包括是否考慮間隔和如何處理不能整除的部分。
不考慮間隔,忽略不能整除部分:
相鄰正方形之間沒有間隔,同時高度不能整除的部分直接被忽略。
示例圖中展示了正方形緊密排列,沒有任何間隔,不整除的部分被舍棄。

不考慮間隔,對不能整除部分進行空白填充:
相鄰正方形之間沒有間隔,同時對高度不能整除的部分進行白色填充。
示例圖中呈現了正方形之間無縫連接,高度不能整除的部分填充為白色。

考慮間隔,忽略不能整除部分:
相鄰正方形之間存在間隙,間隔距離為3像素,同時高度不能整除的部分直接被忽略。
示例圖中顯示了正方形之間的間隔,不整除的部分被舍棄。

考慮間隔,對不能整除部分進行空白填充:
相鄰正方形之間存在間隙,間隔距離為3像素,同時對高度不能整除的部分進行白色填充。
示例圖中演示了正方形之間的間隔,高度不能整除的部分填充為白色。

通用配置
為了統一上述代碼,我們設置通用配置項如下:
config = {"cell_num":7,"whether_crop_image_height": True,"whether_with_gap": True,"gap_width":3
}
上述配置中,各項含義如下:
cell_num: 表示每行劃分格子個數
whether_crop_image_height: 表示是否對高度不能整除部分進行空白填充
whether_with_gap: 表示相鄰正方形之間是否存在間隔
gap_width: 表示相鄰正方形間間隔的大小
不考慮間隔代碼實現
1). 獲取每行格子數目和輸入圖像信息
w_count = config['cell_num']
src_height = img.shape[0]
src_width = img.shape[1]
2).計算每個格子的長度以及結果圖像的寬度
sub_length = int(src_width / w_count)
new_width = sub_length * w_count
3).根據是否需要對高度進行空白填充,計算結果圖像的高度
if config['whether_crop_image_height']:h_count = int(src_height / sub_length)
else:h_count = math.ceil(src_height / sub_length)
new_height = sub_length * h_count
4).對結果圖進行賦值
img_t = np.zeros(shape=(new_height,new_width,3),dtype=np.uint8) + 255
if config['whether_crop_image_height']:img_t = img[:new_height,:new_width,:]
else:img_t[:src_height, :new_width, :] = img[:src_height, :new_width, :]
5).畫格子
 for x_i in range(1, w_count):cv2.line(img_t,(x_i*sub_length,0),(x_i*sub_length,new_height-1),color=(205,205,74),thickness=1)
for y_i in range(1, h_count):cv2.line(img_t,(0,y_i*sub_length),(new_width-1,y_i*sub_length), color=(205,205,74), thickness=1)
完整代碼:
import cv2
import numpy as np
import math# 通用配置
config = {"cell_num": 7,"whether_crop_image_height": True,"whether_with_gap": False,"gap_width": 0
}# 讀取圖像
img = cv2.imread("img.png")# 獲取每行格子數目和輸入圖像信息
w_count = config['cell_num']
src_height = img.shape[0]
src_width = img.shape[1]# 計算每個格子的長度以及結果圖像的寬度
sub_length = int(src_width / w_count)
new_width = sub_length * w_count# 根據是否需要對高度進行空白填充,計算結果圖像的高度
if config['whether_crop_image_height']:h_count = int(src_height / sub_length)
else:h_count = math.ceil(src_height / sub_length)
new_height = sub_length * h_count# 對結果圖進行賦值
img_t = np.zeros(shape=(new_height, new_width, 3), dtype=np.uint8) + 255
if config['whether_crop_image_height']:img_t = img[:new_height, :new_width, :]
else:img_t[:src_height, :new_width, :] = img[:src_height, :new_width, :]# 畫格子
for x_i in range(1, w_count):cv2.line(img_t, (x_i * sub_length, 0), (x_i * sub_length, new_height-1), color=(205, 205, 74), thickness=1)
for y_i in range(1, h_count):cv2.line(img_t, (0, y_i * sub_length), (new_width-1, y_i * sub_length), color=(205, 205, 74), thickness=1)# 展示生成的拼圖效果
cv2.imshow('Mosaic Effect', img_t)
cv2.waitKey(0)
cv2.destroyAllWindows()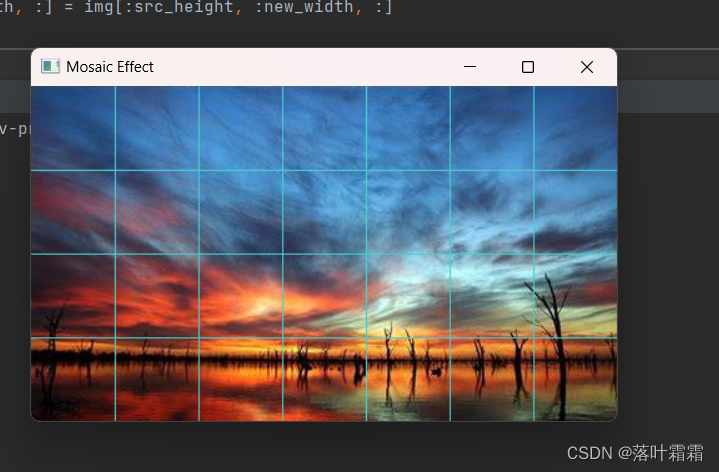
帶填充的結果:
import cv2
import numpy as np
import math# 通用配置
config = {"cell_num": 7,"whether_crop_image_height": True,"whether_with_gap": False,"gap_width": 0
}# 讀取圖像
img = cv2.imread("img.png")# 獲取每行格子數目和輸入圖像信息
w_count = config['cell_num']
src_height = img.shape[0]
src_width = img.shape[1]# 計算每個格子的長度、間隔長度以及結果圖像的寬度
sub_length = int(src_width / w_count)
gap_length = int(config["gap_width"])
new_width = sub_length * w_count + gap_length * (w_count - 1)# 根據是否需要對高度進行空白填充,計算結果圖像的高度
if config['whether_crop_image_height']:h_count = int((src_height + gap_length) / (sub_length + gap_length))
else:h_count = math.ceil((src_height + gap_length) / (sub_length + gap_length))
new_height = sub_length * h_count + gap_length * (h_count - 1)# 對結果圖進行賦值
img_t = np.zeros(shape=(new_height, new_width, 3), dtype=np.uint8) + 255
if config['whether_crop_image_height']:for i in range(h_count):for j in range(w_count):begin_x = sub_length * jbegin_y = sub_length * isrc_x = gap_length * j + begin_xsrc_y = gap_length * i + begin_yimg_t[src_y:src_y + sub_length, src_x:src_x + sub_length, :] = img[begin_y:begin_y + sub_length, begin_x:begin_x + sub_length, :]
else:for i in range(h_count):for j in range(w_count):begin_x = sub_length * jbegin_y = sub_length * isrc_x = gap_length * j + begin_xsrc_y = gap_length * i + begin_yif i < h_count - 1:img_t[src_y:src_y + sub_length, src_x:src_x + sub_length, :] = img[begin_y:begin_y + sub_length, begin_x:begin_x + sub_length, :]else:diff_height = src_height - sub_length * (h_count - 1)img_t[src_y:src_y + diff_height, src_x:src_x + sub_length, :] = img[begin_y:begin_y + diff_height, begin_x:begin_x + sub_length, :]# 展示生成的拼圖效果
cv2.imshow('Mosaic Effect with Fill', img_t)
cv2.waitKey(0)
cv2.destroyAllWindows()
不考慮間隔,帶填充的情況:
img_t = np.zeros(shape=(new_height, new_width, 3), dtype=np.uint8) + 255
if config['whether_crop_image_height']:img_t = img[:new_height, :new_width, :]
else:img_t[:src_height, :new_width, :] = img[:src_height, :new_width, :]
考慮間隔,帶填充的情況:
img_t = np.zeros(shape=(new_height, new_width, 3), dtype=np.uint8) + 255
if config['whether_crop_image_height']:for i in range(h_count):for j in range(w_count):begin_x = sub_length * jbegin_y = sub_length * isrc_x = gap_length * j + begin_xsrc_y = gap_length * i + begin_yimg_t[src_y:src_y + sub_length, src_x:src_x + sub_length, :] = img[begin_y:begin_y + sub_length, begin_x:begin_x + sub_length, :]
else:for i in range(h_count):for j in range(w_count):begin_x = sub_length * jbegin_y = sub_length * isrc_x = gap_length * j + begin_xsrc_y = gap_length * i + begin_yif i < h_count - 1:img_t[src_y:src_y + sub_length, src_x:src_x + sub_length, :] = img[begin_y:begin_y + sub_length, begin_x:begin_x + sub_length, :]else:diff_height = src_height - sub_length * (h_count - 1)img_t[src_y:src_y + diff_height, src_x:src_x + sub_length, :] = img[begin_y:begin_y + diff_height, begin_x:begin_x + sub_length, :]
在帶填充的情況下,會對不能整除的高度部分進行空白填充。帶填充的拼圖效果會更整齊,而不帶填充的情況下可能會有一些截斷。
考慮間隔代碼實現
1). 獲取每行格子數目和輸入圖像信息
w_count = config['cell_num']
src_height = img.shape[0]
src_width = img.shape[1]
2).計算每個格子的長度,間隔長度以及結果圖像的寬度
sub_length = int(src_width / w_count)
gap_length = int(config["gap_width"])
new_width = sub_length * w_count + gap_length * (w_count -1)
3).根據是否需要對高度進行空白填充,計算結果圖像的高度
if config['whether_crop_image_height']:h_count = int( (src_height + gap_length) / (sub_length+gap_length))
else:h_count = math.ceil((src_height + gap_length) / (sub_length+gap_length))
new_height = sub_length * h_count + gap_length * (h_count-1)
4).對結果圖進行賦值
img_t = np.zeros(shape=(new_height,new_width,3),dtype=np.uint8) + 255
if config['whether_crop_image_height']:for i in range(h_count):  for j in range(w_count): begin_x = sub_length * jbegin_y = sub_length * isrc_x = gap_length * j + begin_xsrc_y = gap_length * i + begin_yimg_t[src_y:src_y+sub_length,src_x:src_x + sub_length,:] = img[begin_y:begin_y + sub_length,begin_x:begin_x + sub_length,  :]
else:for i in range(h_count):  for j in range(w_count): begin_x = sub_length * jbegin_y = sub_length * isrc_x = gap_length * j + begin_xsrc_y = gap_length * i + begin_yif i<h_count-1:img_t[src_y:src_y+sub_length,src_x:src_x + sub_length,:] = img[begin_y:begin_y + sub_length,begin_x:begin_x + sub_length,  :]else:diff_height = src_height - sub_length * (h_count-1)img_t[src_y:src_y + diff_height, src_x:src_x + sub_length, :] = img[begin_y:begin_y + diff_height,begin_x:begin_x + sub_length, :]
全部代碼
import cv2
import numpy as np
import math# 通用配置
config = {"cell_num": 7,"whether_crop_image_height": True,"whether_with_gap": True,"gap_width": 3
}# 讀取圖像
img = cv2.imread("img.png")# 獲取每行格子數目和輸入圖像信息
w_count = config['cell_num']
src_height = img.shape[0]
src_width = img.shape[1]# 計算每個格子的長度、間隔長度以及結果圖像的寬度
sub_length = int(src_width / w_count)
gap_length = int(config["gap_width"])
new_width = sub_length * w_count + gap_length * (w_count - 1)# 根據是否需要對高度進行空白填充,計算結果圖像的高度
if config['whether_crop_image_height']:h_count = int((src_height + gap_length) / (sub_length + gap_length))
else:h_count = math.ceil((src_height + gap_length) / (sub_length + gap_length))
new_height = sub_length * h_count + gap_length * (h_count - 1)# 對結果圖進行賦值
img_t = np.zeros(shape=(new_height, new_width, 3), dtype=np.uint8) + 255
if config['whether_crop_image_height']:for i in range(h_count):for j in range(w_count):begin_x = sub_length * jbegin_y = sub_length * isrc_x = gap_length * j + begin_xsrc_y = gap_length * i + begin_yimg_t[src_y:src_y + sub_length, src_x:src_x + sub_length, :] = img[begin_y:begin_y + sub_length, begin_x:begin_x + sub_length, :]
else:for i in range(h_count):for j in range(w_count):begin_x = sub_length * jbegin_y = sub_length * isrc_x = gap_length * j + begin_xsrc_y = gap_length * i + begin_yif i < h_count - 1:img_t[src_y:src_y + sub_length, src_x:src_x + sub_length, :] = img[begin_y:begin_y + sub_length, begin_x:begin_x + sub_length, :]else:diff_height = src_height - sub_length * (h_count - 1)img_t[src_y:src_y + diff_height, src_x:src_x + sub_length, :] = img[begin_y:begin_y + diff_height, begin_x:begin_x + sub_length, :]# 繪制間隔
if config['whether_with_gap']:for i in range(h_count):for j in range(w_count - 1):begin_x = sub_length * (j + 1) + gap_length * jbegin_y = sub_length * i + gap_length * icv2.line(img_t, (begin_x, begin_y), (begin_x, begin_y + sub_length), color=(205, 205, 74), thickness=1)# 展示生成的帶填充和間隔的拼圖效果
cv2.imshow('Mosaic Effect with Fill and Gap', img_t)
cv2.waitKey(0)
cv2.destroyAllWindows()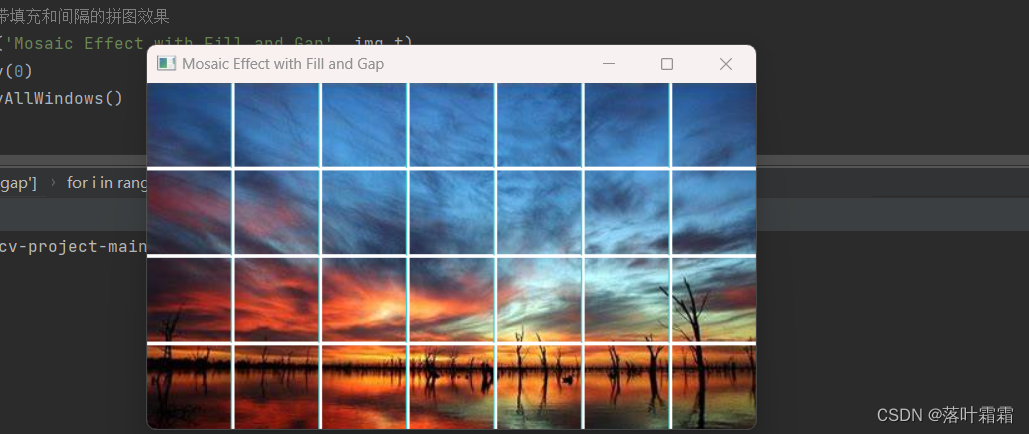
小結
通過使用OpenCV庫和Python編程語言,實現了圖像拼圖效果的生成。
拼圖效果生成: 根據用戶的需求,實現了兩種不同的拼圖效果生成方式。
一種是不考慮間隔,可以選擇是否對高度不能整除的部分進行空白填充;另一種是考慮間隔,可以選擇相鄰正方形之間是否存在間隔,以及間隔的大小,同樣可以選擇是否對高度不能整除的部分進行空白填充。
通用配置: 引入了通用配置項,用戶可以通過修改配置來調整拼圖的格子數、是否裁剪高度、是否考慮間隔以及間隔的寬度等參數。
代碼優化: 封裝了一些功能函數,使代碼更加模塊化和可讀性更強。


)


)


