優質博文:IT-BLOG-CN
SpringBoot啟動類上使用@SpringBootApplication注解,該注解是一個組合注解,包含多個其它注解。和類定義SpringApplication.run要揭開SpringBoot的神秘面紗,我們要從這兩位開始就可以了。
@SpringBootApplication
public class MySpringbootApplication {public static void main(String[] args) {SpringApplication.run(MySpringbootApplication.class, args);}
}
一、@SpringBootApplication
@Target({ElementType.TYPE})
@Retention(RetentionPolicy.RUNTIME)
@Documented
@Inherited
@SpringBootConfiguration
@EnableAutoConfiguration
@ComponentScan(excludeFilters = {@Filter(type = FilterType.CUSTOM,classes = {TypeExcludeFilter.class}
), @Filter(type = FilterType.CUSTOM,classes = {AutoConfigurationExcludeFilter.class}
)}
)
public @interface SpringBootApplication {
@SpringBootApplication注解上標有三個注解@SpringBootConfiguration、@EnableAutoConfiguration、@ComponentScan。其它四個注解用來聲明SpringBootAppliction為一個注解。
@SpringBootConfiguration
@Target({ElementType.TYPE})
@Retention(RetentionPolicy.RUNTIME)
@Documented
@Configuration
public @interface SpringBootConfiguration {
@SpringBootConfiguration注解中沒有定義任何屬性信息,而該注解上有一個注解@Configuration,用于標識配置類。所以@SpringBootConfiguration注解的功能和@Configuration注解的功能相同,用于標識配置類,與@Bean搭配使用,一個帶有@Bean的注解方法將返回一個對象,該對象應該被注冊為在Spring應用程序上下文中的bean。如下案例:
@Configuration
public class Conf { @Bean public Car car() { return new Car(); }
}
@ComponentScan
@ComponentScan這個注解在Spring中很重要,它對應XML配置中的元素,@ComponentScan的功能其實就是自動掃描并加載符合條件的組件(比如@Component和@Repository等)或者bean定義,最終將這些bean定義加載到IoC容器中。我們可以通過basePackages等屬性來細粒度的定制@ComponentScan自動掃描的范圍,如果不指定,則默認Spring框架實現會從聲明@ComponentScan所在類的package進行掃描。注:所以SpringBoot的啟動類最好是放在root package下,因為默認不指定basePackages。
@EnableAutoConfiguration
@Target({ElementType.TYPE})
@Retention(RetentionPolicy.RUNTIME)
@Documented
@Inherited
@AutoConfigurationPackage
@Import({AutoConfigurationImportSelector.class})
public @interface EnableAutoConfiguration {
個人感覺@EnableAutoConfiguration這個Annotation最為重要,Spring框架提供的各種名字為@Enable開頭的Annotation,借助@Import的支持,收集和注冊特定場景相關的bean定義。@EnableAutoConfiguration也是借助@Import的幫助,將所有符合自動配置條件的bean定義加載到IoC容器。@EnableAutoConfiguration注解上標注了兩個注解,@AutoConfigurationPackage、@Import。@Import注解在SpringIOC一些注解的源碼中比較常見,主要用來給容器導入目標bean。這里@Import注解給容器導入的組件用于自動配置:AutoConfigurationImportSelector而@AutoConfigurationPackage注解是Spring自定義的注解,用于將主配置類所在的包作為自動配置的包進行管理。
@AutoConfigurationPackage
package org.springframework.boot.autoconfigure;@Target({ElementType.TYPE})
@Retention(RetentionPolicy.RUNTIME)
@Documented
@Inherited
@Import({Registrar.class})
public @interface AutoConfigurationPackage {String[] basePackages() default {};Class<?>[] basePackageClasses() default {};
}
@AutoConfigurationPackage注解上的@Import注解,給容器導入了Registrar組件
Registrar
static class Registrar implements ImportBeanDefinitionRegistrar, DeterminableImports {Registrar() {}public void registerBeanDefinitions(AnnotationMetadata metadata, BeanDefinitionRegistry registry) {AutoConfigurationPackages.register(registry, (String[])(new AutoConfigurationPackages.PackageImports(metadata)).getPackageNames().toArray(new String[0]));}public Set<Object> determineImports(AnnotationMetadata metadata) {return Collections.singleton(new AutoConfigurationPackages.PackageImports(metadata));}
}
Registrar是抽象類AutoConfigurationPackages的內部靜態類,Registrar內的registerBeanDefinitions()方法負責將注解所在的包及其子包下的所有組件注冊進容器。這也是為什么SpringBoot的啟動類要在其他類的父包或在同一個包中。
AutoConfigurationImportSelector
public class AutoConfigurationImportSelector implements DeferredImportSelector, BeanClassLoaderAware, ResourceLoaderAware, BeanFactoryAware, EnvironmentAware, Ordered {
借助AutoConfigurationImportSelector,@EnableAutoConfiguration可以幫助SpringBoot應用將所有符合條件的@Configuration配置都加載到當前SpringBoot創建的IoC容器中。借助于 Spring框架原有的一個工具類:SpringFactoriesLoader,@EnableAutoConfiguration的自動配置功能才得以大功告成!
SpringFactoriesLoader屬于Spring框架私有的一種擴展方案,其主要功能就是從指定的配置文件META-INF/spring.factories 加載配置。
public abstract class SpringFactoriesLoader {public static <T> List<T> loadFactories(Class<T> factoryClass, ClassLoader classLoader) {......}public static List<String> loadFactoryNames(Class<?> factoryClass, ClassLoader classLoader) {......}
}
配合@EnableAutoConfiguration使用的話,它更多是提供一種配置查找的功能支持,即根據@EnableAutoConfiguration的完整類名org.springframework.boot.autoconfigure.EnableAutoConfiguration作為查找的Key,獲取對應的一組@Configuration類。

上圖就是從SpringBoot的autoconfigure依賴包中的META-INF/spring.factories配置文件中摘錄的一段內容,可以很好地說明問題。
所以,@EnableAutoConfiguration自動配置的魔法騎士就變成了:從classpath中搜尋所有的META-INF/spring.factories配置文件,并將其中org.springframework.boot.autoconfigure.EnableutoConfiguration對應的配置項通過反射Java Refletion實例化,為標注了@Configuration的配置類加載到IoC容器中。
AutoConfigurationImportSelector類實現了很多Aware接口,而Aware接口的功能是使用一些Spring內置的實例獲取一些想要的信息,如容器信息、環境信息、容器中注冊的bean信息等。而 AutoConfigurationImportSelector類的作用是將Spring中已經定義好的自動配置類注入容器中,而實現該功能的方法是selectImports方法:
selectImports
注冊Spring中定義好的配置類
public String[] selectImports(AnnotationMetadata annotationMetadata) {if (!this.isEnabled(annotationMetadata)) {return NO_IMPORTS;} else {AutoConfigurationMetadata autoConfigurationMetadata = AutoConfigurationMetadataLoader.loadMetadata(this.beanClassLoader);AutoConfigurationImportSelector.AutoConfigurationEntry autoConfigurationEntry = this.getAutoConfigurationEntry(autoConfigurationMetadata, annotationMetadata);return StringUtils.toStringArray(autoConfigurationEntry.getConfigurations());}
}
@EnableAutoConfiguration:SpringBoot根據應用所聲明的依賴來對Spring框架進行自動配置。
@SpringBootConfiguration(內部為@Configuration):被標注的類等于在Spring的XML配置文件中(applicationContext.xml),裝配所有Bean事務,提供了一個Spring的上下文環境。
@ComponentScan:組件掃描,可自動發現和裝配Bean,默認掃描SpringApplication的run方法里的Booter.class所在的包路徑下文件,所以最好將該啟動類放到根包路徑下。
二、SpringApplication.run(x.class, args)
SpringApplication的run方法的實現是SpringApplication執行流程的主要線路,該方法的主要流程大體可以歸納如下:
【1】如果我們使用的是SpringApplication的靜態run方法,那么,這個方法里面首先要創建一個SpringApplication對象實例,然后調用這個創建好的SpringApplication的實例方法。在 SpringApplication實例初始化的時候,它會提前做幾件事情:
?● 根據classpath里面是否存在某個特征類org.springframework.web.context.ConfigurableWebApplicationContext來決定是否應該創建一個為Web應用使用的ApplicationContext類型。
?● 使用SpringFactoriesLoader在應用的classpath中查找并加載所有可用的ApplicationContextInitializer。
?● 使用SpringFactoriesLoader在應用的classpath中查找并加載所有可用的ApplicationListener。
?● 推斷并設置main方法的定義類。
【2】SpringApplication完成實例初始化并且完成設置后,就開始執行run方法的邏輯,首先遍歷執行所有通過SpringFactoriesLoader可以查找到并加載的 SpringApplicationRunListener[接口]。調用它們的started()方法,告訴這些SpringApplicationRunListener,“嘿,SpringBoot應用要開始執行咯!”。
public interface SpringApplicationRunListener {default void starting() {}default void environmentPrepared(ConfigurableEnvironment environment) {}default void contextPrepared(ConfigurableApplicationContext context) {}default void contextLoaded(ConfigurableApplicationContext context) {}default void started(ConfigurableApplicationContext context) {}default void running(ConfigurableApplicationContext context) {}default void failed(ConfigurableApplicationContext context, Throwable exception) {}
}
【3】創建并配置當前Spring Boot應用將要使用的Environment(包括配置要使用的PropertySource以及Profile)。
【4】遍歷調用所有SpringApplicationRunListener的environmentPrepared()的方法,告訴他們:“當前SpringBoot應用使用的Environment準備好了咯!”。
【5】如果SpringApplication的showBanner屬性被設置為true,則打印banner。
【6】根據用戶是否明確設置了applicationContextClass類型以及初始化階段的推斷結果,決定該為當前SpringBoot應用創建什么類型的ApplicationContext并創建完成,然后根據條件決定是否添加 ShutdownHook,決定是否使用自定義的BeanNameGenerator,決定是否使用自定義的ResourceLoader,當然,最重要的,將之前準備好的Environment設置給創建好的ApplicationContext使用。
【7】ApplicationContext創建好之后,SpringApplication會再次借助SpringFactoriesLoader,查找并加載classpath中所有可用的ApplicationContextInitializer,然后遍歷調用這些 ApplicationContextInitializer的 initialize(applicationContext)方法來對已經創建好的ApplicationContext進行進一步的處理。
【8】遍歷調用所有SpringApplicationRunListener的contextPrepared()方法。
【9】最核心的一步,將之前通過 @EnableAutoConfiguration獲取的所有配置以及其他形式的 IoC容器配置加載到已經準備完畢的ApplicationContext。
【10】遍歷調用所有SpringApplicationRunListener的contextLoaded()方法。
【11】調用ApplicationContext的refresh()方法,完成IoC容器可用的最后一道工序。
【12】查找當前ApplicationContext中是否注冊有CommandLineRunner,如果有,則遍歷執行它們。
【13】正常情況下,遍歷執行SpringApplicationRunListener的finished()方法、(如果整個過程出現異常,則依然調用所有SpringApplicationRunListener的finished()方法,只不過這種情況下會將異常信息一并傳入處理)
去除事件通知點后,整個流程如下:

調試一個SpringBoot啟動程序為例,參考流程中主要類類圖,來分析其啟動邏輯和自動化配置原理。

上圖為SpringBoot啟動結構圖,我們發現啟動流程主要分為三個部分:
第一部分進行 SpringApplication的初始化模塊,配置一些基本的環境變量、資源、構造器、監聽器
第二部分實現了應用具體的啟動方案,包括啟動流程的監聽模塊、加載配置環境模塊、及核心的創建上下文環境模塊
第三部分是自動化配置模塊,該模塊作為SpringBoot自動配置核心,在后面的分析中會詳細討論。在下面的啟動程序中我們會串聯起結構中的主要功能
SpringBoot啟動類
進入run()方法,run()方法創建了一個SpringApplication實例并調用其run()方法。
public static ConfigurableApplicationContext run(Class<?>[] primarySources, String[] args) {return (new SpringApplication(primarySources)).run(args);
}
SpringApplication構造器主要為SpringApplication對象賦一些初值。構造函數執行完畢后,回到run()方法
public ConfigurableApplicationContext run(String... args) {StopWatch stopWatch = new StopWatch();stopWatch.start();ConfigurableApplicationContext context = null;Collection<SpringBootExceptionReporter> exceptionReporters = new ArrayList();this.configureHeadlessProperty();SpringApplicationRunListeners listeners = this.getRunListeners(args);listeners.starting();Collection exceptionReporters;try {ApplicationArguments applicationArguments = new DefaultApplicationArguments(args);ConfigurableEnvironment environment = this.prepareEnvironment(listeners, applicationArguments);this.configureIgnoreBeanInfo(environment);Banner printedBanner = this.printBanner(environment);context = this.createApplicationContext();exceptionReporters = this.getSpringFactoriesInstances(SpringBootExceptionReporter.class, new Class[]{ConfigurableApplicationContext.class}, context);this.prepareContext(context, environment, listeners, applicationArguments, printedBanner);this.refreshContext(context);this.afterRefresh(context, applicationArguments);stopWatch.stop();if (this.logStartupInfo) {(new StartupInfoLogger(this.mainApplicationClass)).logStarted(this.getApplicationLog(), stopWatch);}listeners.started(context);this.callRunners(context, applicationArguments);} catch (Throwable var10) {this.handleRunFailure(context, var10, exceptionReporters, listeners);throw new IllegalStateException(var10);}try {listeners.running(context);return context;} catch (Throwable var9) {this.handleRunFailure(context, var9, exceptionReporters, (SpringApplicationRunListeners)null);throw new IllegalStateException(var9);}
}
該方法中實現了如下幾個關鍵步驟:
【1】創建了應用的監聽器SpringApplicationRunListeners并開始監聽;
【2】加載SpringBoot配置環境ConfigurableEnvironment,如果是通過web容器發布,會加載StandardEnvironment,其最終也是繼承了ConfigurableEnvironment,類圖如下:

可以看出,*Environment最終都實現了PropertyResolver接口,我們平時通過environment對象獲取配置文件中指定Key對應的value方法時,就是調用了propertyResolver接口的getProperty方法;
【3】配置環境Environment加入到監聽器對象中SpringApplicationRunListeners;
【4】創建run方法的返回對象:ConfigurableApplicationContext(應用配置上下文),我們可以看一下創建方法:
protected ConfigurableApplicationContext createApplicationContext() {Class<?> contextClass = this.applicationContextClass;if (contextClass == null) {try {switch(this.webApplicationType) {case SERVLET:contextClass = Class.forName("org.springframework.boot.web.servlet.context.AnnotationConfigServletWebServerApplicationContext");break;case REACTIVE:contextClass = Class.forName("org.springframework.boot.web.reactive.context.AnnotationConfigReactiveWebServerApplicationContext");break;default:contextClass = Class.forName("org.springframework.context.annotation.AnnotationConfigApplicationContext");}} catch (ClassNotFoundException var3) {throw new IllegalStateException("Unable create a default ApplicationContext, please specify an ApplicationContextClass", var3);}}return (ConfigurableApplicationContext)BeanUtils.instantiateClass(contextClass);
}
會先獲取顯式設置的應用上下文applicationContextClass,如果不存在,再加載默認的環境配置(通過是否是web environment判斷),默認選擇AnnotationConfigApplicationContext注解上下文(通過掃描所有注解類來加載bean),最后通過BeanUtils實例化上下文對象,并返回。
ConfigurableApplicationContext類圖如下:

主要看其繼承的兩個方向:
LifeCycle: 生命周期類,定義了start啟動、stop結束、isRunning是否運行中等生命周期空值方法;
ApplicationContext: 應用上下文類,其主要繼承了beanFactory(bean的工廠類);
【5】回到run方法內,prepareContext方法將listeners、environment、applicationArguments、banner等重要組件與上下文對象關聯;
【6】接下來的refreshContext(context)方法(初始化方法如下)將是實現 spring-boot-starter-*(mybatis、redis等)自動化配置的關鍵,包括spring.factories的加載,bean的實例化等核心工作。SpringIOC源碼refresh方法鏈接 有興趣的可以看下。
private void refreshContext(ConfigurableApplicationContext context) {this.refresh((ApplicationContext)context);
}//進入 refresh 方法,IOC容器著重分析的方法
public void refresh() throws BeansException, IllegalStateException {synchronized(this.startupShutdownMonitor) {this.prepareRefresh();ConfigurableListableBeanFactory beanFactory = this.obtainFreshBeanFactory();this.prepareBeanFactory(beanFactory);try {this.postProcessBeanFactory(beanFactory);this.invokeBeanFactoryPostProcessors(beanFactory);this.registerBeanPostProcessors(beanFactory);this.initMessageSource();this.initApplicationEventMulticaster();this.onRefresh();this.registerListeners();this.finishBeanFactoryInitialization(beanFactory);this.finishRefresh();} catch (BeansException var9) {if (this.logger.isWarnEnabled()) {this.logger.warn("Exception encountered during context initialization - cancelling refresh attempt: " + var9);}this.destroyBeans();this.cancelRefresh(var9);throw var9;} finally {this.resetCommonCaches();}}
}
配置結束后,SpringBoot做了一些基本的收尾工作,返回了應用環境上下文。回顧整體流程,SpringBoot的啟動,主要創建了配置環境environment、事件監聽listeners、應用上下文applicationContext,并基于以上條件,在容器中開始實例化我們需要的Bean,至此,通過SpringBoot啟動的程序已經構造完成,接下來我們來探討自動化配置是如何實現。
自動化配置
之前的啟動結構圖中,我們注意到無論是應用初始化還是具體的執行過程,都調用了SpringBoot自動配置模塊。
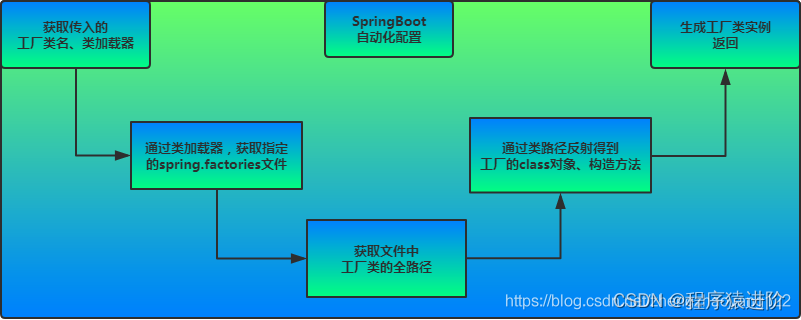
SpringBoot自動配置模塊: 該配置模塊的主要使用到了SpringFactoriesLoader,即Spring工廠加載器,該對象提供了loadFactoryNames方法,入參為factoryClass和classLoader,即需要傳入上圖中的工廠類名稱和對應的類加載器,方法會根據指定的classLoader,加載該類加器搜索路徑下的指定文件,即spring.factories文件,傳入的工廠類為接口,而文件中對應的類則是接口的實現類,或最終作為實現類,所以文件中一般為如下圖這種一對多的類名集合,獲取到這些實現類的類名后,loadFactoryNames方法返回類名集合,方法調用方得到這些集合后,再通過反射獲取這些類的類對象、構造方法,最終生成實例。
# PropertySource Loaders
org.springframework.boot.env.PropertySourceLoader=\
org.springframework.boot.env.PropertiesPropertySourceLoader,\
org.springframework.boot.env.YamlPropertySourceLoader# Run Listeners
org.springframework.boot.SpringApplicationRunListener=\
org.springframework.boot.context.event.EventPublishingRunListener# Error Reporters
org.springframework.boot.SpringBootExceptionReporter=\
org.springframework.boot.diagnostics.FailureAnalyzers# Application Context Initializers
org.springframework.context.ApplicationContextInitializer=\
org.springframework.boot.context.ConfigurationWarningsApplicationContextInitializer,\
下圖有助于我們形象理解自動配置流程。
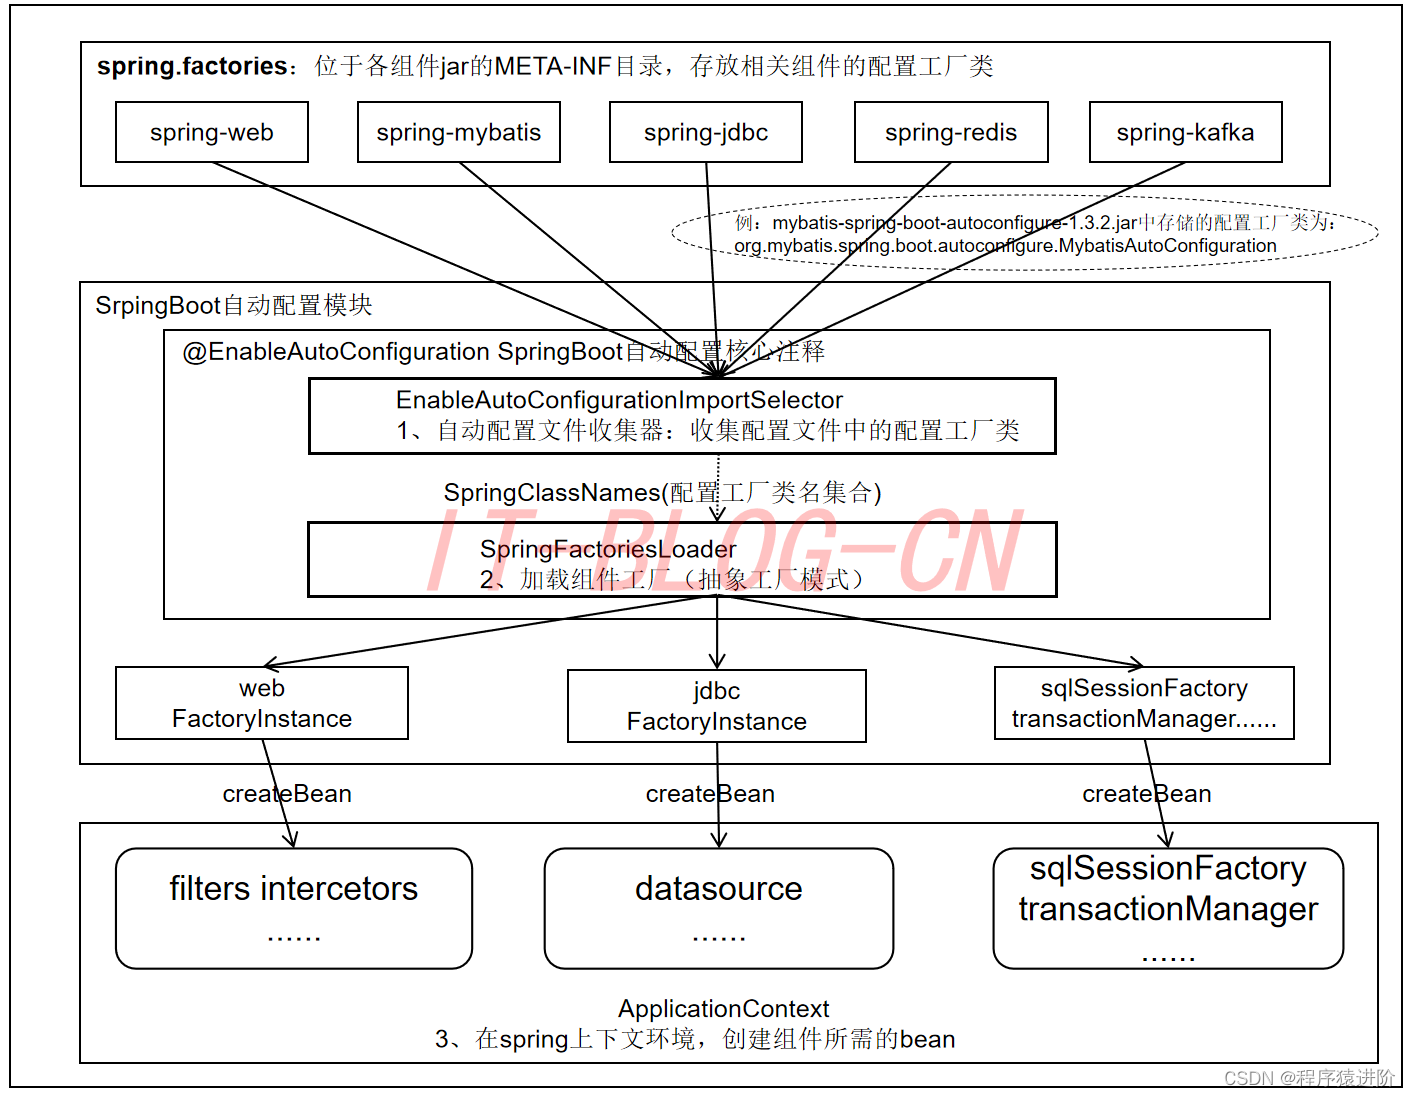
mybatis-spring-boot-starter starter詳細內容鏈接、spring-boot-starter-web等組件的META-INF文件下均含有spring.factories文件,自動配置模塊中,SpringFactoriesLoader收集到文件中的類全名并返回一個類全名的數組,返回的類全名通過反射被實例化,就形成了具體的工廠實例,工廠實例來生成組件具體需要的bean。之前我們提到了EnableAutoConfiguration注解,其類圖如下:
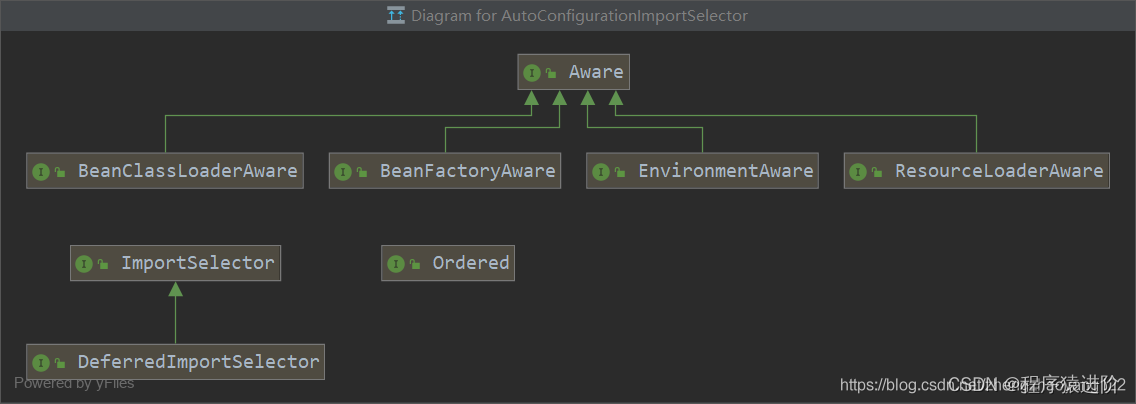
可以發現其最終實現了ImportSelector(選擇器)和 BeanClassLoaderAware(bean類加載器中間件),重點關注一下 AutoConfigurationImportSelector的selectImports方法。
public String[] selectImports(AnnotationMetadata annotationMetadata) {if (!this.isEnabled(annotationMetadata)) {return NO_IMPORTS;} else {AutoConfigurationImportSelector.AutoConfigurationEntry autoConfigurationEntry = this.getAutoConfigurationEntry(annotationMetadata);return StringUtils.toStringArray(autoConfigurationEntry.getConfigurations());}
}protected AutoConfigurationImportSelector.AutoConfigurationEntry getAutoConfigurationEntry(AnnotationMetadata annotationMetadata) {if (!this.isEnabled(annotationMetadata)) {return EMPTY_ENTRY;} else {AnnotationAttributes attributes = this.getAttributes(annotationMetadata);List<String> configurations = this.getCandidateConfigurations(annotationMetadata, attributes);configurations = this.removeDuplicates(configurations);Set<String> exclusions = this.getExclusions(annotationMetadata, attributes);this.checkExcludedClasses(configurations, exclusions);configurations.removeAll(exclusions);configurations = this.getConfigurationClassFilter().filter(configurations);this.fireAutoConfigurationImportEvents(configurations, exclusions);return new AutoConfigurationImportSelector.AutoConfigurationEntry(configurations, exclusions);}
}
該方法在SpringBoot啟動流程Bean實例化前被執行,返回要實例化的類信息列表。如果獲取到類信息,Spring自然可以通過類加載器將類加載到jvm中,現在我們已經通過SpringBoot的starter依賴方式依賴了我們需要的組件,那么這些組建的類信息在select方法中也是可以被獲取到的。
protected List<String> getCandidateConfigurations(AnnotationMetadata metadata, AnnotationAttributes attributes) {List<String> configurations = SpringFactoriesLoader.loadFactoryNames(this.getSpringFactoriesLoaderFactoryClass(), this.getBeanClassLoader());Assert.notEmpty(configurations, "No auto configuration classes found in META-INF/spring.factories. If you are using a custom packaging, make sure that file is correct.");return configurations;
}
該方法中的getCandidateConfigurations方法,其返回一個自動配置類的類名列表,方法調用了loadFactoryNames方法,查看該方法:
public static List<String> loadFactoryNames(Class<?> factoryType, @Nullable ClassLoader classLoader) {String factoryTypeName = factoryType.getName();return (List)loadSpringFactories(classLoader).getOrDefault(factoryTypeName, Collections.emptyList());
}
在上面的代碼可以看到自動配置器會根據傳入的factoryType.getName()到項目系統路徑下所有的spring.factories文件中找到相應的key,從而加載里面的類。我們就選取這個 mybatis-spring-boot-autoconfigure下的spring.factories文件
# Auto Configure
org.springframework.boot.autoconfigure.EnableAutoConfiguration=\
org.mybatis.spring.boot.autoconfigure.MybatisAutoConfiguration
進入org.mybatis.spring.boot.autoconfigure.MybatisAutoConfiguration中,主要看一下類頭:
@Configuration
@ConditionalOnClass({SqlSessionFactory.class, SqlSessionFactoryBean.class})
@ConditionalOnBean({DataSource.class})
@EnableConfigurationProperties({MybatisProperties.class})
@AutoConfigureAfter({DataSourceAutoConfiguration.class})
public class MybatisAutoConfiguration {
@Configuration,儼然是一個通過注解標注的SpringBean;
@ConditionalOnClass({ SqlSessionFactory.class, SqlSessionFactoryBean.class})這個注解的意思是:當存在SqlSessionFactory.class,SqlSessionFactoryBean.class這兩個類時才解析MybatisAutoConfiguration配置類,否則不解析這一個配置類,make sence,我們需要mybatis為我們返回會話對象,就必須有會話工廠相關類;
@CondtionalOnBean(DataSource.class):只有處理已經被聲明為bean的dataSource;
@ConditionalOnMissingBean(MapperFactoryBean.class)這個注解的意思是如果容器中不存在name指定的bean則創建bean注入,否則不執行(該類源碼較長,篇幅限制不全粘貼);
以上配置可以保證sqlSessionFactory、sqlSessionTemplate、dataSource等mybatis所需的組件均可被自動配置,@Configuration注解已經提供了Spring的上下文環境,所以以上組件的配置方式與Spring啟動時通過mybatis.xml文件進行配置起到一個效果。通過分析我們可以發現,只要一個基于SpringBoot項目的類路徑下存在SqlSessionFactory.class, SqlSessionFactoryBean.class,并且容器中已經注冊了dataSourceBean,就可以觸發自動化配置,意思說我們只要在maven的項目中加入了mybatis所需要的若干依賴,就可以觸發自動配置,但引入mybatis原生依賴的話,每集成一個功能都要去修改其自動化配置類,那就得不到開箱即用的效果了。所以SpringBoot為我們提供了統一的 starter可以直接配置好相關的類,觸發自動配置所需的依賴(mybatis)如下:
<dependency><groupId>com.alibaba.cloud</groupId><artifactId>spring-cloud-alibaba-sentinel-gateway</artifactId><version>2.1.0.RELEASE</version>
</dependency>
這里是截取的mybatis-spring-boot-starter的源碼中pom.xml文件中所有依賴:
<dependencies><dependency><groupId>org.springframework.boot</groupId><artifactId>spring-boot-starter</artifactId></dependency><dependency><groupId>org.springframework.boot</groupId><artifactId>spring-boot-starter-jdbc</artifactId></dependency><dependency><groupId>org.mybatis.spring.boot</groupId><artifactId>mybatis-spring-boot-autoconfigure</artifactId></dependency><dependency><groupId>org.mybatis</groupId><artifactId>mybatis</artifactId></dependency><dependency><groupId>org.mybatis</groupId><artifactId>mybatis-spring</artifactId></dependency>
</dependencies>
因為maven依賴的傳遞性,我們只要依賴starter就可以依賴到所有需要自動配置的類,實現開箱即用的功能。也體現出SpringBoot簡化了Spring框架帶來的大量XML配置以及復雜的依賴管理,讓開發人員可以更加關注業務邏輯的開發。
三、總結
配置文件定義屬性[@Configuration],自動裝配到所屬的配置類中,然后通過動態代理進入spring容器中。


)

 計算兩點云之間的最小距離)

函數)


![2023年中國高壓驅動芯片分類、市場規模及發展趨勢分析[圖]](http://pic.xiahunao.cn/2023年中國高壓驅動芯片分類、市場規模及發展趨勢分析[圖])
)