文章目錄
- 1.靜態代理
- 2.動態代理
- 3.實現簡單的Retrofit
- 定義對應的請求注解參數
- 通過動態代理模擬Retrofit的創建
- 請求參數的處理
- 定義請求接口
- 測試請求
1.靜態代理
代理默認給某一個對象提供一個代理對象,并由代理對象控制對原對象的引用。通俗來講,代理模式就是我們生活中常見的中介。比如你按照小卡片上的電話打過去尋求服務,一般不是由本人,可能是一個成年雄性接聽電話,然后真正做事情的可能就是另一個小姐姐了。
目的:
- 通過引入代理對象的方式來間接訪問目標對象,防止直接訪問目標對象給系統帶來的不必要復雜性;
- 通過代理對象來訪問控制;
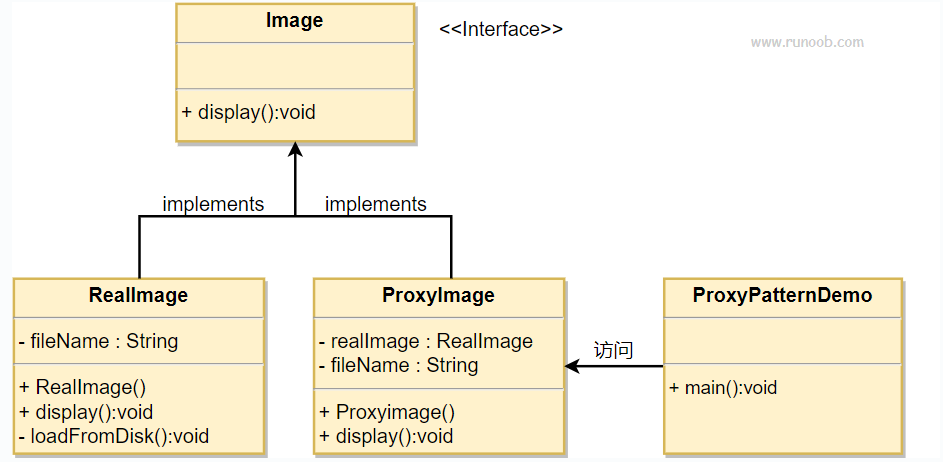
代理模式一般會有三個角色:
抽象角色:指代理角色和真實角色對外提供的公共方法,一般為一個接口
真實角色:需要實現抽象角色接口,定義了真實角色所實現的業務邏輯,以便供代理角色調用。也就是真正的業務邏輯。
代理角色:需要實現抽象角色接口,是真實角色的代理,通過真實角色的業務邏輯方法來實現抽象方法,并可以附加自己的操作。將統一的流程控制都放到代理角色中處理。
比如:抽象角色
創建一個接口
public interface Image {void display();
}
代理角色:
public class ProxyImage implements Image{private RealImage realImage;private String fileName;public ProxyImage(String fileName){this.fileName = fileName;}@Overridepublic void display() {if(realImage == null){realImage = new RealImage(fileName);}realImage.display();}
}
真實角色:
public class RealImage implements Image {private String fileName;public RealImage(String fileName){this.fileName = fileName;loadFromDisk(fileName);}@Overridepublic void display() {System.out.println("Displaying " + fileName);}private void loadFromDisk(String fileName){System.out.println("Loading " + fileName);}
}
當被請求的時候,則使用代理類獲取來獲取真實對象
public class ProxyPatternDemo {public static void main(String[] args) {Image image = new ProxyImage("test_10mb.jpg");// 圖像將從磁盤加載image.display(); System.out.println("");// 圖像不需要從磁盤加載image.display();  }
}
打印:
Loading test_10mb.jpg
Displaying test_10mb.jpgDisplaying test_10mb.jpg
優點:
- 可以在不修改目標對象的前提下,增加功能
- 保護目標對象,客戶端不直接訪問真實對象
缺點:
一個代理類只能代理一個接口/類,代碼冗余嚴重
比如你還要代理一個其他類,就要再寫一個對應的代理類,重復代碼
舉個例子來對比:
靜態代理:新增接口 ->必須改代碼,寫新代理類
動態代理:新增接口 ->完全不用改代碼,直接支持
假設有一個服務平臺,現在有兩類服務:
抽象角色類:
// 發送短信
public interface SmsService {void sendSms(String msg);
}// 發送郵件
public interface EmailService {void sendEmail(String to, String subject);
}
真實實現類:
public class SmsServiceImpl implements SmsService {@Overridepublic void sendSms(String msg) {System.out.println("發送短信: " + msg);}
}public class EmailServiceImpl implements EmailService {@Overridepublic void sendEmail(String to, String subject) {System.out.println("發送郵件到 " + to + ",主題: " + subject);}
}
靜態代理的痛苦,每新增一個接口就要寫一個代理類
起初只有SmsService,寫了一個代理
public class SmsServiceProxy implements SmsService {private final SmsService smsService;public SmsServiceProxy(SmsService smsService) {this.smsService = smsService;}@Overridepublic void sendSms(String msg) {System.out.println("【日志】準備發送短信...");smsService.sendSms(msg);System.out.println("【日志】短信發送完成!");}
}
現在要加EmailService,必須再寫一個代理類
public class EmailServiceProxy implements EmailService {private final EmailService emailService;public EmailServiceProxy(EmailService emailService) {this.emailService = emailService;}@Overridepublic void sendEmail(String to, String subject) {System.out.println("【日志】準備發送郵件...");emailService.sendEmail(to, subject);System.out.println("【日志】郵件發送完成!");}
}
你會發現:兩個代理類的邏輯一模一樣,只是接口不同,但你必須要寫兩個類,否則無法代理。
如果再加WeChatService、PushService…則需要寫WeChatServiceProxy、PushServiceProxy…
當然,也可以代理類和實現類同時實現兩個接口
// 手動實現兩個接口
public class NotificationProxy implements SmsService, EmailService {private final NotificationServiceImpl target;public NotificationProxy(NotificationServiceImpl target) {this.target = target;}@Overridepublic void sendSms(String msg) {System.out.println("【靜態代理】準備發短信...");target.sendSms(msg);System.out.println("【靜態代理】短信發送完成");}@Overridepublic void sendEmail(String to, String subject) {System.out.println("【靜態代理】準備發郵件...");target.sendEmail(to, subject);System.out.println("【靜態代理】郵件發送完成");}
}
public class NotificationServiceImpl implements SmsService, EmailService {@Overridepublic void sendSms(String msg) {System.out.println("發送短信: " + msg);}@Overridepublic void sendEmail(String to, String subject) {System.out.println("發送郵件到: " + to + ",主題: " + subject);}
}
NotificationProxy proxy = new NotificationProxy(new NotificationServiceImpl());SmsService smsProxy = proxy;
smsProxy.sendSms("你好");EmailService emailProxy = proxy;
emailProxy.sendEmail("user@abc.com", "測試");
但這樣的話,代碼重復,維護困難
每個方法都要手動寫一遍代碼邏輯
如果新增WeChatService接口,你必須
- 修改NotificationProxy類
- 添加implements WeChatService
- 實現sendWeChat()方法
2.動態代理
在運行時再創建代理類和其實例,因此顯然效率更低。要完成這個場景,需要在運行期間動態創建一個Class。JDK提供了Proxy來完成這件事情。基本使用如下:
比如動態代理可以同時代理兩個接口
NotificationServiceImpl target = new NotificationServiceImpl();// 創建代理,讓它同時實現兩個接口
Object proxy = Proxy.newProxyInstance(Test.class.getClassLoader(),new Class[]{SmsService.class, EmailService.class},  // 同時代理兩個接口new InvocationHandler() {@Overridepublic Object invoke(Object proxy, Method method, Object[] args) throws Throwable {System.out.println("【日志】調用方法: " + method.getName() + " 開始...");Object result = method.invoke(target, args);System.out.println("【日志】調用方法: " + method.getName() + " 結束.");return result;}}
);
// 當作 SmsService 使用
SmsService smsProxy = (SmsService) proxy;
smsProxy.sendSms("你好啊");// 當作 EmailService 使用
EmailService emailProxy = (EmailService) proxy;
emailProxy.sendEmail("user@abc.com", "訂單確認");
輸出結果
【日志】調用方法: sendSms 開始...
發送短信: 你好啊
【日志】調用方法: sendSms 結束.【日志】調用方法: sendEmail 開始...
發送郵件到: user@abc.com,主題: 訂單確認
【日志】調用方法: sendEmail 結束.
動態代理也可以需要一個通用的處理器,就能代理任意接口
public class LogInvocationHandler implements InvocationHandler {private final Object target;//真實對象public LogInvocationHandler(Object target){this.target = target;}@Overridepublic Object invoke(Object proxy, Method method, Object[] args) throws Throwable {System.out.println("日志調用方法:"+method.getName()+"開始...");Object result = method.invoke(target,args);//調用真實方法System.out.println("日志調用方法:"+method.getName()+"結束...");return result;}
}
public class Test {public static void main(String[] args) {//代理SmsServiceSmsService sms = new SmsServiceImpl();SmsService smProxy = (SmsService) Proxy.newProxyInstance(Test.class.getClassLoader(),new Class[]{SmsService.class},new LogInvocationHandler(sms));smProxy.sendSms("你好啊");//代理EmailServiceEmailService email = new EmailServiceImpl();EmailService emailProxy = (EmailService)Proxy.newProxyInstance(Test.class.getClassLoader(),new Class[]{EmailService.class},new LogInvocationHandler(email));emailProxy.sendEmail("user@abc.com","訂單確認");}
}輸出結果
日志調用方法:sendSms開始...
發送短信:你好啊
日志調用方法:sendSms結束...
日志調用方法:sendEmail開始...
發送郵件到 user@abc.com,主題:訂單確認
日志調用方法:sendEmail結束...
注意要避免的問題
public class LogInvocationHandler implements InvocationHandler {private final Object target;//真實對象public LogInvocationHandler(Object target){this.target = target;}@Overridepublic Object invoke(Object proxy, Method method, Object[] args) throws Throwable {System.out.println(proxy);System.out.println("日志調用方法:"+method.getName()+"開始...");Object result = method.invoke(target,args);//調用真實方法System.out.println("日志調用方法:"+method.getName()+"結束...");return result;}
}
如果你在動態代理的InvocationHandler 里的invoke方法打印一下proxy,你會發現報了棧溢出的錯
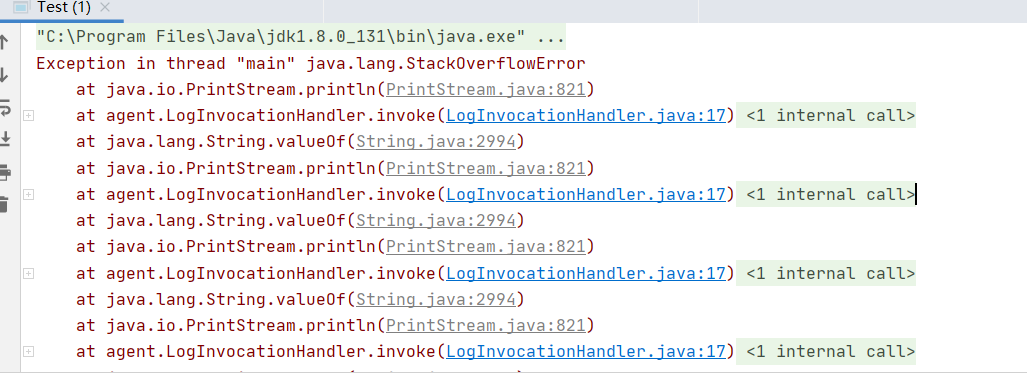
因為你打印proxy其實默認會走proxy的toString()方法也會回到到invoke方法造成棧溢出
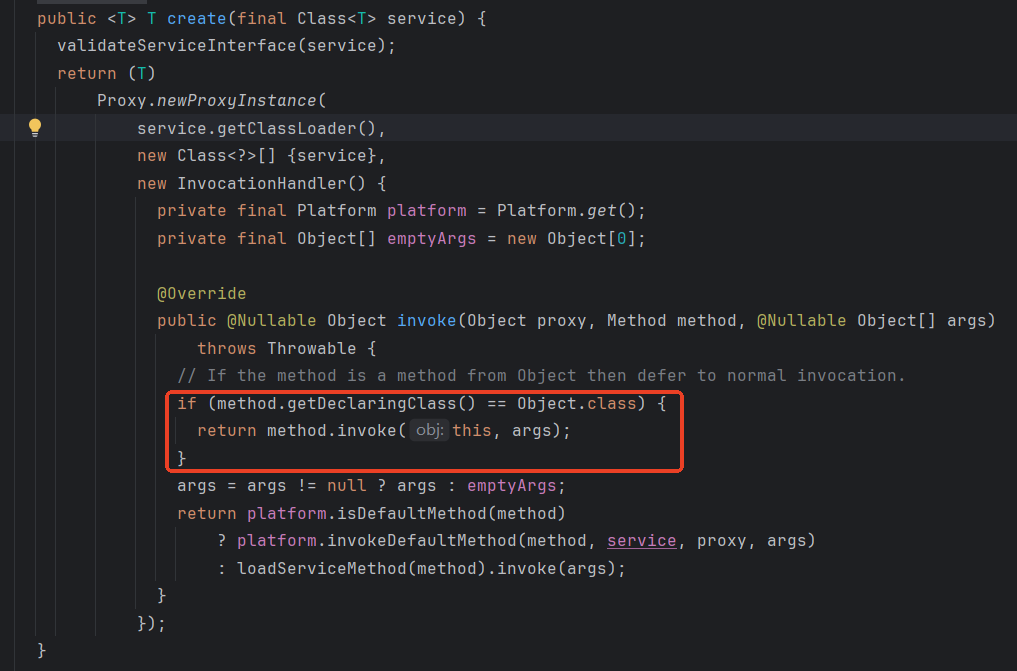
我們也可以看一下Retrofit的代碼,可以看到當使用到Object的方法的時候,傳遞的是this,而不是proxy代理對象。如果你寫 method.invoke(proxy, args),可能會再次觸發 invoke(),導致無限遞歸!所以 Retrofit 選擇調用 this,避免循環。
在生成Class文件的時候,有兩種方式一種是.java源文件通過javac編譯生成的.class文件,再通過類加載生成Class對象,這種方式生成的class文件來源是在硬盤。而動態代理生成的class文件來源在內存生成的。
動態代理生成的源代碼
@CallerSensitivepublic static Object newProxyInstance(ClassLoader loader,Class<?>[] interfaces,InvocationHandler h)throws IllegalArgumentException{Objects.requireNonNull(h);final Class<?>[] intfs = interfaces.clone();// Android-removed: SecurityManager calls/*final SecurityManager sm = System.getSecurityManager();if (sm != null) {checkProxyAccess(Reflection.getCallerClass(), loader, intfs);}*//** Look up or generate the designated proxy class.*/Class<?> cl = getProxyClass0(loader, intfs);/** Invoke its constructor with the designated invocation handler.*/try {// Android-removed: SecurityManager / permission checks./*if (sm != null) {checkNewProxyPermission(Reflection.getCallerClass(), cl);}*/final Constructor<?> cons = cl.getConstructor(constructorParams);final InvocationHandler ih = h;if (!Modifier.isPublic(cl.getModifiers())) {// BEGIN Android-removed: Excluded AccessController.doPrivileged call./*AccessController.doPrivileged(new PrivilegedAction<Void>() {public Void run() {cons.setAccessible(true);return null;}});*/cons.setAccessible(true);// END Android-removed: Excluded AccessController.doPrivileged call.}return cons.newInstance(new Object[]{h});} catch (IllegalAccessException|InstantiationException e) {throw new InternalError(e.toString(), e);} catch (InvocationTargetException e) {Throwable t = e.getCause();if (t instanceof RuntimeException) {throw (RuntimeException) t;} else {throw new InternalError(t.toString(), t);}} catch (NoSuchMethodException e) {throw new InternalError(e.toString(), e);}}
Class<?> cl = getProxyClass0(loader, interfaces); ↓
JVM 調用 ProxyGenerator 生成字節碼↓
ProxyGenerator.generateProxyClass(...) 返回 byte[],生成的Class數據的byte數組↓
JVM defineClass(byte[]) 加載這個類,將這個class數據轉成一個Class對象
驗證
String name = SmsService.class.getName()+"$proxy0";//兩個參數,生成的類名,代理的接口byte[] bytes = ProxyGenerator.generateProxyClass(name,new Class[]{SmsService.class});FileOutputStream fos = new FileOutputStream("src/"+name+".class");fos.write(bytes);fos.close();

//
// Source code recreated from a .class file by IntelliJ IDEA
// (powered by Fernflower decompiler)
//package agent;import java.lang.reflect.InvocationHandler;
import java.lang.reflect.Method;
import java.lang.reflect.Proxy;
import java.lang.reflect.UndeclaredThrowableException;public final class SmsService$proxy0 extends Proxy implements SmsService {private static Method m1;private static Method m3;private static Method m2;private static Method m0;public SmsService$proxy0(InvocationHandler var1) throws  {super(var1);}public final boolean equals(Object var1) throws  {try {return (Boolean)super.h.invoke(this, m1, new Object[]{var1});} catch (RuntimeException | Error var3) {throw var3;} catch (Throwable var4) {throw new UndeclaredThrowableException(var4);}}public final void sendSms(String var1) throws  {try {super.h.invoke(this, m3, new Object[]{var1});} catch (RuntimeException | Error var3) {throw var3;} catch (Throwable var4) {throw new UndeclaredThrowableException(var4);}}public final String toString() throws  {try {return (String)super.h.invoke(this, m2, (Object[])null);} catch (RuntimeException | Error var2) {throw var2;} catch (Throwable var3) {throw new UndeclaredThrowableException(var3);}}public final int hashCode() throws  {try {return (Integer)super.h.invoke(this, m0, (Object[])null);} catch (RuntimeException | Error var2) {throw var2;} catch (Throwable var3) {throw new UndeclaredThrowableException(var3);}}static {try {m1 = Class.forName("java.lang.Object").getMethod("equals", Class.forName("java.lang.Object"));m3 = Class.forName("agent.SmsService").getMethod("sendSms", Class.forName("java.lang.String"));m2 = Class.forName("java.lang.Object").getMethod("toString");m0 = Class.forName("java.lang.Object").getMethod("hashCode");} catch (NoSuchMethodException var2) {throw new NoSuchMethodError(var2.getMessage());} catch (ClassNotFoundException var3) {throw new NoClassDefFoundError(var3.getMessage());}}
}
所以我們使用動態代理,Proxy.newProxyInstance代理SmsService接口生成的.class文件就是上面的樣子
SmsService sms = new SmsServiceImpl();SmsService smProxy = (SmsService) Proxy.newProxyInstance(Test.class.getClassLoader(),new Class[]{SmsService.class},new LogInvocationHandler(sms));smProxy.sendSms("你好啊");smProxy.toString();
這里可以看到SmsService$proxy0類里的構造方法可以看到super(var1);會將new LogInvocationHandler(sms)傳遞進去。
super(var1)進入Proxy.java類的構造方法
protected Proxy(InvocationHandler h) {Objects.requireNonNull(h);this.h = h;}
可以看到將當前的this.h=h,賦值給當前類的InvocationHandler
而當調用smProxy.sendSms(“你好啊”);的時候就會調用SmsService$proxy0類里sendSms方法
public final void sendSms(String var1) throws {try {super.h.invoke(this, m3, new Object[]{var1});} catch (RuntimeException | Error var3) {throw var3;} catch (Throwable var4) {throw new UndeclaredThrowableException(var4);}}
這個時候調用super.h.invoke(this, m3, new Object[]{var1}),就是將對應的信息回調給LogInvocationHandler里的invoke方法。
this就是當前生成的代理類對象。
m3可以看到Class.forName(“agent.SmsService”).getMethod(“sendSms”, Class.forName(“java.lang.String”))
通過反射的方式生成對應的method對象。
3.實現簡單的Retrofit
定義對應的請求注解參數
@Target(PARAMETER)
@Retention(RUNTIME)
public @interface Field {String value();
}@Target(ElementType.METHOD)
@Retention(RetentionPolicy.RUNTIME)
public @interface GET {String value() default "";
}@Target(ElementType.METHOD)//作用在方法上
@Retention(RetentionPolicy.RUNTIME) //保留期在運行期間
public @interface POST {String value() default "";
}@Target(PARAMETER)
@Retention(RUNTIME)
public @interface Query {String value();
}通過動態代理模擬Retrofit的創建
/*** 通過動態代理模擬Retrofit的創建*/
public class MyRetrofit {final Map<Method,ServiceMethod> serviceMethodCache = new ConcurrentHashMap<>();final Call.Factory callFactory;final HttpUrl baseUrl;MyRetrofit(Call.Factory callFactory,HttpUrl baseUrl){this.callFactory = callFactory;this.baseUrl = baseUrl;}public <T> T create(final Class<T> service){return (T) Proxy.newProxyInstance(service.getClassLoader(), new Class[]{service},new InvocationHandler() {@Overridepublic Object invoke(Object proxy, Method method, Object[] args) throws Throwable {//解析這個method上所有注解ServiceMethod serviceMethod = loadServiceMethod(method);//args就是傳遞參數的值return serviceMethod.invoke(args);}});}private ServiceMethod loadServiceMethod(Method method) {//先不上鎖,避免synchronized的性能損失ServiceMethod result = serviceMethodCache.get(method);if(result!=null) return result;//多線程下,避免重復解析synchronized (serviceMethodCache){result = serviceMethodCache.get(method);if(result==null){result = new ServiceMethod.Builder(this,method).build();serviceMethodCache.put(method,result);}}return result;}/*** 構建者模式,將一個復雜對象的構建和它的表示分離,可以使用者不必知道內部組成的細節*/public static final class Builder{private HttpUrl baseUrl;private Call.Factory callFactory;public Builder callFactory(Call.Factory factory){this.callFactory = factory;return this;}public Builder baseUrl(String baseUrl){this.baseUrl = HttpUrl.get(baseUrl);return this;}public MyRetrofit build() throws IllegalAccessException {if(baseUrl == null){throw new IllegalAccessException("Base URL required");}Call.Factory callFactory = this.callFactory;if(callFactory == null){callFactory = new OkHttpClient();}return new MyRetrofit(callFactory,baseUrl);}}}
請求參數的處理
public class ServiceMethod {private final Call.Factory callFactory;private final String relativeUrl;private final boolean hasBody;private final ParameterHandler[] parameterHandler;HttpUrl baseUrl;String httpMethod;private FormBody.Builder formBuild;HttpUrl.Builder urlBuilder;public ServiceMethod(Builder builder) {baseUrl = builder.myRetrofit.baseUrl;callFactory = builder.myRetrofit.callFactory;httpMethod = builder.httpMethod;relativeUrl = builder.relativeUrl;hasBody = builder.hasBody;parameterHandler = builder.parameterHandler;//如果是由請求體,創建一個okhttp的請求體對象if(hasBody){formBuild = new FormBody.Builder();}}public Object invoke(Object[] args) {/*** 處理請求的地址與參數* parameterHandler存的key的順序和args參數的值順序一一對應*/for (int i = 0; i < parameterHandler.length; i++) {ParameterHandler handlers = parameterHandler[i];//handler內本來就記錄了key,現在給到對應的valuehandlers.apply(this,args[i].toString());}//獲取最終請求地址HttpUrl url;if(urlBuilder == null){urlBuilder = baseUrl.newBuilder(relativeUrl);}url = urlBuilder.build();//請求體FormBody formBody = null;if(formBuild!=null){formBody = formBuild.build();}Request request = new Request.Builder().url(url).method(httpMethod,formBody).build();return callFactory.newCall(request);}//get請求,把k-v拼到url里面public void addQueryParameter(String key, String value) {if(urlBuilder == null){urlBuilder = baseUrl.newBuilder(relativeUrl);//將baseUrl和relativeUrl拼到一起}//在url后面加k-vurlBuilder.addQueryParameter(key,value);}//post請求,把k-v放到請求體中public void addFiledParameter(String key, String value) {formBuild.add(key,value);}public static class Builder{private final MyRetrofit myRetrofit;private final Annotation[] methodAnnotations;private final Annotation[][] parameterAnnoations;private String httpMethod;private String relativeUrl;private boolean hasBody;private ParameterHandler[] parameterHandler;public Builder(MyRetrofit myRetrofit, Method method){this.myRetrofit = myRetrofit;//獲取方法上的所有的注解methodAnnotations = method.getAnnotations();//獲得方法參數的所有的注解(一個參數可以有多個注解,一個方法又會有多個參數)parameterAnnoations = method.getParameterAnnotations();}public ServiceMethod build(){/*** 解析方法上的注解,只處理POST和GET*/for (Annotation methodAnnotation : methodAnnotations) {if(methodAnnotation instanceof POST){//記錄當前請求方式this.httpMethod = "POST";//記錄請求url的paththis.relativeUrl = ((POST) methodAnnotation).value();//是否有請求體this.hasBody = true;}else if(methodAnnotation instanceof GET){this.httpMethod = "GET";this.relativeUrl = ((GET) methodAnnotation).value();this.hasBody = false;}}/*** 解析方法參數的注解*/int length = parameterAnnoations.length;parameterHandler = new ParameterHandler[length];for(int i =0;i<length;i++){//一個參數上的所有注解Annotation[] annotations = parameterAnnoations[i];//處理參數上的每一個注解for (Annotation annotation : annotations) {//可以加一個判斷,如果httpMethod是get請求,現在又解析到Filed注解,可以提示使用者使用Query注解if(annotation instanceof Field){String value = ((Field) annotation).value();parameterHandler[i] = new ParameterHandler.FiledParameterHandler(value);//等于在一個新的類中記錄key}else if(annotation instanceof Query){String value = ((Query) annotation).value();parameterHandler[i] = new ParameterHandler.QueryParameterHandler(value);}}}return new ServiceMethod(this);}}}
public abstract class ParameterHandler {abstract void apply(ServiceMethod serviceMethod,String value);static class QueryParameterHandler extends ParameterHandler{String key;public QueryParameterHandler(String key){this.key = key;}@Overridevoid apply(ServiceMethod serviceMethod, String value) {serviceMethod.addQueryParameter(key,value);}}static class FiledParameterHandler extends ParameterHandler{String key;public FiledParameterHandler(String key){this.key = key;}@Overridevoid apply(ServiceMethod serviceMethod, String value) {serviceMethod.addFiledParameter(key,value);}}}定義請求接口
//https://www.wanandroid.com/article/list/0/json?cid=60
public interface MyTestApi {@GET("/article/list/0/json")Call getTestApi(@Query("cid") String cid);/*@GET("/project/list/1/json")Call getWeather(@Query("cid") String cid);
*/@POST("/user/login")Call postTestApi(@Field("username") String username, @Field("password") String password);}
測試請求
class MainActivity3 : AppCompatActivity() {@SuppressLint("MissingInflatedId", "SetTextI18n")override fun onCreate(savedInstanceState: Bundle?) {super.onCreate(savedInstanceState)setContentView(R.layout.activity_main3)val myRetrofit = MyRetrofit.Builder().baseUrl("https://www.wanandroid.com").build()val weatherApi = myRetrofit.create(MyTestApi::class.java)val call = weatherApi.getTestApi("60")call.enqueue(object : Callback {override fun onFailure(call: Call, e: IOException) {Log.d("cyr", "onFailure: $e")}override fun onResponse(call: Call, response: Response) {Log.d("cyr","onResponse get:"+response.body())}})val postCall = weatherApi.postTestApi("xxxx","xxxx")postCall.enqueue(object : Callback{override fun onFailure(call: Call, e: IOException) {}override fun onResponse(call: Call, response: Response) {val body = response.body()try {val string = body!!.string()Log.i("cyr", "onResponse post: $string")} catch (e: IOException) {e.printStackTrace()} finally {body!!.close()}}})}}
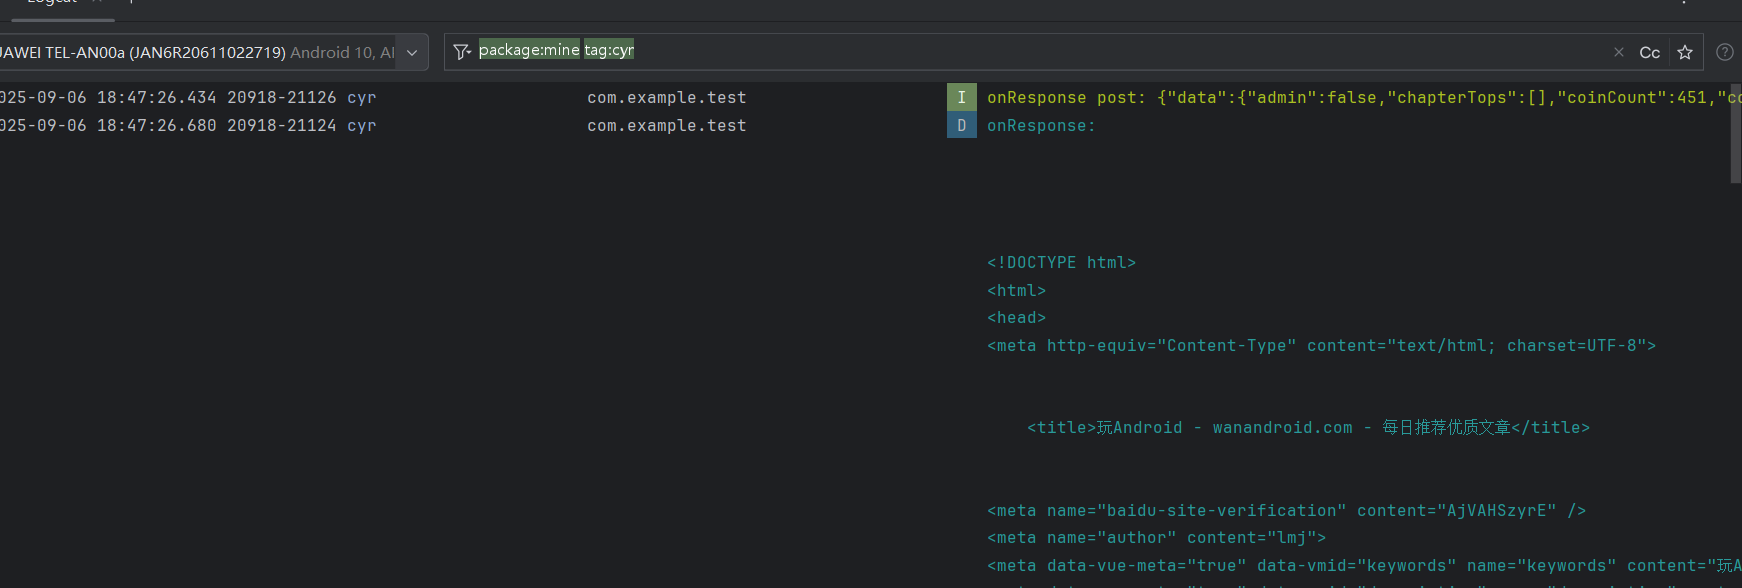
可以看到輸出了請求成功結果日志。


27.移除元素 26.刪除有序數組中的重復項 283.移動零 977.有序數組的平方)


)
)


)

)


)
帶論文文檔1萬字以上,文末可獲取,系統界面在最后面。)
