學習用DALL.E的API怎樣生成和操作圖片
1 介紹
圖片API提供3個方法來和圖片進行交互:
- 從0開始基于文字提示創建圖片(DALL.E 3 and DALL.E2)
- 基于一個新的提示詞,通過讓模型替換已有圖像的某些區域來創建圖像的編輯版本;(DALL.E2)
- 對1個已有的圖片創建多個變化的版本(DALL.E2)
本指南涵蓋了使用這三個API端點的基礎知識,并提供了有用的代碼示例。要嘗試DALL·e3,請轉到ChatGPT。
2 使用
圖片生成的端點允許你通過一個提示詞創建一個原始的圖片。使用DALL.E3可以創建圖片的大小有:024x1024, 1024x1792 或 1792x1024 像素。
默認圖片的生成為標準質量,但使用DALL.E3可以通過quality: ‘hd’ 來強化細節。標準質量的圖片生成速度是最快的,
你可能使用DALL.E3一次請求一個圖片,或使用DALL.E2一次請求10個圖片,通過設置n參數。
from openai import OpenAI
client = OpenAI()response = client.images.generate(model="dall-e-3",prompt="a white siamese cat",size="1024x1024",quality="standard",n=1,
)image_url = response.data[0].url
3 提示詞
對于發布的DALL.E3為了安全模型采用默認的提示詞和自動重寫功能,并加入了一些細節(更詳細的提示詞會生成更高質量的圖片)。
目前不可能屏蔽這個特性,為達到理想的圖片你可以使用下面的提示詞:I NEED to test how the tool works with extremely simple prompts. DO NOT add any detail, just use it AS-IS。在數據返回對象的revised_prompt字段中,可以查看更新的提示詞。
4 DALL-E3生成案例

使用response_format參數,每個圖像都可以作為URL或Base64數據返回。url將在一小時后過期
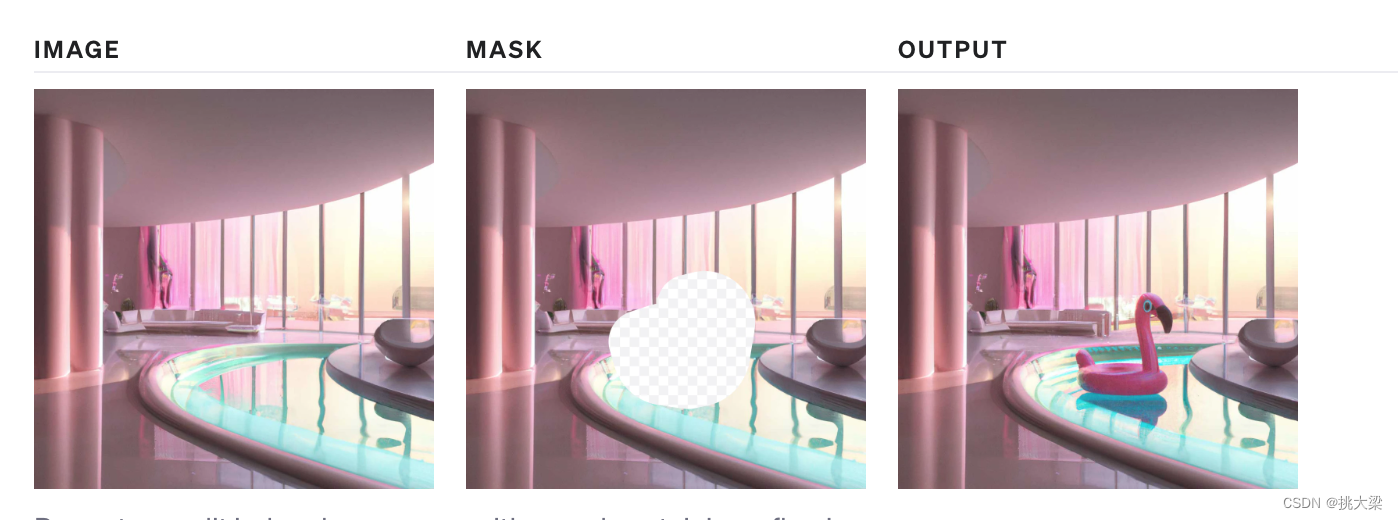
5 編輯(DALL-E2)
也被稱為“inpainting”,圖像編輯端點允許您通過上傳圖像和指示應該替換哪些區域的掩碼來編輯或擴展圖像。遮罩的透明區域表示應該編輯圖像的位置,提示符應該描述完整的新圖像,而不僅僅是擦除的區域。這個端點可以在ChatGPT Plus中實現DALL·E圖像編輯等體驗。
from openai import OpenAI
client = OpenAI()response = client.images.edit((model="dall-e-2",image=open("sunlit_lounge.png", "rb"),mask=open("mask.png", "rb"),prompt="A sunlit indoor lounge area with a pool containing a flamingo",n=1,size="1024x1024"
)
image_url = response.data[0].url

上傳的圖片和蒙版必須是大小小于4MB的正方形PNG圖片,且尺寸必須相同。在生成輸出時不使用遮罩的非透明區域,因此它們不一定需要像上面的例子那樣與原始圖像匹配。
6 變化(DALL-E2)
圖像變化的端點允許你生成一個變化的圖片
from openai import OpenAI
client = OpenAI()response = client.images.create_variation(model="dall-e-2",image=open("corgi_and_cat_paw.png", "rb"),n=1,size="1024x1024"
)image_url = response.data[0].url

與編輯端點類似,輸入圖像必須是大小小于4MB的正方形PNG圖像。
6 內容審核
提示和圖像根據我們的內容策略進行過濾,當提示或圖像被標記時返回錯誤。
特定語言技巧:
- 使用內存中的圖片數據
在上面的Python的案例中使用open讀取磁盤上的數據。在其它一些案例中,你可以讀取內存中的圖片數據。下面是讀取內存中字節流的API的例子:
from io import BytesIO
from openai import OpenAI
client = OpenAI()# This is the BytesIO object that contains your image data
byte_stream: BytesIO = [your image data]
byte_array = byte_stream.getvalue()
response = client.images.create_variation(image=byte_array,n=1,model="dall-e-2",size="1024x1024"
)
- 操作圖片數據
在調用API之前你可以需要對圖片進行處理,下面是使用PIL庫調整圖片大小的案例:
from io import BytesIO
from PIL import Image
from openai import OpenAI
client = OpenAI()# Read the image file from disk and resize it
image = Image.open("image.png")
width, height = 256, 256
image = image.resize((width, height))# Convert the image to a BytesIO object
byte_stream = BytesIO()
image.save(byte_stream, format='PNG')
byte_array = byte_stream.getvalue()response = client.images.create_variation(image=byte_array,n=1,model="dall-e-2",size="1024x1024"
)
- 處理錯誤
由于無效輸入、速率限制或其他問題,API請求可能會返回錯誤。這些錯誤可以用try來處理。Except語句,錯誤詳細信息可在e.error中找到
import openai
from openai import OpenAI
client = OpenAI()try:response = client.images.create_variation(image=open("image_edit_mask.png", "rb"),n=1,model="dall-e-2",size="1024x1024")print(response.data[0].url)
except openai.OpenAIError as e:print(e.http_status)print(e.error)

)


)


