一、Profiling:揭示性能瓶頸的“照妖鏡”
在過去的一年里,我們團隊完成了一項壯舉:將近萬核的 Java 服務成功遷移到 Rust,并收獲了令人矚目的性能提升。我們的實踐經驗已在《RUST練習生如何在生產環境構建萬億流量》一文中與大家分享。然而,在這次大規模遷移中,我們觀察到一個有趣的現象:大多數服務在遷移后性能都得到了顯著提升,但有那么一小部分服務,性能提升卻不盡如人意,僅僅在 10% 左右徘徊。
這讓我們感到疑惑。明明已經用上了性能“王者”Rust,為什么還會遇到瓶頸?為了解開這個謎團,我們決定深入剖析這些“低提升”服務。今天,我就來和大家分享,我們是如何利用?Profiling?工具,找到并解決寫入過程中的性能瓶頸,最終實現更高性能飛躍的!
在性能優化領域,盲目猜測是最大的禁忌。你需要一把鋒利的“手術刀”,精準地找到問題的根源。在 Rust 生態中,雖然不像 Java 社區那樣擁有 VisualVM 或 JProfiler 這類功能強大的成熟工具,但我們依然可以搭建一套高效的性能分析體系。
為了在生產環境中實現高效的性能監控,我們引入了?Jemalloc?內存分配器和?pprof?CPU 分析器。這套方案不僅支持定時自動生成 Profile 文件,還可以在運行時動態觸發,極大地提升了我們定位問題的能力。
二、配置項目:讓Profiling“武裝到牙齒”
首先,我們需要在?Cargo.toml?文件中添加必要的依賴,讓我們的 Rust 服務具備 Profiling 的能力。以下是我們的配置,Rust 版本為 1.87.0。
[target.'cfg(all(not(target_env = "msvc"), not(target_os = "windows")))'.dependencies]
# 使用 tikv-jemallocator 作為內存分配器,并啟用性能分析功能
tikv-jemallocator?= { version =?"0.6", features = ["profiling",?"unprefixed_malloc_on_supported_platforms"] }
# 用于在運行時控制和獲取 jemalloc 的統計信息
tikv-jemalloc-ctl?= { version =?"0.6", features = ["use_std",?"stats"] }
# tikv-jemallocator 的底層綁定,同樣啟用性能分析
tikv-jemalloc-sys?= { version =?"0.6", features = ["profiling"] }
# 用于生成與 pprof 兼容的內存剖析數據,并支持符號化和火焰圖
jemalloc_pprof?= { version =?"0.7", features = ["symbolize","flamegraph"] }
# 用于生成 CPU 性能剖析數據和火焰圖
pprof?= { version =?"0.14", features = ["flamegraph",?"protobuf-codec"] }
簡單來說,這幾個依賴各司其職:
※?tikv-jemallocator
基于?jemalloc?的 Rust 實現,以其高效的內存管理聞名。
※?jemalloc_pprof
負責將?jemalloc?的內存剖析數據轉換成標準的 pprof 格式。
※?pprof
用于 CPU 性能分析,可以生成?pprof?格式的 Profile 文件。
三、? 全局配置:啟動Profiling開關
接下來,在?main.rs?中進行全局配置,指定?Jemalloc?的?Profiling?參數,并將其設置為默認的全局內存分配器。
// 配置 Jemalloc 內存分析參數
#[export_name =?"malloc_conf"]
pub static malloc_conf: &[u8] = b"prof:true,prof_active:true,lg_prof_sample:16\0";#[cfg(not(target_env =?"msvc"))]
use tikv_jemallocator::Jemalloc;// 將 Jemalloc 設置為全局內存分配器
#[cfg(not(target_env =?"msvc"))]
#[global_allocator]
static GLOBAL: Jemalloc = Jemalloc;
這段配置中的?lg_prof_sample:16?是一個關鍵參數。
它表示?jemalloc?會對大約每?2^16?字節(即 64KB)的內存分配進行一次采樣。這個值越大,采樣頻率越低,內存開銷越小,但精度也越低;反之則精度越高,開銷越大。在生產環境中,我們需要根據實際情況進行權衡。
四、實現Profile生成函數:打造你的“數據采集器”
我們將 Profile 文件的生成邏輯封裝成異步函數,這樣就可以在服務的任意時刻按需調用,非常靈活。
內存Profile生成函數
#[cfg(not(target_env =?"msvc"))]
async?fn?dump_memory_profile() ->?Result<String,?String> {// 獲取 jemalloc 的 profiling 控制器let?prof_ctl =?jemalloc_pprof::PROF_CTL.as_ref().ok_or_else(||?"Profiling controller not available".to_string())?;let?mut prof_ctl = prof_ctl.lock().await;// 檢查 profiling 是否已激活if?!prof_ctl.activated() {return?Err("Jemalloc profiling is not activated".to_string());}// 調用 dump_pprof() 方法生成 pprof 數據let?pprof_data = prof_ctl.dump_pprof().map_err(|e| format!("Failed to dump pprof: {}", e))?;// 使用時間戳生成唯一文件名let?timestamp =?chrono::Utc::now().format("%Y%m%d_%H%M%S");let?filename = format!("memory_profile_{}.pb", timestamp);// 將 pprof 數據寫入本地文件std::fs::write(&filename, pprof_data).map_err(|e| format!("Failed to write profile file: {}", e))?;info!("Memory profile dumped to: {}", filename);Ok(filename)
}
CPU Profile生成函數
類似地,我們使用?pprof?庫來實現 CPU?Profile?的生成。
#[cfg(not(target_env = "msvc"))]
async fn dump_cpu_profile() -> Result<String, String> {use?pprof::ProfilerGuard;use?pprof::protos::Message;info!("Starting CPU profiling for 60 seconds...");//?創建 CPU profiler,設置采樣頻率為?100?Hzlet guard = ProfilerGuard::new(100).map_err(|e|?format!("Failed to create profiler: {}", e))?;//?持續采樣?60?秒tokio::time::sleep(std::time::Duration::from_secs(60)).await;//?生成報告let report = guard.report().build().map_err(|e|?format!("Failed to build report: {}", e))?;//?使用時間戳生成文件名let timestamp = chrono::Utc::now().format("%Y%m%d_%H%M%S");let filename =?format!("cpu_profile_{}.pb", timestamp);//?創建文件并寫入 pprof 數據let mut file = std::fs::File::create(&filename).map_err(|e|?format!("Failed to create file: {}", e))?;report.pprof().map_err(|e|?format!("Failed to convert to pprof: {}", e))?.write_to_writer(&mut file).map_err(|e|?format!("Failed to write profile: {}", e))?;info!("CPU profile dumped to: {}", filename);Ok(filename)
}- ?ProfilerGuard::new()???100??Hz 意味著每秒鐘會隨機中斷程序?100 次,以記錄當前正在執行的函數調用棧
- tokio::time::sleep(std::time::Duration::from_secs(60)).await 表示?pprof?將會持續采樣 60 秒鐘
- ?guard.report().build()?這個方法用于將收集到的所有采樣數據進行處理和聚合,最終生成一個?Report?對象。這個?Report?對象包含了所有調用棧的統計信息,但還沒有轉換成特定的文件格式
- ?report.pprof()?這是?Report?對象的一個方法,用于將報告數據轉換成?pprof?格式
五、?觸發和使用 Profiling:隨時隨地捕捉性能數據
有了上述函數,我們實現了兩種靈活的觸發方式。
※?定時自動生成
通過異步定時任務,每隔一段時間自動調用?dump_memory_profile()?和 ?dump_cpu_profile()?。
fn start_profilers() {//?Memory?profilertokio::spawn(async {let mut interval = tokio::time::interval(std::time::Duration::from_secs(300));loop {interval.tick().await;#[cfg(not(target_env = "msvc"))]{info!("Starting memory profiler...");match dump_memory_profile().await {Ok(profile_path) => info!("Memory profile dumped successfully: {}", profile_path),Err(e) => info!("Failed to dump memory profile: {}", e),}}}});//?同理可以實現CPU?profiler
}
※?手動 HTTP 觸發
通過提供?/profile/memory?和?/profile/cpu?兩個 HTTP 接口,可以隨時按需觸發 Profile 文件的生成。
async fn trigger_memory_profile() ->?Result<impl warp::Reply, std::convert::Infallible> {#[cfg(not(target_env = "msvc"))]{info!("HTTP triggered memory profile dump...");match dump_memory_profile().await {Ok(profile_path) =>?Ok(warp::reply::with_status(format!("Memory profile dumped successfully: {}", profile_path),warp::http::StatusCode::OK,)),Err(e) =>?Ok(warp::reply::with_status(format!("Failed to dump memory profile: {}", e),warp::http::StatusCode::INTERNAL_SERVER_ERROR,)),}}
}
//同理也可實現trigger_cpu_profile()函數
fn profile_routes() -> impl?Filter<Extract?= impl?Reply,?Error?= warp::Rejection> +?Clone?{let memory_profile = warp::post().and(warp::path("profile")).and(warp::path("memory")).and(warp::path::end()).and_then(trigger_memory_profile);let cpu_profile = warp::post().and(warp::path("profile")).and(warp::path("cpu")).and(warp::path::end()).and_then(trigger_cpu_profile);memory_profile.or(cpu_profile)
}
現在,我們就可以通過?curl?命令,隨時在生產環境中采集性能數據了:
curl -X POST http://localhost:8080/profile/memory
curl -X POST http://localhost:8080/profile/cpu
生成的?.pb?文件,我們就可以通過?go tool pprof?工具,啟動一個交互式 Web UI,在瀏覽器中直觀查看調用圖、火焰圖等。
go tool pprof -http=localhost:8080 ./target/debug/otel-storage ./otel_storage_cpu_profile_20250806_032509.pb六、性能剖析:火焰圖下的“真相”
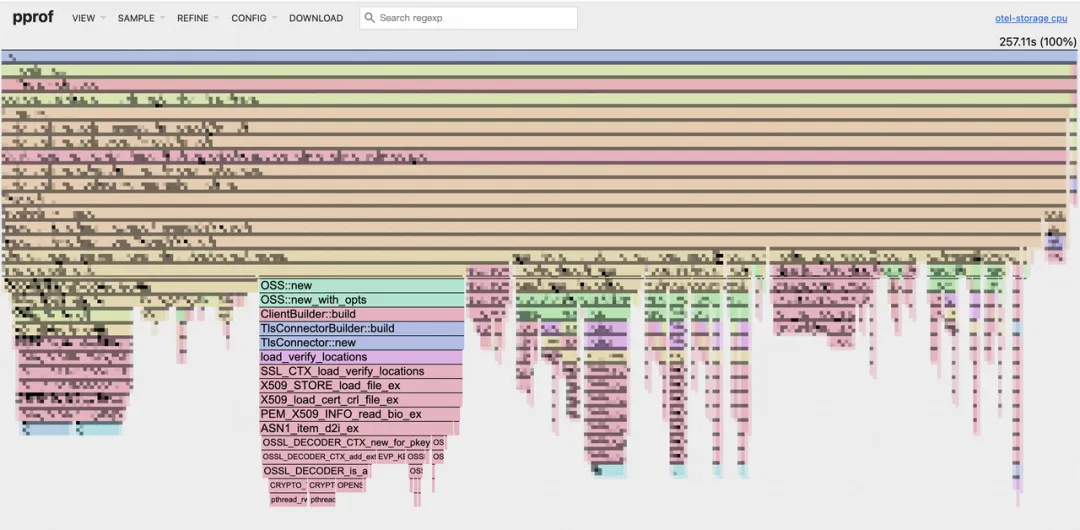
通過?go tool pprof?啟動的 Web UI,我們可以看到程序的火焰圖。
如何閱讀火焰圖
※ 頂部:代表程序的根函數。
※ 向下延伸;子函數調用關系。
※ 火焰條的寬度:代表該函數在 CPU 上消耗的時間。寬度越寬,消耗的時間越多,越可能存在性能瓶頸。
CPU Profile
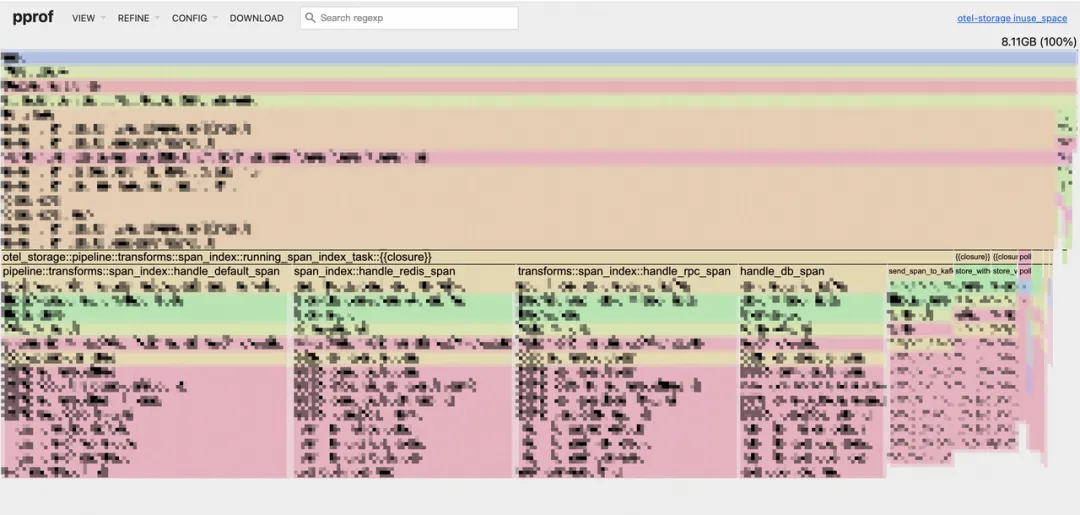
Memory Profile
在我們的 CPU 火焰圖中,一個令人意外的瓶頸浮出水面:OSS::new?占用了約 19.1% 的 CPU 時間。深入分析后發現,?OSS::new?內部的?TlsConnector?在每次新建連接時都會進行 TLS 握手,這是導致 CPU 占用過高的根本原因。
原來,我們的代碼在每次寫入 OSS 時,都會新建一個 OSS 實例,隨之而來的是一個全新的 HTTP 客戶端和一次耗時的 TLS 握手。盡管?oss-rust-sdk?內部有連接池機制,但由于我們每次都創建了新實例,這個連接池根本無法發揮作用!
七、優化方案:從“每次新建”到“共享復用”
問題的核心在于重復創建 OSS 實例。我們的優化思路非常清晰:復用 OSS 客戶端實例,避免不必要的 TLS 握手開銷。
優化前
每次寫入都新建 OSS 客戶端。
fn?write_oss() {// 每次寫入都新建一個OSS實例let?oss_instance =?create_oss_client(oss_config.clone());tokio::spawn(async?move {// 獲取寫入偏移量、文件名// 構造OSS寫入所需資源和頭信息// 寫入OSSlet?result = oss_instance.append_object(data, file_name, headers, resources).await;
}
fn?create_oss_client(config:?OssWriteConfig) ->?OSS?{OSS::new(……)
}
這種方案在流量較小時可能問題不大,但在萬億流量的生產環境中,頻繁的實例創建會造成巨大的性能浪費。
優化前
※ 共享實例
讓每個處理任務(?DecodeTask?)持有?Arc<OSS>?共享智能指針,確保所有寫入操作都使用同一個 OSS 實例。
let oss_client =?Arc::new(create_oss_client(oss_config.clone()));
let oss_instance =?self.oss_client.clone();?
// ...
let result = oss_instance.append_object(data, file_name, headers, resources).await;
※ 自動重建機制
為了應對連接失效或網絡問題,我們引入了自動重建機制。當寫入次數達到閾值或發生寫入失敗時,我們會自動創建一個新的 OSS 實例來替換舊實例,從而保證服務的健壯性。
// 使用原子操作確保多線程環境下的計數安全
let write_count =?self.oss_write_count.load(std::sync::atomic::Ordering::SeqCst);
let failure_count =?self.oss_failure_count.load(std::sync::atomic::Ordering::SeqCst);// 檢查是否需要重建實例...
fn?recreate_oss_client(&mut?self)?{let new_oss_client =?Arc::new(create_oss_client(self.oss_config.clone()));self.oss_client = new_oss_client;self.oss_write_count.store(0, std::sync::atomic::Ordering::SeqCst);self.oss_failure_count.store(0, std::sync::atomic::Ordering::SeqCst);// 記錄OSS客戶端重建次數指標OSS_CLIENT_RECREATE_COUNT.with_label_values(&[]).inc();info!("OSS client recreated");
}
八、優化效果:性能數據“一飛沖天”
優化后的服務上線后,我們觀察到了顯著的性能提升。
CPU 資源使用率
同比下降約?20%。

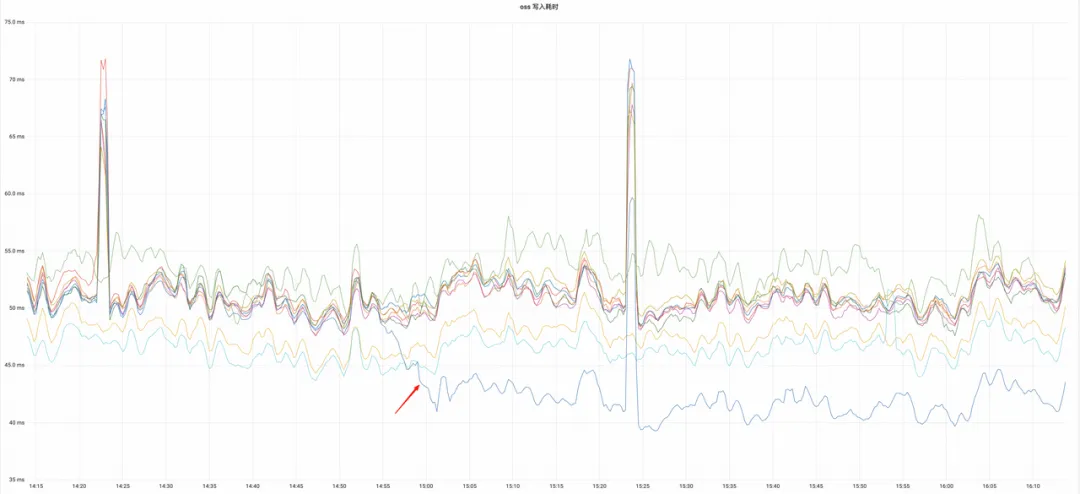
OSS 寫入耗時
同比下降約?17.2%,成為集群中最短的寫入耗時。
※?OSS寫入耗時
※?OSS相關資源只占千分之一

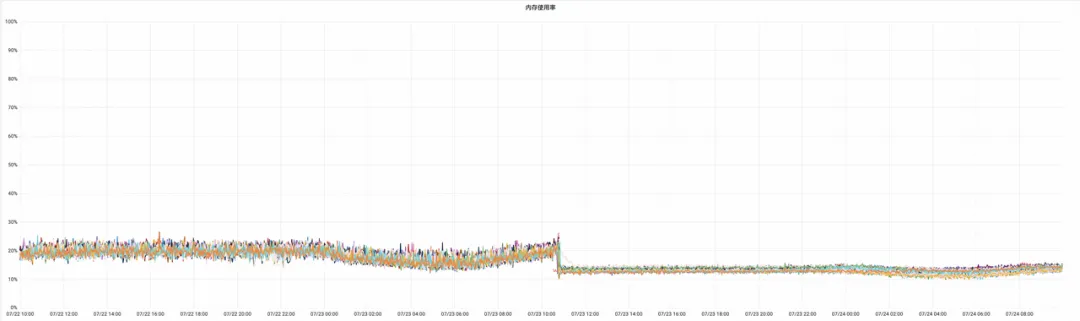
內存使用率
平均下降?8.77%,這部分下降可能也得益于我們將內存分配器從?mimalloc?替換為?jemalloc?的綜合效果。
這次優化不僅解決了特定服務的性能問題,更重要的是,它驗證了在 Rust 中通過 Profiling 工具進行深度性能分析的可行性。即使在已經實現了初步性能提升的 Rust 服務中,仍然存在巨大的優化空間。
未來,我們將繼續探索更高效的 Profiling 方案,并深入挖掘其他潛在的性能瓶頸,以在萬億流量的生產環境中實現極致的性能和資源利用率。
?引用?
- GitHub - tikv/jemallocator: Rust allocator using jemalloc as a backend
- https://crates.io/crates/jemalloc_pprof
- GitHub - google/pprof: pprof is a tool for visualization and analysis of profiling data
- Use Case: Heap Profiling
- https://jemalloc.net/jemalloc.3.html#heap_profile_format
- https://www.brendangregg.com/flamegraphs.html
- https://magiroux.com/rust-jemalloc-profiling
往期回顧
1.Valkey 單點性能比肩 Redis 集群了?Valkey8.0 新特性分析|得物技術
2.Java volatile 關鍵字到底是什么|得物技術
3.社區搜索離線回溯系統設計:架構、挑戰與性能優化|得物技術
4.正品庫拍照PWA應用的實現與性能優化|得物技術
5.得物社區活動:組件化的演進與實踐
文 /?炯帆?南風
關注得物技術,每周更新技術干貨
要是覺得文章對你有幫助的話,歡迎評論轉發點贊~
未經得物技術許可嚴禁轉載,否則依法追究法律責任。


 中的尺度 s 與旋轉 R 相乘,而不是平移 t?)


K230/STM32全開源)

)


