分布式訓練
所有代碼可以見我github 倉庫:https://github.com/xiejialong/ddp_learning.git
數據并行(Data Parallelism,DP)
跨多個gpu訓練模型的最簡單方法是使用 torch.nn.DataParallel. 在這種方法中,模型被復制到所有可用的GPU上,并且所有進程都由第一個GPU(也稱為主進程)管理。該方法將輸入拆分到gpu上,并行計算梯度,并在主進程上更新模型參數之前對它們進行平均。更新后,主進程將更新后的參數廣播給所有其他gpu。
DataParallel并不推薦,有以下原因:
- 額外開支較大:雖然它很容易使用,但它有一些通信開銷,因為要等待所有gpu完成反向傳播、收集梯度并廣播更新的參數。為了獲得更好的性能,特別是在擴展到多個節點時,請使用分布式數據并行
DistributedDataParallel(DDP)。 - 顯存占用大:主GPU的內存使用率比其他GPU高,因為它收集了其他GPU的所有梯度。因此,如果您在單個GPU上已經存在內存問題,那么dataparlil將使其變得更糟。
注意,dataparllel在反向傳播后平均gpu之間的梯度。確保相應地縮放學習率(乘以gpu的數量)以保持相同的有效學習率。這同樣適用于批處理大小,提供給數據加載器的批處理大小在gpu上進行劃分<
例子:
import torch
import torch.nn as nn
import torch.optim as optim
from torch.utils.data import DataLoader, Dataset
import osclass MyModel(nn.Module): # 模型定義def __init__(self):super().__init__()self.net = nn.Sequential(nn.Linear(10, 10000), nn.Linear(10000, 5000),nn.Linear(5000, 2))def forward(self, x):return self.net(x)class MyData(Dataset): # 數據集定義def __init__(self):super().__init__()self.data_x = torch.concat([torch.rand(size=(10000, 10)) + torch.zeros(size=(10000, 10)), torch.rand(size=(10000, 10)) + torch.ones(size=(10000, 10))], dim=0)self.data_y = torch.concat([torch.zeros(size=(10000, ), dtype=torch.long), torch.ones(size=(10000, ), dtype=torch.long)], dim=0)def __getitem__(self, index):x = self.data_x[index]y = self.data_y[index]return x, ydef __len__(self):return len(self.data_x)train_data = MyData()  # 實例化數據集
train_loader = DataLoader(dataset=train_data, batch_size=64, shuffle=True)
model = MyModel() # 實例化模型
if torch.cuda.device_count() > 1:model = nn.DataParallel(model)
model = model.cuda()optimizer = optim.Adam(model.parameters(), lr=0.0001) # 定義優化器
criterion = nn.CrossEntropyLoss() # 定義評價器
print(len(train_loader))
for data, target in train_loader:data, target = data.cuda(), target.cuda() # 數據放入顯卡optimizer.zero_grad() # 梯度歸零output = model(data) # 模型推理loss = criterion(output, target) # 計算lossloss.backward() # 反向傳播梯度optimizer.step() # 模型參數更新print(loss.item())
分布式數據并行(Distributed Data Parallelism, DDP)
為了獲得更好的性能,PyTorch提供了torch.nn.parallel.distributedDataParallel(DDP),它對于多gpu訓練更有效,特別是對于多節點設置。事實上,當使用DDP時,訓練代碼分別在每個GPU上執行,每個GPU直接與其他GPU通信,并且僅在必要時進行通信,從而減少了通信開銷。在DDP方法中,主進程的作用大大減少,每個GPU負責自己的向前和向后傳遞,以及參數更新。向前傳遞后,開始向后傳遞,每個GPU開始將自己的梯度發送給所有其他GPU,每個GPU接收所有其他GPU的梯度之和。這個過程被稱為all-reduce操作。之后,每個GPU都有完全相同的梯度,并更新其自己的模型副本的參數。Reduce:分布式計算中的一種常見操作,其中計算結果跨多個進程聚合。All -reduce意味著所有進程都調用Reduce操作來接收來自所有其他進程的結果。
基于torch.multiprocessing的啟動方式
啟動程序時不需要在命令行輸入額外的參數,寫起來也比較容易,但是調試較麻煩
import os
import torch
import torch.distributed as dist  # 分布式庫
import torch.multiprocessing as mp  # 多線程
from torch.utils.data import Dataset, DataLoader, DistributedSampler  # 數據集庫
import torch.nn as nn  # 網絡結構庫
import torch.optim as optim  # 優化器庫
from torch.amp import autocast, GradScaler  # 混合精度庫os.environ["CUDA_VISIBLE_DEVICES"]='2,3'scaler = GradScaler() # 自動縮放梯度class MyModel(nn.Module): # 模型定義def __init__(self):super().__init__()self.net = nn.Sequential(nn.Linear(10, 10000), nn.Linear(10000, 5000),nn.Linear(5000, 2))def forward(self, x):return self.net(x)class MyData(Dataset): # 數據集定義def __init__(self):super().__init__()self.data_x = torch.concat([torch.rand(size=(10000, 10)) + torch.zeros(size=(10000, 10)), torch.rand(size=(10000, 10)) + torch.ones(size=(10000, 10))], dim=0)self.data_y = torch.concat([torch.zeros(size=(10000, ), dtype=torch.long), torch.ones(size=(10000, ), dtype=torch.long)], dim=0)def __getitem__(self, index):x = self.data_x[index]y = self.data_y[index]return x, ydef __len__(self):return len(self.data_x)def worker(rank, world_size):dist.init_process_group("nccl", rank=rank, world_size=world_size) # 定義通信方式torch.cuda.set_device(rank) # 設置當前線程控制的GPUprint("init model")model = MyModel().cuda()print(f"init ddp rank {rank}")ddp_model = torch.nn.parallel.DistributedDataParallel(model, device_ids=[rank]) traindata = MyData()train_sampler = DistributedSampler(dataset=traindata, shuffle=True) # 定義分布式數據采集器train_loader = DataLoader(traindata, batch_size=64,sampler=train_sampler, num_workers=4, pin_memory=True) # 定義數據加載器optimizer = optim.Adam(ddp_model.parameters(), lr=0.0001) # 定義優化器criterion = nn.CrossEntropyLoss() # 定義評價函數print("train")accumulation_steps = 4 # 設置梯度累計次數optimizer.zero_grad(set_to_none=True) # 重設梯度for batch_idx, (inp, target) in enumerate(train_loader):inp, target = inp.cuda(), target.cuda()with autocast(device_type="cuda"): # 開啟混合精度訓練output = ddp_model(inp)loss = criterion(output, target)loss = loss / accumulation_steps  # 歸一化損失scaler.scale(loss).backward() # 混合精度訓練下進行損失縮放并執行后向傳播if (batch_idx + 1) % accumulation_steps == 0:# optimizer.step()  # 更新權重scaler.step(optimizer) # 混合精度下的權重更新scaler.update()optimizer.zero_grad(set_to_none=True)  # 每次更新完進行梯度清零print(loss)dist.barrier()dist.destroy_process_group()if __name__ == "__main__":world_size = torch.cuda.device_count()mp.spawn(worker, nprocs=world_size, args=(world_size,))
啟動多GPU訓練的命令(高版本被移除rank):
python -m torch.distributed.launch --nproc_per_node=4 train.py
或使用torchrun
torchrun --nproc_per_node=4 train.py
基于torch.distributed的啟動方式
一個完整的訓練架構
參考:
https://blog.csdn.net/wxc971231/article/details/132827787
import os
import torch
import torch.nn as nn
import torch.optim as optim
import torch.distributed as dist
from torch.utils.data import Dataset, DataLoader, DistributedSampler
import argparse
import numpy as np
from tqdm import tqdm
os.environ["CUDA_VISIBLE_DEVICES"]="2,3"class MyModel(nn.Module): # 模型定義def __init__(self):super().__init__()self.net = nn.Sequential(nn.Linear(10, 10000), nn.Linear(10000, 5000),nn.Linear(5000, 2))def forward(self, x):return self.net(x)class MyData(Dataset): # 數據集定義def __init__(self):super().__init__()self.data_x = torch.concat([torch.rand(size=(10000, 10)) + torch.zeros(size=(10000, 10)), torch.rand(size=(10000, 10)) + torch.ones(size=(10000, 10))], dim=0)self.data_y = torch.concat([torch.zeros(size=(10000, ), dtype=torch.long), torch.ones(size=(10000, ), dtype=torch.long)], dim=0)def __getitem__(self, index):x = self.data_x[index]y = self.data_y[index]return x, ydef __len__(self):return len(self.data_x)def load_train_objs(ags):train_dataset = MyData() # 定義數據集train_sampler = DistributedSampler(train_dataset, num_replicas=ags.world_size, rank=ags.rank, shuffle=True)  # 將數據集進行均分train_loader = DataLoader(train_dataset, batch_size=args.batch_size, sampler=train_sampler, pin_memory=True) # 定義數據加載器model = MyModel() # 定義模型model = torch.nn.SyncBatchNorm.convert_sync_batchnorm(model)model.to(ags.device)ddp_model = torch.nn.parallel.DistributedDataParallel(model, device_ids=[ags.local_rank]) # 把模型放入不同的gpureturn train_loader, ddp_modeldef init_ddp_env(args):# 分布式同行環境初始化dist.init_process_group(backend='nccl', init_method="env://")# 獲取全局/本地 rank、world_sizeargs.rank = int(os.environ.get("RANK", -1))args.local_rank = int(os.environ.get("LOCAL_RANK", -1))args.world_size = int(os.environ.get("WORLD_SIZE", -1))# 設置GPU顯卡綁定torch.cuda.set_device(args.local_rank)args.device = torch.device("cuda")# 打印綁定信息print(f"[RANK {args.rank} | LOCAL_RANK {args.local_rank}] Using CUDA device {torch.cuda.current_device()}: {torch.cuda.get_device_name(torch.cuda.current_device())} | World size: {args.world_size}")dist.barrier() # 等待所有進程都初始化完畢,即所有GPU都要運行到這一步以后再繼續class Trainer:def __init__(self, args, model: torch.nn.Module, train_loader: DataLoader, optimizer: torch.optim.Optimizer, criterion):self.model = modelself.train_loader = train_loaderself.optimizer = optimizerself.criterion = criterionself.device = args.deviceself.snapshot_path = args.snapshot_pathself.gpu_id = args.local_rankself.max_epochs = args.max_epochsself.save_every = args.save_everyself.epochs_run = 0if os.path.exists(args.resume_path):print('loading snapshot')self._load_snapshot(args.resume_path)def _load_snapshot(self, resume_path):''' 加載 snapshot 并重啟訓練 '''loc = f"cuda:{self.gpu_id}"snapshot = torch.load(resume_path, map_location=loc)self.model.load_state_dict(snapshot["MODEL_STATE"])self.epochs_run = snapshot["EPOCHS_RUN"]print(f"Resuming training from snapshot at Epoch {self.epochs_run}")def _run_batch(self, inp, targets):self.optimizer.zero_grad()output = self.model(inp)loss = self.criterion(output, targets)loss.backward()self.optimizer.step()return loss.item()def _run_epoch(self, epoch):epoch_losses = []self.train_loader.sampler.set_epoch(epoch)            # 設置 epoch 保證多 GPU 上數據不重疊for inp, targets in self.train_loader:inp = inp.to(self.device)targets = targets.to(self.device)loss = self._run_batch(inp, targets)epoch_losses.append(loss)return np.mean(epoch_losses)def _save_snapshot(self, epoch):# 在 snapshot 中保存恢復訓練所必須的參數snapshot = {"MODEL_STATE": self.model.state_dict(),  # 由于多了一層 DDP 包裝,通過 .module 獲取原始參數 "EPOCHS_RUN": epoch,}save_path = os.path.join(self.snapshot_path, f"epoch_{epoch}.pt")torch.save(snapshot, save_path)# print(f"Epoch {epoch} | Training snapshot saved at {save_path}")def train(self):# 現在從 self.epochs_run 開始訓練,統一重啟的情況with tqdm(total=self.max_epochs, desc=f"[GPU{self.gpu_id}] Training", position=self.gpu_id, initial=self.epochs_run) as pbar:for epoch in range(self.epochs_run, self.max_epochs + self.epochs_run):epoch_loss = self._run_epoch(epoch)                         # 各個 GPU 上都在跑一樣的訓練進程,這里指定 rank0 進程保存 snapshot 以免重復保存if self.gpu_id == 0 and epoch % self.save_every == 0:self._save_snapshot(epoch)pbar.set_postfix({'epoch': epoch, 'loss':'{:.2f}'.format(epoch_loss)})pbar.update()def worker(args):init_ddp_env(args)  # 初始化分布式環境train_loader, ddp_model = load_train_objs(args)  # 導入分布式數據導入器和模型optimizer = optim.Adam(ddp_model.parameters(), lr=args.lr)criterion = nn.CrossEntropyLoss()trainer = Trainer(args, ddp_model, train_loader, optimizer, criterion)trainer.train()if __name__=="__main__":import argparseparser = argparse.ArgumentParser(description='simple distributed training job')parser.add_argument('--rank', default=-1, type=int, help='Rank (default: -1)')parser.add_argument('--world_size', default=1, type=int, help='world_size (default: -1)')parser.add_argument('--local_rank', default=-1, type=int, help='local_rank (default: 1)')parser.add_argument('--device', default="cuda", type=str, help='local_rank (default: 1)')parser.add_argument('--batch_size', default=32, type=int, help='Input batch size on each device (default: 32)')parser.add_argument('--lr', default=0.001, type=float, help='Learing rate (default: 0.001)')parser.add_argument('--snapshot_path', default="checkpoints/", type=str, help='Path of checkpoints (default: checkpoints/)')parser.add_argument('--save_every', default=1, type=int, help='Frequence of checkpoint save')parser.add_argument('--max_epochs', default=5, type=int, help='Total epoch')parser.add_argument('--resume_path', default="checkpoints/epoch_2.pt", type=str, help='Path of resume file')args = parser.parse_args()worker(args)#  torchrun --nnodes=2 --nproc_per_node=2 --node_rank=0 --master_addr=xxx --master_port=xx xxx.py
# --nnodes: 表示參與訓練的總機器數
# --nproc_per_node:表示每臺機器上要啟動幾個訓練進程,一個進程對應一個 GPU,因通常設置為你機器上要用到的GPU數。整個分布式環境下,總訓練進程數 = nnodes * nproc_per_node
# --node_rank:表示當前機器是第幾臺機器,從 0 開始編號,必須每臺機器都不同
# --master_addr 和 --master_port:指定主節點的 IP 和端口,用于 rendezvous(進程對齊)和通信初始化,所有機器必須填寫相同的值!
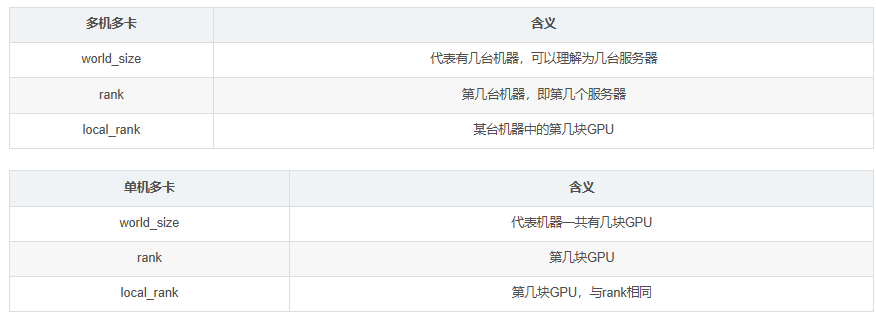
多機多卡的啟動和bash
參考:https://cloud.tencent.com/developer/article/2514642
下面是一個簡單的分布式訓練代碼
import os
from time import sleep
import torch
import torch.distributed as dist
import torch.nn as nn
import torch.optim as optim
import datetimefrom torch.nn.parallel import DistributedDataParallel as DDPclass ToyModel(nn.Module):def __init__(self):super(ToyModel, self).__init__()self.net1 = nn.Linear(10, 10)self.relu = nn.ReLU()self.net2 = nn.Linear(10, 5)def forward(self, x):return self.net2(self.relu(self.net1(x)))def train():local_rank = int(os.environ["LOCAL_RANK"])rank = int(os.environ["RANK"])while True:print(f"[{os.getpid()}] (rank = {rank}, local_rank = {local_rank}) training...")model = ToyModel().cuda(local_rank)ddp_model = DDP(model, [local_rank])loss_fn = nn.MSELoss()optimizer = optim.SGD(ddp_model.parameters(), lr=0.001)optimizer.zero_grad()outputs = ddp_model(torch.randn(20, 10).to(local_rank))labels = torch.randn(20, 5).to(local_rank)loss = loss_fn(outputs, labels)loss.backward()print(f"[{os.getpid()}] (rank = {rank}, local_rank = {local_rank}) loss = {loss.item()}\n")optimizer.step()sleep(1)def run():env_dict = {key: os.environ[key]for key in ("MASTER_ADDR", "MASTER_PORT", "WORLD_SIZE", "LOCAL_WORLD_SIZE")}print(f"[{os.getpid()}] Initializing process group with: {env_dict}")dist.init_process_group(backend="nccl", timeout=datetime.timedelta(seconds=30))train()dist.destroy_process_group()if __name__ == "__main__":run()
在多個主機上執行
torchrun --nproc_per_node=M --nnode=N --node_rank=0 --master_addr='xxx.xxx.xxx.xxx' --master_port=1234 ddp_multi_master.py
注意這里參數M表示你單個機器上的顯卡數,N是你有幾臺機器,--node_rank,這里是不同機器上的區別,主機上設置0,其他機器上設置1,2,…,N-1.
也可以寫bash文件執行更方便
#!/bin/bash
# 設置基本參數
MASTER_ADDR=xxx.xxx.xxx.xxx           # 主機IP
MASTER_PORT=29400                   # 主機端口
NNODES=2                            # 參與訓練的總機器數
NPROC_PER_NODE=2                    # 每臺機器上的進程數# 所有網卡的IP地址,用于篩選
ALL_LOCAL_IPS=$(hostname -I)
# 根據本機 IP 配置通信接口
if [[ "$ALL_LOCAL_IPS" == *"xxx.xxx.xxx.xxx"* ]]; thenNODE_RANK=0                       # 表示當前機器是第0臺機器IFNAME=eno1   # 機器0的網卡名稱mytorchrun=~/anaconda3/envs/lora/bin/torchrun  # 虛擬環境下torchrun的位置
elif [[ "$ALL_LOCAL_IPS" == *"xxx.xxx.xxx.xxx"* ]]; thenNODE_RANK=1                       # 表示當前機器是第1臺機器IFNAME=enp6s0 # 機器1的網卡名稱mytorchrun=/home/users1/xjl/miniconda3/envs/lora/bin/torchrun
elseexit 1
fi# 設置 RDMA 接口
export NCCL_IB_DISABLE=0            # 是否禁用InfiniBand
export NCCL_IB_HCA=mlx5_1           # 使用哪個RDMA接口進行通信
export NCCL_SOCKET_IFNAME=$IFNAME   # 使用哪個網卡進行通信
export NCCL_DEBUG=INFO              # 可選:調試用export GLOO_IB_DISABLE=0            # 是否禁用InfiniBand
export GLOO_SOCKET_IFNAME=$IFNAME   # 使用哪個網卡進行通信
export PYTHONUNBUFFERED=1           # 實時輸出日志# 啟動分布式任務
$mytorchrun \--nnodes=$NNODES \--nproc_per_node=$NPROC_PER_NODE \--node_rank=$NODE_RANK \--master_addr=$MASTER_ADDR \--master_port=$MASTER_PORT \ddp_multi_master.py
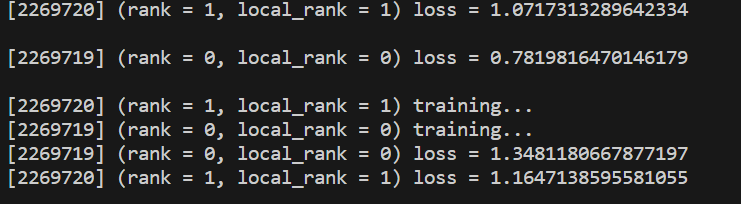
主機輸出信息:
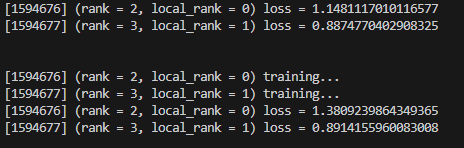
從機輸出信息:


使用方法,優勢,注意點)


 - 使用Cypher操作Neo4j)


