本文為《React Agent:從零開始構建 AI 智能體》專欄系列文章。 專欄地址:https://blog.csdn.net/suiyingy/category_12933485.html。項目地址:https://gitee.com/fgai/react-agent(含完整代碼示?例與實戰源)。完整介紹:https://blog.csdn.net/suiyingy/article/details/146983582。
????????節點和邊是相互依存的關系。邊的存在依賴于節點,因為邊的起點(source)和終點(target)都是節點的 id。邊用于定義節點之間的連接關系,這種關系可以表示流程流向、數據傳遞方向、依賴關系等。節點通過邊與其他節點進行交互,形成一個有機的圖表結構。例如,在一個流程圖中,節點可能代表不同的任務步驟,邊則表示任務之間的執行順序。
????????邊與節點共同構成 React Flow 圖表的核心內容,由 React Flow 容器統一管理。容器負責處理邊的布局計算、渲染以及交互響應,確保邊能夠準確地連接節點,并在節點位置變動、圖表縮放等操作下,依然保持正確的連接關系和視覺效果。邊的存在使得原本獨立的節點形成一個有機整體,賦予圖表實際的業務意義和交互價值。
1 基本示例程序
????????下面是邊的基本示例程序。
import React, { useCallback } from 'react';
import {ReactFlow,useNodesState,useEdgesState,addEdge,
} from 'reactflow';import 'reactflow/dist/style.css';const initialNodes = [{ id: '1', position: { x: 0, y: 0 }, data: { label: '1' } },{ id: '2', position: { x: 0, y: 100 }, data: { label: '2' } },
];const initialEdges = [{ id: 'e1-2', source: '1', target: '2',type: 'default'}
];export default function App() {const [nodes, setNodes, onNodesChange] = useNodesState(initialNodes);const [edges, setEdges, onEdgesChange] = useEdgesState(initialEdges);const onConnect = useCallback((params) => setEdges((eds) => addEdge(params, eds)),[setEdges],);return (<div style={{ height: '500px' }}><ReactFlownodes={nodes}edges={edges}onNodesChange={onNodesChange}onEdgesChange={onEdgesChange}onConnect={onConnect}fitView/></div>);
}
????????運行程序后結果如下圖所示。
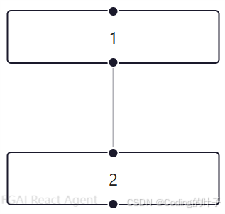
圖1 直線邊
2?基本屬性
2.1 id
????????id:邊的唯一標識符,用于在 React Flow 中識別和管理邊。在復雜圖表中,通過 id 可以方便地獲取、更新或刪除特定邊。
const edgeWithId = {id: 'unique-edge-id-1',source: 'node-a',target: 'node-b',type:'default'
};
2.2?source?和?target
????????source?和?target:分別指定邊的起點和終點節點的 id,是邊存在的基礎,決定邊連接的節點對象。source 是提供輸入的節點,target 則是接收輸出的節點。
const specificConnectionEdge = {id: 'edge-2',source: 'node-3',target: 'node-4',type: 'straight'
};
2.3?sourceHandle?和targetHandle
????????sourceHandle?和targetHandle:分別指定邊的起點和終點節點的連接端點?id。sourceHandle 是提供輸入的端點,targetHandle 則是接收輸出的端點。
import React, { useCallback } from 'react';
import {ReactFlow,useNodesState,useEdgesState,addEdge,Handle,
} from 'reactflow';
import 'reactflow/dist/style.css';const CustomNode = ({ data }) => {return (<div style={{padding: 20,border: '1px solid #ddd',borderRadius: 5,background: '#fff',}}><div>{data.label}</div>{/* 左側兩個輸入句柄 */}<Handletype="target"position="left"id="input-1"style={{ top: '30%' }}/><Handletype="target"position="left"id="input-2"style={{ top: '70%' }}/>{/* 右側兩個輸出句柄 */}<Handletype="source"position="right"id="output-1"style={{ top: '30%' }}/><Handletype="source"position="right"id="output-2"style={{ top: '70%' }}/></div>);
};const initialNodes = [{ id: '1', position: { x: 0, y: 0 }, data: { label: '1' },type: 'custom',},{ id: '2', position: { x: 200, y: 100 }, data: { label: '2' },type: 'custom',},
];const initialEdges = [{ id: 'e1-2a', source: '1', sourceHandle: 'output-1',target: '2', targetHandle: 'input-2',},{ id: 'e1-2b', source: '1', sourceHandle: 'output-2',target: '2', targetHandle: 'input-1',}
];const nodeTypes = {custom: CustomNode,
};export default function App() {const [nodes, setNodes, onNodesChange] = useNodesState(initialNodes);const [edges, setEdges, onEdgesChange] = useEdgesState(initialEdges);const onConnect = useCallback((params) => setEdges((eds) => addEdge({...params,type: 'default',}, eds)),[setEdges]);return (<div style={{ height: '500px' }}><ReactFlownodes={nodes}edges={edges}onNodesChange={onNodesChange}onEdgesChange={onEdgesChange}onConnect={onConnect}nodeTypes={nodeTypes}fitView/></div>);
}
????????運行程序后結果如下圖所示。
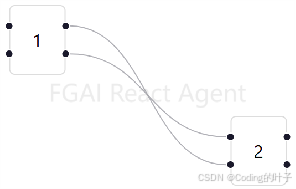
圖2 指定連接點
2.4?type
????????type:指定邊的類型,既可以是內置類型,也可以是自定義類型,影響邊的渲染方式和默認行為。邊的類型豐富多樣,默認包含?default、straight、step、smoothstep?等,每一種類型都賦予邊獨特的形狀與視覺呈現,滿足不同場景的設計需求。default?類型的邊通常會根據節點的相對位置,以自然流暢的曲線形態連接節點,這種曲線過渡柔和,能夠在復雜的節點布局中營造出一種和諧、美觀的視覺效果,讓整個流程圖看起來更具藝術感;straight?類型如其名,邊呈現為筆直的線條,簡潔明了地連接兩個節點,這種形狀在追求簡潔、直觀表達連接關系的場景下極為適用,能夠快速引導用戶理解節點之間的直接關聯;step?類型的邊則是通過直角轉折的方式連接節點,它會以階梯狀的折線形態出現,適合用于表示具有明確步驟、層級關系的連接,為流程圖增添清晰的邏輯層次感;smoothstep?類型的邊在?step?類型的基礎上進行了優化,它同樣有轉折,但轉折處采用了平滑的曲線過渡,在保留邏輯分層感的同時避免了過于生硬的直角,使邊的形態更加優雅流暢,在復雜且注重美觀與邏輯兼具的流程圖中發揮重要作用。
const initialEdges = [{ id: 'e1-2', source: '1', target: '2',type: 'smoothstep'}
];
????????運行程序后結果如下圖所示。

圖3 smoothstep 類型
2.5?style
????????style:用于設置邊的內聯樣式,包括線條顏色、寬度、線型(實線、虛線等)、箭頭樣式等。例如,將邊設置為紅色虛線:
const initialEdges = [{ id: 'e1-2', source: '1', target: '2',type: 'smoothstep',style: {stroke:'red',strokeWidth: 3,strokeDasharray: '5, 5',}}
]
????????運行程序后結果如下圖所示。
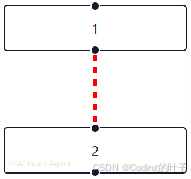
圖4? 邊樣式
2.6?animated
????????animated:設置為true時,邊可以啟用動畫效果,如淡入淡出、路徑變化動畫等,增強圖表的動態展示效果。
const initialEdges = [{ id: 'e1-2', source: '1', target: '2',type: 'smoothstep',animated: true,style: {stroke:'red',strokeWidth: 3,strokeDasharray: '5, 5',}}
];
2.7?selectable
????????selectable:控制邊是否可以被用戶選中。選中邊后,可以對其進行編輯、刪除等操作,或展示相關信息。
const initialEdges = [{ id: 'e1-2', source: '1', target: '2',type: 'smoothstep',animated: true,selectable: true,style: {stroke:'red',strokeWidth: 3,strokeDasharray: '5, 5',}}
];
2.8?事件屬性
????????onClick、onMouseEnter等事件屬性:與節點類似,邊也可以綁定各種事件處理函數,響應用戶操作。例如,當用戶點擊邊時,顯示邊的詳細信息:
const initialEdges = [{ id: 'e1-2', source: '1', target: '2',type: 'smoothstep',animated: true,selectable: true,style: {stroke:'red',strokeWidth: 3,strokeDasharray: '5, 5',},onClick: () => {alert('You clicked the edge!');}}
];
立即關注獲取最新動態
點擊訂閱《React Agent 開發專欄》,每周獲取智能體開發深度教程。項目代碼持續更新至React Agent 開源倉庫,歡迎 Star 獲取實時更新通知!FGAI 人工智能平臺:FGAI 人工智能平臺


)


 - Neo4j安裝教程(Windows))


)