文章目錄
- 前言
- 理論部分
- 棧的模擬實現
- STL中的棧容器
- 隊列的模擬實現
- STL中的隊列容器
- 作業部分
前言
這期的話會給大家講解棧和隊列的模擬實現和在STL中棧和隊列怎么用的一些知識和習題部分(這部分側重于理論知識,習題倒還是不難)
理論部分
棧的模擬實現
typedef int  STDataType;typedef struct Stack
{STDataType* a;//這里的a想表示的是數組int top;//表示數組a當前的容量int capacity;
}ST;void STInit(ST* ps)
{assert(ps);ps->a = (STDataType*)malloc(sizeof(STDataType) * 4);if (ps->a == NULL){perror("malloc fail");return;}ps->capacity = 4;ps->top = 0;
}void STDestroy(ST* ps)
{assert(ps);free(ps->a);ps->a = NULL;ps->top = 0;ps->capacity = 0;
}void STPush(ST* ps, STDataType x)
{assert(ps);if (ps->top == ps->capacity){STDataType* tmp = (STDataType*)realloc(ps->a,sizeof(STDataType) * ps->capacity*2);if (tmp == NULL){perror("realloc fail");return;}ps->a = tmp;ps->capacity *= 2;}ps->a[ps->top] = x;ps->top++;
}void STPop(ST* ps)
{assert(ps);assert(!STEmpty(ps));ps->top--;
}int STSize(ST* ps)
{assert(ps);return ps->top;
}bool STEmpty(ST* ps)
{assert(ps);return ps->top == 0;
}//拓展:bool里面如果return的是數字的話,會隱式轉換STDataType STTop(ST* ps)
{assert(ps);assert(!STEmpty(ps));return ps->a[ps->top - 1];
}
注意:這樣寫的話,此時的棧頂的下標是top-1
stPush那里一般用ps->top == ps->capacity
top那里是還沒存元素的
開空間完記得檢查是否開辟成功
盡量不要用while(st.top!=0去代替while(!STEmpty(&st))),數據結構最好封裝起來
注意STTop最后那里是ps->a[ps->top-1]
這個代碼有個問題:封裝時一般要typedef類型,這里搞了但是沒去用(讓以后要改類型時只用改一次)
STL中的棧容器
stack容器(棧)
頭文件:#include<stack>
創建:stack<T>st;//st是變量名,可以改;T是任意類型的數據
size empty
push:進棧
pop:出棧
top:返回棧頂元素,但是不會刪除棧頂元素(先進后出)
隊列的模擬實現
#include<stdio.h>
#include<stdlib.h>
#include<stdbool.h>
#include<assert.h>typedef char QDatatype;typedef struct QueueNode
{struct QueueNode* next;QDatatype data;
}QNode;typedef struct Queue
{QNode* head;QNode* tail;int size;
}Queue;void QueueInit(Queue* pq);
void QueueDestroy(Queue* pq);
void QueuePush(Queue* pq, QDatatype x);
void QueuePop(Queue* pq);
int QueueSize(Queue* pq);
bool QueueEmpty(Queue* pq);
QDatatype QueueFront(Queue* pq);
QDatatype QueueBack(Queue* pq);void QueueInit(Queue* pq)
{assert(pq);pq->head = pq->tail = NULL;pq->size = 0;
}void QueueDestroy(Queue* pq)
{assert(pq);QNode* cur = pq->head;while (cur){QNode* next = cur->next;free(cur);cur = next;}pq->head = pq->tail = NULL;pq->size = 0;
}void QueuePush(Queue* pq, QDatatype x)
{QNode* newnode = (QNode*)malloc(sizeof(QNode));if (newnode == NULL){perror("malloc fail");return;}newnode->data = x;newnode->next = NULL;if (pq->head == NULL){assert(pq->tail == NULL);pq->head = pq->tail = newnode;}else{pq->tail->next = newnode;pq->tail = newnode;}pq->size++;
}void QueuePop(Queue* pq)
{assert(pq);assert(pq->head != NULL);if (pq->head->next == NULL){free(pq->head);pq->head = pq->tail = NULL;}else{QNode* next = pq->head->next;free(pq->head);pq->head = next;}pq->size--;
}int QueueSize(Queue* pq)
{assert(pq);return pq->size;
}bool QueueEmpty(Queue* pq)
{assert(pq);return pq->size == 0;
}QDatatype QueueFront(Queue* pq)
{assert(pq);assert(!QueueEmpty(pq));return pq->head->data;
}QDatatype QueueBack(Queue* pq)
{assert(pq);assert(!QueueEmpty(pq));return pq->tail->data;
}
結構體定義那里可以像這樣在結構體里面用自己的指針
結構體1里面套結構體2的話,定義結構體1后不用單獨手動再為結構體1中的結構體2開辟
跟定義int指針,想變成數組需要malloc區分
注意:assert檢查的是結果為0,就會報錯
STL中的隊列容器
queue(隊列):
頭文件:#include<queue>
創建:queue<T>q;//q是變量名,T是任意類型的數據
size empty push pop
front:返回隊頭元素,但不會刪除
back:返回隊尾元素,但不會刪除
不可以用clear來直接清除隊列pop刪除的是隊頭
作業部分
力扣 有效的括號
力扣 有效的括號
注意點:右括號數量不等于左括號這個特殊情況不要忘了
感悟:像這種如果匹配的話要繼續走,不匹配的話要干啥的if里面寫不匹配的條件會好些代碼實現:
typedef struct Stack
{char*a;int top;int capacity;}void  STInit(){a = (char*)malloc(sizeof(char)*4);capacity = 4;top = 0;}void STPush(char*ps,char x){assert(ps);if(ps->top == ps->capacity){a = (char*)malloc(sizeof(char)*ps->capacity*2);capacity*=2;}ps->a[ps->top] = x;ps->top++;}void STPop(char*ps,char x){assert(ps);ps->top--;}bool isValid(char* s) {struct Stack;&a = &s;}
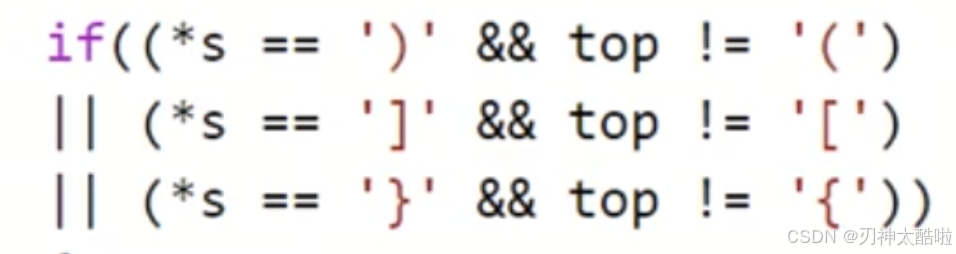
if如果判斷條件多的話可以像下面這樣寫,這樣寫不用續行符
而且if后面只跟一個語句的話,一般跟if寫同一行上
企業中的話,能初始化的盡量還是要初始化一下,競賽一般不用
力扣 用棧實現隊列
題目: 力扣 用棧實現隊列
相比用隊列實現棧可以優化的地方是:可以有個棧專門入棧,一個棧專門出棧,出棧的空了再把另一個棧倒過來代碼實現:
class MyQueue {
public:stack<int>q1;stack<int>q2;int count1 = 0;//用q1來存入棧,q2來搞出棧void push(int x) {q1.push(x);}int pop() {if(!q2.empty()){int m =   q2.top();q2.pop();return m;}else{while(q1.size()){int k = q1.top();q2.push(k); q1.pop();}int n = q2.top();q2.pop();return n;}}int peek() {if(!q2.empty()){return q2.top();}else {while(q1.size()){q2.push(q1.top()); q1.pop();}return q2.top();}}bool empty() {if(q1.empty()&&q2.empty())return true;else{return false;}}
};
力扣 設計循環隊列
題目:力扣 設計循環隊列
這里用鏈表模擬隊列不好(因為要找尾)所以用數組來模擬
想讓數組也能循環的話,就要時不時讓他對k取模(插入,刪除過程中也要)
由這個題引申出來的知識有:
1.malloc了幾次,后續也要free幾次,雖然說不free也可以通過,但是要是在面試中就是減分項,比如下面這種malloc的方式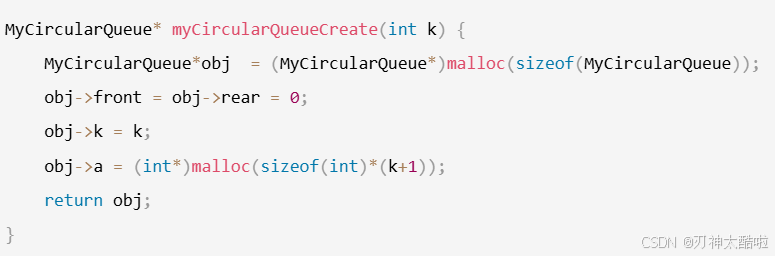
代碼實現:typedef struct {int*a;int front;int rear;int k;} MyCircularQueue;MyCircularQueue* myCircularQueueCreate(int k) {MyCircularQueue*obj = (MyCircularQueue*)malloc(sizeof(MyCircularQueue));obj->front = obj->rear = 0;obj->k = k;obj->a = (int*)malloc(sizeof(int)*(k+1));return obj;
}
bool myCircularQueueIsEmpty(MyCircularQueue* obj) {return obj->front == obj->rear;
}bool myCircularQueueIsFull(MyCircularQueue* obj) {return (obj->rear+1)%(obj->k+1) == obj->front;//這里的作用是讓rear在數組末時可以返回到0那去以及防止是空
}bool myCircularQueueEnQueue(MyCircularQueue* obj, int value) {if(myCircularQueueIsFull(obj)) return false;obj->a[obj->rear] = value;obj->rear = ((++obj->rear))%(obj->k+1);return true;
}bool myCircularQueueDeQueue(MyCircularQueue* obj) {if(myCircularQueueIsEmpty(obj)) return false;obj->front = (++obj->front)%(obj->k+1);return true;
}int myCircularQueueFront(MyCircularQueue* obj) {if(myCircularQueueIsEmpty(obj)){return -1;}return obj->a[obj->front];
}int myCircularQueueRear(MyCircularQueue* obj) {if(myCircularQueueIsEmpty(obj)){return -1;}return obj->a[(obj->rear-1+obj->k+1)%(obj->k+1)];
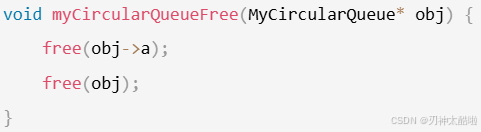
}void myCircularQueueFree(MyCircularQueue* obj) {free(obj->a);free(obj);
}隊列和棧都屬于線性數據結構 循環隊列也是線性數據結構


機器學習---決策樹和隨機森林)


)


)

