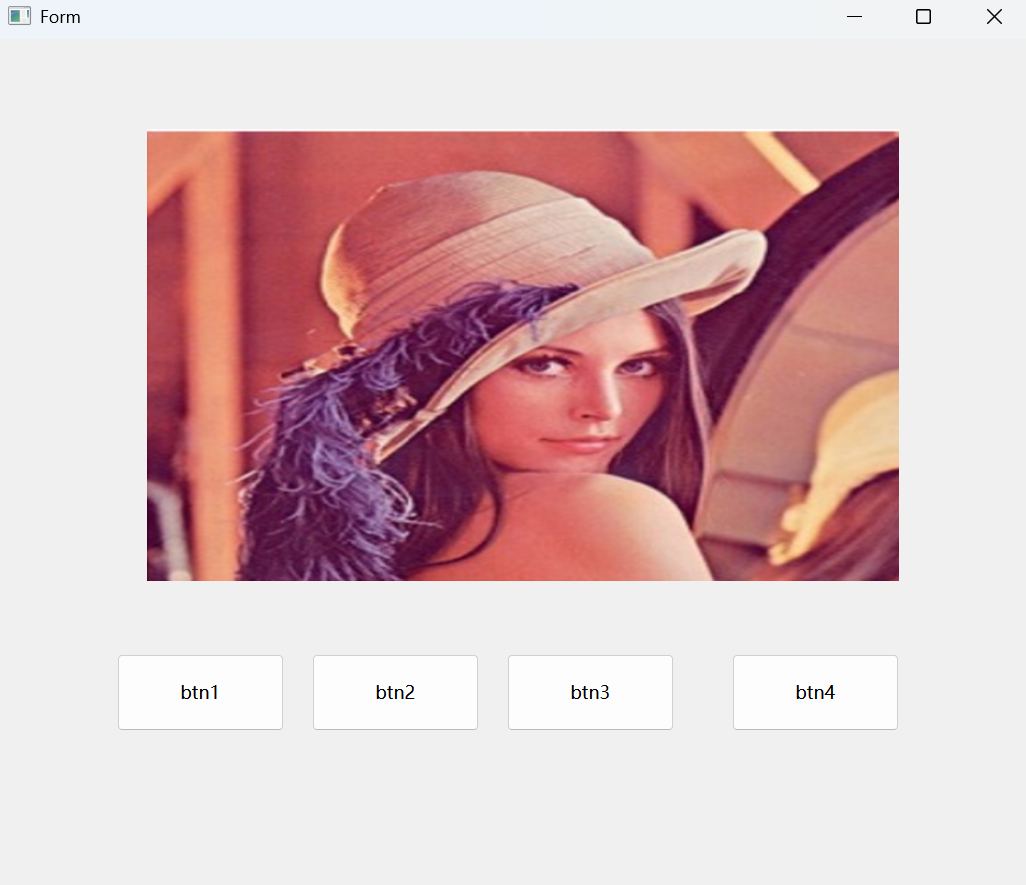
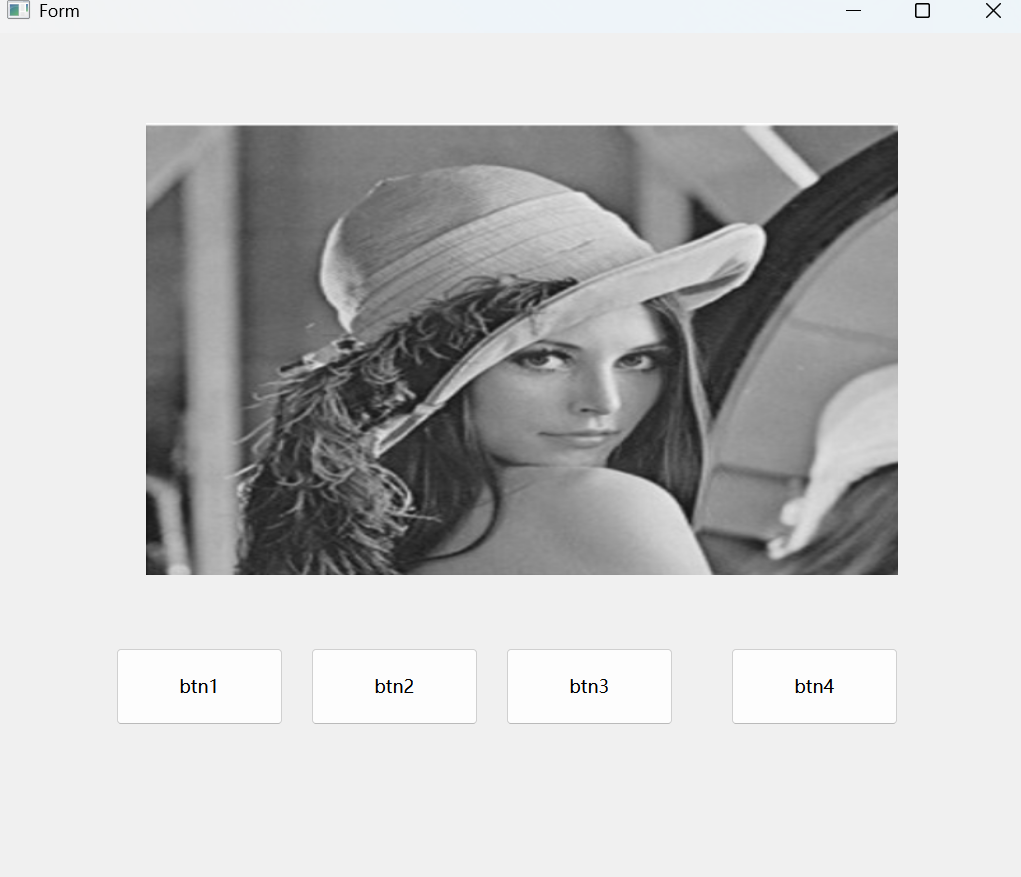
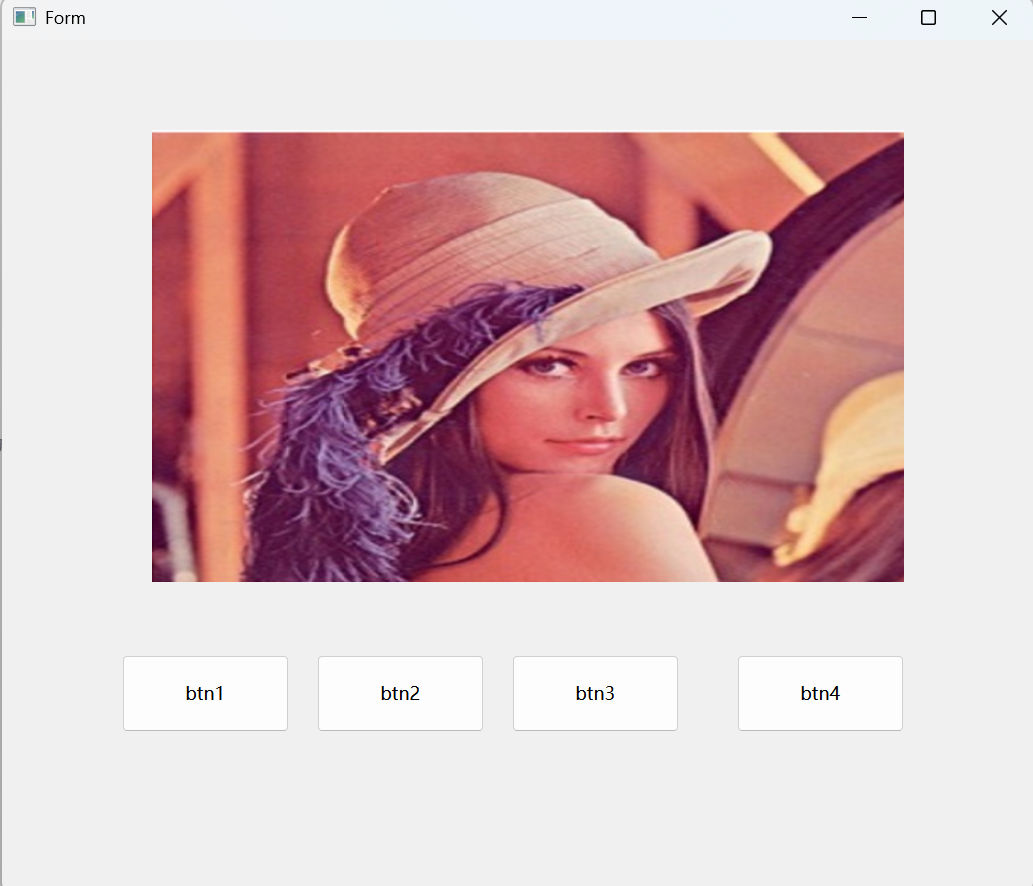
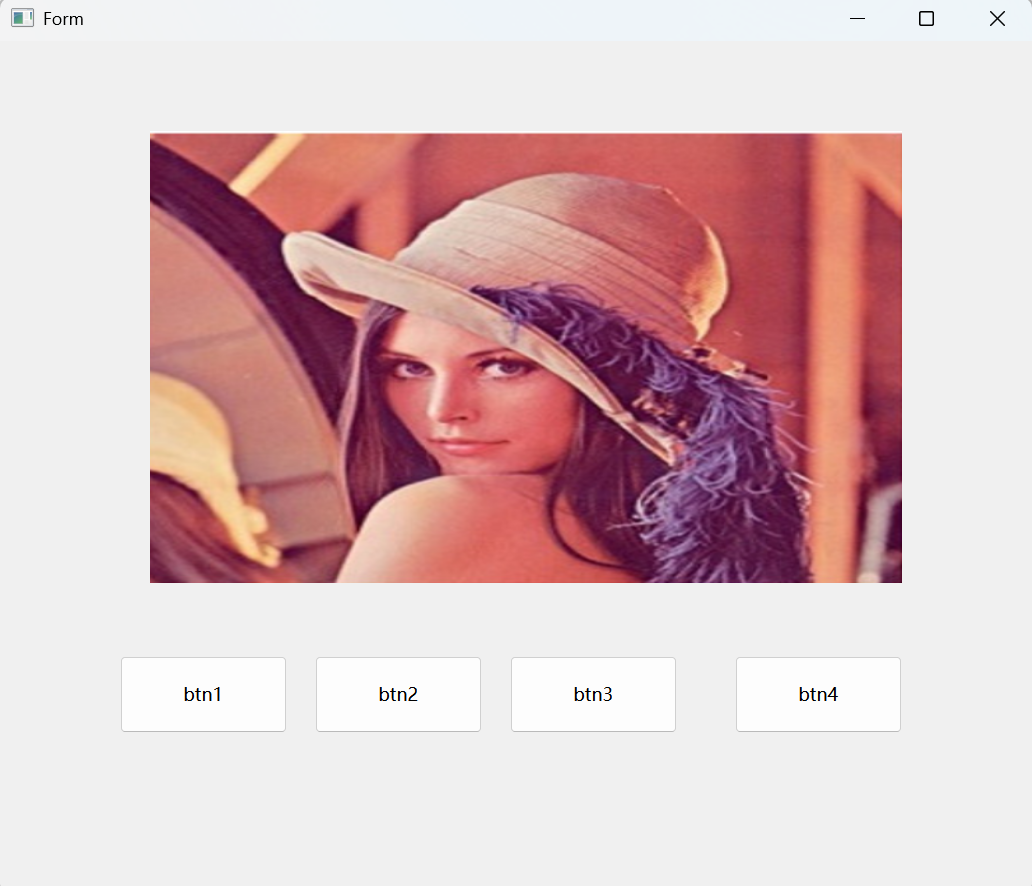
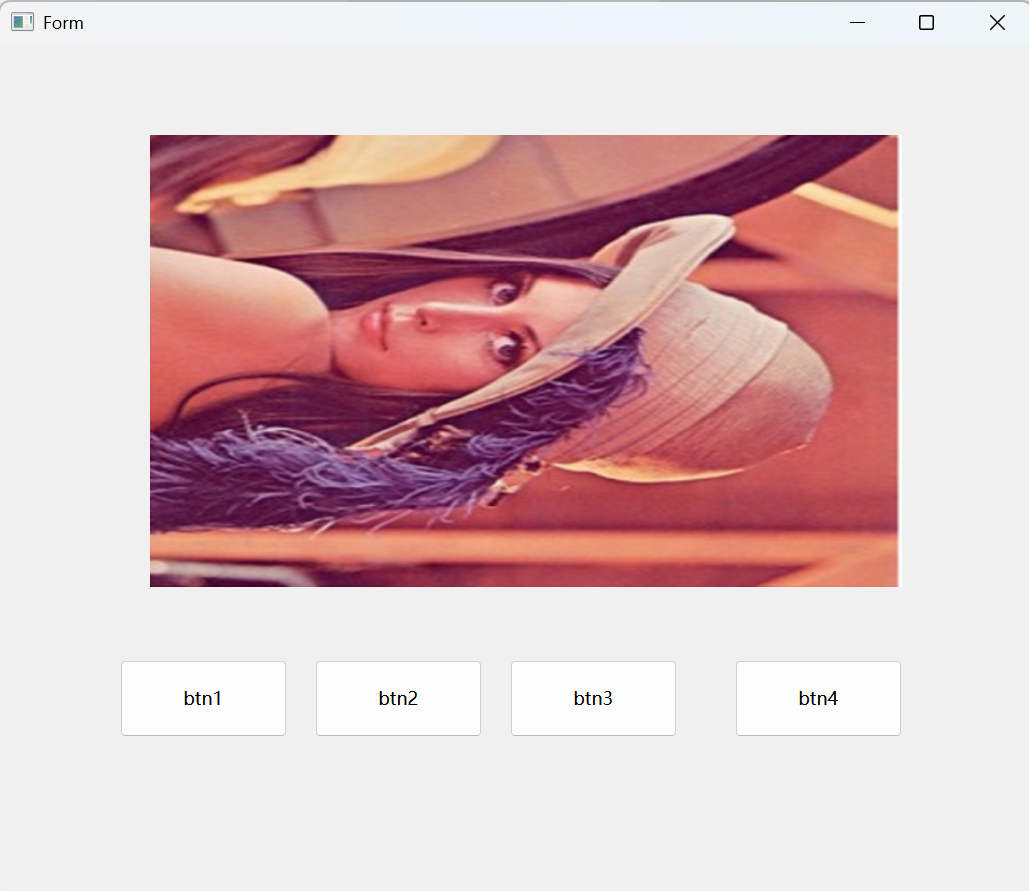
一、創建一個 PyQt 應用程序,該應用程序能夠:
- 使用 OpenCV 加載一張圖像。
- 在 PyQt 的窗口中顯示這張圖像。
- 提供四個按鈕(QPushButton):
- 一個用于將圖像轉換為灰度圖
- 一個用于將圖像恢復為原始彩色圖
- 一個用于將圖像進行翻轉
- 一個用于將圖像進行旋轉
- 4.當用戶點擊按鈕時,相應地更新窗口中顯示的圖像。
import sys
import cv2
from PyQt6.QtGui import QImage, QPixmap
from PyQt6.QtWidgets import QWidget, QApplication, QLabel, QPushButton
from PyQt6 import uic# 封裝一個我的窗口類
class MyWidget(QWidget):def __init__(self):super().__init__()# 通過 uic 將 ui 界面加載到程序中來ui = uic.loadUi("./form.ui", self)# 加載圖像self.original_image = cv2.imread("../images/lena.png")if self.original_image is None:print("無法加載圖像,請檢查圖像路徑。")sys.exit(1)self.current_image = self.original_image.copy()self.label: QLabel = ui.labelself.btn1: QPushButton = ui.btn1self.btn2: QPushButton = ui.btn2self.btn3: QPushButton = ui.btn3self.btn4: QPushButton = ui.btn4# 顯示原始圖像self.display_image(self.current_image)self.label.setScaledContents(True)# 連接按鈕信號和槽函數self.btn1.clicked.connect(self.convert_to_gray)self.btn2.clicked.connect(self.restore_color)self.btn3.clicked.connect(self.flip_image)self.btn4.clicked.connect(self.rotate_image)def display_image(self, image):height, width, channel = image.shapebytes_per_line = 3 * widthq_img = QImage(image.data, width, height, bytes_per_line, QImage.Format.Format_BGR888)pixmap = QPixmap.fromImage(q_img)self.label.setPixmap(pixmap)def convert_to_gray(self):self.current_image = cv2.cvtColor(self.current_image, cv2.COLOR_BGR2GRAY)self.current_image = cv2.cvtColor(self.current_image, cv2.COLOR_GRAY2BGR)self.display_image(self.current_image)def restore_color(self):self.current_image = self.original_image.copy()self.display_image(self.current_image)def flip_image(self):self.current_image = cv2.flip(self.current_image, 1)self.display_image(self.current_image)def rotate_image(self):self.current_image = cv2.rotate(self.current_image, cv2.ROTATE_90_CLOCKWISE)self.display_image(self.current_image)if __name__ == '__main__':app = QApplication(sys.argv)myWidget = MyWidget()myWidget.show()sys.exit(app.exec())
結果展示:
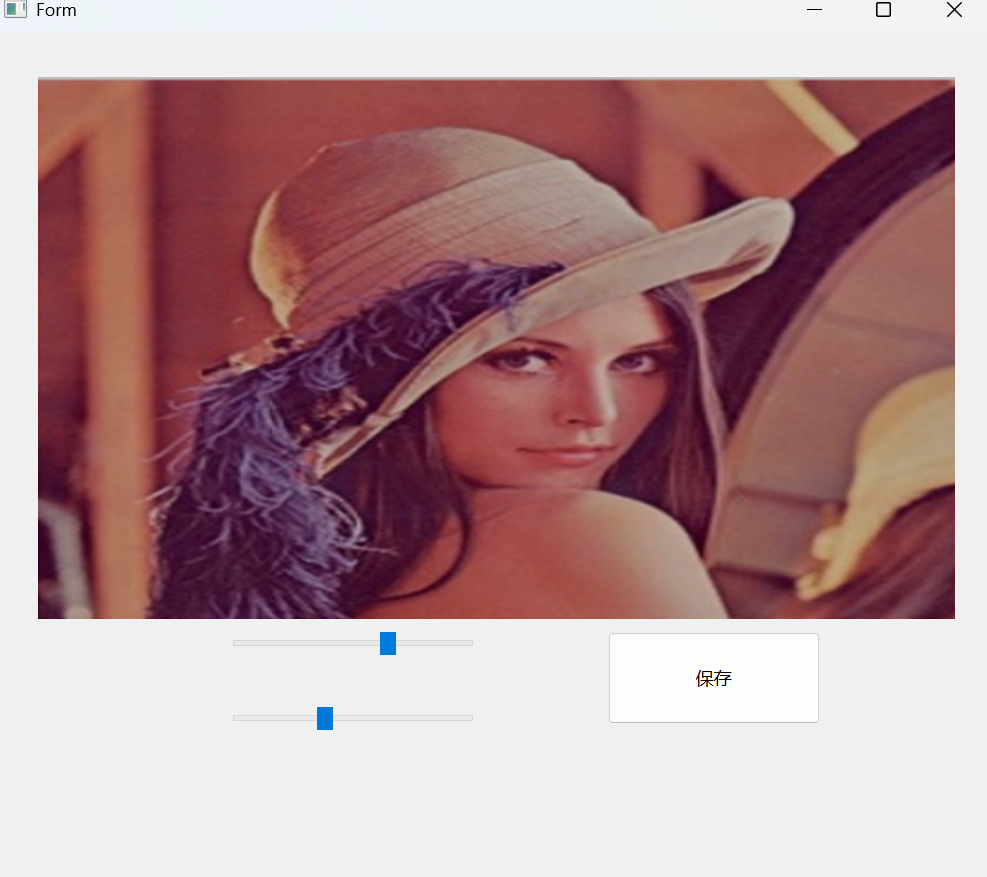
二、創建一個 PyQt 應用程序,該應用程序能夠:
- 使用 OpenCV 加載一張彩色圖像,并在 PyQt 的窗口中顯示它。
- 提供一個滑動條(QSlider),允許用戶調整圖像的亮度。
- 當用戶調整滑動條時,實時更新窗口中顯示的圖像亮度。
- 添加另一個滑動條(QSlider),允許用戶調整圖像的對比度。
- 當用戶調整滾動條時,實時更新窗口中顯示的圖像對比度。
- 提供一個按鈕(QPushButton),允許用戶將圖像保存為新的文件。
- 當用戶點擊保存按鈕時,將調整后的圖像保存到指定的路徑,OpenCV中使用cv2.imwrite()來保存圖片。
import sys
import cv2
from PyQt6.QtGui import QImage, QPixmap
from PyQt6.QtWidgets import QWidget, QApplication, QLabel, QPushButton, QSlider, QFileDialog
from PyQt6 import uicclass MyWidget(QWidget):def __init__(self):super().__init__()# 通過 uic 將 ui 界面加載到程序中來ui = uic.loadUi("./form1.ui", self)self.original_image = cv2.imread("../images/lena.png")if self.original_image is None:print("無法加載圖像,請檢查圖像路徑。")sys.exit(1)self.current_image = self.original_image.copy()self.label: QLabel = ui.labelself.Slider1: QSlider = ui.Slider1self.Slider2: QSlider = ui.Slider2self.pushButton: QPushButton = ui.pushButton# 初始化滑動條范圍self.Slider1.setRange(-100, 100)self.Slider2.setRange(0, 200)self.Slider1.setValue(0)self.Slider2.setValue(100)# 連接信號和槽self.Slider1.valueChanged.connect(self.adjust_brightness)self.Slider2.valueChanged.connect(self.adjust_contrast)self.pushButton.clicked.connect(self.save_image)self.display_image(self.current_image)self.label.setScaledContents(True)def display_image(self, image):height, width, channel = image.shapebytes_per_line = 3 * widthq_img = QImage(image.data, width, height, bytes_per_line, QImage.Format.Format_BGR888)pixmap = QPixmap.fromImage(q_img)self.label.setPixmap(pixmap)def adjust_brightness(self, value):# 調整亮度alpha = 1.0beta = valueself.current_image = cv2.convertScaleAbs(self.original_image, alpha=alpha, beta=beta)self.display_image(self.current_image)def adjust_contrast(self, value):# 調整對比度alpha = value / 100.0beta = 0self.current_image = cv2.convertScaleAbs(self.original_image, alpha=alpha, beta=beta)self.display_image(self.current_image)def save_image(self):# 選擇保存路徑file_path, _ = QFileDialog.getSaveFileName(self, "保存圖像", "", "圖像文件 (*.png *.jpg *.jpeg)")if file_path:try:cv2.imwrite(file_path, self.current_image)print(f"圖像已保存到 {file_path}")except Exception as e:print(f"保存圖像時出錯: {e}")if __name__ == '__main__':app = QApplication(sys.argv)myWidget = MyWidget()myWidget.show()sys.exit(app.exec())
?結果展示:
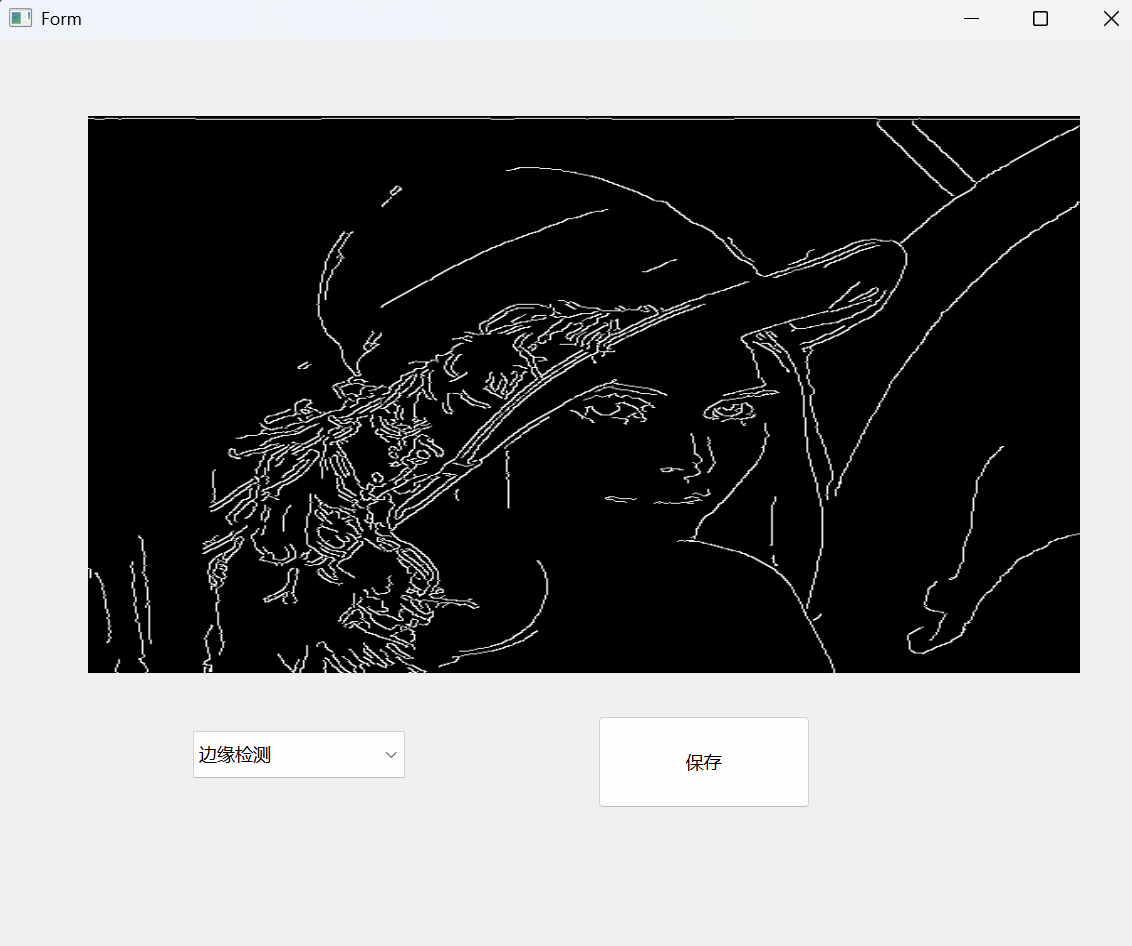
三、創建一個 PyQt 應用程序,該應用程序能夠:
- 使用 OpenCV 加載一張圖像。
- 在 PyQt 的窗口中顯示這張圖像。
- 提供一個下拉列表(QComboBox),對圖像做(模糊、銳化、邊緣檢測)處理:
- 模糊——使用cv2.GaussianBlur()實現
- 銳化——使用cv2.Laplacian()、cv2.Sobel()實現
- 邊緣檢測——使用cv2.Canny()實現
- 當用戶點擊下拉列表選項時,相應地更新窗口中顯示的圖像。
- 提供一個按鈕,當用戶點擊按鈕時,能保存調整后的圖像。
import sys
import cv2
from PyQt6.QtGui import QImage, QPixmap
from PyQt6.QtWidgets import QWidget, QApplication, QLabel, QPushButton, QSlider, QFileDialog, QComboBox
from PyQt6 import uic# 封裝一個我的窗口類
class MyWidget(QWidget):def __init__(self):super().__init__()# 通過uic將ui界面加載到程序中來ui = uic.loadUi("./form2.ui",self)self.original_image = cv2.imread("../images/lena.png")if self.original_image is None:print("無法加載圖像,請檢查圖像路徑。")sys.exit(1)self.current_image = self.original_image.copy()self.label: QLabel = ui.labelself.comboBox:QComboBox = ui.comboBoxself.pushButton:QPushButton = ui.pushButtonself.comboBox.addItems(["原始圖像","模糊處理","銳化處理","邊緣檢測"])self.display_image(self.current_image)self.label.setScaledContents(True)self.comboBox.currentIndexChanged.connect(self.comboBox_slot)self.pushButton.clicked.connect(self.save_image)def display_image(self, image):height, width, channel = image.shapebytes_per_line = 3 * widthq_img = QImage(image.data, width, height, bytes_per_line, QImage.Format.Format_BGR888)pixmap = QPixmap.fromImage(q_img)self.label.setPixmap(pixmap)def comboBox_slot(self):if self.comboBox.currentText() == "原始圖像":self.current_image = self.original_image.copy()elif self.comboBox.currentText() == "模糊處理":self.current_image = cv2.GaussianBlur(self.original_image,(5,5),0)elif self.comboBox.currentText() == "銳化處理":laplacian = cv2.Laplacian(self.original_image,cv2.CV_64F)self.current_image = cv2.convertScaleAbs(laplacian)elif self.comboBox.currentText() == "邊緣檢測":# 使用 Canny 邊緣檢測self.current_image = cv2.Canny(self.original_image, 100, 200)# 轉換為三通道圖像以便顯示self.current_image = cv2.cvtColor(self.current_image, cv2.COLOR_GRAY2BGR)self.display_image(self.current_image)def save_image(self):# 選擇保存路徑file_path, _ = QFileDialog.getSaveFileName(self, "保存圖像", "", "圖像文件 (*.png *.jpg *.jpeg)")if file_path:try:cv2.imwrite(file_path, self.current_image)print(f"圖像已保存到 {file_path}")except Exception as e:print(f"保存圖像時出錯: {e}")if __name__ == '__main__':app = QApplication(sys.argv)myWidget = MyWidget()myWidget.show()sys.exit(app.exec())
結果展示:
?
四、請編寫一段Python代碼,實現以下功能:
- 讀取一張二維碼圖片
- 進行二值化處理和形態學操作,獲取二維碼輪廓
- 通過輪廓外接特征檢測或者多邊形逼近等獲取 二維碼的四個點
- 進行透視變換,矯正二維碼圖像
import cv2
import numpy as npdef order_points(pts):"""對四個點進行排序:左上,右上,右下,左下"""rect = np.zeros((4, 2), dtype="float32")s = pts.sum(axis=1)rect[0] = pts[np.argmin(s)]  # 左上(x+y最小)rect[2] = pts[np.argmax(s)]  # 右下(x+y最大)diff = np.diff(pts, axis=1)rect[1] = pts[np.argmin(diff)]  # 右上(y-x最小)rect[3] = pts[np.argmax(diff)]  # 左下(y-x最大)return rect# 1. 讀取圖片
image = cv2.imread('../images/erwei.jpg')
image = cv2.resize(image,(0,0),fx=0.5,fy=0.5)
orig = image.copy()# 2. 預處理
gray = cv2.cvtColor(image, cv2.COLOR_BGR2GRAY)
blur = cv2.GaussianBlur(gray, (5, 5), 0)
_, thresh = cv2.threshold(blur, 127, 255, cv2.THRESH_BINARY + cv2.THRESH_OTSU)# 形態學操作(閉運算填充內部空隙)
kernel = np.ones((3, 3), np.uint8)
closed = cv2.morphologyEx(thresh, cv2.MORPH_CLOSE, kernel, iterations=2)# 3. 輪廓檢測
contours, _ = cv2.findContours(closed, cv2.RETR_EXTERNAL, cv2.CHAIN_APPROX_SIMPLE)# 篩選最大輪廓并進行多邊形逼近
max_area = 0
screen_pts = None
for cnt in contours:area = cv2.contourArea(cnt)if area < 1000:  # 過濾小面積噪聲continueperi = cv2.arcLength(cnt, True)approx = cv2.approxPolyDP(cnt, 0.02 * peri, True)if len(approx) == 4:if area > max_area:max_area = areascreen_pts = approx.reshape(4, 2)if screen_pts is None:raise ValueError("未檢測到二維碼輪廓")# 4. 透視變換
rect = order_points(screen_pts)
(tl, tr, br, bl) = rect# 計算目標圖像尺寸
width_a = np.linalg.norm(br - bl)
width_b = np.linalg.norm(tr - tl)
max_width = max(int(width_a), int(width_b))height_a = np.linalg.norm(tr - br)
height_b = np.linalg.norm(tl - bl)
max_height = max(int(height_a), int(height_b))# 目標點坐標
dst = np.array([[0, 0],[max_width - 1, 0],[max_width - 1, max_height - 1],[0, max_height - 1]], dtype="float32")# 計算變換矩陣并執行變換
M = cv2.getPerspectiveTransform(rect, dst)
warped = cv2.warpPerspective(orig, M, (max_width, max_height))# 顯示結果
cv2.imshow("Original", orig)
cv2.imshow("Corrected QR Code", warped)
cv2.waitKey(0)
cv2.destroyAllWindows()
五、?請編寫一段Python代碼,實現以下功能:
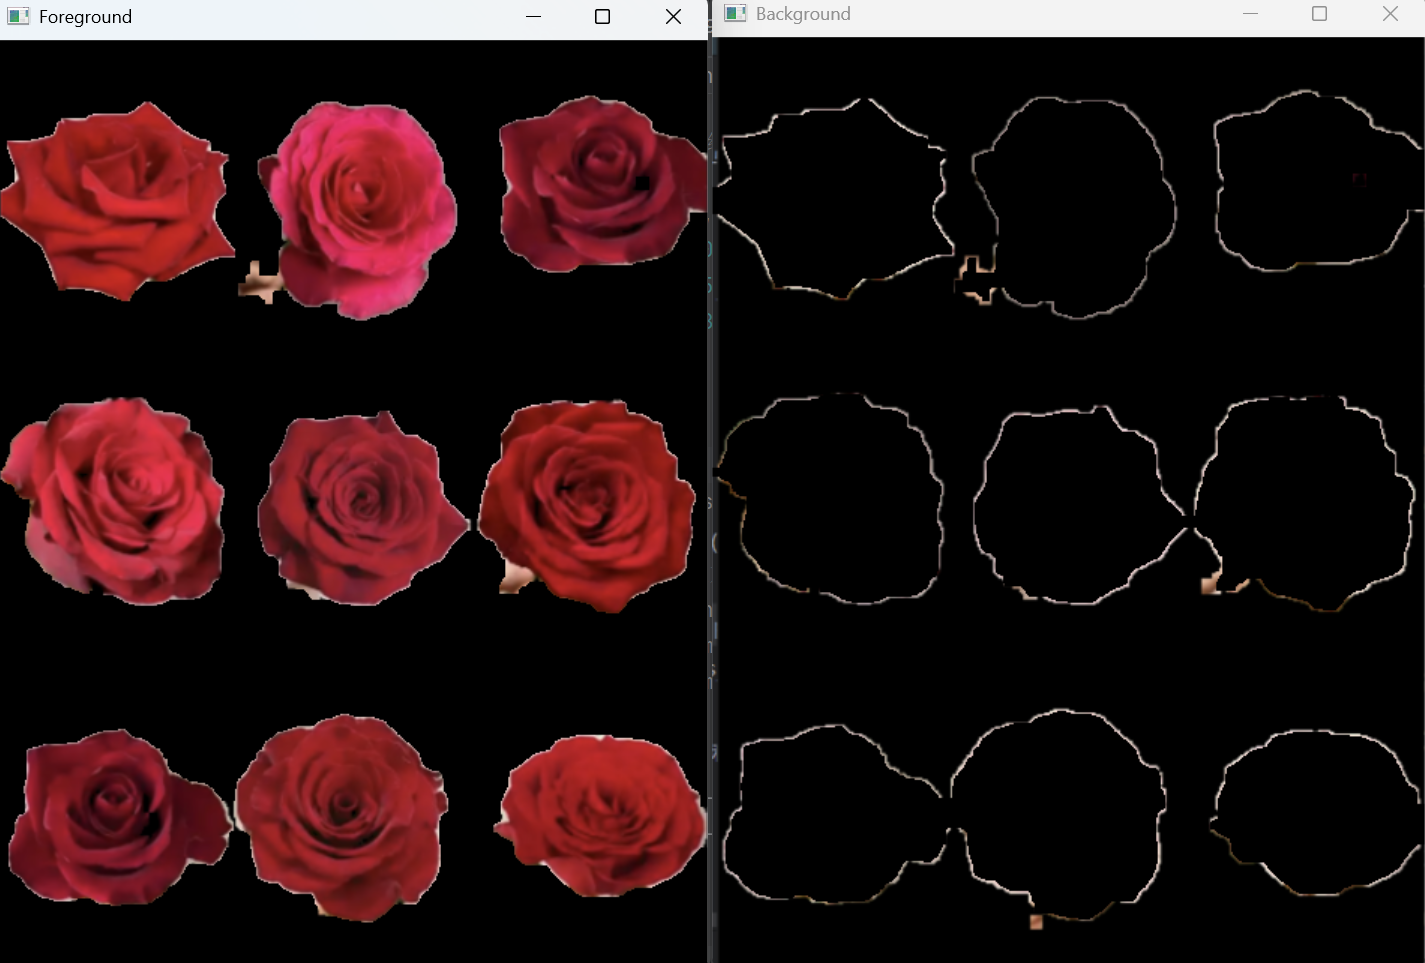
- 讀取一張彩色圖像
- 制作要提取顏色的掩膜
- 輸出摳圖后的前景圖 和 背景圖
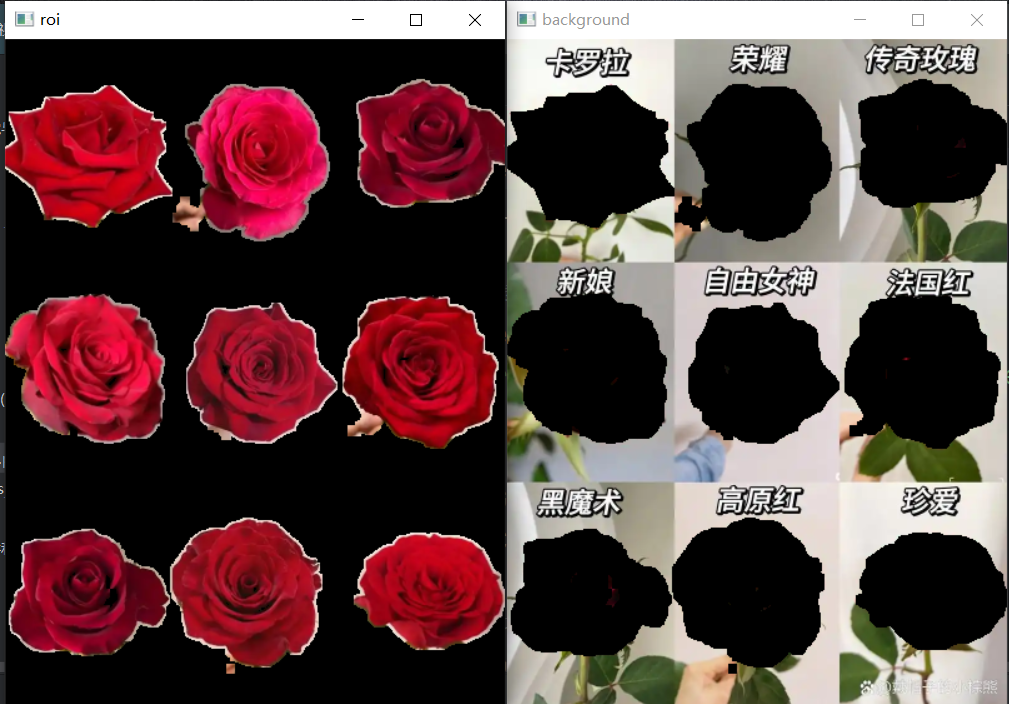
import cv2
import numpy as npdef extract_colors(image_path):# 1. 讀取彩色圖像img = cv2.imread(image_path)hsv = cv2.cvtColor(img, cv2.COLOR_BGR2HSV)# 2. 定義顏色范圍(示例:提取紅色系)# 可根據需求修改閾值范圍lower_red1 = np.array([0, 43, 46])     # 紅色HSV下限1upper_red1 = np.array([10, 255, 255])    # 紅色HSV上限1lower_red2 = np.array([156, 43, 46])   # 紅色HSV下限2(處理色相環閉合)upper_red2 = np.array([180, 255, 255])   # 紅色HSV上限2# 生成掩膜mask1 = cv2.inRange(hsv, lower_red1, upper_red1)mask2 = cv2.inRange(hsv, lower_red2, upper_red2)mask = cv2.bitwise_or(mask1, mask2)# 形態學優化(填充空洞、去除噪聲)kernel = np.ones((5,5), np.uint8)mask = cv2.morphologyEx(mask, cv2.MORPH_CLOSE, kernel, iterations=2)mask = cv2.morphologyEx(mask, cv2.MORPH_OPEN, kernel, iterations=1)# 3. 分割前景和背景foreground = cv2.bitwise_and(img, img, mask=mask)background = cv2.bitwise_and(img, img, mask=cv2.bitwise_not(mask))# 4. 顯示結果# cv2.imshow("Original", img)cv2.imshow("Foreground", foreground)cv2.imshow("Background", background)cv2.waitKey(0)cv2.destroyAllWindows()# 執行函數(替換為你的圖片路徑)
extract_colors("../images/redflowers.png")
?結果展示:


機器學習---決策樹和隨機森林)


)


)


)


