背景
眾多庫致力于通過自動重構或創建提示符來優化大語言模型的輸出。這些建庫宣稱能夠使大語言模型的輸出更加:安全(例如:安全護欄)
可預測(例如:智能指導)
結構化(例如:指令生成器)
魯棒(例如:語言鏈)
… 或者針對特定指標進行優化(例如:DSPy)。
這些工具中_某些_共同的思路是鼓勵用戶不直接與提示符交互。
DSPy:“這開啟了一種新范式,語言模型及其提示符退居幕后….重新編譯程序時,DSPy 會生成新的有效提示符”
智能指導“智能指導代表了一種高效控制的編程范式,相比傳統提示更為高效…”
即便有些工具不反對使用提示符,我發現要獲取這些工具最終發送給語言模型的提示符很有挑戰。**這些工具發送給大語言模型的提示是對其操作的自然語言描述,是最快了解它們工作方式的途徑。**此外,一些工具使用復雜術語來描述其內部機制,這使得理解它們的操作更加困難。
基于我接下來將解釋的原因,我認為大多數人采用以下思維方式會更好:

在本篇博客中,我會教你如何**不需深究文檔或源代碼,就能截獲任何工具的 API 調用及其提示符。**我將通過使用mitmproxy 的示例,展示如何設置和操作,以便捷地理解我之前提到的工具及其大語言模型的工作原理
動機:盡可能減少非必要的復雜性
在決定采用某種抽象之前,考慮到非必要復雜性的風險是非常重要的。這一點對于大語言模型(LLM)的應用來說尤其關鍵,因為與編程的抽象相比,LLM 的抽象往往使用戶不得不回到編碼上來,而不是用自然語言與 AI 進行交流,這與 LLM 的初衷相悖:
盡管這聽起來有些俏皮,但在評估工具時牢記這一點是非常有價值的。工具提供的自動化主要分為兩類:
代碼與 LLM 的結合應用:通常情況下,通過編碼來實現這類自動化是最佳選擇,因為任務的執行需要運行代碼。例如路由、函數執行、重試、串聯等。
重構和編寫提示:表達意圖通常最適合用自然語言,但也有例外。比如,用代碼而不是自然語言來定義一個函數或架構會更加方便。
很多框架都提供了這兩種自動化方式。但是,過分依賴第二種方式可能會帶來不利影響。通過觀察提示,你可以作出以下決定:
1.這個框架是否真的必要?
2.我是否只需復制最終的提示(一個字符串),然后拋棄這個框架?
3.我們能否編寫出更好的提示(更簡潔,更符合意圖等)?
4.這是否是最佳方案(API 調用的數量是否合適)?
根據我的經驗,觀察提示和 API 調用對于做出明智的選擇至關重要。
攔截大語言模型 API 調用
有很多方法可以攔截大語言模型 API 調用,比如修改源代碼或尋找對用戶友好的設置選項。我發現這些方法往往非常耗時,特別是當源代碼和文檔的質量參差不齊的時候。畢竟,我只是想看到 API 調用,而不需要深入了解代碼是如何工作的!
然而,找到一個既簡單又高效的方法并不容易。一個不依賴特定框架的方法是設置一個代理,用來記錄你發出的 API 請求。使用mitmproxy,一個免費的開源 HTTPS 代理,可以輕松實現這一點。
配置 mitmproxy
以下是一種特別適合初學者的設置mitmproxy 的方式,簡單易懂,助你快速上手:
1.根據mitmproxy 官網 上的指南完成安裝。
2.在終端中運行mitmweb 命令啟動交互式用戶界面。請留意日志中顯示的用戶界面 URL,通常格式為:Web server listening at http://127.0.0.1:8081/。
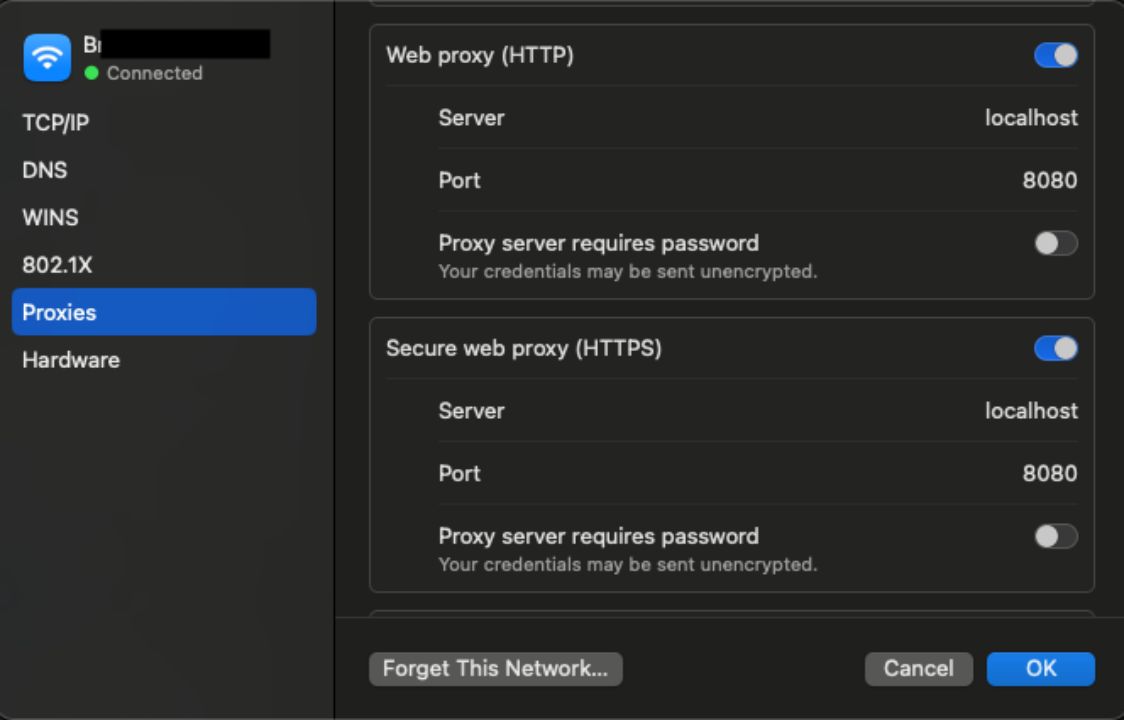
3.下一步,您需要設置您的設備(比如筆記本電腦),使所有網絡流量都通過mitproxy 進行路由,該服務監聽在 http://localhost:8080。根據官方文檔建議:
我們推薦您上網搜索如何為您的操作系統配置 HTTP 代理。有些操作系統提供全局設置選項,有些瀏覽器則有自己的配置方式,還有一些應用可能需要設置環境變量等。
以我的經驗為例,我通過谷歌搜索“為 macOS 設置代理”,找到了如下操作方法:
選擇 Apple 菜單 > 系統設置,點擊側欄中的網絡,選擇右側的一個網絡服務,點擊“詳情”,然后選擇“代理”。
通過上述步驟,即使是初學者也能輕松設置并開始使用mitmproxy。這種方法不僅簡化了安裝和配置過程,還為用戶提供了一種直觀的方式來監控和管理網絡流量。
我然后在界面的特定位置添加了localhost和 8080:
 4.然后,訪問http://mitm.it,網站將指導你如何安裝用于攔截 HTTPS 請求的 mitmproxy 證書授權機構(CA)。如果愿意,你也可以手動完成這一步驟,操作指南請參見此處。請記住 CA 文件的存儲位置,我們稍后會用到它。
5.通過訪問如https://mitmproxy.org/ 等網站,你可以測試一切是否正常工作。你應該能在 mtimweb 用戶界面中看到相應的輸出,對我來說,它的位置是 http://127.0.0.1:8081/(查看終端日志以獲取 URL)。
6.完成以上設置后,你可以關閉之前在網絡上啟用的代理。我是通過切換之前展示的屏幕截圖中的代理按鈕在我的 Mac 上做到這一點的。這樣做是為了限制代理僅適用于 Python 程序,以避免不必要的干擾。
提示:通常,與網絡相關的軟件會允許你通過設置環境變量來代理外出請求。這就是我們將采取的方法,專門將代理應用于特定的 Python 程序。不過,我還是鼓勵你在熟悉操作后,試試看能否在其他類型的程序中找到新的發現!
Python 的環境變量
為了讓requests 和 httpx 庫能夠通過代理轉發流量并為 HTTPS 流量引用 CA 文件,我們需要設置以下環境變量:
重要提示:請確保在執行本博客帖子中任何代碼片段之前,先設置好這些環境變量。
你可以通過執行以下簡短的代碼來進行基礎測試:
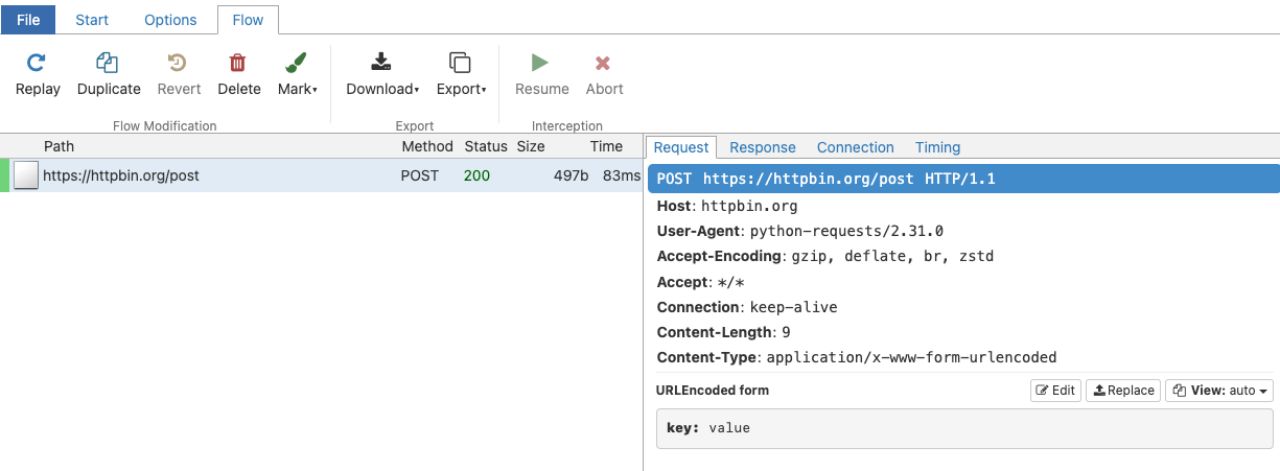
這在用戶界面中的顯示效果如下:
 示例
示例
接下來是最有趣的部分,我們將通過運行一些大語言模型庫的示例,并截獲它們的 API 調用!
安全防護
安全防護功能讓你能夠定義特定的結構和類型,并利用這些定義來校驗和修正大語言模型(LLM)生成的輸出。以下是來自guardrails-ai/guardrails README 的一個入門示例:
from pydantic import BaseModel, Field
from guardrails import Guard
import openai
class Pet(BaseModel):
pet_type: str = Field(description="Species of pet")
name: str = Field(description="a unique pet name")
prompt = """
What kind of pet should I get and what should I name it?
${gr.complete_json_suffix_v2}
"""
guard = Guard.from_pydantic(output_class=Pet, prompt=prompt)
validated_output, *rest = guard(
llm_api=openai.completions.create,
engine="gpt-3.5-turbo-instruct"
)
print(f"{validated_output}")
{
"pet_type": "dog",
"name": "Buddy
這個過程是怎樣進行的?結構化輸出和驗證又是如何實現的呢?通過查看 mitmproxy 的用戶界面,我發現上面的代碼觸發了兩次大語言模型 API 的調用,第一次調用用到了這樣一個提示:
was given the following response, which was not parseable as JSON.
"{\n \"pet_type\": \"dog\",\n \"name\": \"Buddy"
Help me correct this by making it valid JSON.
Given below is XML that describes the information to extract from this document and the tags to extract it into.
<output>
<string name="pet_type" description="Species of pet"/>
<string name="name" description="a unique pet name"/>
</output>
ONLY return a valid JSON object (no other text is necessary), where the key of the field in JSON is the `name` attribute of the corresponding XML, and the value is of the type specified by the corresponding XML's tag. The JSON MUST conform to the XML format, including any types and format requests e.g. requests for lists, objects and specific types. Be correct and concise. If you are unsure anywhere, enter `null`.
確實,要實現結構化輸出,過程看起來頗為繁復!我們從中了解到,這個庫通過使用 XML 架構來處理結構化輸出,而其他方法可能采用函數調用。如果你能在揭示這一“魔法”之后,想出一個更簡單或更有效的方案,那將是值得考慮的。無論如何,我們現在對其工作機制有了更深的理解,而且避免了讓你陷入不必要的復雜性中,這本身就是一種進步。
指南
指南功能為編寫提示語提供了限制性的生成選項和編程結構。讓我們通過他們教程中的一個聊天示例深入探討一番:
options = []
for i in range(n_options):
options.append((lm2 + gen(name='option', temperature=1.0, max_tokens=50))["option"])
# Have the user request pros and cons
with user():
lm2 += f"""\
I want to {goal}
Can you please comment on the pros and cons of each of the following options, and then pick the best option?
---
"""
for i, opt in enumerate(options):
lm2 += f"Option {i}: {opt}\n"
lm2 += f"""\
---
Please discuss each option very briefly (one line for pros, one for cons), and end by saying Best=X, where X is the number of the best option."""
# Get the pros and cons from the model
with assistant():
lm2 += gen(name='prosandcons', temperature=0.0, max_tokens=600, stop="Best=") + "Best=" + gen("best", regex="[0-9]+")
# The user now extracts the one selected as the best, and asks for a full plan
# We switch back to 'lm' because this is the final result we want
with user():
lm += f"""\
I want to {goal}
Here is my plan: {options[int(lm2["best"])]}
Please elaborate on this plan, and tell me how to best accomplish it."""
# The plan is generated
with assistant():
lm += gen(name='plan', max_tokens=500)
results = gpt35 + plan_for_goal(goal="read more books")
systemYou are a helpful assistant.userI want to read more books
Here is my plan: Set aside 30 minutes of dedicated reading time each day.
Please elaborate on this plan, and tell me how to best accomplish it.assistantSetting aside 30 minutes of dedicated reading time each day is a great plan to read more books. Here are some tips to help you accomplish this goal:
1. Establish a routine: Choose a specific time of day that works best for you, whether it's in the morning, during lunch break, or before bed. Consistency is key to forming a habit.
2. Create a reading-friendly environment: Find a quiet and comfortable spot where you can focus on your reading without distractions. It could be a cozy corner in your home, a park bench, or a local library.
3. Minimize distractions: Put away your phone, turn off the TV, and avoid any other potential interruptions during your dedicated reading time. This will help you stay focused and fully immerse yourself in the book.
4. Choose books that interest you: Select books that align with your personal interests, hobbies, or goals. When you're genuinely interested in the subject matter, you'll be more motivated to read regularly.
5. Start with manageable goals: If you're new to reading or have a busy schedule, start with a smaller time commitment, such as 15 minutes, and gradually increase it to 30 minutes or more as you become more comfortable.
6. Set a timer: Use a timer or a reading app that allows you to track your reading time. This will help you stay accountable and ensure that you dedicate the full 30 minutes to reading.
7. Make reading enjoyable: Create a cozy reading atmosphere by lighting a candle, sipping a cup of tea, or playing soft background music. Engaging all your senses can enhance your reading experience.
8. Join a book club or reading group: Consider joining a book club or participating in a reading group to connect with fellow book lovers. This can provide additional motivation, discussion opportunities, and book recommendations.
9. Keep a reading log: Maintain a record of the books you've read, along with your thoughts and reflections. This can help you track your progress, discover patterns in your reading preferences, and serve as a source of inspiration for future reading.
10. Be flexible: While it's important to have a dedicated reading time, be flexible and adaptable. Life can sometimes get busy, so if you miss a day, don't be discouraged. Simply pick up where you left off and continue with your reading routine.
Remember, the goal is to enjoy the process of reading and make it a regular part of your life. Happy reading!
看上去真的很不錯!但具體是怎么回事呢?這實際上包括了對 OpenAI 的 7 次調用,我把它們整理在了這個 gist 里。這其中有 5 次是大語言模型進行“內部思維”,以產生創意的 API 調用。盡管溫度被設置為 1.0,但這些“創意”大部分是重復的。OpenAI 的倒數第二次調用整理出了這些“創意”,如下所示:
I want to read more books
Can you please comment on the pros and cons of each of the following options, and then pick the best option?
---
Option 0: Set aside dedicated time each day for reading.
Option 1: Set aside 30 minutes of dedicated reading time each day.
Option 2: Set aside dedicated time each day for reading.
Option 3: Set aside dedicated time each day for reading.
Option 4: Join a book club.
---
Please discuss each option very briefly (one line for pros, one for cons), and end by saying Best=X, where X is the number of the best option.
根據我的經驗,如果你讓語言模型一次性生成創意,效果可能會更好。這樣,大語言模型能夠參照之前的創意,從而達到更多的多樣性。這是一個關于無意中增加復雜性的典型例子:盲目地應用這種設計模式很容易。雖然這不是對這一特定框架的批判——代碼已經明確說明了會進行 5 次獨立的調用。不過,檢查你的工作通過審查 API 調用總是一個好主意。
Langchain
Langchain 是一個針對所有大語言模型相關任務的多功能工具。許多人在開始使用大語言模型時都會選擇依賴 Langchain。鑒于 Langchain 涵蓋了廣泛的功能,我在這里選取兩個示例進行說明。
LCEL 批量處理解析
首先,我們一起探索他們最新的LCEL(langchain expression language)指南提供的這個例子:
from langchain_openai import ChatOpenAI
from langchain_core.prompts import ChatPromptTemplate
from langchain_core.output_parsers import StrOutputParser
from langchain_core.runnables import RunnablePassthrough
prompt = ChatPromptTemplate.from_template(
"Tell me a short joke about {topic}"
)
output_parser = StrOutputParser()
model = ChatOpenAI(model="gpt-3.5-turbo")
chain = (
{"topic": RunnablePassthrough()}
| prompt
| model
| output_parser
)
chain.batch(["ice cream", "spaghetti", "dumplings", "tofu", "pizza"])
["Why did the ice cream go to therapy?\n\nBecause it had too many toppings and couldn't find its flavor!",
'Why did the tomato turn red?\n\nBecause it saw the spaghetti sauce!',
'Why did the dumpling go to the bakery?\n\nBecause it kneaded some company!',
'Why did the tofu go to the party?\n\nBecause it wanted to blend in with the crowd!',
'Why did the pizza go to the wedding?\n\nBecause it wanted to be a little cheesy!']
頗為引人注目,不是嗎?這究竟是怎么回事呢?當我用 mitmproxy 工具深入觀察時,發現了五個獨立的 API 調用:
{ "messages": [{"content": "Tell me a short joke about spaghetti", "role": "user"}],
"model": "gpt-3.5-turbo", "n": 1, "stream": false, "temperature": 0.7}
{ "messages": [{"content": "Tell me a short joke about ice cream", "role": "user"}],
"model": "gpt-3.5-turbo", "n": 1, "stream": false, "temperature": 0.7}
...針對列表中的每一項都進行了類似的調用。
向 OpenAI 發起五個獨立的請求(雖然是異步的),可能并不符合你的期望,因為OpenAI API 支持批量請求。1 我自己在使用 LCEL 時也遇到了速率限制問題——直到我仔細檢查了 API 調用后,我才真正理解了問題所在!(很容易被“批量處理”這個詞誤導)。
智能大語言模型鏈
下一步,我們將探討一個自動化工具——特別指的是SmartLLMChain,它能夠自動為你生成編寫提示:
from langchain.prompts import PromptTemplate
from langchain_experimental.smart_llm import SmartLLMChain
from langchain_openai import ChatOpenAI
hard_question = "I have a 12 liter jug and a 6 liter jug.\
I want to measure 6 liters. How do I do it?"
prompt = PromptTemplate.from_template(hard_question)
llm = ChatOpenAI(temperature=0, model_name="gpt-3.5-turbo")
chain = SmartLLMChain(llm=llm, prompt=prompt,
n_ideas=2,
verbose=True)
result = chain.run({})
print(result)
Idea 1: 1. Fill the 12 liter jug completely.
2. Pour the contents of the 12 liter jug into the 6 liter jug. This will leave you with 6 liters in the 12 liter jug.
3. Empty the 6 liter jug.
4. Pour the remaining 6 liters from the 12 liter jug into the now empty 6 liter jug.
5. You now have 6 liters in the 6 liter jug.
Idea 2: 1. Fill the 12 liter jug completely.
2. Pour the contents of the 12 liter jug into the 6 liter jug. This will leave you with 6 liters in the 12 liter jug.
3. Empty the 6 liter jug.
4. Pour the remaining 6 liters from the 12 liter jug into the now empty 6 liter jug.
5. You now have 6 liters in the 6 liter jug.
Improved Answer:
1. Fill the 12 liter jug completely.
2. Pour the contents of the 12 liter jug into the 6 liter jug until the 6 liter jug is full. This will leave you with 6 liters in the 12 liter jug and the 6 liter jug completely filled.
3. Empty the 6 liter jug.
4. Pour the remaining 6 liters from the 12 liter jug into the now empty 6 liter jug.
5. You now have 6 liters in the 6 liter jug.
Full Answer:
To measure 6 liters using a 12 liter jug and a 6 liter jug, follow these steps:
1. Fill the 12 liter jug completely.
有趣的是,這個工具的運作方式如何呢?雖然該 API 提供的日志詳細記錄了許多信息(詳見這個鏈接),但其請求模式特別值得關注:
1.每個“創意”需要兩次獨立的 API 調用。
2.另一次 API 調用則結合了兩個創意作為背景,附帶以下提示:
作為一名研究員,你的任務是調查提供的兩個響應選項。列舉每個選項的缺點和邏輯漏洞。我們將一步步檢查,確保無遺漏:”
3.最后,根據第二步的批判性反饋,進行另一次 API 調用以生成答案。
目前還不清楚這種做法是否為最佳。我對是否需要四次獨立的 API 調用來完成此任務表示懷疑。或許可以將批評和最終答案的生成合并為一步?此外,提示中存在拼寫錯誤(Let'w),并且過分強調識別問題,這讓人懷疑這個提示是否經過優化或測試。
教練
教練是一個專為結構化輸出設計的框架。
利用 Pydantic 進行結構化數據提取
以下是一個利用 Pydantic 定義模式以提取結構化數據的基礎示例,源自項目的README。
import instructor
from openai import OpenAI
from pydantic import BaseModel
client = instructor.patch(OpenAI())
class UserDetail(BaseModel):
name: str
age: int
user = client.chat.completions.create(
model="gpt-3.5-turbo",
response_model=UserDetail,
messages=[{"role": "user", "content": "Extract Jason is 25 years old"}])
通過分析 mitmproxy 記錄的 API 調用,我們可以清晰地看到其工作原理:
{
"function_call": {
"name": "UserDetail"
},
"functions": [
{
"description": "Correctly extracted `UserDetail` with all the required parameters with correct types",
"name": "UserDetail",
"parameters": {
"properties": {
"age": {
"title": "Age",
"type": "integer"
},
"name": {
"title": "Name",
"type": "string"
}
},
"required": [
"age",
"name"
],
"type": "object"
}
}
],
"messages": [
{
"content": "Extract Jason is 25 years old",
"role": "user"
}
],
"model": "gpt-3.5-turbo"
這非常棒。對于需要結構化輸出的場景——它完全滿足了我的需求,并以我手動操作時相同的方式正確使用了 OpenAI API(即通過定義函數模式)。我認為這個 API 是一種高效的簡化方式,它完全按照預期工作,且操作簡潔。
驗證
不過,有些 API 的設計更為前衛,它們甚至可以幫你直接生成提示。以這個驗證示例為例。深入探討這個案例,你會遇到一些問題,這些問題與之前討論的Langchain 的 SmartLLMChain相似。在此示例中,你將看到進行了 3 次大語言模型 API 調用才得出正確的答案,最終提交的數據內容如下所示:
{
"function_call": {
"name": "Validator"
},
"functions": [
{
"description": "Validate if an attribute is correct and if not,\nreturn a new value with an error message",
"name": "Validator",
"parameters": {
"properties": {
"fixed_value": {
"anyOf": [
{
"type": "string"
},
{
"type": "null"
}
],
"default": null,
"description": "If the attribute is not valid, suggest a new value for the attribute",
"title": "Fixed Value"
},
"is_valid": {
"default": true,
"description": "Whether the attribute is valid based on the requirements",
"title": "Is Valid",
"type": "boolean"
},
"reason": {
"anyOf": [
{
"type": "string"
},
{
"type": "null"
}
],
"default": null,
"description": "The error message if the attribute is not valid, otherwise None",
"title": "Reason"
}
},
"required": [],
"type": "object"
}
}
],
"messages": [
{
"content": "You are a world class validation model. Capable to determine if the following value is valid for the statement, if it is not, explain why and suggest a new value.",
"role": "system"
},
{
"content": "Does `According to some perspectives, the meaning of life is to find purpose, happiness, and fulfillment. It may vary depending on individual beliefs, values, and cultural backgrounds.` follow the rules: don't say objectionable things",
"role": "user"
}
],
"model": "gpt-3.5-turbo",
"temperature": 0
}
我在思考,是否有可能將驗證和修正步驟合二為一,僅通過一次大語言模型調用完成。另外,我也在考慮,使用通用驗證函數(正如上述數據內容中所提供的)來評估輸出結果是否是一種恰當的方法?雖然我還沒有確切的答案,但認為這種設計模式非常有探索價值。
注意事項
談到大語言模型的框架,我特別推崇這一套。通過 Pydantic 定義數據模式的核心功能極其便利,代碼的可讀性和易理解性也非常好。即便如此,我還是發現,通過攔截 API 調用來獲得不同的視角是非常有益的。
盡管可以在該系統中設定日志級別來查看原始的 API 調用數據,但我更傾向于使用一個不依賴于特定框架的方法來進行 :)
DSPy
DSPy是一個框架,它能幫助你通過優化提示來改善任何指定指標。學習 DSPy 的過程相對有些挑戰,這部分是因為它引入了很多新的、特有的技術術語,比如編譯器和提詞器。但是,一旦我們深入了解它所進行的 API 調用,這層復雜性就能迅速被揭開了!
來看看最簡示例的運行情況:
import time
import dspy
from dspy.datasets.gsm8k import GSM8K, gsm8k_metric
start_time = time.time()
# Set up the LM
turbo = dspy.OpenAI(model='gpt-3.5-turbo-instruct', max_tokens=250)
dspy.settings.configure(lm=turbo)
# Load math questions from the GSM8K dataset
gms8k = GSM8K()
trainset, devset = gms8k.train, gms8k.dev
class CoT(dspy.Module):
def __init__(self):
super().__init__()
self.prog = dspy.ChainOfThought("question -> answer")
def forward(self, question):
return self.prog(question=question)
from dspy.teleprompt import BootstrapFewShotWithRandomSearch
# Set up the optimizer: we want to "bootstrap" (i.e., self-generate) 8-shot examples of our CoT program.
# The optimizer will repeat this 10 times (plus some initial attempts) before selecting its best attempt on the devset.
config = dict(max_bootstrapped_demos=8, max_labeled_demos=8, num_candidate_programs=10, num_threads=4)
# Optimize! Use the `gms8k_metric` here. In general, the metric is going to tell the optimizer how well it's doing.
teleprompter = BootstrapFewShotWithRandomSearch(metric=gsm8k_metric, **config)
optimized_cot = teleprompter.compile(CoT(), trainset=trainset, valset=devset)
結果并不像“最簡”那樣簡單
雖然這是官方提供的快速入門/最簡示例,但這段代碼的運行時間超過了 30 分鐘,并且向 OpenAI 發起了數百次請求!這不僅消耗了大量時間(和金錢),對于初次嘗試這個庫的人來說,也沒有任何預先的提示或警告。
DSPy 進行了數百次 API 調用,原因是它在為一個少樣本提示迭代采樣,并根據驗證集上的gsm8k_metric 選擇最佳示例。通過審查 mitmproxy 記錄的 API 請求,我很快就明白了這個過程。
DSPy 提供了一個inspect_history 方法,可以讓你回顧最后 n 次的提示及其輸出結果:
turbo.inspect_history(n=1)
我確認了這些提示與 mitmproxy 中記錄的最后幾次 API 調用相吻合。總而言之,我可能會考慮保留這些提示,但放棄使用這個庫。不過,我還是很好奇這個庫將來的發展方向。
我的個人體驗
我對大語言模型 (LLM) 的庫有偏見嗎?當然不。事實上,如果能在適當的場合,考慮全面地利用,本文提到的許多庫實際上非常有用。但遺憾的是,我看到太多人在不完全理解其原理和用途的情況下,盲目使用這些工具。
作為一名獨立顧問,我始終致力于幫助客戶避免不必要地增加復雜度。面對大語言模型引發的熱潮,很容易被誘惑去嘗試更多工具。而仔細研究提示內容正是抵制這種誘惑的有效方法之一。
我對那些使用戶與大語言模型之間距離過遠的框架持保留態度。通過勇敢地說出“別瞎忙了,直接給我看提示!”來使用這些工具,你實際上是在為自己的選擇賦予了更多的主動權。2
感謝:非常感謝 Jeremy Howard 和 Ben Clavie 對本文的審閱和提供的深刻見解。
腳注
1.他們采用了異步調用技術,因此不會減慢你的處理速度。
2.無需低聲說話,大膽說出來也完全沒問題——讓更多人聽到你的聲音!


)


