神經網絡 & Keras
目錄
- 神經網絡 & Keras
- 目錄
- 1、Keras簡介
- 1.1 科普: 人工神經網絡 VS 生物神經網絡
- 1.2 什么是神經網絡 (Neural Network)
- 1.3 神經網絡 梯度下降
- 1.4 科普: 神經網絡的黑盒不黑
- 1.5 Why Keras?
- 1.6 兼容 backend
- 2、如何搭建各種神經網絡
- 2.1 Regressor回歸
- 2.2 Classifier 分類
- 2.3 什么是卷積神經網絡 CNN
- 2.4 CNN 卷積神經網絡
- 2.5 什么是循環神經網絡 RNN
- 2.6 什么是 LSTM 循環神經網絡
- 2.7 RNN Classifier
- 2.8 RNN Regressor
- 2.9什么是自編碼(Autoencoder)
- 2.10 Autoencoder 自編碼
- 1、Keras簡介
1、Keras簡介
1.1 科普: 人工神經網絡 VS 生物神經網絡
9百億神經細胞組成了我們復雜的神經網絡系統, 這個數量甚至可以和宇宙中的星球數相比較
1.2 什么是神經網絡 (Neural Network)
是存在于計算機里的神經系統
1.3 神經網絡 梯度下降
optimization
牛頓法 (Newton’s method), 最小二乘法(Least Squares method), 梯度下降法 (Gradient Descent) 等等
梯度下降
全局 and 局部最優
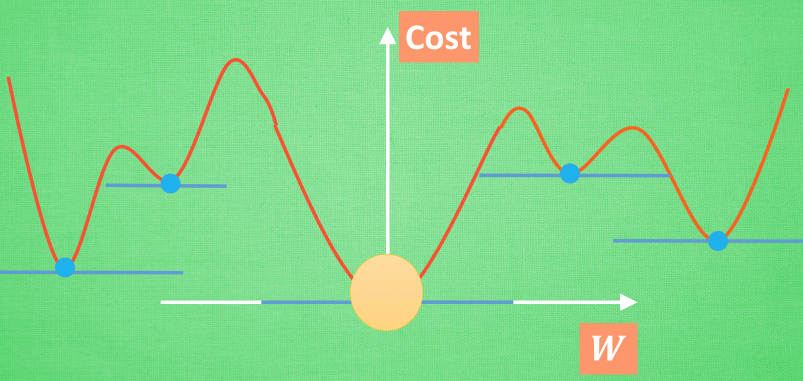
神經網絡能讓你的局部最優足夠優秀
1.4 科普: 神經網絡的黑盒不黑
將神經網絡第一層加工后的寶寶叫做代表特征(feature representation)
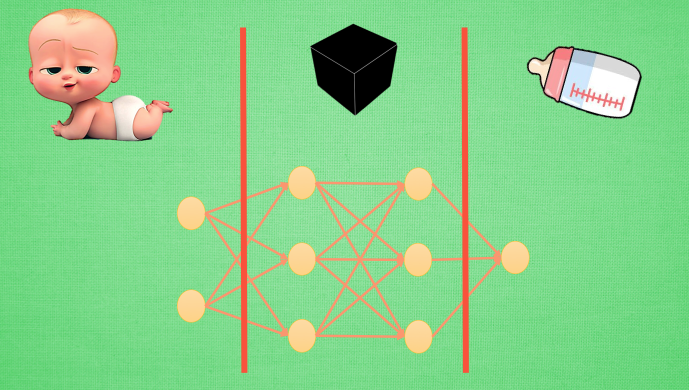
與其說黑盒是在加工處理, 還不如說是在將一種代表特征轉換成另一種代表特征, 一次次特征之間的轉換
1.5 Why Keras?
如果說 Tensorflow 或者 Theano 是神經網絡方面的巨人. 那 Keras 就是站在巨人肩膀上的人.
Keras 是一個兼容 Theano 和 Tensorflow 的神經網絡高級包, 用他來組件一個神經網絡更加快速, 幾條語句就搞定了.
而且廣泛的兼容性能使 Keras 在 Windows 和 MacOS 或者 Linux 上運行無阻礙.
1.6 兼容 backend
我們來介紹 Keras 的兩個 Backend,也就是Keras基于什么東西來做運算。Keras 可以基于兩個Backend,一個是 Theano,一個是 Tensorflow。
如果我們選擇Theano作為Keras的Backend, 那么Keras就用 Theano 在底層搭建你需要的神經網絡;同樣,如果選擇 Tensorflow 的話呢,Keras 就使用 Tensorflow 在底層搭建神經網絡。
import keras
Using Theano Backend
可以修改 Backend
2、如何搭建各種神經網絡
2.1 Regressor回歸
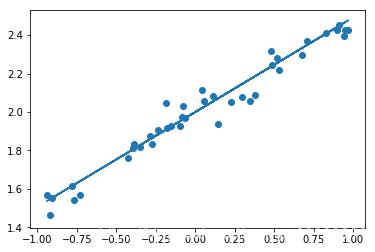
神經網絡可以用來模擬回歸問題 (regression),例如給下面一組數據,用一條線來對數據進行擬合,并可以預測新輸入 x 的輸出值。
"""1、導入模塊、創建數據"""
import numpy as np
np.random.seed(1337)  # for reproducibility
from keras.models import Sequential
from keras.layers import Dense
import matplotlib.pyplot as plt# create some data
X = np.linspace(-1, 1, 200)
np.random.shuffle(X)    # randomize the data
Y = 0.5 * X + 2 + np.random.normal(0, 0.05, (200, ))
# plot data
plt.scatter(X, Y)
plt.show()X_train, Y_train = X[:160], Y[:160]     # first 160 data points
X_test, Y_test = X[160:], Y[160:]       # last 40 data points"""2、建立模型"""
# build a neural network from the 1st layer to the last layer
model = Sequential()model.add(Dense(units=1, input_dim=1)) # choose loss function and optimizing method
model.compile(loss='mse', optimizer='sgd')"""3、訓練、評估"""
# training
print('Training -----------')
for step in range(301):cost = model.train_on_batch(X_train, Y_train)if step % 100 == 0:print('train cost: ', cost)# test
print('\nTesting ------------')
cost = model.evaluate(X_test, Y_test, batch_size=40)
print('test cost:', cost)"""4、預測新樣本"""
W, b = model.layers[0].get_weights()
print('Weights=', W, '\nbiases=', b)# plotting the prediction
Y_pred = model.predict(X_test)
plt.scatter(X_test, Y_test)
plt.plot(X_test, Y_pred)
plt.show()
2.2 分類問題
import numpy as np
np.random.seed(1337)  # for reproducibility
from keras.datasets import mnist
from keras.utils import np_utils
from keras.models import Sequential
from keras.layers import Dense, Activation
from keras.optimizers import RMSprop"""1、數據預處理x變成0-1之間,y進行one-hot編碼
"""
# download the mnist to the path '~/.keras/datasets/' if it is the first time to be called
# X shape (60,000 28x28), y shape (10,000, )
(X_train, y_train), (X_test, y_test) = mnist.load_data()# data pre-processing
X_train = X_train.reshape(X_train.shape[0], -1) / 255.   # normalize
X_test = X_test.reshape(X_test.shape[0], -1) / 255.      # normalize
y_train = np_utils.to_categorical(y_train, num_classes=10)
y_test = np_utils.to_categorical(y_test, num_classes=10)"""2、建立模型直接在模型里面加入多個層
"""
# Another way to build your neural net
model = Sequential([Dense(32, input_dim=784),Activation('relu'),Dense(10),Activation('softmax'),
])"""3、定義優化器、編譯模型、訓練"""
# Another way to define your optimizer
rmsprop = RMSprop(lr=0.001, rho=0.9, epsilon=1e-08, decay=0.0)# We add metrics to get more results you want to see
model.compile(optimizer=rmsprop,loss='categorical_crossentropy',metrics=['accuracy'])print('Training ------------')
# Another way to train the model
model.fit(X_train, y_train, epochs=2, batch_size=32)"""4、評估模型"""
print('\nTesting ------------')
# Evaluate the model with the metrics we defined earlier
loss, accuracy = model.evaluate(X_test, y_test)print('test loss: ', loss)
print('test accuracy: ', accuracy)
Using TensorFlow backend.
Training ------------
Epoch 1/2
60000/60000 [==============================] - 5s 84us/step - loss: 0.3434 - acc: 0.9046
Epoch 2/2
60000/60000 [==============================] - 4s 67us/step - loss: 0.1948 - acc: 0.9437Testing ------------
10000/10000 [==============================] - 0s 35us/step
test loss:  0.174235421626
test accuracy:  0.9505
在回歸網絡中用到的是 model.add 一層一層添加神經層,今天的方法是直接在模型的里面加多個神經層。好比一個水管,一段一段的,數據是從上面一段掉到下面一段,再掉到下面一段。
優化器,可以是默認的,也可以是我們在上一步定義的。 損失函數,分類和回歸問題的不一樣,用的是交叉熵。 metrics,里面可以放入需要計算的 cost,accuracy,score 等。
2.3 什么是卷積神經網絡 CNN
卷積
也就是說神經網絡不再是對每個像素的輸入信息做處理了,而是圖片上每一小塊像素區域進行處理, 這種做法加強了圖片信息的連續性. 使得神經網絡能看到圖形, 而非一個點. 這種做法同時也加深了神經網絡對圖片的理解
池化
是一個篩選過濾的過程, 能將 layer 中有用的信息篩選出來, 給下一個層分析. 同時也減輕了神經網絡的計算負擔
2.4 CNN 卷積神經網絡
import numpy as np
np.random.seed(1337)  # for reproducibility
from keras.datasets import mnist
from keras.utils import np_utils
from keras.models import Sequential
from keras.layers import Dense, Activation, Convolution2D, MaxPooling2D, Flatten
from keras.optimizers import Adam# download the mnist to the path '~/.keras/datasets/' if it is the first time to be called
# X shape (60,000 28x28), y shape (10,000, )
(X_train, y_train), (X_test, y_test) = mnist.load_data()# data pre-processing
X_train = X_train.reshape(-1, 1,28, 28)/255.
X_test = X_test.reshape(-1, 1,28, 28)/255.
y_train = np_utils.to_categorical(y_train, num_classes=10)
y_test = np_utils.to_categorical(y_test, num_classes=10)"""1、建立模型 conv-pool-conv-pool-fc-fc"""
# Another way to build your CNN
model = Sequential()# Conv layer 1 output shape (32, 28, 28)
model.add(Convolution2D(batch_input_shape=(None, 1, 28, 28),filters=32,kernel_size=5,strides=1,padding='same',     # Padding methoddata_format='channels_first',
))
model.add(Activation('relu'))# Pooling layer 1 (max pooling) output shape (32, 14, 14)
model.add(MaxPooling2D(pool_size=2,strides=2,padding='same',    # Padding methoddata_format='channels_first',
))# Conv layer 2 output shape (64, 14, 14)
model.add(Convolution2D(64, 5, strides=1, padding='same', data_format='channels_first'))
model.add(Activation('relu'))# Pooling layer 2 (max pooling) output shape (64, 7, 7)
model.add(MaxPooling2D(2, 2, 'same', data_format='channels_first'))# Fully connected layer 1 input shape (64 * 7 * 7) = (3136), output shape (1024)
model.add(Flatten())
model.add(Dense(1024))
model.add(Activation('relu'))# Fully connected layer 2 to shape (10) for 10 classes
model.add(Dense(10))
model.add(Activation('softmax'))"""2、定義優化器、編譯模型、訓練"""
# Another way to define your optimizer
adam = Adam(lr=1e-4)# We add metrics to get more results you want to see
model.compile(optimizer=adam,loss='categorical_crossentropy',metrics=['accuracy'])print('Training ------------')
# Another way to train the model
model.fit(X_train, y_train, epochs=1, batch_size=64,)"""3、評估"""
print('\nTesting ------------')
# Evaluate the model with the metrics we defined earlier
loss, accuracy = model.evaluate(X_test, y_test)print('\ntest loss: ', loss)
print('\ntest accuracy: ', accuracy)
Using TensorFlow backend.
Training ------------
Epoch 1/1
60000/60000 [==============================] - 557s 9ms/step - loss: 0.2698 - acc: 0.9265Testing ------------
10000/10000 [==============================] - 44s 4ms/steptest loss:  0.0994714692663test accuracy:  0.9691
2.5 什么是循環神經網絡 RNN
今天我們會來聊聊在語言分析, 序列化數據中穿梭自如的循環神經網絡 RNN(Recurrent Neural Network)
只想著斯蒂芬喬布斯這個名字 , 請你再把他逆序念出來. 斯布喬(*#&, 有點難吧. 這就說明, 對于預測, 順序排列是多么重要. 我們可以預測下一個按照一定順序排列的字, 但是打亂順序, 我們就沒辦法分析自己到底在說什么了.
(1)序列數據
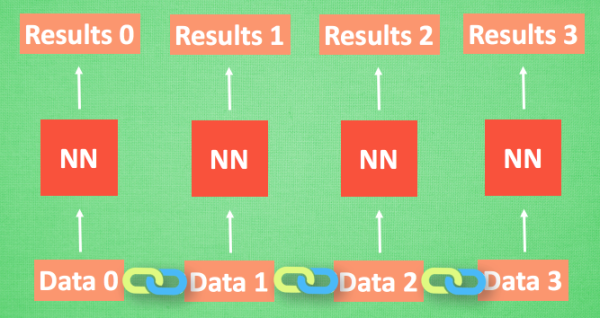
我們想象現在有一組序列數據 data 0,1,2,3. 在當預測 result0 的時候,我們基于的是 data0, 同樣在預測其他數據的時候, 我們也都只單單基于單個的數據.* 每次使用的神經網絡都是同一個 NN. *不過這些數據是有關聯 順序的 , 就像在廚房做菜, 醬料 A要比醬料 B 早放, 不然就串味了. 所以普通的神經網絡結構并不能讓 NN 了解這些數據之間的關聯.
(2)處理序列數據的神經網絡
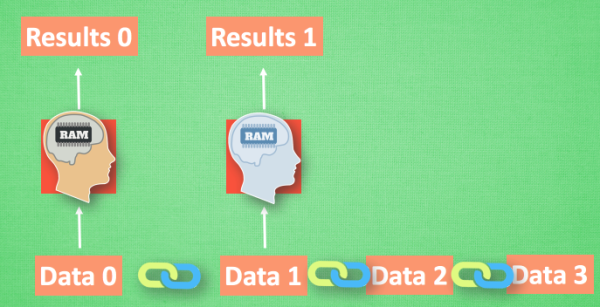
那我們如何讓數據間的關聯也被 NN 加以分析呢? 想想我們人類是怎么分析各種事物的關聯吧, 最基本的方式,就是記住之前發生的事情. 那我們讓神經網絡也具備這種記住之前發生的事的能力.
再分析 Data0 的時候, 我們把分析結果存入記憶. 然后當分析 data1的時候, NN會產生新的記憶, 但是新記憶和老記憶是沒有聯系的. 我們就簡單的把老記憶調用過來, 一起分析. 如果繼續分析更多的有序數據 , RNN就會把之前的記憶都累積起來, 一起分析.
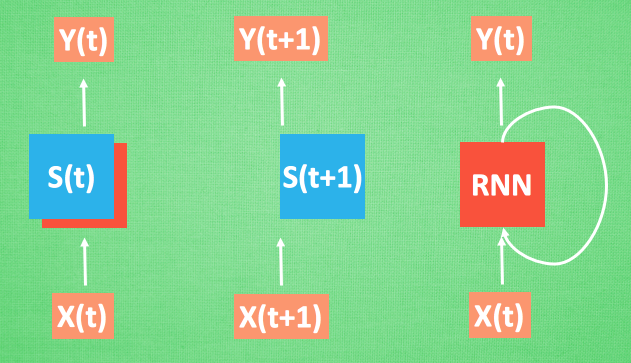
我們再重復一遍剛才的流程, 不過這次是以加入一些數學方面的東西. 每次 RNN 運算完之后都會產生一個對于當前狀態的描述 , state. 我們用簡寫 S( t) 代替, 然后這個 RNN開始分析 x(t+1) , 他會根據 x(t+1)產生s(t+1), 不過此時 y(t+1) 是由 s(t) 和 s(t+1) 共同創造的. 所以我們通常看到的 RNN 也可以表達成這種樣子.
(3)RNN的用途
RNN 的形式不單單這有這樣一種, 他的結構形式很自由. 如果用于分類問題, 比如說一個人說了一句話, 這句話帶的感情色彩是積極的還是消極的. 那我們就可以用只有最后一個時間點輸出判斷結果的RNN.
又或者這是圖片描述 RNN, 我們只需要一個 X 來代替輸入的圖片, 然后生成對圖片描述的一段話.
或者是語言翻譯的 RNN, 給出一段英文, 然后再翻譯成中文.
有了這些不同形式的 RNN, RNN 就變得強大了. 有很多有趣的 RNN 應用. 比如之前提到的, 讓 RNN 描述照片. 讓 RNN 寫學術論文, 讓 RNN 寫程序腳本, 讓 RNN 作曲. 我們一般人甚至都不能分辨這到底是不是機器寫出來的.
2.6 什么是 LSTM 循環神經網絡
今天我們會來聊聊在普通RNN的弊端和為了解決這個弊端而提出的 LSTM 技術. LSTM 是 long-short term memory 的簡稱, 中文叫做 長短期記憶. 是當下最流行的 RNN 形式之一
(1)RNN的弊端

之前我們說過, RNN 是在有順序的數據上進行學習的. 為了記住這些數據, RNN 會像人一樣產生對先前發生事件的記憶. 不過一般形式的 RNN 就像一個老爺爺, 有時候比較健忘. 為什么會這樣呢?(在時間上梯度消失)
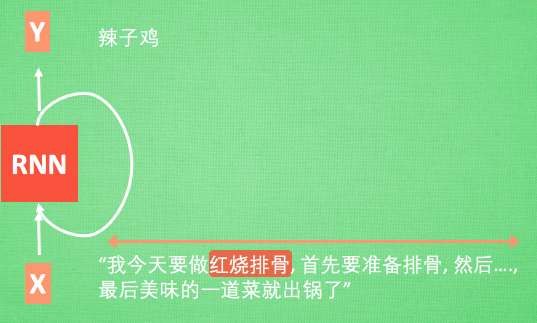
想像現在有這樣一個 RNN, 他的輸入值是一句話: ‘我今天要做紅燒排骨, 首先要準備排骨, 然后…., 最后美味的一道菜就出鍋了’, shua ~ 說著說著就流口水了. 現在請 RNN 來分析, 我今天做的到底是什么菜呢. RNN可能會給出“辣子雞”這個答案. 由于判斷失誤, RNN就要開始學習 這個長序列 X 和 ‘紅燒排骨’ 的關系 , 而RNN需要的關鍵信息 ”紅燒排骨”卻出現在句子開頭,
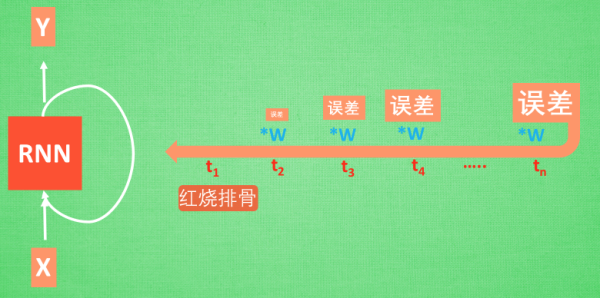
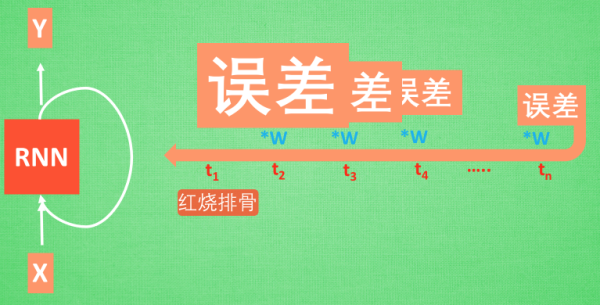
再來看看 RNN是怎樣學習的吧. 紅燒排骨這個信息原的記憶要經過長途跋涉才能抵達最后一個時間點. 然后我們得到誤差, 而且在 反向傳遞 得到的誤差的時候, 他在每一步都會 乘以一個自己的參數 W.
如果這個 W 是一個小于1 的數, 比如0.9. 這個0.9 不斷乘以誤差, 誤差傳到初始時間點也會是一個接近于零的數, 所以對于初始時刻, 誤差相當于就消失了. 我們把這個問題叫做梯度消失或者梯度彌散 Gradient vanishing.
反之如果 W 是一個大于1 的數, 比如1.1 不斷累乘, 則到最后變成了無窮大的數, RNN被這無窮大的數撐死了, 這種情況我們叫做剃度爆炸, Gradient exploding.
這就是普通 RNN 沒有辦法回憶起久遠記憶的原因
(2)LSTM
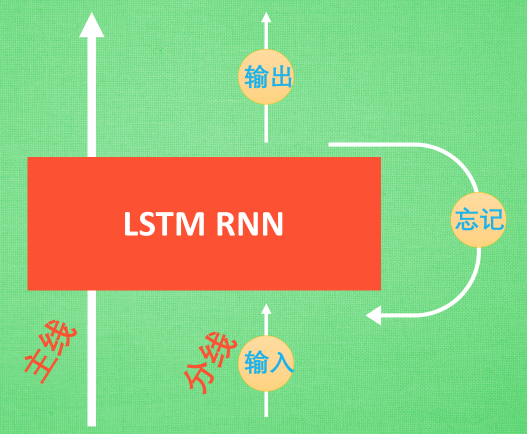
LSTM 就是為了解決這個問題而誕生的. LSTM 和普通 RNN 相比, 多出了三個控制器. (輸入控制, 輸出控制, 忘記控制). 現在, LSTM RNN 內部的情況是這樣.
他多了一個 控制全局的記憶, 我們用粗線代替. 為了方便理解, 我們把粗線想象成電影或游戲當中的 主線劇情. 而原本的 RNN 體系就是 分線劇情. 三個控制器都是在原始的 RNN 體系上, 我們先看 輸入方面 , 如果此時的分線劇情對于劇終結果十分重要, 輸入控制就會將這個分線劇情按重要程度 寫入主線劇情 進行分析. 再看 忘記方面, 如果此時的分線劇情更改了我們對之前劇情的想法, 那么忘記控制就會將之前的某些主線劇情忘記, 按比例替換成現在的新劇情. 所以 主線劇情的更新就取決于輸入 和忘記 控制. 最后的輸出方面, 輸出控制會基于目前的主線劇情和分線劇情判斷要輸出的到底是什么.
基于這些控制機制, LSTM 就像延緩記憶衰退的良藥, 可以帶來更好的結果.
2.7 RNN Classifier
這次我們用循環神經網絡(RNN, Recurrent Neural Networks)進行分類(classification),采用MNIST數據集,主要用到SimpleRNN層。
- MNIST里面的圖像分辨率是28×28,為了使用RNN,我們將圖像理解為序列化數據。 每一行作為一個輸入單元,所以輸入數據大小INPUT_SIZE = 28; 先是第1行輸入,再是第2行,第3行,第4行,…,第28行輸入, 這就是一張圖片也就是一個序列,所以步長TIME_STEPS = 28。
import numpy as np
np.random.seed(1337)  # for reproducibilityfrom keras.datasets import mnist
from keras.utils import np_utils
from keras.models import Sequential
from keras.layers import SimpleRNN, Activation, Dense
from keras.optimizers import AdamTIME_STEPS = 28     # same as the height of the image
INPUT_SIZE = 28     # same as the width of the image
BATCH_SIZE = 50
BATCH_INDEX = 0
OUTPUT_SIZE = 10
CELL_SIZE = 50
LR = 0.001# download the mnist to the path '~/.keras/datasets/' if it is the first time to be called
# X shape (60,000 28x28), y shape (10,000, )
(X_train, y_train), (X_test, y_test) = mnist.load_data()# data pre-processing
X_train = X_train.reshape(-1, 28, 28) / 255.      # normalize
X_test = X_test.reshape(-1, 28, 28) / 255.        # normalize
y_train = np_utils.to_categorical(y_train, num_classes=10)
y_test = np_utils.to_categorical(y_test, num_classes=10)"""1、建立模型"""
# build RNN model
model = Sequential()# RNN cell
model.add(SimpleRNN(# for batch_input_shape, if using tensorflow as the backend, we have to put None for the batch_size.# Otherwise, model.evaluate() will get error.batch_input_shape=(None, TIME_STEPS, INPUT_SIZE),       # Or: input_dim=INPUT_SIZE, input_length=TIME_STEPS,output_dim=CELL_SIZE,unroll=True,
))# output layer
model.add(Dense(OUTPUT_SIZE))
model.add(Activation('softmax'))"""2、編譯模型、訓練"""
# optimizer
adam = Adam(LR)
model.compile(optimizer=adam,loss='categorical_crossentropy',metrics=['accuracy'])# training
for step in range(4001):# data shape = (batch_num, steps, inputs/outputs)X_batch = X_train[BATCH_INDEX: BATCH_INDEX+BATCH_SIZE, :, :]Y_batch = y_train[BATCH_INDEX: BATCH_INDEX+BATCH_SIZE, :]cost = model.train_on_batch(X_batch, Y_batch)BATCH_INDEX += BATCH_SIZEBATCH_INDEX = 0 if BATCH_INDEX >= X_train.shape[0] else BATCH_INDEXif step % 500 == 0:cost, accuracy = model.evaluate(X_test, y_test, batch_size=y_test.shape[0], verbose=False)print('test cost: ', cost, 'test accuracy: ', accuracy)
test cost: 2.40573239326 test accuracy: 0.0390999987721
test cost: 0.608026027679 test accuracy: 0.817900002003
test cost: 0.450786024332 test accuracy: 0.864799976349
test cost: 0.341593921185 test accuracy: 0.899800002575
test cost: 0.343054682016 test accuracy: 0.898400008678
test cost: 0.27272310853 test accuracy: 0.92040002346
test cost: 0.299111783504 test accuracy: 0.908800005913
test cost: 0.228507757187 test accuracy: 0.932900011539
test cost: 0.243453606963 test accuracy: 0.927900016308
有興趣的話可以修改BATCH_SIZE和CELL_SIZE的值,試試這兩個參數對訓練時間和精度的影響。
2.8 RNN Regressor
(1)生成序列
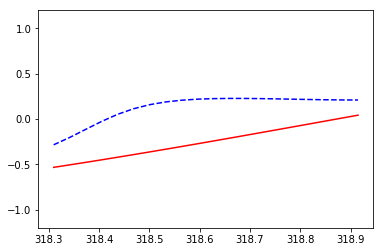
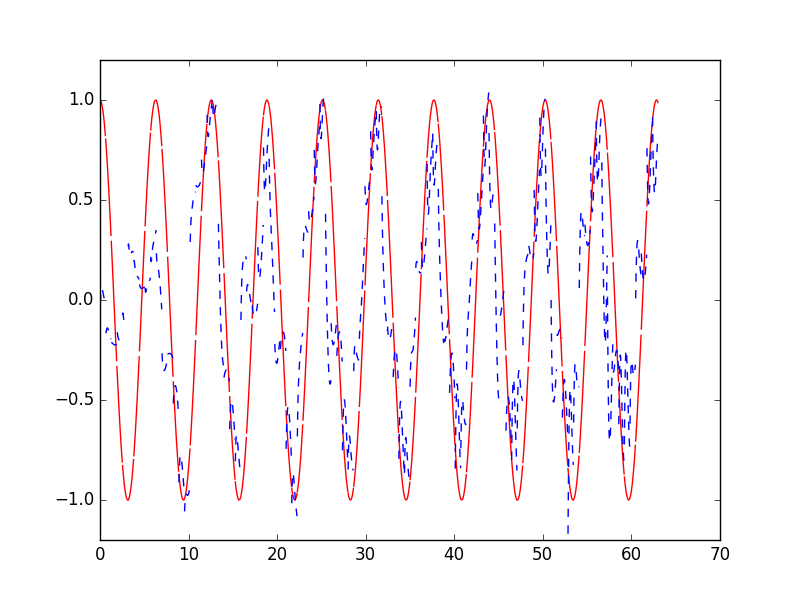
這次我們使用RNN來求解回歸(Regression)問題. 首先生成序列sin(x),對應輸出數據為cos(x),設置序列步長為20,每次訓練的BATCH_SIZE為50.
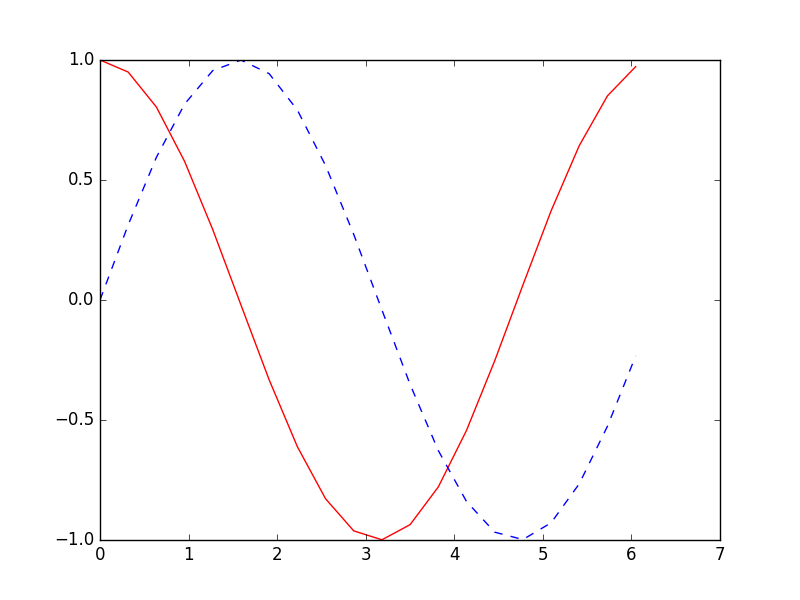
(2)搭建模型
然后添加LSTM RNN層,輸入為訓練數據,輸出數據大小由CELL_SIZE定義。因為每一個輸入都對應一個輸出,所以return_sequences=True。 每一個點的當前輸出都受前面所有輸出的影響,BATCH之間的參數也需要記憶,故stateful=True
model.add(LSTM(batch_input_shape=(BATCH_SIZE, TIME_STEPS, INPUT_SIZE),       # Or: input_dim=INPUT_SIZE, input_length=TIME_STEPS,output_dim=CELL_SIZE,return_sequences=True,      # True: output at all steps. False: output as last step.stateful=True,              # True: the final state of batch1 is feed into the initial state of batch2
))
最后添加輸出層,LSTM層的每一步都有輸出,使用TimeDistributed函數。
model.add(TimeDistributed(Dense(OUTPUT_SIZE)))- 1
import numpy as np
np.random.seed(1337)  # for reproducibility
import matplotlib.pyplot as plt
from keras.models import Sequential
from keras.layers import LSTM, TimeDistributed, Dense
from keras.optimizers import AdamBATCH_START = 0
TIME_STEPS = 20
BATCH_SIZE = 50
INPUT_SIZE = 1
OUTPUT_SIZE = 1
CELL_SIZE = 20
LR = 0.006"""1、生成序列"""
def get_batch():global BATCH_START, TIME_STEPS# xs shape (50batch, 20steps)xs = np.arange(BATCH_START, BATCH_START+TIME_STEPS*BATCH_SIZE).reshape((BATCH_SIZE, TIME_STEPS)) / (10*np.pi)seq = np.sin(xs)res = np.cos(xs)BATCH_START += TIME_STEPS# plt.plot(xs[0, :], res[0, :], 'r', xs[0, :], seq[0, :], 'b--')# plt.show()return [seq[:, :, np.newaxis], res[:, :, np.newaxis], xs]"""建立 LSTM模型"""
model = Sequential()
# build a LSTM RNN
model.add(LSTM(batch_input_shape=(BATCH_SIZE, TIME_STEPS, INPUT_SIZE),       # Or: input_dim=INPUT_SIZE, input_length=TIME_STEPS,output_dim=CELL_SIZE,return_sequences=True,      # True: output at all steps. False: output as last step.stateful=True,              # True: the final state of batch1 is feed into the initial state of batch2
))
# add output layer
model.add(TimeDistributed(Dense(OUTPUT_SIZE)))
adam = Adam(LR)
model.compile(optimizer=adam,loss='mse',)print('Training ------------')
for step in range(501):# data shape = (batch_num, steps, inputs/outputs)X_batch, Y_batch, xs = get_batch()cost = model.train_on_batch(X_batch, Y_batch)pred = model.predict(X_batch, BATCH_SIZE)plt.plot(xs[0, :], Y_batch[0].flatten(), 'r', xs[0, :], pred.flatten()[:TIME_STEPS], 'b--')plt.ylim((-1.2, 1.2))plt.draw()plt.pause(0.1)if step % 10 == 0:print('train cost: ', cost)
train cost: 0.04125822.9什么是自編碼(Autoencoder)
今天我們會來聊聊用神經網絡如何進行非監督形式的學習. 也就是 autoencoder, 自編碼.
有一個神經網絡, 它在做的事情是 接收一張圖片, 然后 給它打碼, 最后 再從打碼后的圖片中還原. 太抽象啦? 行, 我們再具體點.
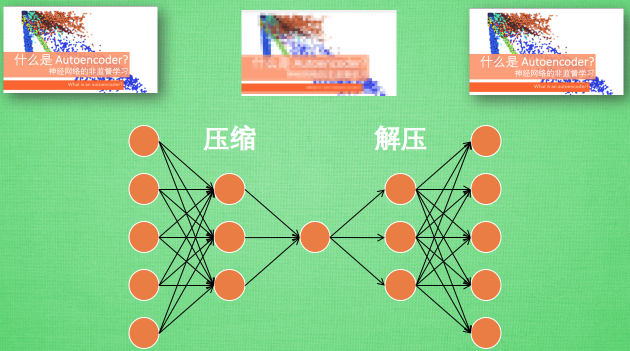
假設剛剛那個神經網絡是這樣, 對應上剛剛的圖片, 可以看出圖片其實是經過了壓縮,再解壓的這一道工序. 當壓縮的時候, 原有的圖片質量被縮減, 解壓時用信息量小卻包含了所有關鍵信息的文件恢復出原本的圖片. 為什么要這樣做呢?
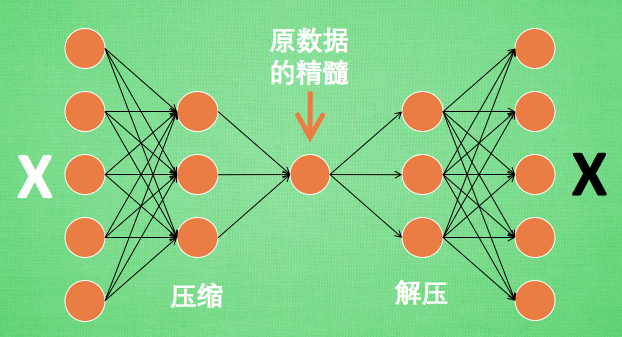
原來有時神經網絡要接受大量的輸入信息, 比如輸入信息是高清圖片時, 輸入信息量可能達到上千萬, 讓神經網絡直接從上千萬個信息源中學習是一件很吃力的工作. 所以, 何不壓縮一下, 提取出原圖片中的最具代表性的信息, 縮減輸入信息量, 再把縮減過后的信息放進神經網絡學習. 這樣學習起來就簡單輕松了.
所以, 自編碼就能在這時發揮作用. 通過將原數據白色的X 壓縮, 解壓 成黑色的X, 然后通過對比黑白 X ,求出預測誤差, 進行反向傳遞, 逐步提升自編碼的準確性. 訓練好的自編碼中間這一部分就是能總結原數據的精髓. 可以看出, 從頭到尾, 我們只用到了輸入數據 X, 并沒有用到 X 對應的數據標簽, 所以也可以說自編碼是一種非監督學習. 到了真正使用自編碼的時候. 通常只會用到自編碼前半部分.
(1)編碼器encoder
這 部分也叫作 encoder 編碼器. 編碼器能得到原數據的精髓, 然后我們只需要再創建一個小的神經網絡學習這個精髓的數據,不僅減少了神經網絡的負擔, 而且同樣能達到很好的效果.
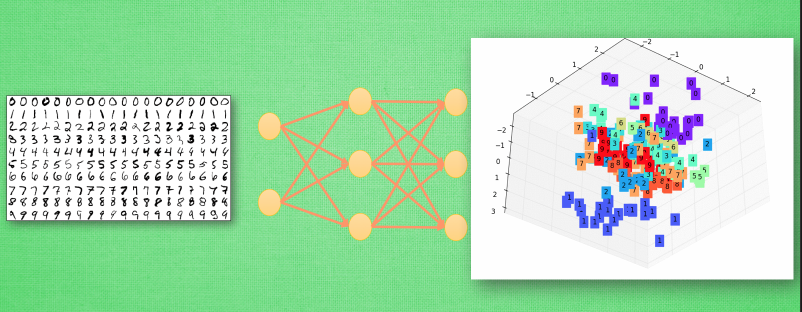
如果你了解 PCA 主成分分析, 再提取主要特征時, 自編碼和它一樣,甚至超越了 PCA. 換句話說, 自編碼 可以像 PCA 一樣 給特征屬性降維.
(2)解碼器 Decoder
至于解碼器 Decoder, 我們也能那它來做點事情. 我們知道, 解碼器在訓練的時候是要將精髓信息解壓成原始信息, 那么這就提供了一個解壓器的作用, 甚至我們可以認為是一個生成器 (類似于GAN). 那做這件事的一種特殊自編碼叫做 variational autoencoders, 你能在這里找到他的具體說明.
2.10 Autoencoder 自編碼
自編碼,簡單來說就是把輸入數據進行一個壓縮和解壓縮的過程。 原來有很多 Feature,壓縮成幾個來代表原來的數據,解壓之后恢復成原來的維度,再和原數據進行比較。
它是一種非監督算法,只需要輸入數據,解壓縮之后的結果與原數據本身進行比較。
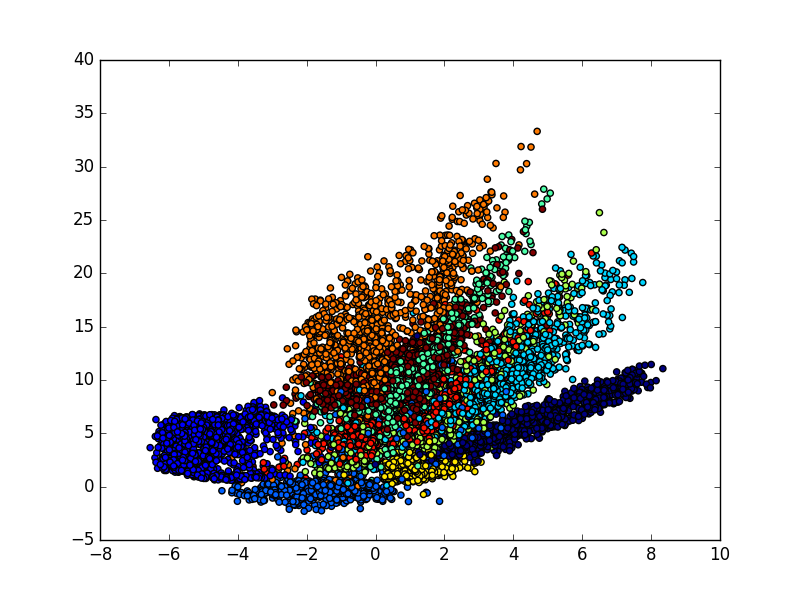
今天要做的事情是把 datasets.mnist 數據的 28×28=784 維的數據,壓縮成 2 維的數據,然后在一個二維空間中可視化出分類的效果。
(1)建立模型
encoding_dim,要壓縮成的維度
import numpy as np
np.random.seed(1337)  # for reproducibilityfrom keras.datasets import mnist
from keras.models import Model
from keras.layers import Dense, Input
import matplotlib.pyplot as plt# download the mnist to the path '~/.keras/datasets/' if it is the first time to be called
# X shape (60,000 28x28), y shape (10,000, )
(x_train, _), (x_test, y_test) = mnist.load_data()# data pre-processing
x_train = x_train.astype('float32') / 255. - 0.5       # minmax_normalized
x_test = x_test.astype('float32') / 255. - 0.5         # minmax_normalized
x_train = x_train.reshape((x_train.shape[0], -1))
x_test = x_test.reshape((x_test.shape[0], -1))
print(x_train.shape)
print(x_test.shape)# in order to plot in a 2D figure
encoding_dim = 2# this is our input placeholder
input_img = Input(shape=(784,))# encoder layers
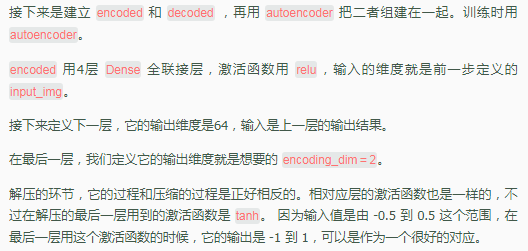
encoded = Dense(128, activation='relu')(input_img)
encoded = Dense(64, activation='relu')(encoded)
encoded = Dense(10, activation='relu')(encoded)
encoder_output = Dense(encoding_dim)(encoded)# decoder layers
decoded = Dense(10, activation='relu')(encoder_output)
decoded = Dense(64, activation='relu')(decoded)
decoded = Dense(128, activation='relu')(decoded)
decoded = Dense(784, activation='tanh')(decoded)# construct the autoencoder model
autoencoder = Model(input=input_img, output=decoded)# construct the encoder model for plotting
encoder = Model(input=input_img, output=encoder_output)# compile autoencoder
autoencoder.compile(optimizer='adam', loss='mse')# training
autoencoder.fit(x_train, x_train,epochs=20,batch_size=256,shuffle=True)# plotting
encoded_imgs = encoder.predict(x_test)
plt.scatter(encoded_imgs[:, 0], encoded_imgs[:, 1], c=y_test)
plt.colorbar()
plt.show()
最后看到可視化的結果,自編碼模型可以把這幾個數字給區分開來,我們可以用自編碼這個過程來作為一個特征壓縮的方法,和PCA的功能一樣,效果要比它好一些,因為它是非線性的結構。
Epoch 1/20
60000/60000 [==============================] - 5s 86us/step - loss: 0.0683
Epoch 2/20
60000/60000 [==============================] - 5s 78us/step - loss: 0.0565
Epoch 3/20
60000/60000 [==============================] - 5s 76us/step - loss: 0.0515
Epoch 4/20
60000/60000 [==============================] - 5s 88us/step - loss: 0.0478
Epoch 5/20
60000/60000 [==============================] - 4s 71us/step - loss: 0.0459
Epoch 6/20
60000/60000 [==============================] - 4s 66us/step - loss: 0.0445
Epoch 7/20
60000/60000 [==============================] - 4s 65us/step - loss: 0.0435
Epoch 8/20
60000/60000 [==============================] - 4s 66us/step - loss: 0.0427
Epoch 9/20
60000/60000 [==============================] - 4s 66us/step - loss: 0.0421
Epoch 10/20
60000/60000 [==============================] - 4s 71us/step - loss: 0.0416
Epoch 11/20
60000/60000 [==============================] - 4s 73us/step - loss: 0.0412
Epoch 12/20
60000/60000 [==============================] - 5s 78us/step - loss: 0.0410
Epoch 13/20
60000/60000 [==============================] - 5s 77us/step - loss: 0.0406
Epoch 14/20
60000/60000 [==============================] - 5s 81us/step - loss: 0.0403
Epoch 15/20
60000/60000 [==============================] - 4s 66us/step - loss: 0.0401
Epoch 16/20
60000/60000 [==============================] - 4s 66us/step - loss: 0.0398
Epoch 17/20
60000/60000 [==============================] - 5s 79us/step - loss: 0.0395
Epoch 18/20
60000/60000 [==============================] - 4s 70us/step - loss: 0.0393
Epoch 19/20
60000/60000 [==============================] - 4s 70us/step - loss: 0.0392
Epoch 20/20
60000/60000 [==============================] - 4s 74us/step - loss: 0.0391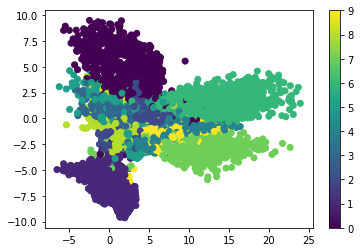

)
-數據載入接口:Dataloader、datasets)
)
-- NoSQL數據庫)

-字典dictionary、集合)


)
-字符串、Unicode字符串)

-高級數據類型的公共方法)


--名片管理系統開發)

-- 云數據庫)
--變量進階)

)