目錄
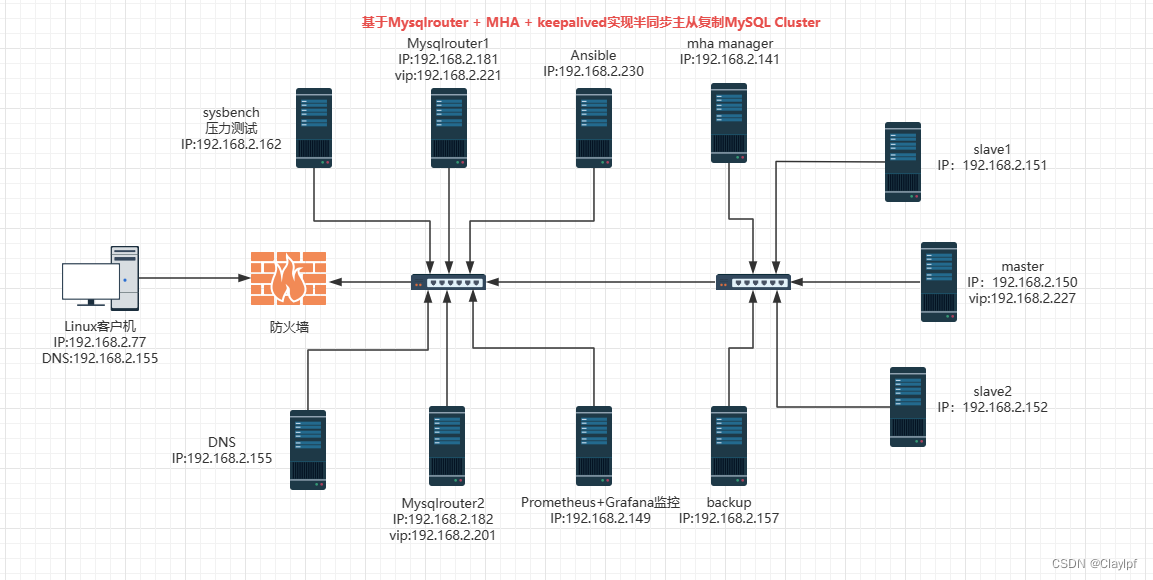
項目名稱:?基于Mysqlrouter + MHA + keepalived實現半同步主從復制MySQL Cluster
MySQL Cluster:?
項目架構圖:
項目環境:
項目環境安裝包:
項目描述:
項目IP地址規劃:
項目步驟:
一、準備10臺全新虛擬機,按照IP規劃配置好靜態IP,修改主機名。安裝部署Ansible,并建立Ansible的免密通道,調用一鍵二進制安裝MySQL腳本,自動化批量部署MySQL
1、根據ip規劃配置好靜態ip
2、修改主機名?
3、建立Ansible免密通道
4、安裝部署ansible
5、準備好MySQL軟件包(mysql-5.7.41-linux-glibc2.12-x86_64.tar.gz),上傳到linux的root目錄下,并上傳一鍵二進制安裝mysql腳本
6、編寫主機清單,加入主機組
7、編寫playbook,上傳源碼包到遠程服務器,調用本地腳本二進制安裝MySQL
8、檢查yaml文件語法,并執行yaml文件?
9、查看Mysql是否安裝成功
二、配置Mysql主從復制半同步模式(semi-sync)
1、在master服務器上開啟二進制日志并配置server_id=1,并且在slave服務器上配置server_id=2
2、刷新master和slave上的Mysql數據庫服務
3、在master上創建可以給slave服務器過來復制二進制日志文件的用戶
4、在master上做一個全備,導出數據,導入到slave上,保持master和slave上的數據是一致的
5、再將導出的數據傳出到slave服務器上去,并將該sql文件導入Mysql數據庫中
6、將該sql文件導入Mysql數據庫中,并檢查我們的slave的Mysql數據是否與master的Mysql數據一致
7、在slave上配置master上拉取的二進制日志用戶名和密碼和日志文件名稱和位置號和端口等信息
8、啟動slave服務器,查看IO線程和SQL線程是否正常啟動
9、啟用半同步復制
9.1、在主服務器master上執行安裝:
9.2、在從服務器slave上執行安裝:
9.3、接下來我們將啟用我們下載好的插件(在master服務器上)
9.4、在slave服務器上啟用我們下載好的插件
9.5、接下來我們將在slave從服務器上刷新服務
9.6、查看是否在slave上打開了半同步復制
9.7、驗證是否可以實現同步操作:
9.8、驗證是否可以實現異步操作:
三、rsync+sersync+計劃任務 實現實時同步全備數據(數據備份)
1、對master進行建庫建表并插入數據,用于模擬企業已經存在的真實數據,也方便后續效果測試
2、計劃任務定時全備數據
2.1、編寫數據備份腳本?
2.2、編寫計劃任務,每天凌晨2點全備數據
3、rsync+sersync實現備份數據實時同步到異地備份服務器
rsync -?backup備份服務器操作?
3.1、新建/backup文件夾,用于存放備份數據
3.2、安裝rsync服務端軟件
3.3、設置開機啟動
3.4、啟動xinetd,查看進程(看到進程說明xinetd已經啟動成功)
3.5、修改/etc/rsyncd.conf配置文件?(注意:[back_data]最好不要加注釋,防止出錯)
3.6、創建用戶認證文件
3.7、設置文件權限
3.8、啟動rsync,查看對應的進程、端口?(看到進程,就說明rsync啟動成功、xinetd監聽873端口)
rsync - master數據源服務器操作
3.9、在master上安裝rsync、xinetd軟件
3.10、啟動xinetd,查看進程
3.11、修改/etc/rsyncd.conf配置文件(注意:[sync]段配置文件最好不要加注釋,防止報錯)
3.12、創建用戶認證文件
3.13、設置文件權限,非root用戶不可讀認證文件
3.14、測試數據同步
3.15、數據源服務器增加文件或者刪除文件,看備份服務器/backup/是否有變化
4、安裝sersync工具,inotify實時觸發rsync進行同步–數據源服務器操作
4.1、修改inotify默認參數(inotify默認內核參數過小),修改參數(inotify在內核里已經安裝了,只需要傳參)
4.2、設置永久生效
4.3、裝sersync軟件包
4.4、解壓sersync軟件
4.5、創建sersync
4.6、修改配置 data_configxml.xml
4.7、加入PATH環境變量,并設置開機永久生效?
4.8、啟動sersync(啟動成功如下)
4.9、查看sersync進程
4.10、設置sersync監控開機自動執行
4.11、效果測試
四、Ansible批量部署mha軟件環境,搭建MHA高可用架構,實現自動failover,完成主從切換
1、編寫主機清單,增添4個mha node節點ip地址,以及一個mha manager節點ip地址
2、編寫一鍵安裝mha node腳本和一鍵安裝mha mangaer腳本
3、編寫playbook,上傳源碼包到家目錄下,調用本地腳本,遠程安裝部署mha相關軟件環境
4、執行playbook
5、所有服務器互相建立免密通道
5.1、mha manager對所有mysql服務器建立免密通道
5.2、master對slave1、slave2建立免密通道
5.3、slave1對master、slave2建立免密通道
?5.4、slave2對master、slave1建立免密通道
6、在搭建好的主從復制服務器里,配置mha相關信息
6.1、所有mysql服務器加入log_bin和log-slave-updates,并刷新配置文件
6.2、所有mysql服務器(master、slave1、slave2)將mysql命令和mysqlbinlog命令軟鏈接到/usr/sbin,方便manager管理節點
6.3、所有mysql服務器新建允許manager訪問的授權用戶mha,密碼123456
7、在mha manager節點上配置好相關腳本、管理節點服務器
7.1、mha manager節點上復制相關腳本到/usr/local/bin下
7.2、復制自動切換時vip管理的腳本到/usr/local/bin下
7.3、修改master_ip_failover文件內容,配置vip(只配置vip相關參數,其他默認不修改)
7.4、創建 MHA 軟件目錄并復制配置文件,使用app1.cnf配置文件來管理 mysql 節點服務器,配置文件一般放在/etc/目錄下(注意:注釋只是提示用,編輯配置文件時最好不要加注釋,否則很可能會出錯)
8、master服務器上手工開啟vip
9、manager節點上測試ssh免密通道,如果正常最后會輸出successfully(注意是否每臺mysql間都建立了ssh免密通道,否則會報錯)
10、在 manager 節點上測試 mysql 主從連接情況,最后出現 MySQL Replication Health is OK 字樣說明正常(如果報錯,思考是否軟鏈接建立好了?或者主從復制搭建正確了)
11、manager節點后臺開啟MHA
11.1、查看 MHA 狀態,可以看到當前的 master 是 Mysql1 節點
11.2、查看MHA日志,看到當前matser是192.168.2.150
11.3、查看mha進程
五、搭建mysqlrouter-keepalived集群,實現高可用 - 讀寫分離功能,減輕主節點的壓力
1、下載安裝Mysql-router:MySQL :: Download MySQL Router
2、安裝Mysql-router并解壓:
3、修改mysqlrouter配置文件:(mysqlrouter必須綁定到keepalived設定的vip上或者使用任意地址0.0.0.0上)(切記不能添加注釋,我添加是為了方便解釋,否則會報錯)
4、刷新mysqlrouter服務,并查看端口:
5、安裝配置keepalived服務
6、修改keepalived的配置文件(從36行以下的全部都不需要)(配置單vip的高可用服務)
6.1、master上的配置
6.2、backup上的配置
7、重新啟動keepalived服務
7.1、查看效果:
8、模擬測試:如果master掛掉了,那么vip是否會轉移到backup上去呢?
8.1、我們將master上的keepalived關閉,查看backup上的ip地址
8.2、backup上的IP地址
8.3、當我們重啟master,vip又會從backup上漂移到master上去的
9、外部連接測試keepalived實現的高可用效果:
10、配置雙vip實現keepalived配置(跟MySQL的主主復制十分相似)
10.1、master配置文件:
10.2、backup配置文件:
10.3、刷新keepalived服務,并查看master和backup的IP地址
六、使用sysbench壓力測試工具測試整個數據庫集群的性能,了解集群系統性能資源的瓶頸
1、安裝sysbench工具
2、調大內核資源限制
3、在master上創建用戶和庫,配置用戶的權限可以使他可以訪問庫(Mysql的主從復制)
4、基于sysbench構造測試表和測試數據
5、創建我們需要的數據庫里的數據
6、數據庫讀寫性能測試(獲取測試數據)
7、執行完成壓測之后可以將run改成cleanup,清除數據
8、IO性能壓力測試
8.1、創建5個文件,總共500MB,每個文件大概100MB
8.2、測試效果
8.3、清除數據:
9、cpu性能壓力測試
七、搭建基于prometheus + grafana的監控系統,對數據庫集群進行監控
1、安裝部署mysqld_exporter
2、上傳軟件包到linux的/root/目錄下
3、解壓,并移動到/usr/local/mysqld_exporter下
4、在/usr/local/mysqld_exporter下編輯連接本機數據庫的配置文件
5、將mysqld_exporter命令加入環境變量,并設置開機自啟
6、后臺啟動
7、看進程,看端口,網頁訪問測試
8、安裝prometheus,配置成服務
8.1、上傳安裝包到linux家目錄下
8.2、解壓Prometheus壓縮包,并移動到/prometheus目錄下
8.3、將Prometheus配置成service服務
8.4、查看Prometheus端口
8.4、訪問Prometheus服務頁面
9、Prometheus添加node節點
9.1、刷新Prometheus服務
10、測試訪問Prometheus服務:
11、安裝grafana
11.1、上傳grafana的rpm安裝包
11.2、安裝grafana
11.3、啟動grafana
11.4、查看端口,并訪問測試grafana
12、在grafana中增添Prometheus數據源
13、添加Dashboards模板(推薦使用14057模板,因為14057模板比較美觀,出圖效果也比較好,推薦使用)
14、grafana效果展示
八、搭建DNS主域名服務器,增添兩條負載均衡記錄,實現對mycat2雙vip地址的DNS負載均衡
1、安裝DNS服務
2、修改dns配置文件,任意ip可以訪問本機的53端口,并且允許dns解析。
3、搭建主域名服務器
3.1、修改named.rfc1912.zones配置文件,告訴named為claylpf.xyz提供域名解析
3.2、創建claylpf.xyz主域名的數據文件
3.3、修改claylpf.xyz.zone文件:
3.4、刷新dns服務
4、效果測試
4.1、修改linux客戶機的dns服務器的地址為搭建的dns服務器192.168.2.155
4.2、查看效果
項目結束!!
項目遇到的問題
項目心得?
項目名稱:?基于Mysqlrouter + MHA + keepalived實現半同步主從復制MySQL Cluster
MySQL Cluster:?
MySQL Cluster 是 MySQL 數據庫的一種高可用性和高可擴展性解決方案,特別適用于需要在分布式環境中提供實時訪問和處理大量數據的應用。MySQL Cluster 使用了分布式架構和內存數據庫技術,可以提供高度可用的數據庫服務,同時支持水平擴展和垂直擴展。
項目架構圖:
項目環境:
軟件環境
CentOS:CentOS Linux release 7.9.2009 (Core)
MySQL:mysql ?Ver 14.14 Distrib 5.7.41, for linux-glibc2.12 (x86_64) using ?EditLine wrapper
mha manager:mha4mysql-manager-0.58
mha node:mha4mysql-node-0.58
Mysqlrouter:MySQL Router ?Ver 8.0.34 for Linux on x86_64 (MySQL Community - GPL)
Keepalived: Keepalived v1.3.5 (03/19,2017)
sysbench:sysbench 1.0.17
Ansible:ansible 2.9.27
Prometheus: prometheus, version 2.43.0
mysqld_exporter:mysqld_exporter, version 0.15.1
Grafana: grafana 9.4.7
DNS:BIND 9.11.4-P2-RedHat-9.11.4-26.P2.el7_9.13
項目環境安裝包:
鏈接:https://pan.baidu.com/s/184n8h0mxUmt1_ETq3wTwRg?pwd=frm3?
提取碼:frm3
項目描述:
本項目旨在通過整合 MySQL Router、MHA(Master High Availability)以及 Keepalived 等關鍵技術,構建一個高可用半同步 MySQL 集群解決方案。通過該解決方案,實現 MySQL 數據庫的高可用性、負載均衡以及半同步主從復制,以提供穩定和高效的數據庫服務,能方便處理大并發的后端MySQL業務。
項目IP地址規劃:
主機名?? ? ? ? ? ? ? ? ? ? ? ? ? ? ? ? ? ? ? ? ? ??IP地址
Linux客戶機?? ? ? ? ? ? ? ? ? ? ? ? ? ? ?192.168.2.77
mysqlrouter1? ? ? ? ? ? ? ? 192.168.2.181?vip 192.168.2.221
mysqlrouter2????????????????192.168.2.182?vip 192.168.2.201
mha_manager、mha_node?? ?192.168.2.141
master、mha_node? ? ?192.168.2.150?vip 192.168.2.227
slave1、mha_node? ? ? ? ? ? ? ? ? ?192.168.2.151?
slave2、mha_node? ? ? ?????????????192.168.2.152
ansible? ? ? ? ? ? ? ? ? ? ? ? ? ? ? ? ??? ? ?192.168.2.230
sysbench?? ????????????????????????????????192.168.2.162
prometheus+grafana?? ?????????????192.168.2.149
dns? ? ? ? ? ? ? ? ? ? ? ? ? ? ? ? ? ? ? ? ? ? ?192.168.2.155backup?? ? ? ? ? ? ? ? ? ? ? ? ? ? ? ? ? ? ? 192.168.2.157
項目步驟:
一、準備11臺全新虛擬機,按照IP規劃配置好靜態IP,修改主機名。安裝部署Ansible,并建立Ansible的免密通道,調用一鍵二進制安裝MySQL腳本,自動化批量部署MySQL
1、根據ip規劃配置好靜態ip
參考:計算機網絡 day6 arp病毒 - ICMP協議 - ping命令 - Linux手工配置IP地址_Claylpf的博客-CSDN博客
[root@master ~]# vi /etc/sysconfig/network-scripts/ifcfg-ens33
BOOTPROTO=static #靜態配置ip
NAME=ens33 #網卡名稱ens33
DEVICE=ens33 #本機網卡ens33
ONBOOT=yes #開機啟動
IPADDR=192.168.2.150 #ip地址
PREFIX=24 #子網掩碼24
GATEWAY=192.168.2.1 #我選擇的是橋接網絡,所以網關是路由器ip 192.168.2.1
DNS1=114.114.114.114 #dns服務器114.114.114.114[root@master ~]# service network restart #重啟網絡
Restarting network (via systemctl):                        [  確定  ]
[root@master ~]# ip add #查看ip
[root@master ~]# ping www.baidu.com #測試能否上網
2、修改主機名?
[root@master ~]# hostnamectl set-hostname master #修改指定主機名,方便辨認
[root@master ~]# su -3、建立Ansible免密通道
參考:Linux - SSH服務 - SCP - 免密通道建立_服務器只允許堡壘機登錄_Claylpf的博客-CSDN博客
[root@ansible ~]# ssh-keygen
Generating public/private rsa key pair.
Enter file in which to save the key (/root/.ssh/id_rsa):
/root/.ssh/id_rsa already exists.
Overwrite (y/n)? y
Enter passphrase (empty for no passphrase):
Enter same passphrase again:
Your identification has been saved in /root/.ssh/id_rsa.
Your public key has been saved in /root/.ssh/id_rsa.pub.
The key fingerprint is:
SHA256:wyZdVrUlL22pZs6sLTAXx/FTcrW66v8CDCtqrQEXBnA root@ansible
The key's randomart image is:
+---[RSA 2048]----+
| ..E        ..o +|
|  . .      . ..*=|
|     o    o . ===|
|    . .o + . oo= |
|   . .. S + o=  .|
|    o  + = +* .  |
|     .o . + .=   |
|     o..   .+.   |
|    ...   .+ooo. |
+----[SHA256]-----+
[root@ansible ~]# [root@ansible ~]# ssh-copy-id -i /root/.ssh/id_rsa.pub 192.168.2.150  #master[root@ansible ~]# ssh-copy-id -i /root/.ssh/id_rsa.pub 192.168.2.151  #slave1[root@ansible ~]# ssh-copy-id -i /root/.ssh/id_rsa.pub 192.168.2.152  #slave2[root@ansible ~]# ssh-copy-id -i /root/.ssh/id_rsa.pub 192.168.2.141  #mha_manager[root@ansible ~]# ssh-copy-id -i /root/.ssh/id_rsa.pub 192.168.2.149  #Prometheus[root@ansible ~]# ssh-copy-id -i /root/.ssh/id_rsa.pub 192.168.2.181  #mysqlrouter1[root@ansible ~]# ssh-copy-id -i /root/.ssh/id_rsa.pub 192.168.2.182  #mysqlrouter2[root@ansible ~]# ssh-copy-id -i /root/.ssh/id_rsa.pub 192.168.2.162  #sysbench
4、安裝部署ansible
參考:ansible ansible的組成 - ansible的配置免密通道 - ansible 常用模塊 - playbook模塊的使用_Claylpf的博客-CSDN博客
[root@ansible ~]# yum install -y epel-release
[root@ansible ~]# yum install ansible
5、準備好MySQL軟件包(mysql-5.7.41-linux-glibc2.12-x86_64.tar.gz),上傳到linux的root目錄下,并上傳一鍵二進制安裝mysql腳本
參考:Mysql的介紹和軟件環境的部署_mysql有軟件嗎_Claylpf的博客-CSDN博客

[root@master ~]# cat onekey_install_mysql_binary.sh
#!/bin/bash#步驟:
#解決軟件依賴關系
yum install cmake ncurses-devel gcc gcc-c++ vim lsof bzip2 openssl-devel -y#解壓二進制安裝包
tar xf mysql-5.7.41-linux-glibc2.12-x86_64.tar.gz#移動mysql解壓文件到/usr/local下,改名為mysql
mv mysql-5.7.41-linux-glibc2.12-x86_64 /usr/local/mysql#新建組和用戶 mysql
groupadd mysql#mysql這個用戶的shell 是/bin/false 無法被調用 表示系統用戶 屬于mysql這個組
useradd -r -g mysql -s /bin/false mysql#進入/usr/local/mysql
cd /usr/local/mysql#關閉firewalld防火墻服務,并且設置開機不啟動
service firewalld stop
systemctl disable firewalld #臨時關閉selinux,永久關閉selinux
setenforce 0
sed -i '/^SELINUX=/ s/enforcing/disabled/' /etc/selinux/config#mysql初始化操作
#創建/data/mysql文檔用于存放數據使用
mkdir /data/mysql -p
#修改文件權限和組別,這樣mysql用戶可以對這個文件夾進行讀寫操作了
chown mysql:mysql /data/mysql/
chmod 750 /data/mysql/#進入/usr/local/mysql/bin目錄下進行初始化操作
cd /usr/local/mysql/bin
#設置啟動用戶為mysql base目錄為/usr/local/mysql/ data目錄為/data/mysql   &>passwd.txt目的是將生成的臨時密碼存入passwd.txt文件中
./mysqld --initialize --user=mysql --basedir=/usr/local/mysql/ --datadir=/data/mysql &>passwd.txt #讓mysql支持ssl方式登錄的設置
./mysql_ssl_rsa_setup --datadir=/data/mysql/#獲得臨時密碼
tem_passwd=$(cat passwd.txt| grep "temporary" | awk '{print $NF}')
#$NF表示最后一個字段#修改環境變量,添加我們編譯安裝的mysql的可執行命令的路徑
#臨時修改PATH變量的值
export PATH=/usr/local/mysql/bin/:$PATH
#永久修改
echo "PATH=/usr/local/mysql/bin:$PATH" >>/root/.bashrc#復制support-files里的mysql.server文件到/etc/init.d目錄下叫mysqld
cp ../support-files/mysql.server  /etc/init.d/mysqld#修改/etc/init.d/mysqld內的第70行的內容(datadir目錄的值)
sed -i '70c  datadir=/data/mysql' /etc/init.d/mysqld#生成/etc/my.cnf配置文件
cat  >/etc/my.cnf  <<EOF
[mysqld_safe]
[client]
socket=/data/mysql/mysql.sock
[mysqld]
socket=/data/mysql/mysql.sock
port = 3306
open_files_limit = 8192
innodb_buffer_pool_size = 512M
character-set-server=utf8
[mysql]
auto-rehash
prompt=\\u@\\d \\R:\\m  mysql>
EOF#啟動mysqld服務
service mysqld start#將mysqld添加到linux系統里的服務管理名單里
chkconfig --add mysqld
#設置mysqld服務開機啟動
/sbin/chkconfig mysqld on#登錄重新設置初始密碼為123456
#初次修改密碼需要使用 --connect-expired-password 選項
#-e 后面接的命令是表示我們需要在mysql里執行的命令
#set password='123456'; 表示修改root用戶的密碼為:123456
mysql -uroot -p$tem_passwd --connect-expired-password -e "set password='123456';"#建議修改密碼是否修改成功
mysql -uroot -p123456 -e 'show databases;' && echo "database is installed success"
[root@master ~]#
6、編寫主機清單,加入主機組
[root@ansible ~]# cd /etc/ansible/
[root@ansible ansible]# ls
ansible.cfg  hosts  nginx  node_exporter  roles
[root@ansible ansible]# vim hosts
[root@ansible ansible]# cat hosts
[mysql]
192.168.2.150 #master
192.168.2.151 #slave1
192.168.2.152 #slave2
[root@ansible ansible]#
7、編寫playbook,上傳源碼包到遠程服務器,調用本地腳本二進制安裝MySQL
[root@ansible ansible]# vim software_install.yaml
[root@ansible ansible]# cat software_install.yaml
- hosts: mysqlremote_user: roottasks:- name: copy file  #上傳本地源碼包到mysql主機組copy: src=/root/mysql-5.7.41-linux-glibc2.12-x86_64.tar.gz dest=/root/- name: one key binary install mysql  #調用本地二進制安裝腳本,遠程執行安裝mysqlscript: /root/onekey_install_mysql_binary.sh- name: alter path #確保mysql命令加入環境變量shell: export PATH=/usr/local/mysql/bin/:$PATH
[root@ansible ansible]#
使用ansible中的copy模塊上傳源碼包時,速度可能比較慢—可以考慮直接使用xshell里的xftp工具直接上傳,不寫playbook
8、檢查yaml文件語法,并執行yaml文件?
[root@ansible ansible]# ansible-playbook --syntax-check /etc/ansible/software_install.yaml  # 檢查yaml文件語法playbook: /etc/ansible/software_install.yaml
[root@ansible ansible]# ansible-playbook  software_install.yaml  # 執行yaml文件
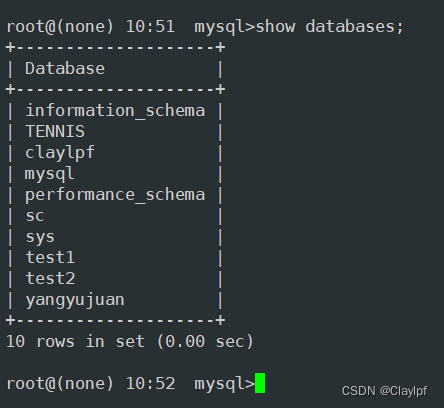
9、查看Mysql是否安裝成功
+--------------------+
| Database           |
+--------------------+
| information_schema |
| mysql              |
| performance_schema |
| sys                |
+--------------------+
database is installed success[root@slave1 ~]# ps aux|grep mysql
root      23541  0.0  0.1  11824  1596 pts/1    S    05:36   0:00 /bin/sh /usr/local/mysql/bin/mysqld_safe --datadir=/data/mysql --pid-file=/data/mysql/slave1.pid
mysql     23695  1.0 20.6 1544672 205120 pts/1  Sl   05:36   0:00 /usr/local/mysql/bin/mysqld --basedir=/usr/local/mysql --datadir=/data/mysql --plugin-dir=/usr/local/mysql/lib/plugin --user=mysql --log-error=slave1.err --open-files-limit=8192 --pid-file=/data/mysql/slave1.pid --socket=/data/mysql/mysql.sock --port=3306
root      23769  0.0  0.0 112824   988 pts/1    R+   05:37   0:00 grep --color=auto mysql
[root@slave1 ~]#
二、配置Mysql主從復制半同步模式(semi-sync)
參考:Mysql - 主從復制介紹_Claylpf的博客-CSDN博客
1、在master服務器上開啟二進制日志并配置server_id=1,并且在slave服務器上配置server_id=2
master上
[root@master ~]# cat /etc/my.cnf
[mysqld_safe][client]
socket=/data/mysql/mysql.sock[mysqld]
socket=/data/mysql/mysql.sock
log-error=/data/mysql/mysql_error.log     #表示設置Mysql的error日志的路徑
slow_query_log = 1      #表示開啟Mysql慢日志
long_query_time = 0.001  #表示設置慢日志的閾值為0.001毫秒
general_log            #我們不需要添加路徑了,因為Mysql會自動幫助我們添加通用日志的路徑和日志文件,表示打開了通用日志
log_bin                #表示我們開啟了二進制日志
server_id = 1          #給我們的Mysql服務器進行編號
expire_logs_days = 7   #表示二進制日志文件過 7天 自動清除port = 3306
open_files_limit = 8192
innodb_buffer_pool_size = 512M
character-set-server=utf8[mysql]
auto-rehash
prompt=\u@\d \R:\m  mysql>
[root@master ~]#
slave上
[root@slave1 ~]# cat /etc/my.cnf
[mysqld_safe][client]
socket=/data/mysql/mysql.sock[mysqld]
socket=/data/mysql/mysql.sock
log-error=/data/mysql/mysql_error.log     #表示設置Mysql的error日志的路徑
slow_query_log = 1      #表示開啟Mysql慢日志
long_query_time = 0.001  #表示設置慢日志的閾值為0.001毫秒
general_log            #我們不需要添加路徑了,因為Mysql會自動幫助我們添加通用日志的路徑和日志文件,表示打開了通用日志
log_bin                #表示我們開啟了二進制日志
server_id = 2          #給我們的Mysql服務器進行編號
expire_logs_days = 7   #表示二進制日志文件過 7天 自動清除port = 3306
open_files_limit = 8192
innodb_buffer_pool_size = 512M
character-set-server=utf8[mysql]
auto-rehash
prompt=\u@\d \R:\m  mysql>
[root@slave1 ~]#
2、刷新master和slave上的Mysql數據庫服務
[root@master ~]# systemctl restart mysqld
3、在master上創建可以給slave服務器過來復制二進制日志文件的用戶
[root@master ~]# mysql -u root -p123456
mysql: [Warning] Using a password on the command line interface can be insecure.
Welcome to the MySQL monitor.  Commands end with ; or \g.
Your MySQL connection id is 4
Server version: 5.7.41 MySQL Community Server (GPL)Copyright (c) 2000, 2023, Oracle and/or its affiliates.Oracle is a registered trademark of Oracle Corporation and/or its
affiliates. Other names may be trademarks of their respective
owners.Type 'help;' or '\h' for help. Type '\c' to clear the current input statement.#創建sc_slave用戶,允許任意網段訪問
root@(none) 06:01  mysql>create user 'sc_slave'@'%' identified by '123456';
Query OK, 0 rows affected (0.00 sec)#賦予該用戶允許復制二進制日志文件的權限
root@(none) 06:02  mysql>grant replication slave on *.* to 'sc_slave'@'%';
Query OK, 0 rows affected (0.00 sec)#重新加載用戶權限表
root@(none) 06:02  mysql>FLUSH PRIVILEGES;
Query OK, 0 rows affected (0.00 sec)root@(none) 06:02  mysql>
4、在master上做一個全備,導出數據,導入到slave上,保持master和slave上的數據是一致的
#為master上的數據做全備,并導出
[root@master ~]# mkdir /backup
[root@master ~]# mysqldump -uroot -p'123456' --all-databases > /backup/all_db.sql
mysqldump: [Warning] Using a password on the command line interface can be insecure.
[root@master ~]#
5、再將導出的數據傳出到slave服務器上去,并將該sql文件導入Mysql數據庫中
[root@master ~]#  scp /backup/all_db.sql root@192.168.2.151:/root
all_db.sql                                                                                                                                                 100%  866KB  28.4MB/s   00:00
[root@master ~]#  scp /backup/all_db.sql root@192.168.2.152:/root
all_db.sql                                                                                                                                                 100%  866KB  19.8MB/s   00:00
[root@master ~]#
6、將該sql文件導入Mysql數據庫中,并檢查我們的slave的Mysql數據是否與master的Mysql數據一致
[root@slave1 ~]# mysql -uroot -p'123456'  < all_db.sql
mysql: [Warning] Using a password on the command line interface can be insecure.
[root@slave1 ~]#
7、在slave上配置master上拉取的二進制日志用戶名和密碼和日志文件名稱和位置號和端口等信息
在master上查看二進制日志文件和位置號:
[root@master mysql]# mysql -uroot -p123456
mysql: [Warning] Using a password on the command line interface can be insecure.
Welcome to the MySQL monitor.  Commands end with ; or \g.
Your MySQL connection id is 2
Server version: 5.7.41-log MySQL Community Server (GPL)Copyright (c) 2000, 2023, Oracle and/or its affiliates.Oracle is a registered trademark of Oracle Corporation and/or its
affiliates. Other names may be trademarks of their respective
owners.Type 'help;' or '\h' for help. Type '\c' to clear the current input statement.# 刷新二進制文件 每運行一次flush logs; 會從新創建一個二進制文件
root@(none) 06:33  mysql>flush logs;
Query OK, 0 rows affected (0.01 sec)# 查看正在使用的二進制文件和它對應的位置號
root@(none) 06:33  mysql>show master status;
+-------------------+----------+--------------+------------------+-------------------+
| File              | Position | Binlog_Do_DB | Binlog_Ignore_DB | Executed_Gtid_Set |
+-------------------+----------+--------------+------------------+-------------------+
| master-bin.000002 |      154 |              |                  |                   |
+-------------------+----------+--------------+------------------+-------------------+
1 row in set (0.00 sec)root@(none) 06:33  mysql>
上圖所示,我通過flush logs命令刷新了二進制日志,產生了一個新的二進制日志文件,位置號為:154。
在slave上配置關于master的配置并上拉取二進制日志的用戶信息和日志文件的名稱和位置號
[root@slave2 ~]# mysql -uroot -p123456
mysql: [Warning] Using a password on the command line interface can be insecure.
Welcome to the MySQL monitor.  Commands end with ; or \g.
Your MySQL connection id is 5
Server version: 5.7.41 MySQL Community Server (GPL)Copyright (c) 2000, 2023, Oracle and/or its affiliates.Oracle is a registered trademark of Oracle Corporation and/or its
affiliates. Other names may be trademarks of their respective
owners.Type 'help;' or '\h' for help. Type '\c' to clear the current input statement.# 在slave上配置master的信息
root@(none) 06:35  mysql>CHANGE MASTER TO MASTER_HOST='192.168.2.150',-> MASTER_USER='sc_slave',-> MASTER_PASSWORD='123456',-> MASTER_PORT=3306,-> MASTER_LOG_FILE='master-bin.000002',-> MASTER_LOG_POS=154;
ERROR 1794 (HY000): Slave is not configured or failed to initialize properly. You must at least set --server-id to enable either a master or a slave. Additional error messages can be found in the MySQL error log.
root@(none) 06:35  mysql>
8、啟動slave服務器,查看IO線程和SQL線程是否正常啟動
直接使用start slave命令
如果啟動了,可以查看如下:
Slave_IO_Running: Yes
Slave_SQL_Running: Yes?如果出現了上述內容,說明Mysql的主從復制功能成功的搭建了
# 在slave上運行, 目的是啟動slave服務
root@(none) 06:41  mysql>start slave;
Query OK, 0 rows affected (0.00 sec)root@(none) 06:41  mysql>show slave status\G;
*************************** 1. row ***************************Slave_IO_State: Waiting for master to send eventMaster_Host: 192.168.2.150Master_User: sc_slaveMaster_Port: 3306Connect_Retry: 60Master_Log_File: master-bin.000002Read_Master_Log_Pos: 154Relay_Log_File: slave1-relay-bin.000002Relay_Log_Pos: 321Relay_Master_Log_File: master-bin.000002Slave_IO_Running: Yes           #說明主從復制服務建立成功Slave_SQL_Running: YesReplicate_Do_DB: Replicate_Ignore_DB: Replicate_Do_Table: Replicate_Ignore_Table: Replicate_Wild_Do_Table: Replicate_Wild_Ignore_Table: Last_Errno: 0Last_Error: Skip_Counter: 0Exec_Master_Log_Pos: 154Relay_Log_Space: 529Until_Condition: NoneUntil_Log_File: Until_Log_Pos: 0Master_SSL_Allowed: NoMaster_SSL_CA_File: Master_SSL_CA_Path: Master_SSL_Cert: Master_SSL_Cipher: Master_SSL_Key: Seconds_Behind_Master: 0
Master_SSL_Verify_Server_Cert: NoLast_IO_Errno: 0Last_IO_Error: Last_SQL_Errno: 0Last_SQL_Error: Replicate_Ignore_Server_Ids: Master_Server_Id: 1Master_UUID: 4cb77830-3958-11ee-83a7-000c29615077Master_Info_File: /data/mysql/master.infoSQL_Delay: 0SQL_Remaining_Delay: NULLSlave_SQL_Running_State: Slave has read all relay log; waiting for more updatesMaster_Retry_Count: 86400Master_Bind: Last_IO_Error_Timestamp: Last_SQL_Error_Timestamp: Master_SSL_Crl: Master_SSL_Crlpath: Retrieved_Gtid_Set: Executed_Gtid_Set: Auto_Position: 0Replicate_Rewrite_DB: Channel_Name: Master_TLS_Version:
1 row in set (0.00 sec)ERROR:
No query specifiedroot@(none) 06:42  mysql>
9、啟用半同步復制
9.1、在主服務器master上執行安裝:
root@(none) 06:44  mysql>INSTALL PLUGIN rpl_semi_sync_master SONAME 'semisync_master.so';
Query OK, 0 rows affected (0.01 sec)root@(none) 06:44  mysql>
9.2、在從服務器slave上執行安裝:
root@(none) 06:42  mysql>INSTALL PLUGIN rpl_semi_sync_slave SONAME 'semisync_slave.so';
Query OK, 0 rows affected (0.01 sec)root@(none) 06:45  mysql>
我們可以通過命令show plugins;命令查看我們mysql安裝的插件。
9.3、接下來我們將啟用我們下載好的插件(在master服務器上)
root@(none) 06:44  mysql>SET GLOBAL rpl_semi_sync_master_enabled = 1;
Query OK, 0 rows affected (0.00 sec)root@(none) 06:47  mysql>
9.4、在slave服務器上啟用我們下載好的插件
root@(none) 06:45  mysql>SET GLOBAL rpl_semi_sync_slave_enabled = 1;
Query OK, 0 rows affected (0.00 sec)root@(none) 06:48  mysql>
9.5、接下來我們將在slave從服務器上刷新服務
root@(none) 06:48  mysql>stop slave;
Query OK, 0 rows affected (0.00 sec)root@(none) 06:49  mysql>start slave;
Query OK, 0 rows affected (0.00 sec)root@(none) 06:49  mysql>
9.6、查看是否在slave上打開了半同步復制
root@(none) 06:51  mysql>show global variables like '%rpl_semi%';
+---------------------------------+-------+
| Variable_name                   | Value |
+---------------------------------+-------+
| rpl_semi_sync_slave_enabled     | ON    |
| rpl_semi_sync_slave_trace_level | 32    |
+---------------------------------+-------+
2 rows in set (0.00 sec)root@(none) 06:51  mysql>
在master上查看
root@(none) 06:47  mysql>show global variables like '%rpl_semi%';
+-------------------------------------------+------------+
| Variable_name                             | Value      |
+-------------------------------------------+------------+
| rpl_semi_sync_master_enabled              | ON         |
| rpl_semi_sync_master_timeout              | 10000      |
| rpl_semi_sync_master_trace_level          | 32         |
| rpl_semi_sync_master_wait_for_slave_count | 1          |
| rpl_semi_sync_master_wait_no_slave        | ON         |
| rpl_semi_sync_master_wait_point           | AFTER_SYNC |
+-------------------------------------------+------------+
6 rows in set (0.00 sec)root@(none) 06:51  mysql>
rpl_semi_sync_master_timeout, the value N is given in milliseconds. The default value is 10000 (10 seconds).意思是如果ack確認包在10秒鐘內沒有送達,master會啟用異步模式
9.7、驗證是否可以實現同步操作:
在master上創建一個新庫;
root@(none) 06:51  mysql>create database liubo;
Query OK, 1 row affected (0.01 sec)
在slave上查看是否存在liubo庫
root@(none) 06:53  mysql>show databases;
+--------------------+
| Database           |
+--------------------+
| information_schema |
| liubo              |
| mysql              |
| performance_schema |
| sys                |
+--------------------+
5 rows in set (0.00 sec)root@(none) 06:53  mysql>
9.8、驗證是否可以實現異步操作:
我們將slave服務中斷,然后在master上創建一個庫,10s過后,查看slave服務器上是否產生了相同的庫
slave服務中斷?
root@(none) 06:53  mysql>stop slave;
Query OK, 0 rows affected (0.00 sec)
在master上創建一個庫?
# 10.01 sec 表示該過程持續了10s
root@(none) 06:53  mysql>create database liubo2;
Query OK, 1 row affected (10.01 sec)   root@(none) 06:56  mysql>
如上圖所示,一共維持了10s鐘才完成了庫的創建,然后我們打開slave服務,查看slave服務器上是否存在了liubo2庫?
root@(none) 06:56  mysql>start slave;
Query OK, 0 rows affected (0.00 sec)root@(none) 06:57  mysql>show databases;
+--------------------+
| Database           |
+--------------------+
| information_schema |
| liubo              |
| liubo2             |
| mysql              |
| performance_schema |
| sys                |
+--------------------+
6 rows in set (0.00 sec)root@(none) 06:58  mysql>
如上圖所示,當我們一打開slave服務,databases里面就出現了了lao10這個庫,說明他變成了異步復制。而這兩者的結合就是半同步復制。
三、rsync+sersync+計劃任務 實現實時同步全備數據(數據備份)
1、對master進行建庫建表并插入數據,用于模擬企業已經存在的真實數據,也方便后續效果測試
root@(none) 06:56  mysql>create database test1;
Query OK, 1 row affected (0.00 sec)root@(none) 07:10  mysql>use test1;
Database changed
root@test1 07:11  mysql>create table t1(id int primary key,name varchar(20));
Query OK, 0 rows affected (0.01 sec)root@test1 07:11  mysql>insert into t1 values(1,'li');
Query OK, 1 row affected (0.04 sec)root@test1 07:11  mysql>insert into t1 values(2,'peng');
Query OK, 1 row affected (0.00 sec)root@test1 07:11  mysql>insert into t1 values(3,'fei');
Query OK, 1 row affected (0.00 sec)root@test1 07:11  mysql>select * from t1;
+----+------+
| id | name |
+----+------+
|  1 | li   |
|  2 | peng |
|  3 | fei  |
+----+------+
3 rows in set (0.00 sec)root@test1 07:11  mysql>
2、計劃任務定時全備數據
2.1、編寫數據備份腳本?
[root@master ~]# cd /backup/
[root@master backup]# vim backup_db.sh
[root@master backup]# cat backup_db.sh
#!/bin/bash#導出數據庫數據到/backup目錄下,以日期時間的格式命名
mysqldump -uroot -p"123456#" --all-databases >/backup/$(date +%F)_all_db.sql
[root@master backup]#
2.2、編寫計劃任務,每天凌晨2點全備數據
[root@master backup]# crontab -e
no crontab for root - using an empty one
crontab: installing new crontab
[root@master backup]# crontab -l
30 2 * * * bash /backup/backup_db.sh
[root@master backup]#
3、rsync+sersync實現備份數據實時同步到異地備份服務器
數據源服務器:master 192.168.2.150
備份服務器:backup 192.168.31.157
rsync -?backup備份服務器操作?
3.1、新建/backup文件夾,用于存放備份數據
[root@backup ~]# mkdir /backup
[root@backup ~]#
3.2、安裝rsync服務端軟件
[root@backup ~]# yum install -y epel-release[root@backup ~]# yum install -y rsync xinetd -y
3.3、設置開機啟動
[root@backup ~]# echo "/usr/bin/rsync --daemon --config=/etc/rsyncd.conf"  #設置開機啟動rsync" >>/etc/rc.d/rc.local
/usr/bin/rsync --daemon --config=/etc/rsyncd.conf
[root@backup ~]# chmod +x /etc/rc.d/rc.local  #賦予可執行權限
[root@backup ~]#
3.4、啟動xinetd,查看進程(看到進程說明xinetd已經啟動成功)
[root@backup ~]# systemctl start xinetd
[root@backup ~]# ps aux|grep xinetd
root      13695  0.0  0.0  25044   588 ?        Ss   06:20   0:00 /usr/sbin/xinetd -stayalive -pidfile /var/run/xinetd.pid
root      13697  0.0  0.0 112824   976 pts/1    S+   06:20   0:00 grep --color=auto xinetd
[root@backup ~]#
xinetd就好像是一個保姆進程,rsync是它照顧的進程
3.5、修改/etc/rsyncd.conf配置文件?(注意:[back_data]最好不要加注釋,防止出錯)
[root@backup ~]# >/etc/rsyncd.conf
[root@backup ~]# vim /etc/rsyncd.conf
[root@backup ~]# cat /etc/rsyncd.conf
uid = root
gid = root
use chroot = yes
max connections = 0
log file = /var/log/rsyncd.log
pid file = /var/run/rsyncd.pid
lock file = /var/run/rsync.lock
secrets file = /etc/rsync.pass   #認證文件
motd file = /etc/rsyncd.Motd
[back_data]    #配置項名稱(自定義)path = /backup/     #數據源服務器,備份文件存儲地址,存放備份文件comment = A directory in which data is storedignore errors = yesread only = nohosts allow = 192.168.2.150  #允許的ip地址(數據源服務器地址)
[root@backup ~]#
3.6、創建用戶認證文件
[root@backup ~]# vim /etc/rsyncd.pass
[root@backup ~]# cat /etc/rsyncd.pass
backup:123456    #設置 認證用戶和密碼,后面會用到
[root@backup ~]# 注意:不要添加注釋
3.7、設置文件權限
[root@backup ~]# chmod 600 /etc/rsyncd.conf
[root@backup ~]# chmod 600 /etc/rsyncd.pass
增強安全性,非root用戶不可讀配置文件和認證文件
3.8、啟動rsync,查看對應的進程、端口?(看到進程,就說明rsync啟動成功、xinetd監聽873端口)
[root@backup ~]# /usr/bin/rsync --daemon --config=/etc/rsyncd.conf
[root@backup ~]# ps aux|grep rsyncd
root      13708  0.0  0.0 114852   572 ?        Ss   06:28   0:00 /usr/bin/rsync --daemon --config=/etc/rsyncd.conf
root      13710  0.0  0.0 112824   980 pts/1    R+   06:29   0:00 grep --color=auto rsyncd
[root@backup ~]# netstat -anplut|grep rsync
tcp        0      0 0.0.0.0:873             0.0.0.0:*               LISTEN      13708/rsync
tcp6       0      0 :::873                  :::*                    LISTEN      13708/rsync
[root@backup ~]#
rsync - master數據源服務器操作
3.9、在master上安裝rsync、xinetd軟件
[root@master backup]# yum install -y rsync xinetd
3.10、啟動xinetd,查看進程
[root@master backup]# systemctl start xinetd
[root@master backup]# ps aux|grep xinetd
root      24033  0.0  0.0  25044   588 ?        Ss   07:42   0:00 /usr/sbin/xinetd -stayalive -pidfile /var/run/xinetd.pid
root      24035  0.0  0.0 112824   984 pts/1    R+   07:42   0:00 grep --color=auto xinetd
[root@master backup]#
3.11、修改/etc/rsyncd.conf配置文件(注意:[sync]段配置文件最好不要加注釋,防止報錯)
[root@master backup]# >/etc/rsyncd.conf
[root@master backup]# cd ~
[root@master ~]# vim /etc/rsyncd.conf
[root@master ~]# cat /etc/rsyncd.conf
log file = /var/log/rsyncd.log
pid file = /var/run/rsyncd.pid
lock file = /var/run/rsync.lock
motd file = /etc/rsyncd.Motd
[Sync]comment = Syncuid = rootgid = rootport= 873
[root@master ~]#
3.12、創建用戶認證文件
[root@master ~]# vim /etc/passwd.txt
[root@master ~]# cat /etc/passwd.txt
123456 #該密碼應與備份服務器中的/etc/rsync.pass中的密碼一致
[root@master ~]#
3.13、設置文件權限,非root用戶不可讀認證文件
[root@master ~]# chmod 600 /etc/passwd.txt
3.14、測試數據同步
數據源服務器開啟rysnc同步
[root@master ~]# rsync -avH --port=873 --progress --delete  /backup/ root@192.168.2.157::back_data  --password-file=/etc/passwd.txtsending incremental file list
./
all_db.sql887,244 100%   67.91MB/s    0:00:00 (xfr#1, to-chk=1/3)
backup_db.sh165 100%   13.43kB/s    0:00:00 (xfr#2, to-chk=0/3)sent 887,818 bytes  received 61 bytes  1,775,758.00 bytes/sec
total size is 887,409  speedup is 1.00
[root@master ~]#
–port 備份服務器端rsync端口
/backup/ 數據源服務器上要備份的數據
root:192.168.2.157?備份服務器的用戶和ip地址
如果有報錯,建議查看日志文件/var/log/rysncd.conf
3.15、數據源服務器增加文件或者刪除文件,看備份服務器/backup/是否有變化
數據源服務器新建文件夾,并上傳同步文件
[root@master ~]# cd /backup/
[root@master backup]# ls
all_db.sql  backup_db.sh
[root@master backup]# touch test1.txt
[root@master backup]# ls
all_db.sql  backup_db.sh  test1.txt
# 使用rsync同步上傳文件
[root@master backup]# rsync -avH --port=873 --progress --delete  /backup/ root@192.168.2.157::back_data  --password-file=/etc/passwd.txtsending incremental file list
./
test1.txt0 100%    0.00kB/s    0:00:00 (xfr#1, to-chk=0/4)sent 174 bytes  received 42 bytes  432.00 bytes/sec
total size is 887,409  speedup is 4,108.38
[root@master backup]#
查看備份服務器/backup/的效果:
[root@backup ~]# cd /backup/
[root@backup backup]# ls    #沒有同步之前
all_db.sql  backup_db.sh
[root@backup backup]# ls    #同步之后
all_db.sql  backup_db.sh  test1.txt
[root@backup backup]#
4、安裝sersync工具,inotify實時觸發rsync進行同步–數據源服務器操作
4.1、修改inotify默認參數(inotify默認內核參數過小),修改參數(inotify在內核里已經安裝了,只需要傳參)
[root@master backup]# cd ~
[root@master ~]# sysctl -w fs.inotify.max_queued_events="99999999"
fs.inotify.max_queued_events = 99999999
[root@master ~]# sysctl -w fs.inotify.max_user_watches="99999999"
fs.inotify.max_user_watches = 99999999
[root@master ~]# sysctl -w fs.inotify.max_user_instances="65535"
fs.inotify.max_user_instances = 65535
[root@master ~]#
4.2、設置永久生效
[root@master ~]# vim /etc/sysctl.conf
fs.inotify.max_queued_events=99999999
fs.inotify.max_user_watches=99999999
fs.inotify.max_user_instances=65535
4.3、裝sersync軟件包
[root@master ~]# wget http://down.whsir.com/downloads/sersync2.5.4_64bit_binary_stable_final.tar.gz
4.4、解壓sersync軟件
[root@master ~]# tar xf sersync2.5.4_64bit_binary_stable_final.tar.gz4.5、創建sersync
[root@master ~]# mv GNU-Linux-x86/ /usr/local/sersync
[root@master ~]# cd /usr/local/sersync/
[root@master sersync]# ls
confxml.xml  sersync2
[root@master sersync]# cp confxml.xml confxml.xml.bak    #備份,防止后續出錯
[root@master sersync]# cp confxml.xml data_configxml.xm  #增加數據配置
[root@master sersync]# ls
confxml.xml  confxml.xml.bak  data_configxml.xm  sersync2
[root@master sersync]#
4.6、修改配置 data_configxml.xml
[root@master sersync]# vim data_configxml.xm #第24行位置<sersync><localpath watch="/backup/"> #本地要備份的數據文件<remote ip="192.168.31.210" name="back_data"/> #備份服務器的ip地址以配置文件里的配置項<!--<remote ip="192.168.8.39" name="tongbu"/>--><!--<remote ip="192.168.8.40" name="tongbu"/>--></localpath><rsync><commonParams params="-artuz"/><auth start="false" users="root" passwordfile="/etc/passwd.txt"/> #認證用戶和密碼所在的路徑<userDefinedPort start="false" port="874"/><!-- port=874 --><timeout start="false" time="100"/><!-- timeout=100 --><ssh start="false"/>
4.7、加入PATH環境變量,并設置開機永久生效?
[root@master sersync]# PATH=/usr/local/sersync/:$PATH
[root@master sersync]# which sersync2
/usr/local/sersync/sersync2
[root@master sersync]# echo "PATH=/usr/local/sersync/:$PATH" >>/root/.bashrc
[root@master sersync]#
4.8、啟動sersync(啟動成功如下)
[root@master sersync]# sersync2 -d -r -o /usr/local/sersync/data_configxml.xm
set the system param
execute:echo 50000000 > /proc/sys/fs/inotify/max_user_watches
execute:echo 327679 > /proc/sys/fs/inotify/max_queued_events
parse the command param
option: -d 	run as a daemon
option: -r 	rsync all the local files to the remote servers before the sersync work
option: -o 	config xml name:  /usr/local/sersync/data_configxml.xm
daemon thread num: 10
parse xml config file
host ip : localhost	host port: 8008
daemon start,sersync run behind the console
config xml parse success
please set /etc/rsyncd.conf max connections=0 Manually
sersync working thread 12  = 1(primary thread) + 1(fail retry thread) + 10(daemon sub threads)
Max threads numbers is: 22 = 12(Thread pool nums) + 10(Sub threads)
please according your cpu ,use -n param to adjust the cpu rate
------------------------------------------
rsync the directory recursivly to the remote servers once
working please wait...
execute command: cd /backup && rsync -artuz -R --delete ./ 192.168.2.157::back_data >/dev/null 2>&1
run the sersync:
watch path is: /backup
[root@master sersync]#
4.9、查看sersync進程
[root@master sersync]# ps aux|grep sersync
root      24100  0.0  0.0  92324   716 ?        Ssl  08:06   0:00 sersync2 -d -r -o /usr/local/sersync/data_configxml.xm
root      24116  0.0  0.0 112824   984 pts/1    R+   08:07   0:00 grep --color=auto sersync
[root@master sersync]#
4.10、設置sersync監控開機自動執行
[root@master sersync]# vim /etc/rc.d/rc.local
[root@master sersync]# cat /etc/rc.d/rc.local /usr/local/sersync/sersync2 -d -r -o  /usr/local/sersync/data_configxml.xm[root@master sersync]#
4.11、效果測試
數據源服務器新建文件夾
[root@master sersync]# cd /backup/
[root@master backup]# touch test2.txt
[root@master backup]# ls
all_db.sql  backup_db.sh  test1.txt  test2.txt
[root@master backup]#
backup備份服務器發現了實時同步的新建文件夾
[root@backup backup]# ls
all_db.sql  backup_db.sh  test1.txt
[root@backup backup]# ls
all_db.sql  backup_db.sh  test1.txt  test2.txt
[root@backup backup]#
測試成功!rsync+sersync實時數據同步搭建成功!
四、Ansible批量部署mha軟件環境,搭建MHA高可用架構,實現自動failover,完成主從切換
參考:Mysql 搭建MHA高可用架構,實現自動failover,完成主從切換_Claylpf的博客-CSDN博客
1、編寫主機清單,增添4個mha node節點ip地址,以及一個mha manager節點ip地址
[root@ansible ansible]# vim /etc/ansible/hosts
[root@ansible ansible]# cat /etc/ansible/hosts
[mha_manager]
192.168.2.141  #mha manager
[mha_node]
192.168.2.141  #mha manager
192.168.2.150  #master
192.168.2.151  #slave1
192.168.2.152  #slave2
[root@ansible ansible]#
2、編寫一鍵安裝mha node腳本和一鍵安裝mha mangaer腳本
mha node腳本
[root@ansible ~]# cat onekey_install_mha_node.sh
#查看可以安裝或者已安裝的rpm包,并且作緩存
yum list
#下載epel源
yum install epel-release --nogpgcheck -y
#下載依賴包
yum install -y perl-DBD-MySQL \
perl-Config-Tiny \
perl-Log-Dispatch \
perl-Parallel-ForkManager \
perl-ExtUtils-CBuilder \
perl-ExtUtils-MakeMaker \
perl-CPAN
#軟件包mha4mysql-node-0.58.tar.gz放入/root目錄下
cd ~
tar zxvf mha4mysql-node-0.58.tar.gz
cd mha4mysql-node-0.58
#編譯安裝
perl Makefile.PL
make && make install
mha manager腳本(因為在安裝mha node時已經安裝好了所有的依賴包,就可以直接進行解壓編譯安裝了)
[root@ansible ~]# cat onekey_install_mha_manager.sh
#軟件包mha4mysql-manager-0.58.tar.gz放入/root目錄下
cd ~
tar zxvf mha4mysql-manager-0.58.tar.gz
cd mha4mysql-manager-0.58
#編譯安裝
perl Makefile.PL
make && make install
3、編寫playbook,上傳源碼包到家目錄下,調用本地腳本,遠程安裝部署mha相關軟件環境
[root@ansible ansible]# vim mha_install.yaml
[root@ansible ansible]# cat mha_install.yaml
- hosts: mha_noderemote_user: roottasks: - name: copy filecopy: src=/root/mha4mysql-node-0.58.tar.gz dest=/root/- name: install mha_nodescript: /root/onekey_install_mha_node.sh
- hosts: mha_managerremote_user: roottasks:- name: copy filecopy: src=/root/mha4mysql-manager-0.58.tar.gz dest=/root/- name: install mha_managerscript: /root/onekey_install_mha_manager.sh
[root@ansible ansible]#
4、執行playbook
[root@ansible ansible]# ansible-playbook mha_install.yaml 5、所有服務器互相建立免密通道
參考:Linux - SSH服務 - SCP - 免密通道建立_linux ssh服務狀態_Claylpf的博客-CSDN博客
5.1、mha manager對所有mysql服務器建立免密通道
[root@mha_manager .ssh]# ssh-keygen
Generating public/private rsa key pair.
Enter file in which to save the key (/root/.ssh/id_rsa):
/root/.ssh/id_rsa already exists.
Overwrite (y/n)? y
Enter passphrase (empty for no passphrase):
Enter same passphrase again:
Your identification has been saved in /root/.ssh/id_rsa.
Your public key has been saved in /root/.ssh/id_rsa.pub.
The key fingerprint is:
SHA256:36631NGvhLwX3HXPFgkfo8t/C0g+k59hqkGi1cn0/cA root@mha_manager
The key's randomart image is:
+---[RSA 2048]----+
|                 |
|             . o |
|         .    + +|
|        + o o. =o|
|       oS= o.Eoo*|
|      o o.ooo==.*|
|     .   ..*=+++.|
|          .oBo=o.|
|         .o++=..o|
+----[SHA256]-----+
[root@mha_manager .ssh]# ssh-copy-id root@192.168.2.150
/bin/ssh-copy-id: INFO: Source of key(s) to be installed: "/root/.ssh/id_rsa.pub"
/bin/ssh-copy-id: INFO: attempting to log in with the new key(s), to filter out any that are already installed
/bin/ssh-copy-id: INFO: 1 key(s) remain to be installed -- if you are prompted now it is to install the new keys
root@192.168.2.150's password: Number of key(s) added: 1Now try logging into the machine, with:   "ssh 'root@192.168.2.150'"
and check to make sure that only the key(s) you wanted were added.[root@mha_manager .ssh]# [root@mha_manager .ssh]# ssh-copy-id root@192.168.2.151[root@mha_manager .ssh]# ssh-copy-id root@192.168.2.152
5.2、master對slave1、slave2建立免密通道
[root@mysql-1 ~]# ssh-keygen
Generating public/private rsa key pair.
Enter file in which to save the key (/root/.ssh/id_rsa):
Enter passphrase (empty for no passphrase):
Enter same passphrase again:
Your identification has been saved in /root/.ssh/id_rsa.
Your public key has been saved in /root/.ssh/id_rsa.pub.
The key fingerprint is:
SHA256:rB6Rg0nbJCHYxWxuBafl4HDB8+1RuuOpHC9/5LYRTAI root@mysql-1
The key's randomart image is:
+---[RSA 2048]----+
| oo=BoE          |
|. .=*B..  .      |
|   o=+o..o.      |
|   .oB.o++       |
|   .+ =.Soo      |
|       ++ ..     |
|      +. =.      |
|     o.+o +.     |
|      ++oo..     |
+----[SHA256]-----+
[root@mysql-1 ~]# ssh-copy-id -i /root/.ssh/id_rsa.pub 192.168.2.151
/usr/bin/ssh-copy-id: INFO: Source of key(s) to be installed: "/root/.ssh/id_rsa.pub"
/usr/bin/ssh-copy-id: INFO: attempting to log in with the new key(s), to filter out any that are already installed
/usr/bin/ssh-copy-id: INFO: 1 key(s) remain to be installed -- if you are prompted now it is to install the new keys
root@192.168.2.151's password: Number of key(s) added: 1Now try logging into the machine, with:   "ssh '192.168.2.151'"
and check to make sure that only the key(s) you wanted were added.[root@mysql-1 ~]# ssh-copy-id -i /root/.ssh/id_rsa.pub 192.168.2.152
/usr/bin/ssh-copy-id: INFO: Source of key(s) to be installed: "/root/.ssh/id_rsa.pub"
/usr/bin/ssh-copy-id: INFO: attempting to log in with the new key(s), to filter out any that are already installed
/usr/bin/ssh-copy-id: INFO: 1 key(s) remain to be installed -- if you are prompted now it is to install the new keys
root@192.168.2.152's password: Number of key(s) added: 1Now try logging into the machine, with:   "ssh '192.168.2.152'"
and check to make sure that only the key(s) you wanted were added.[root@mysql-1 ~]#
5.3、slave1對master、slave2建立免密通道
[root@mysql-2 ~]# ssh-keygen
Generating public/private rsa key pair.
Enter file in which to save the key (/root/.ssh/id_rsa):
Enter passphrase (empty for no passphrase):
Enter same passphrase again:
Your identification has been saved in /root/.ssh/id_rsa.
Your public key has been saved in /root/.ssh/id_rsa.pub.
The key fingerprint is:
SHA256:MMCE8STghhwmha65CVG/w3/9k8/T96sFfcr75CFMTGs root@mysql-2
The key's randomart image is:
+---[RSA 2048]----+
|o*+=+            |
|B ++..           |
|o= .. o      .   |
|o.  .  o    o o  |
|.o . .  S    E ..|
|+   +       +....|
|.o   o   .   +o+.|
|o     . . . o.+++|
|       .   ..+=+B|
+----[SHA256]-----+
[root@mysql-2 ~]# ssh-copy-id -i /root/.ssh/id_rsa.pub 192.168.2.150
/usr/bin/ssh-copy-id: INFO: Source of key(s) to be installed: "/root/.ssh/id_rsa.pub"
The authenticity of host '192.168.2.150 (192.168.2.150)' can't be established.
ECDSA key fingerprint is SHA256:rUDllK9IdVfMva40nDGHGyHLkpuXrHJyRHRPuLbkkv8.
ECDSA key fingerprint is MD5:6d:46:aa:d1:48:87:92:8b:14:ca:d2:18:af:3b:89:51.
Are you sure you want to continue connecting (yes/no)? yes
/usr/bin/ssh-copy-id: INFO: attempting to log in with the new key(s), to filter out any that are already installed
/usr/bin/ssh-copy-id: INFO: 1 key(s) remain to be installed -- if you are prompted now it is to install the new keys
root@192.168.2.150's password: Number of key(s) added: 1Now try logging into the machine, with:   "ssh '192.168.2.150'"
and check to make sure that only the key(s) you wanted were added.[root@mysql-2 ~]# ssh-copy-id -i /root/.ssh/id_rsa.pub 192.168.2.152
/usr/bin/ssh-copy-id: INFO: Source of key(s) to be installed: "/root/.ssh/id_rsa.pub"
The authenticity of host '192.168.2.152 (192.168.2.152)' can't be established.
ECDSA key fingerprint is SHA256:t7FSFcUpEOJYIGkZo1HvvfqhsezGEz7WEScc4KTgQDU.
ECDSA key fingerprint is MD5:7c:68:1c:c3:aa:a5:34:b7:f7:4b:18:0b:93:fb:a6:76.
Are you sure you want to continue connecting (yes/no)? yes
/usr/bin/ssh-copy-id: INFO: attempting to log in with the new key(s), to filter out any that are already installed
/usr/bin/ssh-copy-id: INFO: 1 key(s) remain to be installed -- if you are prompted now it is to install the new keys
root@192.168.2.152's password:
Permission denied, please try again.
root@192.168.2.152's password: Number of key(s) added: 1Now try logging into the machine, with:   "ssh '192.168.2.152'"
and check to make sure that only the key(s) you wanted were added.[root@mysql-2 ~]#
?5.4、slave2對master、slave1建立免密通道
[root@mysql-3 ~]# ssh-keygen
Generating public/private rsa key pair.
Enter file in which to save the key (/root/.ssh/id_rsa):
Enter passphrase (empty for no passphrase):
Enter same passphrase again:
Your identification has been saved in /root/.ssh/id_rsa.
Your public key has been saved in /root/.ssh/id_rsa.pub.
The key fingerprint is:
SHA256:m6F9WyLFkNnweKy2ERj3LflPDHqU5ZUL+S8FpCbXhtw root@mysql-3
The key's randomart image is:
+---[RSA 2048]----+
|      . o    .+ o|
|       + X + @.o |
|      . * X @ E..|
|         * O + o.|
|        S + o o..|
|       + B . o. .|
|      . * o . .. |
|         o +     |
|          .      |
+----[SHA256]-----+
[root@mysql-3 ~]# ssh-copy-id -i /root/.ssh/id_rsa.pub 192.168.2.150
/usr/bin/ssh-copy-id: INFO: Source of key(s) to be installed: "/root/.ssh/id_rsa.pub"
The authenticity of host '192.168.2.150 (192.168.2.150)' can't be established.
ECDSA key fingerprint is SHA256:rUDllK9IdVfMva40nDGHGyHLkpuXrHJyRHRPuLbkkv8.
ECDSA key fingerprint is MD5:6d:46:aa:d1:48:87:92:8b:14:ca:d2:18:af:3b:89:51.
Are you sure you want to continue connecting (yes/no)? yes
/usr/bin/ssh-copy-id: INFO: attempting to log in with the new key(s), to filter out any that are already installed
/usr/bin/ssh-copy-id: INFO: 1 key(s) remain to be installed -- if you are prompted now it is to install the new keys
root@192.168.2.150's password: Number of key(s) added: 1Now try logging into the machine, with:   "ssh '192.168.2.150'"
and check to make sure that only the key(s) you wanted were added.[root@mysql-3 ~]# ssh-copy-id -i /root/.ssh/id_rsa.pub 192.168.2.151
/usr/bin/ssh-copy-id: INFO: Source of key(s) to be installed: "/root/.ssh/id_rsa.pub"
The authenticity of host '192.168.2.151 (192.168.2.151)' can't be established.
ECDSA key fingerprint is SHA256:3SsW//YjcK0UTRAlQkOUcqMcFMaQEhZ1xRSUgHRs/JQ.
ECDSA key fingerprint is MD5:58:8e:3f:27:fb:f5:4e:83:56:70:e6:fd:f7:d0:9d:17.
Are you sure you want to continue connecting (yes/no)? yes
/usr/bin/ssh-copy-id: INFO: attempting to log in with the new key(s), to filter out any that are already installed
/usr/bin/ssh-copy-id: INFO: 1 key(s) remain to be installed -- if you are prompted now it is to install the new keys
root@192.168.2.151's password: Number of key(s) added: 1Now try logging into the machine, with:   "ssh '192.168.2.151'"
and check to make sure that only the key(s) you wanted were added.[root@mysql-3 ~]#
6、在搭建好的主從復制服務器里,配置mha相關信息
6.1、所有mysql服務器加入log_bin和log-slave-updates,并刷新配置文件
master:
root@master ~]# cat /etc/my.cnf
[mysqld_safe][client]
socket=/data/mysql/mysql.sock[mysqld]
socket=/data/mysql/mysql.sock
log-error=/data/mysql/mysql_error.log     #表示設置Mysql的error日志的路徑
slow_query_log = 1      #表示開啟Mysql慢日志
long_query_time = 0.001  #表示設置慢日志的閾值為0.001毫秒
general_log            #我們不需要添加路徑了,因為Mysql會自動幫助我們添加通用日志的路徑和日志文件,表示打開了通用日志
log_bin                #表示我們開啟了二進制日志
server_id = 1          #給我們的Mysql服務器進行編號
expire_logs_days = 7   #表示二進制日志文件過 7天 自動清除
log-slave-updates      #主從切換時,主從服務器身份都可能對換,從服務器重演relay_log日志操作時,也寫入自己的log_bin中port = 3306
open_files_limit = 8192
innodb_buffer_pool_size = 512M
character-set-server=utf8[mysql]
auto-rehash
prompt=\u@\d \R:\m  mysql>
[root@master ~]# service mysqld restart
Shutting down MySQL............. SUCCESS!
Starting MySQL.. SUCCESS!
[root@master ~]#
slave:
[root@slave1 ~]# vim /etc/my.cnf
[root@slave1 ~]# cat /etc/my.cnf
[mysqld_safe][client]
socket=/data/mysql/mysql.sock[mysqld]
socket=/data/mysql/mysql.sock
log-error=/data/mysql/mysql_error.log     #表示設置Mysql的error日志的路徑
slow_query_log = 1      #表示開啟Mysql慢日志
long_query_time = 0.001  #表示設置慢日志的閾值為0.001毫秒
general_log            #我們不需要添加路徑了,因為Mysql會自動幫助我們添加通用日志的路徑和日志文件,表示打開了通用日志
log_bin                #表示我們開啟了二進制日志
server_id = 2          #給我們的Mysql服務器進行編號
expire_logs_days = 7   #表示二進制日志文件過 7天 自動清除
log-slave-updates      #主從切換時,主從服務器身份都可能對換,從服務器重演relay_log日志操作時,也寫入自己的log_bin中port = 3306
open_files_limit = 8192
innodb_buffer_pool_size = 512M
character-set-server=utf8[mysql]
auto-rehash
prompt=\u@\d \R:\m  mysql>
[root@slave1 ~]# service mysqld restart
Shutting down MySQL.... SUCCESS!
Starting MySQL.. SUCCESS!
[root@slave1 ~]#
6.2、所有mysql服務器(master、slave1、slave2)將mysql命令和mysqlbinlog命令軟鏈接到/usr/sbin,方便manager管理節點
[root@master ~]# ln -s /usr/local/mysql/bin/mysql /usr/sbin/
[root@master ~]# ln -s /usr/local/mysql/bin/mysqlbinlog /usr/sbin/[root@salve1 ~]# ln -s /usr/local/mysql/bin/mysql /usr/sbin/
[root@salve1 ~]# ln -s /usr/local/mysql/bin/mysqlbinlog /usr/sbin/[root@salve2 ~]# ln -s /usr/local/mysql/bin/mysql /usr/sbin/
[root@salve2 ~]# ln -s /usr/local/mysql/bin/mysqlbinlog /usr/sbin/
6.3、所有mysql服務器新建允許manager訪問的授權用戶mha,密碼123456
root@(none) 08:38  mysql>grant all on *.* to 'mha'@'192.168.2.%' identified by '123456';
Query OK, 0 rows affected, 1 warning (0.01 sec)root@(none) 08:39  mysql>grant all on *.* to 'mha'@'192.168.2.150' identified by '123456';
Query OK, 0 rows affected, 1 warning (0.00 sec)root@(none) 08:39  mysql>grant all on *.* to 'mha'@'192.168.2.151' identified by '123456';
Query OK, 0 rows affected, 1 warning (0.00 sec)root@(none) 08:39  mysql>grant all on *.* to 'mha'@'192.168.2.152' identified by '123456';
Query OK, 0 rows affected, 1 warning (0.00 sec)root@(none) 08:40  mysql>select user,host from mysql.user;
+---------------+---------------+
| user          | host          |
+---------------+---------------+
| sc_slave      | %             |
| mha           | 192.168.2.%   |
| mha           | 192.168.2.150 |
| mha           | 192.168.2.151 |
| mha           | 192.168.2.152 |
| mysql.session | localhost     |
| mysql.sys     | localhost     |
| root          | localhost     |
+---------------+---------------+
8 rows in set (0.00 sec)root@(none) 08:40  mysql>
7、在mha manager節點上配置好相關腳本、管理節點服務器
7.1、mha manager節點上復制相關腳本到/usr/local/bin下
[root@mha_manager ~]# cp -rp /root/mha4mysql-manager-0.58/samples/scripts/ /usr/local/bin/
#-r 復制目錄
#-p 同時復制文件訪問權限
[root@mha_manager ~]# cd /usr/local/bin/
[root@mha_manager bin]# ls
scripts
[root@mha_manager bin]#
[root@mha_manager bin]# cd scripts/
[root@mha_manager scripts]# ls
master_ip_failover  master_ip_online_change  power_manager  send_report
[root@mha_manager scripts]#
7.2、復制自動切換時vip管理的腳本到/usr/local/bin下
[root@mha_manager scripts]#  cp /usr/local/bin/scripts/master_ip_failover /usr/local/bin/
[root@mha_manager scripts]# cd ..
[root@mha_manager bin]# ls
master_ip_failover  scripts
[root@mha_manager bin]#
7.3、修改master_ip_failover文件內容,配置vip(只配置vip相關參數,其他默認不修改)
[root@mha_manager bin]# >/usr/local/bin/master_ip_failover   # 清空文件
[root@mha_manager bin]# vim /usr/local/bin/master_ip_failover
[root@mha_manager bin]# cat /usr/local/bin/master_ip_failover
#!/usr/bin/env perl
use strict;
use warnings FATAL => 'all';use Getopt::Long;my (
$command, $ssh_user, $orig_master_host, $orig_master_ip,
$orig_master_port, $new_master_host, $new_master_ip, $new_master_port
);
#############################添加內容部分#########################################
my $vip = '192.168.2.227';								#指定vip的地址,自己指定
my $brdc = '192.168.2.255';								#指定vip的廣播地址
my $ifdev = 'ens33';										#指定vip綁定的網卡
my $key = '1';												#指定vip綁定的虛擬網卡序列號
my $ssh_start_vip = "/sbin/ifconfig ens33:$key $vip";		#代表此變量值為ifconfig ens33:1 192.168.2.227
my $ssh_stop_vip = "/sbin/ifconfig ens33:$key down";		#代表此變量值為ifconfig ens33:1 192.168.2.227 down
my $exit_code = 0;											#指定退出狀態碼為0
#my $ssh_start_vip = "/usr/sbin/ip addr add $vip/24 brd $brdc dev $ifdev label $ifdev:$key;/usr/sbin/arping -q -A -c 1 -I $ifdev $vip;iptables -F;";
#my $ssh_stop_vip = "/usr/sbin/ip addr del $vip/24 dev $ifdev label $ifdev:$key";
##################################################################################
GetOptions(
'command=s' => \$command,
'ssh_user=s' => \$ssh_user,
'orig_master_host=s' => \$orig_master_host,
'orig_master_ip=s' => \$orig_master_ip,
'orig_master_port=i' => \$orig_master_port,
'new_master_host=s' => \$new_master_host,
'new_master_ip=s' => \$new_master_ip,
'new_master_port=i' => \$new_master_port,
);exit &main();sub main {print "\n\nIN SCRIPT TEST====$ssh_stop_vip==$ssh_start_vip===\n\n";if ( $command eq "stop" || $command eq "stopssh" ) {my $exit_code = 1;
eval {
print "Disabling the VIP on old master: $orig_master_host \n";
&stop_vip();
$exit_code = 0;
};
if ($@) {
warn "Got Error: $@\n";
exit $exit_code;
}
exit $exit_code;
}
elsif ( $command eq "start" ) {my $exit_code = 10;
eval {
print "Enabling the VIP - $vip on the new master - $new_master_host \n";
&start_vip();
$exit_code = 0;
};
if ($@) {
warn $@;
exit $exit_code;
}
exit $exit_code;
}
elsif ( $command eq "status" ) {
print "Checking the Status of the script.. OK \n";
exit 0;
}
else {
&usage();
exit 1;
}
}
sub start_vip() {
`ssh $ssh_user\@$new_master_host \" $ssh_start_vip \"`;
}
## A simple system call that disable the VIP on the old_master
sub stop_vip() {
`ssh $ssh_user\@$orig_master_host \" $ssh_stop_vip \"`;
}sub usage {
print
"Usage: master_ip_failover --command=start|stop|stopssh|status --orig_master_host=host --orig_master_ip=ip --orig_master_port=port --new_master_host=host --new_master_ip=ip --new_master_port=port\n";
}
[root@mha_manager bin]#
7.4、創建 MHA 軟件目錄并復制配置文件,使用app1.cnf配置文件來管理 mysql 節點服務器,配置文件一般放在/etc/目錄下(注意:注釋只是提示用,編輯配置文件時最好不要加注釋,否則很可能會出錯)
[root@mha_manager masterha]# >app1.cnf
[root@mha_manager masterha]# vim app1.cnf
[root@mha_manager masterha]# cat app1.cnf
[server default]
manager_log=/var/log/masterha/app1/manager.log       #manager日志
manager_workdir=/var/log/masterha/app1.log    		#manager工作目錄
master_binlog_dir=/data/mysql/          #master保存binlog的位置,這里的路徑要與master里配置的binlog的路徑一致,以便MHA能找到
master_ip_failover_script=/usr/local/bin/master_ip_failover            #設置自動failover時候的切換腳本,也就是上面的那個腳本
master_ip_online_change_script=/usr/local/bin/master_ip_online_change  #設置手動切換時候的切換腳本
user=mha					#設置監控用戶mha
password=123456			#設置mysql中mha用戶的密碼,這個密碼是前文中創建監控用戶的那個密碼
ping_interval=1				#設置監控主庫,發送ping包的時間間隔1秒,默認是3秒,嘗試三次沒有回應的時候自動進行failover
remote_workdir=/tmp			#設置遠端mysql在發生切換時binlog的保存位置
repl_user=slave			#設置復制用戶的用戶slave
repl_password=123456		#設置復制用戶slave的密碼
report_script=/usr/local/send_report     #設置發生切換后發送的報警的腳本
secondary_check_script=/usr/local/bin/masterha_secondary_check -s 192.168.2.151 -s 192.168.2.152	#指定檢查的從服務器IP地址
shutdown_script=""			#設置故障發生后關閉故障主機腳本(該腳本的主要作用是關閉主機防止發生腦裂,這里沒有使用)
ssh_user=root				#設置ssh的登錄用戶名[server1]
#master
hostname=192.168.2.150
port=3306[server2]
#slave1
hostname=192.168.2.151
port=3306
candidate_master=1
#設置為候選master,設置該參數以后,發生主從切換以后將會將此從庫提升為主庫,即使這個主庫不是集群中最新的slavecheck_repl_delay=0
#默認情況下如果一個slave落后master 超過100M的relay logs的話,MHA將不會選擇該slave作為一個新的master, 因為對于這個slave的恢復需要花費很長時間;通過設置check_repl_delay=0,MHA觸發切換在選擇一個新的master的時候將會忽略復制延時,這個參數對于設置了candidate_master=1的主機非常有用,因為這個候選主在切換的過程中一定是新的master[server3]
#slave2
hostname=192.168.2.152
port=3306
[root@mha_manager masterha]#
8、master服務器上手工開啟vip
[root@master ~]# ifconfig ens33:1 192.168.2.227/24
[root@master ~]# ip add
1: lo: <LOOPBACK,UP,LOWER_UP> mtu 65536 qdisc noqueue state UNKNOWN group default qlen 1000link/loopback 00:00:00:00:00:00 brd 00:00:00:00:00:00inet 127.0.0.1/8 scope host lovalid_lft forever preferred_lft foreverinet6 ::1/128 scope host valid_lft forever preferred_lft forever
2: ens33: <BROADCAST,MULTICAST,UP,LOWER_UP> mtu 1500 qdisc pfifo_fast state UP group default qlen 1000link/ether 00:0c:29:61:50:77 brd ff:ff:ff:ff:ff:ffinet 192.168.2.150/24 brd 192.168.2.255 scope global noprefixroute ens33valid_lft forever preferred_lft foreverinet 192.168.2.227/24 brd 192.168.2.255 scope global secondary ens33:1valid_lft forever preferred_lft foreverinet6 fe80::20c:29ff:fe61:5077/64 scope link valid_lft forever preferred_lft forever
[root@mysql-1 ~]#
9、manager節點上測試ssh免密通道,如果正常最后會輸出successfully(注意是否每臺mysql間都建立了ssh免密通道,否則會報錯)
[root@mha_manager masterha]# masterha_check_ssh -conf=/etc/masterha/app1.cnf
Mon Aug 14 07:00:46 2023 - [warning] Global configuration file /etc/masterha_default.cnf not found. Skipping.
Mon Aug 14 07:00:46 2023 - [info] Reading application default configuration from /etc/masterha/app1.cnf..
Mon Aug 14 07:00:46 2023 - [info] Reading server configuration from /etc/masterha/app1.cnf..
Mon Aug 14 07:00:46 2023 - [info] Starting SSH connection tests..
Mon Aug 14 07:00:48 2023 - [debug]
Mon Aug 14 07:00:46 2023 - [debug]  Connecting via SSH from root@192.168.2.150(192.168.2.150:22) to root@192.168.2.151(192.168.2.151:22)..
Mon Aug 14 07:00:47 2023 - [debug]   ok.
Mon Aug 14 07:00:47 2023 - [debug]  Connecting via SSH from root@192.168.2.150(192.168.2.150:22) to root@192.168.2.152(192.168.2.152:22)..
Mon Aug 14 07:00:48 2023 - [debug]   ok.
Mon Aug 14 07:00:49 2023 - [debug]
Mon Aug 14 07:00:46 2023 - [debug]  Connecting via SSH from root@192.168.2.151(192.168.2.151:22) to root@192.168.2.150(192.168.2.150:22)..
Mon Aug 14 07:00:48 2023 - [debug]   ok.
Mon Aug 14 07:00:48 2023 - [debug]  Connecting via SSH from root@192.168.2.151(192.168.2.151:22) to root@192.168.2.152(192.168.2.152:22)..
Mon Aug 14 07:00:49 2023 - [debug]   ok.
Mon Aug 14 07:00:49 2023 - [debug]
Mon Aug 14 07:00:47 2023 - [debug]  Connecting via SSH from root@192.168.2.152(192.168.2.152:22) to root@192.168.2.150(192.168.2.150:22)..
Mon Aug 14 07:00:48 2023 - [debug]   ok.
Mon Aug 14 07:00:48 2023 - [debug]  Connecting via SSH from root@192.168.2.152(192.168.2.152:22) to root@192.168.2.151(192.168.2.151:22)..
Mon Aug 14 07:00:49 2023 - [debug]   ok.
Mon Aug 14 07:00:49 2023 - [info] All SSH connection tests passed successfully.
[root@mha_manager masterha]#
10、在 manager 節點上測試 mysql 主從連接情況,最后出現 MySQL Replication Health is OK 字樣說明正常(如果報錯,思考是否軟鏈接建立好了?或者主從復制搭建正確了)
[root@mha_manager masterha]# masterha_check_repl -conf=/etc/masterha/app1.cnf
MySQL Replication Health is OK.
11、manager節點后臺開啟MHA
[root@mha_manager masterha]# nohup masterha_manager --conf=/etc/masterha/app1.cnf --remove_dead_master_conf --ignore_last_failover < /dev/null > /var/log/masterha/app1/manager.log 2>&1 &
[1] 17621
11.1、查看 MHA 狀態,可以看到當前的 master 是 Mysql1 節點
[root@mha_manager masterha]# masterha_check_status --conf=/etc/masterha/app1.cnf
app1 (pid:17621) is running(0:PING_OK), master:192.168.2.150
11.2、查看MHA日志,看到當前matser是192.168.2.150
[root@mha_manager masterha]# cat /var/log/masterha/app1/manager.log | grep "current master"
Mon May  8 11:57:07 2023 - [info] Checking SSH publickey authentication settings on the current master..
192.168.2.150(192.168.2.150:3306) (current master)
11.3、查看mha進程
[root@mha_manager bin]# ps aux|grep manager
root      17624  0.1  4.5 299656 21992 pts/0    S    11:57   0:12 perl /usr/local/bin/masterha_manager --conf=/etc/masterha/app1.cnf --remove_dead_master_conf --ignore_last_failover
root      17826  0.0  0.0 112824   984 pts/2    R+   07:22   0:00 grep --color=auto manager
五、搭建mysqlrouter-keepalived集群,實現高可用 - 讀寫分離功能,減輕主節點的壓力
參考:Mysql - 配置Mysql主從復制-keepalived高可用-讀寫分離集群_Claylpf的博客-CSDN博客
Mysql - 讀寫分離_mysql讀寫分離的工具_Claylpf的博客-CSDN博客?
有兩臺mysqlrouter服務器,由于篇幅有限,我就只展示了一臺,另外一臺操作基本一致的
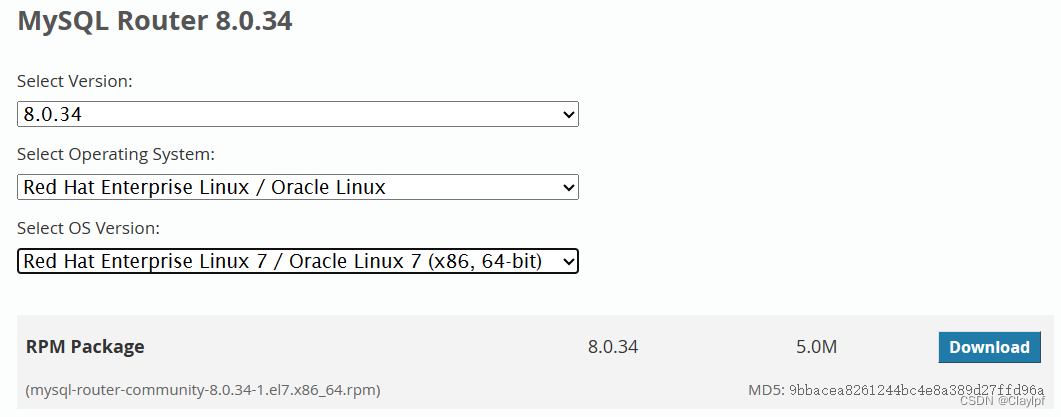
1、下載安裝Mysql-router:MySQL :: Download MySQL Router
[root@mysqlrouter-1 ~]# ls
anaconda-ks.cfg  mysql-router-community-8.0.34-1.el7.x86_64.rpm
[root@mysqlrouter-1 ~]#
注:下載安裝的mysqlrouter的時候必須注意版本,否則解壓安裝的時候會報錯
2、安裝Mysql-router并解壓:

3、修改mysqlrouter配置文件:(mysqlrouter必須綁定到keepalived設定的vip上或者使用任意地址0.0.0.0上)(切記不能添加注釋,我添加是為了方便解釋,否則會報錯)
[root@mysqlrouter-1 mysqlrouter]# cat mysqlrouter.conf
# Copyright (c) 2015, 2023, Oracle and/or its affiliates.
#
# This program is free software; you can redistribute it and/or modify
# it under the terms of the GNU General Public License, version 2.0,
# as published by the Free Software Foundation.
#
# This program is also distributed with certain software (including
# but not limited to OpenSSL) that is licensed under separate terms,
# as designated in a particular file or component or in included license
# documentation.  The authors of MySQL hereby grant you an additional
# permission to link the program and your derivative works with the
# separately licensed software that they have included with MySQL.
#
# This program is distributed in the hope that it will be useful,
# but WITHOUT ANY WARRANTY; without even the implied warranty of
# MERCHANTABILITY or FITNESS FOR A PARTICULAR PURPOSE.  See the
# GNU General Public License, version 2.0, for more details.
#
# You should have received a copy of the GNU General Public License
# along with this program; if not, write to the Free Software
# Foundation, Inc., 51 Franklin St, Fifth Floor, Boston, MA 02110-1301  USA#
# MySQL Router configuration file
#
# Documentation is available at
#    http://dev.mysql.com/doc/mysql-router/en/[DEFAULT]
logging_folder = /var/log/mysqlrouter
runtime_folder = /run/mysqlrouter
config_folder = /etc/mysqlrouter[logger]
level = INFO# If no plugin is configured which starts a service, keepalive
# will make sure MySQL Router will not immediately exit. It is
# safe to remove once Router is configured.
[keepalive]
interval = 60[routing:read_write]
bind_address = 192.168.2.221  #vip地址  虛擬IP地址,可以在keepalived配置之前確定 當然我們可以使用0.0.0.0(任意IP地址),那么不管是vip還是本機的ip地址所對應的7001端口都能訪問到
bind_port= 7001               #自己的端口號
destinations = 192.168.2.150:3306   #設置目的機器IP地址,可以填master的IP,端口為mysqld運行的端口
mode = read-write             #設置目的機器IP地址,可以填master的IP,端口為mysqld運行的端口
max_connections = 65535
max_connect_errors = 100
client_connect_timeout = 9[routing:read_only_1]
bind_address = 192.168.2.221
bind_port= 7002
destinations = 192.168.2.151:3306   #設置目的機器IP地址,可以填master的IP,端口為mysqld運行的端口
mode = read-only
max_connections = 65535
max_connect_errors = 100
client_connect_timeout = 9[routing:read_only_2]
bind_address = 192.168.2.221
bind_port= 7003
destinations = 192.168.2.152:3306   #設置目的機器IP地址,可以填master的IP,端口為mysqld運行的端口
mode = read-only
max_connections = 65535
max_connect_errors = 100
client_connect_timeout = 9
[root@mysqlrouter-1 mysqlrouter]# 4、刷新mysqlrouter服務,并查看端口:
[root@mysqlrouter-1 mysqlrouter]# service mysqlrouter restart
Redirecting to /bin/systemctl restart mysqlrouter.service
[root@mysqlrouter-1 mysqlrouter]# [root@mysqlrouter-1 mysqlrouter]# netstat -anpult |grep mysqlrouter
tcp        0      0 192.168.2.221:7001      0.0.0.0:*               LISTEN      42847/mysqlrouter
tcp        0      0 192.168.2.221:7002      0.0.0.0:*               LISTEN      42847/mysqlrouter
tcp        0      0 192.168.2.221:7003      0.0.0.0:*               LISTEN      42847/mysqlrouter
[root@mysqlrouter-1 mysqlrouter]#
5、安裝配置keepalived服務
下載keepalived服務:
[root@mysqlrouter-1 mysqlrouter]# yum install keepalived -y
已安裝:keepalived.x86_64 0:1.3.5-19.el7                                                                                                                                                           作為依賴被安裝:lm_sensors-libs.x86_64 0:3.4.0-8.20160601gitf9185e5.el7                net-snmp-agent-libs.x86_64 1:5.7.2-49.el7_9.2                net-snmp-libs.x86_64 1:5.7.2-49.el7_9.2               完畢!
6、修改keepalived的配置文件(從36行以下的全部都不需要)(配置單vip的高可用服務)
6.1、master上的配置
global_defs {notification_email {acassen@firewall.locfailover@firewall.locsysadmin@firewall.loc}notification_email_from Alexandre.Cassen@firewall.locsmtp_server 192.168.200.1smtp_connect_timeout 30router_id LVS_DEVELvrrp_skip_check_adv_addr
#   vrrp_strict       # 這一行需要注釋:原因是因為會在iptables里添加一條規則,會阻止網絡通信,導致出現腦裂現象vrrp_garp_interval 0vrrp_gna_interval 0
}vrrp_instance VI_1 {    # 定義一個vrrp協議的實例 名字是VI_1 表示第一個vrrp實例state MASTER        # 做master角色interface ens33     # 指定監聽網絡的接口,其實就是vip綁定到那個網絡接口上virtual_router_id 81  # 虛擬路由器ID 81表示的是編號,另外一臺機器上的配置也必須是81priority 160          # 優先級 數字越大就越容易成為masteradvert_int 1          # 宣告消息的時間間隔 為1sauthentication {auth_type PASS    # 密碼認證 passwordauth_pass 1111    # 具體密碼 可以不用修改}virtual_ipaddress {   # vip 虛擬ip地址 可以配置多個192.168.2.221     # 配置的vip#192.168.200.17#192.168.200.18}
}
6.2、backup上的配置
[root@mysqlrouter-2 keepalived]# cat keepalived.conf
global_defs {notification_email {acassen@firewall.locfailover@firewall.locsysadmin@firewall.loc}notification_email_from Alexandre.Cassen@firewall.locsmtp_server 192.168.200.1smtp_connect_timeout 30router_id LVS_DEVELvrrp_skip_check_adv_addr# vrrp_strict       # 這一行需要注釋:原因是因為會在iptables里添加一條規則,會阻止網絡通信,導致出現腦裂現象vrrp_garp_interval 0vrrp_gna_interval 0
}vrrp_instance VI_1 {    # 定義一個vrrp協議的實例 名字是VI_1 表示第一個vrrp實例state BACKUP        # 做backup角色interface ens33     # 指定監聽網絡的接口,其實就是vip綁定到那個網絡接口上virtual_router_id 81  # 虛擬路由器ID 81表示的是編號,另外一臺機器上的配置也必須是81priority 100          # 優先級 數字越大就越容易成為masteradvert_int 1          # 宣告消息的時間間隔 為1sauthentication {auth_type PASS    # 密碼認證 passwordauth_pass 1111    # 具體密碼 可以不用修改}virtual_ipaddress {   # vip 虛擬ip地址 可以配置多個192.168.2.221     # 配置的vip 必須與master配置的vip是一樣的#192.168.200.17#192.168.200.18}
}
[root@mysqlrouter-2 keepalived]#
7、重新啟動keepalived服務
[root@mysqlrouter-1 keepalived]# service keepalived restart
Redirecting to /bin/systemctl restart keepalived.service
[root@mysqlrouter-1 keepalived]#
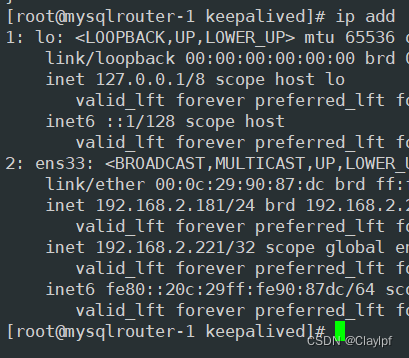
7.1、查看效果:
[root@mysqlrouter-1 keepalived]# ip add
1: lo: <LOOPBACK,UP,LOWER_UP> mtu 65536 qdisc noqueue state UNKNOWN group default qlen 1000link/loopback 00:00:00:00:00:00 brd 00:00:00:00:00:00inet 127.0.0.1/8 scope host lovalid_lft forever preferred_lft foreverinet6 ::1/128 scope host valid_lft forever preferred_lft forever
2: ens33: <BROADCAST,MULTICAST,UP,LOWER_UP> mtu 1500 qdisc pfifo_fast state UP group default qlen 1000link/ether 00:0c:29:90:87:dc brd ff:ff:ff:ff:ff:ffinet 192.168.2.181/24 brd 192.168.2.255 scope global noprefixroute ens33valid_lft forever preferred_lft foreverinet 192.168.2.221/32 scope global ens33valid_lft forever preferred_lft foreverinet6 fe80::20c:29ff:fe90:87dc/64 scope link valid_lft forever preferred_lft forever
[root@mysqlrouter-1 keepalived]#
8、模擬測試:如果master掛掉了,那么vip是否會轉移到backup上去呢?
8.1、我們將master上的keepalived關閉,查看backup上的ip地址
[root@mysqlrouter-1 keepalived]# service keepalived stop
Redirecting to /bin/systemctl stop keepalived.service
[root@mysqlrouter-1 keepalived]#
8.2、backup上的IP地址
[root@mysqlrouter-2 keepalived]# ip add
1: lo: <LOOPBACK,UP,LOWER_UP> mtu 65536 qdisc noqueue state UNKNOWN group default qlen 1000link/loopback 00:00:00:00:00:00 brd 00:00:00:00:00:00inet 127.0.0.1/8 scope host lovalid_lft forever preferred_lft foreverinet6 ::1/128 scope host valid_lft forever preferred_lft forever
2: ens33: <BROADCAST,MULTICAST,UP,LOWER_UP> mtu 1500 qdisc pfifo_fast state UP group default qlen 1000link/ether 00:0c:29:a9:7f:87 brd ff:ff:ff:ff:ff:ffinet 192.168.2.182/24 brd 192.168.2.255 scope global noprefixroute ens33valid_lft forever preferred_lft foreverinet 192.168.2.221/32 scope global ens33valid_lft forever preferred_lft foreverinet6 fe80::20c:29ff:fea9:7f87/64 scope link valid_lft forever preferred_lft forever
[root@mysqlrouter-2 keepalived]#
成功觀察到我們想要的效果,vip真的漂移到了backup上了
8.3、當我們重啟master,vip又會從backup上漂移到master上去的
[root@mysqlrouter-1 keepalived]# service keepalived start
Redirecting to /bin/systemctl start keepalived.service
[root@mysqlrouter-1 keepalived]# ip add
1: lo: <LOOPBACK,UP,LOWER_UP> mtu 65536 qdisc noqueue state UNKNOWN group default qlen 1000link/loopback 00:00:00:00:00:00 brd 00:00:00:00:00:00inet 127.0.0.1/8 scope host lovalid_lft forever preferred_lft foreverinet6 ::1/128 scope host valid_lft forever preferred_lft forever
2: ens33: <BROADCAST,MULTICAST,UP,LOWER_UP> mtu 1500 qdisc pfifo_fast state UP group default qlen 1000link/ether 00:0c:29:90:87:dc brd ff:ff:ff:ff:ff:ffinet 192.168.2.181/24 brd 192.168.2.255 scope global noprefixroute ens33valid_lft forever preferred_lft foreverinet 192.168.2.221/32 scope global ens33valid_lft forever preferred_lft foreverinet6 fe80::20c:29ff:fe90:87dc/64 scope link valid_lft forever preferred_lft forever
[root@mysqlrouter-1 keepalived]#
9、外部連接測試keepalived實現的高可用效果:
當我通過Linux上訪問192.168.2.221:7001端口的時候,他會訪問到我們的master機器的3306端口上去(Mysql數據庫的默認端口是3306)
[root@mysql-2 ~]#  mysql -h 192.168.2.221 -P 7001 -u claylpf -p
Enter password:
Welcome to the MySQL monitor.  Commands end with ; or \g.
Your MySQL connection id is 21
Server version: 5.7.41-log MySQL Community Server (GPL)Copyright (c) 2000, 2023, Oracle and/or its affiliates.Oracle is a registered trademark of Oracle Corporation and/or its
affiliates. Other names may be trademarks of their respective
owners.Type 'help;' or '\h' for help. Type '\c' to clear the current input statement.claylpf@(none) 18:54  mysql>exit
Bye
[root@test ~]# [root@mysql-2 ~]#  mysql -h 192.168.2.221 -P 7002 -u claylpf -p
Enter password:
Welcome to the MySQL monitor.  Commands end with ; or \g.
Your MySQL connection id is 20
Server version: 5.7.41 MySQL Community Server (GPL)Copyright (c) 2000, 2023, Oracle and/or its affiliates.Oracle is a registered trademark of Oracle Corporation and/or its
affiliates. Other names may be trademarks of their respective
owners.Type 'help;' or '\h' for help. Type '\c' to clear the current input statement.claylpf@(none) 19:15  mysql>
10、配置雙vip實現keepalived配置(跟MySQL的主主復制十分相似)
雙 VIP 可以用于實現高可用性架構。在一個服務器出現故障時,流量可以被自動切換到另一個服務器,從而保持服務的連續性。這在負載均衡、高可用的網絡應用中特別有用。
10.1、master配置文件:
[root@mysqlrouter-1 keepalived]# cat keepalived.conf
global_defs {notification_email {acassen@firewall.locfailover@firewall.locsysadmin@firewall.loc}notification_email_from Alexandre.Cassen@firewall.locsmtp_server 192.168.200.1smtp_connect_timeout 30router_id LVS_DEVELvrrp_skip_check_adv_addr# vrrp_strict       vrrp_garp_interval 0vrrp_gna_interval 0
}vrrp_instance VI_1 {    state MASTER        interface ens33     virtual_router_id 81  priority 160          advert_int 1          authentication {auth_type PASS    auth_pass 1111   }virtual_ipaddress {   192.168.2.221     }
}vrrp_instance VI_2 {    state BACKUP        interface ens33     virtual_router_id 101  priority 100          advert_int 1          authentication {auth_type PASS    auth_pass 1111   }virtual_ipaddress {   192.168.2.201     }
}
[root@mysqlrouter-1 keepalived]#
10.2、backup配置文件:
[root@mysqlrouter-2 keepalived]# cat keepalived.conf
global_defs {notification_email {acassen@firewall.locfailover@firewall.locsysadmin@firewall.loc}notification_email_from Alexandre.Cassen@firewall.locsmtp_server 192.168.200.1smtp_connect_timeout 30router_id LVS_DEVELvrrp_skip_check_adv_addr# vrrp_strict       # 這一行需要注釋:原因是因為會在iptables里添加一條規則,會阻止網絡通信,導致出現腦裂現象vrrp_garp_interval 0vrrp_gna_interval 0
}vrrp_instance VI_1 {    # 定義一個vrrp協議的實例 名字是VI_1 表示第一個vrrp實例state BACKUP        # 做backup角色interface ens33     # 指定監聽網絡的接口,其實就是vip綁定到那個網絡接口上virtual_router_id 81  # 虛擬路由器ID 81表示的是編號,另外一臺機器上的配置也必須是51priority 100          # 優先級 數字越大就越容易成為masteradvert_int 1          # 宣告消息的時間間隔 為1sauthentication {auth_type PASS    # 密碼認證 passwordauth_pass 1111    # 具體密碼 可以不用修改}virtual_ipaddress {   # vip 虛擬ip地址 可以配置多個192.168.2.221     # 配置的vip 必須與master配置的vip是一樣的}
}vrrp_instance VI_2 {    # 定義一個vrrp協議的實例 名字是VI_1 表示第一個vrrp實例state MASTER        # 做backup角色interface ens33     # 指定監聽網絡的接口,其實就是vip綁定到那個網絡接口上virtual_router_id 101  # 虛擬路由器ID 101表示的是編號,另外一臺機器上的配置也必須是101priority 120          # 優先級 數字越大就越容易成為masteradvert_int 1          # 宣告消息的時間間隔 為1sauthentication {auth_type PASS    # 密碼認證 passwordauth_pass 1111    # 具體密碼 可以不用修改}virtual_ipaddress {   # vip 虛擬ip地址 可以配置多個192.168.2.201     # 配置的vip 必須與master配置的vip是一樣的}
}
[root@mysqlrouter-2 keepalived]#
10.3、刷新keepalived服務,并查看master和backup的IP地址

六、使用sysbench壓力測試工具測試整個數據庫集群的性能,了解集群系統性能資源的瓶頸
參考:Mysql壓力測試(sysbench)_Claylpf的博客-CSDN博客
1、安裝sysbench工具
[root@ab ~]# yum install epel-release -y[root@ab ~]# yum install sysbench -y已安裝:sysbench.x86_64 0:1.0.17-2.el7 作為依賴被安裝:ck.x86_64 0:0.5.2-2.el7 luajit.x86_64 0:2.0.5-1.20220913.46e62cd.el7 postgresql-libs.x86_64 0:9.2.24-8.el7_9 完畢!
2、調大內核資源限制
[root@sysbench ~]# ulimit -n 100000
[root@sysbench ~]# ulimit -u 100000
[root@sysbench ~]# ulimit -s 100000
3、在master上創建用戶和庫,配置用戶的權限可以使他可以訪問庫(Mysql的主從復制)
CREATE USER 'claylpf'@'%' IDENTIFIED BY '123456'; #創建用戶create database test_db; #創建測試庫GRANT ALL PRIVILEGES ON test_db.* TO 'claylpf'@'%'; #配置用戶權限FLUSH PRIVILEGES; #重新加載用戶權限表4、基于sysbench構造測試表和測試數據
[root@ab ~]# sysbench --db-driver=mysql --time=300 --threads=10 --report-interval=1 --mysql-host=192.168.2.221 --mysql-port=7001 --mysql-user=claylpf --mysql-password=123456 --mysql-db=test_db --tables=10 --table_size=1000 oltp_read_write --db-ps-mode=disable prepare
命令行中的參數說明:
?--db-driver=mysql:代表數據庫驅動
?
--time=300:這個就是說連續訪問300秒
?
--threads=10:這個就是說用10個線程模擬并發訪問
?
--report-interval=1:這個就是說每隔1秒輸出一下壓測情況
?
--mysql-host=192.168.2.221?--mysql-port=7001 --mysql-user=claylpf --mysql-password=123456:數據庫的用戶和密碼等信息
?
--mysql-db=test_db --tables=20 --table_size=1000000:這一串的意思,就是說在test_db這個庫里,構造20個測試表,每個測試表里構造100萬條測試數據,測試表的名字會是類似于sbtest1,sbtest2這個樣子的
?oltp_read_write:這個就是說,執行oltp數據庫的讀寫測試
--db-ps-mode=disable:這個就是禁止ps模式
prepare:意思是參照這個命令的設置去構造出來我們需要的數據庫里的數據,他會自動創建20個測試表,每個表里創建100萬條測試數據,所以這個工具是非常的方便的。
5、創建我們需要的數據庫里的數據
[root@ab ~]# sysbench --db-driver=mysql --time=300 --threads=10 --report-interval=1 --mysql-host=192.168.2.221 --mysql-port=7001 --mysql-user=claylpf --mysql-password=123456 --mysql-db=test_db --tables=10 --table_size=1000 oltp_read_write --db-ps-mode=disable prepare# 注意--tables=10 --table_size=1000所對應的數據不能調試太大(如:--tables=20 --table_size=1000000000),否則會導致你的Mysql集群的磁盤耗盡,導致集群崩潰.
sysbench 1.0.17 (using system LuaJIT 2.0.4)Initializing worker threads...Creating table 'sbtest10'...
Creating table 'sbtest3'...
Creating table 'sbtest9'...
Creating table 'sbtest6'...
Creating table 'sbtest1'...
Creating table 'sbtest8'...
Creating table 'sbtest4'...
Creating table 'sbtest5'...
Creating table 'sbtest7'...
Creating table 'sbtest2'...
Inserting 1000 records into 'sbtest10'
Inserting 1000 records into 'sbtest1'
Inserting 1000 records into 'sbtest2'
Inserting 1000 records into 'sbtest4'
Inserting 1000 records into 'sbtest5'
Inserting 1000 records into 'sbtest6'
Inserting 1000 records into 'sbtest7'
Inserting 1000 records into 'sbtest8'
Inserting 1000 records into 'sbtest9'
Inserting 1000 records into 'sbtest3'
Creating a secondary index on 'sbtest1'...
Creating a secondary index on 'sbtest10'...
Creating a secondary index on 'sbtest6'...
Creating a secondary index on 'sbtest4'...
Creating a secondary index on 'sbtest5'...
Creating a secondary index on 'sbtest2'...
Creating a secondary index on 'sbtest7'...
Creating a secondary index on 'sbtest9'...
Creating a secondary index on 'sbtest8'...
Creating a secondary index on 'sbtest3'...
6、數據庫讀寫性能測試(獲取測試數據)
數據庫讀寫性能測試,將執行指令最后的prepare修改成run:
[root@ab ~]# sysbench --db-driver=mysql --time=300 --threads=10 --report-interval=1 --mysql-host=192.168.2.221 --mysql-port=7001 --mysql-user=claylpf --mysql-password=123456 --mysql-db=test_db --tables=10 --table_size=1000 oltp_read_write --db-ps-mode=disable run
sysbench 1.0.17 (using system LuaJIT 2.0.4)Running the test with following options:
Number of threads: 10
Report intermediate results every 1 second(s)
Initializing random number generator from current timeInitializing worker threads...Threads started!
#? 下面是截取的執行1秒,2秒,3秒,4秒等的數據。
[ 1s ] thds: 10 tps: 172.58 qps: 3597.26 (r/w/o: 2541.82/701.30/354.14) lat (ms,95%): 71.83 err/s: 0.00 reconn/s: 0.00
[ 2s ] thds: 10 tps: 187.08 qps: 3691.57 (r/w/o: 2574.10/745.32/372.16) lat (ms,95%): 71.83 err/s: 0.00 reconn/s: 0.00
[ 3s ] thds: 10 tps: 196.01 qps: 3961.13 (r/w/o: 2774.09/792.03/395.01) lat (ms,95%): 65.65 err/s: 0.00 reconn/s: 0.00
[ 4s ] thds: 10 tps: 206.93 qps: 4139.62 (r/w/o: 2900.04/824.73/414.86) lat (ms,95%): 64.47 err/s: 1.00 reconn/s: 0.00
[ 5s ] thds: 10 tps: 212.06 qps: 4236.12 (r/w/o: 2970.79/841.22/424.11) lat (ms,95%): 62.19 err/s: 0.00 reconn/s: 0.00
[ 6s ] thds: 10 tps: 184.06 qps: 3728.31 (r/w/o: 2608.92/751.26/368.13) lat (ms,95%): 97.55 err/s: 0.00 reconn/s: 0.00
[ 7s ] thds: 10 tps: 208.86 qps: 4131.17 (r/w/o: 2894.02/819.44/417.71) lat (ms,95%): 59.99 err/s: 0.00 reconn/s: 0.00
[ 8s ] thds: 10 tps: 214.14 qps: 4283.87 (r/w/o: 2997.01/858.58/428.29) lat (ms,95%): 62.19 err/s: 0.00 reconn/s: 0.00
[ 9s ] thds: 10 tps: 187.96 qps: 3725.23 (r/w/o: 2600.47/750.85/373.92) lat (ms,95%): 84.47 err/s: 0.00 reconn/s: 0.00
[ 10s ] thds: 10 tps: 195.96 qps: 3981.11 (r/w/o: 2795.38/791.82/393.91) lat (ms,95%): 66.84 err/s: 0.00 reconn/s: 0.00
^C
[root@ab ~]#
對表中的數據進行說明,以第一條數據做解釋描述:
? thds: 10:這個意思就是有10個線程在壓測
? tps: 151.70:這個意思就是每秒執行了151.70個事務
? qps: 2996.03:這個意思就是每秒可以執行2996.03個請求
? (r/w/o: 2091.83/600.80/303.40):這個意思就是說,在每秒2996.03個請求中,有2091.83個請求是讀請求,600.80個請求是寫請求,303.40個請求是其他的請求,就是對QPS進行了拆解
? lat (ms, 95%): 97.55:這個意思就是說,95%的請求的延遲都在 97.55毫秒以下
? err/s: 0.00 reconn/s: 0.00:這兩個的意思就是說,每秒有0個請求是失敗的,發生了0次網絡重連
下面是執行完成后控制臺輸出的數據:
SQL statistics:queries performed:read: 836822write: 239020other: 119517total: 1195359transactions: 59744 (199.12 per sec.)queries: 1195359 (3984.01 per sec.)ignored errors: 29 (0.10 per sec.)reconnects: 0 (0.00 per sec.)General statistics:total time: 300.0377stotal number of events: 59744Latency (ms):min: 19.82avg: 50.21max: 267.2895th percentile: 68.05sum: 2999907.14Threads fairness:events (avg/stddev): 5974.4000/21.35execution time (avg/stddev): 299.9907/0.01
7、執行完成壓測之后可以將run改成cleanup,清除數據
[root@ab ~]# sysbench --db-driver=mysql --time=300 --threads=10 --report-interval=1 --mysql-host=192.168.2.221 --mysql-port=7001 --mysql-user=claylpf --mysql-password=123456 --mysql-db=test_db --tables=10 --table_size=1000 oltp_read_write --db-ps-mode=disable cleanup
sysbench 1.0.17 (using system LuaJIT 2.0.4)Dropping table 'sbtest1'...
Dropping table 'sbtest2'...
Dropping table 'sbtest3'...
Dropping table 'sbtest4'...
Dropping table 'sbtest5'...
Dropping table 'sbtest6'...
Dropping table 'sbtest7'...
Dropping table 'sbtest8'...
Dropping table 'sbtest9'...
Dropping table 'sbtest10'...
[root@ab ~]#
8、IO性能壓力測試
8.1、創建5個文件,總共500MB,每個文件大概100MB
[root@sysbench ~]# sysbench fileio --file-num=5 --file-total-size=500MB prepare
sysbench 1.0.17 (using system LuaJIT 2.0.4)5 files, 102400Kb each, 500Mb total
Creating files for the test...
Extra file open flags: (none)
Creating file test_file.0
Creating file test_file.1
Creating file test_file.2
Creating file test_file.3
Creating file test_file.4
524288000 bytes written in 6.21 seconds (80.54 MiB/sec).
[root@sysbench ~]#
8.2、測試效果
[root@sysbench ~]# sysbench --events=5000 --threads=16 fileio --file-num=5 --file-total-size=500MB --file-test-mode=rndrw --file-fsync-freq=0 --file-block-size=16384 run
sysbench 1.0.17 (using system LuaJIT 2.0.4)Running the test with following options:
Number of threads: 16
Initializing random number generator from current timeExtra file open flags: (none)
5 files, 100MiB each
500MiB total file size
Block size 16KiB
Number of IO requests: 5000
Read/Write ratio for combined random IO test: 1.50
Calling fsync() at the end of test, Enabled.
Using synchronous I/O mode
Doing random r/w test
Initializing worker threads...Threads started!File operations:reads/s:                      22083.80writes/s:                     14833.29fsyncs/s:                     590.67Throughput:                                        #吞吐量read, MiB/s:                  345.06           #讀帶寬written, MiB/s:               231.77           #寫帶寬General statistics:total time:                          0.1292stotal number of events:              5000Latency (ms):min:                                    0.00avg:                                    0.13max:                                   29.0995th percentile:                        0.02sum:                                  664.57Threads fairness:events (avg/stddev):           312.5000/671.89execution time (avg/stddev):   0.0415/0.01[root@sysbench ~]#
8.3、清除數據:
[root@sysbench ~]#  sysbench fileio --file-num=5 --file-total-size=500MB cleanup
sysbench 1.0.17 (using system LuaJIT 2.0.4)Removing test files...
[root@sysbench ~]#
9、cpu性能壓力測試
[root@sysbench ~]#  sysbench cpu --threads=40 --events=10000 --cpu-max-prime=5000 run
sysbench 1.0.17 (using system LuaJIT 2.0.4)Running the test with following options:
Number of threads: 40
Initializing random number generator from current timePrime numbers limit: 5000Initializing worker threads...Threads started!CPU speed:                                  # CPU運行速度events per second:  4804.95             # 每秒運行的事件數General statistics:total time:                          2.0789stotal number of events:              10000Latency (ms):min:                                    0.11avg:                                    7.31max:                                  858.8695th percentile:                        0.31sum:                                73145.78Threads fairness:events (avg/stddev):           250.0000/35.90execution time (avg/stddev):   1.8286/0.17[root@sysbench ~]#
七、搭建基于prometheus + grafana的監控系統,對數據庫集群進行監控
參考:Prometheus監控軟件的學習_nfs exporter_Claylpf的博客-CSDN博客Grafana展示工具的學習_grafana學習_Claylpf的博客-CSDN博客
1、安裝部署mysqld_exporter
下載地址:Download | Prometheus

2、上傳軟件包到linux的/root/目錄下

3、解壓,并移動到/usr/local/mysqld_exporter下
[root@master ~]# tar -zxvf mysqld_exporter-0.15.0.linux-amd64.tar.gz
mysqld_exporter-0.15.0.linux-amd64/
mysqld_exporter-0.15.0.linux-amd64/mysqld_exporter
mysqld_exporter-0.15.0.linux-amd64/NOTICE
mysqld_exporter-0.15.0.linux-amd64/LICENSE
[root@master ~]# ls
anaconda-ks.cfg             mha4mysql-node-0.58         mysql-5.7.41-linux-glibc2.12-x86_64.tar.gz  mysqld_exporter-0.15.0.linux-amd64.tar.gz  onekey_install_mysql_binary.sh
mha4mysql-node-0.56.tar.gz  mha4mysql-node-0.58.tar.gz  mysqld_exporter-0.15.0.linux-amd64          onekey_install_mha_node.sh                 sersync2.5.4_64bit_binary_stable_final.tar.gz
[root@master ~]#
[root@master ~]# mv mysqld_exporter-0.15.0.linux-amd64 /usr/local/mysqld_exporter
[root@master ~]# cd /usr/local/mysqld_exporter/
[root@master mysqld_exporter]# ls
LICENSE  mysqld_exporter  NOTICE
[root@master mysqld_exporter]#
4、在/usr/local/mysqld_exporter下編輯連接本機數據庫的配置文件
[root@master mysqld_exporter]# vim my.cnf
[root@master mysqld_exporter]# cat my.cnf
[client]
user=mysqld_exporter
password=123456
[root@master mysqld_exporter]#
user=mysqld_exporter #監控本機數據庫的授權用戶
password=123456 #密碼
5、將mysqld_exporter命令加入環境變量,并設置開機自啟
[root@master mysqld_exporter]# PATH=/usr/local/mysqld_exporter/:$PATH
[root@master mysqld_exporter]# echo "PATH=/usr/local/mysqld_exporter/:$PATH" >>/root/.bashrc
[root@master mysqld_exporter]#
6、后臺啟動
[root@master mysqld_exporter]# nohup mysqld_exporter --config.my-cnf=/usr/local/mysqld_exporter/my.cnf &
[1] 25415
7、看進程,看端口,網頁訪問測試
[root@master mysqld_exporter]# ps aux|grep exporter
root      25415  0.0  0.4 719560  4752 pts/0    Sl   11:18   0:00 mysqld_exporter --config.my-cnf=/usr/local/mysqld_exporter/my.cnf
root      25419  0.0  0.0 112824   988 pts/0    R+   11:19   0:00 grep --color=auto exporter
[root@master mysqld_exporter]# netstat -anplut|grep mysqld
tcp6       0      0 :::3306                 :::*                    LISTEN      25027/mysqld
tcp6       0      0 :::9104                 :::*                    LISTEN      25415/mysqld_export
tcp6       0      0 192.168.2.150:3306      192.168.2.152:51232     ESTABLISHED 25027/mysqld
tcp6       0      0 192.168.2.150:3306      192.168.2.151:47084     ESTABLISHED 25027/mysqld
[root@master mysqld_exporter]#
網頁訪問測試
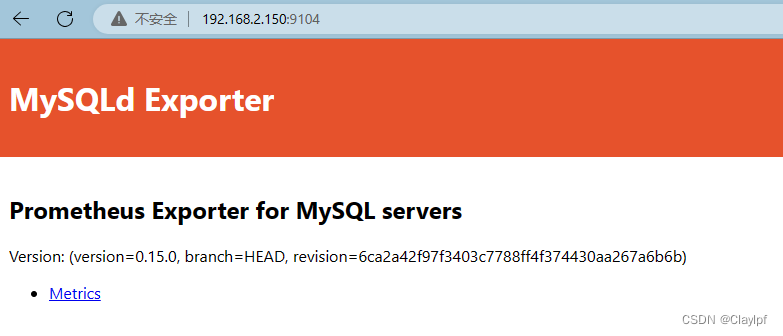
8、安裝prometheus,配置成服務
8.1、上傳安裝包到linux家目錄下

8.2、解壓Prometheus壓縮包,并移動到/prometheus目錄下
[root@prometheus ~]# tar zvxf prometheus-2.43.0.linux-amd64.tar.gz
[root@prometheus ~]# mv prometheus-2.43.0.linux-amd64 /prometheus
8.3、將Prometheus配置成service服務
[root@mysql prometheus]# vim /usr/lib/systemd/system/prometheus.service
#創建一個prometheus.service文件
[root@mysql prometheus]# cat /usr/lib/systemd/system/prometheus.service
#如果需要自行復制
[Unit]
Description=prometheus[Service]
ExecStart=/prometheus/prometheus/prometheus --config.file=/prometheus/prometheus/prometheus.yml
ExecReload=/bin/kill -HUP $MAINPID
KillMode=process
Restart=on-failure[Install]
WantedBy=multi-user.target
[root@mysql prometheus]#
[root@mysql prometheus]# systemctl daemon-reload
#說明我已經向systemd注冊prometheus.service文件了,意思是重新加載systemd相關服務[root@mysql prometheus]# service prometheus restart  #對prometheus服務進行運行
Redirecting to /bin/systemctl restart prometheus.service
[root@mysql prometheus]# [root@mysql prometheus]# ps aux|grep prometheus    #檢查prometheus的進程是否存在
root       5338  0.1  5.3 930420 52784 pts/0    Sl   19:39   0:02 prometheus --config.file=/prometheus/prometheus/prometheus.yml
root       5506  0.0  0.0 112824   992 pts/0    R+   20:22   0:00 grep --color=auto prometheus
[root@mysql prometheus]# service prometheus stop
Redirecting to /bin/systemctl stop prometheus.service
[root@mysql prometheus]# ps aux|grep prometheus
root       5338  0.1  5.3 930420 52784 pts/0    Sl   19:39   0:02 prometheus --config.file=/prometheus/prometheus/prometheus.yml
root       5524  0.0  0.0 112824   988 pts/0    R+   20:22   0:00 grep --color=auto prometheus
因為第一次是使用nohup方式啟動的prometheus,所以還是需要kill的方式殺死進程
后面就可以使用service的方式啟動prometheus了
[root@mysql prometheus]# kill -9 5338      #需要kill原來沒有使用service運行的prometheus進程
[root@mysql prometheus]# service prometheus restart
Redirecting to /bin/systemctl restart prometheus.service
[1]+  已殺死               nohup prometheus --config.file=/prometheus/prometheus/prometheus.yml
[root@mysql prometheus]# ps aux|grep prometheus
root       5541  1.0  3.9 798700 39084 ?        Ssl  20:23   0:00 /prometheus/prometheus/prometheus --config.file=/prometheus/prometheus/prometheus.yml
root       5548  0.0  0.0 112824   992 pts/0    R+   20:23   0:00 grep --color=auto prometheus
[root@mysql prometheus]# service prometheus stop      #關閉prometheus,成功關閉
Redirecting to /bin/systemctl stop prometheus.service
[root@mysql prometheus]# ps aux|grep prometheus
root       5567  0.0  0.0 112824   992 pts/0    R+   20:23   0:00 grep --color=auto prometheus
[root@mysql prometheus]#
驗證成功
8.4、查看Prometheus端口
[root@prometheus ~]# netstat -anpult|grep prometheus
tcp6       0      0 :::9090                 :::*                    LISTEN      2433/prometheus
tcp6       0      0 ::1:9090                ::1:42032               ESTABLISHED 2433/prometheus
tcp6       0      0 ::1:42032               ::1:9090                ESTABLISHED 2433/prometheus
[root@prometheus ~]#
8.4、訪問Prometheus服務頁面

9、Prometheus添加node節點
[root@prometheus ~]# cd /prometheus/prometheus
[root@prometheus prometheus]# ls
console_libraries  consoles  LICENSE  NOTICE  prometheus  prometheus.yml  promtool
[root@prometheus prometheus]# vim prometheus.yml
[root@prometheus prometheus]# cat prometheus.yml
#l config
global:scrape_interval: 15s # Set the scrape interval to every 15 seconds. Default is every 1 minute.evaluation_interval: 15s # Evaluate rules every 15 seconds. The default is every 1 minute.# scrape_timeout is set to the global default (10s).# Alertmanager configuration
alerting:alertmanagers:- static_configs:- targets:# - alertmanager:9093# Load rules once and periodically evaluate them according to the global 'evaluation_interval'.
rule_files:# - "first_rules.yml"# - "second_rules.yml"# A scrape configuration containing exactly one endpoint to scrape:
# Here it's Prometheus itself.
scrape_configs:# The job name is added as a label `job=<job_name>` to any timeseries scraped from this config.- job_name: "prometheus"# metrics_path defaults to '/metrics'# scheme defaults to 'http'.static_configs:- targets: ["localhost:9090"]- job_name: "mysqlrouter1"static_configs:- targets: ["192.168.2.181:9104"]- job_name: "mysqlrouter2"static_configs:- targets: ["192.168.2.182:9104"]- job_name: "slave1"static_configs:- targets: ["192.168.2.151:9104"]- job_name: "slave2"static_configs:- targets: ["192.168.2.152:9104"]- job_name: "master"static_configs:- targets: ["192.168.2.150:9104"]- job_name: "mha_manager"static_configs:- targets: ["192.168.2.141:9104"]- job_name: "backup"static_configs:- targets: ["192.168.2.157:9104"]
[root@prometheus prometheus]#
9.1、刷新Prometheus服務
[root@prometheus prometheus]# service prometheus restart
Redirecting to /bin/systemctl restart prometheus.service
[root@prometheus prometheus]#
10、測試訪問Prometheus服務:

11、安裝grafana
11.1、上傳grafana的rpm安裝包

11.2、安裝grafana
[root@prometheus ~]# yum install -y grafana-enterprise-9.4.7-1.x86_64.rpm11.3、啟動grafana
[root@prometheus ~]# service grafana-server start
Starting grafana-server (via systemctl):                   [  確定  ]
[root@prometheus ~]#
11.4、查看端口,并訪問測試grafana
查看端口
[root@prometheus ~]# netstat -anpult | grep grafana
tcp        0      0 192.168.2.149:47398     34.120.177.193:443      ESTABLISHED 2627/grafana
tcp        0      0 192.168.2.149:58982     185.199.108.133:443     ESTABLISHED 2627/grafana
tcp6       0      0 :::3000                 :::*                    LISTEN      2627/grafana
[root@prometheus ~]#
訪問測試grafana
頁面訪問,第一次登錄賬號密碼默認都為admin

登陸后需要修改密碼(lpf1375509........) 賬號默認admin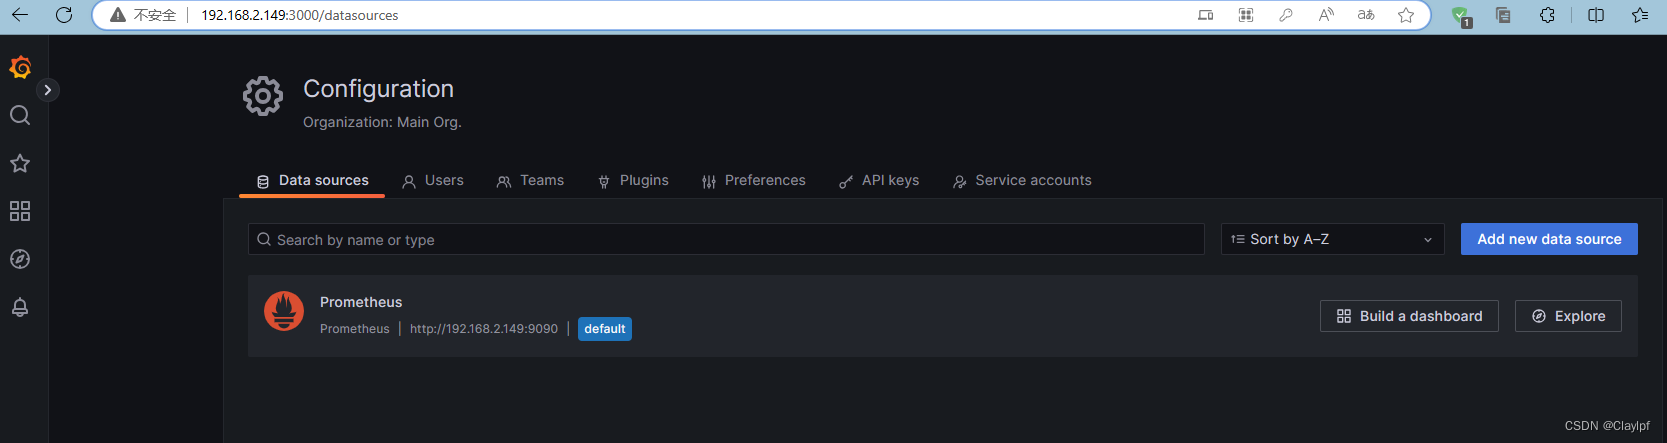
如果忘記密碼了我們可以使用
sqlite3 /var/lib/grafana/grafana.db? ?
> update user set password = '59acf18b94d7eb0694c61e60ce44c110c7a683ac6a8f09580d626f90f4a242000746579358d77dd9e570e83fa24faa88a8a6', salt = 'F3FAxVm33R' where login = 'admin';? ? ? ? ?
> .exit
PS: 用戶:admin 密碼:admin
重啟服務
/etc/init.d/grafana-server restart
12、在grafana中增添Prometheus數據源
 ?
?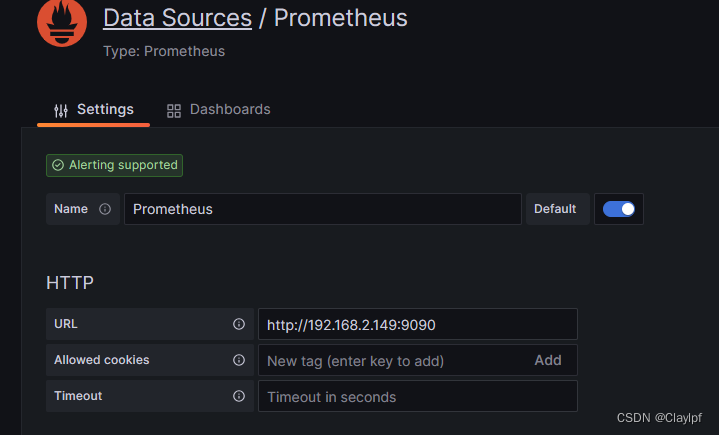
13、添加Dashboards模板(推薦使用14057模板,因為14057模板比較美觀,出圖效果也比較好,推薦使用)

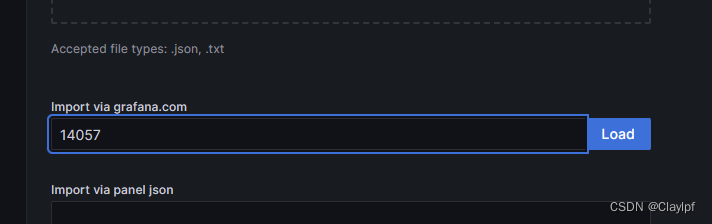
14、grafana效果展示
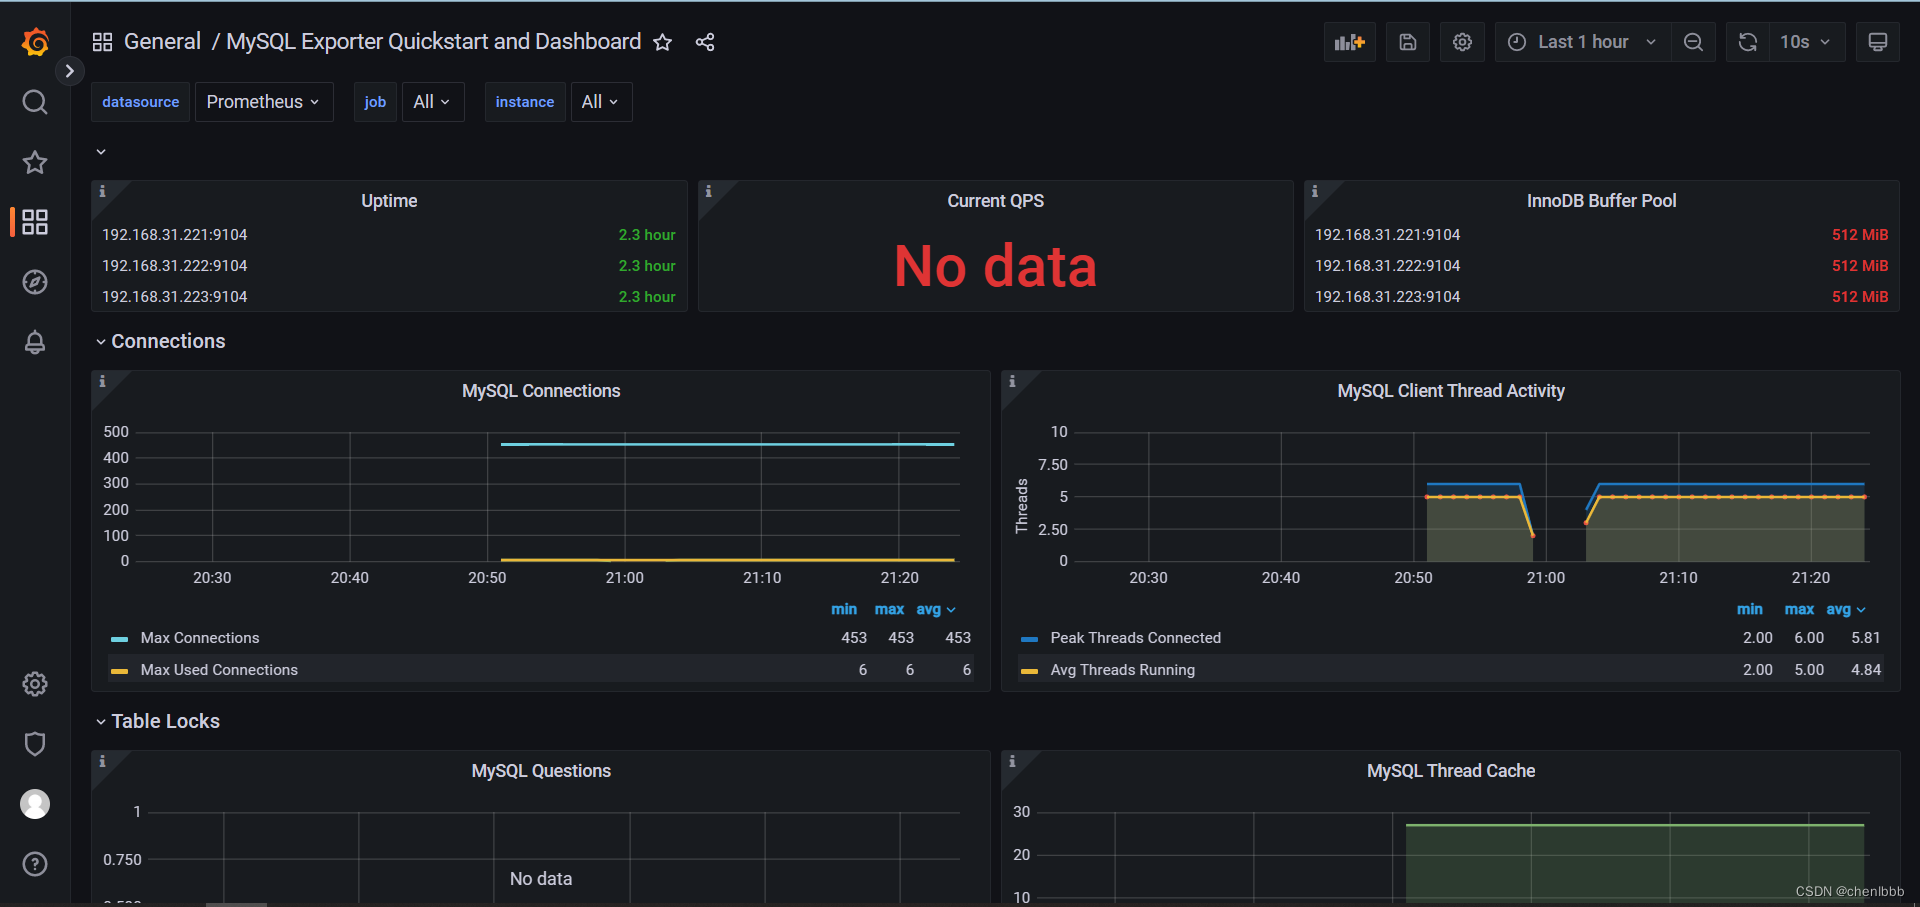
八、搭建DNS主域名服務器,增添兩條負載均衡記錄,實現對Mysqlrouter雙vip地址的DNS負載均衡
1、安裝DNS服務
[root@dns ~]# systemctl disable firewalld #關閉防火墻,防止windows客戶機無法訪問dns服務器
[root@dns ~]# systemctl disable NetworkManager #關閉NetworkManager
[root@dns ~]# yum install bind* #安裝dns服務的軟件包
[root@dns ~]# service named start #啟動dns服務
[root@dns ~]# systemctl enable named  #開機啟動dns服務
2、修改dns配置文件,任意ip可以訪問本機的53端口,并且允許dns解析。
[root@dns ~]# vim /etc/named.conf
listen-on port 53 { any; };#允許任意ip訪問53端口listen-on-v6 port 53 { any; }; directory       "/var/named";dump-file       "/var/named/data/cache_dump.db";statistics-file "/var/named/data/named_stats.txt";memstatistics-file "/var/named/data/named_mem_stats.txt";recursing-file  "/var/named/data/named.recursing";secroots-file   "/var/named/data/named.secroots";allow-query     { any; }; #允許任意dns解析
3、搭建主域名服務器
3.1、修改named.rfc1912.zones配置文件,告訴named為claylpf.xyz提供域名解析
[root@dns ~]# vim /etc/named.rfc1912.zones
[root@dns ~]# cat /etc/named.rfc1912.zones
// named.rfc1912.zones:
//
// Provided by Red Hat caching-nameserver package
//
// ISC BIND named zone configuration for zones recommended by
// RFC 1912 section 4.1 : localhost TLDs and address zones
// and http://www.ietf.org/internet-drafts/draft-ietf-dnsop-default-local-zones-02.txt
// (c)2007 R W Franks
//
// See /usr/share/doc/bind*/sample/ for example named configuration files.
//zone "localhost.localdomain" IN {type master;file "named.localhost";allow-update { none; };
};zone "localhost" IN {type master;file "named.localhost";allow-update { none; };
};zone "claylpf.xyz" IN {type master;file "claylpf.xyz.zone";allow-update { none; };
};
#添加上面的配置,建議在localhost的后面zone "1.0.0.0.0.0.0.0.0.0.0.0.0.0.0.0.0.0.0.0.0.0.0.0.0.0.0.0.0.0.0.0.ip6.arpa" IN {type master;file "named.loopback";allow-update { none; };
};zone "1.0.0.127.in-addr.arpa" IN {type master;file "named.loopback";allow-update { none; };
};zone "0.in-addr.arpa" IN {type master;file "named.empty";allow-update { none; };
};[root@dns ~]#
3.2、創建claylpf.xyz主域名的數據文件
[root@dns ~]# cd /var/named/
[root@dns named]# ls
chroot  chroot_sdb  data  dynamic  dyndb-ldap  named.ca  named.empty  named.localhost  named.loopback  slaves
[root@dns named]# cp -a named.localhost claylpf.xyz.zone
[root@dns named]# ls
chroot  chroot_sdb  claylpf.xyz.zone  data  dynamic  dyndb-ldap  named.ca  named.empty  named.localhost  named.loopback  slaves
[root@dns named]#
3.3、修改claylpf.xyz.zone文件:
[root@dns named]# vim claylpf.xyz.zone
[root@dns named]# cat claylpf.xyz.zone
$TTL 1D
@       IN SOA  @ rname.invalid. (0       ; serial1D      ; refresh1H      ; retry1W      ; expire3H )    ; minimumNS      @A       192.168.2.155
www IN  A       192.168.2.221
www IN  A       192.168.2.201
[root@dns named]#
3.4、刷新dns服務
[root@dns named]# service named restart
Redirecting to /bin/systemctl restart named.service
[root@dns named]#
4、效果測試
4.1、修改linux客戶機的dns服務器的地址為搭建的dns服務器192.168.2.155
[root@claylpf network-scripts]# vim /etc/resolv.conf
[root@claylpf network-scripts]# cat /etc/resolv.conf
# Generated by NetworkManager
#nameserver 114.114.114.114
nameserver 192.168.2.155
[root@claylpf network-scripts]#
4.2、查看效果
[root@claylpf ~]# nslookup www.claylpf.xyz
Server:		192.168.2.155
Address:	192.168.2.155#53Name:	www.claylpf.xyz
Address: 192.168.2.221
Name:	www.claylpf.xyz
Address: 192.168.2.201[root@claylpf ~]#
同一域名解析出了中間件mysqlrouter的雙vip地址,實現了基于dns的負載均衡
項目結束!!
項目遇到的問題
1、各種軟件的有些配置項加了注釋項,導致無法正常啟動
答:多查看軟件的報錯信息以及查看服務日志,對排錯的幫助會很大2、主從復制時,只在slave上進行了操作,導致事務數比主服務器還要多,主從復制一直起不來
答:查看報錯信息,是事務數比主服務器還要多—>盡可能刪除比主服務器還要多出來的數據,在reset master,并重新設置master_info信息3、本以為mysqlrouter訪問讀寫數據源的vip地址(mha架構里寫服務器的特有ip)要修改mysql的綁定ip地址才能登錄,后來發現只要新建了允許mysqlrouter訪問的授權用戶允許所有ip登錄就行
4、使用rsync時,數據源備份文件/backup/打成了/backup導致把整個文件夾都同步過去了
發現dns負載均衡的效果不是很明顯,再linux上訪問能解析出199,而在windows機上能解析出188
5、壓力測試的時候,由于內核參數的限制,導致無法起太多的線程
答:修改內核限制參數,以及調大mysql中與內核相關的參數6、使用ansible調用一鍵二進制安裝腳本中mysql加入環境變量不成功
答:再使用shell模塊,遠程加入PATH變量7、ulimit -n修改不生效
答:寫入到/etc/security/limits.conf中使其永久生效8、修改主機名后,mysql重啟不成功
答:需要殺死所有mysqld進程,在重新啟動mysql

項目心得?
1、提前規劃好整個集群的架構,可以提高項目開展時效率
2、運行報錯,多看出錯信息提示以及日志,對排錯的幫助很大
3、對半同步的主從復制有了更深入的理解4、對keepalived的腦裂和vip漂移現象也有了更加深刻的體會和分析
5、加強了mha架構中自動failover的實現原理的理解
6、對基于mysqlrouter的讀寫分離過程更加的熟悉
7、認識到了數據備份的重要性
8、深刻的體會到了rsync+sersync數據同步工具的便利與好處
9、熟練了sysbench下的壓力測試,認識到了系統性能資源的重要性,對壓力測試下整個集群的瓶頸有了一個整體概念
10、對監控也有了的更進一步的認識,監控可以提前看到問題,做好預警
11、對很多軟件之間的配合有了一定的理解,如mysqlrouter、mha、mysql等
12、troubleshooting的能力得到了提升


—— 循環結構程序設計(1):for 循環)


導數與微分)


