微服務系列文章之 Springboot+Vue實現登錄注冊

一、springBoot

創建springBoot項目

分為三個包,分別為controller,service, dao以及resource目錄下的xml文件。

UserController.java

1

2

3

4

5

6

7

8

9

10

11

12

13

14

15

16

17

18

19

20

21

22

23

24

25

26

27

28

29

30

31

32

33

34

35

36

37

38

39

40

package springbootmybatis.controller;

import org.springframework.web.bind.annotation.CrossOrigin;

import org.springframework.web.bind.annotation.PostMapping;

import org.springframework.web.bind.annotation.RequestBody;

import org.springframework.web.bind.annotation.RestController;

import springbootmybatis.pojo.User;

import springbootmybatis.service.UserService;

import javax.annotation.Resource;

@RestController

public class UserController {

????@Resource

????UserService userService;

????@PostMapping("/register/")

????@CrossOrigin("*")

????String register(@RequestBody User user) {

????????System.out.println("有人請求注冊!");

????????int res = userService.register(user.getAccount(), user.getPassword());

????????if(res==1) {

????????????return "注冊成功";

????????} else {

????????????return "注冊失敗";

????????}

????}

????@PostMapping("/login/")

????@CrossOrigin("*")

????String login(@RequestBody User user) {

????????int res = userService.login(user.getAccount(), user.getPassword());

????????if(res==1) {

????????????return "登錄成功";

????????} else {

????????????return "登錄失敗";

????????}

????}

}

UserService.java

1

2

3

4

5

6

7

8

9

10

11

12

13

14

15

16

17

18

19

20

package springbootmybatis.service;

import org.springframework.stereotype.Service;

import springbootmybatis.dao.UserMapper;

import javax.annotation.Resource;

@Service

public class UserService {

????@Resource

????UserMapper userMapper;

????public int register(String account, String password) {

????????return userMapper.register(account, password);

????}

????public int login(String account, String password) {

????????return userMapper.login(account, password);

????}

}

User.java (我安裝了lombok插件)

1

2

3

4

5

6

7

8

9

package springbootmybatis.pojo;

import lombok.Data;

@Data

public class User {

????private String account;

????private String password;

}

UserMapper.java

1

2

3

4

5

6

7

8

9

10

package springbootmybatis.dao;

import org.apache.ibatis.annotations.Mapper;

@Mapper

public interface UserMapper {

????int register(String account, String password);

????int login(String account, String password);

}

UserMapper.xml

1

2

3

4

5

6

7

8

9

10

11

12

13

14

15

<?xml version="1.0" encoding="UTF-8" ?>

<!DOCTYPE mapper

????????PUBLIC "-//mybatis.org//DTD Mapper 3.0//EN"

????????"http://mybatis.org/dtd/mybatis-3-mapper.dtd">

<mapper namespace="springbootmybatis.dao.UserMapper">

????<insert id="register">

???????insert into User (account, password) values (#{account}, #{password});

????</insert>

????<select id="login" resultType="Integer">

????????select count(*) from User where account=#{account} and password=#{password};

????</select>

</mapper>

主干配置

application.yaml

1

2

3

4

5

6

7

8

9

10

11

12

server.port: 8000

spring:

??datasource:

????username: root

????password: 123456

????url: jdbc:mysql://localhost:3306/community?serverTimezone=UTC&useUnicode=true&characterEncoding=utf-8

????driver-class-name: com.mysql.cj.jdbc.Driver

mybatis:

????type-aliases-package: springbootmybatis.pojo

????mapper-locations: classpath:mybatis/mapper/*.xml

????configuration:

??????map-underscore-to-camel-case: true

數據庫需要建相應得到表

1

2

3

4

CREATE TABLE `user` (

??`account` varchar(255) COLLATE utf8_bin DEFAULT NULL,

??`password` varchar(255) COLLATE utf8_bin DEFAULT NULL

) ENGINE=InnoDB DEFAULT CHARSET=utf8 COLLATE=utf8_bin;

二、創建VUE項目

安裝node,npm,配置環境變量。
配置cnpm倉庫,下載的時候可以快一些。

1

npm i -g cnpm --registry=https://registry.npm.taobao.org

安裝VUE

1

npm i -g vue-cli

初始化包結構

1

vue init webpack project

啟動項目

1

2

3

4

5

6

# 進入項目目錄

cd vue-01

# 編譯

npm install

# 啟動

npm run dev

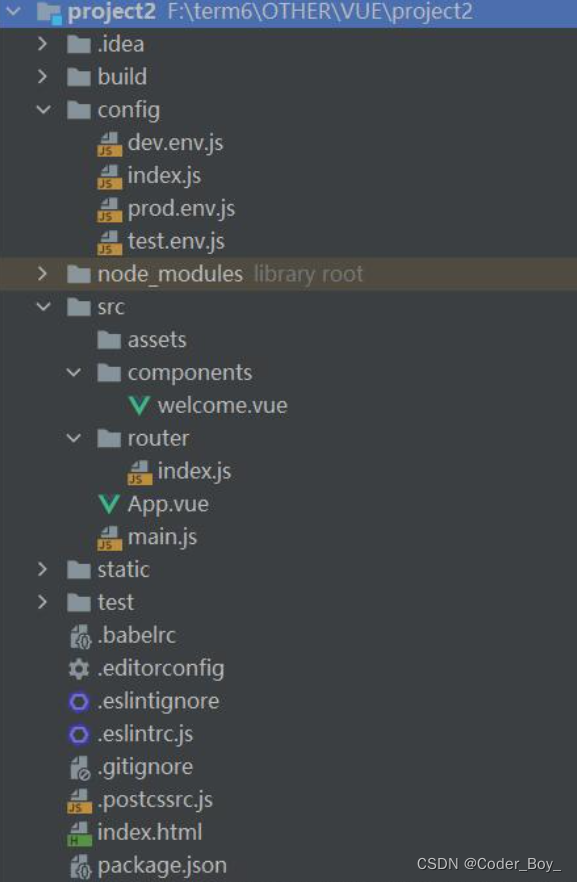
修改項目文件,按照如下結構

?

APP.vue

1

2

3

4

5

6

7

8

9

10

11

12

13

14

15

<template>

??<div id="app">

????<router-view/>

??</div>

</template>

<script>

export default {

??name: 'App'

}

</script>

<style>

</style>

welcome.vue

1

2

3

4

5

6

7

8

9

10

11

12

13

14

15

16

17

18

19

20

21

22

23

24

25

26

27

28

29

30

31

32

33

34

35

36

37

38

39

40

41

42

43

44

45

46

47

48

<template>

??<div>

????<el-input v-model="account" placeholder="請輸入帳號"></el-input>

????<el-input v-model="password" placeholder="請輸入密碼" show-password></el-input>

????<el-button type="primary" @click="login">登錄</el-button>

????<el-button type="primary" @click="register">注冊</el-button>

??</div>

</template>

<script>

export default {

??name: 'welcome',

??data () {

????return {

??????account: '',

??????password: ''

????}

??},

??methods: {

????register: function () {

??????this.axios.post('/api/register/', {

????????account: this.account,

????????password: this.password

??????}).then(function (response) {

????????console.log(response);

??????}).catch(function (error) {

????????console.log(error);

??????});

??????// this.$router.push({path:'/registry'});

????},

????login: function () {

??????this.axios.post('/api/login/', {

????????account: this.account,

????????password: this.password

??????}).then(function () {

????????alert('登錄成功');

??????}).catch(function (e) {

????????alert(e)

??????})

??????// this.$router.push({path: '/board'});

????}

??}

}

</script>

<style scoped>

</style>

main.js

1

2

3

4

5

6

7

8

9

10

11

12

13

14

15

16

17

18

19

20

21

// The Vue build version to load with the `import` command

// (runtime-only or standalone) has been set in webpack.base.conf with an alias.

import Vue from 'vue'

import App from './App'

import router from './router'

import ElementUI from 'element-ui'

import 'element-ui/lib/theme-chalk/index.css'

import axios from 'axios'

import VueAxios from 'vue-axios'

Vue.use(VueAxios, axios)

Vue.use(ElementUI)

Vue.config.productionTip = false

/* eslint-disable no-new */

new Vue({

??el: '#app',

??router,

??components: {App},

??template: '<App/>'

})

router/index.js

1

2

3

4

5

6

7

8

9

10

11

12

13

14

15

import Vue from 'vue'

import Router from 'vue-router'

import welcome from '@/components/welcome'

Vue.use(Router)

export default new Router({

??routes: [

????{

??????path: '/',

??????name: 'welcome',

??????component: welcome

????}

??]

})

config/index.js

1

2

3

4

5

6

7

8

9

10

11

12

13

14

15

16

17

18

19

20

21

22

23

24

25

26

27

28

29

30

31

32

33

34

35

36

37

38

39

40

41

42

43

44

45

46

47

48

49

50

51

52

53

54

55

56

57

58

59

60

61

62

63

64

65

66

67

68

69

70

71

72

73

74

75

76

77

78

79

80

81

82

83

84

85

86

'use strict'

// Template version: 1.3.1

// see http://vuejs-templates.github.io/webpack for documentation.

const path = require('path')

module.exports = {

??dev: {

????// Paths

????assetsSubDirectory: 'static',

????assetsPublicPath: '/',

????proxyTable: {

??????'/api': {

????????target: 'http://localhost:8000', // 后端接口的域名

????????// secure: false,? // 如果是https接口,需要配置這個參數

????????changeOrigin: true, // 如果接口跨域,需要進行這個參數配置

????????pathRewrite: {

??????????'^/api': '' //路徑重寫,當你的url帶有api字段時如/api/v1/tenant,

??????????//可以將路徑重寫為與規則一樣的名稱,即你在開發時省去了再添加api的操作

????????}

??????}

????},

????// Various Dev Server settings

????host: 'localhost', // can be overwritten by process.env.HOST

????port: 8080, // can be overwritten by process.env.PORT, if port is in use, a free one will be determined

????autoOpenBrowser: false,

????errorOverlay: true,

????notifyOnErrors: true,

????poll: false, // https://webpack.js.org/configuration/dev-server/#devserver-watchoptions-

????// Use Eslint Loader?

????// If true, your code will be linted during bundling and

????// linting errors and warnings will be shown in the console.

????useEslint: true,

????// If true, eslint errors and warnings will also be shown in the error overlay

????// in the browser.

????showEslintErrorsInOverlay: false,

????/**

?????* Source Maps

?????*/

????// https://webpack.js.org/configuration/devtool/#development

????devtool: 'cheap-module-eval-source-map',

????// If you have problems debugging vue-files in devtools,

????// set this to false - it *may* help

????// https://vue-loader.vuejs.org/en/options.html#cachebusting

????cacheBusting: true,

????cssSourceMap: true

??},

??build: {

????// Template for index.html

????index: path.resolve(__dirname, '../dist/index.html'),

????// Paths

????assetsRoot: path.resolve(__dirname, '../dist'),

????assetsSubDirectory: 'static',

????assetsPublicPath: '/',

????/**

?????* Source Maps

?????*/

????productionSourceMap: true,

????// https://webpack.js.org/configuration/devtool/#production

????devtool: '#source-map',

????// Gzip off by default as many popular static hosts such as

????// Surge or Netlify already gzip all static assets for you.

????// Before setting to `true`, make sure to:

????// npm install --save-dev compression-webpack-plugin

????productionGzip: false,

????productionGzipExtensions: ['js', 'css'],

????// Run the build command with an extra argument to

????// View the bundle analyzer report after build finishes:

????// `npm run build --report`

????// Set to `true` or `false` to always turn it on or off

????bundleAnalyzerReport: process.env.npm_config_report

??}

}

輸入賬號密碼,實現簡單的注冊,登錄功能。

本文來自互聯網用戶投稿,該文觀點僅代表作者本人,不代表本站立場。本站僅提供信息存儲空間服務,不擁有所有權,不承擔相關法律責任。
如若轉載,請注明出處:http://www.pswp.cn/news/36575.shtml
繁體地址,請注明出處:http://hk.pswp.cn/news/36575.shtml
英文地址,請注明出處:http://en.pswp.cn/news/36575.shtml

如若內容造成侵權/違法違規/事實不符,請聯系多彩編程網進行投訴反饋email:809451989@qq.com,一經查實,立即刪除!

相關文章

如何利用 EMC 模型解決能源服務提供商的瓶頸

01. 什么是合同能源管理&#xff1f; 合同能源管理(EMC-Energy Management Contract) 是一種新型的市場化節能機制,其實質就是以減少的能源費用來支付節能項目全部成本的節能投資方式。&#xff1a;節能服務公司與用能單位以契約形式約定節能項目的節能目標&#xff0c;節能服…

(二)Node.js 基礎模塊

&#xff08;二&#xff09;Node.js 基礎模塊 1. fs文件系統模塊1.1 什么是fs文件系統模塊1.2 讀取指定文件中的內容1. fs.readFile()的語法格式2. fs.readFile()的示例代碼 1.3 向指定的文件中寫入內容1. fs.writeFile()的語法格式2. fs.writeFile()的實例代碼 1.4 __dirname …

正則表達式的使用

1、正則表達式-教程 正則表達式&#xff1a;文本模式&#xff0c;包括普通字符&#xff08;例如&#xff0c;a到z之間的字母&#xff09;和特殊字符&#xff08;稱為元字符&#xff09;。 正則表達式使用單個字符串來描述&#xff0c;匹配一系列匹配某個句法規則的字符串。 2、…

《論文閱讀13》Efficient Urban-scale Point Clouds Segmentationwith BEV Projection

一、論文 研究領域&#xff1a; 城市級3D語義分割論文&#xff1a;Efficient Urban-scale Point Clouds Segmentationwith BEV Projection清華大學&#xff0c;新疆大學2021.9.19論文github論文鏈接 二、論文概要 2.1主要思路 提出了城市級3D語義分割新的方法&#xff0c;將…

1.SpringMVC接收請求參數及數據回顯:前端url地址欄傳遞參數通過轉發顯示在網頁

1、SpringMVC 處理前端提交的數據 1.1 提交的域名和處理方法的參數不一致&#xff0c;使用注解解決 1.2 提交的域名和處理方法的參數不一致&#xff0c;使用注解解決 1.3 提交的是一個對象 2、前端url地址欄傳遞的是一個參數 請求地址url&#xff1a;http://localhost:8080/s…

測試開發工程師到底是做什么的?

一二三線互聯網公司對測試開發工程師的要求&#xff1a; 現在很多測試的同事對測試開發工程師的認識都有一定的誤差。 我最早在阿里的時候和測試開發工程師溝通的時候&#xff0c;發現阿里的測試開發工程師&#xff0c;他們基本上都分為兩種&#xff0c;一種是業務類型的&…

Python基礎教程: json序列化詳細用法介紹

前言 嗨嘍&#xff0c;大家好呀~這里是愛看美女的茜茜吶 Python內置的json模塊提供了非常完善的對象到JSON格式的轉換。 廢話不多說&#xff0c;我們先看看如何把Python對象變成一個JSON&#xff1a; d dict(nameKaven, age17, sexMale) print(json.dumps(d)) # {"na…

【Linux】環境變量

目錄 一、環境變量的概念二、 常見的環境變量1.查看環境變量的方法2.PATH3.HOME4.SHELL 三、環境變量的相關指令四、命令行參數 一、環境變量的概念 環境變量(environment variables)一般是指在操作系統中用來指定操作系統運行環境的一些參數 如&#xff1a;我們在編寫C/C代碼的…

Prometheus技術文檔-基本使用-配置文件全解!!!!!

簡介&#xff1a; Prometheus是一個開源的系統監控和告警系統&#xff0c;由Google的BorgMon監控系統發展而來。它主要用于監控和度量各種時間序列數據&#xff0c;比如系統性能、網絡延遲、應用程序錯誤等。Prometheus通過采集監控數據并存儲在時間序列數據庫中&#xff0c;…

【視頻】使用OBS將MP4推流至騰訊云直播

1、下載OBS OBS官網:https://obsproject.com/ OBS支持Win、Mac、Linux,如果下載速度很慢,建議使用迅雷下載 2、OBS推流設置 2.1 添加場景 默認會有一個“場景”,如果想繼續添加可以點擊“+”按鈕 2.2 添加媒體源 1)點擊“來源”窗口中“+”按鈕 2)支持的媒體源如…

什么是Redis緩存雪崩、緩存穿透、緩存擊穿

緩存穿透&#xff08;Cache Penetration&#xff09; 什么是緩存穿透&#xff1f; 緩存穿透是指惡意或無效的請求導致緩存無法命中&#xff0c;從而每個請求都需要訪問數據庫。這可能發生在請求的數據根本不存在于緩存和數據庫中。 緩存穿透解決方案 使用布隆過濾器&#x…

安裝Tomac服務器——安裝步驟以及易出現問題的解決方法

文章目錄 前言 一、下載Tomcat及解壓 1、選擇下載版本&#xff08;本文選擇tomcat 8版本為例&#xff09; 2、解壓安裝包 二、配置環境 1、在電腦搜索欄里面搜索環境變量即可 2、點擊高級系統設置->環境變量->新建系統變量 1) 新建系統變量&#xff0c;變量名為…

【學會動態規劃】最大子數組和(19)

目錄 動態規劃怎么學&#xff1f; 1. 題目解析 2. 算法原理 1. 狀態表示 2. 狀態轉移方程 3. 初始化 4. 填表順序 5. 返回值 3. 代碼編寫 寫在最后&#xff1a; 動態規劃怎么學&#xff1f; 學習一個算法沒有捷徑&#xff0c;更何況是學習動態規劃&#xff0c; 跟我…

LeetCode 0088. 合并兩個有序數組

【LetMeFly】88.合并兩個有序數組&#xff1a;O(m 1) O(1)的做法 力扣題目鏈接&#xff1a;https://leetcode.cn/problems/merge-sorted-array/ 給你兩個按 非遞減順序 排列的整數數組 nums1 和 nums2&#xff0c;另有兩個整數 m 和 n &#xff0c;分別表示 nums1 和 nums2…

Linux:Shell編輯之文本處理器(sed)

目錄 緒論 1、sed的原理&#xff1a;讀取 執行 顯示 三個過程 2、sed 文本內容處理工具&#xff0c;文件過大怎么辦&#xff1f; 3、sed的操作選項 3.1 常用選項 3.2 操作符 3.3 行號的范圍打印 3.4 對包含指定字符串的內容進行打印 3.5 刪 3.5.1 正則表達式刪除 3.6…

一個工作簿中的多個工作表拆分成多個工作簿

在Excel 2016中將一個工作簿中的多個工作表拆分成多個工作簿&#xff0c;在開發工具中的vba 模塊中輸入一下代碼&#xff08;并修改savepath的值為要存儲的路徑&#xff09;&#xff0c;然后運行即可。 Sub SplitWorkbook()Dim srcWorkbook As WorkbookDim srcWorksheet As Wo…

深入淺出 棧和隊列(附加循環隊列、雙端隊列)

棧和隊列 一、棧 概念與特性二、Stack 集合類及模擬實現1、Java集合中的 Stack2、Stack 模擬實現 三、棧、虛擬機棧、棧幀有什么區別&#xff1f;四、隊列 概念與特性五、Queue集合類及模擬實現1、Queue的底層結構&#xff08;1&#xff09;順序結構&#xff08;2&#xff09;鏈…

Golang-使用 gvm 進行版本控制

當你想為每個項目切換 go 版本時&#xff0c;gvm (Go Version Manager) 很方便。 這里&#xff0c;我將介紹“如何在Mac上安裝gvm”和“如何使用gvm” 使用準備 僅適用于 Mac 的準備工作 按照MacOSX 要求中的說明執行以下命令。 xcode-select --install brew update brew …

C++(Qt)軟件調試---將調試工具安裝到AeDebug(11)

C(Qt)軟件調試—將調試工具安裝到AeDebug&#xff08;11&#xff09; 文章目錄 C(Qt)軟件調試---將調試工具安裝到AeDebug&#xff08;11&#xff09;1、前言1.1 使用的調試工具 2、調試器安裝1.1 WinDbg1.2 procdump1.3 DrMinGW1.4 vsjitdebugger 更多精彩內容&#x1f449;個…

深入了解Linux運維的重要性與最佳實踐

Linux作為開源操作系統的代表&#xff0c;在企業級環境中的應用越來越廣泛。而在保障Linux系統的正常運行和管理方面&#xff0c;Linux運維顯得尤為關鍵。本文將介紹Linux運維的重要性以及一些最佳實踐&#xff0c;幫助讀者更好地了解和掌握Linux系統的運維技巧。 首先&#xf…