本文基于 spring cloud dalston,同時文章較長,請選擇舒服姿勢進行閱讀。
Eureka 與 Ribbon 是什么?和服務發現什么關系?
Eureka 與 Ribbon 都是 Netflix 提供的微服務組件,分別用于服務注冊與發現、負載均衡。同時,這兩者均屬于 spring cloud netflix 體系,和 spring cloud 無縫集成,也正由于此被大家所熟知。
Eureka 本身是服務注冊發現組件,實現了完整的 Service Registry 和 Service Discovery。
Ribbon 則是一款負載均衡組件,那它和服務發現又有什么關系呢?負載均衡在整個微服務的調用模型中是緊挨著服務發現的,而 Ribbon 這個框架它其實是起到了開發者服務消費行為與底層服務發現組件 Eureka 之間橋梁的作用。從嚴格概念上說 Ribbon 并不是做服務發現的,但是由于 Netflix 組件的松耦合,Ribbon 需要對 Eureka 的緩存服務列表進行類似"服務發現"的行為,從而構建自己的負載均衡列表并及時更新,也就是說 Ribbon 中的"服務發現"的賓語變成了 Eureka(或其他服務發現組件)。
Eureka 的服務注冊與發現
我們會先對 Eureka 的服務發現進行描述,重點是 Eureka-client 是如何進行服務的注冊與發現的,同時不會過多停留于 Eureka 的架構、Eureka-server 的實現、Zone/Region 等范疇。
Eureka-client 的服務發現都是由 DiscoveryClient 類實現的,它主要包括的功能有:
- 向 Eureka-server 注冊服務實例
- 更新在 Eureka-server 的租期
- 取消在 Eureka-server 的租約(服務下線)
- 發現服務實例并定期更新
服務注冊
DiscoveryClient 所有的定時任務都是在 initScheduledTasks()方法里,我們可以看到以下關鍵代碼:
private void initScheduledTasks() {...if (clientConfig.shouldRegisterWithEureka()) {...// InstanceInfo replicatorinstanceInfoReplicator = new InstanceInfoReplicator(this,instanceInfo,clientConfig.getInstanceInfoReplicationIntervalSeconds(),2); // burstSize...instanceInfoReplicator.start(clientConfig.getInitialInstanceInfoReplicationIntervalSeconds());}
}
我們可以看到在 if 判斷分支里創建了一個 instanceInfoReplicator 實例,它會通過 start 執行一個定時任務:
public void run() {try {discoveryClient.refreshInstanceInfo();Long dirtyTimestamp = instanceInfo.isDirtyWithTime();if (dirtyTimestamp != null) {discoveryClient.register();instanceInfo.unsetIsDirty(dirtyTimestamp);}} catch (Throwable t) {logger.warn("There was a problem with the instance info replicator", t);} finally {Future next = scheduler.schedule(this, replicationIntervalSeconds, TimeUnit.SECONDS);scheduledPeriodicRef.set(next);}}
我們可以在 InstanceInfoReplicator 類的 run()方法中找到這一段,同時可以一眼發現其注冊關鍵點在于discoveryClient.register()這段,我們點進去看看:
boolean register() throws Throwable {logger.info(PREFIX + appPathIdentifier + ": registering service...");EurekaHttpResponse<Void> httpResponse;try {httpResponse = eurekaTransport.registrationClient.register(instanceInfo);} catch (Exception e) {logger.warn("{} - registration failed {}", PREFIX + appPathIdentifier, e.getMessage(), e);throw e;}if (logger.isInfoEnabled()) {logger.info("{} - registration status: {}", PREFIX + appPathIdentifier, httpResponse.getStatusCode());}return httpResponse.getStatusCode() == 204;}
這邊可以發現是通過 HTTP REST (jersey 客戶端)請求的方式將 instanceInfo 實例信息注冊到 Eureka-server 上。我們簡單看一下 InstanceInfo 對象,屬性基本上都能見名知義:
@JsonCreatorpublic InstanceInfo(@JsonProperty("instanceId") String instanceId,@JsonProperty("app") String appName,@JsonProperty("appGroupName") String appGroupName,@JsonProperty("ipAddr") String ipAddr,@JsonProperty("sid") String sid,@JsonProperty("port") PortWrapper port,@JsonProperty("securePort") PortWrapper securePort,@JsonProperty("homePageUrl") String homePageUrl,@JsonProperty("statusPageUrl") String statusPageUrl,@JsonProperty("healthCheckUrl") String healthCheckUrl,@JsonProperty("secureHealthCheckUrl") String secureHealthCheckUrl,@JsonProperty("vipAddress") String vipAddress,@JsonProperty("secureVipAddress") String secureVipAddress,@JsonProperty("countryId") int countryId,@JsonProperty("dataCenterInfo") DataCenterInfo dataCenterInfo,@JsonProperty("hostName") String hostName,@JsonProperty("status") InstanceStatus status,@JsonProperty("overriddenstatus") InstanceStatus overriddenstatus,@JsonProperty("leaseInfo") LeaseInfo leaseInfo,@JsonProperty("isCoordinatingDiscoveryServer") Boolean isCoordinatingDiscoveryServer,@JsonProperty("metadata") HashMap<String, String> metadata,@JsonProperty("lastUpdatedTimestamp") Long lastUpdatedTimestamp,@JsonProperty("lastDirtyTimestamp") Long lastDirtyTimestamp,@JsonProperty("actionType") ActionType actionType,@JsonProperty("asgName") String asgName) {this.instanceId = instanceId;this.sid = sid;this.appName = StringCache.intern(appName);this.appGroupName = StringCache.intern(appGroupName);this.ipAddr = ipAddr;this.port = port == null ? 0 : port.getPort();this.isUnsecurePortEnabled = port != null && port.isEnabled();this.securePort = securePort == null ? 0 : securePort.getPort();this.isSecurePortEnabled = securePort != null && securePort.isEnabled();this.homePageUrl = homePageUrl;this.statusPageUrl = statusPageUrl;this.healthCheckUrl = healthCheckUrl;this.secureHealthCheckUrl = secureHealthCheckUrl;this.vipAddress = StringCache.intern(vipAddress);this.secureVipAddress = StringCache.intern(secureVipAddress);this.countryId = countryId;this.dataCenterInfo = dataCenterInfo;this.hostName = hostName;this.status = status;this.overriddenstatus = overriddenstatus;this.leaseInfo = leaseInfo;this.isCoordinatingDiscoveryServer = isCoordinatingDiscoveryServer;this.lastUpdatedTimestamp = lastUpdatedTimestamp;this.lastDirtyTimestamp = lastDirtyTimestamp;this.actionType = actionType;this.asgName = StringCache.intern(asgName);// ---------------------------------------------------------------// for compatibilityif (metadata == null) {this.metadata = Collections.emptyMap();} else if (metadata.size() == 1) {this.metadata = removeMetadataMapLegacyValues(metadata);} else {this.metadata = metadata;}if (sid == null) {this.sid = SID_DEFAULT;}}
總結一下整個過程如下: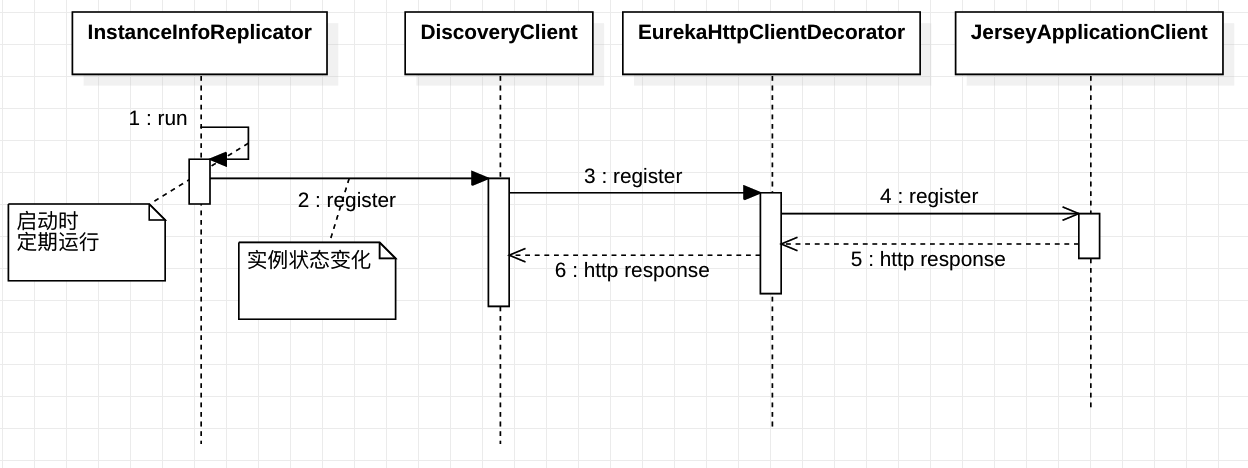
服務續期
服務續期說起來可能比較晦澀,其實就是在 client 端定時發起調用,讓 Eureka-server 知道自己還活著,在 eureka 代碼中的注釋解釋為心跳(heart-beat)。
這里有兩個比較重要的配置需要注意:
- instance.leaseRenewalIntervalInSeconds
表示客戶端的更新頻率,默認 30s,也就是每 30s 就會向 Eureka-server 發起 renew 更新操作。 - instance.leaseExpirationDurationInSeconds
這是服務端視角的失效時間,默認是 90s,也就是 Eureka-server 在 90s 內沒有接收到來自 client 的 renew 操作就會將其剔除。
我們直接從代碼角度看一下,同樣呢相關定時任務在 initScheduledTasks()方法中:
private void initScheduledTasks() {...if (clientConfig.shouldRegisterWithEureka()) {...// Heartbeat timerscheduler.schedule(new TimedSupervisorTask("heartbeat",scheduler,heartbeatExecutor,renewalIntervalInSecs,TimeUnit.SECONDS,expBackOffBound,new HeartbeatThread()),renewalIntervalInSecs, TimeUnit.SECONDS);...}
}
可以看到這里創建了一個 HeartbeatThread()線程執行操作:
private class HeartbeatThread implements Runnable {public void run() {if (renew()) {lastSuccessfulHeartbeatTimestamp = System.currentTimeMillis();}}}
我們直接看 renew()方法:
boolean renew() {EurekaHttpResponse<InstanceInfo> httpResponse;try {httpResponse = eurekaTransport.registrationClient.sendHeartBeat(instanceInfo.getAppName(), instanceInfo.getId(), instanceInfo, null);logger.debug("{} - Heartbeat status: {}", PREFIX + appPathIdentifier, httpResponse.getStatusCode());if (httpResponse.getStatusCode() == 404) {REREGISTER_COUNTER.increment();logger.info("{} - Re-registering apps/{}", PREFIX + appPathIdentifier, instanceInfo.getAppName());return register();}return httpResponse.getStatusCode() == 200;} catch (Throwable e) {logger.error("{} - was unable to send heartbeat!", PREFIX + appPathIdentifier, e);return false;}}
這里比較簡單,可以發現和服務注冊是類似的,同樣使用 HTTP REST 發起一個 hearbeat 請求,底層使用 jersey 客戶端。
總結一下整個過程如下: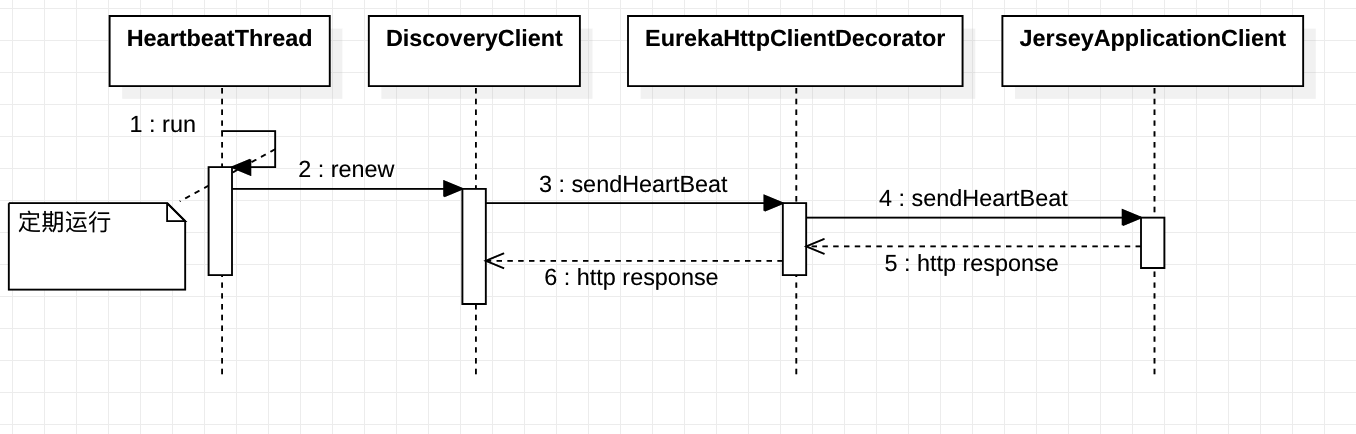
服務注銷
服務注銷邏輯比較簡單,本身并不在定時任務中觸發,而是通過對方法標記@PreDestroy,從而調用 shutdown 方法觸發,最終會調用 unRegister()方法進行注銷,同樣的這也是一個 HTTP REST 請求,可以簡單看下代碼:
@PreDestroy@Overridepublic synchronized void shutdown() {if (isShutdown.compareAndSet(false, true)) {logger.info("Shutting down DiscoveryClient ...");if (statusChangeListener != null && applicationInfoManager != null) {applicationInfoManager.unregisterStatusChangeListener(statusChangeListener.getId());}cancelScheduledTasks();// If APPINFO was registeredif (applicationInfoManager != null && clientConfig.shouldRegisterWithEureka()) {applicationInfoManager.setInstanceStatus(InstanceStatus.DOWN);unregister();}if (eurekaTransport != null) {eurekaTransport.shutdown();}heartbeatStalenessMonitor.shutdown();registryStalenessMonitor.shutdown();logger.info("Completed shut down of DiscoveryClient");}}/*** unregister w/ the eureka service.*/void unregister() {// It can be null if shouldRegisterWithEureka == falseif(eurekaTransport != null && eurekaTransport.registrationClient != null) {try {logger.info("Unregistering ...");EurekaHttpResponse<Void> httpResponse = eurekaTransport.registrationClient.cancel(instanceInfo.getAppName(), instanceInfo.getId());logger.info(PREFIX + appPathIdentifier + " - deregister status: " + httpResponse.getStatusCode());} catch (Exception e) {logger.error(PREFIX + appPathIdentifier + " - de-registration failed" + e.getMessage(), e);}}}服務發現及更新
我們來看作為服務消費者的關鍵邏輯,即發現服務以及更新服務。
首先 consumer 會在啟動時從 Eureka-server 獲取所有的服務列表,并在本地緩存。同時呢,由于本地有一份緩存,所以需要定期更新,更新頻率可以配置。
啟動時候在 consumer 在 discoveryClient 中會調用 fetchRegistry() 方法:
private boolean fetchRegistry(boolean forceFullRegistryFetch) {...if (clientConfig.shouldDisableDelta()|| (!Strings.isNullOrEmpty(clientConfig.getRegistryRefreshSingleVipAddress()))|| forceFullRegistryFetch|| (applications == null)|| (applications.getRegisteredApplications().size() == 0)|| (applications.getVersion() == -1)) //Client application does not have latest library supporting delta{...getAndStoreFullRegistry();} else {getAndUpdateDelta(applications);}...
}
這里可以看到 fetchRegistry 里有 2 個判斷分支,對應首次更新以及后續更新。首次更新會調用 getAndStoreFullRegistry()方法,我們看一下:
private void getAndStoreFullRegistry() throws Throwable {long currentUpdateGeneration = fetchRegistryGeneration.get();logger.info("Getting all instance registry info from the eureka server");Applications apps = null;EurekaHttpResponse<Applications> httpResponse = clientConfig.getRegistryRefreshSingleVipAddress() == null? eurekaTransport.queryClient.getApplications(remoteRegionsRef.get()): eurekaTransport.queryClient.getVip(clientConfig.getRegistryRefreshSingleVipAddress(), remoteRegionsRef.get());if (httpResponse.getStatusCode() == Status.OK.getStatusCode()) {apps = httpResponse.getEntity();}logger.info("The response status is {}", httpResponse.getStatusCode());if (apps == null) {logger.error("The application is null for some reason. Not storing this information");} else if (fetchRegistryGeneration.compareAndSet(currentUpdateGeneration, currentUpdateGeneration + 1)) {localRegionApps.set(this.filterAndShuffle(apps));logger.debug("Got full registry with apps hashcode {}", apps.getAppsHashCode());} else {logger.warn("Not updating applications as another thread is updating it already");}}
可以看到和之前類似,如果在沒有特殊指定的情況下,我們會發起一個 HTTP REST 請求拉取所有應用的信息并進行緩存,緩存對象為 Applications,有興趣的可以進一步查看。
接下來,在我們熟悉的 initScheduledTasks()方法中,我們還會啟動一個更新應用信息緩存的 task:
private void initScheduledTasks() {if (clientConfig.shouldFetchRegistry()) {// registry cache refresh timerint registryFetchIntervalSeconds = clientConfig.getRegistryFetchIntervalSeconds();int expBackOffBound = clientConfig.getCacheRefreshExecutorExponentialBackOffBound();scheduler.schedule(new TimedSupervisorTask("cacheRefresh",scheduler,cacheRefreshExecutor,registryFetchIntervalSeconds,TimeUnit.SECONDS,expBackOffBound,new CacheRefreshThread()),registryFetchIntervalSeconds, TimeUnit.SECONDS);}...
}
在 CacheRefreshThread()這個 task 的 run 方法中,仍然會調用到我們之前的 fetchRegistry()方法,同時在判斷時會走到另一個分支中,即調用到 getAndUpdateDelta()方法:
private void getAndUpdateDelta(Applications applications) throws Throwable {long currentUpdateGeneration = fetchRegistryGeneration.get();Applications delta = null;EurekaHttpResponse<Applications> httpResponse = eurekaTransport.queryClient.getDelta(remoteRegionsRef.get());if (httpResponse.getStatusCode() == Status.OK.getStatusCode()) {delta = httpResponse.getEntity();}if (delta == null) {logger.warn("The server does not allow the delta revision to be applied because it is not safe. "+ "Hence got the full registry.");getAndStoreFullRegistry();} else if (fetchRegistryGeneration.compareAndSet(currentUpdateGeneration, currentUpdateGeneration + 1)) {logger.debug("Got delta update with apps hashcode {}", delta.getAppsHashCode());String reconcileHashCode = "";if (fetchRegistryUpdateLock.tryLock()) {try {updateDelta(delta);reconcileHashCode = getReconcileHashCode(applications);} finally {fetchRegistryUpdateLock.unlock();}} else {logger.warn("Cannot acquire update lock, aborting getAndUpdateDelta");}// There is a diff in number of instances for some reasonif (!reconcileHashCode.equals(delta.getAppsHashCode()) || clientConfig.shouldLogDeltaDiff()) {reconcileAndLogDifference(delta, reconcileHashCode); // this makes a remoteCall}} else {logger.warn("Not updating application delta as another thread is updating it already");logger.debug("Ignoring delta update with apps hashcode {}, as another thread is updating it already", delta.getAppsHashCode());}}
可以看到,這邊是使用 HTTP REST 發起一個 getDelta 請求,同時在 updateDelta()方法中會更新本地的 Applications 緩存對象。
總結一下,整個服務發現與更新的過程如下: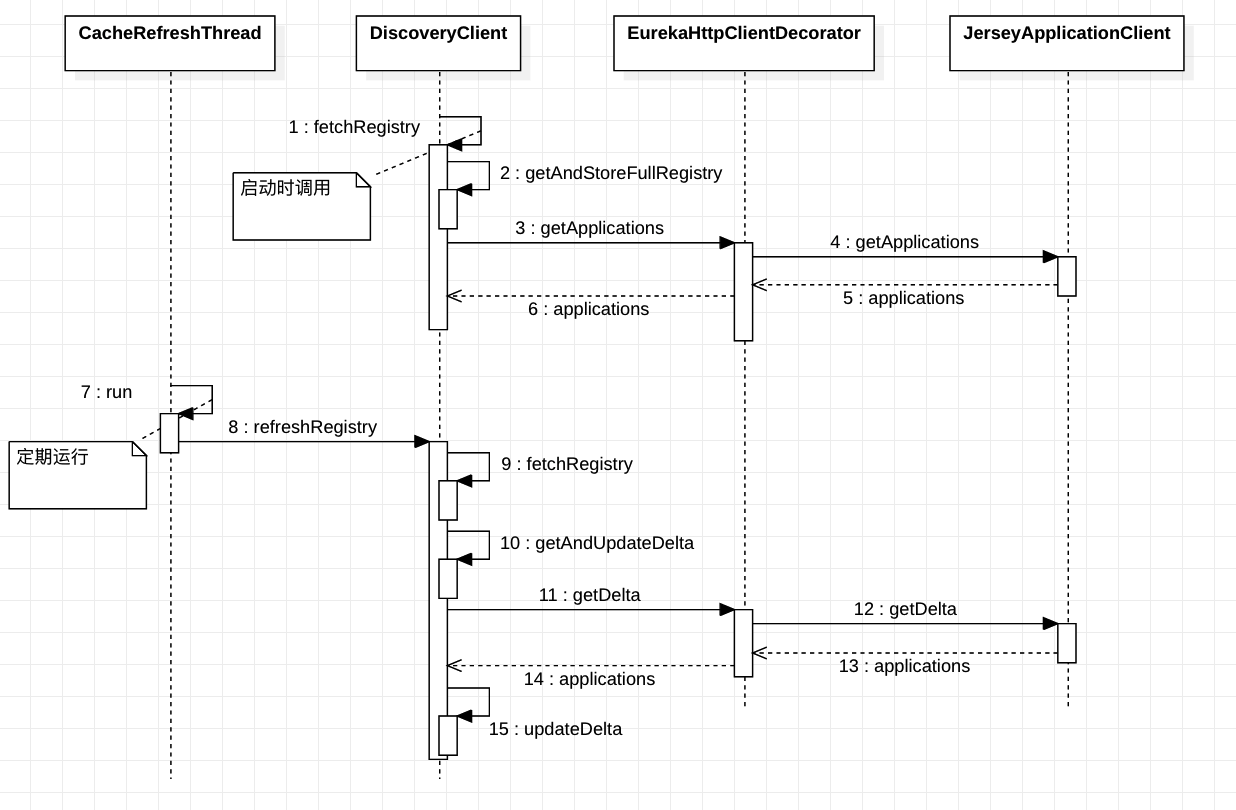
Ribbon 的"服務發現"
接下來我們來看看 Ribbon 是怎么基于 Eureka 進行"服務發現"的,我們之前說過這里的"服務發現"并不是嚴格意義上的服務發現,而是 Ribbon 如何基于 Eureka 構建自己的負載均衡列表并及時更新,同時我們也不關注 Ribbon 其他負載均衡的具體邏輯(包括 IRule 路由,IPing 判斷可用性)。
我們可以先做一些猜想,首先 Ribbon 肯定是基于 Eureka 的服務發現的。我們上邊描述了 Eureka 會拉取所有服務信息到本地緩存 Applications 中,那么 Ribbon 肯定是基于這個 Applications 緩存來構建負載均衡列表的了,同時呢,負載均衡列表同樣需要一個定時更新的機制來保證一致性。
服務調用
首先我們從開發者的最初使用上看,在開發者在 RestTemplate 上開啟@LoadBalanced 注解就可開啟 Ribbon 的邏輯了,顯然這是用了類似攔截的方法。在 LoadBalancerAutoConfiguration 類中,我們可以看到相關代碼:
...
@Beanpublic SmartInitializingSingleton loadBalancedRestTemplateInitializer(final List<RestTemplateCustomizer> customizers) {return new SmartInitializingSingleton() {@Overridepublic void afterSingletonsInstantiated() {for (RestTemplate restTemplate : LoadBalancerAutoConfiguration.this.restTemplates) {for (RestTemplateCustomizer customizer : customizers) {customizer.customize(restTemplate);}}}};}@Configuration@ConditionalOnMissingClass("org.springframework.retry.support.RetryTemplate")static class LoadBalancerInterceptorConfig {@Beanpublic LoadBalancerInterceptor ribbonInterceptor(LoadBalancerClient loadBalancerClient,LoadBalancerRequestFactory requestFactory) {return new LoadBalancerInterceptor(loadBalancerClient, requestFactory);}@Bean@ConditionalOnMissingBeanpublic RestTemplateCustomizer restTemplateCustomizer(final LoadBalancerInterceptor loadBalancerInterceptor) {return new RestTemplateCustomizer() {@Overridepublic void customize(RestTemplate restTemplate) {List<ClientHttpRequestInterceptor> list = new ArrayList<>(restTemplate.getInterceptors());list.add(loadBalancerInterceptor);restTemplate.setInterceptors(list);}};}}
...
可以看到,在初始化的過程中通過調用 customize()方法來給 RestTemplate 增加了攔截器 LoadBalancerInterceptor。而 LoadBalancerInterceptor 則是在攔截方法中使用了 loadBalancer(RibbonLoadBalancerClient 類) 完成請求調用:
@Overridepublic ClientHttpResponse intercept(final HttpRequest request, final byte[] body,final ClientHttpRequestExecution execution) throws IOException {final URI originalUri = request.getURI();String serviceName = originalUri.getHost();Assert.state(serviceName != null, "Request URI does not contain a valid hostname: " + originalUri);return this.loadBalancer.execute(serviceName, requestFactory.createRequest(request, body, execution));}
服務發現
到現在為止呢,我們的請求調用已經被 RibbonLoadBalancerClient 所封裝,而其"服務發現"也是發生在 RibbonLoadBalancerClient 中的。
我們點到其 execute()方法中:
@Overridepublic <T> T execute(String serviceId, LoadBalancerRequest<T> request) throws IOException {ILoadBalancer loadBalancer = getLoadBalancer(serviceId);Server server = getServer(loadBalancer);if (server == null) {throw new IllegalStateException("No instances available for " + serviceId);}RibbonServer ribbonServer = new RibbonServer(serviceId, server, isSecure(server,serviceId), serverIntrospector(serviceId).getMetadata(server));return execute(serviceId, ribbonServer, request);}
這里根據 serviceId 構建了一個 ILoadBalancer,同時從 loadBalancer 中獲取到了最終的實例 server 信息。ILoadBalancer 是定義了負載均衡的一個接口,它的關鍵方法 chooseServer()即是從負載均衡列表根據路由規則中選取一個 server。當然我們主要關心的點在于,負載均衡列表是怎么構建出來的。通過源碼跟蹤我們發現,在通過 getLoadBalancer()方法構建好 ILoadBalancer 對象后,對象中就已經包含了服務列表。所以我們來看看 ILoadBalancer 對象是怎么創建的:
protected ILoadBalancer getLoadBalancer(String serviceId) {return this.clientFactory.getLoadBalancer(serviceId);}
那么這里其實是 springcloud 封裝的 clientFactory,它會在 applicationContext 容器中尋找對應的 bean 。
通過源碼追蹤,我們可以在自動配置類 RibbonClientConfiguration 中找到對應代碼:
@Bean@ConditionalOnMissingBeanpublic ILoadBalancer ribbonLoadBalancer(IClientConfig config,ServerList<Server> serverList, ServerListFilter<Server> serverListFilter,IRule rule, IPing ping, ServerListUpdater serverListUpdater) {if (this.propertiesFactory.isSet(ILoadBalancer.class, name)) {return this.propertiesFactory.get(ILoadBalancer.class, config, name);}return new ZoneAwareLoadBalancer<>(config, rule, ping, serverList,serverListFilter, serverListUpdater);}
我們看到這里最終構建了 ILoadBalancer,其實現類是 ZoneAwareLoadBalancer,我們觀察其超類的初始化:
public DynamicServerListLoadBalancer(IClientConfig clientConfig, IRule rule, IPing ping,ServerList<T> serverList, ServerListFilter<T> filter,ServerListUpdater serverListUpdater) {super(clientConfig, rule, ping);this.serverListImpl = serverList;this.filter = filter;this.serverListUpdater = serverListUpdater;if (filter instanceof AbstractServerListFilter) {((AbstractServerListFilter) filter).setLoadBalancerStats(getLoadBalancerStats());}restOfInit(clientConfig);}
這邊最終執行了 restOfInit()方法,進一步跟蹤:
void restOfInit(IClientConfig clientConfig) {boolean primeConnection = this.isEnablePrimingConnections();// turn this off to avoid duplicated asynchronous priming done in BaseLoadBalancer.setServerList()this.setEnablePrimingConnections(false);enableAndInitLearnNewServersFeature();updateListOfServers();if (primeConnection && this.getPrimeConnections() != null) {this.getPrimeConnections().primeConnections(getReachableServers());}this.setEnablePrimingConnections(primeConnection);LOGGER.info("DynamicServerListLoadBalancer for client {} initialized: {}", clientConfig.getClientName(), this.toString());}
updateListOfServers()方法是獲取所有的 ServerList 的,最終由 serverListImpl.getUpdatedListOfServers()獲取所有的服務列表,在此 serverListImpl 即實現類為 DiscoveryEnabledNIWSServerList。其中 DiscoveryEnabledNIWSServerList 有 getInitialListOfServers()和 getUpdatedListOfServers()方法,具體代碼如下
@Overridepublic List<DiscoveryEnabledServer> getInitialListOfServers(){return obtainServersViaDiscovery();}@Overridepublic List<DiscoveryEnabledServer> getUpdatedListOfServers(){return obtainServersViaDiscovery();}
此時我們查看 obtainServersViaDiscovery()方法,已經基本接近于事物本質了,它創建了一個 EurekaClient 對象,在此就是 Eureka 的 DiscoveryClient 實現類,調用了其 getInstancesByVipAddress()方法,它最終從 DiscoveryClient 的 Applications 緩存中根據 serviceId 選取了對應的服務信息:
private List<DiscoveryEnabledServer> obtainServersViaDiscovery() {List<DiscoveryEnabledServer> serverList = new ArrayList<DiscoveryEnabledServer>();if (eurekaClientProvider == null || eurekaClientProvider.get() == null) {logger.warn("EurekaClient has not been initialized yet, returning an empty list");return new ArrayList<DiscoveryEnabledServer>();}EurekaClient eurekaClient = eurekaClientProvider.get();if (vipAddresses!=null){for (String vipAddress : vipAddresses.split(",")) {// if targetRegion is null, it will be interpreted as the same region of clientList<InstanceInfo> listOfInstanceInfo = eurekaClient.getInstancesByVipAddress(vipAddress, isSecure, targetRegion);for (InstanceInfo ii : listOfInstanceInfo) {if (ii.getStatus().equals(InstanceStatus.UP)) {if(shouldUseOverridePort){if(logger.isDebugEnabled()){logger.debug("Overriding port on client name: " + clientName + " to " + overridePort);}// copy is necessary since the InstanceInfo builder just uses the original reference,// and we don't want to corrupt the global eureka copy of the object which may be// used by other clients in our systemInstanceInfo copy = new InstanceInfo(ii);if(isSecure){ii = new InstanceInfo.Builder(copy).setSecurePort(overridePort).build();}else{ii = new InstanceInfo.Builder(copy).setPort(overridePort).build();}}DiscoveryEnabledServer des = new DiscoveryEnabledServer(ii, isSecure, shouldUseIpAddr);des.setZone(DiscoveryClient.getZone(ii));serverList.add(des);}}if (serverList.size()>0 && prioritizeVipAddressBasedServers){break; // if the current vipAddress has servers, we dont use subsequent vipAddress based servers}}}return serverList;}
服務更新
我們已經知道初次啟動時,Ribbon 是怎么結合 Eureka 完成負載均衡列表的構建了,那么與 Eureka 類似,我們還需要及時對服務列表進行更新以保證一致性。
在 RibbonClientConfiguration 自動配置類中構建 ILoadBalancer 時我們可以看到其構造器中有 ServerListUpdater 對象,而此對象也是在當前類中構建的:
@Bean@ConditionalOnMissingBeanpublic ServerListUpdater ribbonServerListUpdater(IClientConfig config) {return new PollingServerListUpdater(config);}
我們觀察此對象中的 start()方法看是如何完成更新的:
@Overridepublic synchronized void start(final UpdateAction updateAction) {if (isActive.compareAndSet(false, true)) {final Runnable wrapperRunnable = new Runnable() {@Overridepublic void run() {if (!isActive.get()) {if (scheduledFuture != null) {scheduledFuture.cancel(true);}return;}try {updateAction.doUpdate();lastUpdated = System.currentTimeMillis();} catch (Exception e) {logger.warn("Failed one update cycle", e);}}};scheduledFuture = getRefreshExecutor().scheduleWithFixedDelay(wrapperRunnable,initialDelayMs,refreshIntervalMs,TimeUnit.MILLISECONDS);} else {logger.info("Already active, no-op");}}
這里有 2 個配置,即 initialDelayMs 首次檢測默認 1s,refreshIntervalMs 檢測間隔默認 30s(和 Eureka 一致),創建了一個定時任務,執行 updateAction.doUpdate()方法。
我們回到之前的 restOfInit()方法,查看其中的 enableAndInitLearnNewServersFeature()方法,可以看到是在此處觸發了 ServerListUpdater 的 start 方法,同時傳入了 updateAction 對象:
public void enableAndInitLearnNewServersFeature() {LOGGER.info("Using serverListUpdater {}", serverListUpdater.getClass().getSimpleName());serverListUpdater.start(updateAction);}
其實 updateAction 一開始就已經創建好了,它仍然是調用 之前的 updateListOfServers 方法來進行后續的更新:
protected final ServerListUpdater.UpdateAction updateAction = new ServerListUpdater.UpdateAction() {@Overridepublic void doUpdate() {updateListOfServers();}};
總結一下 Ribbon 三部分服務發現的整體流程如下: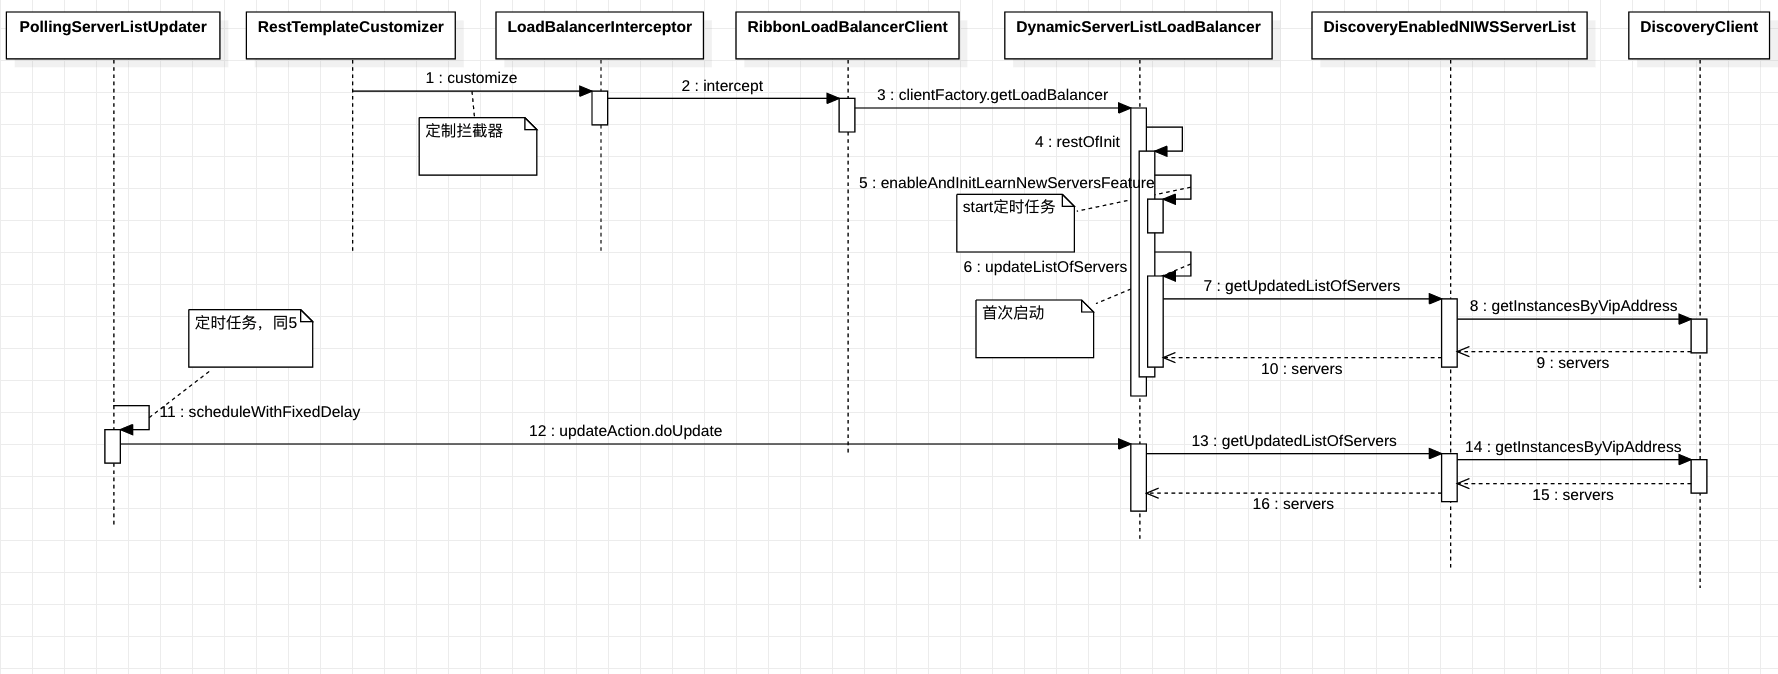
參考資料
深度剖析服務發現組件 Netflix Eureka
深入理解 Ribbon 之源碼解析
---------------------
作者:YouluBank
來源:CSDN
原文:https://blog.csdn.net/m0_37787662/article/details/109286790
版權聲明:本文為作者原創文章,轉載請附上博文鏈接!
內容解析By:CSDN,CNBLOG博客文章一鍵轉載插件


)


)


)
)
