背景:前面幾篇博客中寫了很多關于BundleFusion的東西,主要包括bundlefusion的論文閱讀筆記,.sens數據集的生成等,經過最近幾天的工作,我對bundlefusion又有了新的技術積累,在這里整理一下,也算是理一下思路,然后開始新的工作。
1. 生成.sens文件
根據在https://graphics.stanford.edu/projects/bundlefusion/下載的.zip的數據集可知,一個數據集中包含,以frame-xxxxxx.color.png的彩色圖像,有以frame-xxxxxx.depth.png命名的深度圖像,以及,以frame-xxxxxx.pose.txt命名的位姿文件,該文件中存儲的是一幀位姿,一個4x4的矩陣。如下圖所示,所以首先你需要想辦法得到這種標準格式的數據。我曾經把我使用kinectV2相機獲取的深度圖和彩色圖對齊后的數據編輯為如下格式,所有的.pose.txt文件中我都寫入單位陣。我還試著將TUM數據集和ICL-NUIM數據集編輯成下面這種格式,并且我將數據集提供的groundtruth寫入到.pose.txt文件中,目的是想讓bundlefusion按照groundtruth位姿來重建。由于數據集提供的groundtruth是用四元數表示的旋轉,所以需要將四元數轉換為旋轉矩陣,由于我使用的是python腳本,這個是時候,scipy庫就派上用場了,這里面有很多轉換,包括,四元數,旋轉矩陣,旋轉向量,歐拉角之間的轉換。

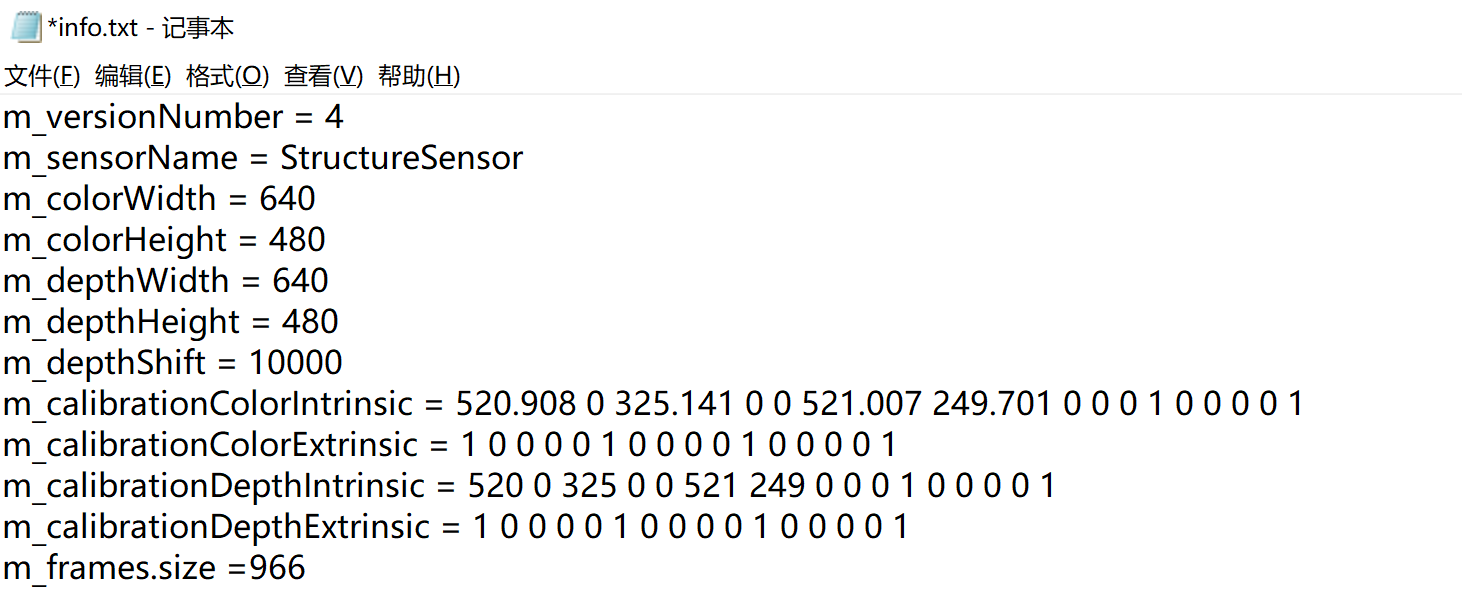
當然不要忘了,在目錄的最后還有一個info.txt文件, 除了彩色圖的尺寸,相機的內參數,要按照實際情況改寫之后,還有很關鍵的一個參數就是m_depthShift,在BundleFusion官網上下載的數據集,info.txt中設置的m_depthShift =1000,而在我生成TUM和ICL的數據集時,這個值就得設置為10000,否則生成的數據集,重建不出來模型,具體的分析請閱讀我的這篇博客,https://blog.csdn.net/weixin_38636815/article/details/107563959
?下面是我將ICL數據集整理成上述格式的python腳本
import numpy as np
from scipy.spatial.transform import Rotation as R
import associate
import os
import shutildef copy_files(sourcefile):rgb_path = sourcefile+"rgb/"depth_path = sourcefile + "depth/"bf_path = sourcefile + "bf_dataset/"print(rgb_path)print(depth_path)rgb_images = os.listdir(rgb_path)depth_images = os.listdir(depth_path)rgb_int = []depth_int = []for rgb in rgb_images:rgb = rgb.replace('.png', '')# print(rgb)rgb_int.append(int(rgb))for depth in depth_images:depth = depth.replace('.png', '')depth_int.append(int(depth))rgb_id = 0for rgb_name in sorted(rgb_int):print("frame-" + str(rgb_id).zfill(6) + ".color.png" + " is writing into bf_dataset" )shutil.copyfile(rgb_path + "/" + str(rgb_name) + ".png",bf_path + "frame-" + str(rgb_id).zfill(6) + ".color.png")rgb_id += 1depth_id = 0for depth_name in sorted(depth_int):print("frame-" + str(depth_id).zfill(6) + ".depth.png" + " is writing into bf_dataset")shutil.copyfile(depth_path + "/" + str(depth_name) + ".png",bf_path + "frame-" + str(depth_id).zfill(6) + ".depth.png")depth_id += 1"""transform quaternion into rotation and write them into separated pose files"""gt_file = open(sourcefile + "livingRoom3n.gt.freiburg")gt_data =gt_file.read()lines = gt_data.replace(",", " ").replace("\t", " ").split("\n")positions = []quaternions = []lines_data = []for line in lines:line_data = []if len(line) > 0 and line[0] != '#':for v in line.split(' '):line_data.append(v)lines_data.append(line_data)# print(line_data)share_vect = np.array([0, 0, 0, 1], dtype=np.float32)[np.newaxis, :]pose_id = 0for line in lines_data:single_position = np.array([line[1], line[2], line[3]], dtype=np.float32)[:, np.newaxis]single_quaternion = np.array([line[4], line[5], line[6], line[7]], dtype=np.float32)positions.append(single_position)quaternions.append(single_quaternion)rotation = R.from_quat(single_quaternion)m34 = np.concatenate((rotation.as_matrix(), single_position), axis=1)m44 = np.concatenate((m34, share_vect), axis=0)print("frame-" + str(pose_id).zfill(6) + ".pose.txt" + "is writing into bf_dataset")fp = open(bf_path + "frame-" + str(pose_id).zfill(6) + ".pose.txt", 'w')for row in m44:# fp.write(" ".join(row) + "\n")fp.write(' '.join(str(i) for i in row) + '\n')pose_id += 1print(len(positions))print(len(quaternions))if __name__ == '__main__':print('test')# copy_files("/media/yunlei/YL/DATASETS/ICL_DATABASE/lr_kt0/living_room_traj0_frei_png/")# copy_files("/media/yunlei/YL/DATASETS/ICL_DATABASE/lr_kt1/living_room_traj1n_frei_png/")# copy_files("/media/yunlei/YL/DATASETS/ICL_DATABASE/lr_kt2/living_room_traj2n_frei_png/")copy_files("/media/yunlei/YL/DATASETS/ICL_DATABASE/lr_kt3/living_room_traj3n_frei_png/")
假設現在已經 整理出的規范的文件格式,現在我們需要一個工具,將彩色圖,深度圖和位姿數據寫入到.sens文件中,在BundleFusion工程中有實現將圖像寫入到.sens文件的函數,只需要用下面的mian函數替換你原工程 BundleFusion/FriedLiver/Source下FriedLiver.cpp中的主函數,在新的主函數中寫入你自己數據的路徑和名稱,使用ctrl+F5的方式在vs2013中運行此時的工程,可以在saveToFile函數中加上一些打印信息,這樣可以更清楚的看到數據的生成狀態。不出意外的話上述方式就可以成功生成.sens文件。
int main()
{ml::SensorData sd;sd.initDefault(640, 480, 640, 480, sd.m_calibrationColor, sd.m_calibrationDepth);sd.loadFromImages("E:/DATASETS/ICL_DATABASE/lr_kt1/living_room_traj1n_frei_png/bf_dataset", "frame-", "png");sd.saveToFile("E:/DATASETS/ICL_DATABASE/lr_kt1/living_room_traj1n_frei_png.sens");std::cout << "generate sens data" << std::endl;return 0;
}
二、使用自己生成的.sens文件運行BundleFusion
如果你想通過ctrl+F5的方式運行代碼,那么你就修改,位于BundleFusion-master/FriedLiver下的zParametersDefault.txt下的s_binaryDumpSensorFile,當然你也可以先在vs2013上編譯工程,然后雙擊 BundleFusion-master/FriedLiver/x64/Release下的FriedLiver.exe可執行文件,這個時候你需要修改,FriedLiver.exe同目錄下的zParametersDefault.txt文件中的s_binaryDumpSensorFile變量。兩個配置文件中的其他一些參數也要調整,尤其是有關圖像的寬度和高度的變量,要根據你數據集的實際大小來修改。需要注意的是,在zParametersBundingDefault.txt文件中的s_downsampledWidth和s_downsampledHeight這兩變量的值設置不當,會導致系統很容易跟蹤失敗,大面積的跟蹤失敗會導致重建的模型不完整。
如果不出什么意外,自己生成的數據集就可以在bundlefusion上運行了。
?
?
...)


![[機器學習] 推薦系統之協同過濾算法(轉)](http://pic.xiahunao.cn/[機器學習] 推薦系統之協同過濾算法(轉))


與重載(overload)區別)

—— SVN版本控制工具)