前置默認都安裝了k8s,且k8s都正常
1、nfs文件系統
1.1、安裝nfs-server
# 在每個機器。
yum install -y nfs-utils# 在master 執行以下命令
echo "/nfs/data/ *(insecure,rw,sync,no_root_squash)" > /etc/exports# 執行以下命令,啟動 nfs 服務;創建共享目錄
mkdir -p /nfs/data# 在master執行
systemctl enable rpcbind
systemctl enable nfs-server
systemctl start rpcbind
systemctl start nfs-server# 使配置生效
exportfs -r#檢查配置是否生效
exportfs
?
?
1.2、配置默認存儲
- 創建nfs.yam文件
vi nfs.yaml- 根據自己的情況,更改文件內容即可
## 創建了一個存儲類
apiVersion: storage.k8s.io/v1
kind: StorageClass
metadata:name: nfs-storageannotations:storageclass.kubernetes.io/is-default-class: "true"
provisioner: k8s-sigs.io/nfs-subdir-external-provisioner
parameters:archiveOnDelete: "true" ## 刪除pv的時候,pv的內容是否要備份---
apiVersion: apps/v1
kind: Deployment
metadata:name: nfs-client-provisionerlabels:app: nfs-client-provisioner# replace with namespace where provisioner is deployednamespace: default
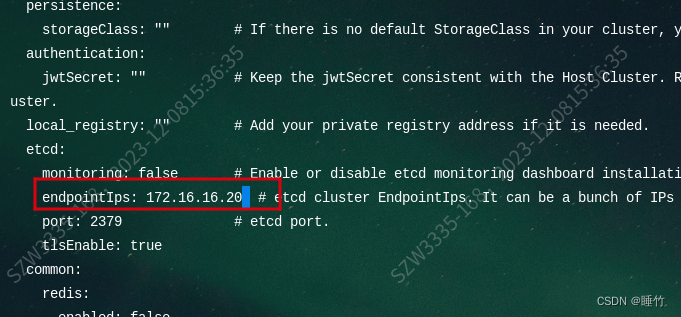
spec:replicas: 1strategy:type: Recreateselector:matchLabels:app: nfs-client-provisionertemplate:metadata:labels:app: nfs-client-provisionerspec:serviceAccountName: nfs-client-provisionercontainers:- name: nfs-client-provisionerimage: registry.cn-hangzhou.aliyuncs.com/lfy_k8s_images/nfs-subdir-external-provisioner:v4.0.2# resources:# limits:# cpu: 10m# requests:# cpu: 10mvolumeMounts:- name: nfs-client-rootmountPath: /persistentvolumesenv:- name: PROVISIONER_NAMEvalue: k8s-sigs.io/nfs-subdir-external-provisioner- name: NFS_SERVERvalue: 172.16.16.20 ## 指定自己nfs服務器地址- name: NFS_PATH value: /nfs/data ## nfs服務器共享的目錄volumes:- name: nfs-client-rootnfs:server: 172.16.16.20path: /nfs/data
---
apiVersion: v1
kind: ServiceAccount
metadata:name: nfs-client-provisioner# replace with namespace where provisioner is deployednamespace: default
---
kind: ClusterRole
apiVersion: rbac.authorization.k8s.io/v1
metadata:name: nfs-client-provisioner-runner
rules:- apiGroups: [""]resources: ["nodes"]verbs: ["get", "list", "watch"]- apiGroups: [""]resources: ["persistentvolumes"]verbs: ["get", "list", "watch", "create", "delete"]- apiGroups: [""]resources: ["persistentvolumeclaims"]verbs: ["get", "list", "watch", "update"]- apiGroups: ["storage.k8s.io"]resources: ["storageclasses"]verbs: ["get", "list", "watch"]- apiGroups: [""]resources: ["events"]verbs: ["create", "update", "patch"]
---
kind: ClusterRoleBinding
apiVersion: rbac.authorization.k8s.io/v1
metadata:name: run-nfs-client-provisioner
subjects:- kind: ServiceAccountname: nfs-client-provisioner# replace with namespace where provisioner is deployednamespace: default
roleRef:kind: ClusterRolename: nfs-client-provisioner-runnerapiGroup: rbac.authorization.k8s.io
---
kind: Role
apiVersion: rbac.authorization.k8s.io/v1
metadata:name: leader-locking-nfs-client-provisioner# replace with namespace where provisioner is deployednamespace: default
rules:- apiGroups: [""]resources: ["endpoints"]verbs: ["get", "list", "watch", "create", "update", "patch"]
---
kind: RoleBinding
apiVersion: rbac.authorization.k8s.io/v1
metadata:name: leader-locking-nfs-client-provisioner# replace with namespace where provisioner is deployednamespace: default
subjects:- kind: ServiceAccountname: nfs-client-provisioner# replace with namespace where provisioner is deployednamespace: default
roleRef:kind: Rolename: leader-locking-nfs-client-provisionerapiGroup: rbac.authorization.k8s.io1.3、k8s應用nfs
kubectl apply -f nfs.yaml
2、安裝kubesphere
- 下面操作主節點執行即可
2.1、下載核心文件
wget https://github.com/kubesphere/ks-installer/releases/download/v3.1.1/kubesphere-installer.yamlwget https://github.com/kubesphere/ks-installer/releases/download/v3.1.1/cluster-configuration.yaml
2.2、修改
- 需要指定下etcd服務IP,一般為master節點的IP
- cluster-configuration.yaml包含了kubesphere工具,默認都是false,在安裝kubesphere時不會安裝這些工具,我們可以選擇想要安裝的工具,改為true即可
- 配置低的話,不建議在安裝時去同步安裝工具
2.3、執行安裝
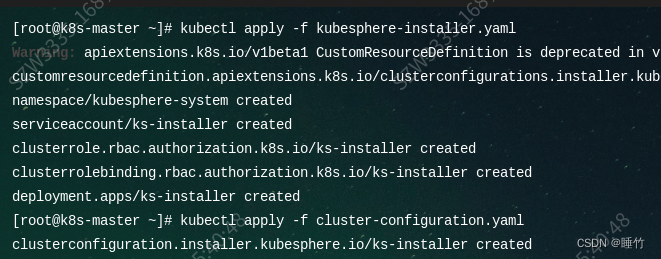
kubectl apply -f kubesphere-installer.yamlkubectl apply -f cluster-configuration.yaml
 ?
?
- 注意:電腦配置一定要滿足官方的最低要求,否則安裝會不成功!
2.4、查看安裝進度
kubectl logs -n kubesphere-system $(kubectl get pod -n kubesphere-system -l app=ks-install -o jsonpath='{.items[0].metadata.name}') -f
- 安裝時間會有點長,建議用上面命令查看
- 安裝成功截圖如下:

- 也可以查看service的生成狀態,下面這個是成功后的service列表
kubectl get svc -A
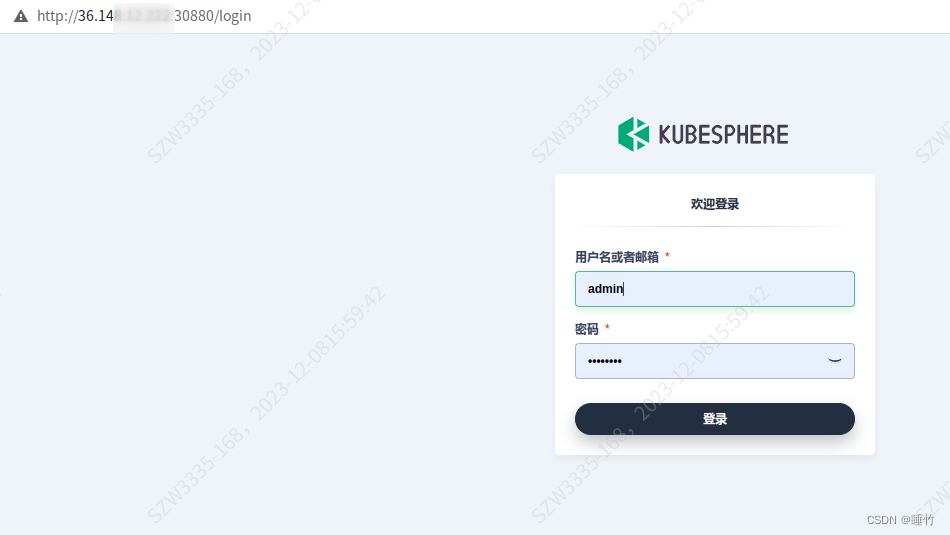
2.5、登錄
地址:http://k8s節點的IP:30880
賬號:admin
密碼:P@88w0rd


持有)


進行鏈接預測)


)


、電池管理系統、多口快充充電器的優雅升級)
)