?第五章 Servlet
一 Servlet簡介
1.1 動態資源和靜態資源
靜態資源
-
無需在程序運行時通過代碼運行生成的資源,在程序運行之前就寫好的資源. 例如:html css js img ,音頻文件和視頻文件
動態資源
-
需要在程序運行時通過代碼運行生成的資源,在程序運行之前無法確定的數據,運行時動態生成,例如Servlet,Thymeleaf ... ...
-
動態資源指的不是視圖上的動畫效果或者是簡單的人機交互效果
生活舉例
-
去蛋糕店買蛋糕
-
直接買柜臺上已經做好的 : 靜態資源
-
和柜員說要求后現場制作 : 動態資源
-
1.2 Servlet簡介
Servlet (server applet) 是運行在服務端(tomcat)的Java小程序,是sun公司提供一套定義動態資源規范; 從代碼層面上來講Servlet就是一個接口
-
用來接收、處理客戶端請求、響應給瀏覽器的動態資源。在整個Web應用中,Servlet主要負責接收處理請求、協同調度功能以及響應數據。我們可以把Servlet稱為Web應用中的控制器
-
不是所有的JAVA類都能用于處理客戶端請求,能處理客戶端請求并做出響應的一套技術標準就是Servlet
-
Servlet是運行在服務端的,所以 Servlet必須在WEB項目中開發且在Tomcat這樣的服務容器中運行
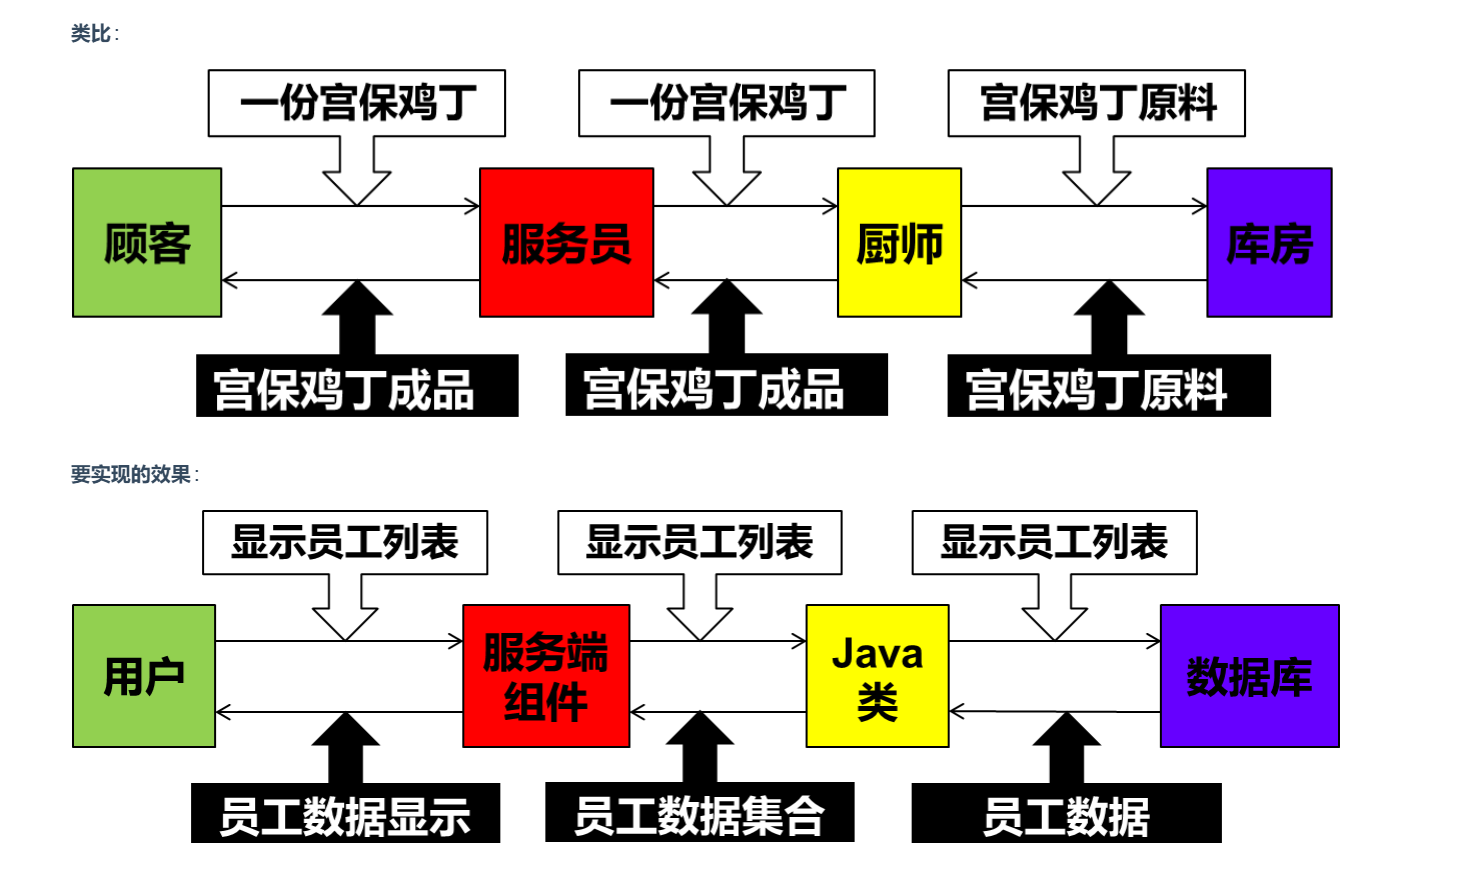
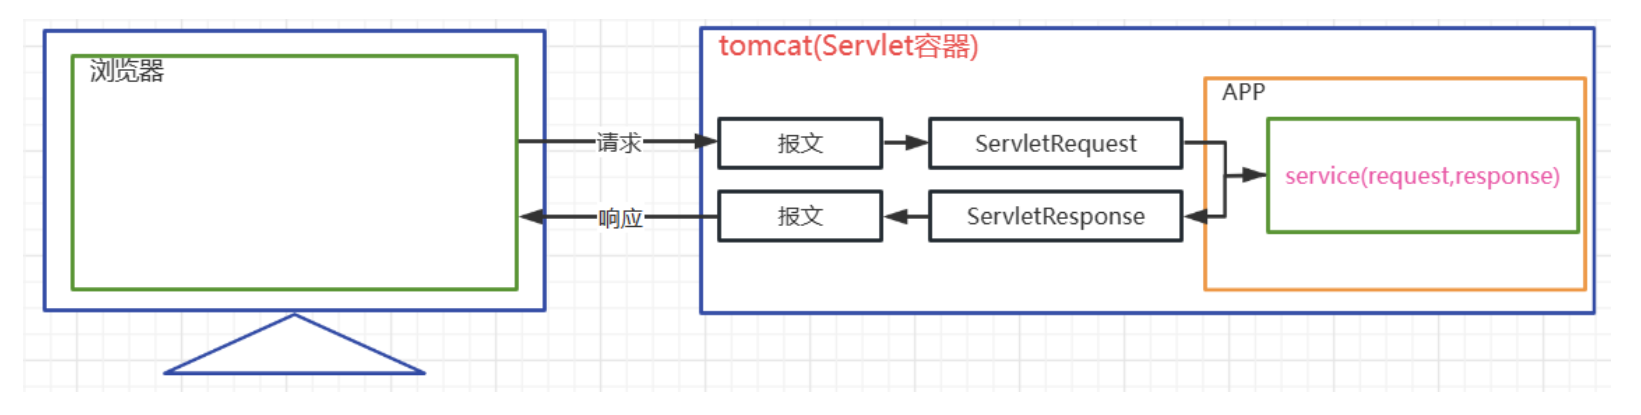
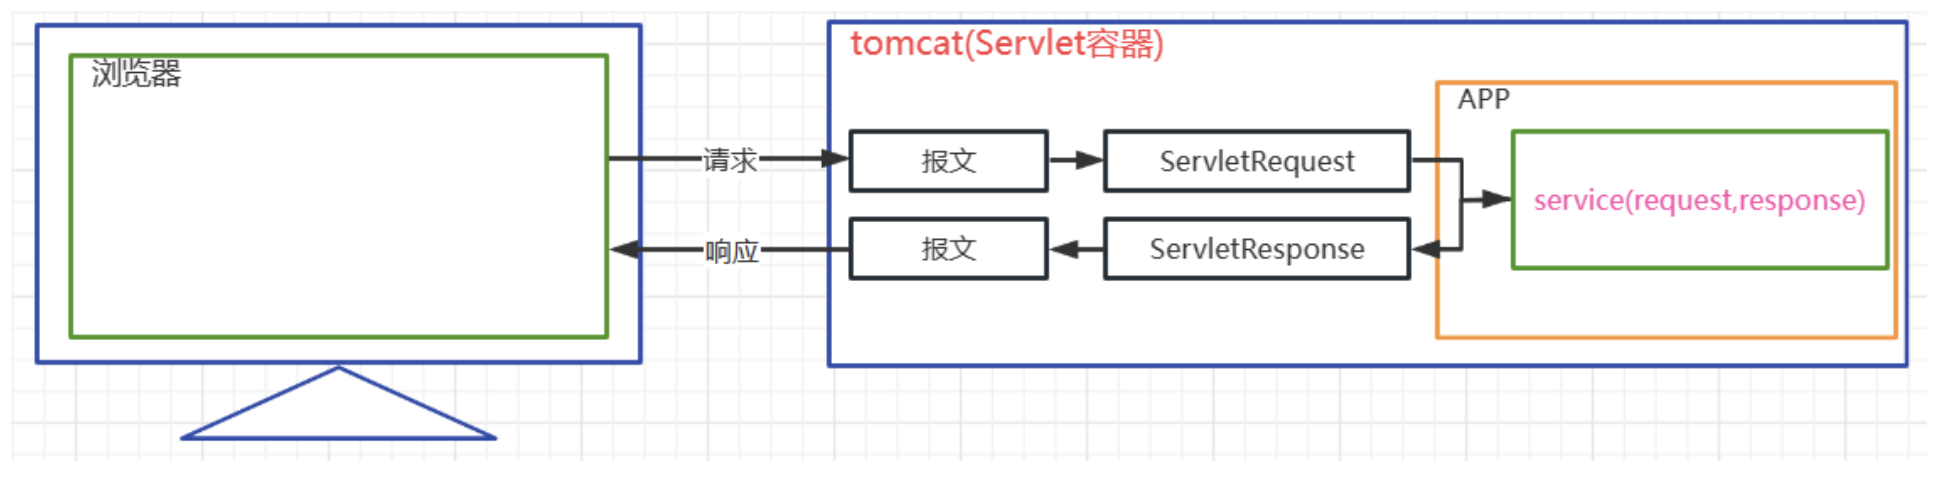
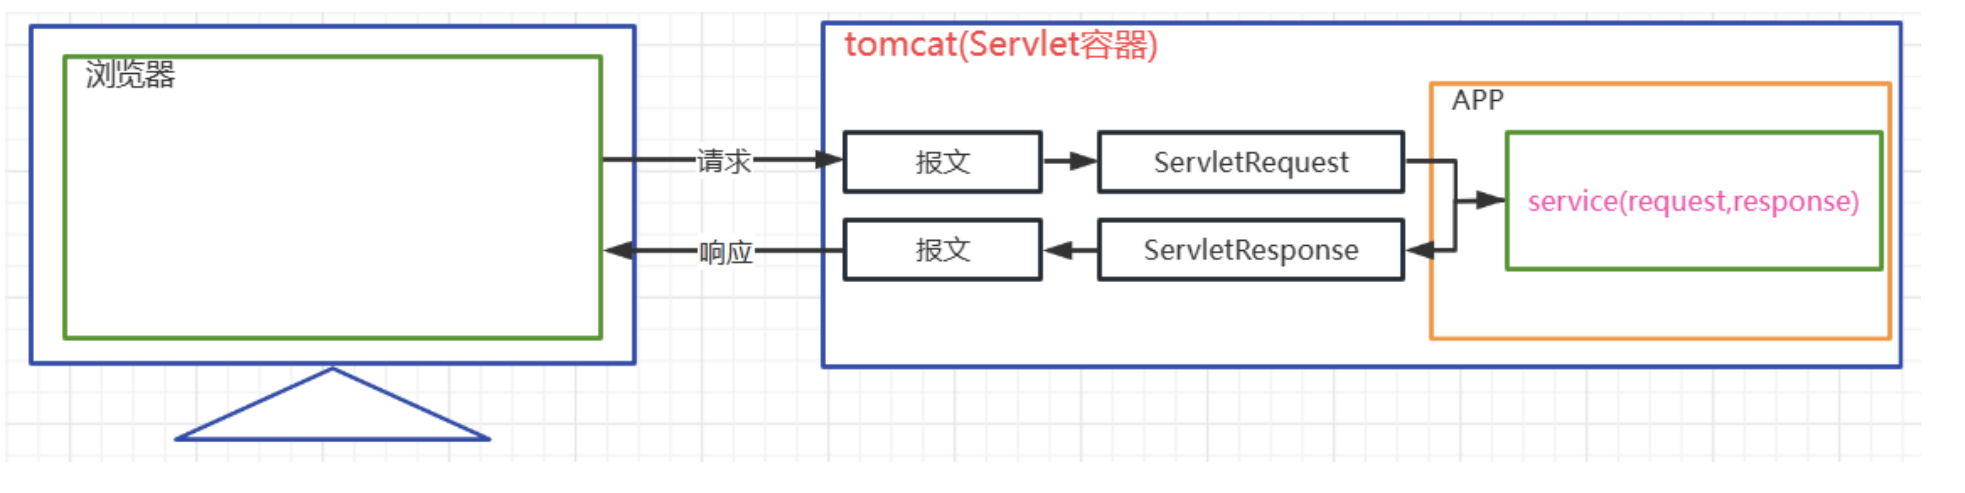
請求響應與HttpServletRequest和HttpServletResponse之間的對應關系
二 Servlet開發流程
2.1 目標
校驗注冊時,用戶名是否被占用. 通過客戶端向一個Servlet發送請求,攜帶username,如果用戶名是'atguigu',則向客戶端響應 NO,如果是其他,響應YES
2.2 開發過程
步驟1 開發一個web類型的module
-
過程參照之前
步驟2 開發一個UserServlet
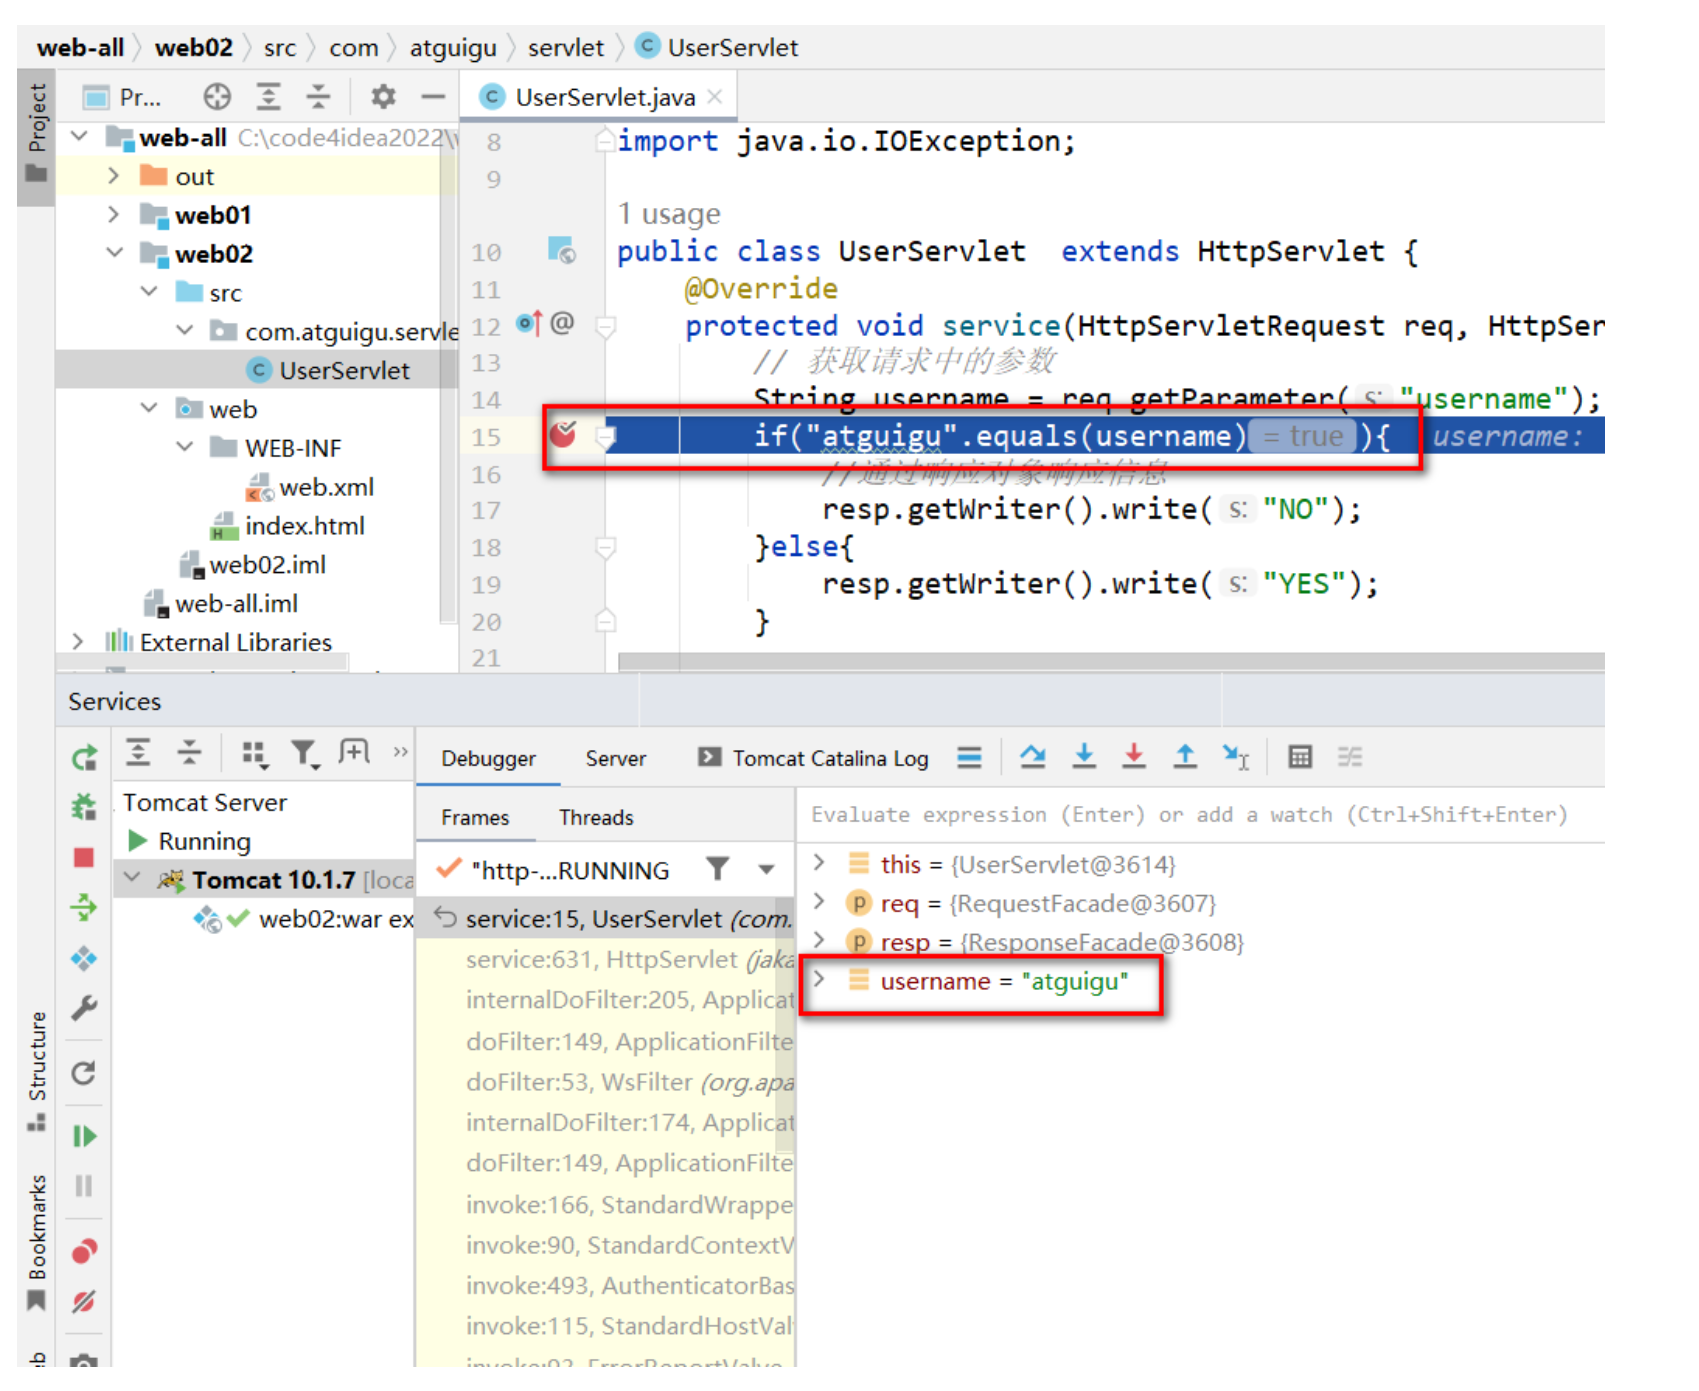
public class UserServlet  extends HttpServlet {@Overrideprotected void service(HttpServletRequest req, HttpServletResponse resp) throws ServletException, IOException {// 獲取請求中的參數String username = req.getParameter("username");if("atguigu".equals(username)){//通過響應對象響應信息resp.getWriter().write("NO");}else{resp.getWriter().write("YES");}}
}-
自定義一個類,要繼承HttpServlet類
-
重寫service方法,該方法主要就是用于處理用戶請求的服務方法
-
HttpServletRequest 代表請求對象,是有請求報文經過tomcat轉換而來的,通過該對象可以獲取請求中的信息
-
HttpServletResponse 代表響應對象,該對象會被tomcat轉換為響應的報文,通過該對象可以設置響應中的信息
-
Servlet對象的生命周期(創建,初始化,處理服務,銷毀)是由tomcat管理的,無需我們自己new
-
HttpServletRequest HttpServletResponse 兩個對象也是有tomcat負責轉換,在調用service方法時傳入給我們用的
步驟3 在web.xml為UseServlet配置請求的映射路徑
<?xml version="1.0" encoding="UTF-8"?>
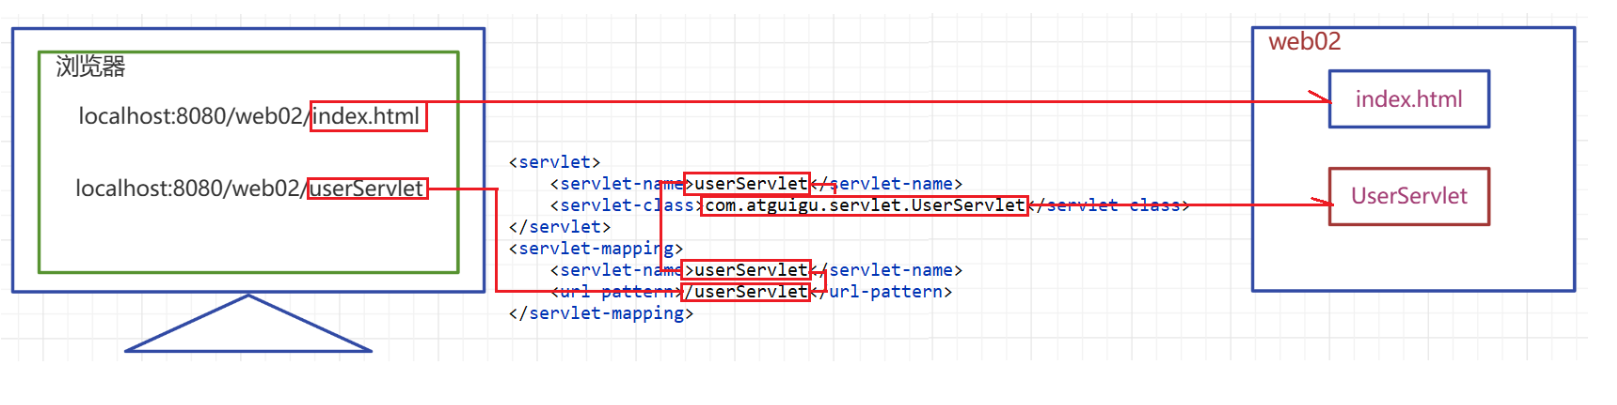
<web-app xmlns="https://jakarta.ee/xml/ns/jakartaee"xmlns:xsi="http://www.w3.org/2001/XMLSchema-instance"xsi:schemaLocation="https://jakarta.ee/xml/ns/jakartaee https://jakarta.ee/xml/ns/jakartaee/web-app_5_0.xsd"version="5.0"><servlet><!--給UserServlet起一個別名--><servlet-name>userServlet</servlet-name><servlet-class>com.atguigu.servlet.UserServlet</servlet-class></servlet><servlet-mapping><!--關聯別名和映射路徑--><servlet-name>userServlet</servlet-name><!--可以為一個Servlet匹配多個不同的映射路徑,但是不同的Servlet不能使用相同的url-pattern--><url-pattern>/userServlet</url-pattern><!-- <url-pattern>/userServlet2</url-pattern>--><!--/ 表示通配所有資源,不包括jsp文件/* 表示通配所有資源,包括jsp文件/a/* 匹配所有以a前綴的映射路徑*.action 匹配所有以action為后綴的映射路徑--><!-- <url-pattern>/*</url-pattern>--></servlet-mapping></web-app>+ Servlet并不是文件系統中實際存在的文件或者目錄,所以為了能夠請求到該資源,我們需要為其配置映射路徑
+ servlet的請求映射路徑配置在web.xml中
+ servlet-name作為servlet的別名,可以自己隨意定義,見名知意就好
+ url-pattern標簽用于定義Servlet的請求映射路徑
+ 一個servlet可以對應多個不同的url-pattern
+ 多個servlet不能使用相同的url-pattern
+ url-pattern中可以使用一些通配寫法+ / 表示通配所有資源,不包括jsp文件+ /* 表示通配所有資源,包括jsp文件+ /a/* 匹配所有以a前綴的映射路徑+ *.action 匹配所有以action為后綴的映射路徑> 步驟4 開發一個form表單,向servlet發送一個get請求并攜帶username參數<!DOCTYPE html>
<html lang="en">
<head><meta charset="UTF-8"><title>Title</title>
</head>
<body><form action="userServlet">請輸入用戶名:<input type="text" name="username" /> <br><input type="submit" value="校驗"></form>
</body>
</html>啟動項目,訪問index.html ,提交表單測試
-
使用debug模式運行測試
映射關系圖
三 Servlet注解方式配置
3.1 @WebServlet注解源碼
官方JAVAEEAPI文檔下載地址
-
Java EE - Technologies (oracle.com)
-
@WebServlet注解的源碼閱讀
package jakarta.servlet.annotation;import java.lang.annotation.Documented;
import java.lang.annotation.ElementType;
import java.lang.annotation.Retention;
import java.lang.annotation.RetentionPolicy;
import java.lang.annotation.Target;/*** @since Servlet 3.0*/
@Target({ ElementType.TYPE })
@Retention(RetentionPolicy.RUNTIME)
@Documented
public @interface WebServlet {/*** The name of the servlet* 相當于 servlet-name* @return the name of the servlet*/String name() default "";/*** The URL patterns of the servlet* 如果只配置一個url-pattern ,則通過該屬性即可,和urlPatterns屬性互斥* @return the URL patterns of the servlet*/String[] value() default {};/*** The URL patterns of the servlet* 如果要配置多個url-pattern ,需要通過該屬性,和value屬性互斥* @return the URL patterns of the servlet*/String[] urlPatterns() default {};/*** The load-on-startup order of the servlet* 配置Servlet是否在項目加載時實例化* @return the load-on-startup order of the servlet*/int loadOnStartup() default -1;/*** The init parameters of the servlet* 配置初始化參數* @return the init parameters of the servlet*/WebInitParam[] initParams() default {};/*** Declares whether the servlet supports asynchronous operation mode.** @return {@code true} if the servlet supports asynchronous operation mode* @see jakarta.servlet.ServletRequest#startAsync* @see jakarta.servlet.ServletRequest#startAsync( jakarta.servlet.ServletRequest,jakarta.servlet.ServletResponse)*/boolean asyncSupported() default false;/*** The small-icon of the servlet** @return the small-icon of the servlet*/String smallIcon() default "";/*** The large-icon of the servlet** @return the large-icon of the servlet*/String largeIcon() default "";/*** The description of the servlet** @return the description of the servlet*/String description() default "";/*** The display name of the servlet** @return the display name of the servlet*/String displayName() default "";}
3.2 @WebServlet注解使用
使用@WebServlet注解替換Servlet配置
@WebServlet(name = "userServlet",//value = "/user",urlPatterns = {"/userServlet1","/userServlet2","/userServlet"},initParams = {@WebInitParam(name = "encoding",value = "UTF-8")},loadOnStartup = 6
)
public class UserServlet  extends HttpServlet {@Overrideprotected void service(HttpServletRequest req, HttpServletResponse resp) throws ServletException, IOException {String encoding = getServletConfig().getInitParameter("encoding");System.out.println(encoding);// 獲取請求中的參數String username = req.getParameter("username");if("atguigu".equals(username)){//通過響應對象響應信息resp.getWriter().write("NO");}else{resp.getWriter().write("YES");}}
}
四 Servlet生命周期
4.1 生命周期簡介
什么是Servlet的生命周期
-
應用程序中的對象不僅在空間上有層次結構的關系,在時間上也會因為處于程序運行過程中的不同階段而表現出不同狀態和不同行為——這就是對象的生命周期。
-
簡單的敘述生命周期,就是對象在容器中從開始創建到銷毀的過程。
Servlet容器
-
Servlet對象是Servlet容器創建的,生命周期方法都是由容器(目前我們使用的是Tomcat)調用的。這一點和我們之前所編寫的代碼有很大不同。在今后的學習中我們會看到,越來越多的對象交給容器或框架來創建,越來越多的方法由容器或框架來調用,開發人員要盡可能多的將精力放在業務邏輯的實現上。
Servlet主要的生命周期執行特點
| 生命周期 | 對應方法 | 執行時機 | 執行次數 |
|---|---|---|---|
| 構造對象 | 構造器 | 第一次請求或者容器啟動 | 1 |
| 初始化 | init() | 構造完畢后 | 1 |
| 處理服務 | service(HttpServletRequest req,HttpServletResponse resp) | 每次請求 | 多次 |
| 銷毀 | destory() | 容器關閉 | 1 |
4.2 生命周期測試
開發servlet代碼
package com.atguigu.servlet;
import jakarta.servlet.ServletException;
import jakarta.servlet.http.HttpServlet;
import jakarta.servlet.http.HttpServletRequest;
import jakarta.servlet.http.HttpServletResponse;import java.io.IOException;public class ServletLifeCycle  extends HttpServlet {public ServletLifeCycle(){System.out.println("構造器");}@Overridepublic void init() throws ServletException {System.out.println("初始化方法");}@Overrideprotected void service(HttpServletRequest req, HttpServletResponse resp) throws ServletException, IOException {System.out.println("service方法");}@Overridepublic void destroy() {System.out.println("銷毀方法");}
}
配置Servlet
<servlet><servlet-name>servletLifeCycle</servlet-name><servlet-class>com.atguigu.servlet.ServletLifeCycle</servlet-class><!--load-on-startup如果配置的是正整數則表示容器在啟動時就要實例化Servlet,數字表示的是實例化的順序--><load-on-startup>1</load-on-startup></servlet><servlet-mapping><servlet-name>servletLifeCycle</servlet-name><url-pattern>/servletLiftCycle</url-pattern></servlet-mapping>-
請求Servlet測試
4.3 生命周期總結
-
通過生命周期測試我們發現Servlet對象在容器中是單例的
-
容器是可以處理并發的用戶請求的,每個請求在容器中都會開啟一個線程
-
多個線程可能會使用相同的Servlet對象,所以在Servlet中,我們不要輕易定義一些容易經常發生修改的成員變量
-
load-on-startup中定義的正整數表示實例化順序,如果數字重復了,容器會自行解決實例化順序問題,但是應該避免重復
-
Tomcat容器中,已經定義了一些隨系統啟動實例化的servlet,我們自定義的servlet的load-on-startup盡量不要占用數字1-5
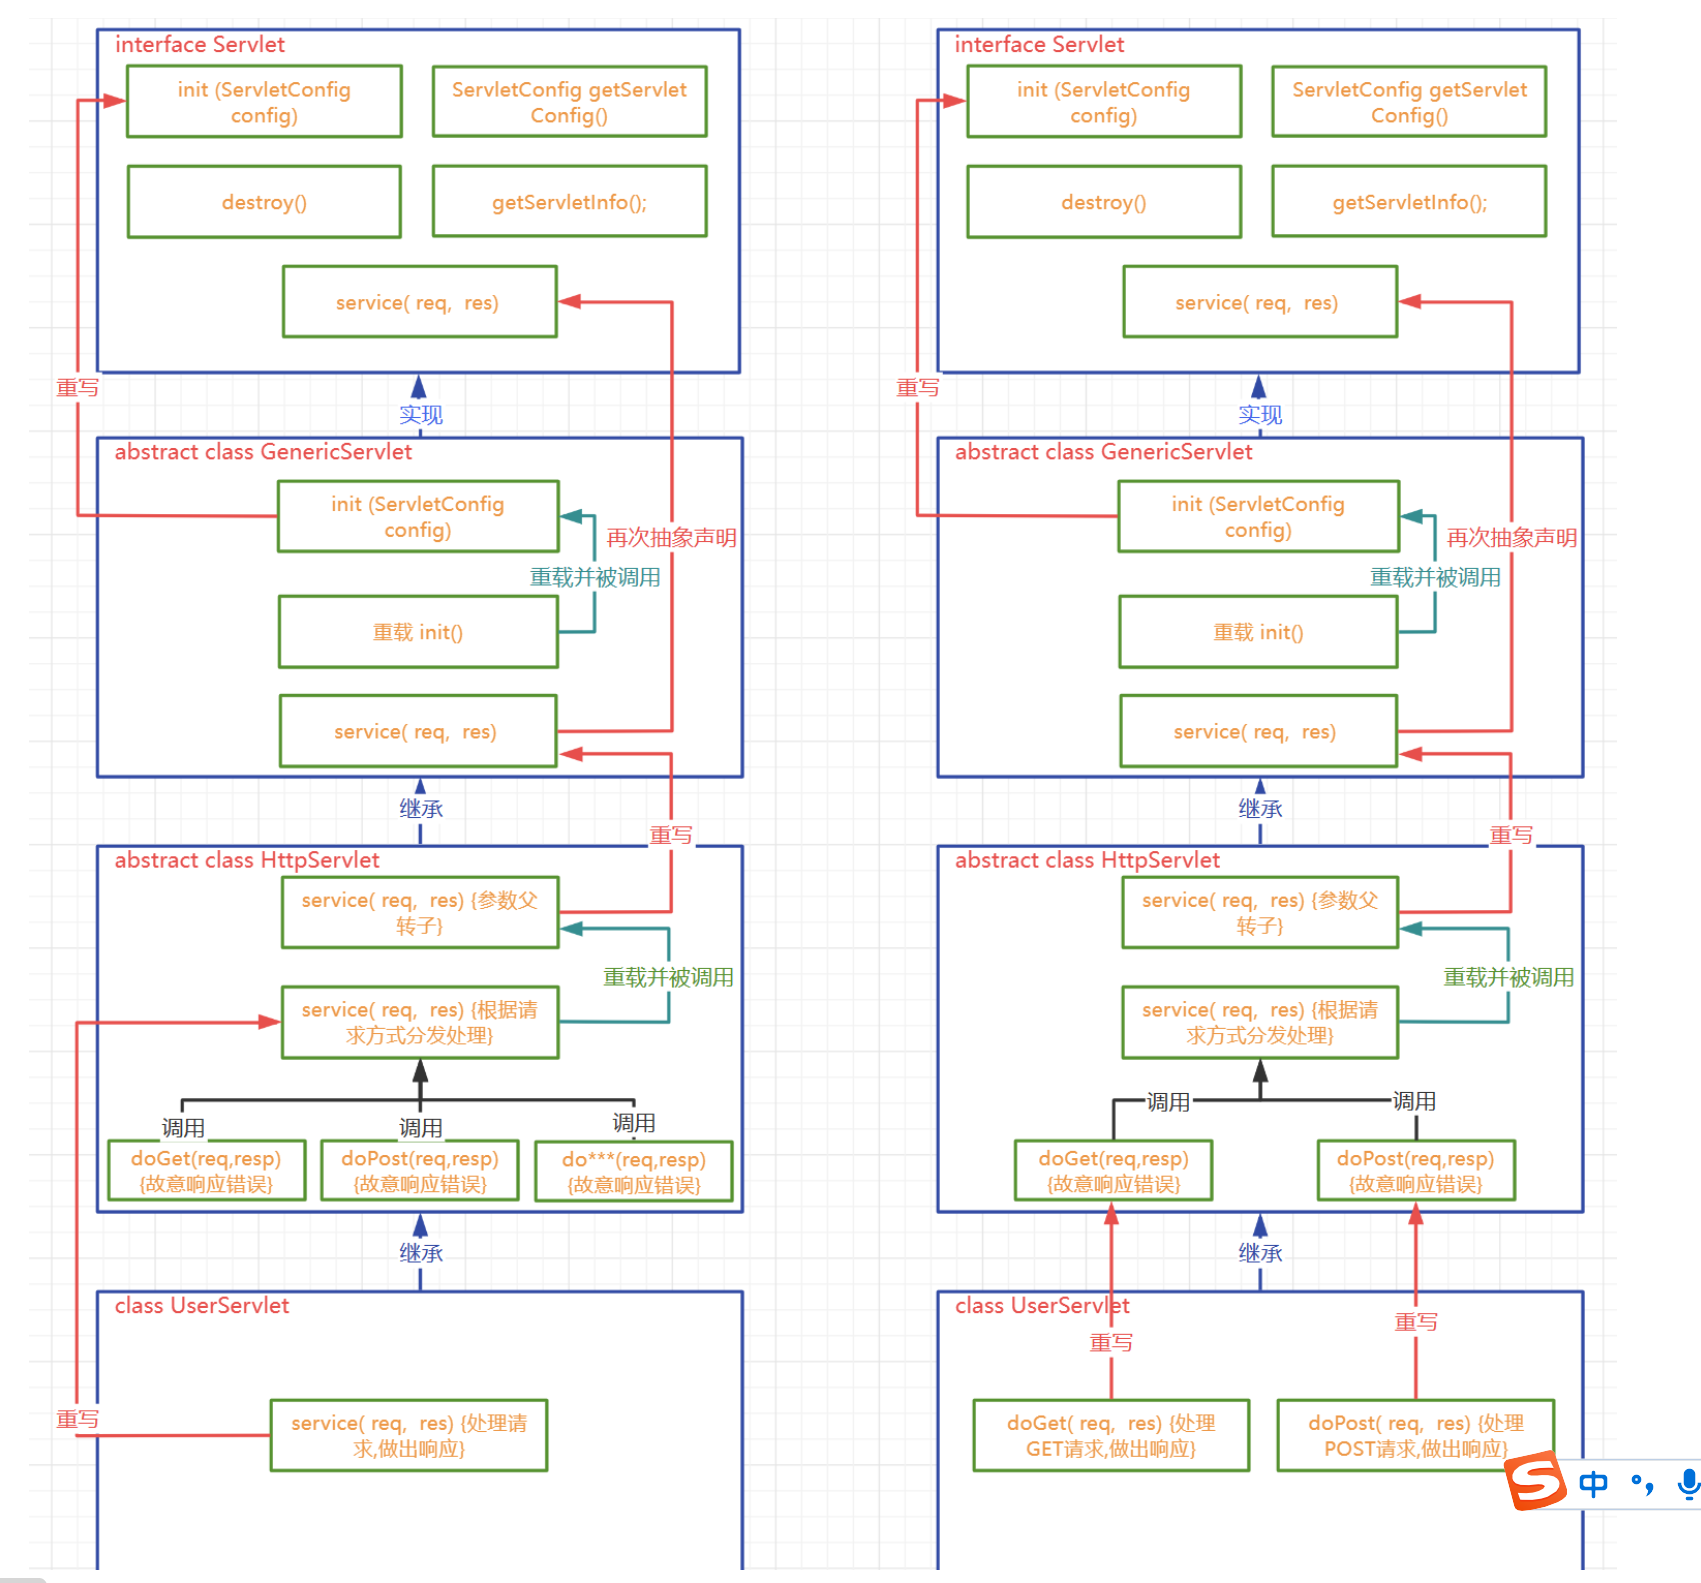
五 Servlet繼承結構
5.1 Servlet 接口
源碼及功能解釋
-
通過idea查看: 此處略
接口及方法說明
-
Servlet 規范接口,所有的Servlet必須實現
-
public void init(ServletConfig config) throws ServletException;
-
初始化方法,容器在構造servlet對象后,自動調用的方法,容器負責實例化一個ServletConfig對象,并在調用該方法時傳入
-
ServletConfig對象可以為Servlet 提供初始化參數
-
-
public ServletConfig getServletConfig();
-
獲取ServletConfig對象的方法,后續可以通過該對象獲取Servlet初始化參數
-
-
public void service(ServletRequest req, ServletResponse res) throws ServletException, IOException;
-
處理請求并做出響應的服務方法,每次請求產生時由容器調用
-
容器創建一個ServletRequest對象和ServletResponse對象,容器在調用service方法時,傳入這兩個對象
-
-
public String getServletInfo();
-
獲取ServletInfo信息的方法
-
-
public void destroy();
-
Servlet實例在銷毀之前調用的方法
-
-
5.2 GenericServlet 抽象類
源碼
-
通過idea查看: 此處略
源碼解釋
-
GenericServlet 抽象類是對Servlet接口一些固定功能的粗糙實現,以及對service方法的再次抽象聲明,并定義了一些其他相關功能方法
-
private transient ServletConfig config;
-
初始化配置對象作為屬性
-
-
public GenericServlet() { }
-
構造器,為了滿足繼承而準備
-
-
public void destroy() { }
-
銷毀方法的平庸實現
-
-
public String getInitParameter(String name)
-
獲取初始參數的快捷方法
-
-
public Enumeration<String> getInitParameterNames()
-
返回所有初始化參數名的方法
-
-
public ServletConfig getServletConfig()
-
獲取初始Servlet初始配置對象ServletConfig的方法
-
-
public ServletContext getServletContext()
-
獲取上下文對象ServletContext的方法
-
-
public String getServletInfo()
-
獲取Servlet信息的平庸實現
-
-
public void init(ServletConfig config) throws ServletException()
-
初始化方法的實現,并在此調用了init的重載方法
-
-
public void init() throws ServletException
-
重載init方法,為了讓我們自己定義初始化功能的方法
-
-
public void log(String msg)
-
public void log(String message, Throwable t)
-
打印日志的方法及重載
-
-
public abstract void service(ServletRequest req, ServletResponse res) throws ServletException, IOException;
-
服務方法再次聲明
-
-
public String getServletName()
-
獲取ServletName的方法
-
-
5.3 HttpServlet 抽象類
源碼
-
通過idea查看: 此處略
解釋
-
abstract class HttpServlet extends GenericServlet HttpServlet抽象類,除了基本的實現以外,增加了更多的基礎功能
-
private static final String METHOD_DELETE = "DELETE";
-
private static final String METHOD_HEAD = "HEAD";
-
private static final String METHOD_GET = "GET";
-
private static final String METHOD_OPTIONS = "OPTIONS";
-
private static final String METHOD_POST = "POST";
-
private static final String METHOD_PUT = "PUT";
-
private static final String METHOD_TRACE = "TRACE";
-
上述屬性用于定義常見請求方式名常量值
-
-
public HttpServlet() {}
-
構造器,用于處理繼承
-
-
public void service(ServletRequest req, ServletResponse res) throws ServletException, IOException
-
對服務方法的實現
-
在該方法中,將請求和響應對象轉換成對應HTTP協議的HttpServletRequest HttpServletResponse對象
-
調用重載的service方法
-
-
public void service(HttpServletRequest req, HttpServletResponse res) throws ServletException, IOException
-
重載的service方法,被重寫的service方法所調用
-
在該方法中,通過請求方式判斷,調用具體的do***方法完成請求的處理
-
-
protected void doGet(HttpServletRequest req, HttpServletResponse resp) throws ServletException, IOException
-
protected void doPost(HttpServletRequest req, HttpServletResponse resp) throws ServletException, IOException
-
protected void doHead(HttpServletRequest req, HttpServletResponse resp) throws ServletException, IOException
-
protected void doPut(HttpServletRequest req, HttpServletResponse resp) throws ServletException, IOException
-
protected void doDelete(HttpServletRequest req, HttpServletResponse resp) throws ServletException, IOException
-
protected void doOptions(HttpServletRequest req, HttpServletResponse resp) throws ServletException, IOException
-
protected void doTrace(HttpServletRequest req, HttpServletResponse resp) throws ServletException, IOException
-
對應不同請求方式的處理方法
-
除了doOptions和doTrace方法,其他的do*** 方法都在故意響應錯誤信息
-
-
5.4 自定義Servlet
繼承關系圖解
-
自定義Servlet中,必須要對處理請求的方法進行重寫
-
要么重寫service方法
-
要么重寫doGet/doPost方法
-
六 ServletConfig和ServletContext
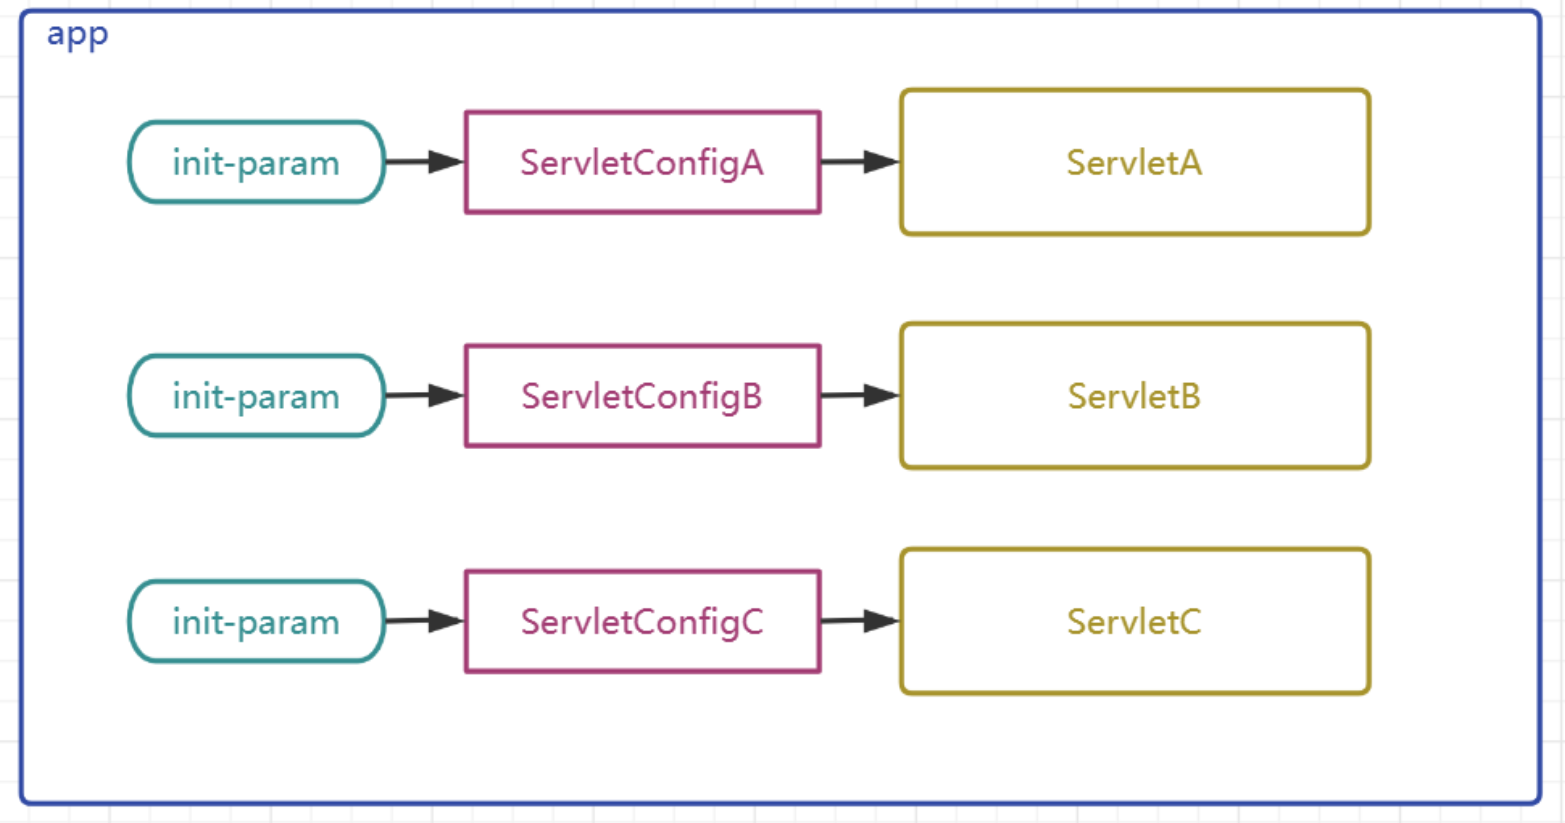
6.1 ServletConfig的使用
ServletConfig是什么
-
為Servlet提供初始配置參數的一種對象,每個Servlet都有自己獨立唯一的ServletConfig對象
-
容器會為每個Servlet實例化一個ServletConfig對象,并通過Servlet生命周期的init方法傳入給Servlet作為屬性
ServletConfig是一個接口,定義了如下API
package jakarta.servlet;
import java.util.Enumeration;
public interface ServletConfig {String getServletName();ServletContext getServletContext();String getInitParameter(String var1);Enumeration<String> getInitParameterNames();
}| 方法名 | 作用 |
|---|---|
| getServletName() | 獲取<servlet-name>HelloServlet</servlet-name>定義的Servlet名稱 |
| getServletContext() | 獲取ServletContext對象 |
| getInitParameter() | 獲取配置Servlet時設置的『初始化參數』,根據名字獲取值 |
| getInitParameterNames() | 獲取所有初始化參數名組成的Enumeration對象 |
ServletConfig怎么用,測試代碼如下
-
定義Servlet
public class ServletA extends HttpServlet {@Overrideprotected void service(HttpServletRequest req, HttpServletResponse resp) throws ServletException, IOException {ServletConfig servletConfig = this.getServletConfig();// 根據參數名獲取單個參數String value = servletConfig.getInitParameter("param1");System.out.println("param1:"+value);// 獲取所有參數名Enumeration<String> parameterNames = servletConfig.getInitParameterNames();// 迭代并獲取參數名while (parameterNames.hasMoreElements()) {String paramaterName = parameterNames.nextElement();System.out.println(paramaterName+":"+servletConfig.getInitParameter(paramaterName));}}
}public class ServletB extends HttpServlet {@Overrideprotected void service(HttpServletRequest req, HttpServletResponse resp) throws ServletException, IOException {ServletConfig servletConfig = this.getServletConfig();// 根據參數名獲取單個參數String value = servletConfig.getInitParameter("param1");System.out.println("param1:"+value);// 獲取所有參數名Enumeration<String> parameterNames = servletConfig.getInitParameterNames();// 迭代并獲取參數名while (parameterNames.hasMoreElements()) {String paramaterName = parameterNames.nextElement();System.out.println(paramaterName+":"+servletConfig.getInitParameter(paramaterName));}}
}-
配置Servlet
<servlet><servlet-name>ServletA</servlet-name><servlet-class>com.atguigu.servlet.ServletA</servlet-class><!--配置ServletA的初始參數--><init-param><param-name>param1</param-name><param-value>value1</param-value></init-param><init-param><param-name>param2</param-name><param-value>value2</param-value></init-param></servlet><servlet><servlet-name>ServletB</servlet-name><servlet-class>com.atguigu.servlet.ServletB</servlet-class><!--配置ServletB的初始參數--><init-param><param-name>param3</param-name><param-value>value3</param-value></init-param><init-param><param-name>param4</param-name><param-value>value4</param-value></init-param></servlet><servlet-mapping><servlet-name>ServletA</servlet-name><url-pattern>/servletA</url-pattern></servlet-mapping><servlet-mapping><servlet-name>ServletB</servlet-name><url-pattern>/servletB</url-pattern></servlet-mapping>請求Servlet測試
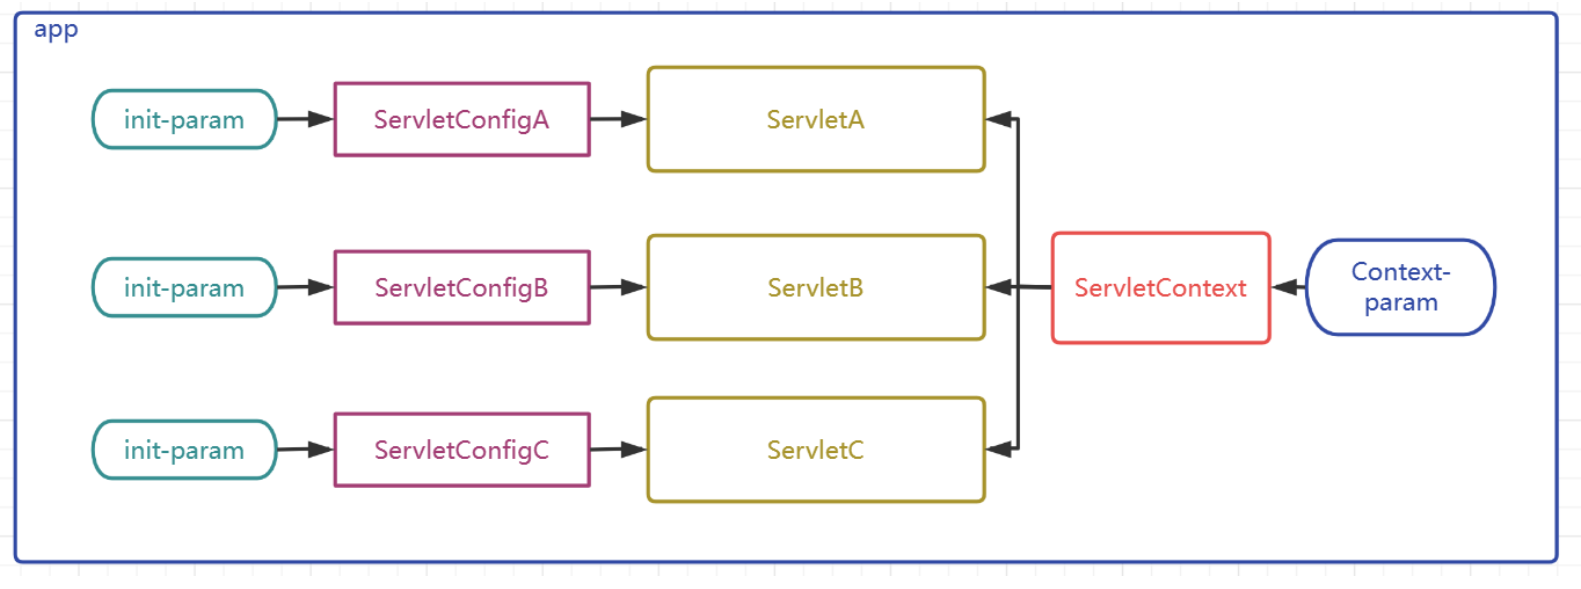
6.2 ServletContext的使用
ServletContext是什么
-
ServletContext對象有稱呼為上下文對象,或者叫應用域對象(后面統一講解域對象)
-
容器會為每個app創建一個獨立的唯一的ServletContext對象
-
ServletContext對象為所有的Servlet所共享
-
ServletContext可以為所有的Servlet提供初始配置參數
ServletContext怎么用
-
配置ServletContext參數
<?xml version="1.0" encoding="UTF-8"?>
<web-app xmlns="https://jakarta.ee/xml/ns/jakartaee"xmlns:xsi="http://www.w3.org/2001/XMLSchema-instance"xsi:schemaLocation="https://jakarta.ee/xml/ns/jakartaee https://jakarta.ee/xml/ns/jakartaee/web-app_5_0.xsd"version="5.0"><context-param><param-name>paramA</param-name><param-value>valueA</param-value></context-param><context-param><param-name>paramB</param-name><param-value>valueB</param-value></context-param>
</web-app>-
在Servlet中獲取ServletContext并獲取參數
package com.atguigu.servlet;import jakarta.servlet.ServletConfig;
import jakarta.servlet.ServletContext;
import jakarta.servlet.ServletException;
import jakarta.servlet.http.HttpServlet;
import jakarta.servlet.http.HttpServletRequest;
import jakarta.servlet.http.HttpServletResponse;import java.io.IOException;
import java.util.Enumeration;public class ServletA extends HttpServlet {@Overrideprotected void service(HttpServletRequest req, HttpServletResponse resp) throws ServletException, IOException {// 從ServletContext中獲取為所有的Servlet準備的參數ServletContext servletContext = this.getServletContext();String valueA = servletContext.getInitParameter("paramA");System.out.println("paramA:"+valueA);// 獲取所有參數名Enumeration<String> initParameterNames = servletContext.getInitParameterNames();// 迭代并獲取參數名while (initParameterNames.hasMoreElements()) {String paramaterName = initParameterNames.nextElement();System.out.println(paramaterName+":"+servletContext.getInitParameter(paramaterName));}}
}
6.3 ServletContext其他重要API
獲取資源的真實路徑
String realPath = servletContext.getRealPath("資源在web目錄中的路徑");
-
例如我們的目標是需要獲取項目中某個靜態資源的路徑,不是工程目錄中的路徑,而是部署目錄中的路徑;我們如果直接拷貝其在我們電腦中的完整路徑的話其實是有問題的,因為如果該項目以后部署到公司服務器上的話,路徑肯定是會發生改變的,所以我們需要使用代碼動態獲取資源的真實路徑. 只要使用了servletContext動態獲取資源的真實路徑,那么無論項目的部署路徑發生什么變化,都會動態獲取項目運行時候的實際路徑,所以就不會發生由于寫死真實路徑而導致項目部署位置改變引發的路徑錯誤問題
獲取項目的上下文路徑
String contextPath = servletContext.getContextPath();
-
項目的部署名稱,也叫項目的上下文路徑,在部署進入tomcat時所使用的路徑,該路徑是可能發生變化的,通過該API動態獲取項目真實的上下文路徑,可以幫助我們解決一些后端頁面渲染技術或者請求轉發和響應重定向中的路徑問題
域對象的相關API
-
域對象: 一些用于存儲數據和傳遞數據的對象,傳遞數據不同的范圍,我們稱之為不同的域,不同的域對象代表不同的域,共享數據的范圍也不同
-
ServletContext代表應用,所以ServletContext域也叫作應用域,是webapp中最大的域,可以在本應用內實現數據的共享和傳遞
-
webapp中的三大域對象,分別是應用域,會話域,請求域
-
后續我們會將三大域對象統一進行講解和演示,三大域對象都具有的API如下
| API | 功能解釋 |
|---|---|
| void setAttribute(String key,Object value); | 向域中存儲/修改數據 |
| Object getAttribute(String key); | 獲得域中的數據 |
| void removeAttribute(String key); | 移除域中的數據 |
七 HttpServletRequest
7.1 HttpServletRequest簡介
HttpServletRequest是什么
-
HttpServletRequest是一個接口,其父接口是ServletRequest
-
HttpServletRequest是Tomcat將請求報文轉換封裝而來的對象,在Tomcat調用service方法時傳入
-
HttpServletRequest代表客戶端發來的請求,所有請求中的信息都可以通過該對象獲得
7.2 HttpServletRequest常見API
HttpServletRequest怎么用
-
獲取請求行信息相關(方式,請求的url,協議及版本)
| API | 功能解釋 |
|---|---|
| StringBuffer getRequestURL(); | 獲取客戶端請求的url |
| String getRequestURI(); | 獲取客戶端請求項目中的具體資源 |
| int getServerPort(); | 獲取客戶端發送請求時的端口 |
| int getLocalPort(); | 獲取本應用在所在容器的端口 |
| int getRemotePort(); | 獲取客戶端程序的端口 |
| String getScheme(); | 獲取請求協議 |
| String getProtocol(); | 獲取請求協議及版本號 |
| String getMethod(); | 獲取請求方式 |
-
獲得請求頭信息相關
| API | 功能解釋 |
|---|---|
| String getHeader(String headerName); | 根據頭名稱獲取請求頭 |
| Enumeration<String> getHeaderNames(); | 獲取所有的請求頭名字 |
| String getContentType(); | 獲取content-type請求頭 |
?代碼?
package com.atguigu.servlet;import jakarta.servlet.ServletException;
import jakarta.servlet.annotation.WebServlet;
import jakarta.servlet.http.HttpServlet;
import jakarta.servlet.http.HttpServletRequest;
import jakarta.servlet.http.HttpServletResponse;import java.io.IOException;
import java.util.Enumeration;/*** ClassName: Servlet04* Package: com.atguigu.servlet* Description:** @Author: lwfstart* @Create 2025-07-24 21:53* @Version: 1.0*/
@WebServlet("/servlet04")
public class Servlet04 extends HttpServlet {@Overrideprotected void service(HttpServletRequest req, HttpServletResponse resp) throws ServletException, IOException {// 行相關  GET/POST   uri  http/1.1System.out.println(req.getMethod()); // 獲取請求方式System.out.println(req.getScheme()); //獲取請求協議System.out.println(req.getProtocol()); //獲取請求協議及版本System.out.println(req.getRequestURI()); //獲取請求的uri  項目內的資源路徑System.out.println(req.getRequestURL()); //獲取請求的uri  項目內資源的完成的路徑/** URI  統一資源標識符   /demo03/a.html   interface URI{}               資源定位的要求和規范   動物類* URL  統一資源定位符  http://ip:port/demo03/a.html   class URL implements URI{}    一個具體的資源路徑     哺乳動物** */System.out.println(req.getLocalPort());  //本應用容器的端口號  8080System.out.println(req.getServerPort());  // 客戶端發請求使用的端口號System.out.println(req.getRemotePort());  // 客戶端軟件的端口號//頭相關   key:value  key:value ... ...//根據名字單獨獲取某個請求頭String accept = req.getHeader("Accept");System.out.println("Accept:"+accept);//獲取本次請求中所有的請求頭的名字Enumeration<String> headerNames = req.getHeaderNames();while(headerNames.hasMoreElements()){String hname = headerNames.nextElement();System.out.println(hname+":"+req.getHeaderNames());}//獲取請求參數}
}
獲得請求參數相關
| API | 功能解釋 |
|---|---|
| String getParameter(String parameterName); | 根據請求參數名獲取請求單個參數值 |
| String[] getParameterValues(String parameterName); | 根據請求參數名獲取請求多個參數值數組 |
| Enumeration<String> getParameterNames(); | 獲取所有請求參數名 |
| Map<String, String[]> getParameterMap(); | 獲取所有請求參數的鍵值對集合 |
| BufferedReader getReader() throws IOException; | 獲取讀取請求體的字符輸入流 |
| ServletInputStream getInputStream() throws IOException; | 獲取讀取請求體的字節輸入流 |
| int getContentLength(); | 獲得請求體長度的字節數 |
?代碼
package com.atguigu.servlet;import jakarta.servlet.ServletException;
import jakarta.servlet.ServletInputStream;
import jakarta.servlet.annotation.WebServlet;
import jakarta.servlet.http.HttpServlet;
import jakarta.servlet.http.HttpServletRequest;
import jakarta.servlet.http.HttpServletResponse;import java.io.BufferedReader;
import java.io.IOException;
import java.util.Arrays;
import java.util.Enumeration;
import java.util.Map;
import java.util.Set;/*** ClassName: Servlet05* Package: com.atguigu.servlet* Description:** @Author: lwfstart* @Create 2025-07-24 22:29* @Version: 1.0*/
@WebServlet("/servlet05")
public class Servlet05 extends HttpServlet {@Overrideprotected void service(HttpServletRequest req, HttpServletResponse resp) throws ServletException, IOException {//獲取鍵值對的參數//接收請求中的參數//根據參數名獲取單個參數值String username = req.getParameter("username");System.out.println(username);String userPwd = req.getParameter("userPwd");System.out.println(userPwd);//根據參數名獲取多個參數值String[] hobbies = req.getParameterValues("hobby");System.out.println(Arrays.toString(hobbies));//獲取所有的參數名Enumeration<String> pnames = req.getParameterNames();while(pnames.hasMoreElements()){String pname = pnames.nextElement();String[] values = req.getParameterValues(pname);if(values.length>1){System.out.println(pname+"="+Arrays.toString(values));}else {System.out.println(pname+"="+values[0]);}}//返回所有參數的map集合    key=參數名   value=參數值Map<String,String[]> parameterMap = req.getParameterMap();Set<Map.Entry<String,String[]>> entries = parameterMap.entrySet();for(Map.Entry<String,String[]> entry : entries){String pname = entry.getKey();String[] value = entry.getValue();if(value.length>1){System.out.println(pname+"="+Arrays.toString(value));}else {System.out.println(pname+"="+value[0]);}}/** 以上API專門用于獲取key=value形式的參數,無論這些參數是在url后還是在請求體中      GET    POST都一樣* 請求*   請求行   方式     uri     http/1.1*   請求頭*   請求體* form  表單標簽提交GET請求時,參數以鍵值對形式放在url后,不放在請求體里,GET方式的請求也是可以有請求體*   post*** 獲得請求體中的非鍵值對數據?   JSON串    文件* //獲得一個從請求體中讀取字符的字符輸入流* BufferedReader reader = req.getReader();  JSON串* //獲取一個從請求體中讀取二進制數據字節的輸入流* ServletInputStream inputStream = req.getInputStream();  文件* */System.out.println(req.getServletPath());}
}
-
其他API
| API | 功能解釋 |
|---|---|
| String getServletPath(); | 獲取請求的Servlet的映射路徑 |
| ServletContext getServletContext(); | 獲取ServletContext對象 |
| Cookie[] getCookies(); | 獲取請求中的所有cookie |
| HttpSession getSession(); | 獲取Session對象 |
| void setCharacterEncoding(String encoding) ; | 設置請求體字符集 |
八 HttpServletResponse
8.1 HttpServletResponse簡介
HttpServletResponse是什么
-
HttpServletResponse是一個接口,其父接口是ServletResponse
-
HttpServletResponse是Tomcat預先創建的,在Tomcat調用service方法時傳入
-
HttpServletResponse代表對客戶端的響應,該對象會被轉換成響應的報文發送給客戶端,通過該對象我們可以設置響應信息
8.2 HttpServletResponse的常見API
HttpServletRequest怎么用
-
設置響應行相關
| API | 功能解釋 |
|---|---|
| void setStatus(int code); | 設置響應狀態碼 |
-
設置響應頭相關
| API | 功能解釋 |
|---|---|
| void setHeader(String headerName, String headerValue); | 設置/修改響應頭鍵值對 |
| void setContentType(String contentType); | 設置content-type響應頭及響應字符集(設置MIME類型) |
設置響應體相關
| API | 功能解釋 |
|---|---|
| PrintWriter getWriter() throws IOException; | 獲得向響應體放入信息的字符輸出流 |
| ServletOutputStream getOutputStream() throws IOException; | 獲得向響應體放入信息的字節輸出流 |
| void setContentLength(int length); | 設置響應體的字節長度,其實就是在設置content-length響應頭 |
其他API
| API | 功能解釋 |
|---|---|
| void sendError(int code, String message) throws IOException; | 向客戶端響應錯誤信息的方法,需要指定響應碼和響應信息 |
| void addCookie(Cookie cookie); | 向響應體中增加cookie |
| void setCharacterEncoding(String encoding); | 設置響應體字符集 |
MIME類型
-
MIME類型,可以理解為文檔類型,用戶表示傳遞的數據是屬于什么類型的文檔
-
瀏覽器可以根據MIME類型決定該用什么樣的方式解析接收到的響應體數據
-
可以這樣理解: 前后端交互數據時,告訴對方發給對方的是 html/css/js/圖片/聲音/視頻/... ...
-
tomcat/conf/web.xml中配置了常見文件的拓展名和MIMIE類型的對應關系
-
常見的MIME類型舉例如下
| 文件拓展名 | MIME類型 |
|---|---|
| .html | text/html |
| .css | text/css |
| .js | application/javascript |
| .png /.jpeg/.jpg/... ... | image/jpeg |
| .mp3/.mpe/.mpeg/ ... ... | audio/mpeg |
| .mp4 | video/mp4 |
| .m1v/.m1v/.m2v/.mpe/... ... | video/mpeg |
代碼
package com.atguigu.servlet;import jakarta.servlet.ServletException;
import jakarta.servlet.ServletOutputStream;
import jakarta.servlet.annotation.WebServlet;
import jakarta.servlet.http.HttpServlet;
import jakarta.servlet.http.HttpServletRequest;
import jakarta.servlet.http.HttpServletResponse;import java.io.IOException;
import java.io.PrintWriter;/*** ClassName: Servlet06* Package: com.atguigu.servlet* Description:** @Author: lwfstart* @Create 2025-07-24 23:38* @Version: 1.0*/
@WebServlet("/servlet06")
public class Servlet06 extends HttpServlet {@Overrideprotected void service(HttpServletRequest req, HttpServletResponse resp) throws ServletException, IOException {// 設置響應行相關的API  HTTP/1.1   200/404/405/500/...resp.setStatus(405);String info = "<h1>hello</h1>";//設置響應頭相關的API//resp.setHeader("aaa","valuea");
//        resp.setHeader("content-Type", "text/html");
//        resp.setHeader("content-Length", "1234");resp.setContentType("text/html");resp.setContentLength(info.getBytes().length);// 設置響應體內容APIPrintWriter writer =  resp.getWriter();writer.write(info);//獲得一個向響應體中輸入二進制信息的字節輸出流//ServletOutputStream outputStream = resp.getOutputStream();}
}
九 請求轉發和響應重定向
9.1 概述
什么是請求轉發和響應重定向
-
請求轉發和響應重定向是web應用中間接訪問項目資源的兩種手段,也是Servlet控制頁面跳轉的兩種手段
-
請求轉發通過HttpServletRequest實現,響應重定向通過HttpServletResponse實現
-
請求轉發生活舉例: 張三找李四借錢,李四沒有,李四找王五,讓王五借給張三
-
響應重定向生活舉例:張三找李四借錢,李四沒有,李四讓張三去找王五,張三自己再去找王五借錢
9.2 請求轉發
請求轉發運行邏輯圖
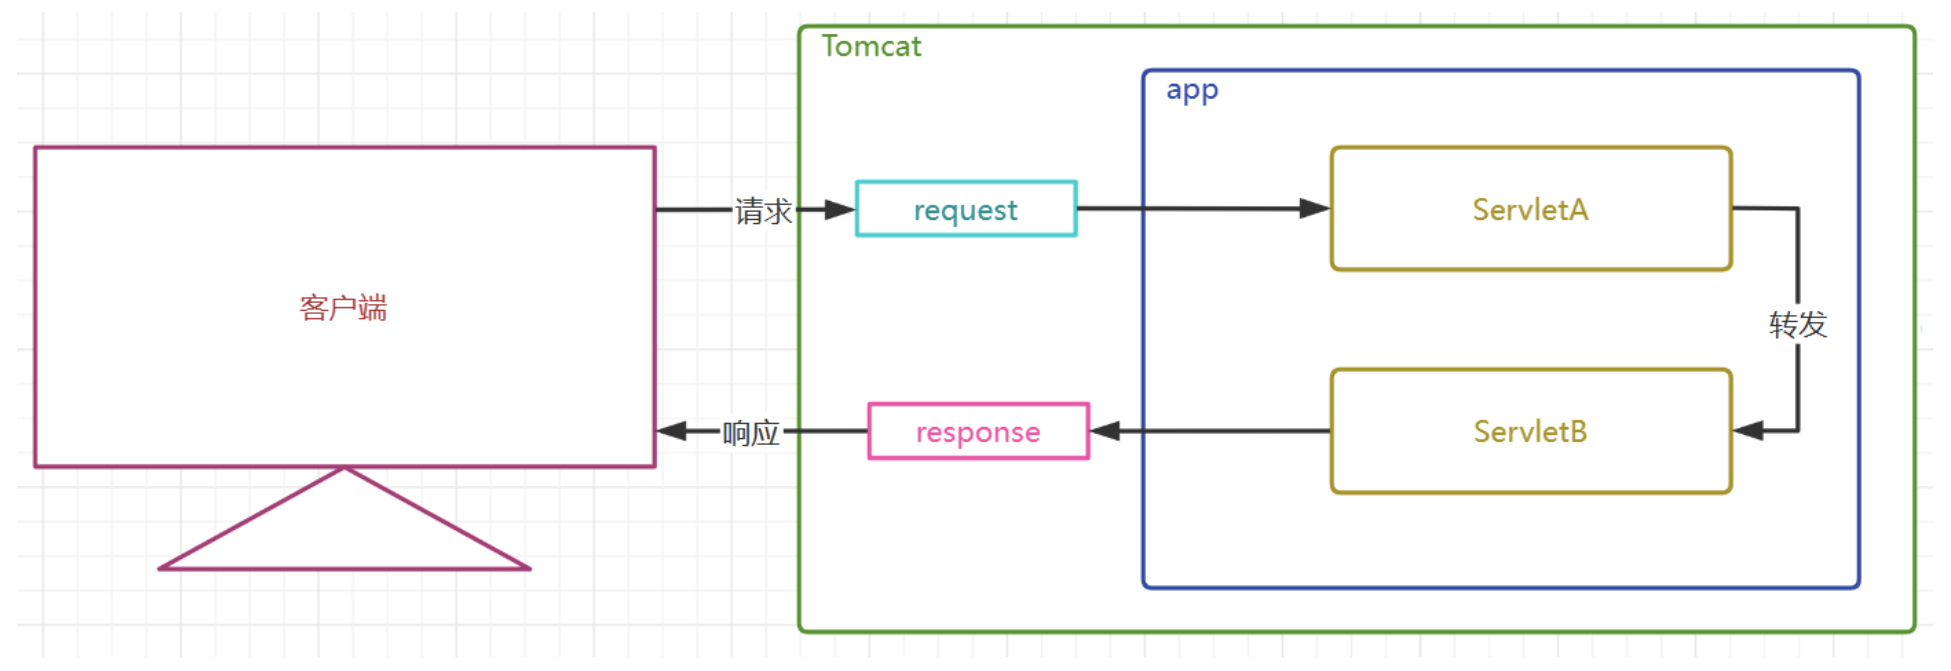
請求轉發特點(背誦)
-
請求轉發通過HttpServletRequest對象獲取請求轉發器實現
-
請求轉發是服務器內部的行為,對客戶端是屏蔽的
-
客戶端只發送了一次請求,客戶端地址欄不變
-
服務端只產生了一對請求和響應對象,這一對請求和響應對象會繼續傳遞給下一個資源
-
因為全程只有一個HttpServletRequset對象,所以請求參數可以傳遞,請求域中的數據也可以傳遞
-
請求轉發可以轉發給其他Servlet動態資源,也可以轉發給一些靜態資源以實現頁面跳轉
-
請求轉發可以轉發給WEB-INF下受保護的資源
-
請求轉發不能轉發到本項目以外的外部資源
相關目錄:
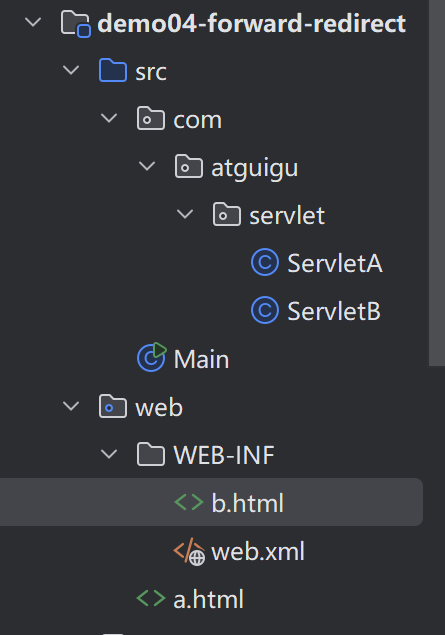
請求轉發測試代碼
servletA
package com.atguigu.servlet;import jakarta.servlet.RequestDispatcher;
import jakarta.servlet.ServletException;
import jakarta.servlet.annotation.WebServlet;
import jakarta.servlet.http.HttpServlet;
import jakarta.servlet.http.HttpServletRequest;
import jakarta.servlet.http.HttpServletResponse;import java.io.IOException;/*** ClassName: ServletA* Package: com.atguigu.servlet* Description:** @Author: start* @Create 2025-07-27 13:20* @Version: 1.0*/@WebServlet("/servletA")
public class ServletA extends HttpServlet {/** 1 請求轉發是通過HttpServletRequest對象實現的* 2 請求轉發是服務器內部行為,對客戶端是屏蔽的* 3 客戶端只產生了一次請求  服務端只產生了一對 request 和 response 對象* 4 客戶端的地址欄是不變的* 5 請求的參數是可以繼續傳遞的* 6 目標資源可以是servlet動態資源,也可以是html靜態資源* 7 目標資源WEB-INF下的受保護的資源,該方式也是WEB-INF下的資源的唯一訪問方式* 8 目標資源不可以是外部的資源* */@Overrideprotected void service(HttpServletRequest req, HttpServletResponse resp) throws ServletException, IOException {System.out.println("servletA 執行了");String money = req.getParameter("money");System.out.println("servletA獲得參數:money=" + money);//請求轉發給ServletB//獲得請求轉發器
//        RequestDispatcher requestDispatcher = req.getRequestDispatcher("servletB");
//        RequestDispatcher requestDispatcher = req.getRequestDispatcher("a.html");
//        RequestDispatcher requestDispatcher = req.getRequestDispatcher("WEB-INF/b.html");RequestDispatcher requestDispatcher = req.getRequestDispatcher("http://www.atguigu.com");//讓請求轉發器做出轉發動作requestDispatcher.forward(req,resp);}
}
servletB
package com.atguigu.servlet;import jakarta.servlet.ServletException;
import jakarta.servlet.annotation.WebServlet;
import jakarta.servlet.http.HttpServlet;
import jakarta.servlet.http.HttpServletRequest;
import jakarta.servlet.http.HttpServletResponse;import java.io.IOException;/*** ClassName: ServletB* Package: com.atguigu.servlet* Description:** @Author: start* @Create 2025-07-27 13:20* @Version: 1.0*/
@WebServlet("/servletB")
public class ServletB extends HttpServlet {@Overrideprotected void service(HttpServletRequest req, HttpServletResponse resp) throws ServletException, IOException {System.out.println("servletB執行了");String money = req.getParameter("money");System.out.println("servletB獲得參數:money=" + money);}
}
a.html
<!DOCTYPE html>
<html lang="en">
<head><meta charset="UTF-8"/><title>Title</title>
</head>
<body>
this is page aaa
</body>
</html>
b.html
<!DOCTYPE html>
<html lang="en">
<head><meta charset="UTF-8"/><title>Title</title>
</head>
<body>
this is page bbb
</body>
</html>
9.3 響應重定向
響應重定向運行邏輯圖
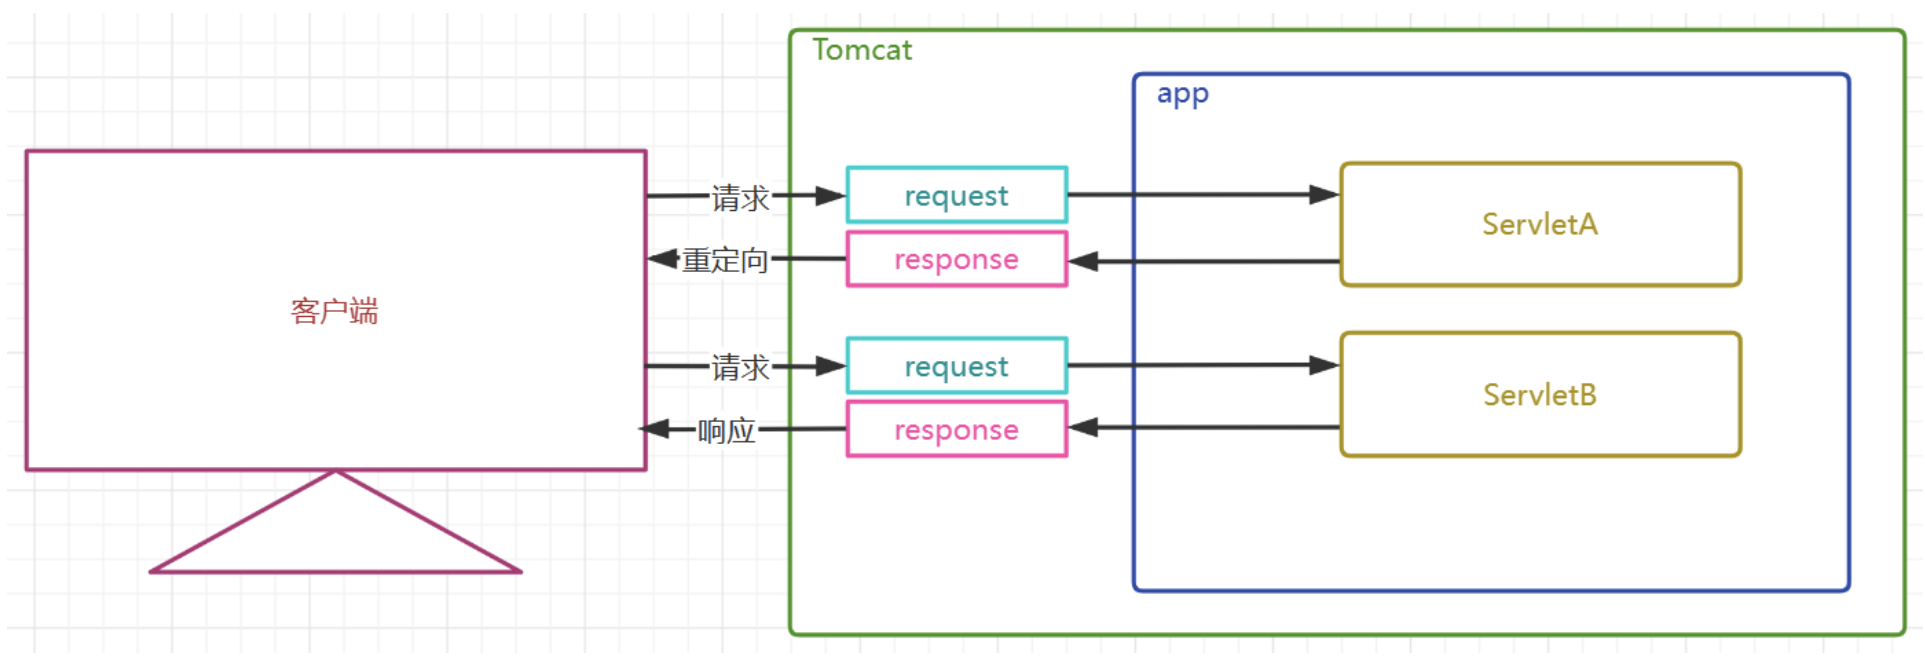
響應重定向特點(背誦)
-
響應重定向通過HttpServletResponse對象的sendRedirect方法實現
-
響應重定向是服務端通過302響應碼和路徑,告訴客戶端自己去找其他資源,是在服務端提示下的,客戶端的行為
-
客戶端至少發送了兩次請求,客戶端地址欄是要變化的
-
服務端產生了多對請求和響應對象,且請求和響應對象不會傳遞給下一個資源
-
因為全程產生了多個HttpServletRequset對象,所以請求參數不可以傳遞,請求域中的數據也不可以傳遞
-
重定向可以是其他Servlet動態資源,也可以是一些靜態資源以實現頁面跳轉
-
重定向不可以到給WEB-INF下受保護的資源
-
重定向可以到本項目以外的外部資源
響應重定向測試代碼
servlet1
package com.atguigu.servlet;import jakarta.servlet.ServletException;
import jakarta.servlet.annotation.WebServlet;
import jakarta.servlet.http.HttpServlet;
import jakarta.servlet.http.HttpServletRequest;
import jakarta.servlet.http.HttpServletResponse;import java.io.IOException;/*** ClassName: Servlet1* Package: com.atguigu.servlet* Description:** @Author: start* @Create 2025-07-27 13:55* @Version: 1.0*/
@WebServlet("/servlet1")
public class Servlet1 extends HttpServlet {/** 1 重定向是通過HttpServletResponse對象實現* 2 響應重定向是在服務器提示下,客戶端的行為* 3 客戶端地址欄是變化的* 4 客戶端至少發送了兩次請求,客戶端產生了多次請求* 5 請求產生了多次,后端就會有多個request對象,此時請求中的參數不能繼續自動傳遞* 6 目標資源可以是視圖資源* 7 目標資源WEB-INF下的資源* 8 目標資源可以是外部資源** 重點:同樣能夠實現頁面跳轉,優先使用響應重定向** */@Overrideprotected void service(HttpServletRequest req, HttpServletResponse resp) throws ServletException, IOException {//接收用戶請求System.out.println("servlet1執行了");System.out.println("servlet1 got money:" + req.getParameter("money"));//響應重定向  設置響應狀態碼302  同時設置Location響應頭:      這行代碼的作用
//        resp.sendRedirect("servlet2");
//        resp.sendRedirect("a.html");
//        resp.sendRedirect("WEB-INF/b.html");resp.sendRedirect("http://www.atguigu.com");}
}
servlet2
package com.atguigu.servlet;import jakarta.servlet.ServletException;
import jakarta.servlet.annotation.WebServlet;
import jakarta.servlet.http.HttpServlet;
import jakarta.servlet.http.HttpServletRequest;
import jakarta.servlet.http.HttpServletResponse;import java.io.IOException;/*** ClassName: Servlet2* Package: com.atguigu.servlet* Description:** @Author: start* @Create 2025-07-27 13:55* @Version: 1.0*/
@WebServlet("/servlet2")
public class Servlet2 extends HttpServlet {@Overrideprotected void service(HttpServletRequest req, HttpServletResponse resp) throws ServletException, IOException {//接收用戶請求System.out.println("servlet2 got money:" + req.getParameter("money"));System.out.println("servlet2 執行了");}
}
十 web亂碼和路徑問題總結
10.1 亂碼問題
亂碼問題產生的根本原因是什么
-
數據的編碼和解碼使用的不是同一個字符集
-
使用了不支持某個語言文字的字符集
各個字符集的兼容性
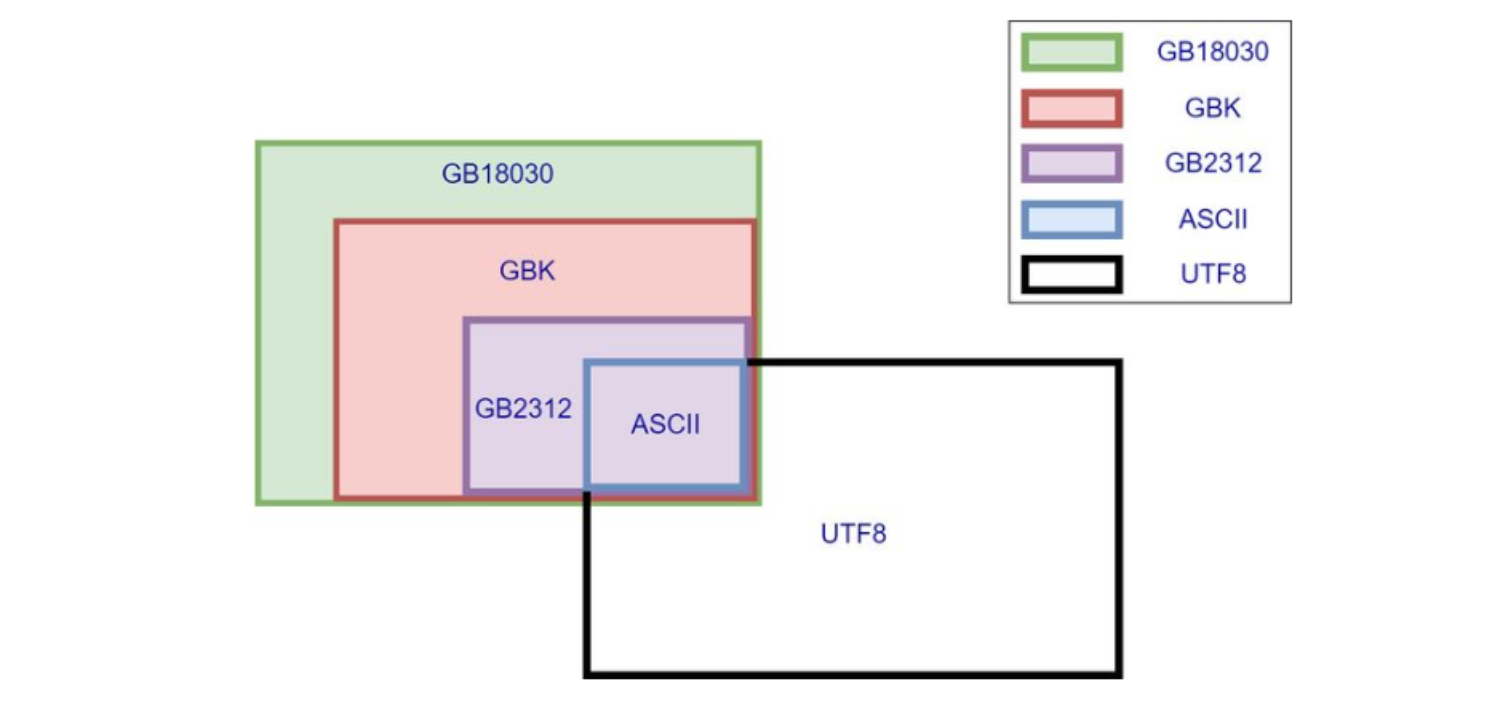
-
由上圖得知,上述字符集都兼容了ASCII
-
ASCII中有什么? 英文字母和一些通常使用的符號,所以這些東西無論使用什么字符集都不會亂碼
10.1.1 HTML亂碼問題
設置項目文件的字符集要使用一個支持中文的字符集
-
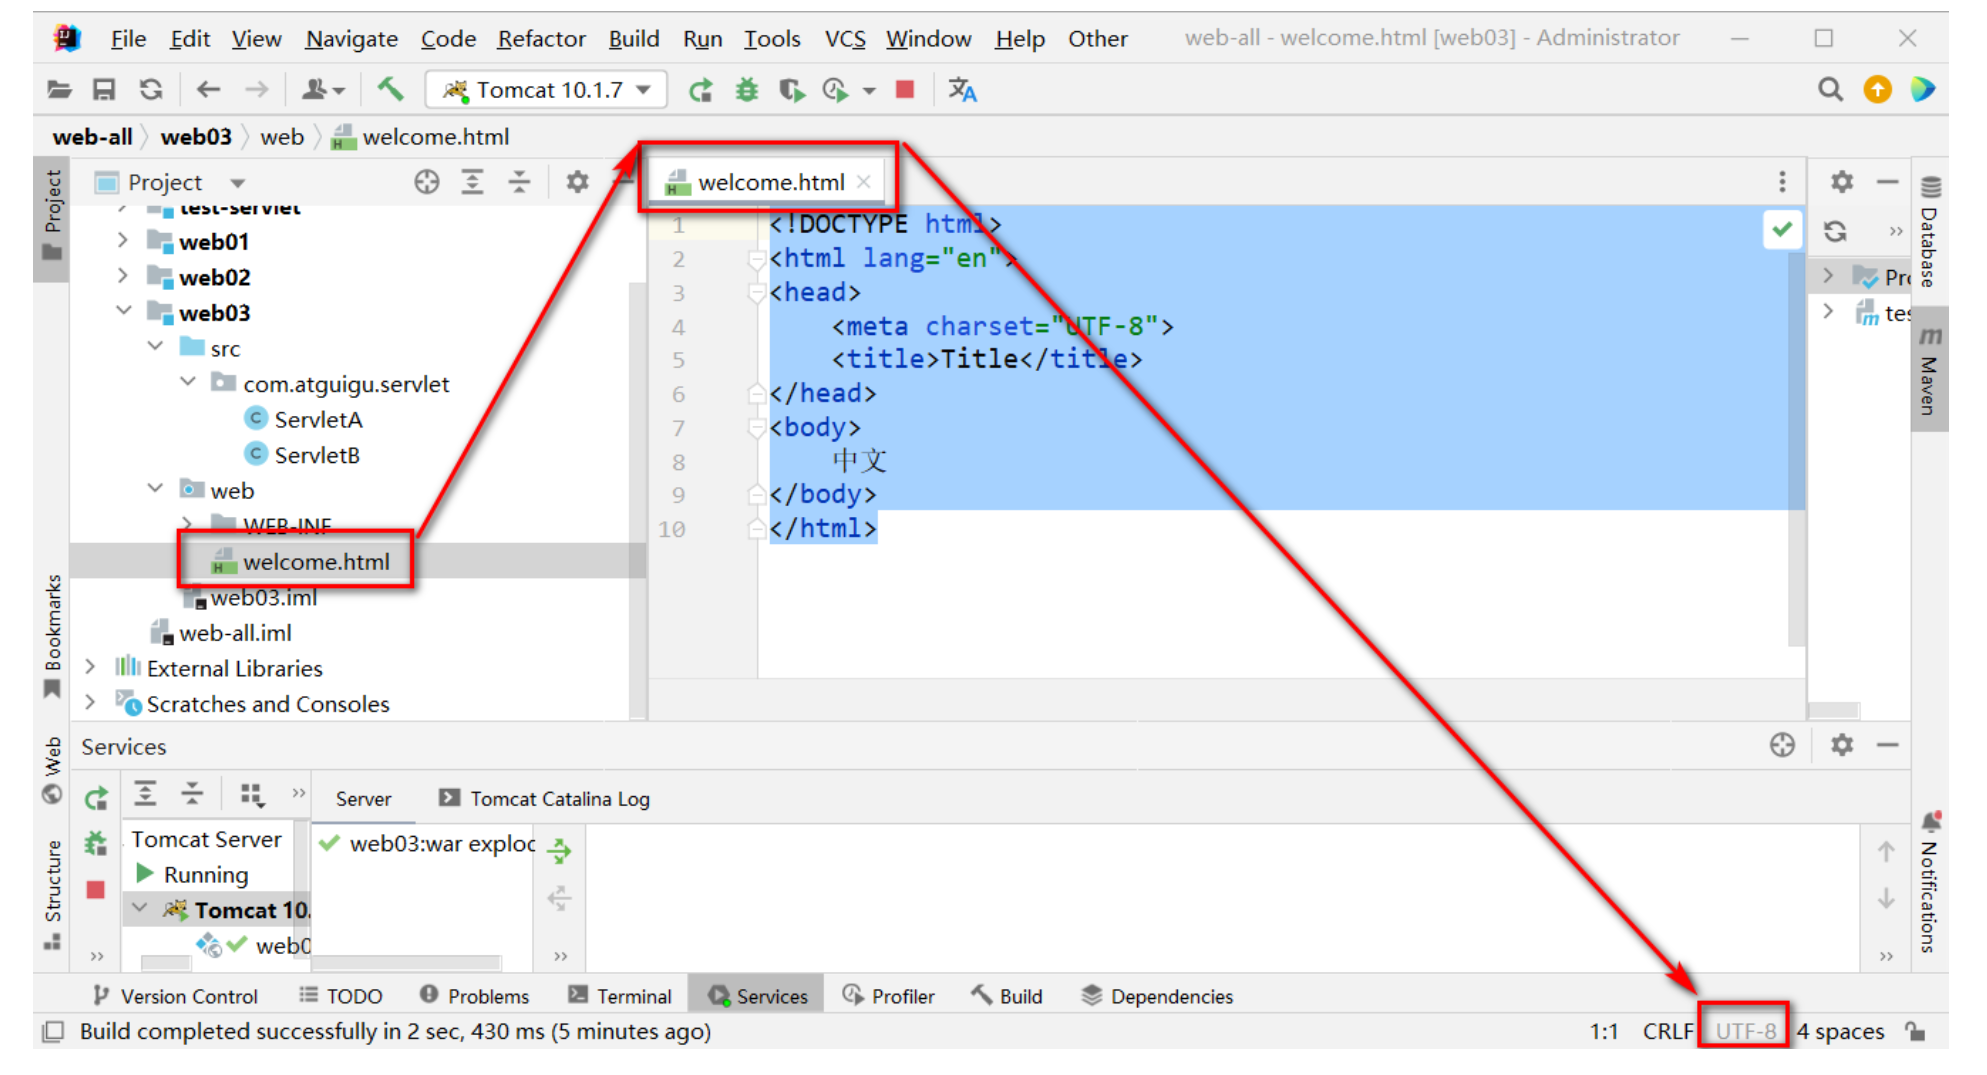
查看當前文件的字符集
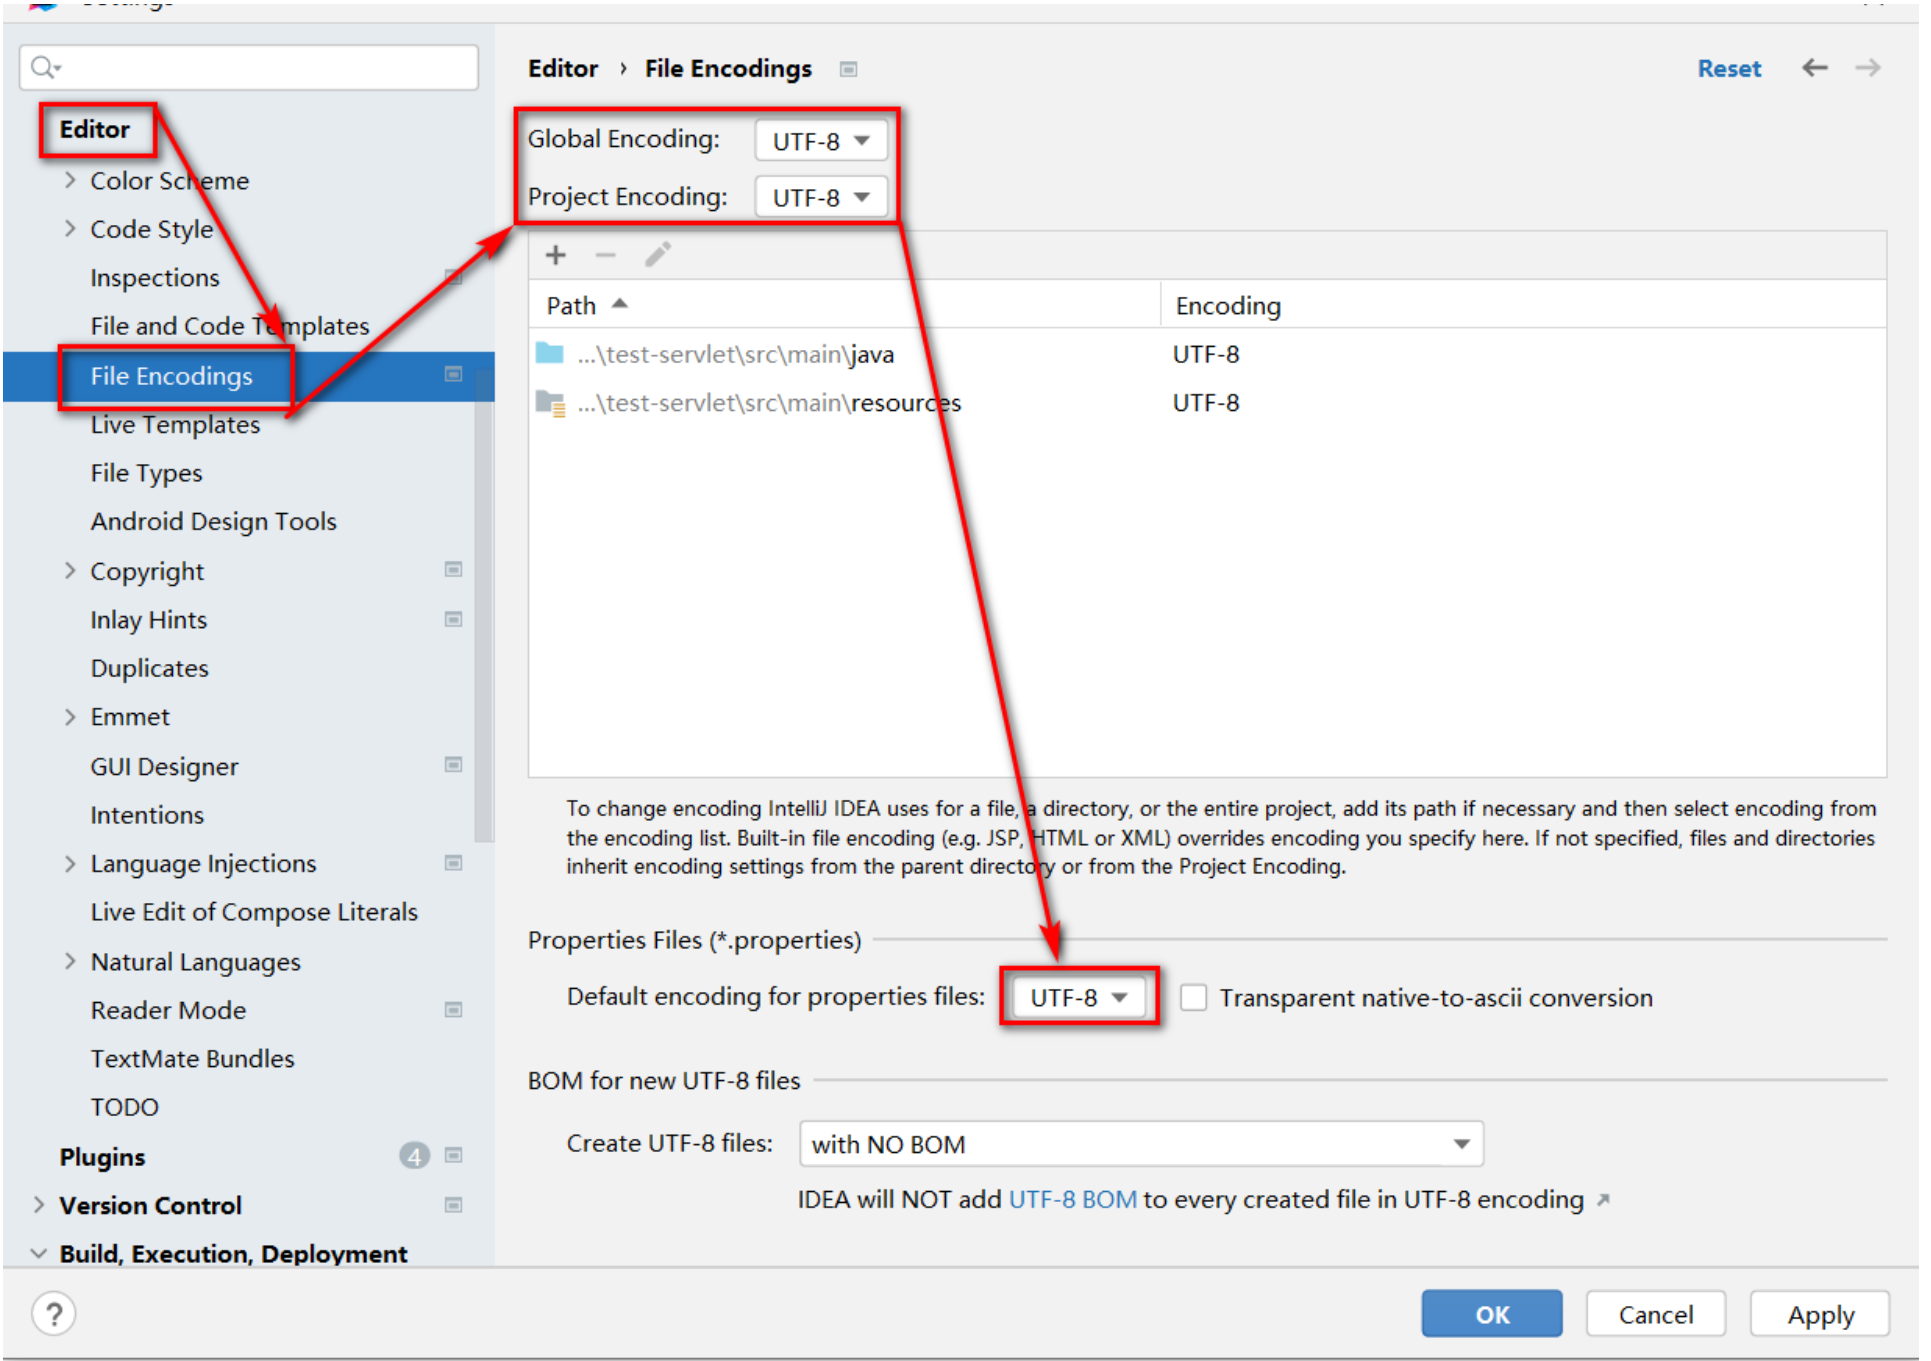
-
查看項目字符集 配置,將Global Encoding 全局字符集,Project Encoding 項目字符集, Properties Files 屬性配置文件字符集設置為UTF-8
當前視圖文件的字符集通過<meta charset="UTF-8"> 來告知瀏覽器通過什么字符集來解析當前文件
<!DOCTYPE html>
<html lang="en">
<head><meta charset="UTF-8"><title>Title</title>
</head>
<body>中文
</body>
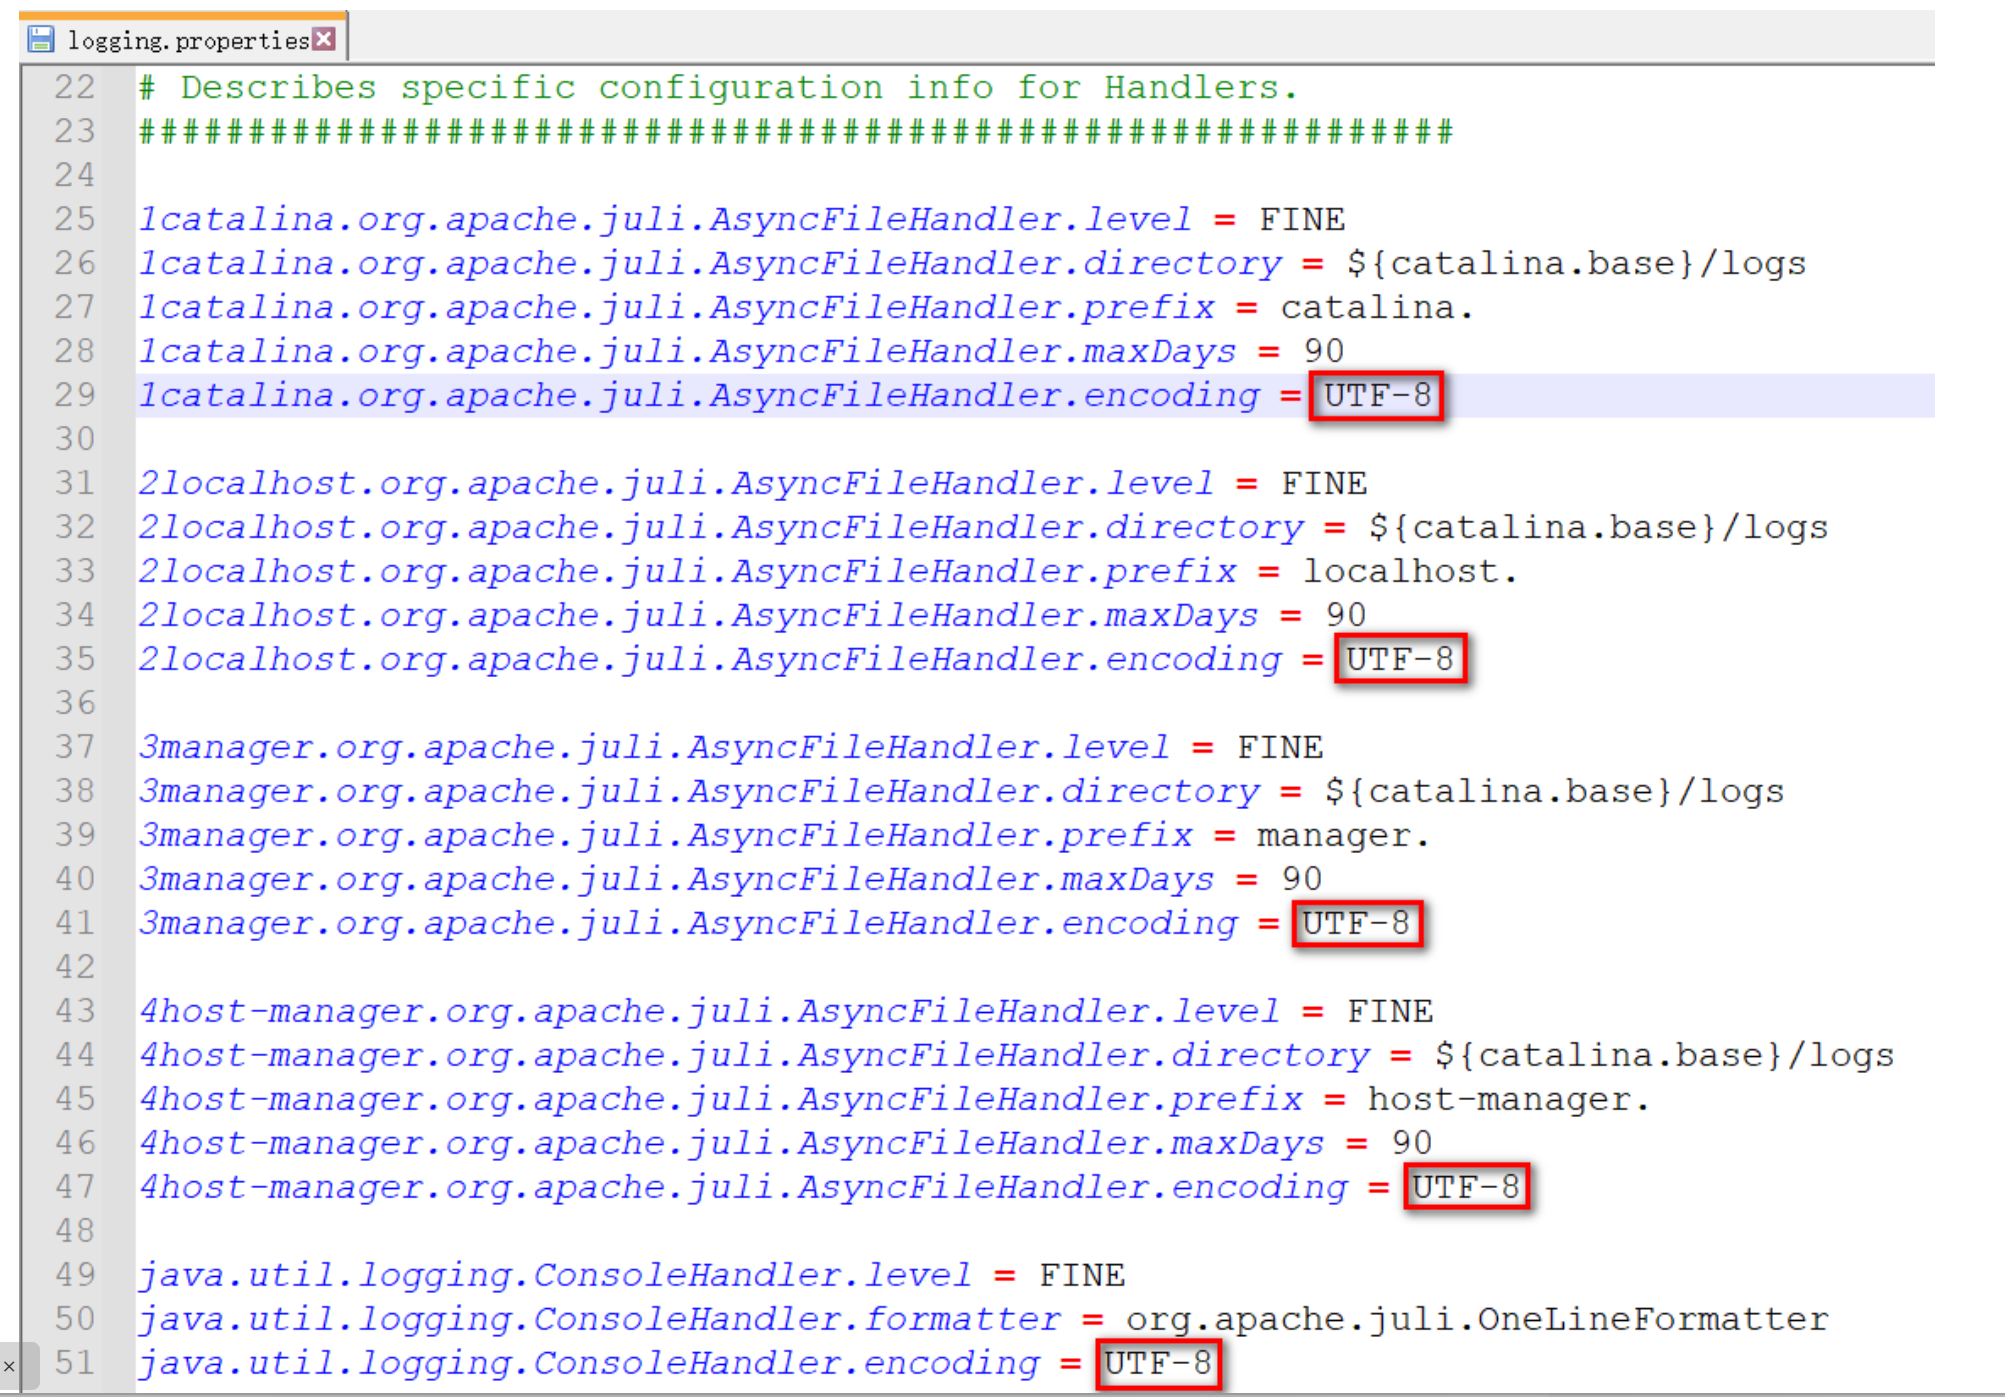
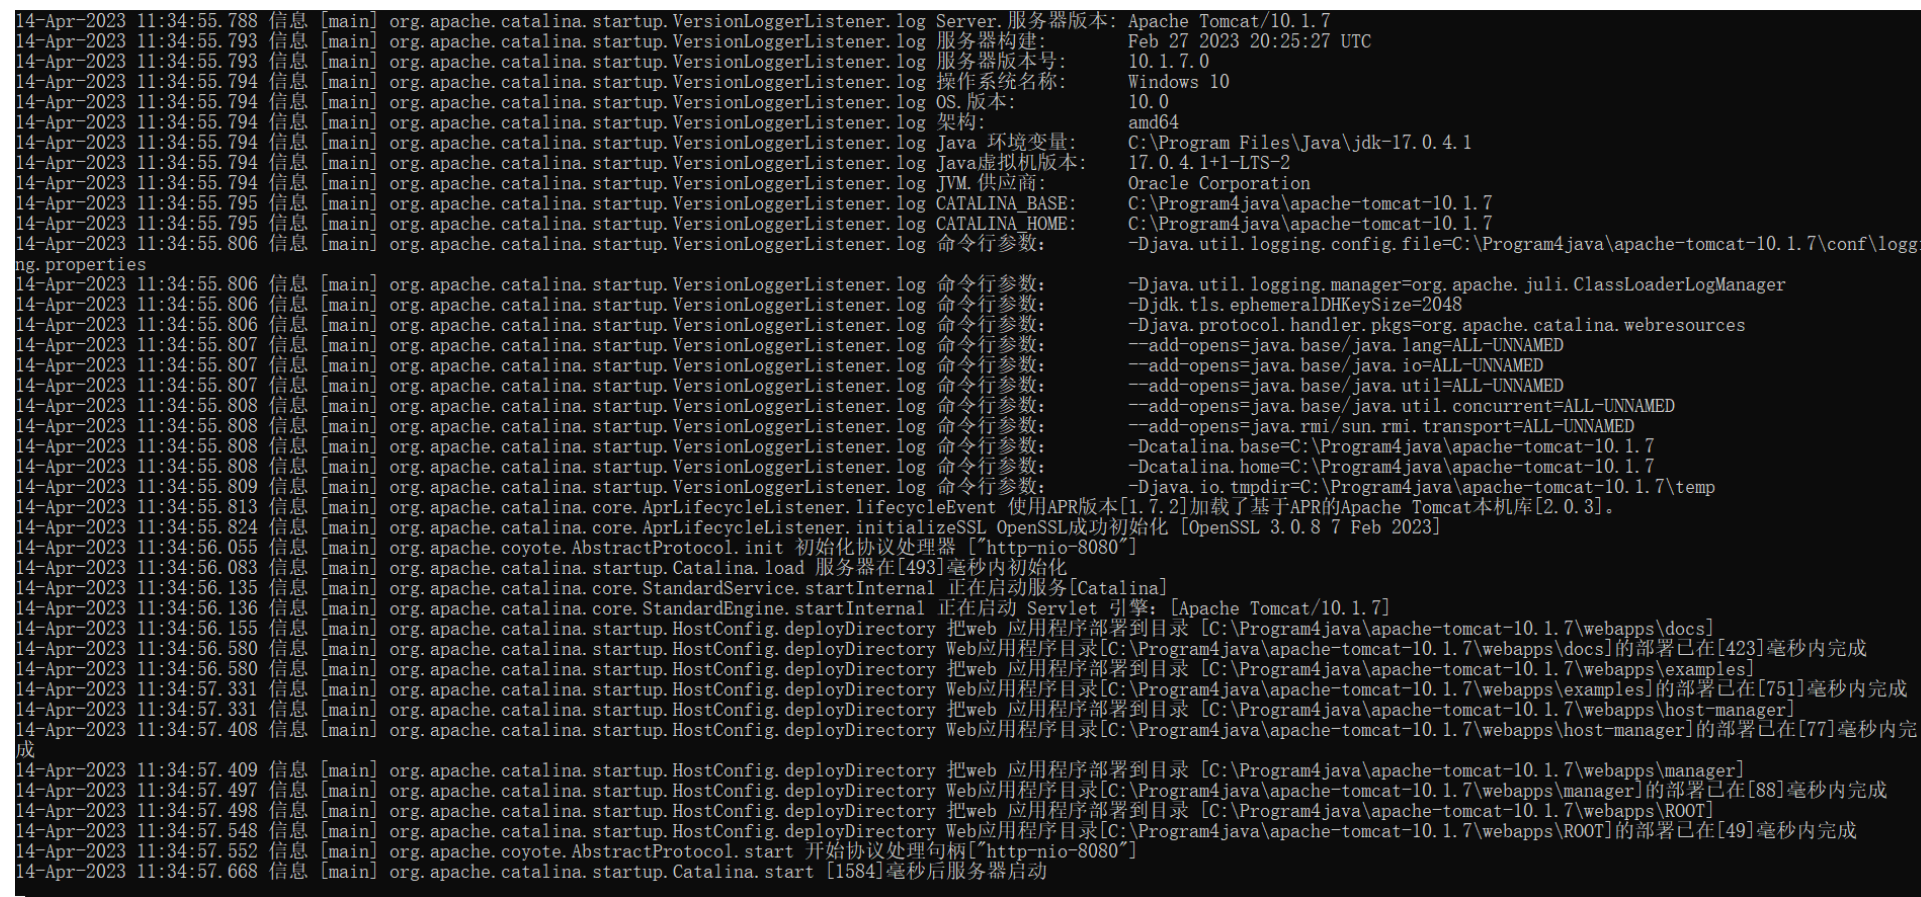
</html>10.1.2 Tomcat控制臺亂碼
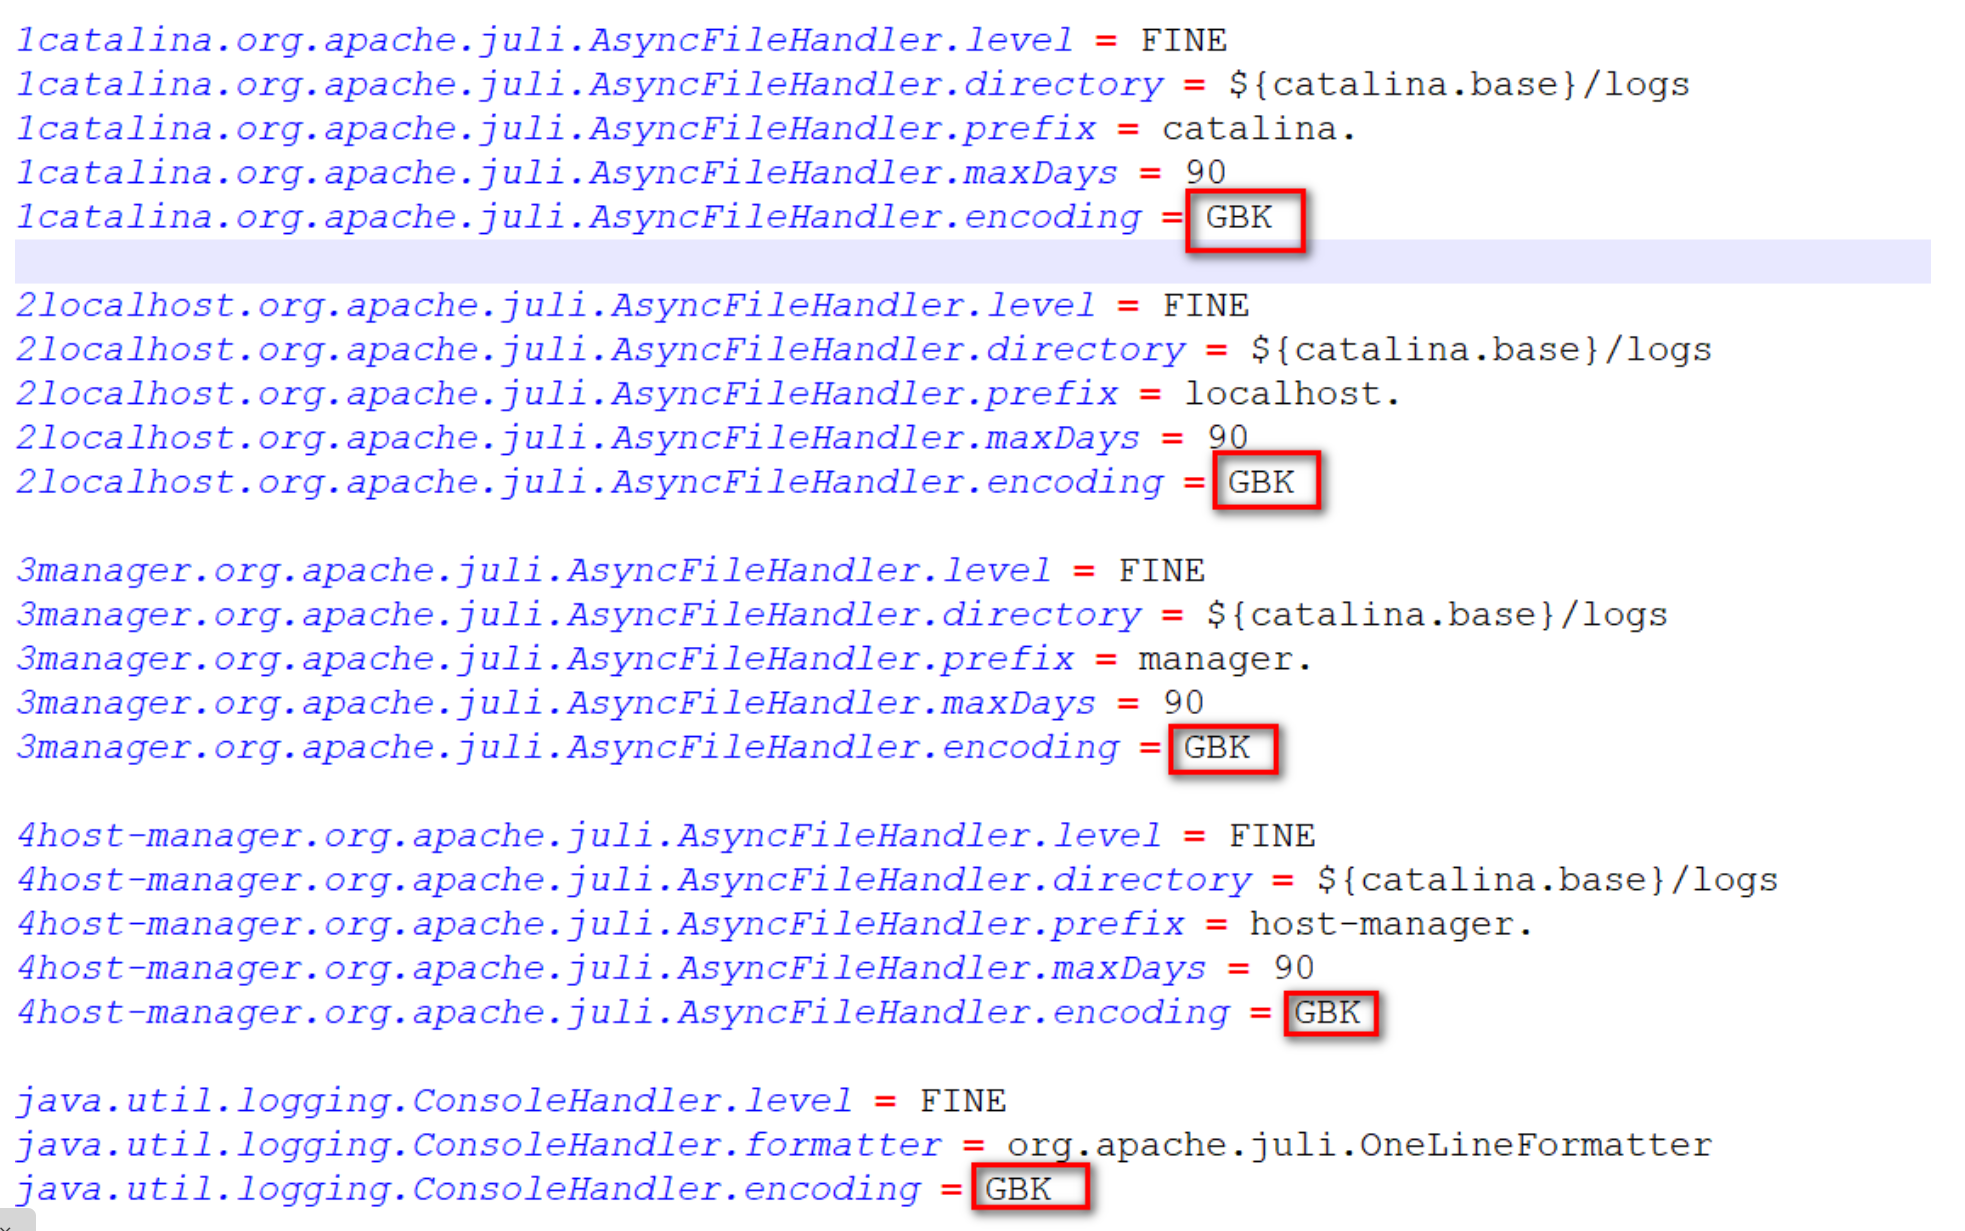
在tomcat10.1.7這個版本中,修改 tomcat/conf/logging.properties中,所有的UTF-8為GBK即可
-
修改前
-
修改后
-
重啟測試
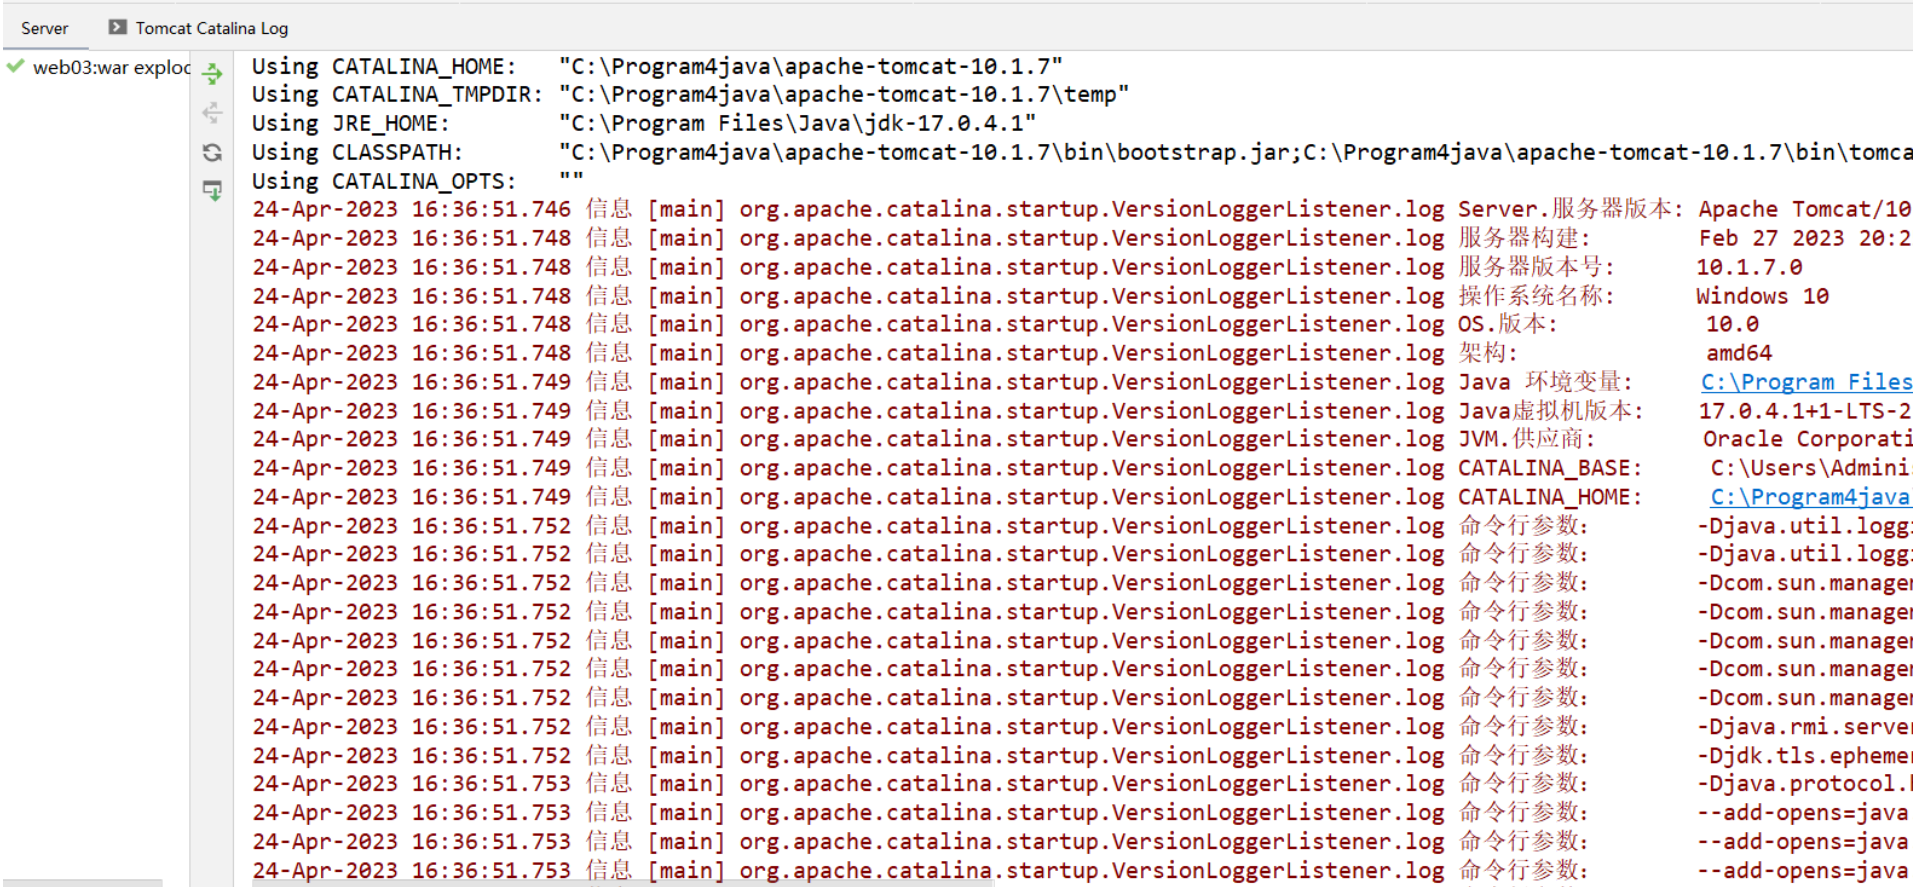
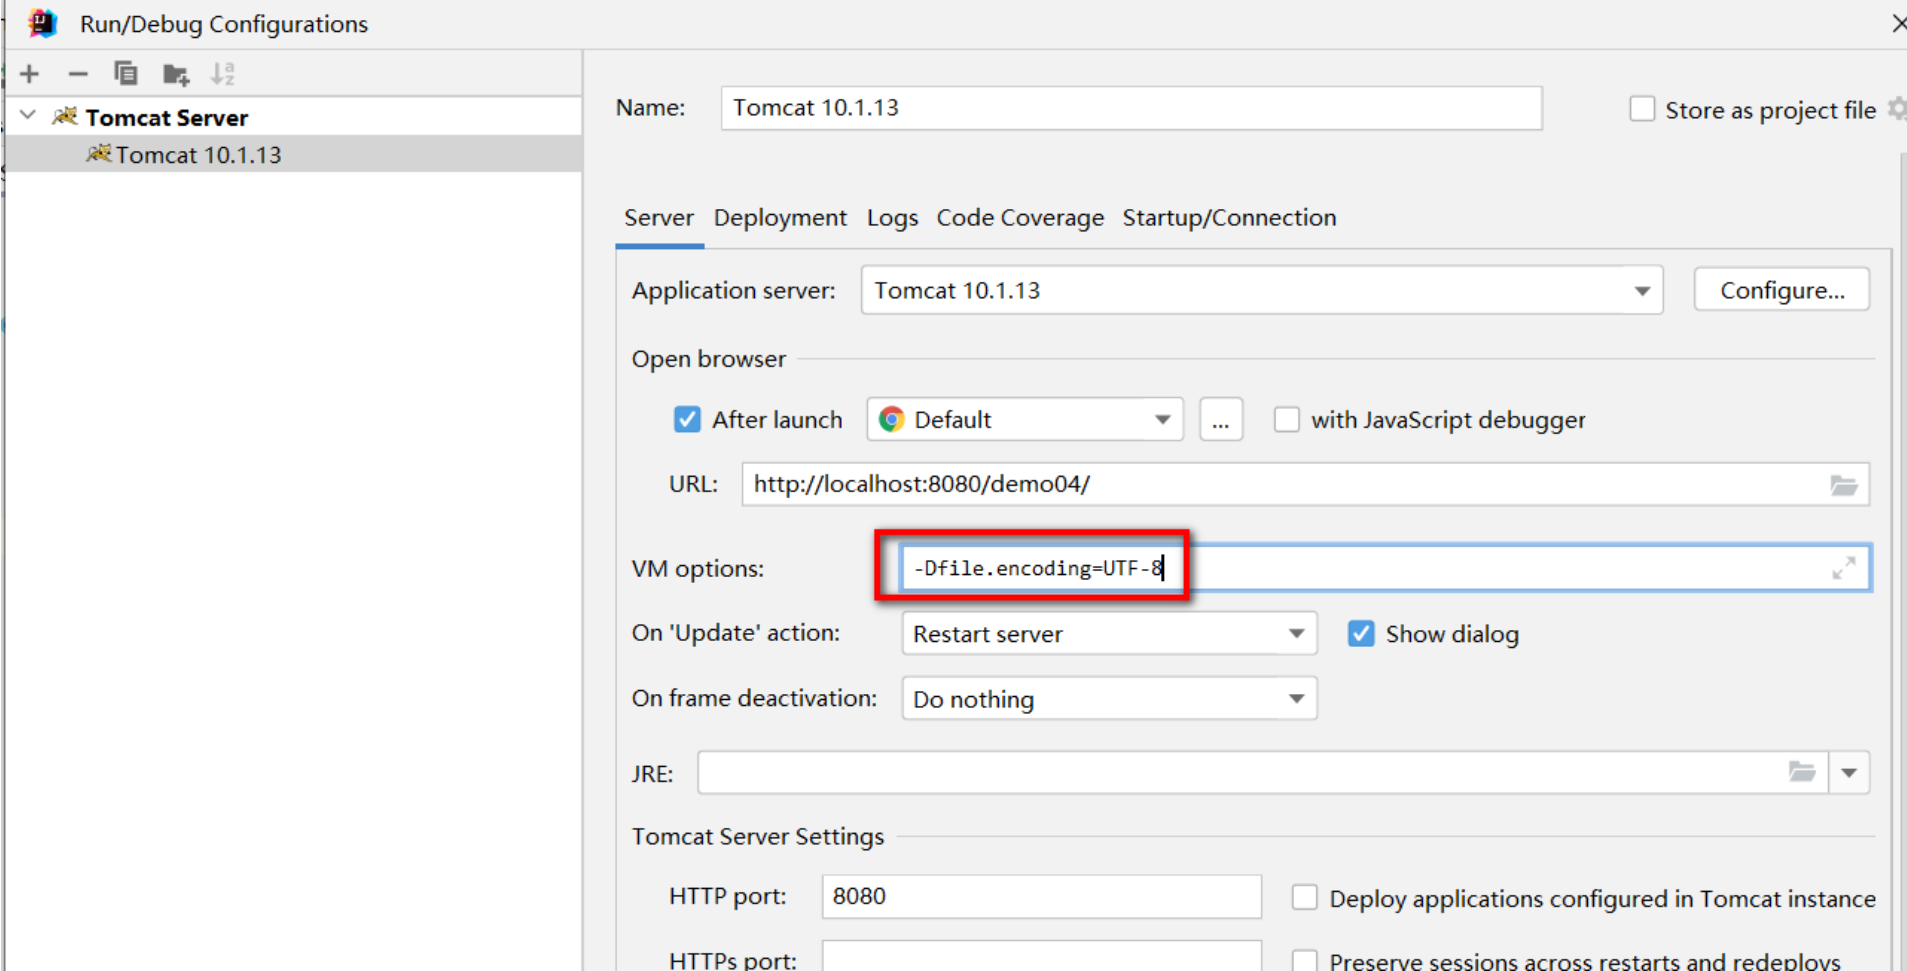
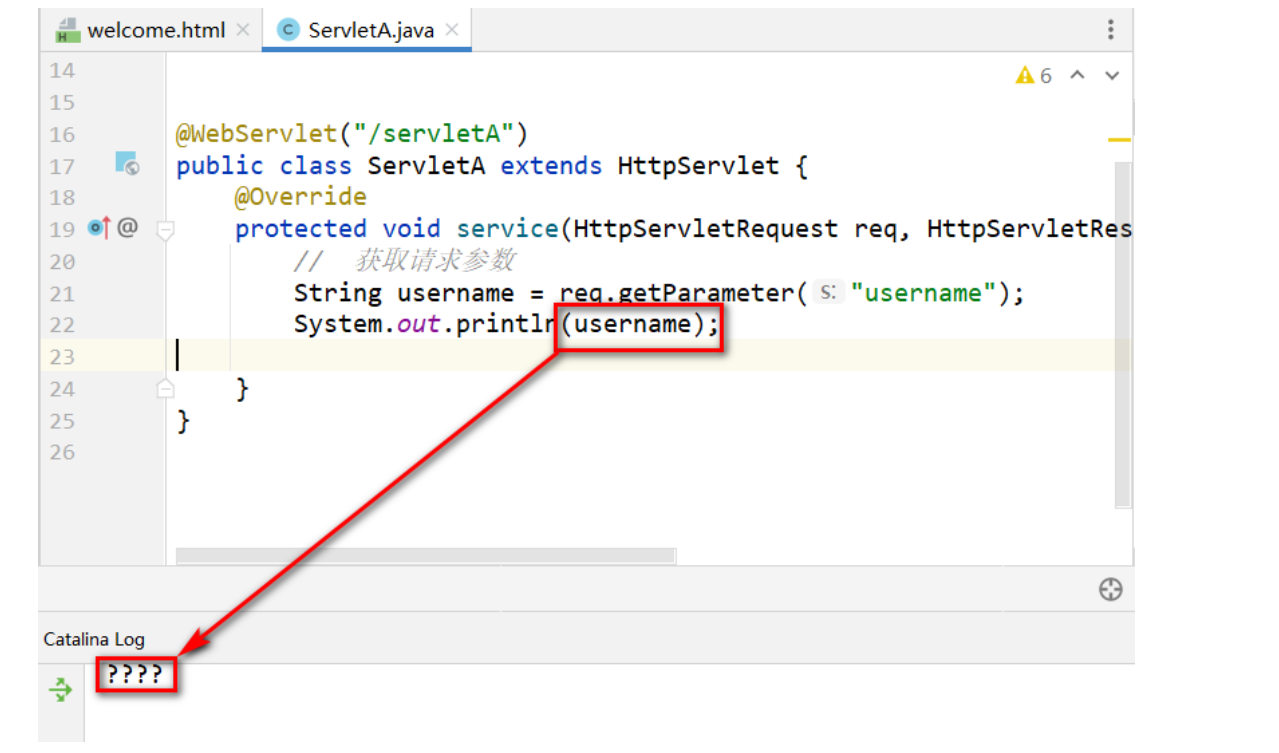
sout亂碼問題,設置JVM加載.class文件時使用UTF-8字符集
-
設置虛擬機加載.class文件的字符集和編譯時使用的字符集一致
10.1.3 請求亂碼問題
10.1.3.1 GET請求亂碼
GET請求方式亂碼分析
-
GET方式提交參數的方式是將參數放到URL后面,如果使用的不是UTF-8,那么會對參數進行URL編碼處理
-
HTML中的 <meta charset='字符集'/> 影響了GET方式提交參數的URL編碼
-
tomcat10.1.7的URI編碼默認為 UTF-8
-
當GET方式提交的參數URL編碼和tomcat10.1.7默認的URI編碼不一致時,就會出現亂碼
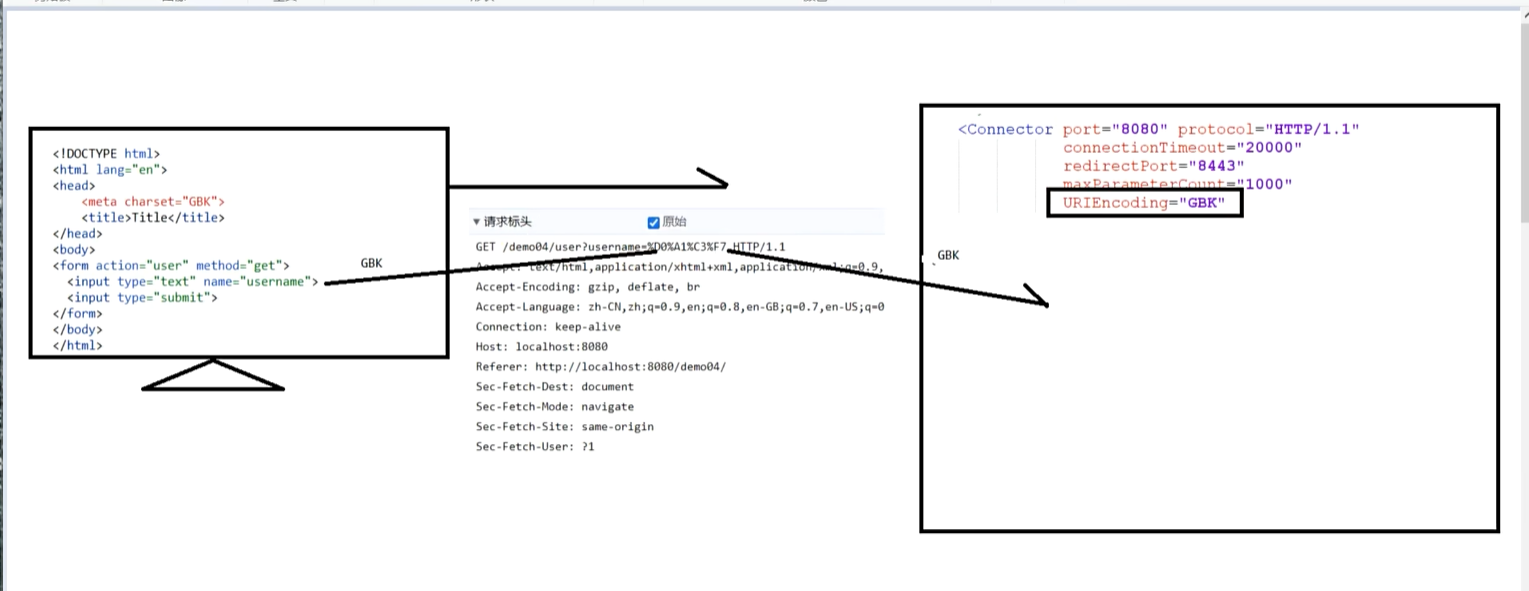
GET請求方式亂碼演示
-
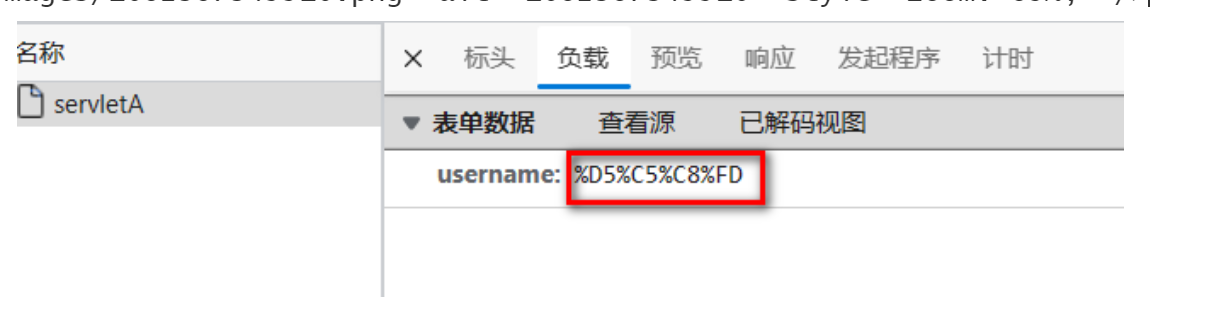
瀏覽器解析的文檔的<meta charset="GBK" />

-
GET方式提交時,會對數據進行URL編碼處理 ,是將GBK 轉碼為 "百分號碼"
GET請求方式亂碼解決
-
方式1 :設置GET方式提交的編碼和Tomcat10.1.7的URI默認解析編碼一致即可 (推薦)
-
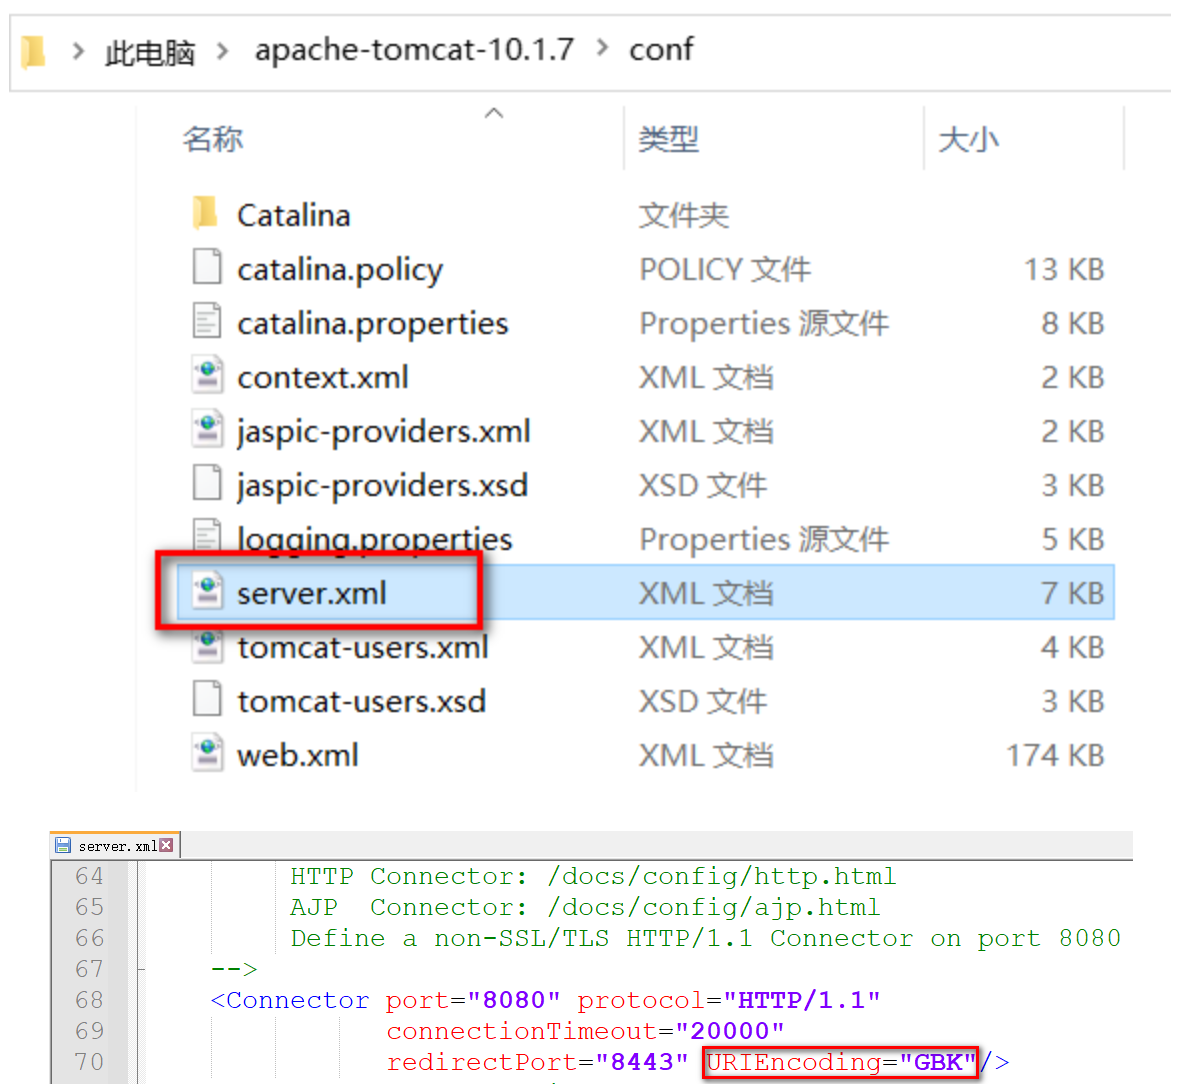
方式2 : 設置Tomcat10.1.7的URI解析字符集和GET請求發送時所使用URL轉碼時的字符集一致即可,修改conf/server.xml中 Connecter 添加 URIEncoding="GBK" (不推薦)
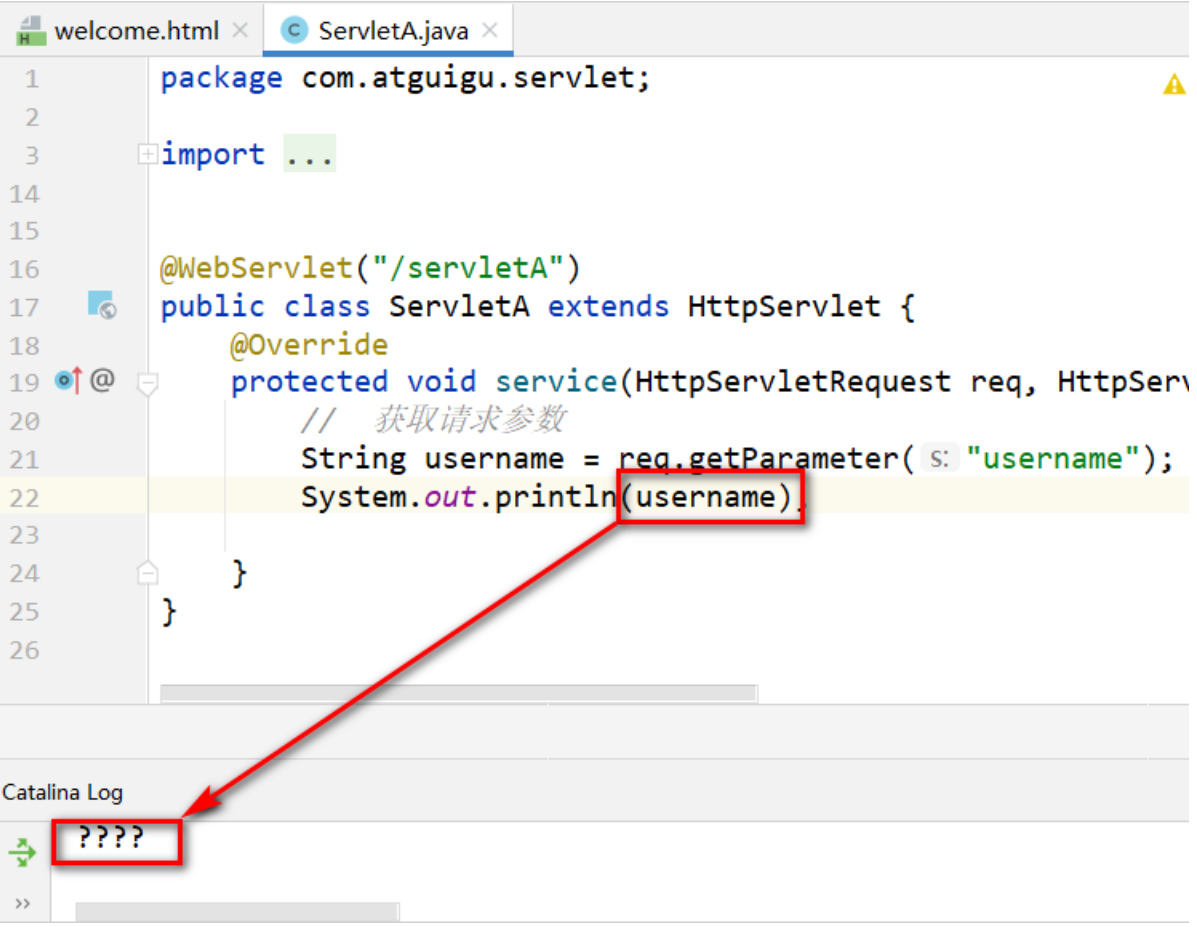
10.1.3.2 POST方式請求亂碼
POST請求方式亂碼分析
-
POST請求將參數放在請求體中進行發送
-
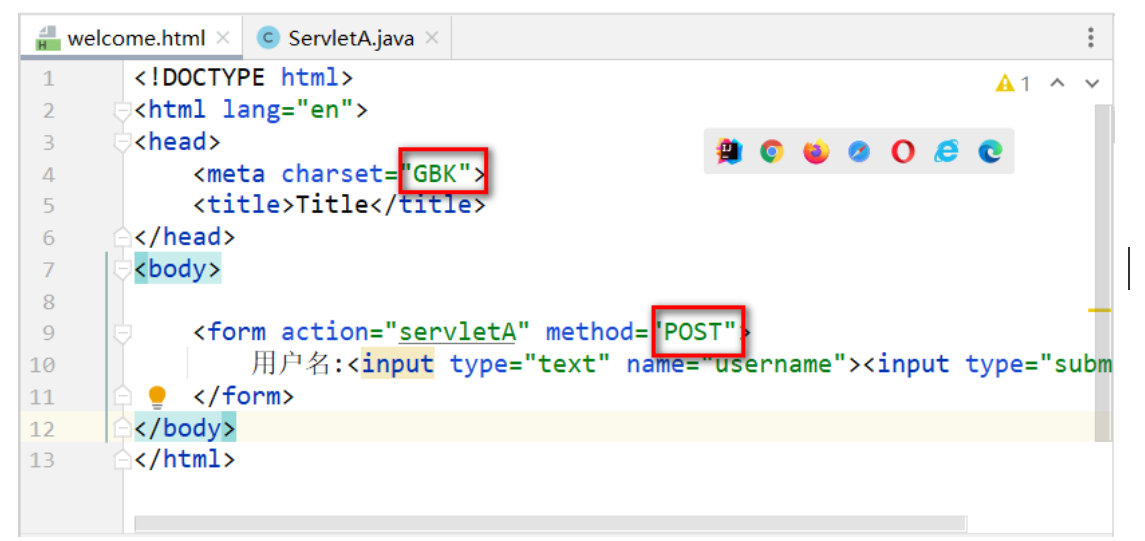
請求體使用的字符集受到了<meta charset="字符集"/> 的影響
-
Tomcat10.1.7 默認使用UTF-8字符集對請求體進行解析
-
如果請求體的URL轉碼和Tomcat的請求體解析編碼不一致,就容易出現亂碼
POST方式亂碼演示
-
POST請求請求體受到了<meta charset="字符集"/> 的影響
URLEncoding="GBK"針對的是對url當中字符的解碼,而不是請求體中的,所以此時加上了這段代碼并不生效
-
請求體中,將GBK數據進行 URL編碼
-
后端默認使用UTF-8解析請求體,出現字符集不一致,導致亂碼
POST請求方式亂碼解決
-
方式1 : 請求時,使用UTF-8字符集提交請求體 (推薦)

-
方式2 : 后端在獲取參數前,設置解析請求體使用的字符集和請求發送時使用的字符集一致 (不推薦)

10.1.3 響應亂碼問題
響應亂碼分析
-
在Tomcat10.1.7中,向響應體中放入的數據默認使用了工程編碼 UTF-8
-
瀏覽器在接收響應信息時,使用了不同的字符集或者是不支持中文的字符集就會出現亂碼
響應亂碼演示
-
服務端通過response對象向響應體添加數據
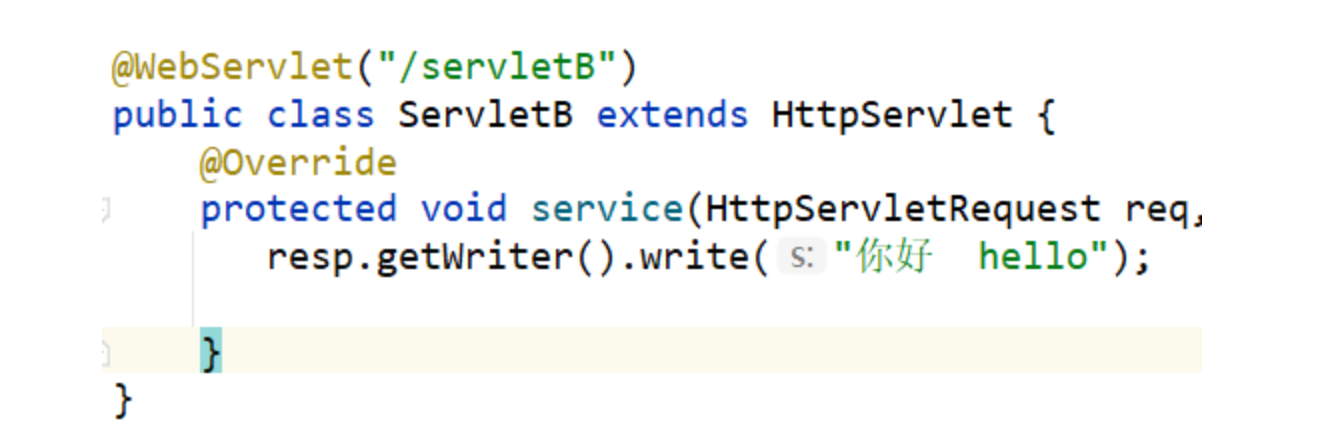
瀏覽器接收數據解析亂碼

響應亂碼解決
-
方式1 : 手動設定瀏覽器對本次響應體解析時使用的字符集(不推薦)
-
edge和 chrome瀏覽器沒有提供直接的比較方便的入口,不方便
-
-
方式2: 后端通過設置響應體的字符集和瀏覽器解析響應體的默認字符集一致(不推薦)
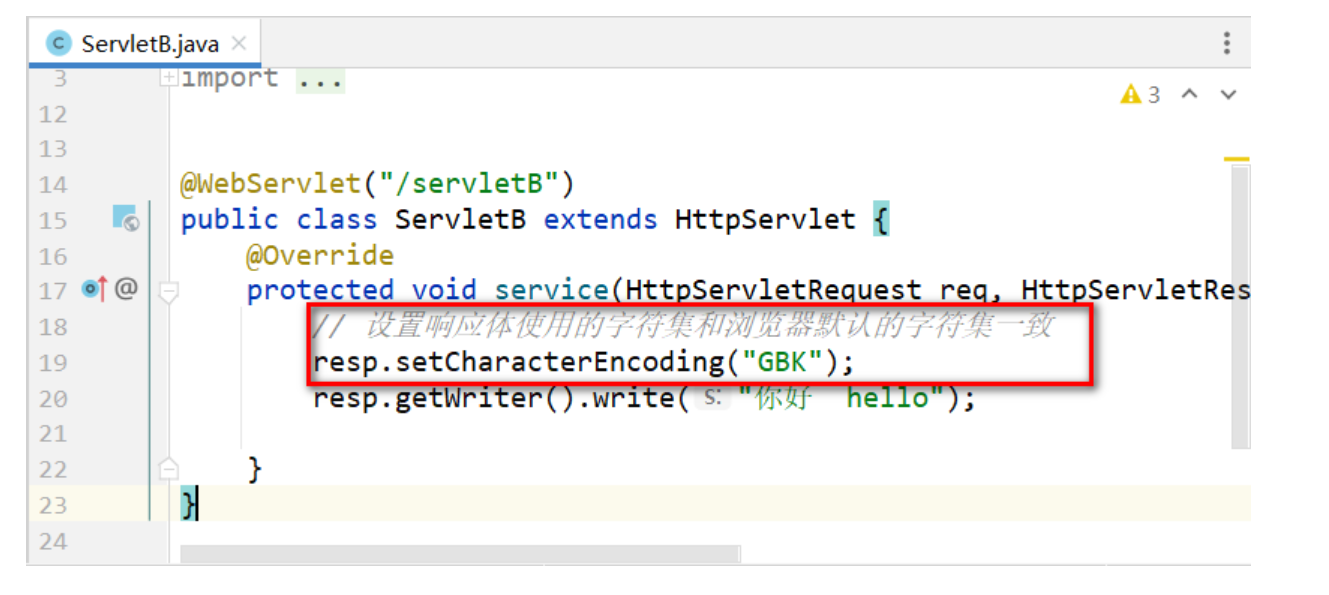
方式3: 通過設置content-type響應頭,告訴瀏覽器以指定的字符集解析響應體(推薦)
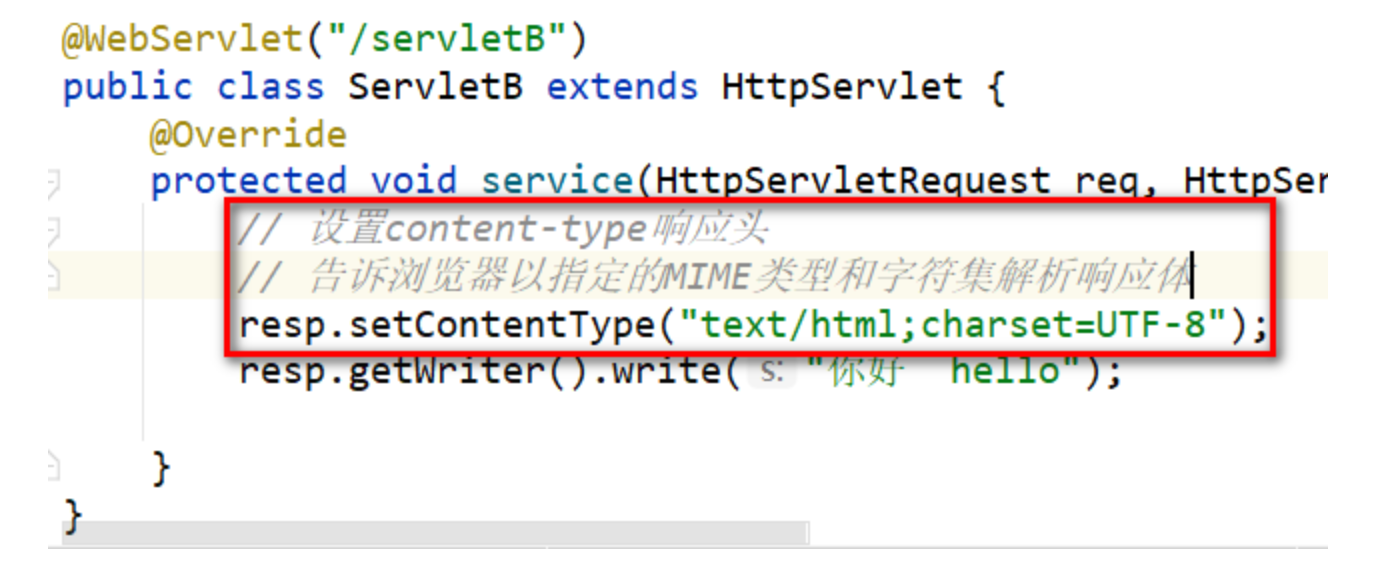
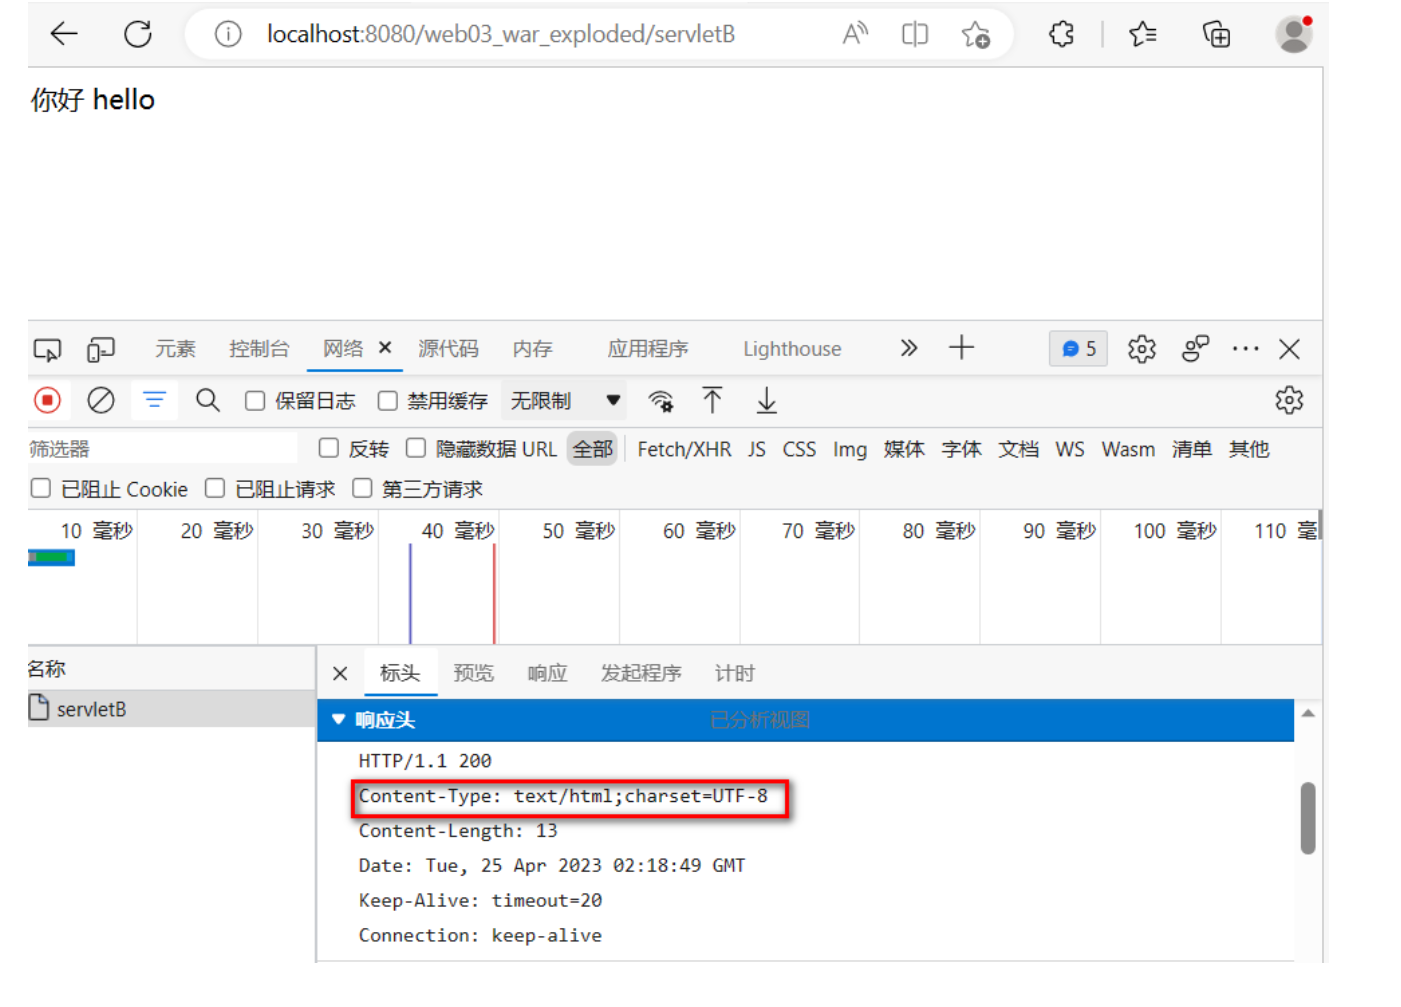 ?代碼
?代碼
package com.atguigu.servlet;import jakarta.servlet.ServletException;
import jakarta.servlet.annotation.WebServlet;
import jakarta.servlet.http.HttpServlet;
import jakarta.servlet.http.HttpServletRequest;
import jakarta.servlet.http.HttpServletResponse;import java.io.IOException;/*** ClassName: ServletC* Package: com.atguigu.servlet* Description:** @Author: start* @Create 2025-07-27 20:22* @Version: 1.0*/
@WebServlet("/servletC")
public class ServletC extends HttpServlet {@Overrideprotected void service(HttpServletRequest req, HttpServletResponse resp) throws ServletException, IOException {//設置響應體使用UTF-8編碼resp.setCharacterEncoding("GBK");//設置Content-Type響應頭,告訴客戶端用UTF-8解碼resp.setContentType("text/html;charset=UTF-8");// 向客戶端響應一些文字resp.getWriter().write("你好,hello");/** tomcat10中,響應體默認的編碼字符集使用的是UTF-8** 解決思路*   1 可以設置響應體的編碼字符集和客戶端的保持一致   不推薦  客戶端解析的字符集是無法預測*   2 可以告訴客戶端使用指定的字符集進行解碼   通過設置Content-Type響應頭* 注意的是  明確響應體的編碼,然后再設置Content-Type* 響應行* 響應頭* 響應體  你好  hello(GBK)* */}
}
10.2 路徑問題
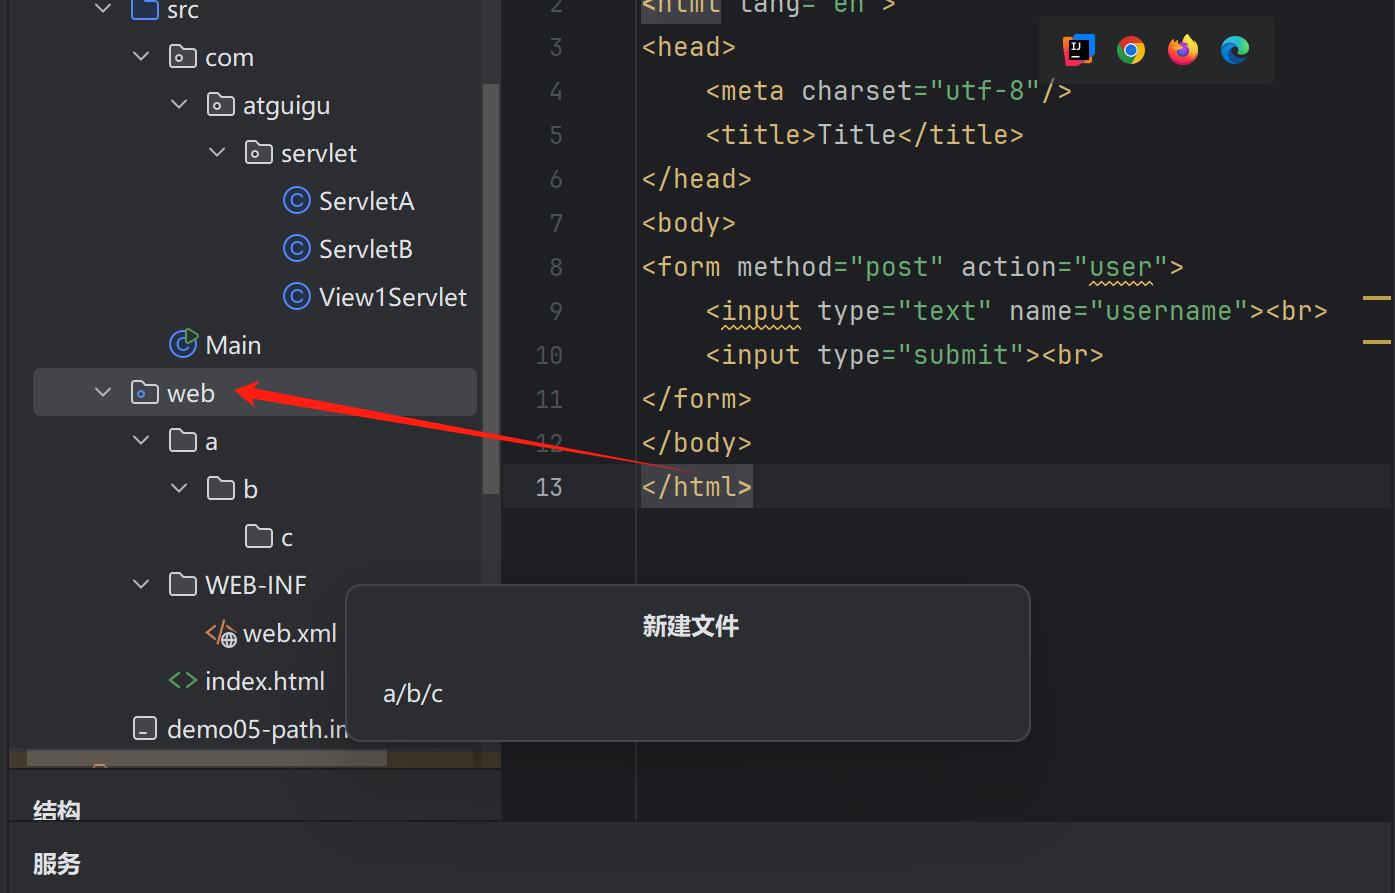
在web當中創建目錄的話,要使用/來創建
注釋:每一個../都會抵消掉一個目錄
?點擊熱重載重新構建
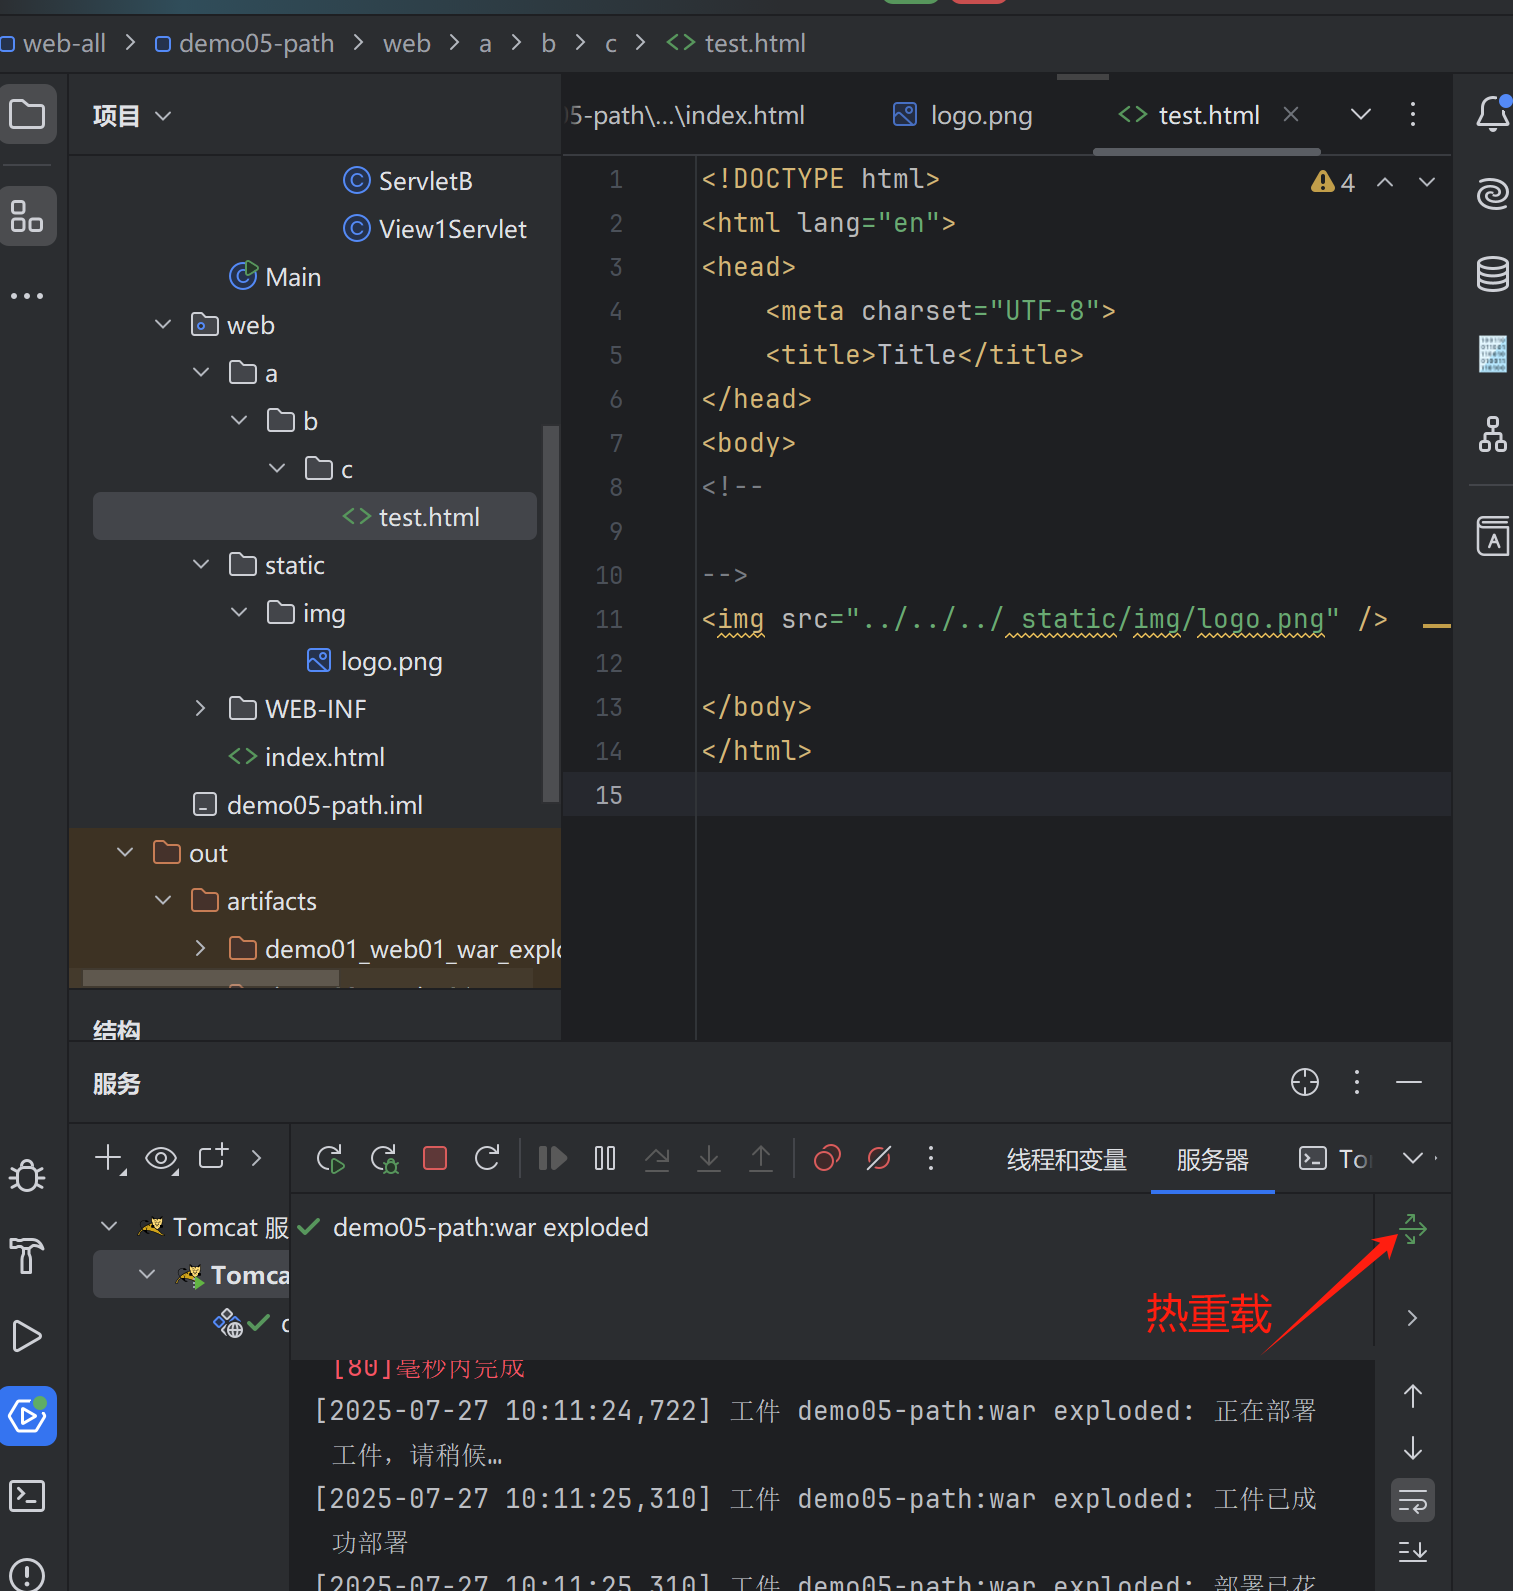
目錄結構
10.2.1.1 相對路徑情況分析
相對路徑情況1:web/index.html中引入web/static/img/logo.png
-
訪問index.html的url為 : http://localhost:8080/web03_war_exploded/index.html
-
當前資源為 : index.html
-
當前資源的所在路徑為 : http://localhost:8080/web03_war_exploded/
-
要獲取的目標資源url為 : http://localhost:8080/web03_war_exploded/static/img/logo.png
-
index.html中定義的了 :
<img src="static/img/logo.png"/> -
尋找方式就是在當前資源所在路徑(http://localhost:8080/web03_war_exploded/)后拼接src屬性值(static/img/logo.png),正好是目標資源正常獲取的url(http://localhost:8080/web03_war_exploded/static/img/logo.png)
<!DOCTYPE html>
<html lang="en">
<head><meta charset="UTF-8"><title>Title</title>
</head>
<body><img src="static/img/logo.png">
</body>
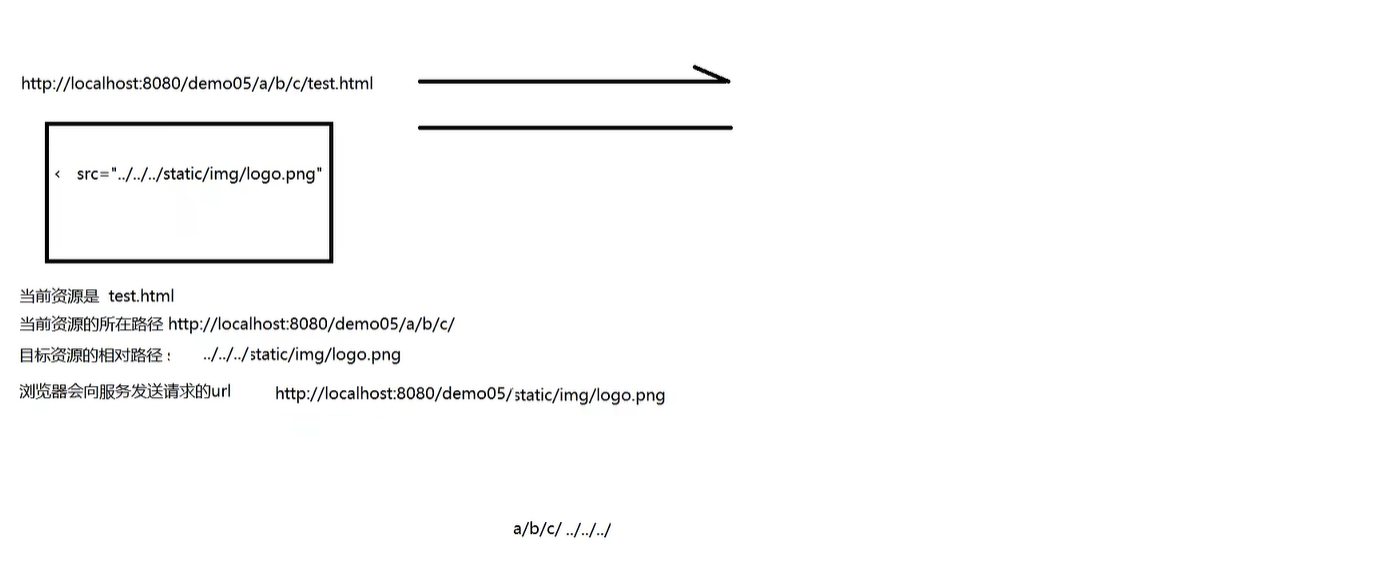
</html>相對路徑情況2:web/a/b/c/test.html中引入web/static/img/logo.png
-
訪問test.html的url為 : http://localhost:8080/web03_war_exploded/a/b/c/test.html
-
當前資源為 : test.html
-
當前資源的所在路徑為 : http://localhost:8080/web03_war_exploded/a/b/c/
-
要獲取的目標資源url為 : http://localhost:8080/web03_war_exploded/static/img/logo.png
-
test.html中定義的了 :
<img src="../../../static/img/logo.png"/> -
尋找方式就是在當前資源所在路徑(http://localhost:8080/web03_war_exploded/a/b/c/)后拼接src屬性值(../../../static/img/logo.png),其中 ../可以抵消一層路徑,正好是目標資源正常獲取的url(http://localhost:8080/web03_war_exploded/static/img/logo.png)
<!DOCTYPE html>
<html lang="en">
<head><meta charset="UTF-8"><title>Title</title>
</head>
<body><!-- ../代表上一層路徑 --><img src="../../../static/img/logo.png">
</body>
</html>
相對路徑情況3:web/WEB-INF/views/view1.html中引入web/static/img/logo.png
-
view1.html在WEB-INF下,需要通過Servlet請求轉發獲得
@WebServlet("/view1Servlet")
public class View1Servlet extends HttpServlet {@Overrideprotected void service(HttpServletRequest req, HttpServletResponse resp) throws ServletException, IOException {RequestDispatcher requestDispatcher = req.getRequestDispatcher("WEB-INF/views/view1.html");requestDispatcher.forward(req,resp);}
}-
訪問view1.html的url為 : http://localhost:8080/web03_war_exploded/view1Servlet
-
當前資源為 : view1Servlet
-
當前資源的所在路徑為 : http://localhost:8080/web03_war_exploded/
-
要獲取的目標資源url為 : http://localhost:8080/web03_war_exploded/static/img/logo.png
-
view1.html中定義的了 :
<img src="static/img/logo.png"/> -
尋找方式就是在當前資源所在路徑(http://localhost:8080/web03_war_exploded/)后拼接src屬性值(static/img/logo.png),正好是目標資源正常獲取的url(http://localhost:8080/web03_war_exploded/static/img/logo.png)
<!DOCTYPE html>
<html lang="en">
<head><meta charset="UTF-8"><title>Title</title>
</head>
<body><img src="static/img/logo.png">
</body>
</html>
10.2.1.2 絕對路徑情況分析
絕對路徑情況1:web/index.html中引入web/static/img/logo.png
-
訪問index.html的url為 : http://localhost:8080/web03_war_exploded/index.html
-
絕對路徑的基準路徑為 : http://localhost:8080
-
要獲取的目標資源url為 : http://localhost:8080/web03_war_exploded/static/img/logo.png
-
index.html中定義的了 :
<img src="/web03_war_exploded/static/img/logo.png"/> -
尋找方式就是在基準路徑(http://localhost:8080)后面拼接src屬性值(/web03_war_exploded/static/img/logo.png),得到的正是目標資源訪問的正確路徑
<!DOCTYPE html>
<html lang="en">
<head><meta charset="UTF-8"><title>Title</title>
</head>
<body><!-- 絕對路徑寫法 --><img src="/web03_war_exploded/static/img/logo.png">
</body>
</html>
絕對路徑情況2:web/a/b/c/test.html中引入web/static/img/logo.png
-
訪問test.html的url為 : http://localhost:8080/web03_war_exploded/a/b/c/test.html
-
絕對路徑的基準路徑為 : http://localhost:8080
-
要獲取的目標資源url為 : http://localhost:8080/web03_war_exploded/static/img/logo.png
-
test.html中定義的了 :
<img src="/web03_war_exploded/static/img/logo.png"/> -
尋找方式就是在基準路徑(http://localhost:8080)后面拼接src屬性值(/web03_war_exploded/static/img/logo.png),得到的正是目標資源訪問的正確路徑
<!DOCTYPE html>
<html lang="en">
<head><meta charset="UTF-8"><title>Title</title>
</head>
<body><!-- 絕對路徑寫法 --><img src="/web03_war_exploded/static/img/logo.png">
</body>
</html>
絕對路徑情況3:web/WEB-INF/views/view1.html中引入web/static/img/logo.png
-
view1.html在WEB-INF下,需要通過Servlet請求轉發獲得
@WebServlet("/view1Servlet")
public class View1Servlet extends HttpServlet {@Overrideprotected void service(HttpServletRequest req, HttpServletResponse resp) throws ServletException, IOException {RequestDispatcher requestDispatcher = req.getRequestDispatcher("WEB-INF/views/view1.html");requestDispatcher.forward(req,resp);}
}-
訪問view1.html的url為 : http://localhost:8080/web03_war_exploded/view1Servlet
-
絕對路徑的基準路徑為 : http://localhost:8080
-
要獲取的目標資源url為 : http://localhost:8080/web03_war_exploded/static/img/logo.png
-
view1.html中定義的了 :
<img src="/web03_war_exploded/static/img/logo.png"/> -
尋找方式就是在基準路徑(http://localhost:8080)后面拼接src屬性值(/static/img/logo.png),得到的正是目標資源訪問的正確路徑
<!DOCTYPE html>
<html lang="en">
<head><meta charset="UTF-8"><title>Title</title>
</head>
<body><img src="/web03_war_exploded/static/img/logo.png">
</body>
</html>
10.2.1.3 base標簽的使用
base標簽定義頁面相對路徑公共前綴
-
base 標簽定義在head標簽中,用于定義相對路徑的公共前綴
-
base 標簽定義的公共前綴只在相對路徑上有效,絕對路徑中無效
-
如果相對路徑開頭有 ./ 或者../修飾,則base標簽對該路徑同樣無效
index.html 和a/b/c/test.html 以及view1Servlet 中的路徑處理
<!DOCTYPE html>
<html lang="en">
<head><meta charset="UTF-8"><title>Title</title><!--定義相對路徑的公共前綴,將相對路徑轉化成了絕對路徑--><base href="/web03_war_exploded/">
</head>
<body><img src="static/img/logo.png">
</body>
</html>
10.2.1.4 缺省項目上下文路徑
項目上下文路徑變化問題
-
通過 base標簽雖然解決了相對路徑轉絕對路徑問題,但是base中定義的是項目的上下文路徑
-
項目的上下文路徑是可以隨意變化的
-
一旦項目的上下文路徑發生變化,所有base標簽中的路徑都需要改
解決方案
-
將項目的上下文路徑進行缺省設置,設置為 /,所有的絕對路徑中就不必填寫項目的上下文了,直接就是/開頭即可
10.2.2 重定向中的路徑問題
目標 :由/x/y/z/servletA重定向到a/b/c/test.html
@WebServlet("/x/y/z/servletA")
public class ServletA extends HttpServlet {@Overrideprotected void service(HttpServletRequest req, HttpServletResponse resp) throws ServletException, IOException {}
}
10.2.2.1相對路徑寫法
-
訪問ServletA的url為 : http://localhost:8080/web03_war_exploded/x/y/z/servletA
-
當前資源為 : servletA
-
當前資源的所在路徑為 : http://localhost:8080/web03_war_exploded/x/x/z/
-
要獲取的目標資源url為 : http://localhost:8080/web03_war_exploded/a/b/c/test.html
-
ServletA重定向的路徑 : ../../../a/b/c/test/html
-
尋找方式就是在當前資源所在路徑(http://localhost:8080/web03_war_exploded/x/y/z/)后拼接(../../../a/b/c/test/html),形成(http://localhost:8080/web03_war_exploded/x/y/z/../../../a/b/c/test/html)每個../抵消一層目錄,正好是目標資源正常獲取的url(http://localhost:8080/web03_war_exploded/a/b/c/test/html)
@WebServlet("/x/y/z/servletA")
public class ServletA extends HttpServlet {@Overrideprotected void service(HttpServletRequest req, HttpServletResponse resp) throws ServletException, IOException {// 相對路徑重定向到test.htmlresp.sendRedirect("../../../a/b/c/test.html");}
}
10.2.2.2絕對路徑寫法
-
訪問ServletA的url為 : http://localhost:8080/web03_war_exploded/x/y/z/servletA
-
絕對路徑的基準路徑為 : http://localhost:8080
-
要獲取的目標資源url為 : http://localhost:8080/web03_war_exploded/a/b/c/test.html
-
ServletA重定向的路徑 : /web03_war_exploded/a/b/c/test.html
-
尋找方式就是在基準路徑(http://localhost:8080)后面拼接(/web03_war_exploded/a/b/c/test.html),得到( http://localhost:8080/web03_war_exploded/a/b/c/test.html)正是目標資源訪問的正確路徑
-
絕對路徑中需要填寫項目上下文路徑,但是上下文路徑是變換的
-
可以通過 ServletContext的getContextPath()獲取上下文路徑
-
可以將項目上下文路徑定義為 / 缺省路徑,那么路徑中直接以/開頭即可
-
//絕對路徑中,要寫項目上下文路徑
//resp.sendRedirect("/web03_war_exploded/a/b/c/test.html");
// 通過ServletContext對象動態獲取項目上下文路徑
//resp.sendRedirect(getServletContext().getContextPath()+"/a/b/c/test.html");
// 缺省項目上下文路徑時,直接以/開頭即可
resp.sendRedirect("/a/b/c/test.html");
10.2.3 請求轉發中的路徑問題
目標 :由x/y/servletB請求轉發到a/b/c/test.html
@WebServlet("/x/y/servletB")
public class ServletB extends HttpServlet {@Overrideprotected void service(HttpServletRequest req, HttpServletResponse resp) throws ServletException, IOException {}
}
10.2.3.1 相對路徑寫法
+ 訪問ServletB的url為 ? ? ? : ?http://localhost:8080/web03_war_exploded/x/y/servletB
+ 當前資源為 ? ? ? ? ? ? ? ? ? ? ?: ?servletB
+ 當前資源的所在路徑為 ?: http://localhost:8080/web03_war_exploded/x/x/
+ 要獲取的目標資源url為 : ?http://localhost:8080/web03_war_exploded/a/b/c/test.html
+ ServletA請求轉發路徑 ? ?: ?../../a/b/c/test/html
+ 尋找方式就是在當前資源所在路徑(http://localhost:8080/web03_war_exploded/x/y/)后拼接(../../a/b/c/test/html),形成(http://localhost:8080/web03_war_exploded/x/y/../../a/b/c/test/html)每個../抵消一層目錄,正好是目標資源正常獲取的url(http://localhost:8080/web03_war_exploded/a/b/c/test/html)
@WebServlet("/x/y/servletB")
public class ServletB extends HttpServlet {@Overrideprotected void service(HttpServletRequest req, HttpServletResponse resp) throws ServletException, IOException {RequestDispatcher requestDispatcher = req.getRequestDispatcher("../../a/b/c/test.html");requestDispatcher.forward(req,resp);}
}
10.2.3.2絕對路徑寫法
-
請求轉發只能轉發到項目內部的資源,其絕對路徑無需添加項目上下文路徑
-
請求轉發絕對路徑的基準路徑相當于http://localhost:8080/web03_war_exploded
-
在項目上下文路徑為缺省值時,也無需改變,直接以/開頭即可
@WebServlet("/x/y/servletB")
public class ServletB extends HttpServlet {@Overrideprotected void service(HttpServletRequest req, HttpServletResponse resp) throws ServletException, IOException {RequestDispatcher requestDispatcher = req.getRequestDispatcher("/a/b/c/test.html");requestDispatcher.forward(req,resp);}
}
10.2.3.3目標資源內相對路徑處理
-
此時需要注意,請求轉發是服務器行為,瀏覽器不知道,地址欄不變化,相當于我們訪問test.html的路徑為http://localhost:8080/web03_war_exploded/x/y/servletB
-
那么此時 test.html資源的所在路徑就是http://localhost:8080/web03_war_exploded/x/y/所以test.html中相對路徑要基于該路徑編寫,如果使用絕對路徑則不用考慮
<!DOCTYPE html>
<html lang="en">
<head><meta charset="UTF-8"><title>Title</title>
</head>
<body><!--當前資源路徑是     http://localhost:8080/web03_war_exploded/x/y/servletB當前資源所在路徑是  http://localhost:8080/web03_war_exploded/x/y/目標資源路徑=所在資源路徑+src屬性值 http://localhost:8080/web03_war_exploded/x/y/../../static/img/logo.pnghttp://localhost:8080/web03_war_exploded/static/img/logo.png得到目標路徑正是目標資源的訪問路徑	-->
<img src="../../static/img/logo.png">
</body>
</html>
項目代碼:
index.html
<!DOCTYPE html>
<html lang="en">
<head><meta charset="utf-8"/><title>Title</title><!--  當前頁面中,所有不加任何修飾的相對路徑錢,會自動補充href中的內容  -->
<!--    <base href="/d05/">-->
</head>
<body>
<!--1 相對路徑以當前資源的所在路徑為出發點去找目標資源語法:不以/開頭./表示當前資源的路徑../表示當前資源的上一層路徑缺點:目標資源路徑受到當前資源路徑的影響,不同的位置,相對路徑寫法不同2 絕對路徑始終以固定的路徑作為出發點去找目標資源 和當前資源的所在路徑沒有關系語法:以/開頭不同的項目中,固定的路徑出發點可能不一致,可以測試一下   http://localhost:8080/demo05/static/img/logo.png優點:目標資源路徑的寫法不會受到當前資源路徑的影響,不同的位置,絕對路徑寫法一致缺點:絕對路徑要補充項目的上下文  項目上下文是可以改變的  http://localhost:8080/通過 head>base>href屬性,定義相對路徑公共前綴,通過公共前綴把一個相對路徑轉換為絕對路徑(不完美)<base href="/d05/">
-->
<!--<img src="static/img/logo.png"/>-->
<img src="/static/img/logo.png"/>
<img src="/static/img/logo.png">
<img src="/static/img/logo.png">
<img src="/static/img/logo.png">
<img src="/static/img/logo.png">
<img src="/static/img/logo.png">
<img src="/static/img/logo.png"><!--<a href=""></a>
<form action=""></form>
<link href="">
<script src=""></script>--></body>
</html>
view1.html
<!DOCTYPE html>
<html lang="en">
<head><meta charset="UTF-8"><title>Title</title>
</head>
<body>
<!---->
<!--<img src="static/img/logo.png"/>-->
<img src="/static/img/logo.png"/>
</body>
</html>
test.html
<!DOCTYPE html>
<html lang="en">
<head><meta charset="UTF-8"><title>Title</title>
</head>
<body>
<!---->
<!--<img src="../../../static/img/logo.png" />--><img src="/static/img/logo.png"/></body>
</html>
servletA
package com.atguigu.servlet;import jakarta.servlet.ServletContext;
import jakarta.servlet.ServletException;
import jakarta.servlet.annotation.WebServlet;
import jakarta.servlet.http.HttpServlet;
import jakarta.servlet.http.HttpServletRequest;
import jakarta.servlet.http.HttpServletResponse;import java.io.IOException;/*** ClassName: ServletA* Package: com.atguigu.servlet* Description:** @Author: start* @Create 2025-07-27 21:26* @Version: 1.0*/
@WebServlet("/servletA")
public class ServletA extends HttpServlet {@Overrideprotected void service(HttpServletRequest req, HttpServletResponse resp) throws ServletException, IOException {System.out.println("ServletA");//重定向到ServletB/** 1 相對路徑寫法*      和前端相對路徑規則一致* 2 絕對路徑寫法*       http://localhost:8080/* */ServletContext servletContext = req.getServletContext();String contextPath = servletContext.getContextPath();
//        contextPath  "/d05"
//        resp.sendRedirect(contextPath + "/servletB");
//        resp.sendRedirect("../../../servletB");
//        resp.sendRedirect("/d05/servletB");resp.sendRedirect("/servletB");/* 請求轉發到ServletB *//** 1 相對路徑寫法  一致*     http://localhost:8080/d05/servletA**     http://localhost:8080/d05/servletB* 2 絕對路徑*       請求轉發的絕對路徑是不需要添加項目上下文*       請求轉發的/ 代表的路徑是   http://localhost:8080/d05/* */req.getRequestDispatcher("/servletB").forward(req,resp);}
}
servletB
package com.atguigu.servlet;import jakarta.servlet.ServletException;
import jakarta.servlet.annotation.WebServlet;
import jakarta.servlet.http.HttpServlet;
import jakarta.servlet.http.HttpServletRequest;
import jakarta.servlet.http.HttpServletResponse;import java.io.IOException;/*** ClassName: ServletA* Package: com.atguigu.servlet* Description:** @Author: start* @Create 2025-07-27 21:26* @Version: 1.0*/
@WebServlet("/servletB")
public class ServletB extends HttpServlet {@Overrideprotected void service(HttpServletRequest req, HttpServletResponse resp) throws ServletException, IOException {System.out.println("ServletB");//}
}
View1Servlet
package com.atguigu.servlet;import jakarta.servlet.ServletException;
import jakarta.servlet.annotation.WebServlet;
import jakarta.servlet.http.HttpServlet;
import jakarta.servlet.http.HttpServletRequest;
import jakarta.servlet.http.HttpServletResponse;import java.io.IOException;/*** ClassName: ServletA* Package: com.atguigu.servlet* Description:** @Author: start* @Create 2025-07-27 21:26* @Version: 1.0*/
@WebServlet("/view1Servlet")
public class View1Servlet extends HttpServlet {@Overrideprotected void service(HttpServletRequest req, HttpServletResponse resp) throws ServletException, IOException {// 請求轉發到req.getRequestDispatcher("WEB-INF/views/view1.html").forward(req,resp);}
}
十二 案例開發-日程管理-第二期
12.1 項目搭建
12.1.1 數據庫準備
-
創建schedule_system數據庫并執行如下語句
SET NAMES utf8mb4;
SET FOREIGN_KEY_CHECKS = 0;-- ----------------------------
-- 創建日程表
-- ----------------------------
DROP TABLE IF EXISTS `sys_schedule`;
CREATE TABLE `sys_schedule` (`sid` int NOT NULL AUTO_INCREMENT,`uid` int NULL DEFAULT NULL,`title` varchar(20) CHARACTER SET utf8mb4 COLLATE utf8mb4_0900_ai_ci NULL DEFAULT NULL,`completed` int(1) NULL DEFAULT NULL,PRIMARY KEY (`sid`) USING BTREE
) ENGINE = InnoDB AUTO_INCREMENT = 1 CHARACTER SET = utf8mb4 COLLATE = utf8mb4_0900_ai_ci ROW_FORMAT = Dynamic;-- ----------------------------
-- 插入日程數據
-- ------------------------------ ----------------------------
-- 創建用戶表
-- ----------------------------
DROP TABLE IF EXISTS `sys_user`;
CREATE TABLE `sys_user` (`uid` int NOT NULL AUTO_INCREMENT,`username` varchar(10) CHARACTER SET utf8mb4 COLLATE utf8mb4_0900_ai_ci NULL DEFAULT NULL,`user_pwd` varchar(100) CHARACTER SET utf8mb4 COLLATE utf8mb4_0900_ai_ci NULL DEFAULT NULL,PRIMARY KEY (`uid`) USING BTREE,UNIQUE INDEX `username`(`username`) USING BTREE
) ENGINE = InnoDB CHARACTER SET = utf8mb4 COLLATE = utf8mb4_0900_ai_ci ROW_FORMAT = Dynamic;-- ----------------------------
-- 插入用戶數據
-- ----------------------------
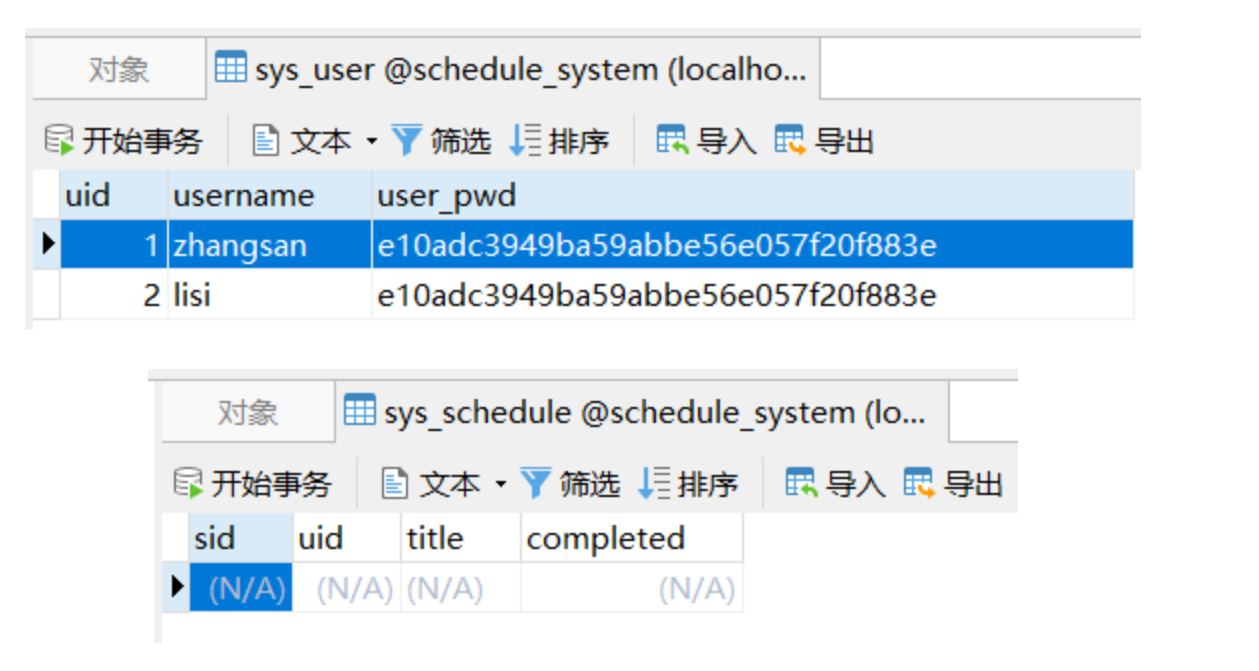
INSERT INTO `sys_user` VALUES (1, 'zhangsan', 'e10adc3949ba59abbe56e057f20f883e');
INSERT INTO `sys_user` VALUES (2, 'lisi', 'e10adc3949ba59abbe56e057f20f883e');SET FOREIGN_KEY_CHECKS = 1;
-
獲得如下表格
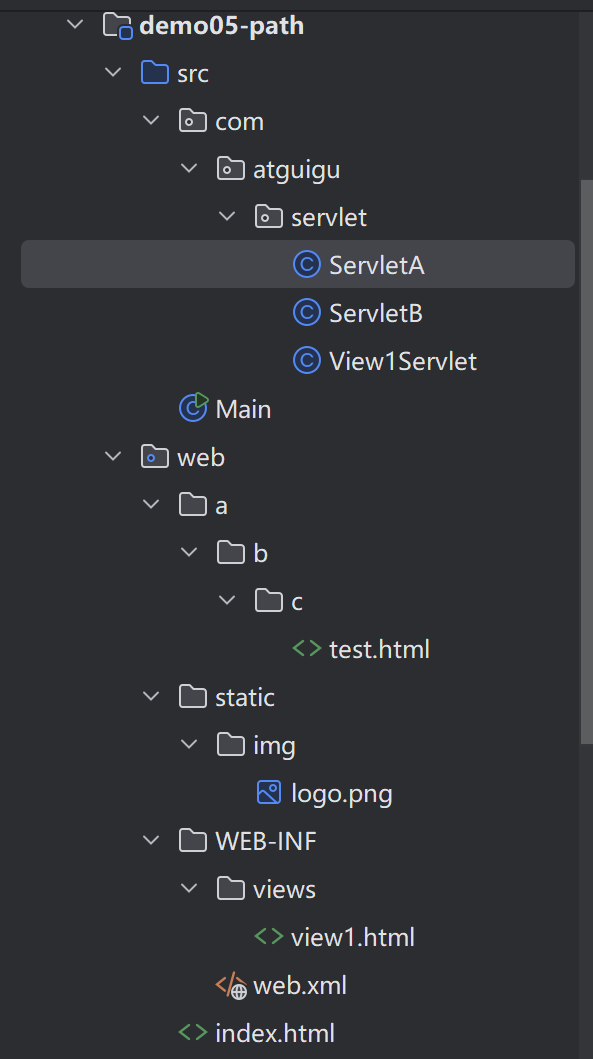
12.1.2 項目結構
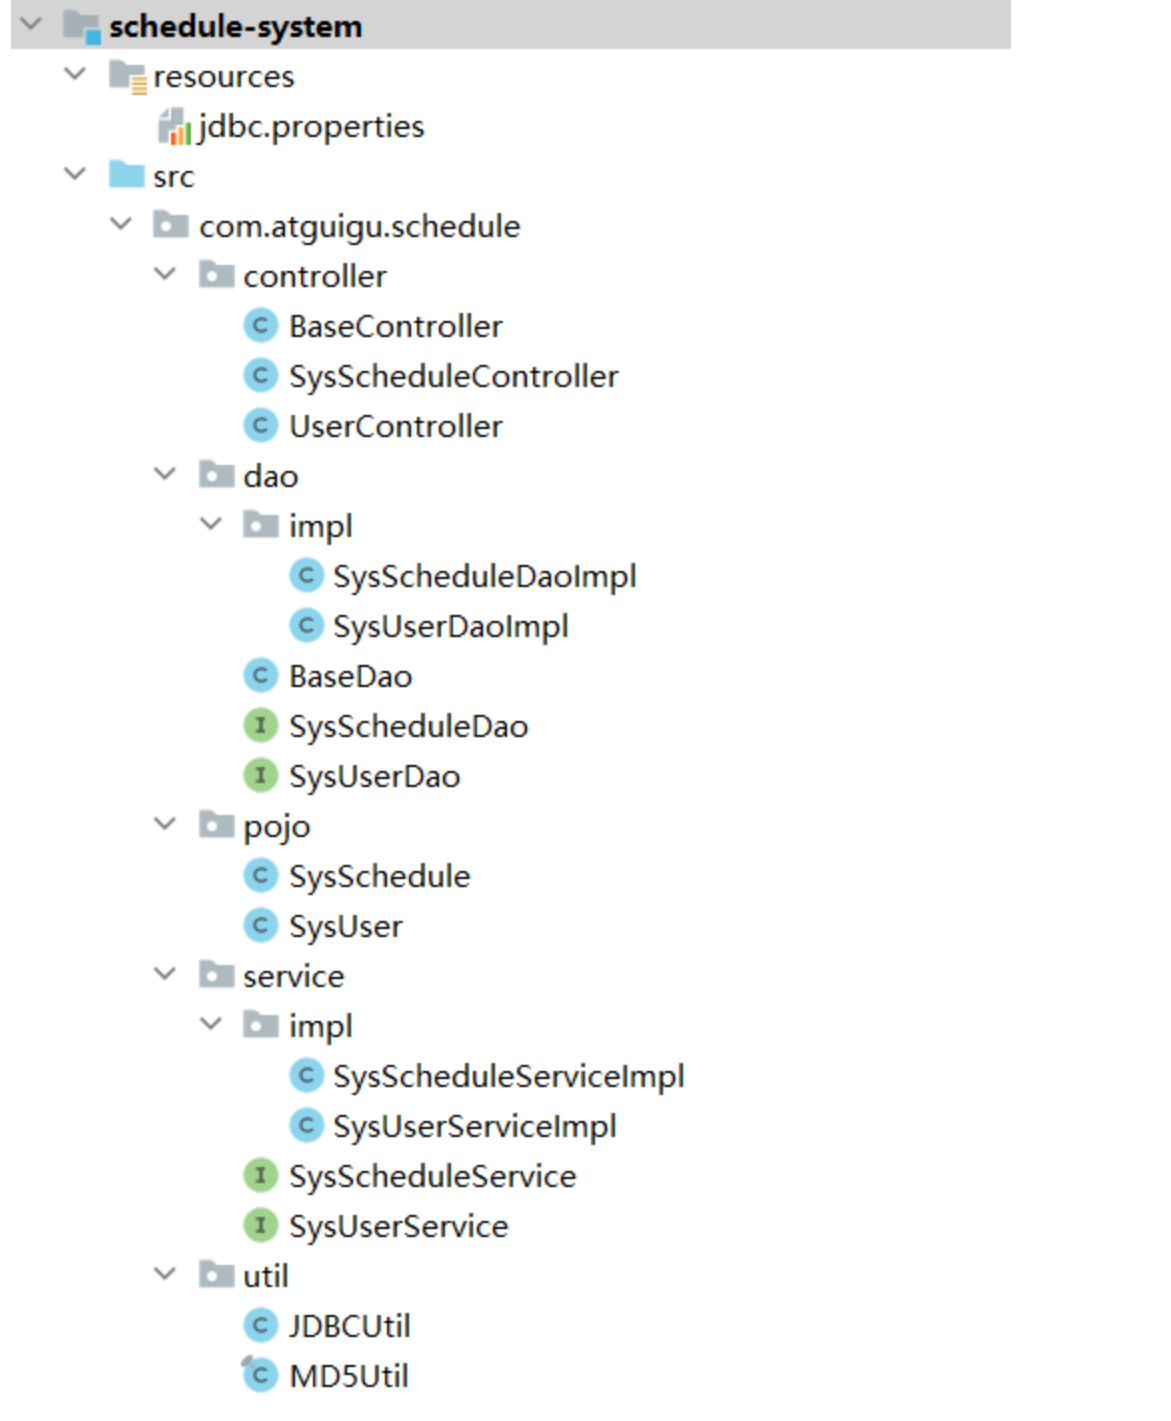
12.1.3 導入依賴
項目開發前的測試
TestBaseDao?
package com.atguigu.schedule.test;import com.atguigu.schedule.dao.BaseDao;
import com.atguigu.schedule.pojo.SysUser;
import org.junit.BeforeClass;
import org.junit.Test;
import java.util.List;/**ClassName: TestBaseDaoPackage: com.atguigu.schedule.testDescription:@Author: start@Create 2025-07-31 22:05@Version: 1.0
*/
public class TestBaseDao {private static BaseDao baseDao;@BeforeClasspublic static void initBaseDao(){baseDao = new BaseDao();}@Testpublic void testBaseQueryObject(){//查詢用戶數量  baseQueryObject   查詢結果集是單行  單列的  一個值的數據方法String sql = "select count(1) from sys_user";Long count = baseDao.baseQueryObject(Long.class,sql);System.out.println(count);}@Testpublic void testBaseQuery(){String sql = "select uid,username,user_pwd userPwd from sys_user";List<SysUser> sysUserList = baseDao.baseQuery(SysUser.class,sql);sysUserList.forEach(System.out::println);}@Testpublic void testBaseUpdate(){String sql = "insert into sys_schedule values(DEFAULT,?,?,?)";int rows = baseDao.baseUpdate(sql,1,"學習JAVA",0);System.out.println(rows);}
}
?TestLombok
package com.atguigu.schedule.test;import com.atguigu.schedule.pojo.SysUser;/*** ClassName: TestLombok* Package: com.atguigu.schedule.test* Description:** @Author: start* @Create 2025-07-30 23:21* @Version: 1.0*/
public class TestLombok {public void testAnnotation(){SysUser user = new SysUser(1,"","");}
}
testMD5Util??
package com.atguigu.schedule.test;import com.atguigu.schedule.util.MD5Util;
import org.junit.Test;/*** ClassName: testMD5Util* Package: com.atguigu.schedule.test* Description:** @Author: start* @Create 2025-08-02 17:14* @Version: 1.0*/
public class testMD5Util {@Testpublic void testEncrypt(){String encrypt = MD5Util.encrypt("123456");System.out.println(encrypt);}
}
TestSysScheduleDao??
package com.atguigu.schedule.test;import com.atguigu.schedule.dao.SysScheduleDao;
import com.atguigu.schedule.dao.impl.SysScheduleDaoImpl;
import com.atguigu.schedule.pojo.SysSchedule;
import org.junit.Before;
import org.junit.BeforeClass;
import org.junit.Test;import java.util.List;/*** ClassName: TestSysScheduleDao* Package: com.atguigu.schedule.test* Description:** @Author: start* @Create 2025-08-02 12:40* @Version: 1.0*/
public class TestSysScheduleDao {private static SysScheduleDao scheduleDao;//   BeforeClass 要求方法必須是靜態的@BeforeClasspublic static void initScheduleDao(){scheduleDao = new SysScheduleDaoImpl();}@Testpublic void testAddSchedule(){int rows = scheduleDao.addSchedule(new SysSchedule(null,2,"學習數據庫",1));System.out.println(rows);}@Testpublic void testFindAll(){List<SysSchedule> scheduleList = scheduleDao.findAll();scheduleList.forEach(System.out::println);}
}
12.1.4 pojo包處理
使用lombok處理getter setter equals hashcode 構造器
SysUser.java
package com.atguigu.schedule.pojo;import lombok.*;import java.io.Serializable;
import java.util.Objects;/*** ClassName: SysUser* Package: com.atguigu.schedule.pojo* Description:** @Author: start* @Create 2025-07-30 22:58* @Version: 1.0*/
/*
* 1 實體類的類名和表格名稱應該對應(對應不是一致)
* 2 實體類的屬性名和表格的列名應該對應
* 3 每個屬性都必須是私有的
* 4 每個屬性都應該具備 getter  setter
* 5 必須具備無參構造器
* 6 應該實現序列化接口(緩存  分布式項目數據傳遞  可能會將對象序列化)
* 7 應該重寫類的hashcode 和 equals方法
* 8 toString是否重寫都可以
*
* 使用Lombok幫助我們生成這些內容 getter setter  全參構造  無參構造  equals  hashcode
*   Lombok使用步驟
*       1 檢查idea是否已經安裝了Lombok插件
*       2 檢查是否勾選了 enable annotation processer
*       3 導入Lombok的依賴
*       3 在實體類上添加注解
*
*
* */
@AllArgsConstructor // 添加了全參構造
@NoArgsConstructor //添加了無參構造
@Data  //getter setter equals  hashcode  toString
public class SysUser implements Serializable {private Integer uid;private String username;private String userPwd;}
SysSchedule.java
package com.atguigu.schedule.pojo;import lombok.AllArgsConstructor;
import lombok.Data;
import lombok.NoArgsConstructor;import java.io.Serializable;/*** ClassName: SysSchedule* Package: com.atguigu.schedule.pojo* Description:** @Author: start* @Create 2025-07-30 23:26* @Version: 1.0*/
@AllArgsConstructor
@NoArgsConstructor
@Data
public class SysSchedule implements Serializable {private Integer sid;private Integer uid;private String title;private Integer completed;
}
12.1.5 dao包處理
導入JDBCUtil連接池工具類并準備jdbc.properties配置文件
JDBCUtil.java
package com.atguigu.schedule.util;import com.alibaba.druid.pool.DruidDataSourceFactory;import javax.sql.DataSource;
import java.io.IOException;
import java.io.InputStream;
import java.sql.Connection;
import java.sql.SQLException;
import java.util.Properties;public class JDBCUtil {private static ThreadLocal<Connection> threadLocal =new ThreadLocal<>();private static DataSource dataSource;// 初始化連接池static{// 可以幫助我們讀取.properties配置文件Properties properties = new Properties();InputStream resourceAsStream = JDBCUtil.class.getClassLoader().getResourceAsStream("jdbc.properties");try {properties.load(resourceAsStream);} catch (IOException e) {throw new RuntimeException(e);}try {dataSource = DruidDataSourceFactory.createDataSource(properties);} catch (Exception e) {throw new RuntimeException(e);}}/*1 向外提供連接池的方法*/public static DataSource getDataSource(){return dataSource;}/*2 向外提供連接的方法*/public static Connection getConnection(){Connection connection = threadLocal.get();if (null == connection) {try {connection = dataSource.getConnection();} catch (SQLException e) {throw new RuntimeException(e);}threadLocal.set(connection);}return connection;}/*定義一個歸還連接的方法 (解除和ThreadLocal之間的關聯關系) */public static void releaseConnection(){Connection connection = threadLocal.get();if (null != connection) {threadLocal.remove();// 把連接設置回自動提交的連接try {connection.setAutoCommit(true);// 自動歸還到連接池connection.close();} catch (SQLException e) {throw new RuntimeException(e);}}}
}
jdbc.properties
driverClassName=com.mysql.cj.jdbc.Driver
url=jdbc:mysql://localhost:3306/schedule_system
username=root
password=abc123
initialSize=5
maxActive=10
maxWait=1000
-
創建BaseDao對象并復制如下代碼
package com.atguigu.schedule.dao;import com.atguigu.schedule.util.JDBCUtil;import java.lang.reflect.Field;
import java.sql.*;
import java.time.LocalDateTime;
import java.util.ArrayList;
import java.util.List;public class BaseDao {// 公共的查詢方法  返回的是單個對象public <T> T baseQueryObject(Class<T> clazz, String sql, Object ... args) {T t = null;Connection connection = JDBCUtil.getConnection();PreparedStatement preparedStatement = null;ResultSet resultSet = null;int rows = 0;try {// 準備語句對象preparedStatement = connection.prepareStatement(sql);// 設置語句上的參數for (int i = 0; i < args.length; i++) {preparedStatement.setObject(i + 1, args[i]);}// 執行 查詢resultSet = preparedStatement.executeQuery();if (resultSet.next()) {t = (T) resultSet.getObject(1);}} catch (Exception e) {e.printStackTrace();} finally {if (null != resultSet) {try {resultSet.close();} catch (SQLException e) {e.printStackTrace();}}if (null != preparedStatement) {try {preparedStatement.close();} catch (SQLException e) {e.printStackTrace();}}JDBCUtil.releaseConnection();}return t;}// 公共的查詢方法  返回的是對象的集合public <T> List<T> baseQuery(Class clazz, String sql, Object ... args){List<T> list =new ArrayList<>();Connection connection = JDBCUtil.getConnection();PreparedStatement preparedStatement=null;ResultSet resultSet =null;int rows = 0;try {// 準備語句對象preparedStatement = connection.prepareStatement(sql);// 設置語句上的參數for (int i = 0; i < args.length; i++) {preparedStatement.setObject(i+1,args[i]);}// 執行 查詢resultSet = preparedStatement.executeQuery();ResultSetMetaData metaData = resultSet.getMetaData();int columnCount = metaData.getColumnCount();// 將結果集通過反射封裝成實體類對象while (resultSet.next()) {// 使用反射實例化對象Object obj =clazz.getDeclaredConstructor().newInstance();for (int i = 1; i <= columnCount; i++) {String columnName = metaData.getColumnLabel(i);Object value = resultSet.getObject(columnName);// 處理datetime類型字段和java.util.Data轉換問題if(value.getClass().equals(LocalDateTime.class)){value= Timestamp.valueOf((LocalDateTime) value);}Field field = clazz.getDeclaredField(columnName);field.setAccessible(true);field.set(obj,value);}list.add((T)obj);}} catch (Exception e) {e.printStackTrace();} finally {if (null !=resultSet) {try {resultSet.close();} catch (SQLException e) {throw new RuntimeException(e);}}if (null != preparedStatement) {try {preparedStatement.close();} catch (SQLException e) {throw new RuntimeException(e);}}JDBCUtil.releaseConnection();}return list;}// 通用的增刪改方法public int baseUpdate(String sql,Object ... args) {// 獲取連接Connection connection = JDBCUtil.getConnection();PreparedStatement preparedStatement=null;int rows = 0;try {// 準備語句對象preparedStatement = connection.prepareStatement(sql);// 設置語句上的參數for (int i = 0; i < args.length; i++) {preparedStatement.setObject(i+1,args[i]);}// 執行 增刪改 executeUpdaterows = preparedStatement.executeUpdate();// 釋放資源(可選)} catch (SQLException e) {e.printStackTrace();} finally {if (null != preparedStatement) {try {preparedStatement.close();} catch (SQLException e) {throw new RuntimeException(e);}}JDBCUtil.releaseConnection();}// 返回的是影響數據庫記錄數return rows;}
}
-
dao層所有接口
SysUserDao
package com.atguigu.schedule.dao;import com.atguigu.schedule.pojo.SysUser;/*** ClassName: SysUserDao* Package: com.atguigu.schedule.dao* Description:** @Author: start* @Create 2025-07-31 20:48* @Version: 1.0*/
/*
* Data access Object  數據訪問對象
* 該類中用于定義針對表格的CRUD的方法
* DAO層一般需要定義接口和實現類
*
* */
public interface SysUserDao {/*** 向數據庫中增加一條用戶記錄的方法* @param sysUser 要增加的記錄的username和user_pwd字段以SysUser實體類對象的形式接收* @return 增加成功返回1,增加失敗返回0*/int addSysUser(SysUser sysUser);SysUser findByUsername(String username);
}
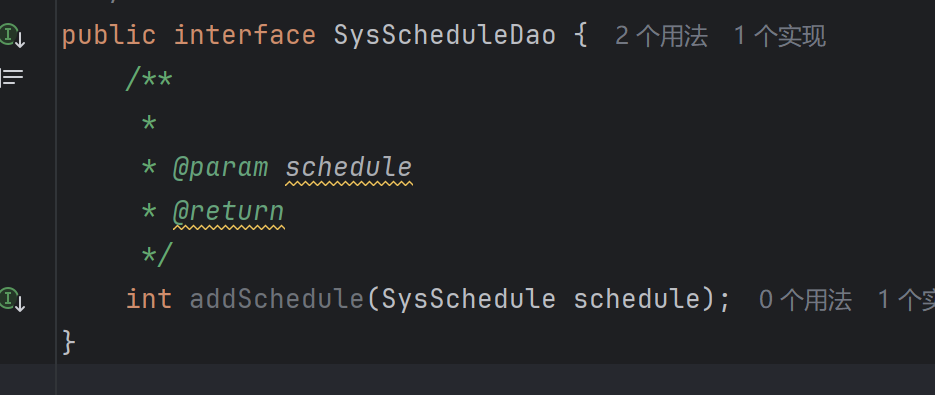
SysScheduleDao
package com.atguigu.schedule.dao;import com.atguigu.schedule.pojo.SysSchedule;import java.util.List;/*** ClassName: SysScheduleDao* Package: com.atguigu.schedule.dao* Description:** @Author: start* @Create 2025-07-31 20:50* @Version: 1.0*/
/*
* 介紹一下當前類...
* 作者:...
* 時間:... ...
*
* */
public interface SysScheduleDao {/*** 該方法用于向數據庫中增加一條日程記錄* @param schedule  日程數據以SysSchedule實體類對象形式入參* @return  返回影響數據庫記錄的行數,行數為0說明增加失敗,行數大于0說明增加成功*/int addSchedule(SysSchedule schedule);/**** 查詢所有用戶的所有日程* @return  將所有日程放入一個:List<SysSchedule>集合中*/List<SysSchedule> findAll();
}
-
dao層所有實現類
SysUserDaoImpl
package com.atguigu.schedule.dao.impl;import com.atguigu.schedule.dao.BaseDao;
import com.atguigu.schedule.dao.SysUserDao;
import com.atguigu.schedule.pojo.SysUser;import java.util.List;/*** ClassName: SysUserDaoImpl* Package: com.atguigu.schedule.dao.impl* Description:** @Author: start* @Create 2025-07-31 20:59* @Version: 1.0*/
public class SysUserDaoImpl extends BaseDao implements SysUserDao {@Overridepublic int addSysUser(SysUser sysUser) {String sql = "insert into sys_user values(DEFAULT,?,?)";return baseUpdate(sql,sysUser.getUsername(),sysUser.getUserPwd());}@Overridepublic SysUser findByUsername(String username) {String sql = "select uid,username,user_pwd userPwd from sys_user where username=?";List<SysUser> sysUserList = baseQuery(SysUser.class, sql, username);return sysUserList != null && sysUserList.size() > 0 ? sysUserList.get(0) : null;}
}
SysScheduleDaoImpl
package com.atguigu.schedule.dao.impl;import com.atguigu.schedule.dao.BaseDao;
import com.atguigu.schedule.dao.SysScheduleDao;
import com.atguigu.schedule.pojo.SysSchedule;import java.util.List;/*** ClassName: SysScheduleDaoImpl* Package: com.atguigu.schedule.dao.impl* Description:** @Author: start* @Create 2025-07-31 20:59* @Version: 1.0*/
public class SysScheduleDaoImpl extends BaseDao implements SysScheduleDao {@Overridepublic int addSchedule(SysSchedule schedule) {String sql = "insert into sys_schedule values(DEFAULT,?,?,?)";int rows = baseUpdate(sql,schedule.getUid(),schedule.getTitle(),schedule.getCompleted());return rows;}@Overridepublic List<SysSchedule> findAll() {String sql = "select sid,uid,title,completed from sys_schedule";List<SysSchedule> scheduleList = baseQuery(SysSchedule.class,sql);return scheduleList;}
}
12.1.6 service包處理
-
接口
SysUserService
package com.atguigu.schedule.service;import com.atguigu.schedule.pojo.SysUser;/*** ClassName: SysUserService* Package: com.atguigu.schedule.service* Description:** @Author: start* @Create 2025-08-02 13:42* @Version: 1.0*/
/*
* 該接口定義了以sys_user表格為核心的業務處理功能
* */
public interface SysUserService {/*** 注冊用戶的方法* @param sysUser  要注冊的用戶名和明文密碼以SysUser對象的形式接收* @return  注冊成功返回1,注冊失敗返回0*/int regist(SysUser sysUser);/*** 根據用戶名獲得完整用戶信息的方法* @param username  要查詢的用戶名* @return  如果找到了返回SysUser對象,找不到返回null*/SysUser findByUsername(String username);
}
SysScheduleService
package com.atguigu.schedule.service;/*** ClassName: SysScheduleService* Package: com.atguigu.schedule.service* Description:** @Author: start* @Create 2025-08-02 13:45* @Version: 1.0*/
public interface SysScheduleService {
}
SysUserServiceImpl
package com.atguigu.schedule.service.impl;import com.atguigu.schedule.dao.SysUserDao;
import com.atguigu.schedule.dao.impl.SysUserDaoImpl;
import com.atguigu.schedule.pojo.SysUser;
import com.atguigu.schedule.service.SysUserService;
import com.atguigu.schedule.util.MD5Util;import java.util.List;/*** ClassName: SysUserServiceImpl* Package: com.atguigu.schedule.service.impl* Description:** @Author: start* @Create 2025-08-02 13:44* @Version: 1.0*/
public class SysUserServiceImpl implements SysUserService {private SysUserDao userDao = new SysUserDaoImpl();@Overridepublic int regist(SysUser sysUser) {//將用戶的明文密碼轉為密文密碼sysUser.setUserPwd(MD5Util.encrypt(sysUser.getUserPwd()));//調用DAO層的方法  將sysUser信息存入數據庫return userDao.addSysUser(sysUser);}@Overridepublic SysUser findByUsername(String username) {return userDao.findByUsername(username);}
}
SysScheduleServiceImpl
package com.atguigu.schedule.service.impl;import com.atguigu.schedule.service.SysScheduleService;
import com.atguigu.schedule.service.SysUserService;/*** ClassName: SysScheduleServiceImpl* Package: com.atguigu.schedule.service.impl* Description:** @Author: start* @Create 2025-08-02 13:46* @Version: 1.0*/
public class SysScheduleServiceImpl implements SysScheduleService {}
12.1.7 controller包處理
-
BaseController處理請求路徑問題
package com.atguigu.schedule.controller;import jakarta.servlet.ServletException;
import jakarta.servlet.http.HttpServlet;
import jakarta.servlet.http.HttpServletRequest;
import jakarta.servlet.http.HttpServletResponse;
import java.io.IOException;
import java.lang.reflect.Method;/*** ClassName: BaseController* Package: com.atguigu.schedule.controller* Description:** @Author: start* @Create 2025-08-02 16:24* @Version: 1.0*/
public class BaseController extends HttpServlet {@Overrideprotected void service(HttpServletRequest req, HttpServletResponse resp) throws ServletException, IOException {String requestURI = req.getRequestURI(); //schedule/addString[] split = requestURI.split("/");String methodName = split[split.length-1];//使用反射通過方法名獲取下面的方法/*if (methodName.equals("add")) {//做增加操作add(req,resp);}else if(methodName.equals("find")){//做查詢處理find(req,resp);}else if(methodName.equals("update")){//做修改處理update(req,resp);}else if(methodName.equals("remove")){//做刪除處理remove(req,resp);}*/Class aClass = this.getClass();//獲取方法try {Method declaredMethod = aClass.getDeclaredMethod(methodName, HttpServletRequest.class, HttpServletResponse.class);//暴力 破解方法的訪問修飾符的限制declaredMethod.setAccessible(true);//執行方法declaredMethod.invoke(this,req,resp);} catch (Exception e) {e.printStackTrace();}}
}
SysUserController
package com.atguigu.schedule.controller;import com.atguigu.schedule.pojo.SysUser;
import com.atguigu.schedule.service.SysUserService;
import com.atguigu.schedule.service.impl.SysUserServiceImpl;
import com.atguigu.schedule.util.MD5Util;
import jakarta.servlet.ServletException;
import jakarta.servlet.annotation.WebServlet;
import jakarta.servlet.http.HttpServlet;
import jakarta.servlet.http.HttpServletRequest;
import jakarta.servlet.http.HttpServletResponse;import java.io.IOException;/*** ClassName: SysUserController* Package: com.atguigu.schedule.controller* Description:** @Author: start* @Create 2025-08-02 14:26* @Version: 1.0*/
@WebServlet("/user/*")
public class SysUserController extends BaseController {private SysUserService userService = new SysUserServiceImpl();/*** 接收用戶登錄請求,完成的登錄業務接口* @param req* @param resp* @throws ServletException* @throws IOException*/protected void login(HttpServletRequest req, HttpServletResponse resp) throws ServletException, IOException {//1 接收用戶名和密碼String username = req.getParameter("username");String userPwd = req.getParameter("userPwd");//2 調用服務層方法,根據用戶名查詢用戶信息SysUser loginUser = userService.findByUsername(username);if(null == loginUser){// 跳轉到用戶名有誤提示頁resp.sendRedirect("/loginUsernameError.html");}else if(!MD5Util.encrypt(userPwd).equals(loginUser.getUserPwd())){//3 判斷密碼是否匹配//跳轉到密碼有誤提示項resp.sendRedirect("/loginUserPwdError.html");}else {//4 跳轉到首頁resp.sendRedirect("/showSchedule.html");}}/*** 接收用戶注冊請求的業務處理方法(業務接口  不是java中的interface)* @param req* @param resp* @throws ServletException* @throws IOException*/protected void regist(HttpServletRequest req, HttpServletResponse resp) throws ServletException, IOException {//1 接收客戶端提交的參數String username = req.getParameter("username");String userPwd = req.getParameter("userPwd");//2 調用服務層方法,完成注冊功能//將參數放入一個SysUser對象中,在調用regist方法時傳入SysUser sysUser = new SysUser(null,username,userPwd);int rows = userService.regist(sysUser);
//      //3 根據注冊結果(成功  失敗) 做頁面跳轉if(rows>0){resp.sendRedirect("/registSuccess.html");}else {resp.sendRedirect("/registFail.html");}//3 格局注冊結果(成功  失敗) 做頁面跳轉}
}
SysScheduleController
package com.atguigu.schedule.controller;import jakarta.servlet.ServletException;
import jakarta.servlet.annotation.WebServlet;
import jakarta.servlet.http.HttpServletRequest;
import jakarta.servlet.http.HttpServletResponse;import java.io.IOException;/*** ClassName: SysScheduleController* Package: com.atguigu.schedule.controller* Description:** @Author: start* @Create 2025-08-02 14:28* @Version: 1.0*/
/*
* 增加日程的請求  /schedule/add
* 查詢日程的請求  /schedule/find
* 修改日程的請求  /schedule/update
* 刪除日程的請求  /schedule/remove
* ... ...
* */
@WebServlet("/schedule/*")
public class SysScheduleController extends BaseController {protected void add(HttpServletRequest req, HttpServletResponse resp) throws ServletException, IOException {System.out.println("add");}
}
12.1.8 加密工具類的使用
-
導入MD5Util工具類
package com.atguigu.schedule.util;
import java.security.MessageDigest;
import java.security.NoSuchAlgorithmException;public final class MD5Util {public static String encrypt(String strSrc) {try {char hexChars[] = { '0', '1', '2', '3', '4', '5', '6', '7', '8','9', 'a', 'b', 'c', 'd', 'e', 'f' };byte[] bytes = strSrc.getBytes();MessageDigest md = MessageDigest.getInstance("MD5");md.update(bytes);bytes = md.digest();int j = bytes.length;char[] chars = new char[j * 2];int k = 0;for (int i = 0; i < bytes.length; i++) {byte b = bytes[i];chars[k++] = hexChars[b >>> 4 & 0xf];chars[k++] = hexChars[b & 0xf];}return new String(chars);} catch (NoSuchAlgorithmException e) {e.printStackTrace();throw new RuntimeException("MD5加密出錯!!!");}}
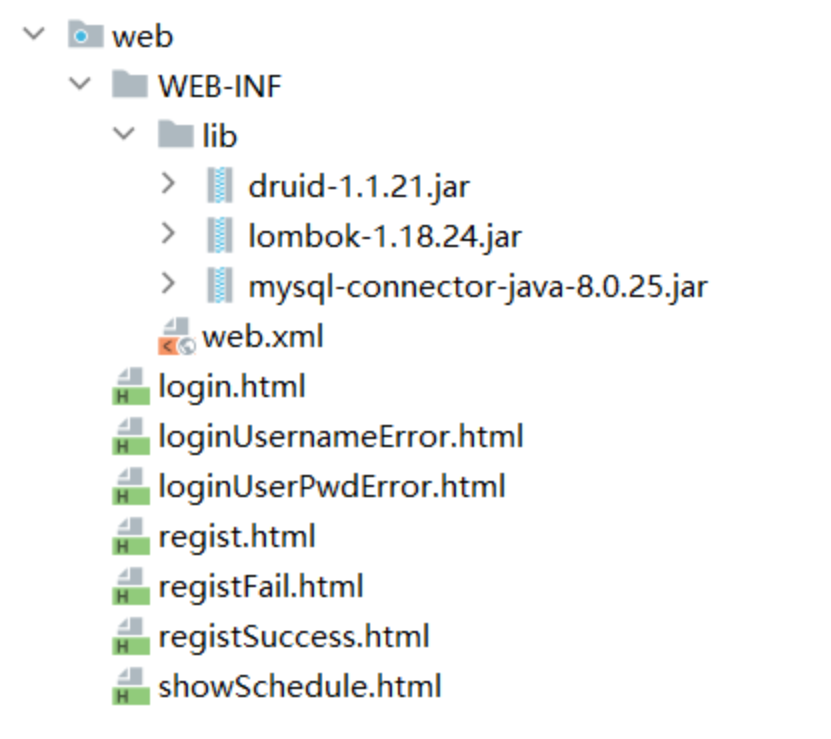
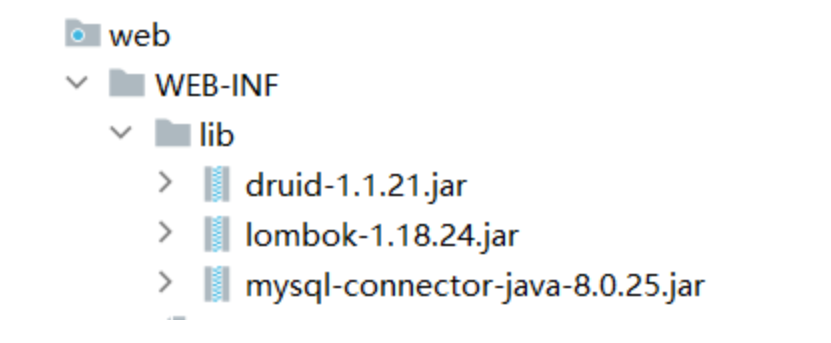
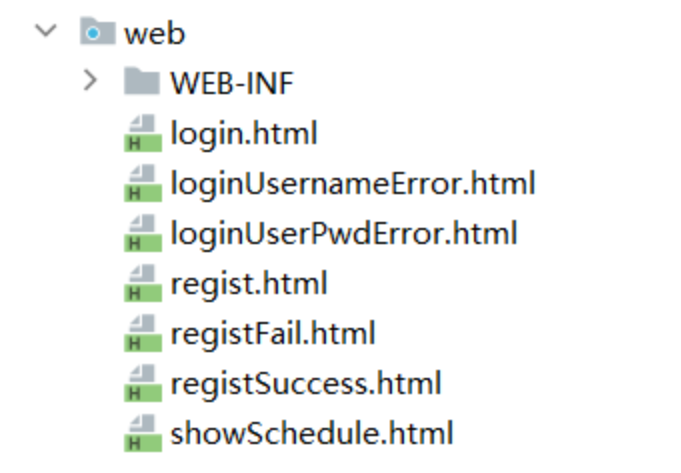
}12.1.9 頁面文件的導入
-
復制資源下的日程管理中的HTML到項目的web目錄下即可
注意:
在idea編輯器當中輸入/**回車之后可以生成當前方法上的文檔注釋

)


、基本功能、數據結構內容、單向鏈表(概念、對象、應用))


實現)
)

)
React +Ts(vite創建項目/useState/Props/Interface))