CentOS 7 LAMP 架構部署 WordPress全步驟

本文將詳細介紹如何在 CentOS 7 系統上通過 LAMP(Linux + Apache + MariaDB + PHP)架構部署 WordPress 博客平臺。
在CentOS 7上基于LAMP架構部署WordPress
一、系統基礎配置
1. 修改主機名(本機IP:192.168.100.10)
[root@lamp ~]# hostnamectl set-hostname lamp.example.com  # 設置主機名為lamp.example.com
[root@lamp ~]# bash  # 刷新當前Shell會話,使主機名生效
2. 關閉防火墻和SELinux
[root@lamp ~]# systemctl stop firewalld  # 臨時關閉防火墻
[root@lamp ~]# systemctl disable firewalld  # 永久禁用防火墻(開機不啟動)
[root@lamp ~]# setenforce 0  # 臨時關閉SELinux(立即生效)
[root@lamp ~]# vim /etc/selinux/config  SELINUX=disabled   # 永久關閉SELinux(需重啟生效)
3. 配置時鐘同步
[root@lamp ~]# yum -y install chrony  # 安裝chrony時間同步工具
[root@lamp ~]# systemctl restart chronyd  # 重啟chronyd服務
[root@lamp ~]# systemctl enable chronyd  # 設置chronyd開機自啟
[root@lamp ~]# hwclock -w  # 將系統時間同步到硬件時鐘(防止重啟后時間錯亂)
4.
# 下載阿里云 CentOS 7 yum 源配置文件。
[root@lamp yum.repos.d]# wget -O /etc/yum.repos.d/CentOS-Base.repo https://mirrors.aliyun.com/repo/Centos-7.repo
--2025-08-18 15:30:38--  https://mirrors.aliyun.com/repo/Centos-7.repo
正在解析主機 mirrors.aliyun.com (mirrors.aliyun.com)... 119.84.54.233, 119.84.54.6, 119.84.54.4
正在連接 mirrors.aliyun.com (mirrors.aliyun.com)|119.84.54.233|:443... 已連接。
已發出 HTTP 請求,正在等待回應... 200 OK
長度:2523 (2.5K) [application/octet-stream]
正在保存至: “/etc/yum.repos.d/CentOS-Base.repo”100%[=============================================>] 2,523       --.-K/s 用時 0s      2025-08-18 15:30:38 (1.16 GB/s) - 已保存 “/etc/yum.repos.d/CentOS-Base.repo” [2523/2523])[root@lamp yum.repos.d]# ls
CentOS-Base.repo
[root@lamp yum.repos.d]# yum -y install epel-release
已加載插件:fastestmirror, langpacks
Loading mirror speeds from cached hostfile* base: mirrors.aliyun.com* extras: mirrors.aliyun.com* updates: mirrors.aliyun.com
base                                                            | 3.6 kB  00:00:00
extras                                                          | 2.9 kB  00:00:00
updates                                                         | 2.9 kB  00:00:00
(1/4): base/7/x86_64/group_gz                                   | 153 kB  00:00:00
(2/4): extras/7/x86_64/primary_db                               | 253 kB  00:00:00
(3/4): updates/7/x86_64/primary_db                              |  27 MB  00:00:01
base/7/x86_64/primary_db       FAILED
http://mirrors.aliyuncs.com/centos/7/os/x86_64/repodata/6d0c3a488c282fe537794b5946b01e28c7f44db79097bb06826e1c0c88bad5ef-primary.sqlite.bz2: [Errno 14] curl#7 - "Failed connect to mirrors.aliyuncs.com:80; Connection refused"
正在嘗試其它鏡像。
(4/4): base/7/x86_64/primary_db                                 | 6.1 MB  00:00:00
正在解決依賴關系
--> 正在檢查事務
---> 軟件包 epel-release.noarch.0.7-11 將被 安裝
--> 解決依賴關系完成依賴關系解決=======================================================================================Package                  架構               版本             源                  大小
=======================================================================================
正在安裝:epel-release             noarch             7-11             extras              15 k事務概要
=======================================================================================
安裝  1 軟件包總下載量:15 k
安裝大小:24 k
Downloading packages:
警告:/var/cache/yum/x86_64/7/extras/packages/epel-release-7-11.noarch.rpm: 頭V3 RSA/SHA256 Signature, 密鑰 ID f4a80eb5: NOKEY
epel-release-7-11.noarch.rpm 的公鑰尚未安裝
epel-release-7-11.noarch.rpm                                    |  15 kB  00:00:00
從 http://mirrors.aliyun.com/centos/RPM-GPG-KEY-CentOS-7 檢索密鑰
導入 GPG key 0xF4A80EB5:用戶ID     : "CentOS-7 Key (CentOS 7 Official Signing Key) <security@centos.org>"指紋       : 6341 ab27 53d7 8a78 a7c2 7bb1 24c6 a8a7 f4a8 0eb5來自       : http://mirrors.aliyun.com/centos/RPM-GPG-KEY-CentOS-7
Running transaction check
Running transaction test
Transaction test succeeded
Running transaction正在安裝    : epel-release-7-11.noarch                                           1/1 驗證中      : epel-release-7-11.noarch                                           1/1 已安裝:epel-release.noarch 0:7-11                                                           完畢!
[root@lamp yum.repos.d]# ls
CentOS-Base.repo  epel.repo  epel-testing.repo
二、安裝LAMP組件
1. 安裝Apache和MariaDB
# 安裝Apache(httpd)和MariaDB數據庫及服務端
[root@lamp ~]# yum -y install httpd mariadb-server mariadb
已加載插件:fastestmirror, langpacks
Loading mirror speeds from cached hostfile
epel/x86_64/metalink                                            | 4.4 kB  00:00:00     * base: mirrors.aliyun.com* epel: ftp-stud.hs-esslingen.de* extras: mirrors.aliyun.com* updates: mirrors.aliyun.com
epel                                                            | 4.3 kB  00:00:00
(1/3): epel/x86_64/group                                        | 399 kB  00:00:28
(2/3): epel/x86_64/updateinfo                                   | 1.0 MB  00:00:58
(3/3): epel/x86_64/primary_db                                   | 8.7 MB  00:09:28
正在解決依賴關系
--> 正在檢查事務
---> 軟件包 httpd.x86_64.0.2.4.6-99.el7.centos.1 將被 安裝
--> 正在處理依賴關系 httpd-tools = 2.4.6-99.el7.centos.1,它被軟件包 httpd-2.4.6-99.el7.centos.1.x86_64 需要
--> 正在處理依賴關系 /etc/mime.types,它被軟件包 httpd-2.4.6-99.el7.centos.1.x86_64 需要
--> 正在處理依賴關系 libaprutil-1.so.0()(64bit),它被軟件包 httpd-2.4.6-99.el7.centos.1.x86_64 需要
--> 正在處理依賴關系 libapr-1.so.0()(64bit),它被軟件包 httpd-2.4.6-99.el7.centos.1.x86_64 需要
---> 軟件包 mariadb.x86_64.1.5.5.68-1.el7 將被 安裝
--> 正在處理依賴關系 mariadb-libs(x86-64) = 1:5.5.68-1.el7,它被軟件包 1:mariadb-5.5.68-1.el7.x86_64 需要
---> 軟件包 mariadb-server.x86_64.1.5.5.68-1.el7 將被 安裝
--> 正在處理依賴關系 perl-DBD-MySQL,它被軟件包 1:mariadb-server-5.5.68-1.el7.x86_64 需要
--> 正在檢查事務
---> 軟件包 apr.x86_64.0.1.4.8-7.el7 將被 安裝
---> 軟件包 apr-util.x86_64.0.1.5.2-6.el7_9.1 將被 安裝
---> 軟件包 httpd-tools.x86_64.0.2.4.6-99.el7.centos.1 將被 安裝
---> 軟件包 mailcap.noarch.0.2.1.41-2.el7 將被 安裝
---> 軟件包 mariadb-libs.x86_64.1.5.5.60-1.el7_5 將被 升級
---> 軟件包 mariadb-libs.x86_64.1.5.5.68-1.el7 將被 更新
---> 軟件包 perl-DBD-MySQL.x86_64.0.4.023-6.el7 將被 安裝
--> 解決依賴關系完成依賴關系解決=======================================================================================Package               架構          版本                         源              大小
=======================================================================================
正在安裝:httpd                 x86_64        2.4.6-99.el7.centos.1        updates        2.7 Mmariadb               x86_64        1:5.5.68-1.el7               base           8.8 Mmariadb-server        x86_64        1:5.5.68-1.el7               base            11 M
為依賴而安裝:apr                   x86_64        1.4.8-7.el7                  base           104 kapr-util              x86_64        1.5.2-6.el7_9.1              updates         92 khttpd-tools           x86_64        2.4.6-99.el7.centos.1        updates         94 kmailcap               noarch        2.1.41-2.el7                 base            31 kperl-DBD-MySQL        x86_64        4.023-6.el7                  base           140 k
為依賴而更新:mariadb-libs          x86_64        1:5.5.68-1.el7               base           760 k事務概要
=======================================================================================
安裝  3 軟件包 (+5 依賴軟件包)
升級           ( 1 依賴軟件包)總下載量:24 M
Downloading packages:
No Presto metadata available for base
(1/9): apr-1.4.8-7.el7.x86_64.rpm                               | 104 kB  00:00:00
(2/9): apr-util-1.5.2-6.el7_9.1.x86_64.rpm                      |  92 kB  00:00:00
(3/9): httpd-tools-2.4.6-99.el7.centos.1.x86_64.rpm             |  94 kB  00:00:00
(4/9): httpd-2.4.6-99.el7.centos.1.x86_64.rpm                   | 2.7 MB  00:00:00
(5/9): mailcap-2.1.41-2.el7.noarch.rpm                          |  31 kB  00:00:00
(6/9): mariadb-libs-5.5.68-1.el7.x86_64.rpm                     | 760 kB  00:00:00
(7/9): mariadb-server-5.5.68-1.el7.x86_64.rpm                   |  11 MB  00:00:00
(8/9): perl-DBD-MySQL-4.023-6.el7.x86_64.rpm                    | 140 kB  00:00:00
(9/9): mariadb-5.5.68-1.el7.x86_64.rpm                          | 8.8 MB  00:00:00
---------------------------------------------------------------------------------------
總計                                                       27 MB/s |  24 MB  00:00
Running transaction check
Running transaction test
Transaction test succeeded
Running transaction正在更新    : 1:mariadb-libs-5.5.68-1.el7.x86_64                                1/10 正在安裝    : apr-1.4.8-7.el7.x86_64                                            2/10 正在安裝    : apr-util-1.5.2-6.el7_9.1.x86_64                                   3/10 正在安裝    : httpd-tools-2.4.6-99.el7.centos.1.x86_64                          4/10 正在安裝    : perl-DBD-MySQL-4.023-6.el7.x86_64                                 5/10 正在安裝    : 1:mariadb-5.5.68-1.el7.x86_64                                     6/10 正在安裝    : mailcap-2.1.41-2.el7.noarch                                       7/10 正在安裝    : httpd-2.4.6-99.el7.centos.1.x86_64                                8/10 正在安裝    : 1:mariadb-server-5.5.68-1.el7.x86_64                              9/10 清理        : 1:mariadb-libs-5.5.60-1.el7_5.x86_64                             10/10 驗證中      : httpd-tools-2.4.6-99.el7.centos.1.x86_64                          1/10 驗證中      : 1:mariadb-server-5.5.68-1.el7.x86_64                              2/10 驗證中      : apr-1.4.8-7.el7.x86_64                                            3/10 驗證中      : perl-DBD-MySQL-4.023-6.el7.x86_64                                 4/10 驗證中      : 1:mariadb-5.5.68-1.el7.x86_64                                     5/10 驗證中      : httpd-2.4.6-99.el7.centos.1.x86_64                                6/10 驗證中      : mailcap-2.1.41-2.el7.noarch                                       7/10 驗證中      : apr-util-1.5.2-6.el7_9.1.x86_64                                   8/10 驗證中      : 1:mariadb-libs-5.5.68-1.el7.x86_64                                9/10 驗證中      : 1:mariadb-libs-5.5.60-1.el7_5.x86_64                             10/10 已安裝:httpd.x86_64 0:2.4.6-99.el7.centos.1          mariadb.x86_64 1:5.5.68-1.el7         mariadb-server.x86_64 1:5.5.68-1.el7         作為依賴被安裝:apr.x86_64 0:1.4.8-7.el7                       apr-util.x86_64 0:1.5.2-6.el7_9.1    httpd-tools.x86_64 0:2.4.6-99.el7.centos.1     mailcap.noarch 0:2.1.41-2.el7        perl-DBD-MySQL.x86_64 0:4.023-6.el7           作為依賴被升級:mariadb-libs.x86_64 1:5.5.68-1.el7                                                   完畢!
2. 初始化MariaDB數據庫
[root@lamp ~]# systemctl restart mariadb  # 啟動MariaDB服務
[root@lamp ~]# systemctl enable mariadb  # 設置MariaDB開機自啟
Created symlink from /etc/systemd/system/multi-user.target.wants/mariadb.service to /usr/lib/systemd/system/mariadb.service.
[root@lamp ~]# mysql_secure_installation  # 運行數據庫安全初始化腳本(加固數據庫)NOTE: RUNNING ALL PARTS OF THIS SCRIPT IS RECOMMENDED FOR ALL MariaDBSERVERS IN PRODUCTION USE!  PLEASE READ EACH STEP CAREFULLY!In order to log into MariaDB to secure it, we'll need the current
password for the root user.  If you've just installed MariaDB, and
you haven't set the root password yet, the password will be blank,
so you should just press enter here.Enter current password for root (enter for none):     #  初始密碼為空:直接回車
OK, successfully used password, moving on...Setting the root password ensures that nobody can log into the MariaDB
root user without the proper authorisation.Set root password? [Y/n] Y    #  是否改root密碼:輸入Y
New password:          #設置密碼
Re-enter new password:        #確認密碼
Password updated successfully!
Reloading privilege tables..... Success!By default, a MariaDB installation has an anonymous user, allowing anyone
to log into MariaDB without having to have a user account created for
them.  This is intended only for testing, and to make the installation
go a bit smoother.  You should remove them before moving into a
production environment.Remove anonymous users? [Y/n] y    #是否移除匿名用戶,禁止未授權訪問:輸入`Y`... Success!Normally, root should only be allowed to connect from 'localhost'.  This
ensures that someone cannot guess at the root password from the network.Disallow root login remotely? [Y/n] n    #是否禁止root遠程登錄:輸入`n`允許遠程管理,按需選擇... skipping.By default, MariaDB comes with a database named 'test' that anyone can
access.  This is also intended only for testing, and should be removed
before moving into a production environment.
輸入`Y`
Remove test database and access to it? [Y/n] y    # 是否移除默認測試庫輸入Y- Dropping test database...... Success!- Removing privileges on test database...... Success!Reloading the privilege tables will ensure that all changes made so far
will take effect immediately.Reload privilege tables now? [Y/n] y      #  刷新權限表:輸入Y,使配置立即生效... Success!Cleaning up...All done!  If you've completed all of the above steps, your MariaDB
installation should now be secure.Thanks for using MariaDB!
[root@lamp ~]# mysql -uroot -p       # 用 root 用戶登錄MariaDB
Enter password:       # 輸入密碼
Welcome to the MariaDB monitor.  Commands end with ; or \g.
Your MariaDB connection id is 9
Server version: 5.5.68-MariaDB MariaDB ServerCopyright (c) 2000, 2018, Oracle, MariaDB Corporation Ab and others.Type 'help;' or '\h' for help. Type '\c' to clear the current input statement.MariaDB [(none)]> exit
Bye數據庫安全配置步驟說明:
3. 安裝PHP及擴展
# 安裝Remi倉庫(提供高版本PHP)
[root@lamp ~]# yum -y install http://rpms.remirepo.net/enterprise/remi-release-7.rpm
已加載插件:fastestmirror, langpacks
remi-release-7.rpm                                              |  28 kB  00:00:00
正在檢查 /var/tmp/yum-root-_zrwpI/remi-release-7.rpm: remi-release-7.9-6.el7.remi.noarch
/var/tmp/yum-root-_zrwpI/remi-release-7.rpm 將被安裝
正在解決依賴關系
--> 正在檢查事務
---> 軟件包 remi-release.noarch.0.7.9-6.el7.remi 將被 安裝
--> 解決依賴關系完成依賴關系解決=======================================================================================Package             架構          版本                   源                      大小
=======================================================================================
正在安裝:remi-release        noarch        7.9-6.el7.remi         /remi-release-7         39 k事務概要
=======================================================================================
安裝  1 軟件包總計:39 k
安裝大小:39 k
Downloading packages:
Running transaction check
Running transaction test
Transaction test succeeded
Running transaction正在安裝    : remi-release-7.9-6.el7.remi.noarch                                 1/1 驗證中      : remi-release-7.9-6.el7.remi.noarch                                 1/1 已安裝:remi-release.noarch 0:7.9-6.el7.remi                                                 完畢!# 安裝yum工具(用于管理倉庫)
[root@lamp ~]# yum -y install yum-utils
已加載插件:fastestmirror, langpacks
Loading mirror speeds from cached hostfile* base: mirrors.aliyun.com* epel: ftp-stud.hs-esslingen.de* extras: mirrors.aliyun.com* remi-safe: mirrors.tuna.tsinghua.edu.cn* updates: mirrors.aliyun.com
remi-safe                                                       | 3.0 kB  00:00:00
remi-safe/primary_db                                            | 2.6 MB  00:00:01
正在解決依賴關系
--> 正在檢查事務
---> 軟件包 yum-utils.noarch.0.1.1.31-50.el7 將被 升級
---> 軟件包 yum-utils.noarch.0.1.1.31-54.el7_8 將被 更新
--> 解決依賴關系完成依賴關系解決=======================================================================================Package             架構             版本                        源              大小
=======================================================================================
正在更新:yum-utils           noarch           1.1.31-54.el7_8             base           122 k事務概要
=======================================================================================
升級  1 軟件包總下載量:122 k
Downloading packages:
No Presto metadata available for base
yum-utils-1.1.31-54.el7_8.noarch.rpm                            | 122 kB  00:00:00
Running transaction check
Running transaction test
Transaction test succeeded
Running transaction正在更新    : yum-utils-1.1.31-54.el7_8.noarch                                   1/2 清理        : yum-utils-1.1.31-50.el7.noarch                                     2/2 驗證中      : yum-utils-1.1.31-54.el7_8.noarch                                   1/2 驗證中      : yum-utils-1.1.31-50.el7.noarch                                     2/2 更新完畢:yum-utils.noarch 0:1.1.31-54.el7_8                                                   完畢!# 啟用PHP 7.0倉庫
[root@lamp ~]# yum-config-manager --enable remi-php70
已加載插件:fastestmirror, langpacks
================================== repo: remi-php70 ===================================
[remi-php70]
async = True
bandwidth = 0
base_persistdir = /var/lib/yum/repos/x86_64/7
baseurl =
cache = 0
cachedir = /var/cache/yum/x86_64/7/remi-php70
check_config_file_age = True
compare_providers_priority = 80
cost = 1000
deltarpm_metadata_percentage = 100
deltarpm_percentage =
enabled = 1
enablegroups = True
exclude =
failovermethod = priority
ftp_disable_epsv = False
gpgcadir = /var/lib/yum/repos/x86_64/7/remi-php70/gpgcadir
gpgcakey =
gpgcheck = True
gpgdir = /var/lib/yum/repos/x86_64/7/remi-php70/gpgdir
gpgkey = file:///etc/pki/rpm-gpg/RPM-GPG-KEY-remi
hdrdir = /var/cache/yum/x86_64/7/remi-php70/headers
http_caching = all
includepkgs =
ip_resolve =
keepalive = True
keepcache = False
mddownloadpolicy = sqlite
mdpolicy = group:small
mediaid =
metadata_expire = 21600
metadata_expire_filter = read-only:present
metalink =
minrate = 0
mirrorlist = http://cdn.remirepo.net/enterprise/7/php70/mirror
mirrorlist_expire = 86400
name = Remi's PHP 7.0 RPM repository for Enterprise Linux 7 - x86_64
old_base_cache_dir =
password =
persistdir = /var/lib/yum/repos/x86_64/7/remi-php70
pkgdir = /var/cache/yum/x86_64/7/remi-php70/packages
proxy = False
proxy_dict =
proxy_password =
proxy_username =
repo_gpgcheck = False
retries = 10
skip_if_unavailable = False
ssl_check_cert_permissions = True
sslcacert =
sslclientcert =
sslclientkey =
sslverify = True
throttle = 0
timeout = 30.0
ui_id = remi-php70
ui_repoid_vars = releasever,basearch
username = # 安裝PHP及WordPress所需擴展(如圖片處理、數據庫連接等)
[root@lamp ~]# yum -y install php php-cli php-fpm php-gd php-curl php-zip php-mbstring php-opcache php-intl php-mysqlnd
已加載插件:fastestmirror, langpacks
Loading mirror speeds from cached hostfile* base: mirrors.aliyun.com* epel: mirror.math.princeton.edu* extras: mirrors.aliyun.com* remi-php70: mirrors.tuna.tsinghua.edu.cn* remi-safe: mirrors.tuna.tsinghua.edu.cn* updates: mirrors.aliyun.com
remi-php70                                                      | 3.0 kB  00:00:00
remi-php70/primary_db                                           | 250 kB  00:00:00
正在解決依賴關系
--> 正在檢查事務
---> 軟件包 php.x86_64.0.7.0.33-42.el7.remi 將被 安裝
---> 軟件包 php-cli.x86_64.0.7.0.33-42.el7.remi 將被 安裝
---> 軟件包 php-common.x86_64.0.7.0.33-42.el7.remi 將被 安裝
--> 正在處理依賴關系 php-json(x86-64) = 7.0.33-42.el7.remi,它被軟件包 php-common-7.0.33-42.el7.remi.x86_64 需要
---> 軟件包 php-fpm.x86_64.0.7.0.33-42.el7.remi 將被 安裝
---> 軟件包 php-gd.x86_64.0.7.0.33-42.el7.remi 將被 安裝
--> 正在處理依賴關系 libgd.so.103()(64bit),它被軟件包 php-gd-7.0.33-42.el7.remi.x86_64 需要
---> 軟件包 php-intl.x86_64.0.7.0.33-42.el7.remi 將被 安裝
--> 正在處理依賴關系 libicudata.so.69()(64bit),它被軟件包 php-intl-7.0.33-42.el7.remi.x86_64 需要
--> 正在處理依賴關系 libicui18n.so.69()(64bit),它被軟件包 php-intl-7.0.33-42.el7.remi.x86_64 需要
--> 正在處理依賴關系 libicuio.so.69()(64bit),它被軟件包 php-intl-7.0.33-42.el7.remi.x86_64 需要
--> 正在處理依賴關系 libicuuc.so.69()(64bit),它被軟件包 php-intl-7.0.33-42.el7.remi.x86_64 需要
---> 軟件包 php-mbstring.x86_64.0.7.0.33-42.el7.remi 將被 安裝
---> 軟件包 php-mysqlnd.x86_64.0.7.0.33-42.el7.remi 將被 安裝
--> 正在處理依賴關系 php-pdo(x86-64) = 7.0.33-42.el7.remi,它被軟件包 php-mysqlnd-7.0.33-42.el7.remi.x86_64 需要
---> 軟件包 php-opcache.x86_64.0.7.0.33-42.el7.remi 將被 安裝
---> 軟件包 php-pecl-zip.x86_64.0.1.22.3-1.el7.remi.7.0 將被 安裝
--> 正在處理依賴關系 libzip5(x86-64) >= 1.10.1,它被軟件包 php-pecl-zip-1.22.3-1.el7.remi.7.0.x86_64 需要
--> 正在處理依賴關系 libzip.so.5()(64bit),它被軟件包 php-pecl-zip-1.22.3-1.el7.remi.7.0.x86_64 需要
--> 正在檢查事務
---> 軟件包 gd3php.x86_64.0.2.3.3-7.el7.remi 將被 安裝
--> 正在處理依賴關系 libraqm.so.0()(64bit),它被軟件包 gd3php-2.3.3-7.el7.remi.x86_64 需要
--> 正在處理依賴關系 libwebp.so.7()(64bit),它被軟件包 gd3php-2.3.3-7.el7.remi.x86_64 需要
---> 軟件包 libicu69.x86_64.0.69.1-4.el7.remi 將被 安裝
---> 軟件包 libzip5.x86_64.0.1.10.1-1.el7.remi 將被 安裝
--> 正在處理依賴關系 libzstd(x86-64) >= 1.3.6,它被軟件包 libzip5-1.10.1-1.el7.remi.x86_64 需要
--> 正在處理依賴關系 libzstd.so.1()(64bit),它被軟件包 libzip5-1.10.1-1.el7.remi.x86_64 需要
---> 軟件包 php-json.x86_64.0.7.0.33-42.el7.remi 將被 安裝
---> 軟件包 php-pdo.x86_64.0.7.0.33-42.el7.remi 將被 安裝
--> 正在檢查事務
---> 軟件包 libraqm.x86_64.0.0.7.0-4.el7 將被 安裝
---> 軟件包 libwebp7.x86_64.0.1.0.3-2.el7.remi 將被 安裝
---> 軟件包 libzstd.x86_64.0.1.5.5-1.el7 將被 安裝
--> 解決依賴關系完成依賴關系解決=======================================================================================Package            架構         版本                           源                大小
=======================================================================================
正在安裝:php                x86_64       7.0.33-42.el7.remi             remi-php70       2.6 Mphp-cli            x86_64       7.0.33-42.el7.remi             remi-php70       4.0 Mphp-common         x86_64       7.0.33-42.el7.remi             remi-php70       1.0 Mphp-fpm            x86_64       7.0.33-42.el7.remi             remi-php70       1.4 Mphp-gd             x86_64       7.0.33-42.el7.remi             remi-php70        80 kphp-intl           x86_64       7.0.33-42.el7.remi             remi-php70       222 kphp-mbstring       x86_64       7.0.33-42.el7.remi             remi-php70       580 kphp-mysqlnd        x86_64       7.0.33-42.el7.remi             remi-php70       245 kphp-opcache        x86_64       7.0.33-42.el7.remi             remi-php70       168 kphp-pecl-zip       x86_64       1.22.3-1.el7.remi.7.0          remi-php70        65 k
為依賴而安裝:gd3php             x86_64       2.3.3-7.el7.remi               remi-safe        138 klibicu69           x86_64       69.1-4.el7.remi                remi-safe        9.6 Mlibraqm            x86_64       0.7.0-4.el7                    epel              15 klibwebp7           x86_64       1.0.3-2.el7.remi               remi-safe        266 klibzip5            x86_64       1.10.1-1.el7.remi              remi-safe         67 klibzstd            x86_64       1.5.5-1.el7                    epel             292 kphp-json           x86_64       7.0.33-42.el7.remi             remi-php70        68 kphp-pdo            x86_64       7.0.33-42.el7.remi             remi-php70       130 k事務概要
=======================================================================================
安裝  10 軟件包 (+8 依賴軟件包)總下載量:21 M
安裝大小:74 M
Downloading packages:
警告:/var/cache/yum/x86_64/7/epel/packages/libraqm-0.7.0-4.el7.x86_64.rpm: 頭V3 RSA/SHA256 Signature, 密鑰 ID 352c64e5: NOKEY
libraqm-0.7.0-4.el7.x86_64.rpm 的公鑰尚未安裝
(1/18): libraqm-0.7.0-4.el7.x86_64.rpm                          |  15 kB  00:00:01
警告:/var/cache/yum/x86_64/7/remi-safe/packages/gd3php-2.3.3-7.el7.remi.x86_64.rpm: 頭V4 DSA/SHA1 Signature, 密鑰 ID 00f97f56: NOKEY
gd3php-2.3.3-7.el7.remi.x86_64.rpm 的公鑰尚未安裝
(2/18): gd3php-2.3.3-7.el7.remi.x86_64.rpm                      | 138 kB  00:00:01
(3/18): libwebp7-1.0.3-2.el7.remi.x86_64.rpm                    | 266 kB  00:00:00
(4/18): libzip5-1.10.1-1.el7.remi.x86_64.rpm                    |  67 kB  00:00:00
(5/18): libicu69-69.1-4.el7.remi.x86_64.rpm                     | 9.6 MB  00:00:02
php-7.0.33-42.el7.remi.x86_64.rpm 的公鑰尚未安裝     ] 3.8 MB/s |  13 MB  00:00:02 ETA
(6/18): php-7.0.33-42.el7.remi.x86_64.rpm                       | 2.6 MB  00:00:01
(7/18): php-cli-7.0.33-42.el7.remi.x86_64.rpm                   | 4.0 MB  00:00:01
(8/18): php-common-7.0.33-42.el7.remi.x86_64.rpm                | 1.0 MB  00:00:00
(9/18): php-gd-7.0.33-42.el7.remi.x86_64.rpm                    |  80 kB  00:00:00
(10/18): php-intl-7.0.33-42.el7.remi.x86_64.rpm                 | 222 kB  00:00:00
(11/18): php-fpm-7.0.33-42.el7.remi.x86_64.rpm                  | 1.4 MB  00:00:00
(12/18): php-mbstring-7.0.33-42.el7.remi.x86_64.rpm             | 580 kB  00:00:00
(13/18): php-mysqlnd-7.0.33-42.el7.remi.x86_64.rpm              | 245 kB  00:00:00
(14/18): php-json-7.0.33-42.el7.remi.x86_64.rpm                 |  68 kB  00:00:00
(15/18): php-opcache-7.0.33-42.el7.remi.x86_64.rpm              | 168 kB  00:00:00
(16/18): php-pdo-7.0.33-42.el7.remi.x86_64.rpm                  | 130 kB  00:00:00
(17/18): php-pecl-zip-1.22.3-1.el7.remi.7.0.x86_64.rpm          |  65 kB  00:00:00
(18/18): libzstd-1.5.5-1.el7.x86_64.rpm                         | 292 kB  00:00:04
---------------------------------------------------------------------------------------
總計                                                      3.5 MB/s |  21 MB  00:05
從 file:///etc/pki/rpm-gpg/RPM-GPG-KEY-remi 檢索密鑰
導入 GPG key 0x00F97F56:用戶ID     : "Remi Collet <RPMS@FamilleCollet.com>"指紋       : 1ee0 4cce 88a4 ae4a a29a 5df5 004e 6f47 00f9 7f56軟件包     : remi-release-7.9-6.el7.remi.noarch (installed)來自       : /etc/pki/rpm-gpg/RPM-GPG-KEY-remi
從 file:///etc/pki/rpm-gpg/RPM-GPG-KEY-EPEL-7 檢索密鑰
導入 GPG key 0x352C64E5:用戶ID     : "Fedora EPEL (7) <epel@fedoraproject.org>"指紋       : 91e9 7d7c 4a5e 96f1 7f3e 888f 6a2f aea2 352c 64e5軟件包     : epel-release-7-11.noarch (@extras)來自       : /etc/pki/rpm-gpg/RPM-GPG-KEY-EPEL-7
Running transaction check
Running transaction test
Transaction test succeeded
Running transaction正在安裝    : php-common-7.0.33-42.el7.remi.x86_64                              1/18 正在安裝    : php-json-7.0.33-42.el7.remi.x86_64                                2/18 正在安裝    : php-cli-7.0.33-42.el7.remi.x86_64                                 3/18 正在安裝    : php-pdo-7.0.33-42.el7.remi.x86_64                                 4/18 正在安裝    : libicu69-69.1-4.el7.remi.x86_64                                   5/18 正在安裝    : libwebp7-1.0.3-2.el7.remi.x86_64                                  6/18 正在安裝    : libzstd-1.5.5-1.el7.x86_64                                        7/18 正在安裝    : libzip5-1.10.1-1.el7.remi.x86_64                                  8/18 正在安裝    : libraqm-0.7.0-4.el7.x86_64                                        9/18 正在安裝    : gd3php-2.3.3-7.el7.remi.x86_64                                   10/18 正在安裝    : php-gd-7.0.33-42.el7.remi.x86_64                                 11/18 正在安裝    : php-pecl-zip-1.22.3-1.el7.remi.7.0.x86_64                        12/18 正在安裝    : php-intl-7.0.33-42.el7.remi.x86_64                               13/18 正在安裝    : php-mysqlnd-7.0.33-42.el7.remi.x86_64                            14/18 正在安裝    : php-7.0.33-42.el7.remi.x86_64                                    15/18 正在安裝    : php-fpm-7.0.33-42.el7.remi.x86_64                                16/18 正在安裝    : php-opcache-7.0.33-42.el7.remi.x86_64                            17/18 正在安裝    : php-mbstring-7.0.33-42.el7.remi.x86_64                           18/18 驗證中      : php-cli-7.0.33-42.el7.remi.x86_64                                 1/18 驗證中      : gd3php-2.3.3-7.el7.remi.x86_64                                    2/18 驗證中      : php-fpm-7.0.33-42.el7.remi.x86_64                                 3/18 驗證中      : php-opcache-7.0.33-42.el7.remi.x86_64                             4/18 驗證中      : libraqm-0.7.0-4.el7.x86_64                                        5/18 驗證中      : libzstd-1.5.5-1.el7.x86_64                                        6/18 驗證中      : php-mbstring-7.0.33-42.el7.remi.x86_64                            7/18 驗證中      : libzip5-1.10.1-1.el7.remi.x86_64                                  8/18 驗證中      : php-pdo-7.0.33-42.el7.remi.x86_64                                 9/18 驗證中      : php-json-7.0.33-42.el7.remi.x86_64                               10/18 驗證中      : php-mysqlnd-7.0.33-42.el7.remi.x86_64                            11/18 驗證中      : php-gd-7.0.33-42.el7.remi.x86_64                                 12/18 驗證中      : php-7.0.33-42.el7.remi.x86_64                                    13/18 驗證中      : php-intl-7.0.33-42.el7.remi.x86_64                               14/18 驗證中      : libwebp7-1.0.3-2.el7.remi.x86_64                                 15/18 驗證中      : libicu69-69.1-4.el7.remi.x86_64                                  16/18 驗證中      : php-common-7.0.33-42.el7.remi.x86_64                             17/18 驗證中      : php-pecl-zip-1.22.3-1.el7.remi.7.0.x86_64                        18/18 已安裝:php.x86_64 0:7.0.33-42.el7.remi          php-cli.x86_64 0:7.0.33-42.el7.remi        php-common.x86_64 0:7.0.33-42.el7.remi   php-fpm.x86_64 0:7.0.33-42.el7.remi        php-gd.x86_64 0:7.0.33-42.el7.remi       php-intl.x86_64 0:7.0.33-42.el7.remi       php-mbstring.x86_64 0:7.0.33-42.el7.remi php-mysqlnd.x86_64 0:7.0.33-42.el7.remi    php-opcache.x86_64 0:7.0.33-42.el7.remi  php-pecl-zip.x86_64 0:1.22.3-1.el7.remi.7.0作為依賴被安裝:gd3php.x86_64 0:2.3.3-7.el7.remi           libicu69.x86_64 0:69.1-4.el7.remi        libraqm.x86_64 0:0.7.0-4.el7               libwebp7.x86_64 0:1.0.3-2.el7.remi       libzip5.x86_64 0:1.10.1-1.el7.remi         libzstd.x86_64 0:1.5.5-1.el7             php-json.x86_64 0:7.0.33-42.el7.remi       php-pdo.x86_64 0:7.0.33-42.el7.remi      完畢!# 驗證PHP版本(確認安裝成功)
[root@lamp ~]# php -v
PHP 7.0.33 (cli) (built: Jun  5 2024 09:34:26) ( NTS )
Copyright (c) 1997-2017 The PHP Group
Zend Engine v3.0.0, Copyright (c) 1998-2017 Zend Technologieswith Zend OPcache v7.0.33, Copyright (c) 1999-2017, by Zend Technologies
4. 配置PHP時區
[root@lamp ~]# vim /etc/php.ini  # 編輯PHP主配置文件# 修改時區配置為:date.timezone = Asia/Shanghai(確保時間顯示正確)[root@lamp ~]# systemctl restart php-fpm  # 重啟PHP進程管理器
[root@lamp ~]# systemctl enable php-fpm  # 設置php-fpm開機自啟
三、配置Apache服務
1. 設置默認網頁
[root@lamp ~]# vim /etc/httpd/conf/httpd.conf  # 編輯Apache主配置文件# 找到<IfModule dir_module>部分,修改為:<IfModule dir_module>DirectoryIndex index.html index.php  # 加載index.php 、 index網頁文件
</IfModule>
2. 創建PHP測試頁面
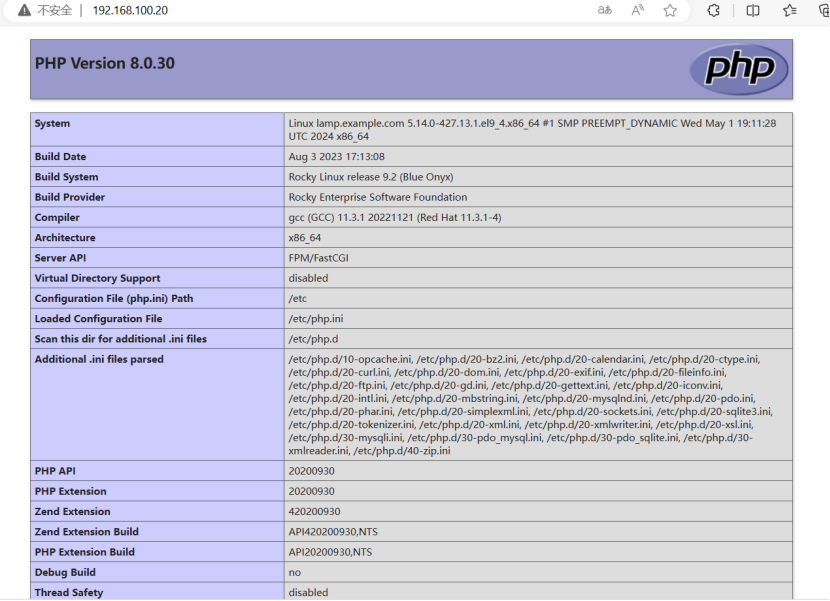
[root@lamp ~]# vim /var/www/html/index.php  # 創建PHP信息測試頁# 添加以下內容(用于驗證PHP是否正常運行):<?phpphpinfo();  # 輸出PHP配置信息
?>[root@lamp ~]# systemctl restart httpd  # 重啟Apache使配置生效
[root@lamp ~]# systemctl enable httpd  # 設置Apache開機自啟
測試說明:瀏覽器訪問服務器IP(如http://192.168.100.20),若顯示PHP版本、模塊等信息,說明LAMP架構正常。
四、部署WordPress
1. 準備安裝包(從本地上傳)
[root@lamp ~]# yum -y install lrzsz  # 安裝文件上傳工具(支持從本地向服務器上傳文件)
[root@lamp ~]# mkdir /opt/software  # 創建存放軟件包的目錄
[root@lamp ~]# cd /opt/software  # 進入軟件目錄
[root@lamp software]# rz  # 執行后選擇本地的wordpress-6.5.5.tar.gz文件上傳
2. 解壓并部署文件
[root@lamp software]# yum -y install tar  # 安裝解壓工具(若未安裝)
[root@lamp software]# tar -zxvf wordpress-6.5.5.tar.gz  # 解壓WordPress壓縮包
[root@lamp software]# cp -R wordpress /var/www/html/  # 將解壓后的文件復制到Apache網站根目錄(供瀏覽器訪問)
3. 配置目錄權限
[root@lamp software]# chown -R apache.apache /var/www/html/wordpress/  # 將目錄所有者所有組改為Apache用戶Apache組(確保網站可讀寫)
[root@lamp software]# chmod -R 775 /var/www/html/wordpress/  # 設置權限:所有者和組有讀寫執行權,其他用戶有讀執行權
4. 創建WordPress數據庫及用戶
[root@lamp software]# mysql -u root -p  # 登錄MariaDB(-u指定用戶,-p提示輸入密碼)
# 輸入密碼redhat(之前設置的數據庫root密碼)MariaDB [(none)]> create database wordpress_db;  # 創建名為wordpress_db的數據庫
MariaDB [(none)]> create user 'wordpress_user'@'localhost' identified by 'redhat';  # 創建本地用戶wordpress_user,密碼redhat
MariaDB [(none)]> grant all on wordpress_db.* to 'wordpress_user'@'localhost';  # 授權該用戶管理wordpress_db數據庫
MariaDB [(none)]> flush privileges;  # 刷新權限表(使授權生效)
MariaDB [(none)]> exit  # 退出數據庫[root@lamp software]# mysql -u root -p  # 登錄MariaDB(-u指定用戶,-p提示輸入密碼)
Enter password:
Welcome to the MariaDB monitor.  Commands end with ; or \g.
Your MariaDB connection id is 10
Server version: 5.5.68-MariaDB MariaDB ServerCopyright (c) 2000, 2018, Oracle, MariaDB Corporation Ab and others.Type 'help;' or '\h' for help. Type '\c' to clear the current input statement.MariaDB [(none)]> create database wordpress_db;    # 創建名為wordpress_db的數據庫
Query OK, 1 row affected (0.00 sec)MariaDB [(none)]> create user'wordpress_user'@'localhost' identified by 'redhat';  # 創建本地用戶wordpress_user,密碼redhat
Query OK, 0 rows affected (0.00 sec)MariaDB [(none)]> grant all on wordpress_db.* to 'wordpress_user'@'localhost';# 授權該用戶管理wordpress_db數據庫
Query OK, 0 rows affected (0.00 sec)MariaDB [(none)]> flush privileges;  # 刷新權限表(使授權生效)MariaDB [(none)]> show databases;   #查看數據庫列表
+--------------------+
| Database           |
+--------------------+
| information_schema |
| mysql              |
| performance_schema |
| wordpress_db       |
+--------------------+
4 rows in set (0.00 sec)MariaDB [(none)]> exit    # 退出數據庫
Bye
5. 配置虛擬主機
[root@lamp software]# cp -p /usr/share/doc/httpd-2.4.6/httpd-vhosts.conf /etc/httpd/conf.d/  # 復制虛擬主機配置模板到Apache配置目錄
[root@lamp software]# vim /etc/httpd/conf.d/httpd-vhosts.conf  # 編輯虛擬主機配置
# 添加以下內容(指定WordPress網站目錄和訪問權限):
````ba
<VirtualHost 192.168.100.20:80>  # 綁定服務器IP和80端口DocumentRoot "/var/www/html/wordpress"  # 網站根目錄<Directory "/var/www/html/wordpress">  # 目錄權限配置Options Indexes FollowSymLinks  # 允許目錄索引和跟隨符號鏈接AllowOverride all  # 允許.htaccess文件覆蓋配置(WordPress固定鏈接需要)Require all granted  # 允許所有用戶訪問</Directory>
</VirtualHost>[root@lamp software]# systemctl restart httpd  # 重啟Apache使虛擬主機配置生效
五、完成WordPress安裝
- 瀏覽器訪問服務器IP(如
http://192.168.100.20),按向導完成:- 選擇語言(如“中文(簡體)”)
- 輸入數據庫信息(前文創建的數據庫名、用戶名、密碼)
- 填寫網站基本信息(站點標題、管理員賬號密碼等)
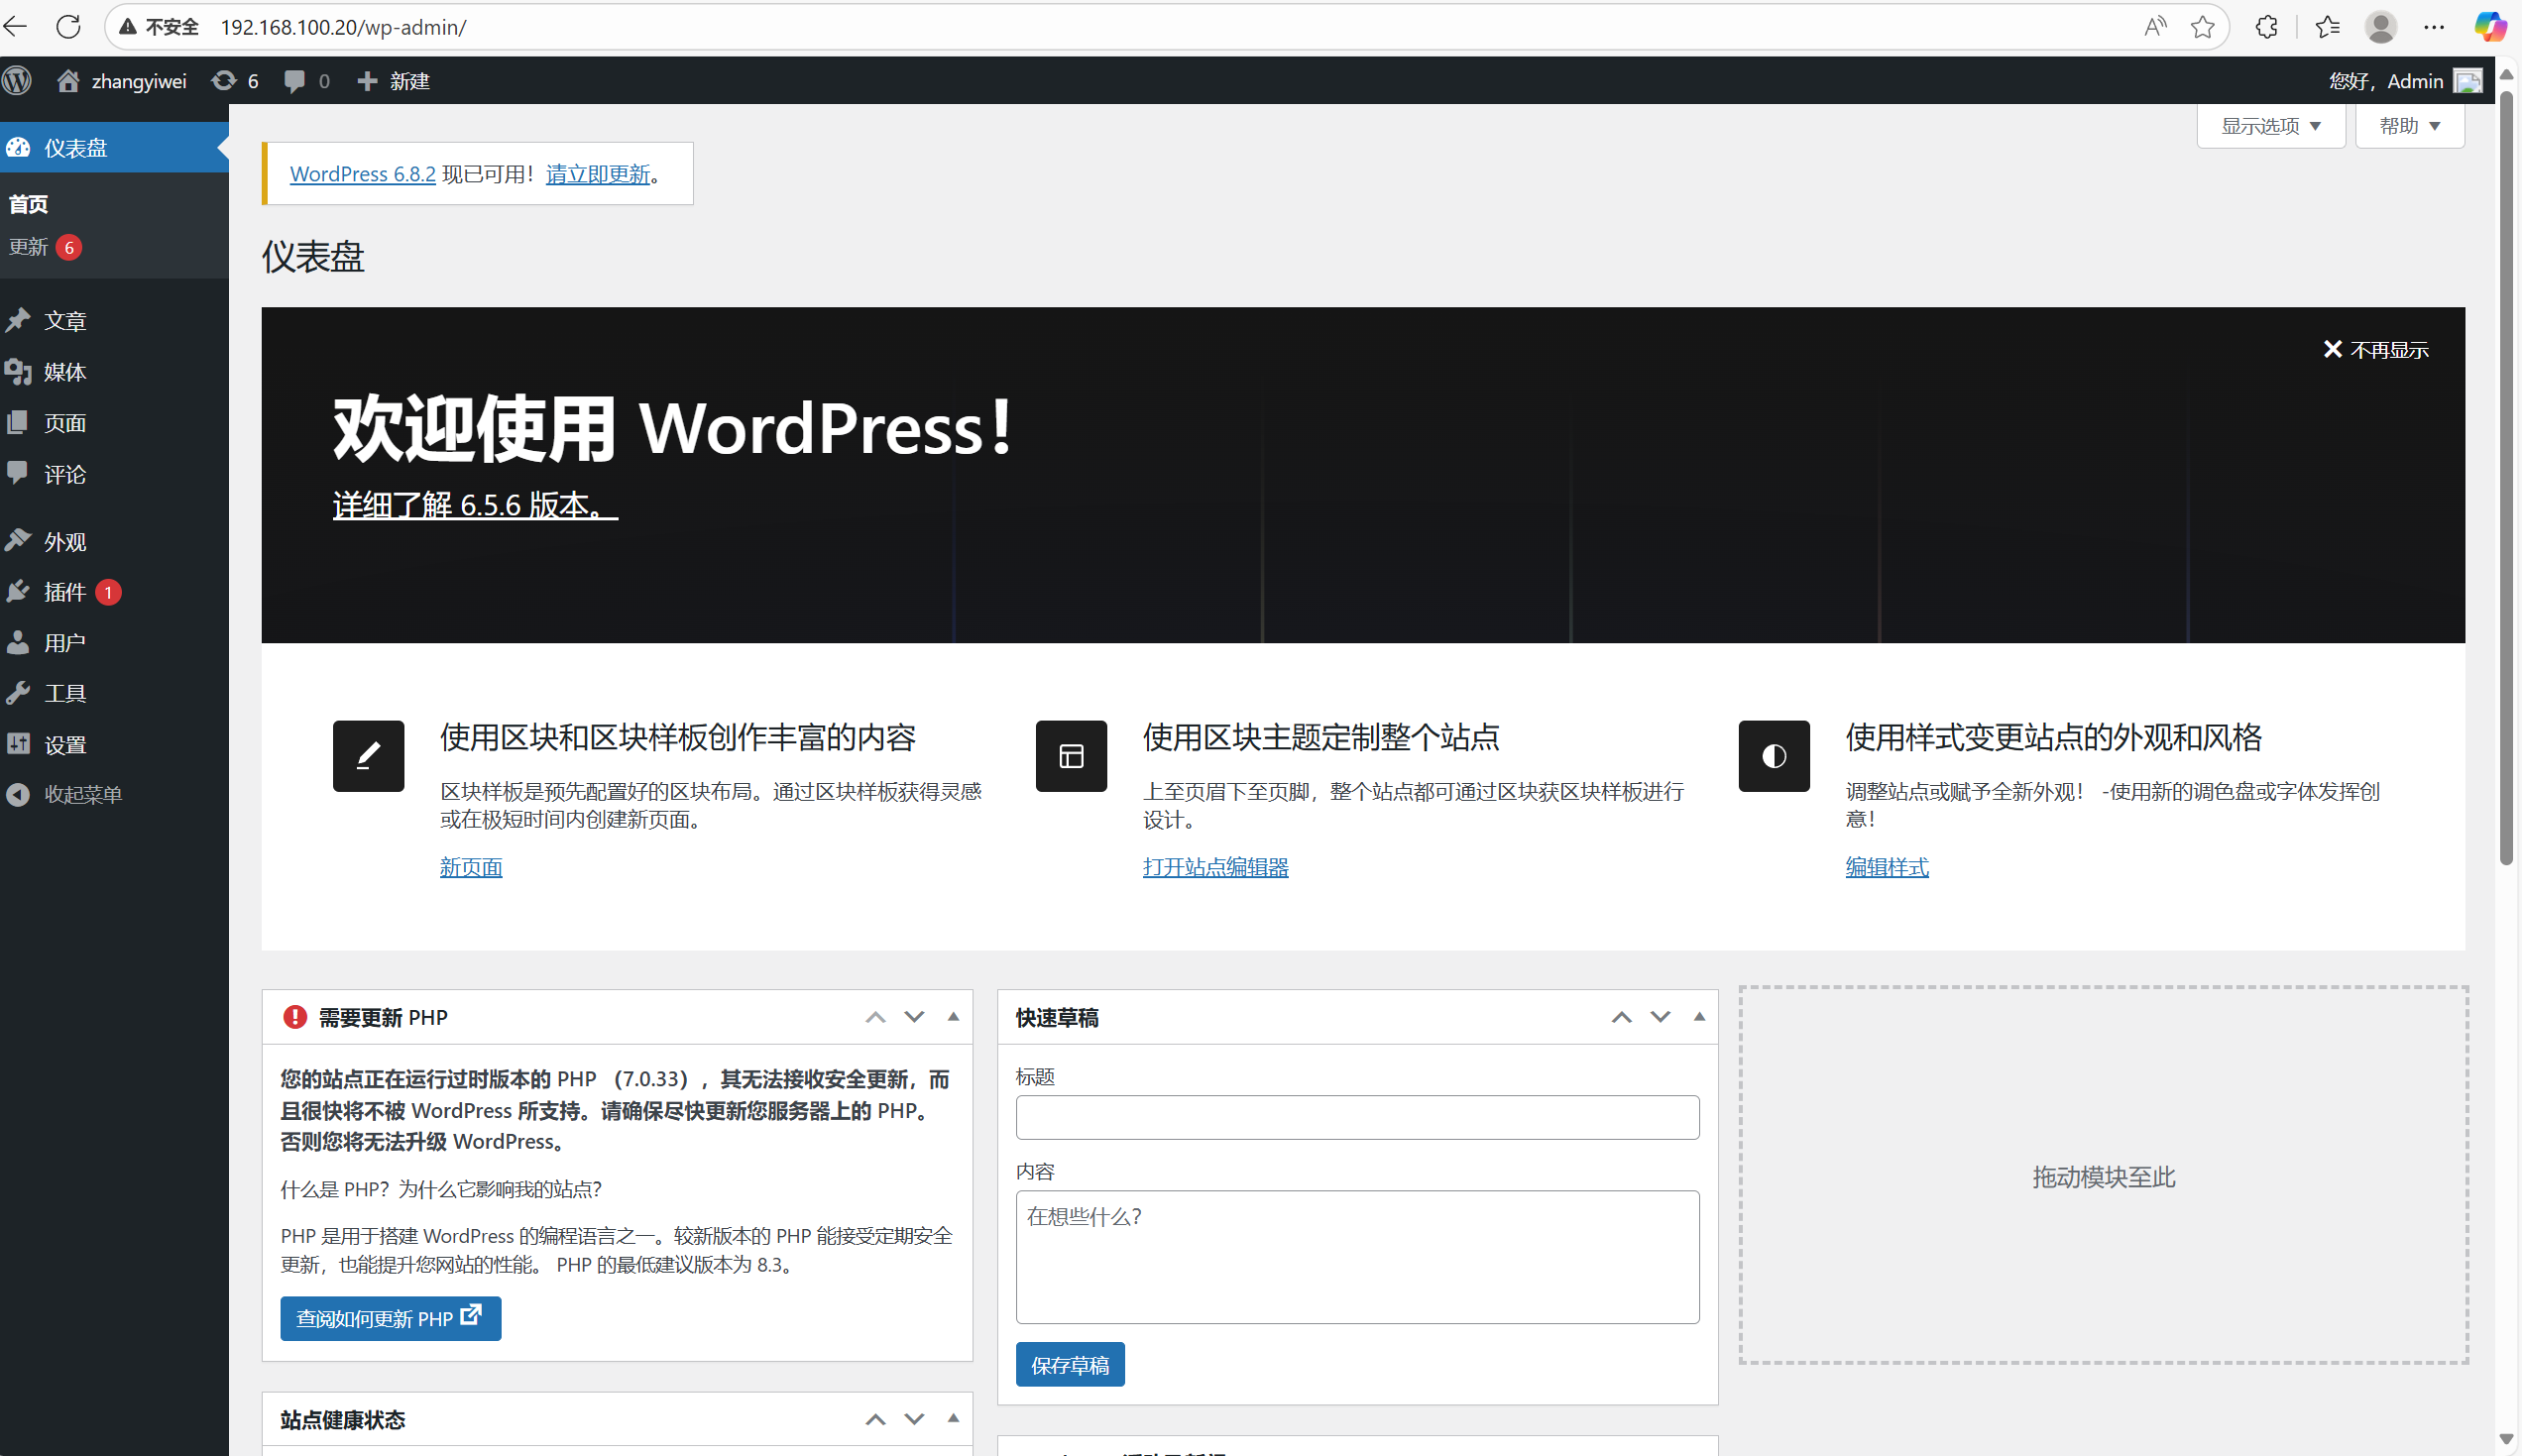
- 點擊“安裝WordPress”,完成后使用管理員賬號登錄后臺(
http://IP/wp-admin)
至此,WordPress部署完成,可通過前臺訪問網站或后臺管理內容。


 IntelliJ Idea 常用快捷鍵(Mac))


)


)


 114. 二叉樹展開為鏈表 (深度優先搜索dfs+鏈表))
