Fine-Tuning Llama2 with LoRA
- 1. What is LoRA?
- 2. How does LoRA work?
- 3. Applying LoRA to Llama2 models
- 4. LoRA finetuning recipe in torchtune
- 5. Trading off memory and model performance with LoRA
- Model Arguments
- References
https://docs.pytorch.org/torchtune/main/tutorials/lora_finetune.html
This guide will teach you about LoRA, a parameter-efficient finetuning technique, and show you how you can use torchtune to finetune a Llama2 model with LoRA.
LoRA: Low-Rank Adaptation of Large Language Models
https://arxiv.org/abs/2106.09685
1. What is LoRA?
LoRA is an adapter-based method for parameter-efficient finetuning that adds trainable low-rank decomposition matrices to different layers of a neural network, then freezes the network’s remaining parameters. LoRA is most commonly applied to transformer models, in which case it is common to add the low-rank matrices to some of the linear projections in each transformer layer’s self-attention.
- Note
If you’re unfamiliar, check out these references for thedefinition of rankhttps://en.wikipedia.org/wiki/Rank_(linear_algebra) and discussion oflow-rank approximationshttps://en.wikipedia.org/wiki/Low-rank_approximation.
By finetuning with LoRA (as opposed to finetuning all model parameters), you can expect to see memory savings due to a substantial reduction in the number of parameters with gradients. When using an optimizer with momentum, like AdamW https://docs.pytorch.org/docs/stable/generated/torch.optim.AdamW.html,
you can expect to see further memory savings from the optimizer state.
- Note
LoRA memory savings come primarily from gradient and optimizer states, so if your model’s peak memory comes in itsforward()method, then LoRA may not reduce peak memory.
2. How does LoRA work?
LoRA replaces weight update matrices with a low-rank approximation. In general, weight updates for an arbitrary nn.Linear(in_dim,out_dim) layer could have rank as high as min(in_dim,out_dim). LoRA (and other related papers such as Aghajanyan et al.) hypothesize that the intrinsic dimension https://en.wikipedia.org/wiki/Intrinsic_dimension of these updates during LLM fine-tuning can in fact be much lower. To take advantage of this property, LoRA finetuning will freeze the original model, then add a trainable weight update from a low-rank projection. More explicitly, LoRA trains two matrices A and B. A projects the inputs down to a much smaller rank (often four or eight in practice), and B projects back up to the dimension output by the original linear layer.
hypothesize /ha??p?θ?sa?z/
v. 假設;假定
Intrinsic Dimensionality Explains the Effectiveness of Language Model Fine-Tuning
https://arxiv.org/abs/2012.13255
The image below gives a simplified representation of a single weight update step from a full finetune (on the left) compared to a weight update step with LoRA (on the right). The LoRA matrices A and B serve as an approximation to the full rank weight update in blue.
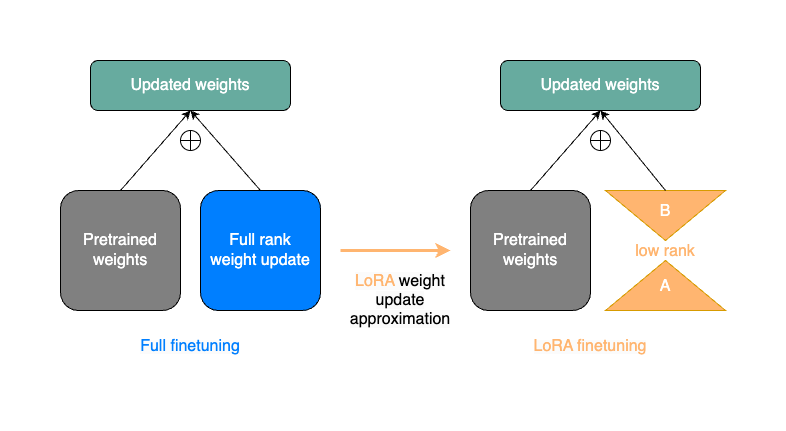
Although LoRA introduces a few extra parameters in the model forward(), only the A and B matrices are trainable. This means that with a rank r LoRA decomposition, the number of gradients we need to store reduces from in_dim * out_dim to r * (in_dim+out_dim). (Remember that in general r is much smaller than in_dim and out_dim.)
For example, in the 7B Llama2’s self-attention, in_dim=out_dim=4096 for the Q, K, and V projections. This means a LoRA decomposition of rank r=8 will reduce the number of trainable parameters for a given projection from 4096 ? 4096 ≈ 15 M 4096 * 4096 \approx 15M 4096?4096≈15M to 8 ? 8192 ≈ 65 K 8 * 8192 \approx 65K 8?8192≈65K, a reduction of over 99%.
Let’s take a look at a minimal implementation of LoRA in native PyTorch.
import torch
from torch import nnclass LoRALinear(nn.Module):def __init__(self,in_dim: int,out_dim: int,rank: int,alpha: float,dropout: float):# These are the weights from the original pretrained modelself.linear = nn.Linear(in_dim, out_dim, bias=False)# These are the new LoRA params. In general rank << in_dim, out_dimself.lora_a = nn.Linear(in_dim, rank, bias=False)self.lora_b = nn.Linear(rank, out_dim, bias=False)# Rank and alpha are commonly-tuned hyperparametersself.rank = rankself.alpha = alpha# Most implementations also include some dropoutself.dropout = nn.Dropout(p=dropout)# The original params are frozen, and only LoRA params are trainable.self.linear.weight.requires_grad = Falseself.lora_a.weight.requires_grad = Trueself.lora_b.weight.requires_grad = Truedef forward(self, x: torch.Tensor) -> torch.Tensor:# This would be the output of the original modelfrozen_out = self.linear(x)# lora_a projects inputs down to the much smaller self.rank,# then lora_b projects back up to the output dimensionlora_out = self.lora_b(self.lora_a(self.dropout(x)))# Finally, scale by the alpha parameter (normalized by rank)# and add to the original model's outputsreturn frozen_out + (self.alpha / self.rank) * lora_out
There are some other details around initialization which we omit here, but if you’d like to know more you can see our implementation in LoRALinear https://docs.pytorch.org/torchtune/main/generated/torchtune.modules.peft.LoRALinear.html. Now that we understand what LoRA is doing, let’s look at how we can apply it to our favorite models.
3. Applying LoRA to Llama2 models
With torchtune, we can easily apply LoRA to Llama2 with a variety of different configurations. Let’s take a look at how to construct Llama2 models in torchtune with and without LoRA.
from torchtune.models.llama2 import llama2_7b, lora_llama2_7b# Build Llama2 without any LoRA layers
base_model = llama2_7b()# The default settings for lora_llama2_7b will match those for llama2_7b
# We just need to define which layers we want LoRA applied to.
# Within each self-attention, we can choose from ["q_proj", "k_proj", "v_proj", and "output_proj"].
# We can also set apply_lora_to_mlp=True or apply_lora_to_output=True to apply LoRA to other linear
# layers outside of the self-attention.
lora_model = lora_llama2_7b(lora_attn_modules=["q_proj", "v_proj"])
- Note
Callinglora_llama_2_7bhttps://docs.pytorch.org/torchtune/main/generated/torchtune.models.llama2.lora_llama2_7b.html alone will not handle the definition of which parameters are trainable.
Let’s inspect each of these models a bit more closely.
# Print the first layer's self-attention in the usual Llama2 model
>>> print(base_model.layers[0].attn)
MultiHeadAttention((q_proj): Linear(in_features=4096, out_features=4096, bias=False)(k_proj): Linear(in_features=4096, out_features=4096, bias=False)(v_proj): Linear(in_features=4096, out_features=4096, bias=False)(output_proj): Linear(in_features=4096, out_features=4096, bias=False)(pos_embeddings): RotaryPositionalEmbeddings()
)# Print the same for Llama2 with LoRA weights
>>> print(lora_model.layers[0].attn)
MultiHeadAttention((q_proj): LoRALinear((dropout): Dropout(p=0.0, inplace=False)(lora_a): Linear(in_features=4096, out_features=8, bias=False)(lora_b): Linear(in_features=8, out_features=4096, bias=False))(k_proj): Linear(in_features=4096, out_features=4096, bias=False)(v_proj): LoRALinear((dropout): Dropout(p=0.0, inplace=False)(lora_a): Linear(in_features=4096, out_features=8, bias=False)(lora_b): Linear(in_features=8, out_features=4096, bias=False))(output_proj): Linear(in_features=4096, out_features=4096, bias=False)(pos_embeddings): RotaryPositionalEmbeddings()
)
Notice that our LoRA model’s layer contains additional weights in the Q and V projections, as expected. Additionally, inspecting the type of lora_model and base_model, would show that they are both instances of the same TransformerDecoder https://docs.pytorch.org/torchtune/main/generated/torchtune.modules.TransformerDecoder.html.
Why does this matter? torchtune makes it easy to load checkpoints for LoRA directly from our Llama2 model without any wrappers or custom checkpoint conversion logic.
# Assuming that base_model already has the pretrained Llama2 weights,
# this will directly load them into your LoRA model without any conversion necessary.
lora_model.load_state_dict(base_model.state_dict(), strict=False)
- Note
Whenever loading weights withstrict=False, you should verify that any missing or extra keys in the loadedstate_dictare as expected. torchtune’s LoRA recipes do this by default viavalidate_missing_and_unexpected_for_lora()https://docs.pytorch.org/torchtune/main/generated/torchtune.modules.peft.validate_missing_and_unexpected_for_lora.html.
Once we’ve loaded the base model weights, we also want to set only LoRA parameters to trainable.
from torchtune.modules.peft.peft_utils import get_adapter_params, set_trainable_params# Fetch all params from the model that are associated with LoRA.
lora_params = get_adapter_params(lora_model)# Set requires_grad=True on lora_params, and requires_grad=False on all others.
set_trainable_params(lora_model, lora_params)# Print the total number of parameters
total_params = sum([p.numel() for p in lora_model.parameters()])
trainable_params = sum([p.numel() for p in lora_model.parameters() if p.requires_grad])
print(f"""{total_params} total params,{trainable_params}" trainable params,{(100.0 * trainable_params / total_params):.2f}% of all params are trainable."""
)6742609920 total params,
4194304 trainable params,
0.06% of all params are trainable.
- Note
If you are directly using the LoRA recipe, you need only pass the relevant checkpoint path. Loading model weights and setting trainable parameters will be taken care of in the recipe.
recipe /?res?pi/
n. 配方;食譜;方法;秘訣;烹飪法;訣竅
4. LoRA finetuning recipe in torchtune
Finally, we can put it all together and finetune a model using torchtune’s LoRA recipe. Make sure that you have first downloaded the Llama2 weights and tokenizer by following these instructions. You can then run the following command to perform a LoRA finetune of Llama2-7B with two GPUs (each having VRAM of at least 16GB):
tune run --nnodes 1 --nproc_per_node 2 lora_finetune_distributed --config llama2/7B_lora
-
Note
Make sure to point to the location of your Llama2 weights and tokenizer. This can be done either by addingcheckpointer.checkpoint_files=[my_model_checkpoint_path]tokenizer_checkpoint=my_tokenizer_checkpoint_pathor by directly modifying the7B_lora.yamlfile. See our “All About Configs” https://docs.pytorch.org/torchtune/main/deep_dives/configs.html recipe for more details on how you can easily clone and modify torchtune configs. -
Note
You can modify the value ofnproc_per_nodedepending on (a) the number of GPUs you have available, and (b) the memory constraints of your hardware.
The preceding command will run a LoRA finetune with torchtune’s factory settings, but we may want to experiment a bit. Let’s take a closer look at some of the lora_finetune_distributed config.
# Model Arguments
model:_component_: lora_llama2_7blora_attn_modules: ['q_proj', 'v_proj']lora_rank: 8lora_alpha: 16
...
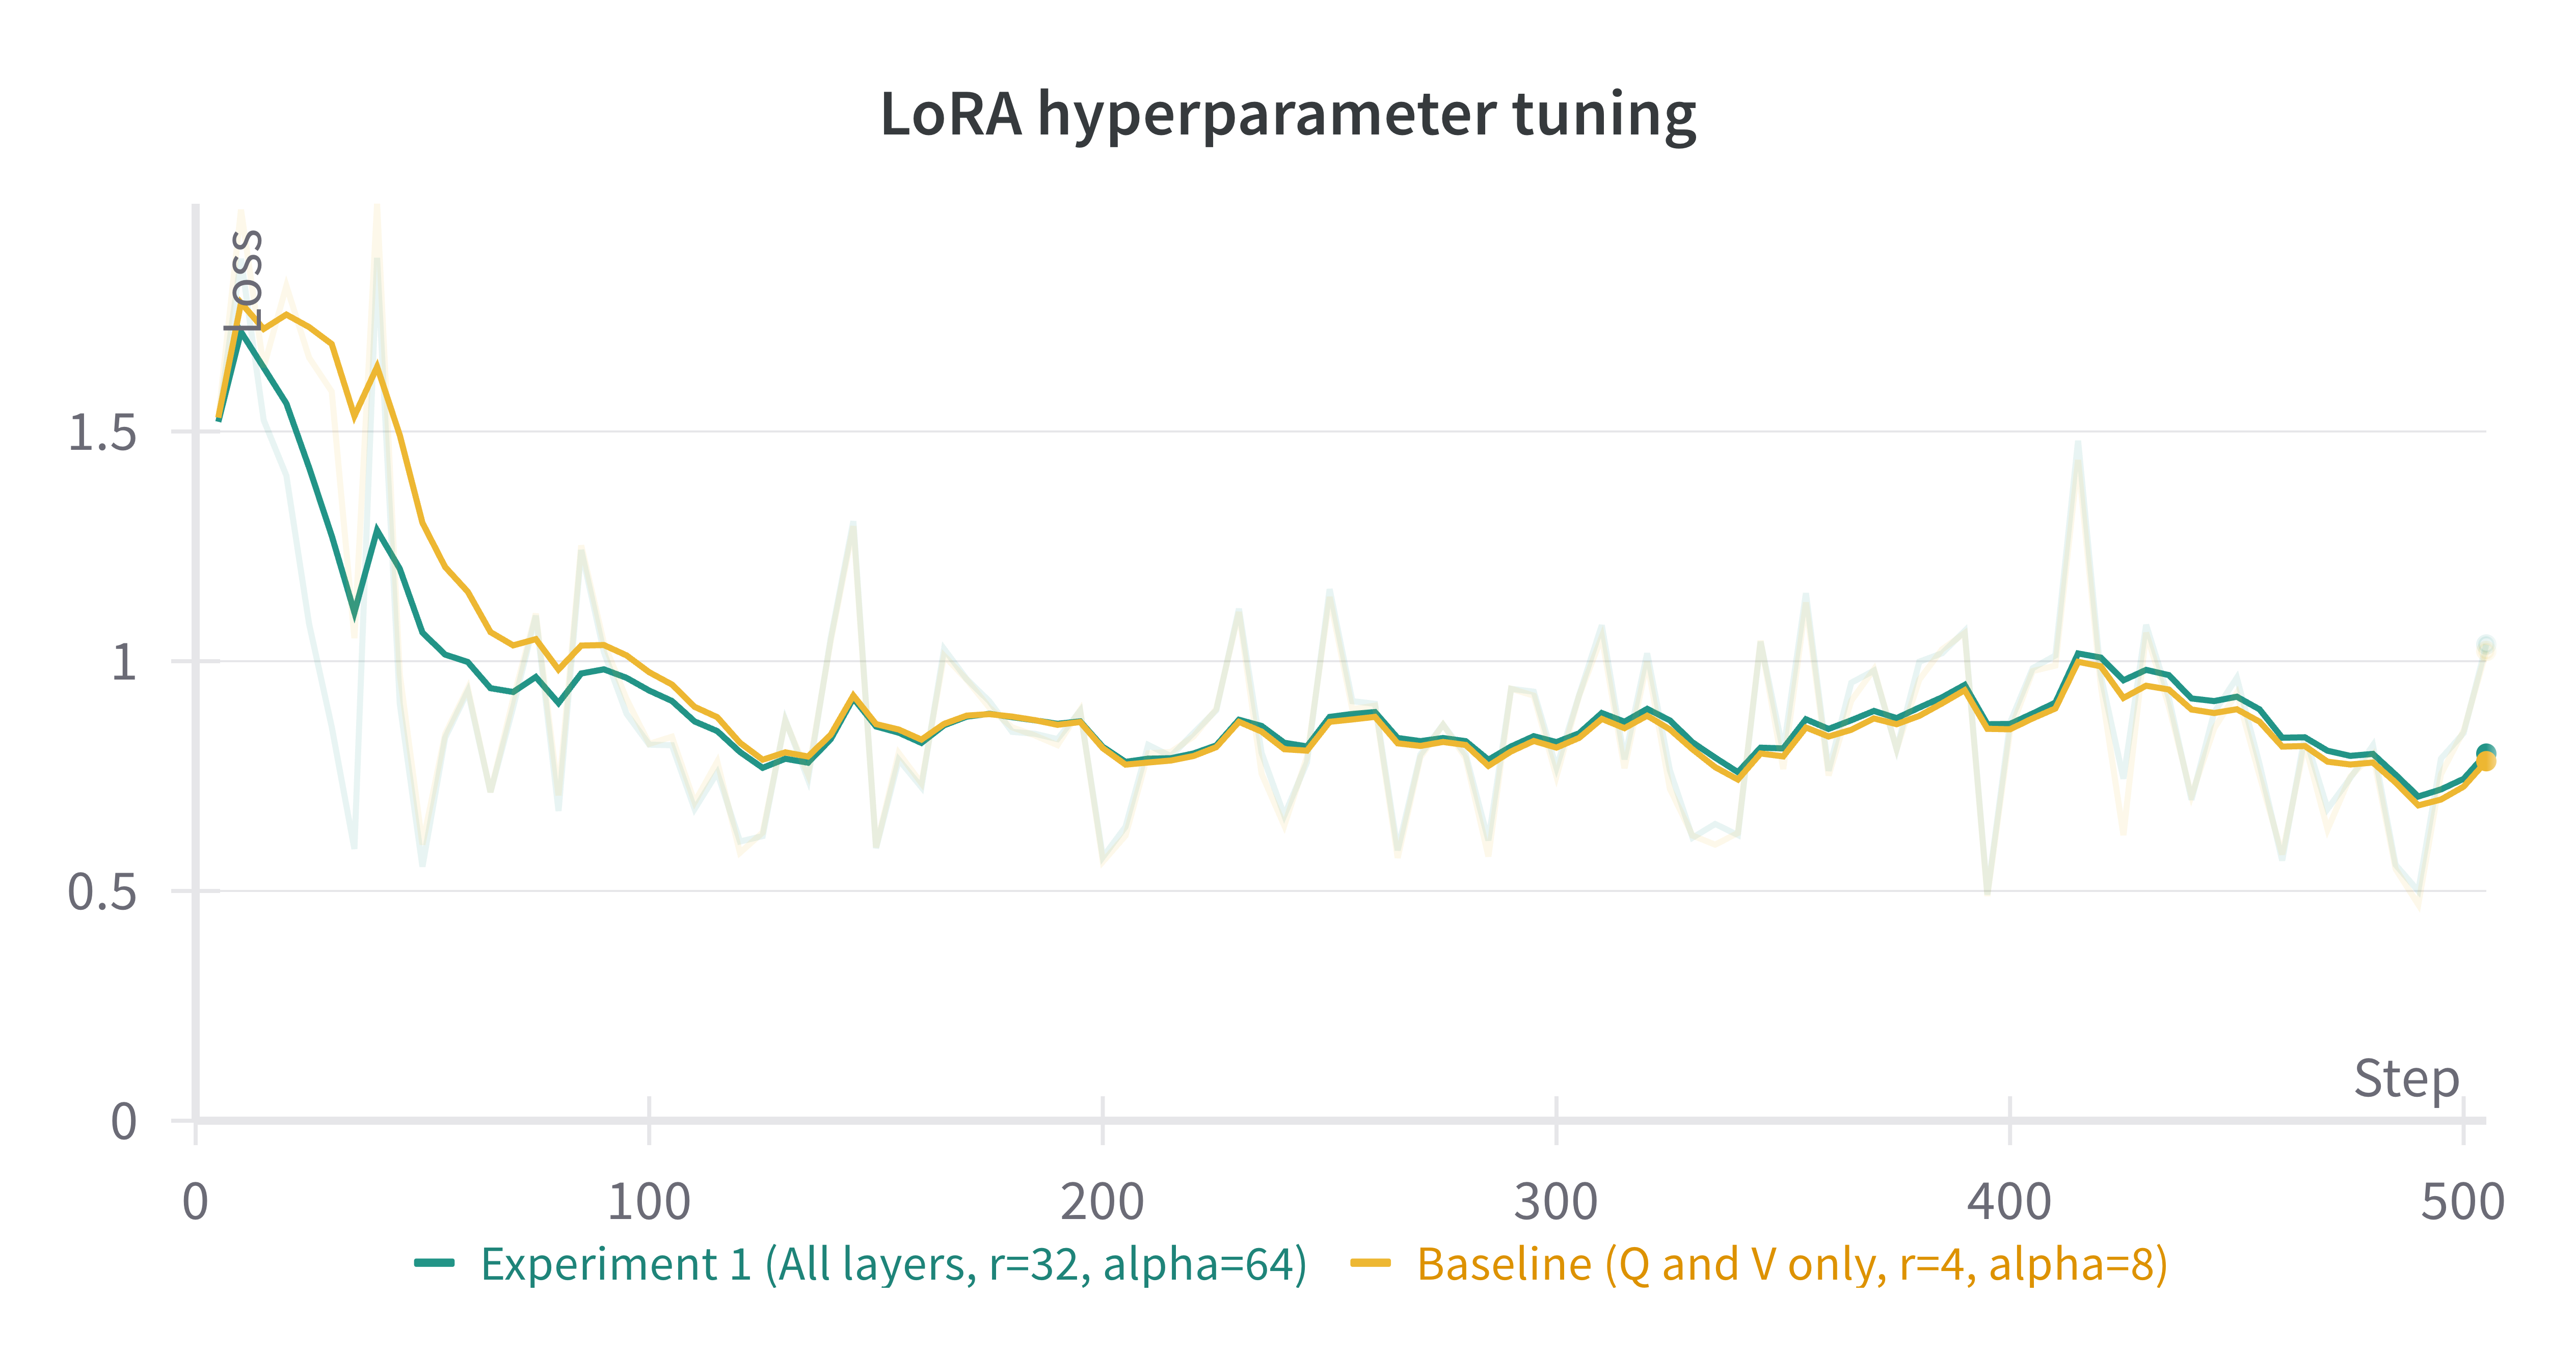
We see that the default is to apply LoRA to Q and V projections with a rank of 8. Some experiments with LoRA have found that it can be beneficial to apply LoRA to all linear layers in the self-attention, and to increase the rank to 16 or 32. Note that this is likely to increase our max memory, but as long as we keep rank<<embed_dim, the impact should be relatively minor.
Let’s run this experiment. We can also increase alpha (in general it is good practice to scale alpha and rank together).
tune run --nnodes 1 --nproc_per_node 2 lora_finetune_distributed --config llama2/7B_lora \
lora_attn_modules=['q_proj','k_proj','v_proj','output_proj'] \
lora_rank=32 lora_alpha=64 output_dir=./lora_experiment_1
A comparison of the (smoothed) loss curves between this run and our baseline over the first 500 steps can be seen below.
- Note
The above figure was generated with W&B. You can use torchtune’sWandBLoggerhttps://docs.pytorch.org/torchtune/main/generated/torchtune.training.metric_logging.WandBLogger.html to generate similar loss curves, but you will need to install W&B and setup an account separately. For more details on using W&B in torchtune, see our “Logging to Weights & Biases” https://docs.pytorch.org/torchtune/main/deep_dives/wandb_logging.html recipe.
5. Trading off memory and model performance with LoRA
In the preceding example, we ran LoRA on two devices. But given LoRA’s low memory footprint, we can run fine-tuning
on a single device using most commodity GPUs which support bfloat16 <https://en.wikipedia.org/wiki/Bfloat16_floating-point_format#bfloat16_floating-point_format>_
floating-point format. This can be done via the command:
… code-block:: bash
tune run lora_finetune_single_device --config llama2/7B_lora_single_device
On a single device, we may need to be more cognizant of our peak memory. Let’s run a few experiments
to see our peak memory during a finetune. We will experiment along two axes:
first, which model layers have LoRA applied, and second, the rank of each LoRA layer. (We will scale
alpha in parallel to LoRA rank, as discussed above.)
To compare the results of our experiments, we can evaluate our models on truthfulqa_mc2 <https://github.com/sylinrl/TruthfulQA>, a task from
the TruthfulQA <https://arxiv.org/abs/2109.07958> benchmark for language models. For more details on how to run this and other evaluation tasks
with torchtune’s EleutherAI evaluation harness integration, see our :ref:End-to-End Workflow Tutorial <eval_harness_label>.
Previously, we only enabled LoRA for the linear layers in each self-attention module, but in fact there are other linear
layers we can apply LoRA to: MLP layers and our model’s final output projection. Note that for Llama-2-7B the final output
projection maps to the vocabulary dimension (32000 instead of 4096 as in the other linear layers), so enabling LoRA for this layer will increase
our peak memory a bit more than the other layers. We can make the following changes to our config:
… code-block:: yaml
Model Arguments
model:
component: lora_llama2_7b
lora_attn_modules: [‘q_proj’, ‘k_proj’, ‘v_proj’, ‘output_proj’]
apply_lora_to_mlp: True
apply_lora_to_output: True
…
… note::
All the finetuning runs below use the llama2/7B_lora_single_device <https://github.com/pytorch/torchtune/blob/main/recipes/configs/llama2/7B_lora_single_device.yaml>_
config, which has a default batch size of 2. Modifying the batch size (or other hyperparameters, e.g. the optimizer) will impact both peak memory
and final evaluation results.
… list-table::
:widths: 25 25 25 25 25
:header-rows: 1
-
- LoRA Layers
- Rank
- Alpha
- Peak Memory
- Accuracy (truthfulqa_mc2)
-
- Q and V only
- 8
- 16
- 15.57 GB
- 0.475
-
- all layers
- 8
- 16
- 15.87 GB
- 0.508
-
- Q and V only
- 64
- 128
- 15.86 GB
- 0.504
-
- all layers
- 64
- 128
- 17.04 GB
- 0.514
We can see that our baseline settings give the lowest peak memory, but our evaluation performance is relatively lower.
By enabling LoRA for all linear layers and increasing the rank to 64, we see almost a 4% absolute improvement
in our accuracy on this task, but our peak memory also increases by about 1.4GB. These are just a couple simple
experiments; we encourage you to run your own finetunes to find the right tradeoff for your particular setup.
Additionally, if you want to decrease your model’s peak memory even further (and still potentially achieve similar
model quality results), you can check out our :ref:QLoRA tutorial<qlora_finetune_label>.
References
[1] Yongqiang Cheng, https://yongqiang.blog.csdn.net/


-解決知識庫問答時語料“總重復”問題)

集群)


?)
![[創業之路-362]:企業戰略管理案例分析-3-戰略制定-華為使命、愿景、價值觀的演變過程](http://pic.xiahunao.cn/[創業之路-362]:企業戰略管理案例分析-3-戰略制定-華為使命、愿景、價值觀的演變過程)


)
