📢博客主頁:https://blog.csdn.net/2301_779549673
📢博客倉庫:https://gitee.com/JohnKingW/linux_test/tree/master/lesson
📢歡迎點贊 👍 收藏 ?留言 📝 如有錯誤敬請指正!
📢本文由 JohnKi 原創,首發于 CSDN🙉
📢未來很長,值得我們全力奔赴更美好的生活?


文章目錄
- 🏳??🌈一、服務端更新
- 1.1 函數對象聲明
- 1.2 UdpServer 類成員更新
- 1.3 構造函數更新
- 1.4 開始 - Start() 更新
- 🏳??🌈二、Dictionary 字典類設計
- 2.1 基本結構
- 2.2 加載字典文件 - LoadDictionary(const std::string& path)
- 2.3 構造函數
- 2.4 翻譯函數
- 2.5 服務端運行更新
- 🏳??🌈三、整體代碼
- 👥總結
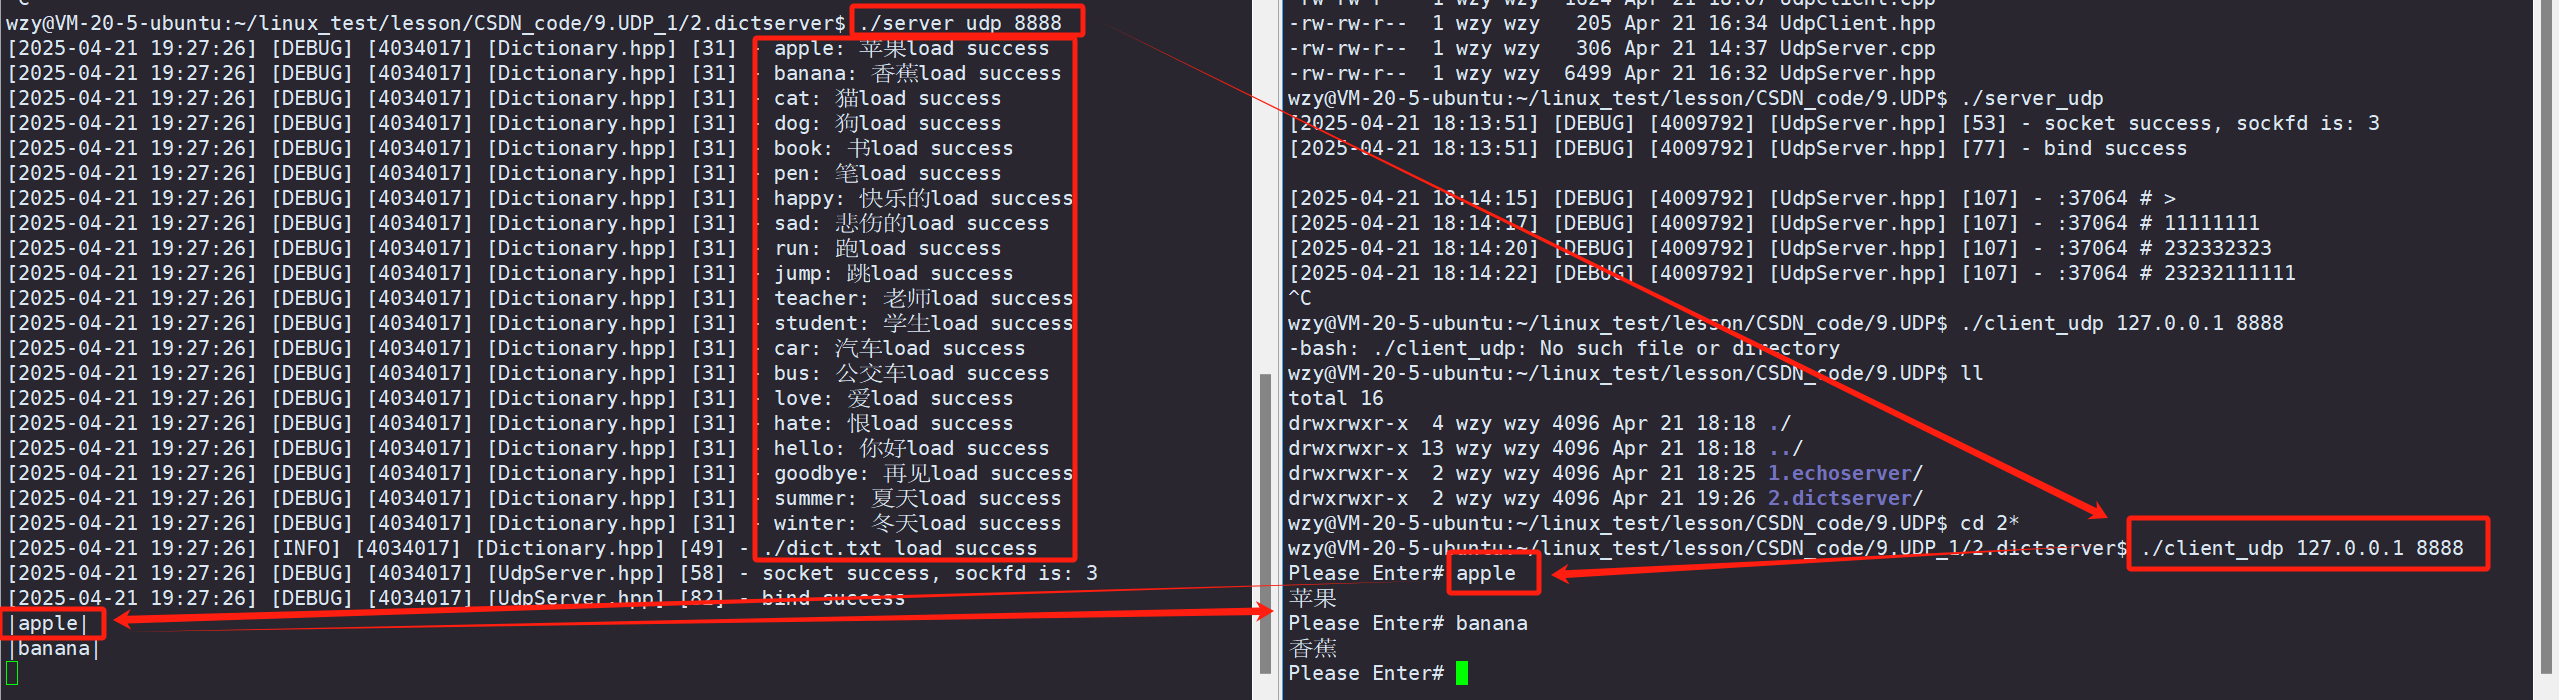
上一篇文章中,我們實現了回顯客戶端輸入的功能,這功能往往是不夠的,為了更好地模擬現實需求,我們現在多增加一個功能 - 字典翻譯功能
🏳??🌈一、服務端更新
1.1 函數對象聲明
別的功能、成員名保持不變,為了新增字典翻譯功能,我們需要引入函數對象類型
// 回調函數對象聲明
using func_t = std::function<std::string(std::string)>;
1.2 UdpServer 類成員更新
class UdpServer : public nocopy{public:UdpServer(func_t func,uint16_t localport = glocalport);void InitServer();void Start();~UdpServer();private:int _sockfd;            // 文件描述符uint16_t _localport;    // 端口號std::string _localip;   // 本地IP地址bool _isrunning;        // 運行狀態func_t _func;           // 回調函數
};
1.3 構造函數更新
- 構造函數只需增加一個函數對象參數,初始化列表初始化變量即可!!!
UdpServer(uint16_t localport = gdefaultport, func_t func = nullptr): _sockfd(gsockfd), _localport(localport), _isrunning(false), _func(func) {}
1.4 開始 - Start() 更新
- 之前只需要回顯的時候,我們直接接收客戶端信息,將網絡字節序的客戶端ip和端口號轉換為主機字節序,再返回就行了
- 現在我們要在這之間添加一個環節,使收到的客戶端信息,先通過字典翻譯回調函數,將處理后的值傳回去
void Start() {_isrunning = true;while (true) {char inbuffer[1024];              // 接收緩沖區struct sockaddr_in peer;          // 接收客戶端地址socklen_t peerlen = sizeof(peer); // 計算接收的客戶端地址長度// 接收數據報// recvfrom(int sockfd, void* buf, size_t len, int flags, struct// sockaddr* src_addr, socklen_t* addrlen)// 從套接字接收數據,并存入buf指向的緩沖區中,返回實際接收的字節數// 參數sockfd:套接字文件描述符// 參數buf:指向接收緩沖區的指針,c_str()函數可以將字符串轉換為char*,以便存入緩沖區// 參數len:接收緩沖區的長度// 參數flags:接收標志,一般設為0// 參數src_addr:指向客戶端地址的指針,若不為NULL,函數返回時,該指針指向客戶端的地址,是網絡字節序// 參數addrlen:客戶端地址長度的指針,若不為NULL,函數返回時,該指針指向實際的客戶端地址長度ssize_t n = ::recvfrom(_sockfd, inbuffer, sizeof(inbuffer) - 1, 0,CONV(&peer), &peerlen);if (n > 0) {// 將英文單詞 轉換為 中文std::string result = _func(inbuffer);::sendto(_sockfd, result.c_str(), result.size(), 0, CONV(&peer),peerlen);}}
}
🏳??🌈二、Dictionary 字典類設計
字典類執行加載字典文件 和 執行翻譯的功能
2.1 基本結構
class Dictionary{private:// 加載字典文件void LoadDictionary(const std::string& path);public:// 構造函數Dictionary(const std::string& path);// 翻譯std::string Translate(const std::string& word);// 析構函數 ~Dictionary();private:std::unordered_map<std::string, std::string> _dict;     // 字典結構std::string _dict_path;                                 // 文件路徑
};
2.2 加載字典文件 - LoadDictionary(const std::string& path)
我們以
": "一個冒號加一個空格的形式,進行翻譯
-
加載字典文件的本質是以KV的形式將英文單詞和中文翻譯插入到_dict哈希表中!
-
加載文件包含3個大的步驟:
- 讀方式打開文件
- 按行讀取內容[需要考慮中間有空格情況,一行中沒找到分隔符情況]
- 關閉文件
// 加載字典文件
void LoadDictionary(const std::string& path) {// 1. 讀方式打開文件std::ifstream in(path);if (!in.is_open()) {LOG(LogLevel::FATAL) << "open " << path.c_str() << " failed";Die(1);}std::string line;// 2. 按行讀取內容while (std::getline(in, line)) {LOG(LogLevel::DEBUG) << line.c_str() << "load success";if (line.empty())continue; // 中間有空格情況auto pos = line.find(sep); // 使用find找到分隔符位置,返回迭代器位置if (pos == std::string::npos)continue; // 找不到分隔符,跳過該行std::string key = line.substr(0, pos); // 前閉后開if (key.empty())continue; // 鍵為空,跳過該行std::string value = line.substr(pos + sep.size());if (value.empty())continue; // 值為空,跳過該行_dict.insert(std::make_pair(key, value));}LOG(LogLevel::INFO) << path.c_str() << " load success";// 3. 關閉文件in.close();
}
2.3 構造函數
初始化字典文件,并將鍵值對加載到本地保存
// 構造函數
Dictionary(const std::string& path = gpath + gdictname) { LoadDictionary(path); }
2.4 翻譯函數
在鍵值對中查找是否有該單詞,有單詞就返回值,沒有返回None
// 翻譯
std::string Translate(const std::string& word) {auto iter = _dict.find(word);if (iter == _dict.end())return "None";return iter->second;
}
2.5 服務端運行更新
因為我們現在需要將字典類的查找方法 作為回調函數傳給服務端 ,所以需要進行一些變化
#include "UdpServer.hpp"
#include "Dictionary.hpp"int main(int argc, char *argv[])
{if(argc != 2){std::cerr << "Usage: " << argv[0] << " localport" << std::endl;Die(1);}uint16_t port = std::stoi(argv[1]);ENABLE_CONSOLE_LOG();   // 日期類方法,使日志在控制臺輸出std::shared_ptr<Dictionary> dict_ptr = std::make_shared<Dictionary>();std::unique_ptr<UdpServer> usvr = std::make_unique<UdpServer>(port, [&dict_ptr]( const std::string& word){std::cout << "|" << word << "|" << std::endl;return dict_ptr->Translate(word);});usvr->InitServer(); // 初始化服務端usvr->Start();      // 啟動服務端return 0;
}
🏳??🌈三、整體代碼
UdpServer.hpp
#include <iostream>
#include <string>
#include <memory>
#include <cstring>
#include <functional>
#include <cerrno>   // 這個頭文件包含了errno定義,用于存放系統調用的返回值
#include <strings.h>    // 屬于POSIX擴展?(非標準C/C++),常見于Unix/Linux系統,提供額外字符串函數(如 bcopy, bzero)#include <sys/types.h>
#include <sys/socket.h>
#include <netinet/in.h>
#include <arpa/inet.h>#include "InetAddr.hpp"
#include "Log.hpp"
#include "Common.hpp"using namespace LogModule;const static int gsockfd = -1;
const static std::string gdefaultip = "127.0.0.1"; // 表示本地主機
const static uint16_t gdefaultport = 8080;// 回調函數對象聲明
using func_t = std::function<std::string(std::string)>;class nocopy{public:nocopy(){}~nocopy(){}nocopy(const nocopy&) = delete;     // 禁止拷貝構造函數const nocopy& operator=(const nocopy&) = delete;   // 禁止拷貝賦值運算符
};class UdpServer : public nocopy{public:UdpServer(uint16_t localport = gdefaultport, func_t func = nullptr): _sockfd(gsockfd),_localport(localport),_isrunning(false),_func(func){}void InitServer(){// 1. 創建套接字// socket(int domain, int type, int protocol)// 返回一個新的套接字文件描述符,或者在出錯時返回-1// 參數domain:協議族,AF_INET,表示IPv4協議族// 參數type:套接字類型,SOCK_DGRAM,表示UDP套接字// 參數protocol:協議,0,表示默認協議_sockfd = ::socket(AF_INET, SOCK_DGRAM, 0);if(_sockfd < 0){LOG(LogLevel::FATAL) << "socket: " << strerror(errno);// exit(SOCKET_ERR) 表示程序運行失敗,并返回指定的錯誤碼exit(SOCKET_ERR);}LOG(LogLevel::DEBUG) << "socket success, sockfd is: " << _sockfd;// 2. bind// sockaddr_in struct sockaddr_in local;// 將local全部置零,以便后面設置memset(&local, 0, sizeof(local)); local.sin_family = AF_INET; // IPv4協議族local.sin_port = htons(_localport); // 端口號,網絡字節序local.sin_addr.s_addr = htonl(INADDR_ANY); // 本地IP地址,網絡字節序// 將套接字綁定到本地地址// bind(int sockfd, const struct sockaddr* addr, socklen_t addrlen)// 綁定一個套接字到一個地址,使得套接字可以接收來自該地址的數據報// 參數sockfd:套接字文件描述符// 參數addr:指向sockaddr_in結構體的指針,表示要綁定的地址// 參數addrlen:地址長度,即sizeof(sockaddr_in)// 返回0表示成功,-1表示出錯int n = ::bind(_sockfd, (struct sockaddr* )&local, sizeof(local));if(n < 0){LOG(LogLevel::FATAL) << "bind: " << strerror(errno);exit(BIND_ERR);}LOG(LogLevel::DEBUG) << "bind success";}void Start(){_isrunning = true;while(true){char inbuffer[1024];                // 接收緩沖區struct sockaddr_in peer;            // 接收客戶端地址socklen_t peerlen = sizeof(peer);   // 計算接收的客戶端地址長度// 接收數據報// recvfrom(int sockfd, void* buf, size_t len, int flags, struct sockaddr* src_addr, socklen_t* addrlen)// 從套接字接收數據,并存入buf指向的緩沖區中,返回實際接收的字節數// 參數sockfd:套接字文件描述符// 參數buf:指向接收緩沖區的指針,c_str()函數可以將字符串轉換為char*,以便存入緩沖區// 參數len:接收緩沖區的長度// 參數flags:接收標志,一般設為0// 參數src_addr:指向客戶端地址的指針,若不為NULL,函數返回時,該指針指向客戶端的地址,是網絡字節序// 參數addrlen:客戶端地址長度的指針,若不為NULL,函數返回時,該指針指向實際的客戶端地址長度ssize_t n = ::recvfrom(_sockfd, inbuffer, sizeof(inbuffer) - 1, 0, CONV(&peer), &peerlen);if(n > 0){// 將英文單詞 轉換為 中文std::string result = _func(inbuffer);::sendto(_sockfd, result.c_str(), result.size(), 0, CONV(&peer), peerlen);}}}~UdpServer(){// 判斷 _sockfd 是否是一個有效的套接字文件描述符// 有效的文件描述符(如套接字、打開的文件等)是非負整數?(>= 0)if(_sockfd > -1) ::close(_sockfd);}private:int _sockfd;            // 文件描述符uint16_t _localport;    // 端口號std::string _localip;   // 本地IP地址bool _isrunning;        // 運行狀態func_t _func;           // 回調函數
};
UdpServer.cpp
#include "UdpServer.hpp"
#include "Dictionary.hpp"int main(int argc, char *argv[])
{if(argc != 2){std::cerr << "Usage: " << argv[0] << " localport" << std::endl;Die(1);}uint16_t port = std::stoi(argv[1]);ENABLE_CONSOLE_LOG();   // 日期類方法,使日志在控制臺輸出std::shared_ptr<Dictionary> dict_ptr = std::make_shared<Dictionary>();std::unique_ptr<UdpServer> usvr = std::make_unique<UdpServer>(port, [&dict_ptr]( const std::string& word){std::cout << "|" << word << "|" << std::endl;return dict_ptr->Translate(word);});usvr->InitServer(); // 初始化服務端usvr->Start();      // 啟動服務端return 0;
}
UdpClient.hpp
#pragma once#include "Common.hpp"
#include <iostream>
#include <cstring>
#include <string>
#include <cstdlib>
#include <sys/types.h>
#include <sys/socket.h>
#include <netinet/in.h>
#include <arpa/inet.h>
UdpClient.cpp
#include "UdpClient.hpp"int main(int argc, char* argv[]){if(argc != 3){std::cerr << argv[0] << " serverip server" << std::endl;Die(USAGE_ERR);}std::string serverip = argv[1];uint16_t serverport = std::stoi(argv[2]);// 1. 創建套接字int sockfd = socket(AF_INET, SOCK_DGRAM, 0);if(sockfd < 0){std::cerr << "create socket error" << std::endl;Die(SOCKET_ERR);}// 1. 填充 server 信息struct sockaddr_in server;memset(&server, 0, sizeof(server));server.sin_family = AF_INET;server.sin_port = ::htons(serverport);server.sin_addr.s_addr = ::inet_addr(serverip.c_str());// 2. 發送數據while(true){std::cout << "Please Enter# ";std::string msg;std::getline(std::cin, msg);// client 必須自己的ip和端口。但是客戶端,不需要顯示調用bind// 客戶端首次 sendto 消息的時候,由OS自動bind// 1. 如何理解 client 自動隨機bind端口號? 一個端口號,只能讀一個進程bind// 2. 如何理解 server 要顯示地bind? 必須穩定!必須是眾所周知且不能輕易改變的int n = ::sendto(sockfd, msg.c_str(), msg.size(), 0, CONV(&server), sizeof(server));(void)n;struct sockaddr_in temp;socklen_t len = sizeof(temp);char buffer[1024];n = ::recvfrom(sockfd, buffer,sizeof(buffer) - 1, 0, CONV(&temp), &len);if(n > 0){buffer[n] = 0;std::cout << buffer << std::endl;}}return 0;
}
Common.hpp
#pragma once#include <iostream>#define Die(code)   \do              \{               \exit(code); \} while (0)#define CONV(v) (struct sockaddr *)(v)enum
{USAGE_ERR = 1,SOCKET_ERR,BIND_ERR
};
InetAddr.hpp
#pragma once#include <iostream>
#include <sys/types.h>
#include <sys/socket.h>
#include <netinet/in.h>
#include <arpa/inet.h>
#include "Common.hpp"class InetAddr
{
private:void PortNet2Host(){_port = ::ntohs(_net_addr.sin_port);}void IpNet2Host(){char ipbuffer[64];const char *ip = ::inet_ntop(AF_INET, &_net_addr.sin_addr, ipbuffer, sizeof(ipbuffer));(void)ip;}public:InetAddr(){}InetAddr(const struct sockaddr_in &addr) : _net_addr(addr){PortNet2Host();IpNet2Host();}InetAddr(uint16_t port) : _port(port), _ip(""){_net_addr.sin_family = AF_INET;_net_addr.sin_port = htons(_port);_net_addr.sin_addr.s_addr = INADDR_ANY;}struct sockaddr *NetAddr() { return CONV(&_net_addr); }socklen_t NetAddrLen() { return sizeof(_net_addr); }std::string Ip() { return _ip; }uint16_t Port() { return _port; }~InetAddr(){}private:struct sockaddr_in _net_addr;std::string _ip;uint16_t _port;
};
Dictionary.hpp
#pragma once#include <iostream>
#include <string>
#include <fstream>
#include <unordered_map>
#include "Log.hpp"
#include "Common.hpp"using namespace LogModule;const static std::string sep = ": ";
const static std::string gpath = "./";
const static std::string gdictname = "dict.txt";class Dictionary{private:// 加載字典文件void LoadDictionary(const std::string& path){// 1. 讀方式打開文件std::ifstream in(path);if(!in.is_open()){LOG(LogLevel::FATAL) << "open " << path.c_str() << " failed";Die(1);}std::string line;// 2. 按行讀取內容while(std::getline(in, line)){LOG(LogLevel::DEBUG) << line.c_str() << "load success";if(line.empty())continue; // 中間有空格情況auto pos = line.find(sep);  // 使用find找到分隔符位置,返回迭代器位置if(pos == std::string::npos)continue; // 找不到分隔符,跳過該行std::string key = line.substr(0, pos); // 前閉后開if(key.empty())continue; // 鍵為空,跳過該行std::string value = line.substr(pos + sep.size()); if(value.empty())continue; // 值為空,跳過該行_dict.insert(std::make_pair(key, value));}LOG(LogLevel::INFO) << path.c_str() << " load success";// 3. 關閉文件in.close(); }public:// 構造函數Dictionary(const std::string& path = gpath + gdictname){LoadDictionary(path);}// 翻譯std::string Translate(const std::string& word){auto iter = _dict.find(word);if(iter == _dict.end()) return "None";return iter->second;}// 析構函數 ~Dictionary(){}private:std::unordered_map<std::string, std::string> _dict;     // 字典結構std::string _dict_path;                                 // 文件路徑
};
Log.hpp
#pragma once#include <iostream>
#include <cstdio>
#include <string>
#include <fstream>
#include <sstream>
#include <memory>
#include <filesystem> //C++17
#include <unistd.h>
#include <time.h>
#include "Mutex.hpp"namespace LogModule
{using namespace LockModule;// 獲取一下當前系統的時間std::string CurrentTime(){time_t time_stamp = ::time(nullptr);struct tm curr;localtime_r(&time_stamp, &curr); // 時間戳,獲取可讀性較強的時間信息5char buffer[1024];// bugsnprintf(buffer, sizeof(buffer), "%4d-%02d-%02d %02d:%02d:%02d",curr.tm_year + 1900,curr.tm_mon + 1,curr.tm_mday,curr.tm_hour,curr.tm_min,curr.tm_sec);return buffer;}// 構成: 1. 構建日志字符串 2. 刷新落盤(screen, file)//  1. 日志文件的默認路徑和文件名const std::string defaultlogpath = "./log/";const std::string defaultlogname = "log.txt";// 2. 日志等級enum class LogLevel{DEBUG = 1,INFO,WARNING,ERROR,FATAL};std::string Level2String(LogLevel level){switch (level){case LogLevel::DEBUG:return "DEBUG";case LogLevel::INFO:return "INFO";case LogLevel::WARNING:return "WARNING";case LogLevel::ERROR:return "ERROR";case LogLevel::FATAL:return "FATAL";default:return "None";}}// 3. 刷新策略.class LogStrategy{public:virtual ~LogStrategy() = default;virtual void SyncLog(const std::string &message) = 0;};// 3.1 控制臺策略class ConsoleLogStrategy : public LogStrategy{public:ConsoleLogStrategy(){}~ConsoleLogStrategy(){}void SyncLog(const std::string &message){LockGuard lockguard(_lock);std::cout << message << std::endl;}private:Mutex _lock;};// 3.2 文件級(磁盤)策略class FileLogStrategy : public LogStrategy{public:FileLogStrategy(const std::string &logpath = defaultlogpath, const std::string &logname = defaultlogname): _logpath(logpath),_logname(logname){// 確認_logpath是存在的.LockGuard lockguard(_lock);if (std::filesystem::exists(_logpath)){return;}try{std::filesystem::create_directories(_logpath);}catch (std::filesystem::filesystem_error &e){std::cerr << e.what() << "\n";}}~FileLogStrategy(){}void SyncLog(const std::string &message){LockGuard lockguard(_lock);std::string log = _logpath + _logname; // ./log/log.txtstd::ofstream out(log, std::ios::app); // 日志寫入,一定是追加if (!out.is_open()){return;}out << message << "\n";out.close();}private:std::string _logpath;std::string _logname;// 鎖Mutex _lock;};// 日志類: 構建日志字符串, 根據策略,進行刷新class Logger{public:Logger(){// 默認采用ConsoleLogStrategy策略_strategy = std::make_shared<ConsoleLogStrategy>();}void EnableConsoleLog(){_strategy = std::make_shared<ConsoleLogStrategy>();}void EnableFileLog(){_strategy = std::make_shared<FileLogStrategy>();}~Logger() {}// 一條完整的信息: [2024-08-04 12:27:03] [DEBUG] [202938] [main.cc] [16] + 日志的可變部分(<< "hello world" << 3.14 << a << b;)class LogMessage{public:LogMessage(LogLevel level, const std::string &filename, int line, Logger &logger): _currtime(CurrentTime()),_level(level),_pid(::getpid()),_filename(filename),_line(line),_logger(logger){std::stringstream ssbuffer;ssbuffer << "[" << _currtime << "] "<< "[" << Level2String(_level) << "] "<< "[" << _pid << "] "<< "[" << _filename << "] "<< "[" << _line << "] - ";_loginfo = ssbuffer.str();}template <typename T>LogMessage &operator<<(const T &info){std::stringstream ss;ss << info;_loginfo += ss.str();return *this;}~LogMessage(){if (_logger._strategy){_logger._strategy->SyncLog(_loginfo);}}private:std::string _currtime; // 當前日志的時間LogLevel _level;       // 日志等級pid_t _pid;            // 進程pidstd::string _filename; // 源文件名稱int _line;             // 日志所在的行號Logger &_logger;       // 負責根據不同的策略進行刷新std::string _loginfo;  // 一條完整的日志記錄};// 就是要拷貝,故意的拷貝LogMessage operator()(LogLevel level, const std::string &filename, int line){return LogMessage(level, filename, line, *this);}private:std::shared_ptr<LogStrategy> _strategy; // 日志刷新的策略方案};Logger logger;#define LOG(Level) logger(Level, __FILE__, __LINE__)
#define ENABLE_CONSOLE_LOG() logger.EnableConsoleLog()
#define ENABLE_FILE_LOG() logger.EnableFileLog()
}
Mutex.hpp
#pragma once
#include <iostream>
#include <pthread.h>namespace LockModule
{class Mutex{public:Mutex(const Mutex&) = delete;const Mutex& operator = (const Mutex&) = delete;Mutex(){int n = ::pthread_mutex_init(&_lock, nullptr);(void)n;}~Mutex(){int n = ::pthread_mutex_destroy(&_lock);(void)n;}void Lock(){int n = ::pthread_mutex_lock(&_lock);(void)n;}pthread_mutex_t *LockPtr(){return &_lock;}void Unlock(){int n = ::pthread_mutex_unlock(&_lock);(void)n;}private:pthread_mutex_t _lock;};class LockGuard{public:LockGuard(Mutex &mtx):_mtx(mtx){_mtx.Lock();}~LockGuard(){_mtx.Unlock();}private:Mutex &_mtx;};
}
Makefile
.PHONY: all
all:server_udp client_udpserver_udp:UdpServer.cppg++ -o $@ $^ -std=c++17client_udp:UdpClient.cpp g++ -o $@ $^ -std=c++17.PHONY: clean
clean:rm -f server_udp client_udp
👥總結
本篇博文對 【Linux網絡】構建Udp服務器與字典翻譯系統 做了一個較為詳細的介紹,不知道對你有沒有幫助呢
覺得博主寫得還不錯的三連支持下吧!會繼續努力的~

和view(微信小程序專用組件)的主要區別體)


)


