????????在linux中,確實可以像裸機一樣自己取模、自己寫函數打點顯示,但是效率很低,不能滿足多文字顯示,在Linux 系統中, 字體文件通常會放在/usr/share/fonts 目錄下,有了字體文件之后,我們就不需要再對字符進行取模了,它們已經編碼進了字體文件中,我們只需要解析字體文件、訪問字體文件,從字體文件中讀取出字符的位圖數據即可。
freetype:
????????FreeType 一個完全免費(開源)的軟件字體引擎庫,FreeType”也稱為“FreeType 2”,以區別于舊的、已棄用的“FreeType 1”庫, Freetype 1庫已經不再維護和支持了。
下載 FreeType 源碼:進入到 https://download.savannah.gnu.org/releases/freetype/鏈接地址
例如下載2.8版本,選擇 freetype-2.8.tar.gz 壓縮文件:

(tips:有很多情況直接點擊會進入網頁亂碼下載不了,可以開個加速器,我開了加速器下載成功了)
將freetype傳到ubuntu,同樣,創一個freetype文件夾作為安裝路徑。
解壓:
tar -xzf freetype-2.8.tar.gz
進入其解壓文件目錄freetype-2.8
執行:
vi include/freetype/config/ftoption.h這里我們打開以下兩個配置宏:
?
#define FT_CONFIG_OPTION_SYSTEM_ZLIB
#define FT_CONFIG_OPTION_USE_PNG
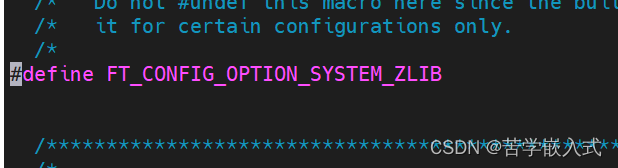
????????第一個配置宏表示使用系統安裝的 zlib 庫,因為 FreeType 支持 Gzip 壓縮文件,會使用到 zlib 庫, zlib之前我們移植好了;第二個配置宏表示支持 PNG bitmap 位圖,因為 FreeType 可以加載 PNG 格式的彩色位圖字形,需要依賴于 libpng 庫,這個庫前面我們也是移植好了。
????????接著執行如下命令對 FreeType 工程源碼進行配置:
./configure --prefix=/home/book/linux/tool/freetype/ --host=arm-poky-linux-gnueabi --with-zlib=yes --with-bzip2=no --with-png=yes --with-harfbuzz=no ZLIB_CFLAGS="-I/home/book/linux/tool/zlib/include -L/home/book/linux/tool/zlib/lib" ZLIB_LIBS=-lz LIBPNG_CFLAGS="-I/home/book/linux/tool/png/include -L/home/book/linux/tool/libpng/lib" LIBPNG_LIBS=-lpng
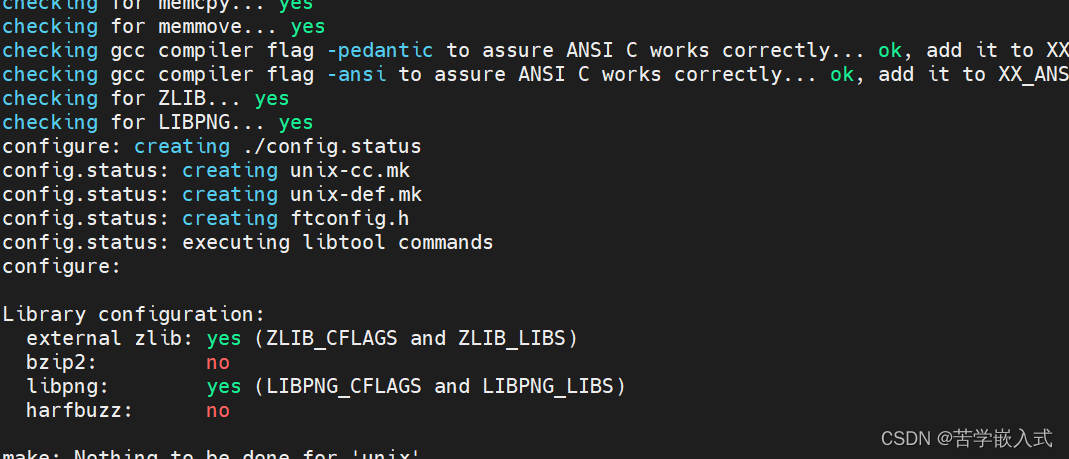
--prefix 選項指定 FreeType 庫的安裝目錄; --host 選項設置為交叉編譯器名稱的前綴,
--with-zlib=yes 表示使用 zlib;
--with-bzip2=no 表示不使用 bzip2 庫; --with-png=yes 表示使用 libpng 庫; --with-harfbuzz=no 表示不使用 harfbuzz 庫。
ZLIB_CFLAGS 選項用于指定 zlib 的頭文件路徑和庫文件路徑,根據實際安裝路徑填寫; ZLIB_LIBS 選項指定鏈接的 zlib 庫的名稱;
LIBPNG_CFLAGS 選項用于指定 libpng 的頭文件路徑和庫文件路徑,根據實際安裝路徑填寫; LIBPNG_LIBS 選項用于指定鏈接的 libpng 庫的名稱
接下來編譯安裝:
make
make install
如果出現錯誤,那么有可能是環境沒設置錯誤,如果正確就跳過以下步驟。
1.確保指定的 zlib 和 libpng 庫路徑是正確的,并且庫文件存在:
ls /home/book/linux/tool/zlib/lib/libz.*
ls /home/book/linux/tool/libpng/lib/libpng.*
2.將庫路徑添加到 LDFLAGS 環境變量中,以確保鏈接器可以找到這些庫:
export LDFLAGS="-L/home/book/linux/tool/zlib/lib -L/home/book/linux/tool/libpng/lib"
3.確保 LIBPNG_LIBS 和 ZLIB_LIBS 環境變量設置正確:
export ZLIB_LIBS="-lz"
export LIBPNG_LIBS="-lpng"
4.最后程序執行鏈接編譯
./configure --prefix=/home/book/linux/tool/freetype/ --host=arm-poky-linux-gnueabi --with-zlib=yes --with-bzip2=no --with-png=yes --with-harfbuzz=no ZLIB_CFLAGS="-I/home/book/linux/tool/zlib/include -L/home/book/linux/tool/zlib/lib" ZLIB_LIBS="-lz" LIBPNG_CFLAGS="-I/home/book/linux/tool/png/include -L/home/book/linux/tool/libpng/lib" LIBPNG_LIBS="-lpng"make?
make install
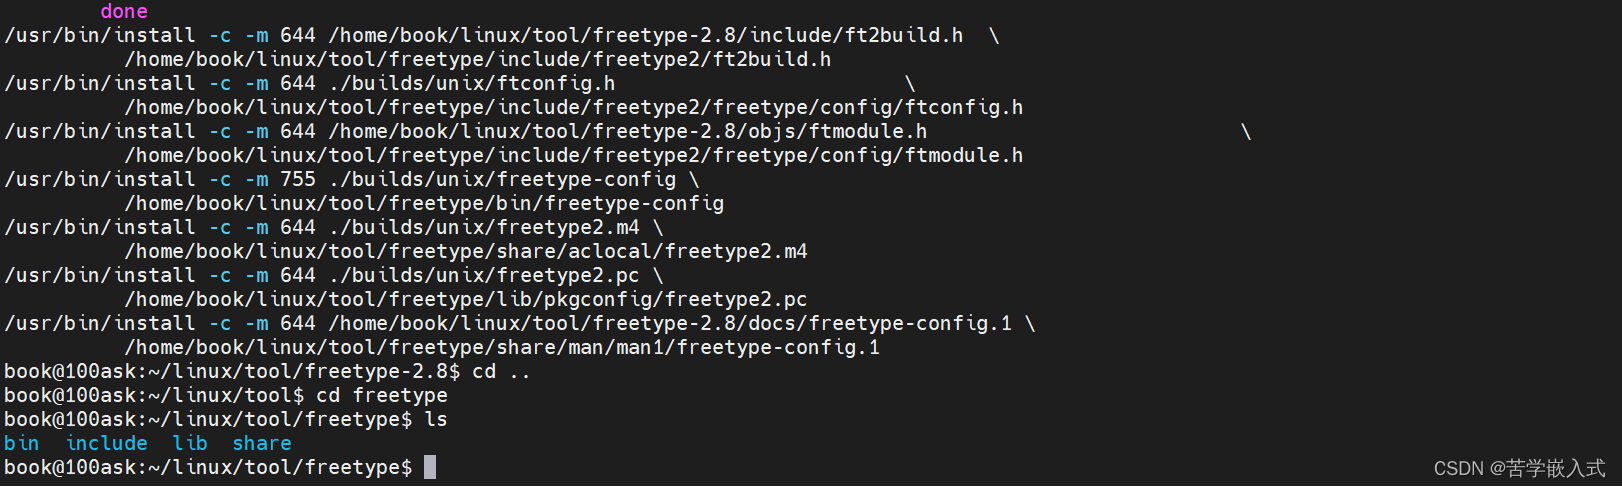
移植到開發板
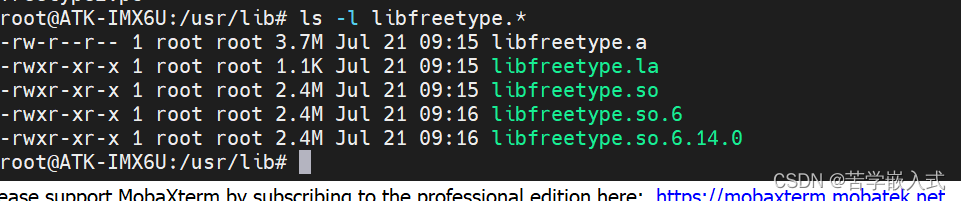
????????接下來將編譯得到的動態鏈接庫文件拷貝到開發板 Linux 系統/usr/lib 目錄,在拷貝之前,需將/usr/lib 目錄下原有的 FreeType 庫文件刪除掉,執行下面這條命令:
rm -rf /usr/lib/libfreetype.*????????刪除之后,再將我們編譯得到的庫文件拷貝到開發板/usr/lib 目錄下,也就是 FreeType 安裝目錄 lib 目錄下的所有庫文件,拷貝的時候注意符號鏈接的問題。拷貝完成之后,如下所示:
,建議用nfs。
將文件傳至nfs后
sudo cp -r /mnt/lib/* /usr/lib/注意:不要忘了*,因為鏈接也要傳過去
如果是scp的話:
sudo mv /home/user/temp_lib/* /usr/lib/
注意后面的鏈接不能丟
基本概念:
????????????????像素點數 = 點數 * dpi / 72
????????譬如,假設某一顯示設備水平方向 dpi 為 300,已知水平方向的點數為 50,那么像素點數的計算方式為:
50 * 300 / 72 = 208 所以可以算出像素點數為 208,
例程:例程這兒引用韋東山老師的源碼
#include <sys/mman.h>
#include <sys/types.h>
#include <sys/stat.h>
#include <unistd.h>
#include <linux/fb.h>
#include <fcntl.h>
#include <stdio.h>
#include <string.h>
#include <math.h>
#include <wchar.h>
#include <sys/ioctl.h>#include <ft2build.h>
#include FT_FREETYPE_H
#include FT_GLYPH_Hint fd_fb;
struct fb_var_screeninfo var;   /* Current var */
struct fb_fix_screeninfo fix;   /* Current fix */
int screen_size;
unsigned char *fbmem;
unsigned int line_width;
unsigned int pixel_width;/* color : 0x00RRGGBB */
void lcd_put_pixel(int x, int y, unsigned int color)
{unsigned char *pen_8 = fbmem+y*line_width+x*pixel_width;unsigned short *pen_16; unsigned int *pen_32;   unsigned int red, green, blue;  pen_16 = (unsigned short *)pen_8;pen_32 = (unsigned int *)pen_8;switch (var.bits_per_pixel){case 8:{*pen_8 = color;break;}case 16:{/* 565 */red   = (color >> 16) & 0xff;green = (color >> 8) & 0xff;blue  = (color >> 0) & 0xff;color = ((red >> 3) << 11) | ((green >> 2) << 5) | (blue >> 3);*pen_16 = color;break;}case 32:{*pen_32 = color;break;}default:{printf("can't surport %dbpp\n", var.bits_per_pixel);break;}}
}/*********************************************************************** 函數名稱: draw_bitmap* 功能描述: 根據bitmap位圖,在LCD指定位置顯示漢字* 輸入參數: x坐標,y坐標,位圖指針* 輸出參數: 無* 返 回 值: 無* 修改日期        版本號     修改人        修改內容* -----------------------------------------------* 2020/05/12        V1.0     zh(angenao)         創建***********************************************************************/
void
draw_bitmap( FT_Bitmap*  bitmap,FT_Int      x,FT_Int      y)
{FT_Int  i, j, p, q;FT_Int  x_max = x + bitmap->width;FT_Int  y_max = y + bitmap->rows;//printf("x = %d, y = %d\n", x, y);for ( j = y, q = 0; j < y_max; j++, q++ ){for ( i = x, p = 0; i < x_max; i++, p++ ){if ( i < 0      || j < 0       ||i >= var.xres || j >= var.yres )continue;//image[j][i] |= bitmap->buffer[q * bitmap->width + p];lcd_put_pixel(i, j, bitmap->buffer[q * bitmap->width + p]);}}
}int compute_string_bbox(FT_Face       face, wchar_t *wstr, FT_BBox  *abbox)
{int i;int error;FT_BBox bbox;FT_BBox glyph_bbox;FT_Vector pen;FT_Glyph  glyph;FT_GlyphSlot slot = face->glyph;/* 初始化 */bbox.xMin = bbox.yMin = 32000;bbox.xMax = bbox.yMax = -32000;/* 指定原點為(0, 0) */pen.x = 0;pen.y = 0;/* 計算每個字符的bounding box *//* 先translate, 再load char, 就可以得到它的外框了 */for (i = 0; i < wcslen(wstr); i++){/* 轉換:transformation */FT_Set_Transform(face, 0, &pen);/* 加載位圖: load glyph image into the slot (erase previous one) */error = FT_Load_Char(face, wstr[i], FT_LOAD_RENDER);if (error){printf("FT_Load_Char error\n");return -1;}/* 取出glyph */error = FT_Get_Glyph(face->glyph, &glyph);if (error){printf("FT_Get_Glyph error!\n");return -1;}/* 從glyph得到外框: bbox */FT_Glyph_Get_CBox(glyph, FT_GLYPH_BBOX_TRUNCATE, &glyph_bbox);/* 更新外框 */if ( glyph_bbox.xMin < bbox.xMin )bbox.xMin = glyph_bbox.xMin;if ( glyph_bbox.yMin < bbox.yMin )bbox.yMin = glyph_bbox.yMin;if ( glyph_bbox.xMax > bbox.xMax )bbox.xMax = glyph_bbox.xMax;if ( glyph_bbox.yMax > bbox.yMax )bbox.yMax = glyph_bbox.yMax;/* 計算下一個字符的原點: increment pen position */pen.x += slot->advance.x;pen.y += slot->advance.y;}/* return string bbox */*abbox = bbox;
}int display_string(FT_Face     face, wchar_t *wstr, int lcd_x, int lcd_y)
{int i;int error;FT_BBox bbox;FT_Vector pen;FT_Glyph  glyph;FT_GlyphSlot slot = face->glyph;/* 把LCD坐標轉換為笛卡爾坐標 */int x = lcd_x;int y = var.yres - lcd_y;/* 計算外框 */compute_string_bbox(face, wstr, &bbox);/* 反推原點 */pen.x = (x - bbox.xMin) * 64; /* 單位: 1/64像素 */pen.y = (y - bbox.yMax) * 64; /* 單位: 1/64像素 *//* 處理每個字符 */for (i = 0; i < wcslen(wstr); i++){/* 轉換:transformation */FT_Set_Transform(face, 0, &pen);/* 加載位圖: load glyph image into the slot (erase previous one) */error = FT_Load_Char(face, wstr[i], FT_LOAD_RENDER);if (error){printf("FT_Load_Char error\n");return -1;}/* 在LCD上繪制: 使用LCD坐標 */draw_bitmap( &slot->bitmap,slot->bitmap_left,var.yres - slot->bitmap_top);/* 計算下一個字符的原點: increment pen position */pen.x += slot->advance.x;pen.y += slot->advance.y;}return 0;
}int main(int argc, char **argv)
{wchar_t *wstr = L"百問網www.100ask.net";FT_Library    library;FT_Face       face;int error;FT_BBox bbox;int font_size = 24;int lcd_x, lcd_y;if (argc < 4){printf("Usage : %s <font_file> <lcd_x> <lcd_y> [font_size]\n", argv[0]);return -1;}lcd_x = strtoul(argv[2], NULL, 0);      lcd_y = strtoul(argv[3], NULL, 0);      if (argc == 5)font_size = strtoul(argv[4], NULL, 0);      fd_fb = open("/dev/fb0", O_RDWR);if (fd_fb < 0){printf("can't open /dev/fb0\n");return -1;}if (ioctl(fd_fb, FBIOGET_VSCREENINFO, &var)){printf("can't get var\n");return -1;}if (ioctl(fd_fb, FBIOGET_FSCREENINFO, &fix)){printf("can't get fix\n");return -1;}line_width  = var.xres * var.bits_per_pixel / 8;pixel_width = var.bits_per_pixel / 8;screen_size = var.xres * var.yres * var.bits_per_pixel / 8;fbmem = (unsigned char *)mmap(NULL , screen_size, PROT_READ | PROT_WRITE, MAP_SHARED, fd_fb, 0);if (fbmem == (unsigned char *)-1){printf("can't mmap\n");return -1;}/* 清屏: 全部設為黑色 */memset(fbmem, 0, screen_size);error = FT_Init_FreeType( &library );              /* initialize library */error = FT_New_Face( library, argv[1], 0, &face ); /* create face object */FT_Set_Pixel_Sizes(face, font_size, 0);display_string(face, wstr, lcd_x, lcd_y);return 0;
}
編譯:
${CC} -o show_line show_line.c -I/home/book/linux/tool/freetype/include/freetype2 -L/home/book/linux/tool/freetype/lib -lfreetype -L/home/book/linux/tool/zlib/lib -lz -L/home/book/linux/tool/libpng/lib -lpng -lm后將show_line和simsun.ttc傳過去,運行成功(simsun.ttc是定義的字體文件)


】Nios II軟件開發人員手冊中設計位置的錯誤示例)

)


——結合案例正式搭建項目)

- OOM問題排查)


