文章目錄
- 項目準備
- 新建項目并選擇模塊安裝
- 添加依賴
- 添加application.yml
- 刪除demos.web包
- 編寫pojo層
- user
- dto/ResultJson
- 編寫mapper層
- UserMapper
- 編寫service層
- UserService
- 編寫controller層
- 編寫配置類
- MybatisPlusConfig
- 編寫測試類
- 1 緩存分類
- 1.1 MyBatis一級緩存
- 1.2 MyBatis二級緩存
- 1.2.1 開啟二級緩存
- 1.2.2 Mybatis開啟使用二級緩存
- 2 SpringBoot使用緩存
- 2.1 SpringBoot開啟MyBatis緩存+ehcache
- 2.1.1 引入依賴
- 2.1.2 添加緩存的配置文件 ehcache.xml
- 2.1.3 讀取ehcache.xml文件
- 2.1.4 設置項目啟動時使用緩存
- 2.1.5 序列化你的pojo層
- 2.2 緩存的使用
- 2.2.1 基本使用
- 2.2.2 @Cacheable注解使用
- 2.2.2 @CachePut
- 2.2.3 @CacheEvict
- 3 SpringBoot+Redis使用
- 3.1 Redis 緩存配置
- 3.1.1 引入依賴
- 3.1.2 yml添加配置
- 3.1.3 序列化
- 3.2 Cacheable 注解
- 3.3 多參數 Cacheable 注解
- 3.4 緩存的清除 @CacheEvict
- 3.5 yml配置
- 3.6 緩存管理
- 3.6.1 編寫MyRedisCacheManager配置類
- 3.6.2 編寫CacheConfig
- 3.6.3 演示
項目準備
新建項目并選擇模塊安裝
創建一個空的 Spring Boot 工程
文件–>新建項目
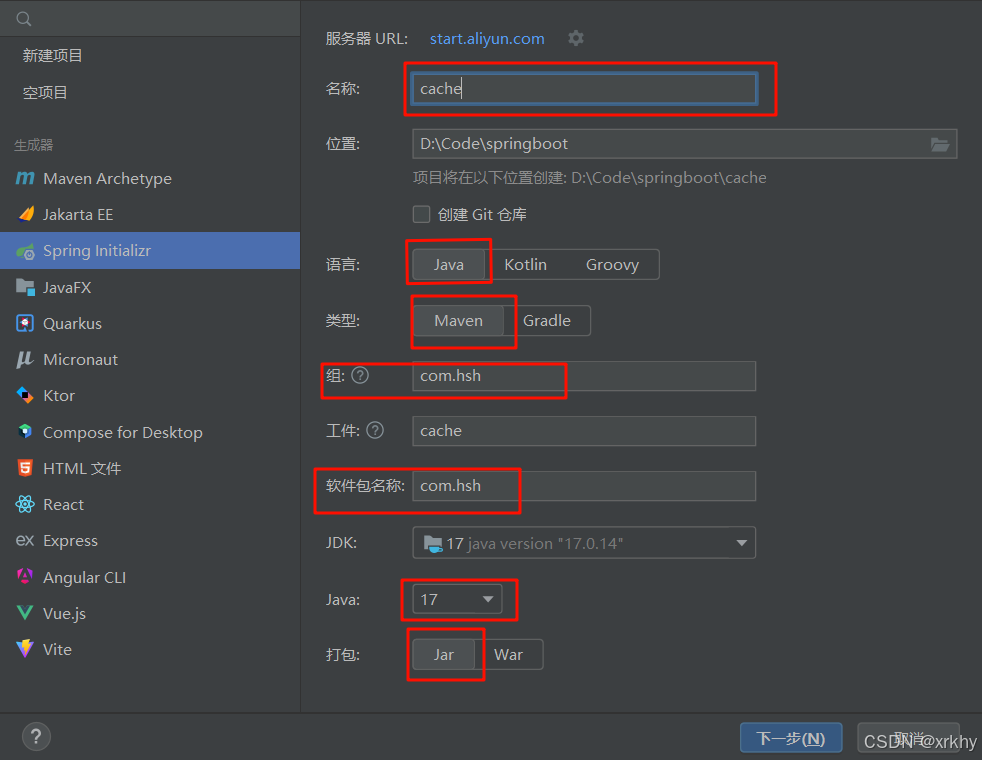
選擇模塊
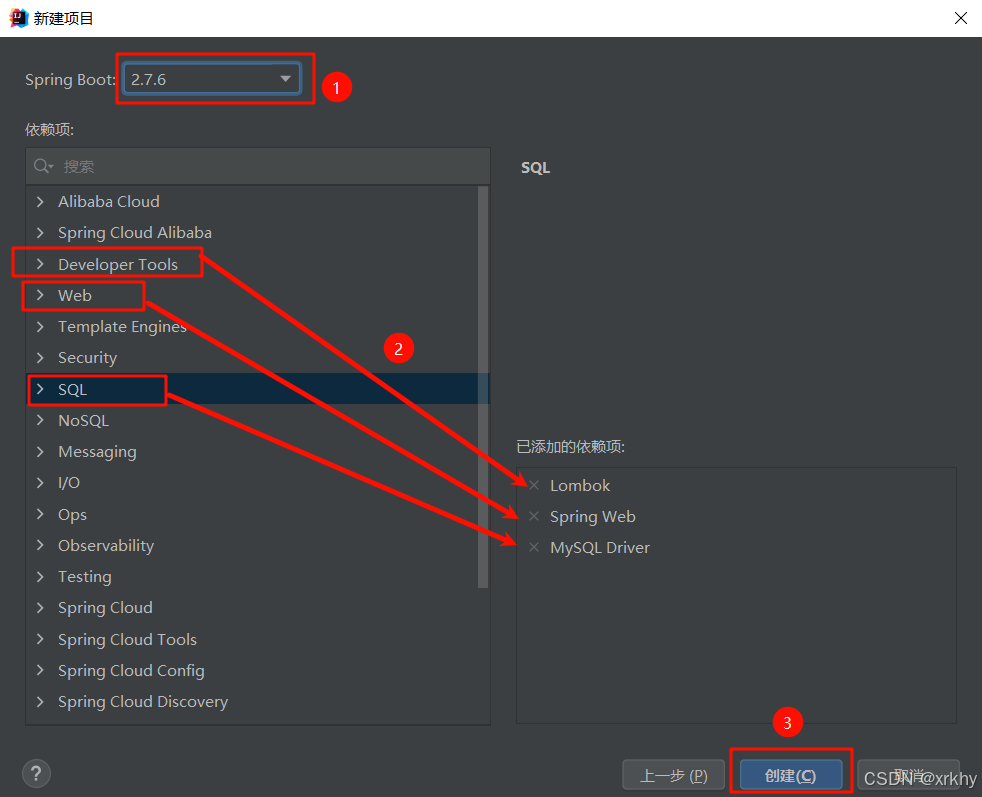
SpringBoot版本選擇2.7.6- 在
DeveloperTools中選擇Lombok - 在
Web中選擇SpringWeb - 在
SQL中選擇MySQLDriver
添加依賴
<!-- mybatis-plus依賴 -->
<dependency><groupId>com.baomidou</groupId><artifactId>mybatis-plus-boot-starter</artifactId><version>3.5.1</version><!--sql性能分析插件使用版本--><!-- <version>3.1.2</version> -->
</dependency>
添加application.yml
我們刪除application.properties
在resources文件下新建application.yml.
在 application.yml 中配置文件中添加mysql 數據庫相關配置:
server:port: 8080
spring:datasource:driver-class-name: com.mysql.cj.jdbc.Driverurl: jdbc:mysql://127.0.0.1:3306/smbms?useUnicode=true&characterEncoding=utf-8&useSSL=false&allowPublicKeyRetrieval=trueusername: rootpassword: root
# mybatis-plus 相關配置
mybatis-plus:type-aliases-package: com.hsh.pojo #類型別名所在的包#控制臺打印sql語句configuration:log-impl: org.apache.ibatis.logging.stdout.StdOutImplmap-underscore-to-camel-case: false #關閉駝峰映射
注意你要寫你的
數據庫端口號,賬號,密碼,你要簡化的包名這些一定要看一下。
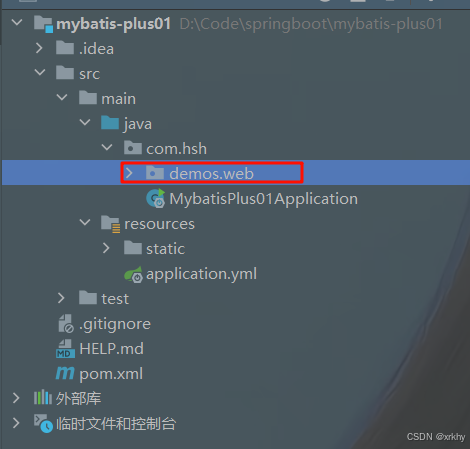
刪除demos.web包
編寫pojo層
user
com/hsh/pojo/user
package com.hsh.pojo;import lombok.AllArgsConstructor;
import lombok.Data;
import lombok.NoArgsConstructor;import java.time.LocalDateTime;@Data
@NoArgsConstructor
@AllArgsConstructor
@TableName("smbms_user")
public class User {private Long id;// 主鍵IDprivate String userCode;// 用戶編碼private String userName;// 用戶名稱private String userPassword;// 用戶密碼private Integer gender;// 性別(1:女、 2:男)private LocalDateTime birthday;//  出生日期private String phone;//  手機private String address;//  地址private Long userRole;// 用戶角色(取自角色表-角色id)private Long createdBy;// 創建者(userId)private LocalDateTime creationDate;// 創建時間private Long modifyBy; // 更新者(userId)private LocalDateTime modifyDate; // 更新時間
}
dto/ResultJson
package com.hsh.pojo.tdo;
import java.io.Serializable;@Data
public class ResultJSON<T> implements Serializable {private Integer code;private String msg;private T data;public ResultJSON(Integer code, String msg, T data) {this.code = code;this.msg = msg;this.data = data;}/*** 操作成功或者失敗* @param c 受影響行數* @return 當前傳入的受影響行數>0則返回成功,否則返回失敗*/public static  ResultJSON successORerror(int c){return c>0?new ResultJSON(200,"操作成功",c):new ResultJSON(400,"操作失敗",c);}public static ResultJSON success(){return new ResultJSON(200,"操作成功",null);}public static ResultJSON success(String msg){return new ResultJSON(200,msg,null);}public static <T> ResultJSON success(T data){return new ResultJSON(200,"操作成功",data);}public static ResultJSON success(Integer code,String msg){return new ResultJSON(code,msg,null);}public static <T> ResultJSON success(String msg,T data){return new ResultJSON(200,msg,data);}public static <T> ResultJSON success(Integer code,String msg,T data){return new ResultJSON(code,msg,data);}public static ResultJSON error(){return new ResultJSON(500,"操作失敗",null);}public static ResultJSON error(String msg){return new ResultJSON(500,msg,null);}public static ResultJSON error(Integer code,String msg){return new ResultJSON(code,msg,null);}}
編寫mapper層
UserMapper
package com.hsh.mapper;public interface UserMapper extends BaseMapper<User> {}
編寫service層
UserService
// 接口
package com.hsh.service;
public interface UserService {ResultJSON<User> getUserById(Long id);
}
// 實現類
package com.hsh.service.impl;import com.baomidou.mybatisplus.extension.service.impl.ServiceImpl;
import com.hsh.mapper.UserMapper;
import com.hsh.pojo.User;
import com.hsh.pojo.dto.ResultJSON;
import com.hsh.service.UserService;
import org.springframework.beans.factory.annotation.Autowired;
import org.springframework.stereotype.Service;@Service
public class UserServiceImpl extends ServiceImpl<UserMapper, User> implements UserService {@Autowiredprivate UserMapper userMapper;@Overridepublic ResultJSON<User> getUserById(Long id) {User user = userMapper.selectById(id);return ResultJSON.success(user);}
}
編寫controller層
package com.hsh.controller;@RestController
@RequestMapping("/user")
public class UserController {@Autowiredprivate UserService userService;@RequestMapping("/getUserById")public ResultJSON getUserById(Long id){return ResultJSON.success(userService.getUserById(id));}
}
編寫配置類
MybatisPlusConfig
package com.hsh.config;@Configuration
@MapperScan("com.hsh.mapper")
public class MybatisPlusConfig {}
編寫測試類
package com.hsh;import com.hsh.mapper.UserMapper;
import org.junit.jupiter.api.Test;
import org.springframework.beans.factory.annotation.Autowired;
import org.springframework.boot.test.context.SpringBootTest;@SpringBootTest
class MybatisPlus01ApplicationTests {@Autowiredprivate UserMapper userMapper;@Testvoid contextLoads() {System.out.println(userMapper.selectById(1));}
}

1 緩存分類
1.1 MyBatis一級緩存
Mybatis對緩存提供支持,但是在沒有配置的默認情況下,它只開啟一級緩存,一級緩存只是相對于同一個SqlSession而言。所以在參數和SQL完全一樣的情況下,我們使用同一個SqlSession對象調用一個Mapper方法,往往只執行一次SQL,因為使用SelSession第一次查詢后,MyBatis會將其放在緩存中,以后再查詢的時候,如果沒有聲明需要刷新,并且緩存沒有超時的情況下,SqlSession都會取出當前緩存的數據,而不會再次發送SQL到數據庫。
1.2 MyBatis二級緩存
MyBatis的二級緩存是Application級別的緩存,它可以提高對數據庫查詢的效率,以提高應用的性能。
1.2.1 開啟二級緩存
SqlSessionFactory層面上的二級緩存默認是不開啟的,二級緩存的開啟需要進行配置,實現二級緩存的時候,
springboot+ehcache的MyBatis要求返回的POJO必須是可序列化的。 也就是要求實現Serializable接口,配置方法很簡單,只需要在映射XML文件配置就可以開啟緩存了。
1.2.2 Mybatis開啟使用二級緩存
修改配置文件mybatis-config.xml加入
<setting name="cacheEnabled"value="true"/>
在mapper.xml中開啟二緩存,mapper.xml下的sql執行完成會存儲到它的緩存區
<!--回收策略為先進先出,每隔60秒刷新一次,最多緩存512個引用對象,只讀-->
<cache eviction="FIFO" flushInterval="60000" size="512" readOnly="true"/>
參數說明:
eviction:
LRU 最近最少使用的:移除最長時間不被使用的對象
FIFO 先進先出:按對象進入緩存的順序來移除它們
SOFT 軟引用:移除基于垃圾回收器狀態和軟引用規則的對象
WEAK 弱引用:更積極地移除基于垃圾收集器狀態和弱引用規則的對象
flushInterval :刷新間隔)可以被設置為任意的正整數,而且它們代表一個合理的毫秒形式的時間段。默
認情況是不設置,也就是沒有刷新間隔,緩存僅僅調用語句時刷新(mia毫秒單位)
size :引用數目)可以被設置為任意正整數,要記住你緩存的對象數目和你運行環境的可用內存資源數目。
默認值是1024
readOnly :(只讀)屬性可以被設置為true或false。只讀的緩存會給所有調用者返回緩存對象的相同實
例。因此這些對象不能被修改。這提供了很重要的性能優勢。可讀寫的緩存會返回緩存對象的拷貝(通過序列
化)。這會慢一些,但是安全,因此默認是false
select,insert,update標簽中的緩存屬性
useCache=false,禁用二級緩存
flushCache=true 刷新緩存 ,一般用于insert,update(目前版本可以自動刷新)
2 SpringBoot使用緩存
2.1 SpringBoot開啟MyBatis緩存+ehcache
2.1.1 引入依賴
引入緩存的依賴包,在配置 pom.xml 文件中添加
<!--添加緩存-->
<dependency><groupId>org.springframework.boot</groupId><artifactId>spring-boot-starter-cache</artifactId>
</dependency>
<dependency><groupId>net.sf.ehcache</groupId><artifactId>ehcache</artifactId>
</dependency>
2.1.2 添加緩存的配置文件 ehcache.xml
標簽解釋
diskStore標簽:指定一個文件目錄,當EhCache把數據寫到硬盤上時,將把數據寫到這個文件目錄下- user.home 屬性: 用戶主目錄
- user.dir屬性 : 用戶當前工作目錄
- java.io.tmpdir屬性 : 這是 Java 虛擬機的默認??臨時文件路徑??。默認臨時文件路徑。例如,在 Windows 系統中可能是 C:\Users[用戶名]\AppData\Local\Temp`
defaultCache標簽:默認緩存策略,當ehcache找不到定義的緩存時,則默認緩存策略。- 屬性同下面的cache。只不過他沒有name屬性
cache:自定義的緩存策略。(可以有多個cache標簽)- name: 緩存名稱
- eternal: true表示對象永不過期,此時會忽略 timeToIdleSeconds和timeToLiveSeconds屬性,默認為false
- timeToIdleSeconds: 設定允許對象處于空閑狀態的最長時間,以秒為單位。當對象自從最近一次被訪問后,如果處于空閑狀態的時間超過了。timeToIdleSeconds屬性值,這個對象就會過期,EHCache將把它從緩存中清空。只有當eternal屬性為false,該屬性才有效。如果該屬性值為0,則表示對象可以無限期地處于空閑狀態
- timeToLiveSeconds: 設定對象允許存在于緩存中的最長時間,以秒為單位。當對
象自從被存放到緩存中后,如果處于緩存中的時間超過了 timeToLiveSeconds屬性值,這個對象就會過期,EHCache將把它從緩存中清除。只有當eternal屬性為false,該屬性才有效。如果該屬性值為0,則表示對象可以無限期地存在于緩存中。timeToLiveSeconds必須大于timeToIdleSeconds屬性,才有意義。 - maxElementsInMemory: 內存中最大緩存對象數;maxElementsInMemory界限
后,會把溢出的對象寫到硬盤緩存中。注意:如果緩存的對象要寫入到硬盤中的話,則該對象必須實現了Serializable接口才行 - memoryStoreEvictionPolicy: 當達到maxElementsInMemory限制時,Ehcache將會根
據指定的策略去清理內存。可選策略有:LRU(最近最少使用,默認策略)、FIFO(先進先出)、LFU(最少訪問次數) - maxElementsOnDisk: 硬盤中最大緩存對象數,若是0表示無窮大
- overflowToDisk: 是否保存到磁盤,當系統宕機時
- diskPersistent: 是否緩存虛擬機重啟期數據,是否持久化磁盤緩存,當這個屬性的值為true時,系統在初始化時會在磁盤中查找文件名為cache名稱,后綴名為index的文件,這個文件中存放了已經持久化在磁盤中的cache的index,找到后會把cache加載到內存,要想把cache真正持久化到磁盤,寫程序時注意執行net.sf.ehcache.Cache.put(Element element)后要調用flush()方法。
- diskSpoolBufferSizeMB: 這個參數設置DiskStore(磁盤緩存)的緩存區大小。默認是30MB。每個Cache都應該有自己的一個緩沖區。
- diskExpiryThreadIntervalSeconds: 磁盤失效線程運行時間間隔,默認為120秒。
- clearOnFlush: 內存數量最大時是否清除。
在resources下新建ehcache.xml
<?xml version="1.0" encoding="UTF-8"?>
<ehcache xmlns:xsi="http://www.w3.org/2001/XMLSchema-instance"
xsi:noNamespaceSchemaLocation="http://ehcache.org/ehcache.xsd"
updateCheck="false"><!--diskStore標簽:指定一個文件目錄,當EhCache把數據寫到硬盤上時,將把數據寫到這個文件目錄下user.home : 用戶主目錄user.dir : 用戶當前工作目錄java.io.tmpdir : 這是 Java 虛擬機的默認??臨時文件路徑??。默認臨時文件路徑例如,在 Windows 系統中可能是 C:\Users\[用戶名]\AppData\Local\Temp\`--><diskStore path="java.io.tmpdir/Tmp_EhCache"/><!--1.name: 緩存名稱2.eternal: true表示對象永不過期,此時會忽略 timeToIdleSeconds和timeToLiveSeconds屬性,默認為false3.timeToIdleSeconds: 設定允許對象處于空閑狀態的最長時間,以秒為單位。當對象自從最近一次被訪問后,如果處于空閑狀態的時間超過了。timeToIdleSeconds屬性值,這個對象就會過期,EHCache將把它從緩存中清空。只有當eternal屬性為false,該屬性才有效。如果該屬性值為0,則表示對象可以無限期地處于空閑狀態4.timeToLiveSeconds: 設定對象允許存在于緩存中的最長時間,以秒為單位。當對象自從被存放到緩存中后,如果處于緩存中的時間超過了 timeToLiveSeconds屬性值,這個對象就會過期,EHCache將把它從緩存中清除。只有當eternal屬性為false,該屬性才有效。如果該屬性值為0,則表示對象可以無限期地存在于緩存中。timeToLiveSeconds必須大于timeToIdleSeconds屬性,才有意義5.maxElementsInMemory: 內存中最大緩存對象數;maxElementsInMemory界限后,會把溢出的對象寫到硬盤緩存中。注意:如果緩存的對象要寫入到硬盤中的話,則該對象必須實現了Serializable接口才行6.memoryStoreEvictionPolicy: 當達到maxElementsInMemory限制時,Ehcache將會根據指定的策略去清理內存。可選策略有:LRU(最近最少使用,默認策略)、FIFO(先進先出)、LFU(最少訪問次數)7.maxElementsOnDisk: 硬盤中最大緩存對象數,若是0表示無窮大8.overflowToDisk: 是否保存到磁盤,當系統宕機時9.diskPersistent: 是否緩存虛擬機重啟期數據,是否持久化磁盤緩存,當這個屬性的值為true時,系統在初始化時會在磁盤中查找文件名為cache名稱,后綴名為index的文件,這個文件中存放了已經持久化在磁盤中的cache的index,找到后會把cache加載到內存,要想把cache真正持久化到磁盤,寫程序時注意執行net.sf.ehcache.Cache.put(Element element)后要調用flush()方法10.diskSpoolBufferSizeMB: 這個參數設置DiskStore(磁盤緩存)的緩存區大小。默認是30MB。每個Cache都應該有自己的一個緩沖區11.diskExpiryThreadIntervalSeconds: 磁盤失效線程運行時間間隔,默認為120秒12.clearOnFlush: 內存數量最大時是否清除--><!--defaultCache:默認緩存策略,當ehcache找不到定義的緩存時,則默認緩存策略--><defaultCache eternal="false" maxElementsInMemory="1000"overflowToDisk="true" diskPersistent="true" timeToIdleSeconds="0"timeToLiveSeconds="600" memoryStoreEvictionPolicy="LRU"/><cachename="myCache"eternal="false"maxElementsInMemory="200"overflowToDisk="false"diskPersistent="true"timeToIdleSeconds="0"timeToLiveSeconds="300"memoryStoreEvictionPolicy="LRU"/></ehcache>
2.1.3 讀取ehcache.xml文件
在application.properties配置中讀取ehcache.xml文件
#讀取緩存配置文件
spring.cache.ehcache.config=classpath:ehcache.xml#最后記得開啟打印sql語句,方便測試,下面二選一
logging.level.com.hz.dao=debug
mybatis-plus.configuration.log-impl=org.apache.ibatis.logging.stdout.StdOutImpl
2.1.4 設置項目啟動時使用緩存
@SpringBootApplication
@EnableCaching //開啟緩存
public class Springboot1Application {public static void main(String[] args) {SpringApplication.run(Springboot1Application.class, args);}
}
2.1.5 序列化你的pojo層
pojo/dto/ResultJSON
package com.hsh.pojo.dto;@Data
public class ResultJSON<T> implements Serializable {// ....
}
pojo/user
package com.hsh.pojo;@Data
@TableName("smbms_user")
public class User implements Serializable {//....
}
2.2 緩存的使用
2.2.1 基本使用
在service層加上@Cacheable("myCache")這個myCache是指定上面的cache標簽的name。如果不寫使用<defaultCache/>
package com.hsh.service.impl;@Service
public class UserServiceImpl extends ServiceImpl<UserMapper, User> implements UserService {@Autowiredprivate UserMapper userMapper;@Override@Cacheable(value = "myCache", key = "#id")public ResultJSON<User> getUserById(Long id) {User user = userMapper.selectById(id);return ResultJSON.success(user);}
}
訪問http://localhost:8080/user/getUserById?id=1多次刷新
idea控制臺日志只輸出一次說明緩存使用成功。
2.2.2 @Cacheable注解使用
@Cacheable
可以標記在一個方法上,也可以標記在一個類上。當標記在一個方法上時表示該方法是支持緩存的,當標記在一個類上時則表示該類所有的方法都是支持緩存的。對于一個支持緩存的方法,Spring會在其被調用后將其返回值緩存起來,以保證下次利用同樣的參數來執行該方法時可以直接從緩存中獲取結果,而不需要再次執行該方法。該注解一般用在service層上
@Cacheable可以指定三個屬性,value、key和condition
key= "#id"的作用
key = "#id"是一個 ??SpEL(Spring Expression Language)表達式??,它指定了緩存項的??唯一標識符(緩存鍵)??。具體作用是:- #id??:表示使用該方法入參中的 id的值作為緩存鍵。
- 例如,當你調用 getUserById(123L)時,Spring 會以 123為鍵,將查詢到的 User對象存儲在名為 "myCache"的緩存區域中。
- 下次再調用 getUserById(123L),Spring 會先檢查 "myCache"緩存區域中是否存在鍵為 123的數據。如果存在,則直接返回該緩存數據,不再執行 userMapper.selectById(id)和數據庫查詢。
condition(緩存條件):方法執行??前??判斷,滿足條件才緩存
@Cacheable("myCache1")//Cache是發生在ehcache.xml中myCache1上的
public User find(Integer id) {
....
}
@Cacheable({"cache1", "cache2"})//Cache是發生在ehcache.xml中cache1和cache2上的
public User find(Integer id) {
.....
}
//自定義策略是指我們可以通過Spring的EL表達式來指定我們的key
//#id指參數id作為key
@Cacheable(value="myCache1", key="#id")
public User find(Integer id) {
...
}
//#p0標識第一個參數作為key
@Cacheable(value="myCache1", key="#p0")
public User find(Integer id) {
.....
}
//#user.user_id表示對象user屬性user_id作為key
@Cacheable(value="myCache1", key="#user.user_id")
public User find(User user) {
.....
}
@Cacheable(value="myCache1", key="#p0.user_id")
public User find(User user) {
.....
}
Spring還為我們提供了一個root對象可以用來生成key
| 示例 | 描述 |
|---|---|
| #root.methodName | 當前方法名 |
| #root.method.name | 當前方法 |
| #root.target | 當前被調用的對象 |
| #root.targetClass | 當前被調用的對象的class |
| #root.args[0] | 當前方法參數組成的數組 |
| #root.caches[0].name | 當前被調用的方法使用的Cache |
//表示只有當user的id為偶數時才會進行緩存
@Cacheable(value={"users"}, key="#user.id", condition="#user.id%2==0")
public User find(User user) {
...
}
2.2.2 @CachePut
使用@CachePut時我們可以指定的屬性跟@Cacheable是一樣的
@Cacheable不同的是使用@CachePut標注的方法在執行前不會去檢查緩存中是否存在之前執行過的結果,而是每次都會執行該方法,并將執行結果以鍵值對的形式存入指定的緩存中
2.2.3 @CacheEvict
@CacheEvict 清除緩存
可以指定的屬性有value、key、condition、allEntries、beforeInvocation
@CacheEvict(value="myCache",key="#p0.user_id")
public int updUser(SfUser user) throws Exception {return sfUserMapper.updUser(user);
}
// allEntries是boolean類型,表示是否需要清除緩存中的所有元素。默認為false,表示不需要。當指定了。
// allEntries為true時,Spring Cache將忽略指定的key。
// 有的時候我們需要Cache一下清除所有的元素,這比一個一個清除元素更有效率。
@CacheEvict(value="users", allEntries=true)
public void delete(Integer id) {System.out.println("delete user by id: " + id);
}
3 SpringBoot+Redis使用
當我們的應用程序需要頻繁地讀取和寫入數據時,為了提高應用程序的性能,我們通常會使用緩存技術。Spring Boot 提供了一種簡單而強大的緩存框架,它可以輕松地將數據緩存到 Redis 中。
在 Spring Boot 中可以在方法上簡單的加上注解實現緩存。
3.1 Redis 緩存配置
3.1.1 引入依賴
首先,您需要在您的項目中添加 Redis 的依賴。您可以將以下依賴添加到您的項目的 pom.xml 文件中:
<dependency><groupId>org.springframework.boot</groupId><artifactId>spring-boot-starter-data-redis</artifactId>
</dependency>
3.1.2 yml添加配置
一旦 Redis 的依賴被添加,您需要配置 Redis 的相關信息。以下是一個示例 Redis 配置:
spring:redis:host: 127.0.0.1port: 6379password:database: 0
在上述配置文件中,host 和 port 屬性指定了 Redis 服務器的主機名和端口號,password 屬性用于指定 Redis 服務器的密碼(如果有的話),而 database 屬性則指定了 Redis 服務器使用的數據庫編號。
3.1.3 序列化
Redis 的默認序列化器是 JdkSerializationRedisSerializer,但是在實際使用中,由于其序列化后的大小通常比較大,因此我們通常使用 StringRedisSerializer 或者 Jackson2JsonRedisSerializer 將緩存值序列化為字符串或者 JSON 格式。以下是一個自定義序列化器的示例:
package com.hsh.config;@Configuration
public class RedisConfig {/*** redisTemplate 默認使用JDK的序列化機制, 存儲二進制字節碼, 所以自定義序列化類* @param redisConnectionFactory redis連接工廠類* @return RedisTemplate*/@Beanpublic RedisTemplate<Object, Object> redisTemplate(RedisConnectionFactory redisConnectionFactory) {RedisTemplate<Object, Object> redisTemplate = new RedisTemplate<>();redisTemplate.setConnectionFactory(redisConnectionFactory);// 使用Jackson2JsonRedisSerialize 替換默認序列化Jackson2JsonRedisSerializer jackson2JsonRedisSerializer = new Jackson2JsonRedisSerializer(Object.class);ObjectMapper objectMapper = new ObjectMapper();objectMapper.setVisibility(PropertyAccessor.ALL,JsonAutoDetect.Visibility.ANY);objectMapper.enableDefaultTyping(ObjectMapper.DefaultTyping.NON_FINAL);jackson2JsonRedisSerializer.setObjectMapper(objectMapper);// 設置value的序列化規則和 key的序列化規則redisTemplate.setKeySerializer(new StringRedisSerializer());redisTemplate.setValueSerializer(jackson2JsonRedisSerializer);redisTemplate.afterPropertiesSet();return redisTemplate;}
}
在此示例中,我們通過自定義 Bean 配置了 RedisTemplate,使用 StringRedisSerializer 序列化 Redis鍵,并使用 Jackson2JsonRedisSerializer 序列化 Redis 值為 JSON 格式。
可以再測試類中驗證使用一下
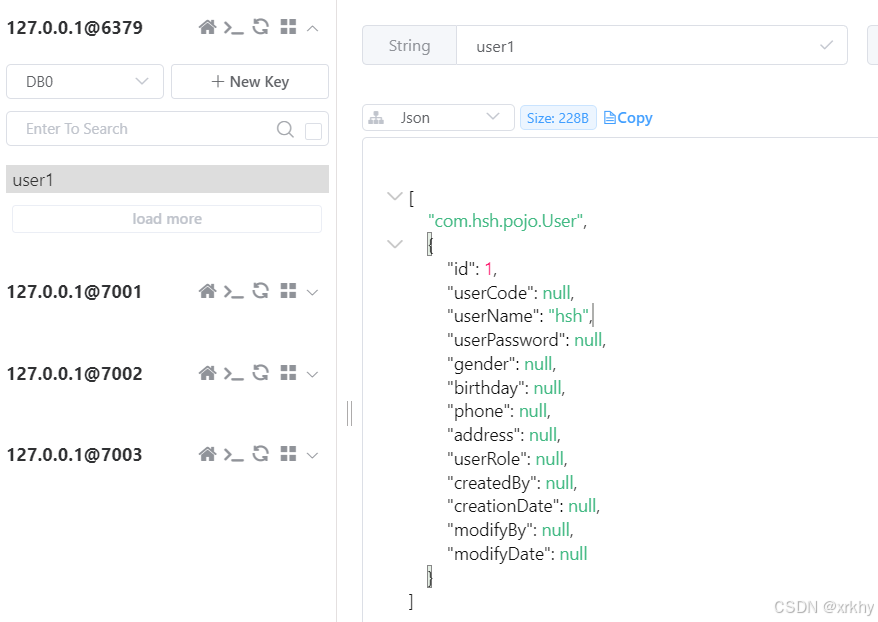
package com.hsh;@SpringBootTest
class CacheApplicationTests {@Autowiredprivate RedisTemplate<Object, Object> redisTemplate;@Testvoid contextLoads() {User user = new User();user.setId(1L);user.setUserName("hsh");redisTemplate.opsForValue().set("user1", user);System.out.println(redisTemplate.opsForValue().get("user1"));}
}
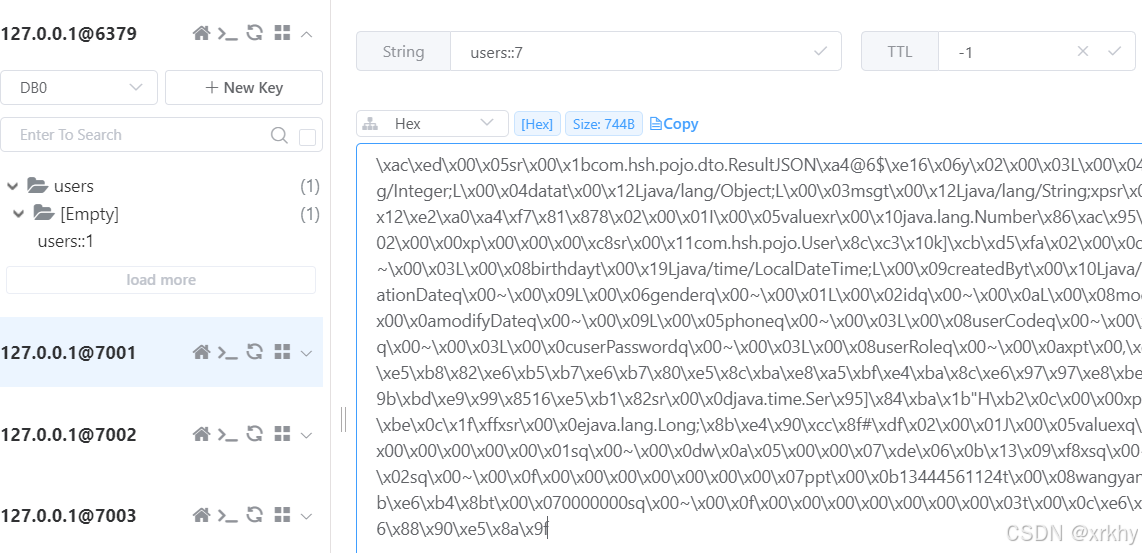
打開redis可視化工具查看。
3.2 Cacheable 注解
我們知道上面ehcache已經使用@Cacheable注解了,此時這個Redis也使用了這個注解。idea
可能會報錯,
如果報錯解決辦法:將上面引入的spring-boot-starter-cache和ehcache的依賴注釋掉就行。
使用 Cacheable 注解來標記需要進行緩存的方法。以下是一個具有 Cacheable 注解的示例方法:同樣還是在service實現類的方法上編寫。
package com.hsh.service.impl;@Service
public class UserServiceImpl extends ServiceImpl<UserMapper, User> implements UserService {@Autowiredprivate UserMapper userMapper;@Override@Cacheable(value = "users")public ResultJSON<User> getUserById(Long id) {User user = userMapper.selectById(id);return ResultJSON.success(user);}
}
訪問http://localhost:8080/user/getUserById?id=1。
打開Redis的可視化窗口查看。
在這個例子中,@Cacheable 注解用于標記 getUserById 方法,而 value 屬性則用于指定緩存的存儲區域的名稱。由于我們正在使用 Redis 作為緩存,因此 Redis 中的 key 將由 Cacheable 注解中的 key 屬性指定。在此示例中,key 屬性設置為 “#id”,這意味著我們將使用方法參數 id 作為 Redis 緩存的鍵。
3.3 多參數 Cacheable 注解
在某些情況下,我們需要以多個參數作為 key 來緩存數據。此時,我們可以對 key 屬性使用表達式language(SpEL)來設置多個參數:
@Servicepublic class UserService {
@Cacheable(value = "users", key = "#id + '_' + #name")public User getUserByIdAndName(Long id, String name) {// 查詢用戶并返回}
}
在上述示例中,我們使用了表達式語言(SpEL)將 id 和 name 兩個參數組合成了一個 Redis 緩存鍵。
3.4 緩存的清除 @CacheEvict
有時候,您需要清除 Redis 緩存中的某些數據,以便在下一次訪問時重建緩存。在 Spring Boot 中,可以使用 @CacheEvict 注解來清除 Redis 緩存中的數據。以下是一個使用 @CacheEvict 注解的示例:
@Servicepublic class UserService {@Cacheable(value = "users", key = "#id")public User getUserById(Long id) {// 查詢用戶并返回}@CacheEvict(value = "users", key = "#id")public void deleteUserById(Long id) {// 刪除用戶并返回}@CacheEvict(value = "users", allEntries = true)public void deleteAllUsers() {// 刪除所有用戶并返回}
}
在此示例中,我們添加了刪除單個用戶和刪除所有用戶的兩個方法,使用 @CacheEvict 注解來刪除Redis 緩存中的相應數據。請注意,我們設置了 allEntries 屬性為 true,以刪除所有緩存中的數據。
3.5 yml配置
spring:cache:type: redisredis:cache-names: userCache,providerCache #緩存名稱列表cache-null-values: false #查詢結果為 null 不進行緩存time-to-live: 90000ms #緩存毫秒 設置過期時間use-key-prefix: true #配置key的前綴 如果指定了前綴,就用指定的,如果沒有,就默認使用緩存的名字作為前綴
下面90秒后消失。

3.6 緩存管理
上面的3.5yml配置的方式有問題,我們所有的@Cacheable(cacheNames = "userCache", key = "#id")都是90秒。我們希望在寫@Cacheable是自定義緩存時間。即最終我們期望的使用方式如下。
@Cacheable(cacheNames = "demoCache#3600", key = "#id")
通過 # 分隔,后面部分表示此 Cache 的TTL(單位:秒)
下面來寫代碼演示
演示之前記得把yml中的配置刪除。
3.6.1 編寫MyRedisCacheManager配置類
編寫MyRedisCacheManager 類,給下面的CacheConfig類中的cacheManager方法使用。MyRedisCacheManager這個類只是把字符串中的時間給拆了出來。
package com.hsh.config;public class MyRedisCacheManager extends RedisCacheManager {public MyRedisCacheManager(RedisCacheWriter cacheWriter,RedisCacheConfiguration defaultCacheConfiguration) {super(cacheWriter, defaultCacheConfiguration);}@Overrideprotected RedisCache createRedisCache(String name, RedisCacheConfigurationcacheConfig) {String[] array = StringUtils.delimitedListToStringArray(name, "#");name = array[0];if (array.length > 1) { // 解析TTLlong ttl = Long.parseLong(array[1]);cacheConfig = cacheConfig.entryTtl(Duration.ofSeconds(ttl)); // 注意單位我此處用的是秒,而非毫秒}return super.createRedisCache(name, cacheConfig);}
}
3.6.2 編寫CacheConfig
package com.hsh.config;
// @EnableCaching已經在啟動類配置過這里不用配置了。
//@EnableCaching // 使用了CacheManager,別忘了開啟它 否則無效
@Configuration
public class CacheConfig extends CachingConfigurerSupport {@Beanpublic CacheManager cacheManager() {// entryTtl(Duration.ofDays(1))是今天有效RedisCacheConfiguration defaultCacheConfig =RedisCacheConfiguration.defaultCacheConfig().entryTtl(Duration.ofDays(1)).computePrefixWith(cacheName -> "caching:" + cacheName);MyRedisCacheManager redisCacheManager = new MyRedisCacheManager(RedisCacheWriter.nonLockingRedisCacheWriter(redisConnectionFactory()), defaultCacheConfig);return redisCacheManager;}@Beanpublic RedisConnectionFactory redisConnectionFactory() {RedisStandaloneConfiguration configuration = newRedisStandaloneConfiguration();configuration.setHostName("127.0.0.1");configuration.setPort(6379);configuration.setDatabase(0);configuration.setPassword("123456");LettuceConnectionFactory factory = newLettuceConnectionFactory(configuration);return factory;}// 下面這個序列化可以不寫,因為我們已經在RedisConfig這個類中配置過了序列化//@Bean//public RedisTemplate<String, String> redisTemplate() {//    RedisTemplate<String, String> redisTemplate = new StringRedisTemplate();//    redisTemplate.setConnectionFactory(redisConnectionFactory());//    return redisTemplate;//}
}
3.6.3 演示
package com.hsh.service.impl;@Service
public class UserServiceImpl extends ServiceImpl<UserMapper, User> implements UserService {@Autowiredprivate UserMapper userMapper;// 注意這里必須使用@Cacheable的屬性cacheNames 且我們設置的單位是秒。@Override@Cacheable(cacheNames = "userCache#30", key = "#id")public ResultJSON<User> getUserById(Long id) {User user = userMapper.selectById(id);return ResultJSON.success(user);}
}
)


-單頁應用程序路由)
熱區展示(帶鼠標移入彈窗))


解析)


)