目錄
一、Statefulset控制器:概念、原理解讀
有狀態服務
無狀態服務
StatefulSet部分組成
Headless service
二、Statefulset資源清單文件編寫技巧
三、Statefulset使用案例:部署web站點
四、Statefulset管理pod:擴容、縮容、更新
Statefulset實現pod的動態擴容
Statefulset實現pod的動態縮容
Statefulset實現pod的更新
一、概述
二、 Kube-proxy的三種模式
2.1 userspace 模式
2.2 iptables 模式
2.3 ipvs 模式
三、Service資源類型
四、Service實戰案例
實驗環境準備
4.1 ClusterIP類型的Service
4.2 HeadLiness類型的Service
4.3 NodePort類型的Service
4.4 LoadBalancer類型的Service
4.5 ExternalName類型的Service
一、Statefulset控制器:概念、原理解讀
StatefulSet是為了管理有狀態服務的問題而設計的。
有狀態服務
StatefulSet是有狀態的集合,管理有狀態的服務,它所管理的Pod的名稱不能隨意變化。數據持久化的目錄也是不一樣,每一個Pod都有自己獨有的數據持久化存儲目錄。比如MySQL主從、redis集群等。
無狀態服務
RC、Deployment、DaemonSet都是管理無狀態的服務,它們所管理的Pod的IP、名字,啟停順序等都是隨機的。個體對整體無影響,所有pod都是共用一個數據卷的,部署的tomcat就是無狀態的服務,tomcat被刪除,在啟動一個新的tomcat,加入到集群即可,跟tomcat的名字無關。
StatefulSet部分組成
-
Headless Service:用來定義pod網路標識,生成可解析的DNS記錄
-
volumeClaimTemplates:存儲卷申請模板,創建pvc,指定pvc名稱大小,自動創建pvc,且pvc由存儲類供應。
-
StatefulSet:管理pod的
Headless service
Headless service不分配clusterIP,headless service可以通過解析service的DNS,返回所有Pod的dns和ip地址 (只有statefulSet部署的Pod才有DNS地址),普通的service,只能通過解析service的DNS返回service的ClusterIP。
為什么要用headless service(沒有service ip的service)?
在使用Deployment時,創建的Pod名稱是沒有順序的,是隨機字符串,在用statefulset管理pod時要求pod名稱必須是有序的 ,每一個pod不能被隨意取代,pod重建后pod名稱還是一樣的。因為pod IP是變化的,所以要用Pod名稱來識別。pod名稱是pod唯一性的標識符,必須持久穩定有效。這時候要用到無頭服務,它可以給每個Pod一個唯一的名稱。
1、headless service會為service分配一個域名
<service name>.$<namespace name>.svc.cluster.localK8s中資源的全局FQDN格式:
 Service_NAME.NameSpace_NAME.Domain.LTD.Domain.LTD.=svc.cluster.local.     #這是默認k8s集群的域名。
FQDN 全稱?Fully Qualified Domain Name
?
即全限定域名:同時帶有主機名和域名的名稱
?
FQDN = Hostname + DomainName
?
如:主機名是 duoduo
?
域名是 [baidu.com](http://baidu.com/)
?
FQDN= duoduo.baidu.com.
?
#eg:
[root@k8s-master deployment]# dig nginx-deploy-svc.default.svc.cluster.local @10.96.0.10
?
; <<>> DiG 9.11.36-RedHat-9.11.36-14.el8_10 <<>> nginx-deploy-svc.default.svc.cluster.local @10.96.0.10
;; global options: +cmd
;; Got answer:
;; WARNING: .local is reserved for Multicast DNS
;; You are currently testing what happens when an mDNS query is leaked to DNS
;; ->>HEADER<<- opcode: QUERY, status: NOERROR, id: 19414
;; flags: qr aa rd; QUERY: 1, ANSWER: 1, AUTHORITY: 0, ADDITIONAL: 1
;; WARNING: recursion requested but not available
?
;; OPT PSEUDOSECTION:
; EDNS: version: 0, flags:; udp: 4096
; COOKIE: 16379d4770867ed4 (echoed)
;; QUESTION SECTION:
;nginx-deploy-svc.default.svc.cluster.local. IN A
?
;; ANSWER SECTION:
nginx-deploy-svc.default.svc.cluster.local. 30 IN A 10.97.172.98
?
;; Query time: 7 msec
;; SERVER: 10.96.0.10#53(10.96.0.10)
;; WHEN: 一 1月 13 01:25:21 EST 2025
;; MSG SIZE  rcvd: 141
?
[root@k8s-master deployment]# kubectl get svc
NAME ? ? ? ? ? ? ? TYPE ? ? ?  CLUSTER-IP ? ? EXTERNAL-IP ? PORT(S) ? ? ?  AGE
kubernetes ? ? ? ? ClusterIP ? 10.96.0.1 ? ?  <none> ? ? ? ?443/TCP ? ? ?  6d4h
nginx-deploy-svc ? NodePort ? ?10.97.172.98 ? <none> ? ? ? ?80:30676/TCP ? 2m20s
2、StatefulSet會為關聯的Pod保持一個不變的Pod Name
statefulset中Pod的名字格式為 【 $(StatefulSet name)-$(pod序號) 】3、StatefulSet會為關聯的Pod分配一個dnsName
$<Pod Name>.$<service name>.$<namespace name>.svc.cluster.local二、Statefulset資源清單文件編寫技巧
#查看定義Statefulset資源需要的字段
?
[root@k8s-master01~]# kubectl explain statefulset
?
FIELDS:
?apiVersion???????<string> #定義statefulset資源需要使用的api版本
?kind??<string>????????? #定義的資源類型
?metadata?????????<Object>???? #元數據
?spec?<Object>????????? #定義容器相關的信息
?
#查看statefulset.spec字段如何定義
?
[root@k8s-master01~]# kubectl explain statefulset.spec
?
FIELDS:
?podManagementPolicy?<string> #pod管理策略
?replicas????<integer>? #副本數
?revisionHistoryLimit???????<integer> #保留的歷史版本
?selector????<Object> -required- #標簽選擇器,選擇它所關聯的pod
?serviceName???<string> -required-? #headless service的名字
?template??<Object> -required-???? #生成pod的模板
?updateStrategy???????<Object>?? #更新策略
?volumeClaimTemplates?<[]Object> #存儲卷申請模板
?
#查看statefulset的spec.template字段如何定義?
?
#對于template而言,其內部定義的就是pod,pod模板是一個獨立的對象
?
[root@k8s-master01~]# kubectl explain statefulset.spec.template
?
FIELDS:
?metadata?????????<Object>
?spec?<Object>? #定義容器屬性的
通過上面可以看到,statefulset資源中有兩個spec字段。第一個spec聲明的是statefulset定義多少個Pod副本(默認將僅部署1個Pod)、匹配Pod標簽的選擇器、創建pod的模板、存儲卷申請模板,第二個spec是spec.template.spec:主要用于Pod里的容器屬性等配置。
.spec.template里的內容是聲明Pod對象時要定義的各種屬性,所以這部分也叫做PodTemplate(Pod模板)。還有一個值得注意的地方是:在.spec.selector中定義的標簽選擇器必須能夠匹配到spec.template.metadata.labels里定義的Pod標簽,否則Kubernetes將不允許創建statefulset。
三、Statefulset使用案例:部署web站點
#編寫一個Statefulset資源清單文件
?
[root@k8s-master01~]# cat statefulset.yaml
?
apiVersion: v1
kind: Service
metadata:name: nginx-svclabels:app: nginx
spec:ports:- port: 80name: webclusterIP: "None"selector:app: nginx
---
apiVersion: apps/v1
kind: StatefulSet
metadata:name: web
spec:selector:matchLabels:app: nginxserviceName: "nginx-svc"replicas: 2template:metadata:labels:app: nginxspec:containers:- name: nginximage: nginximagePullPolicy: IfNotPresentports:- containerPort: 80name: web
?
#更新資源清單文件
?
[root@k8s-master01~]# kubectl apply -f statefulset.yaml
?
service/nginx created
?
statefulset.apps/web created
?
#查看statefulset是否創建成功
?
[root@k8s-master01~]# kubectl get statefulset
?
NAME?? READY?? AGE
?
web????? 2/2????? 42s
?
#查看pod
?
[root@k8s-master01~]# kubectl get pods -l app=nginx
?
NAME??? READY?? STATUS??? RESTARTS?? AGE
?
web-0?? 1/1???? Running?? 0????????? 2m17s
?
web-1?? 1/1???? Running?? 0????????? 115s
?
#通過上面可以看到創建的pod是有序的
?
#查看headless service
?
[root@k8s-master01~]# kubectl get svc -l app=nginx
?
NAME??? TYPE??????? CLUSTER-IP?? EXTERNAL-IP?? PORT(S)?? AGE
?
nginx??? ClusterIP????? None???????? <none>??????? 80/TCP??? 3m19s
?
#查看pvc
?
[root@k8s-master01~]# kubectl get pvc
?
#查看pod主機名
?
[root@k8s-master01~]# for i in 0 1; do kubectl exec web-$i -- sh -c 'hostname';done
?
web-0
?
web-1
?
#使用k運行一個提供nslookup命令的容器(bubybox:1.28),這個命令來自于dnsutils包,通過對pod主機名執行nslookup,可以檢查它們在集群內部的DNS地址:
?
[root@hd1 ~]# cat pod-second.yaml
?
apiVersion: v1
kind: Pod
metadata:name: pod-secondlabels:app: backendtier: db
spec:containers:- name: busyboximage: busybox:1.28imagePullPolicy: IfNotPresentcommand: ["sh","-c","sleep 3600"]
?
[root@hd1 ~]# kubectl apply -f pod-second.yaml
?
[root@hd1 ~]# kubectl exec -it pod-second -- /bin/sh
?
/ # nslookup??web-0.nginx.default.svc.cluster.local
?
Server:????10.10.0.10
?
Address 1: 10.10.0.10 kube-dns.kube-system.svc.cluster.local
?
Name:??????web-0.nginx.default.svc.cluster.local
?
Address 1: 10.10.156.137 web-0.nginx.default.svc.cluster.local
?
/ #
?
#statefulset創建的pod也是有dns記錄的
?
Address: 10.10.209.154? #解析的是pod的ip地址,還可以解析 nginx.default.svc.cluster.local
?
/ # nslookup??nginx.default.svc.cluster.local
?
Server:????10.10.0.10
?
Address 1: 10.10.0.10 kube-dns.kube-system.svc.cluster.local
?
Name:??????nginx.default.svc.cluster.local
?
Address 1: 10.10.25.245 web-1.nginx.default.svc.cluster.local
?
Address 2: 10.10.156.137 web-0.nginx.default.svc.cluster.local
?
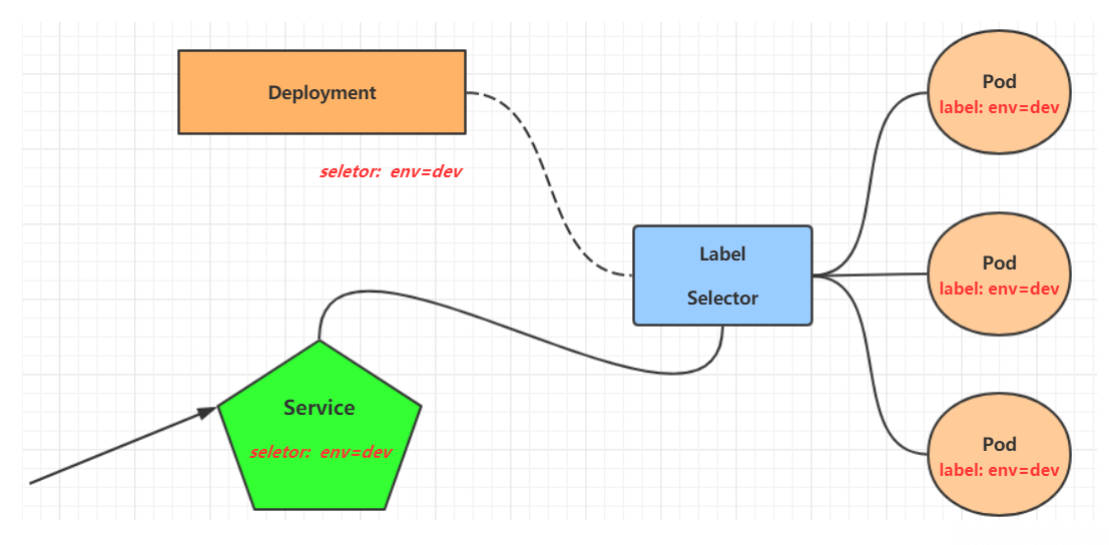
/ #舉例說明service 和headless service區別?
#通過deployment創建pod,pod前端創建一個service
[root@k8s-master01~]# cat deploy-service.yaml
?
apiVersion: v1
?
kind: Service
?
metadata:
?name: my-nginx
?labels:
?run: my-nginx
?
spec:
?type: ClusterIP
?ports:
?- port: 80?? #service的端口,暴露給k8s集群內部服務訪問
?protocol: TCP
?targetPort: 80??? #pod容器中定義的端口
?selector:
?run: my-nginx? #選擇擁有run=my-nginx標簽的pod
?
---
?
apiVersion: apps/v1
?
kind: Deployment
?
metadata:
?name: my-nginx
?
spec:
?selector:
?matchLabels:
?run: my-nginx
?replicas: 2
?template:
?metadata:
?labels:
?run: my-nginx
?spec:
?containers:
?- name: my-nginx
?image: busybox
?imagePullPolicy: IfNotPresent
?ports:
?- containerPort: 80
?command:
?- sleep: 0"
?
#更新資源清單文件
?
[root@k8s-master01~]# kubectl apply -f deploy-service.yaml
?
#查看service
?
[root@k8s-master01~]# kubectl get svc -l run=my-nginx
?
NAME?????? TYPE??????? CLUSTER-IP???? EXTERNAL-IP?? PORT(S)?
?
my-nginx?? ClusterIP???? 10.100.89.90?? <none>??????? 80/TCP??
?
#查看pod
?
[root@k8s-master01~]# kubectl get pods -l run=my-nginx
?
NAME??????????????????????? READY?? STATUS??? RESTARTS?? AGE
?
my-nginx-58f74fc5b6-jzbvk?? 1/1???? Running?? 0????????? 70s
?
my-nginx-58f74fc5b6-n9lqv?? 1/1???? Running?? 0????????? 53s
?
#通過上面可以看到deployment創建的pod是隨機生成的
?
#進入到web-1的pod
?
[root@k8s-master01~]# kubectl exec -it web-1 -- /bin/bash
?
root@web-1:/# nslookup my-nginx.default.svc.cluster.local
?
Server:???????????10.10.0.10
?
Address:????????10.10.0.10#53
?
Name:???my-nginx.default.svc.cluster.local
?
Address: 10.100.89.90?? #解析的是service的ip地址
四、Statefulset管理pod:擴容、縮容、更新
Statefulset實現pod的動態擴容
如果我們覺得兩個副本太少了,想要增加,只需要修改配置文件statefulset.yaml里的replicas的值即可,原來replicas: 2,現在變成replicaset: 3,修改之后,執行如下命令更新:
[root@k8s-master01~]# kubectl apply -f statefulset.yaml
?
service/nginx unchanged
?
statefulset.apps/web configured
?
[root@k8s-master01~]# kubectl get sts
?
NAME?? READY?? AGE
?
web??? 3/3???? 60m
?[root@k8s-master01~]# kubectl get pods -l app=nginx
?
NAME??? READY?? STATUS??? RESTARTS?? AGE
?
web-0?? 1/1???? Running?? 0????????? 61m
?
web-1?? 1/1???? Running?? 0????????? 60m
?
web-2?? 1/1???? Running?? 0????????? 79s
?#也可以直接編輯控制器實現擴容
?
[root@k8s-master01~]# kubectl edit sts web
?
#這個是我們把請求提交給了apiserver,實時修改,把上面的spec下的replicas 后面的值改成4,保存退出
[root@k8s-master01~]#? kubectl get pods -l app=nginx
?
NAME??? READY?? STATUS??? RESTARTS?? AGE
?
web-0?? 1/1???? Running?? 0????????? 62m
?
web-1?? 1/1???? Running?? 0????????? 62m
?
web-2?? 1/1???? Running?? 0????????? 3m13s
?
web-3?? 1/1???? Running?? 0????????? 26s
Statefulset實現pod的動態縮容
如果我們覺得4個Pod副本太多了,想要減少,只需要修改配置文件statefulset.yaml里的replicas的值即可,把replicaset:4變成replicas: 2,修改之后,執行如下命令更新:
[root@k8s-master01~]# kubectl apply -f statefulset.yaml
?
service/nginx unchanged
?
statefulset.apps/web configured
?
[root@k8s-master01~]#? kubectl get pods -l app=nginx
?
NAME??? READY?? STATUS??? RESTARTS?? AGE
?
web-0?? 1/1???? Running?? 0????????? 64m
?
web-1?? 1/1???? Running?? 0????????? 64m
Statefulset實現pod的更新
myapp.tar.gz上傳到k8s-worker01上,手動解壓[root@k8s-worker01 ~]# docker load -i myapp.tar.gz
?
[root@k8s-master01~]# kubectl edit sts web
?
#修改鏡像nginx變成- image: ikubernetes/myapp:v2,修改之后保存退出
?
[root@k8s-master01~]# kubectl get pods -o wide -l app=nginx
?
NAME??? READY?? STATUS??? RESTARTS?? AGE?? IP?????????????? NODE?????? NOMINATED NODE?? READINESS GATES
?
web-0?? 1/1???? Running?? 0????????? 18s?? 10.10.209.156? k8s-worker01??
?
web-1?? 1/1???? Running?? 0????????? 36s?? 10.10.187.115? k8s-worker02
?
#查看pod詳細信息
?
[root@k8s-master01~]# kubectl describe pods web-0
?
#可以看到pod已經使用剛才更新的鏡像ikubernetes/myapp:v2
一、概述
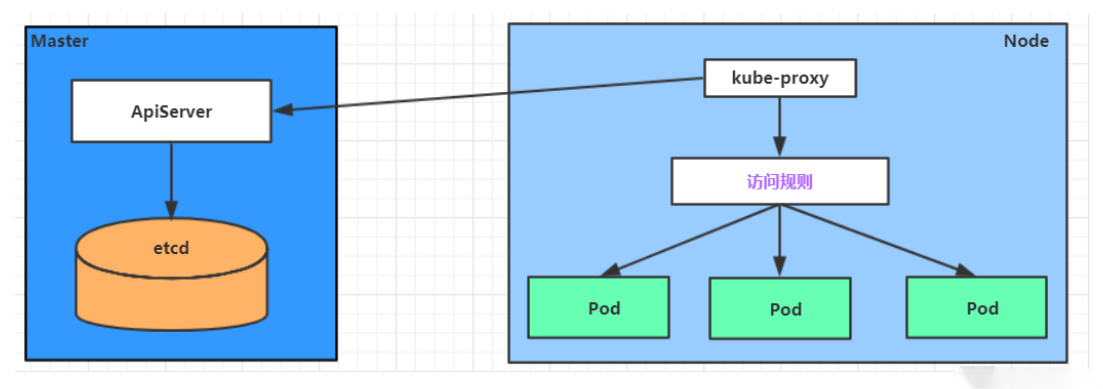
在kubernetes中,pod是應用程序的載體,我們可以通過pod的ip來訪問應用程序,但是pod的ip地址不是固定的,這也就意味著不方便直接采用pod的ip對服務進行訪問。
為了解決這個問題,kubernetes提供了Service資源,Service會對提供同一個服務的多個pod進行聚合,并且提供一個統一的入口地址。通過訪問Service的入口地址就能訪問到后面的pod服務。 Service在很多情況下只是一個概念,真正起作用的其實是kube-proxy服務進程,每個Node節點上都運行著一個kube-proxy服務進程。當創建Service的時候會通過api-server向etcd寫入創建的service的信息,而kube-proxy會基于監聽的機制發現這種Service的變動,然后它會將最新的Service信息轉換成對應的訪問規則。
二、 Kube-proxy的三種模式
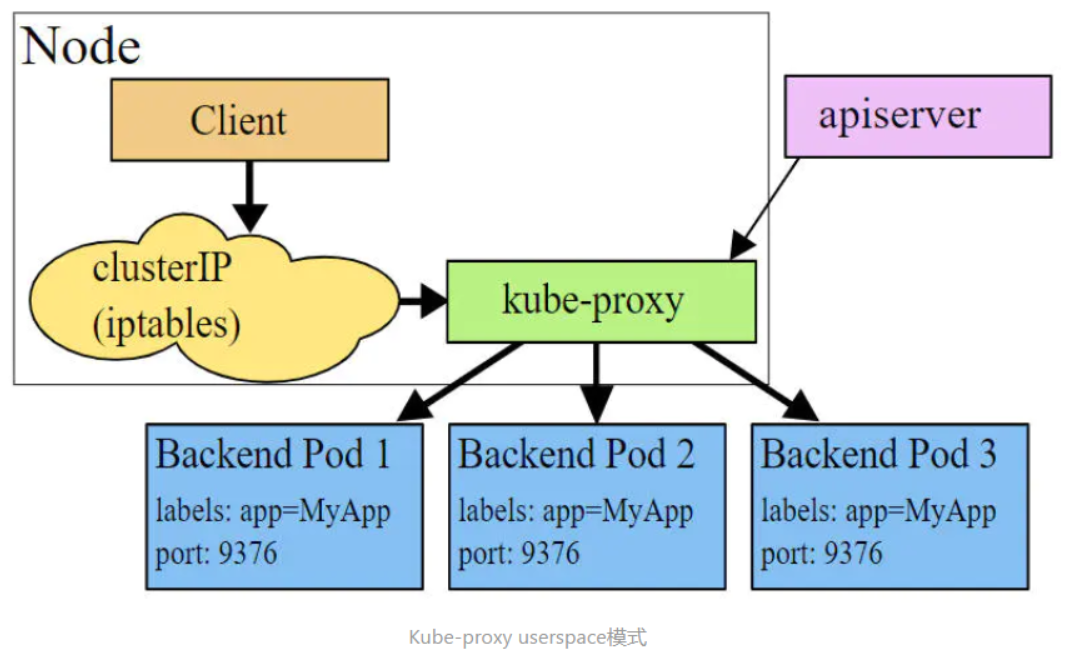
2.1 userspace 模式
userspace模式下,kube-proxy會為每一個Service創建一個監聽端口,發向Cluster IP的請求被Iptables規則重定向到kube-proxy監聽的端口上,kube-proxy根據LB(LoadBalance,負載均衡)算法選擇一個提供服務的Pod并和其建立鏈接,以將請求轉發到Pod上。 該模式下,kube-proxy充當了一個四層負載均衡器的角色。由于kube-proxy運行在userspace中,在進行轉發處理時會增加內核和用戶空間之間的數據拷貝,雖然比較穩定,但是效率比較低。
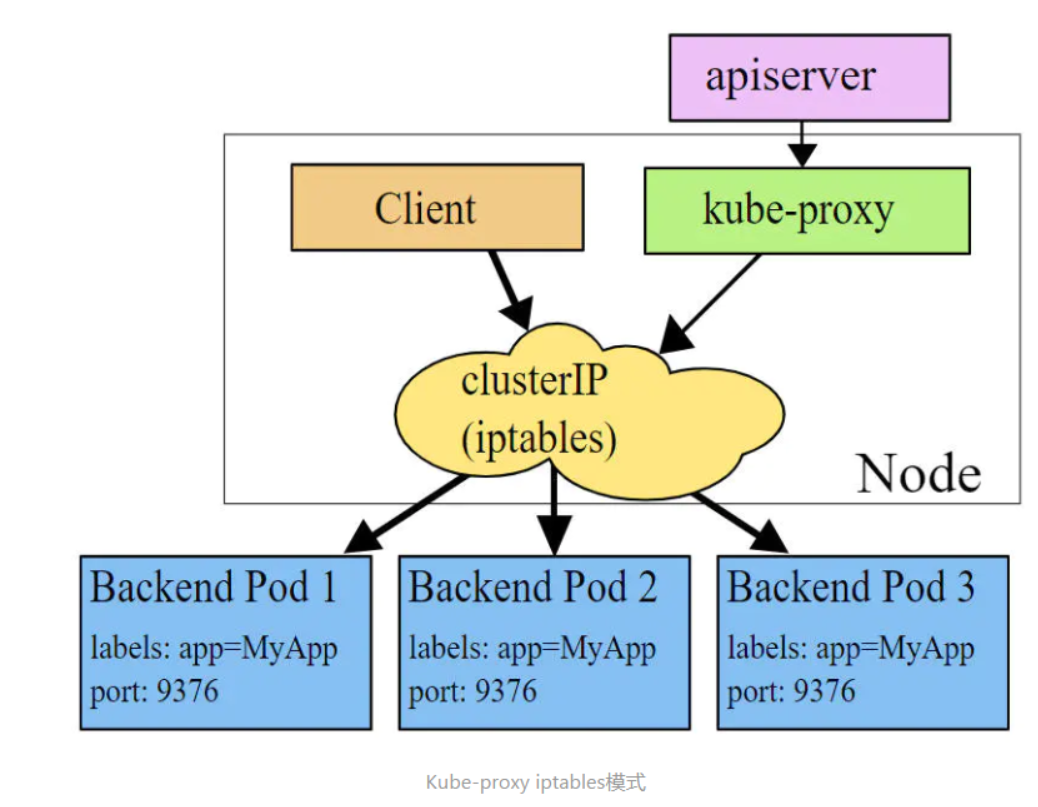
2.2 iptables 模式
iptables模式下,kube-proxy為service后端的每個Pod創建對應的iptables規則,直接將發向Cluster IP的請求重定向到一個Pod IP。 該模式下kube-proxy不承擔四層負載均衡器的角色,只負責創建iptables規則。該模式的優點是較userspace模式效率更高,但不能提供靈活的LB策略,當后端Pod不可用時也無法進行重試。
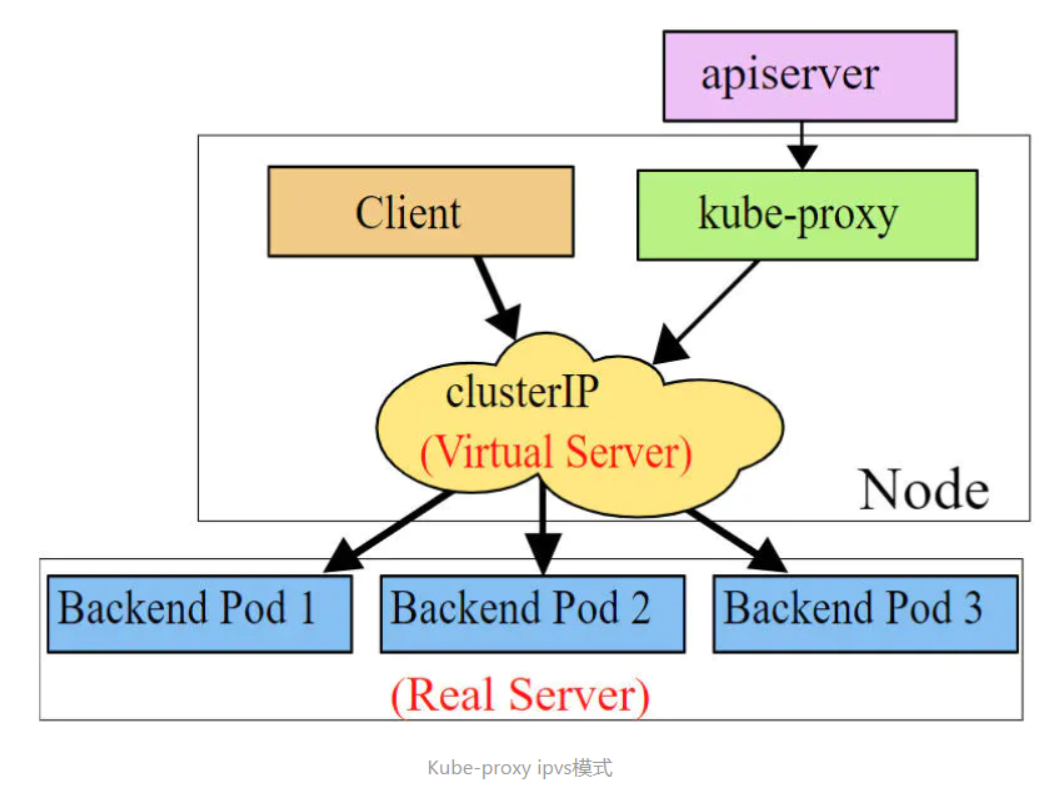
2.3 ipvs 模式
ipvs模式和iptables類似,kube-proxy監控Pod的變化并創建相應的ipvs規則。ipvs相對iptables轉發效率更高。除此以外,ipvs支持更多的LB算法。
# 此模式必須安裝ipvs內核模塊(集群部署的時候已安裝),否則會降級為iptables
# 開啟ipvs,cm: configmap
[root@k8s-master01 ~]# kubectl edit cm kube-proxy -n kube-system
# 修改mode: "ipvs"
[root@k8s-master01 ~]# kubectl delete pod -l k8s-app=kube-proxy -n kube-system
[root@node1 ~]# ipvsadm -Ln
IP Virtual Server version 1.2.1 (size=4096)
Prot LocalAddress:Port Scheduler Flags-> RemoteAddress:Port ? ? ? ? ? Forward Weight ActiveConn InActConn
TCP ?172.16.32.128:30080 rr-> 172.16.79.79:80 ? ? ? ? ? ?  Masq ? ?1 ? ? ?0 ? ? ? ? ?0 ? ? ? ?
TCP ?172.16.32.128:32665 rr-> 172.16.79.82:8443 ? ? ? ? ?  Masq ? ?1 ? ? ?0 ? ? ? ? ?0 ? ? ? ?
TCP ?172.17.0.1:30080 rr-> 172.16.79.79:80 ? ? ? ? ? ?  Masq ? ?1 ? ? ?0 ? ? ? ? ?0 ? ? ? ?
TCP ?172.17.0.1:32665 rr-> 172.16.79.82:8443 ? ? ? ? ?  Masq ? ?1 ? ? ?0 ? ? ? ? ?0 ? ? ? ?
TCP ?192.168.115.161:30080 rr-> 172.16.79.79:80 ? ? ? ? ? ?  Masq ? ?1 ? ? ?0 ? ? ? ? ?0 ? ? ? ?
TCP ?192.168.115.161:32665 rr-> 172.16.79.82:8443 ? ? ? ? ?  Masq ? ?1 ? ? ?0 ? ? ? ? ?0 ? ? ? ?
TCP ?192.168.115.166:30080 rr-> 172.16.79.79:80 ? ? ? ? ? ?  Masq ? ?1 ? ? ?0 ? ? ? ? ?0 ? ? ? ?
TCP ?192.168.115.166:32665 rr-> 172.16.79.82:8443 ? ? ? ? ?  Masq ? ?1 ? ? ?0 ? ? ? ? ?0 ? ? ? ?
TCP ?10.10.0.1:443 rr-> 192.168.115.161:6443 ? ? ? ? Masq ? ?1 ? ? ?0 ? ? ? ? ?0 ? ? ? ? -> 192.168.115.162:6443 ? ? ? ? Masq ? ?1 ? ? ?0 ? ? ? ? ?0 ? ? ? ? -> 192.168.115.163:6443 ? ? ? ? Masq ? ?1 ? ? ?1 ? ? ? ? ?0 ? ? ? ?
TCP ?10.10.0.10:53 rr-> 172.16.122.139:53 ? ? ? ? ?  Masq ? ?1 ? ? ?0 ? ? ? ? ?0 ? ? ? ? -> 172.16.122.140:53 ? ? ? ? ?  Masq ? ?1 ? ? ?0 ? ? ? ? ?0 ? ? ? ?
TCP ?10.10.0.10:9153 rr-> 172.16.122.139:9153 ? ? ? ?  Masq ? ?1 ? ? ?0 ? ? ? ? ?0 ? ? ? ? -> 172.16.122.140:9153 ? ? ? ?  Masq ? ?1 ? ? ?0 ? ? ? ? ?0 ? ? ? ?
TCP ?10.10.39.128:8000 rr-> 172.16.79.80:8000 ? ? ? ? ?  Masq ? ?1 ? ? ?0 ? ? ? ? ?0 ? ? ? ?
TCP ?10.10.128.23:443 rr-> 172.16.79.81:443 ? ? ? ? ? ? Masq ? ?1 ? ? ?0 ? ? ? ? ?0 ? ? ? ?
TCP ?10.10.166.16:8000 rr-> 172.16.79.79:80 ? ? ? ? ? ?  Masq ? ?1 ? ? ?0 ? ? ? ? ?0 ? ? ? ?
TCP ?10.10.195.192:443 rr-> 172.16.79.82:8443 ? ? ? ? ?  Masq ? ?1 ? ? ?0 ? ? ? ? ?0 ? ? ? ?
UDP ?10.10.0.10:53 rr-> 172.16.122.139:53 ? ? ? ? ?  Masq ? ?1 ? ? ?0 ? ? ? ? ?0 ? ? ? ? -> 172.16.122.140:53 ? ? ? ? ?  Masq ? ?1 ? ? ?0 ? ? ? ? ?0 ? ? ?
三、Service資源類型
常見的Service資源清單
apiVersion: v1
kind: Service
matadata: ? ? ? ? ? ? ? ? ? ? ? ? ? ? ? ?#元數據name: string ? ? ? ? ? ? ? ? ? ? ? ? ? #service的名稱namespace: string ? ? ? ? ? ? ? ? ? ? ?#命名空間 ?labels: ? ? ? ? ? ? ? ? ? ? ? ? ? ? ? ?#自定義標簽屬性列表- name: stringannotations: ? ? ? ? ? ? ? ? ? ? ? ? ? #自定義注解屬性列表 ?- name: string
spec: ? ? ? ? ? ? ? ? ? ? ? ? ? ? ? ? ? ?#詳細描述selector: [] ? ? ? ? ? ? ? ? ? ? ? ? ? #label selector配置,將選擇具有label標簽的Pod作為管理范圍type: string ? ? ? ? ? ? ? ? ? ? ? ? ? #service的類型,指定service的訪問方式,默認為clusterIp ? ? ? ? ? ? ?clusterIP: string ? ? ? ? ? ? ? ? ? ? ?#虛擬服務地址 ? ? ?sessionAffinity: string ? ? ? ? ? ? ? ?#是否支持sessionports: ? ? ? ? ? ? ? ? ? ? ? ? ? ? ? ? #service需要暴露的端口列表- name: string ? ? ? ? ? ? ? ? ? ? ? ? #端口名稱protocol: string ? ? ? ? ? ? ? ? ? ? #端口協議,支持TCP和UDP,默認TCPport: int ? ? ? ? ? ? ? ? ? ? ? ? ? ?#服務監聽的service端口號targetPort: int ? ? ? ? ? ? ? ? ? ? ?#需要轉發到后端Pod的端口號nodePort: int ? ? ? ? ? ? ? ? ? ? ? ?#當type = NodePort時,指定映射到物理機的端口號status: ? ? ? ? ? ? ? ? ? ? ? ? ? ? ? ?#當spce.type=LoadBalancer時,設置外部負載均衡器的地址loadBalancer: ? ? ? ? ? ? ? ? ? ? ? ?#外部負載均衡器 ? ?ingress: ? ? ? ? ? ? ? ? ? ? ? ? ? #外部負載均衡器 ip: string ? ? ? ? ? ? ? ? ? ? ? #外部負載均衡器的Ip地址值hostname: string ? ? ? ? ? ? ? ? #外部負載均衡器的主機名
資源清單案例
apiVersion: v1 ?# 資源版本
kind: Service ?# 資源類型
metadata: # 元數據name: service # 資源名稱namespace: dev # 命名空間
spec: # 描述selector: # 標簽選擇器,用于確定當前service代理哪些podapp: nginxtype: # Service類型,指定service的訪問方式clusterIP: ?# 虛擬服務的ip地址sessionAffinity: # session親和性,支持ClientIP、None兩個選項ports: # 端口信息- protocol: TCP port: 3017 ?# service端口targetPort: 5003 # pod端口nodePort: 31122 # 主機端口
Service中的service.spec.type類型
| 類型 | 含義 |
|---|---|
| ClusterIP | 意味著服務僅在集群內部可用,只能通過集群IP訪問。 |
| ExternalName | 意味著服務僅包含一個對外部名稱的引用,Kubedns或等價物將返回作為CNAME記錄,不會涉及任何容器的暴露或代理。 |
| LoadBalancer | 意味著服務將通過外部負載均衡器(如果云提供商支持的話)進行暴露,除了NodePort類型之外。 |
| NodePort | 意味著服務將在每個節點的一個端口上進行暴露,除了ClusterIP類型之外。 |
Service中的三類IP地址
| IP類型 | 作用 |
|---|---|
| Node IP | 節點IP是Kubernetes集群中每個節點的唯一標識符。它代表了節點的網絡接口,用于在集群內部進行通信。節點IP通常是一個私有IP地址范圍,用于在集群內部進行通信。節點IP是Service在集群內部提供服務的唯一標識,用于路由流量到指定的Pod。 |
| Pod IP | Pod IP是Kubernetes中每個Pod的唯一標識符。它代表了Pod的網絡接口,用于在集群內部進行通信。Pod IP通常是一個私有IP地址范圍,用于在集群內部進行通信。Pod IP是Service在集群內部提供服務的唯一標識,用于路由流量到指定的Pod。 |
| Cluster IP | Cluster IP是Kubernetes集群中Service的IP地址。它代表了Service在集群內部提供的服務,用于在集群內部進行通信。Cluster IP通常是一個私有IP地址范圍,用于在集群內部進行通信。Cluster IP是Service在集群內部提供服務的唯一標識,用于路由流量到指定的Pod。 |
綜上所述,Kubernetes中的三類IP地址分別是Node IP、Pod IP和Cluster IP。這些IP地址用于在不同網絡之間路由流量,以便外部和內部應用程序可以訪問Kubernetes集群中的服務和Pod。
四、Service實戰案例
實驗環境準備
在使用service之前,首先利用Deployment創建出3個pod,注意要為pod設置app=nginx-pod的標簽
創建deployment.yaml,內容如下:
apiVersion: apps/v1
kind: Deployment ? ? ?
metadata:name: pc-deploymentnamespace: dev
spec: replicas: 3selector:matchLabels:app: nginx-podtemplate:metadata:labels:app: nginx-podspec:containers:- name: nginximage: nginxports:- containerPort: 80
[root@k8s-master01 ~]# kubectl create -f deployment.yaml
deployment.apps/pc-deployment created
?
# 查看pod詳情
[root@k8s-master01 ~]# kubectl get pods -n dev -o wide --show-labels
NAME ? ? ? ? ? ? ? ? ? ? ? ? ? ? READY ? STATUS ?  RESTARTS ? AGE ? IP ? ? ? ? ? ?  NODE ? ? ? ? ? NOMINATED NODE ? READINESS GATES ? LABELS
pc-deployment-59c564ffb7-8vzp5 ? 1/1 ? ? Running ? 0 ? ? ? ?  89s ? 172.16.79.83 ?  k8s-worker01 ? <none> ? ? ? ? ? <none> ? ? ? ? ? ?app=nginx-pod,pod-template-hash=59c564ffb7
pc-deployment-59c564ffb7-fg2j8 ? 1/1 ? ? Running ? 0 ? ? ? ?  89s ? 172.16.69.206 ? k8s-worker02 ? <none> ? ? ? ? ? <none> ? ? ? ? ? ?app=nginx-pod,pod-template-hash=59c564ffb7
pc-deployment-59c564ffb7-sprp7 ? 1/1 ? ? Running ? 0 ? ? ? ?  89s ? 172.16.69.207 ? k8s-worker02 ? <none> ? ? ? ? ? <none> ? ? ? ? ? ?app=nginx-pod,pod-template-hash=59c564ffb7
?
# 為了方便后面的測試,修改下三臺nginx的index.html頁面(三臺修改的IP地址不一致)
[root@k8s-master01 ~]# kubectl exec -it pc-deployment-59c564ffb7-8vzp5 -n dev -- /bin/sh
root@pc-deployment-59c564ffb7-8vzp5:/# echo "172.16.79.83" > /usr/share/nginx/html/index.html
[root@k8s-master01 ~]# kubectl -n dev exec -it pc-deployment-59c564ffb7-fg2j8 -- /bin/bash
root@pc-deployment-59c564ffb7-fg2j8:/# echo "172.16.69.206" > /usr/share/nginx/html/index.html
[root@k8s-master01 ~]# kubectl -n dev exec -it pc-deployment-59c564ffb7-sprp7 -- /bin/bash
root@pc-deployment-59c564ffb7-sprp7:/# echo "172.16.69.207" > /usr/share/nginx/html/index.html
#修改完畢之后,訪問測試
[root@k8s-master01 ~]# curl 172.16.79.83
172.16.79.83
[root@k8s-master01 ~]# curl 172.16.69.206
172.16.69.206
[root@k8s-master01 ~]# curl 172.16.69.207
172.16.69.207
4.1 ClusterIP類型的Service
創建service-clusterip.yaml文件apiVersion: v1
kind: Service
metadata:name: service-clusteripnamespace: dev
spec:selector:app: nginx-podclusterIP: 10.10.97.97 # service的ip地址,如果不寫,默認會生成一個type: ClusterIPports:- port: 80 ?# Service端口 ? ? ? targetPort: 80 # pod端口# 創建service
[root@k8s-master01 ~]# kubectl create -f service-clusterip.yaml
service/service-clusterip created
?
# 查看service
[root@k8s-master01 ~]# kubectl get svc -n dev
[root@k8s-master01 ~]# kubectl -n dev get svc
NAME ? ? ? ? ? ? ?  TYPE ? ? ?  CLUSTER-IP ?  EXTERNAL-IP ? PORT(S) ?  AGE
service-clusterip ? ClusterIP ? 10.10.97.97 ? <none> ? ? ? ?8001/TCP ? 10s
?
# 查看service的詳細信息
# 在這里有一個Endpoints列表,里面就是當前service可以負載到的服務入口
[root@k8s-master01 ~]# kubectl describe service -n dev
Name: ? ? ? ? ? ?  service-clusterip
Namespace: ? ? ? ? dev
Labels: ? ? ? ? ?  <none>
Annotations: ? ? ? <none>
Selector: ? ? ? ? ?app=nginx-pod
Type: ? ? ? ? ? ?  ClusterIP
IP Family Policy:  SingleStack
IP Families: ? ? ? IPv4
IP: ? ? ? ? ? ? ? ?10.10.97.97
IPs: ? ? ? ? ? ? ? 10.10.97.97
Port: ? ? ? ? ? ?  <unset> ?8001/TCP
TargetPort: ? ? ? ?80/TCP
Endpoints: ? ? ? ? 172.16.69.206:80,172.16.69.207:80,172.16.79.83:80
Session Affinity:  None
Events: ? ? ? ? ?  <none>
?
# 查看ipvs的映射規則
[root@k8s-master01 ~]# ipvsadm -Ln
TCP ?10.97.97.97:80 rr-> 10.10.1.39:80 ? ? ? ? ? ? ? Masq ? ?1 ? ? ?0 ? ? ? ? ?0-> 10.10.1.40:80 ? ? ? ? ? ? ? Masq ? ?1 ? ? ?0 ? ? ? ? ?0-> 10.10.2.33:80 ? ? ? ? ? ? ? Masq ? ?1 ? ? ?0 ? ? ? ? ?0
?
# 訪問10.10.97.97:8001觀察效果
?
[root@k8s-master01 ~]# curl 10.10.97.97:8001
172.16.79.83
[root@k8s-master01 ~]# curl 10.10.97.97:8001
172.16.69.207
[root@k8s-master01 ~]# curl 10.10.97.97:8001
172.16.69.206
Endpoint解析
-
Endpoint是kubernetes中的一個資源對象,存儲在etcd中,用來記錄一個service對應的所有pod的訪問地址,它是根據service配置文件中selector描述產生的。
-
一個Service由一組Pod組成,這些Pod通過Endpoints暴露出來,Endpoints是實現實際服務的端點集合。換句話說,service和pod之間的聯系是通過endpoints實現的。
負載分發策略
對Service的訪問被分發到了后端的Pod上去,目前kubernetes提供了兩種負載分發策略:
-
如果不定義,默認使用kube-proxy的策略,比如隨機、輪詢
-
基于客戶端地址的會話保持模式,即來自同一個客戶端發起的所有請求都會轉發到固定的一個Pod上
# 查看ipvs的映射規則【rr 輪詢】
[root@k8s-master01 ~]# ipvsadm -Ln
TCP ?10.97.97.97:80 rr-> 10.10.1.39:80 ? ? ? ? ? ? ? Masq ? ?1 ? ? ?0 ? ? ? ? ?0-> 10.10.1.40:80 ? ? ? ? ? ? ? Masq ? ?1 ? ? ?0 ? ? ? ? ?0-> 10.10.2.33:80 ? ? ? ? ? ? ? Masq ? ?1 ? ? ?0 ? ? ? ? ?0
?
# 循環訪問測試
[root@k8s-master01 ~]# while true;do curl 10.97.97.97:80; sleep 5;  done;
10.10.1.40
10.10.1.39
10.10.2.33
10.10.1.40
10.10.1.39
10.10.2.33
?
# 修改分發策略----sessionAffinity:ClientIP
?
# 查看ipvs規則【persistent 代表持久】
[root@k8s-master01 ~]# ipvsadm -Ln
TCP ?10.97.97.97:80 rr persistent 10800-> 10.10.1.39:80 ? ? ? ? ? ? ? Masq ? ?1 ? ? ?0 ? ? ? ? ?0-> 10.10.1.40:80 ? ? ? ? ? ? ? Masq ? ?1 ? ? ?0 ? ? ? ? ?0-> 10.10.2.33:80 ? ? ? ? ? ? ? Masq ? ?1 ? ? ?0 ? ? ? ? ?0
?
# 循環訪問測試
[root@k8s-master01 ~]# while true;do curl 10.97.97.97; sleep 5; done;
10.10.2.33
10.10.2.33
10.10.2.33# 刪除service
[root@k8s-master01 ~]# kubectl delete -f service-clusterip.yaml
service "service-clusterip" deleted
[root@k8s-master01 ~]# kubectl delete service service-clusterip -n dev
service "service-clusterip" deleted
4.2 HeadLiness類型的Service
在某些場景中,開發人員可能不想使用Service提供的負載均衡功能,而希望自己來控制負載均衡策略,針對這種情況,kubernetes提供了HeadLiness Service,這類Service不會分配Cluster IP,如果想要訪問service,只能通過service的域名進行查詢。
創建service-headliness.yaml
apiVersion: v1
kind: Service
metadata:name: service-headlinessnamespace: dev
spec:selector:app: nginx-podclusterIP: None # 將clusterIP設置為None,即可創建headliness Servicetype: ClusterIPports:- port: 80 ? ?targetPort: 80
?# 創建service
[root@k8s-master01 ~]# kubectl apply -f deployment-nginx-headliness.yaml
service/service-headliness created
?
# 獲取service, 發現CLUSTER-IP未分配
[root@k8s-master01 ~]# kubectl -n dev get svc
NAME ? ? ? ? ? ? ? ? TYPE ? ? ? CLUSTER-IP ? EXTERNAL-IP ? PORT(S) ? AGE
service-headliness ? ClusterIP ? None ? ? ? ? <none> ? ? ? ?80/TCP ? 10s
?
# 查看service詳情
[root@k8s-master01 ~]# kubectl describe svc -n dev
Name: ? ? ? ? ? ? service-headliness
Namespace: ? ? ? ? dev
Labels: ? ? ? ? ? <none>
Annotations: ? ? ? <none>
Selector: ? ? ? ? ?app=nginx-pod
Type: ? ? ? ? ? ? ClusterIP
IP Family Policy: SingleStack
IP Families: ? ? ? IPv4
IP: ? ? ? ? ? ? ? None
IPs: ? ? ? ? ? ? ? None
Port: ? ? ? ? ? ? <unset> ?80/TCP
TargetPort: ? ? ? ?80/TCP
Endpoints: ? ? ? ? 172.16.69.206:80,172.16.69.207:80,172.16.79.83:80
Session Affinity: None
Events: ? ? ? ? ? <none>
?
?
# 查看域名的解析情況
[root@k8s-master01 ~]# kubectl -n dev exec -it pc-deployment-59c564ffb7-8vzp5 -- /bin/bash
[root@k8s-master01 ~]# kubectl -n dev exec -it pc-deployment-59c564ffb7-8vzp5 -- /bin/bash
root@pc-deployment-59c564ffb7-8vzp5:/#
root@pc-deployment-59c564ffb7-8vzp5:/# cat /etc/resolv.conf
search dev.svc.cluster.local svc.cluster.local cluster.local
nameserver 10.10.0.10
options ndots:5
?
[root@k8s-master01 ~]# dig @10.96.0.10 service-headliness.dev.svc.cluster.local
service-headliness.dev.svc.cluster.local. 30 IN A 172.16.79.83
service-headliness.dev.svc.cluster.local. 30 IN A 172.16.69.206
service-headliness.dev.svc.cluster.local. 30 IN A 172.16.69.207
?
#刪除service
[root@k8s-master01 ~]# kubectl delete -n dev svc service-headliness
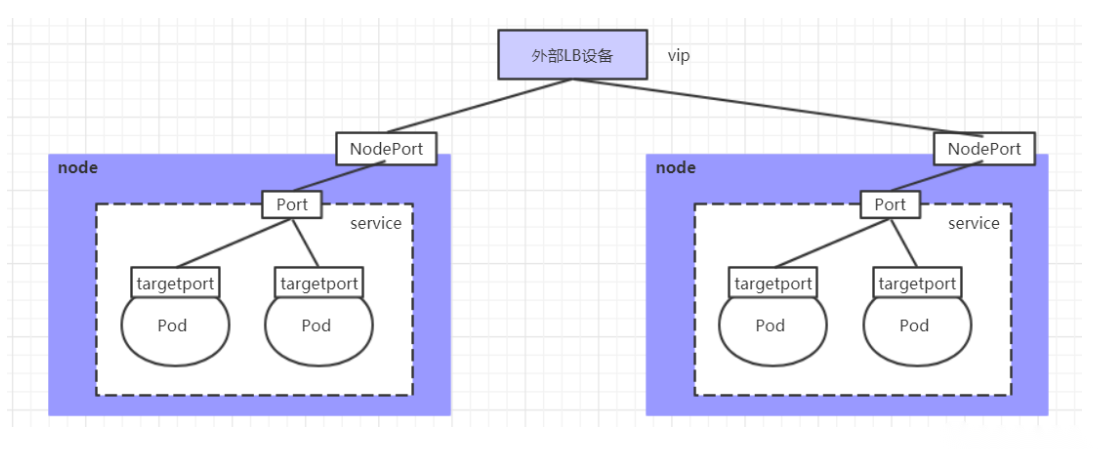
service "service-headliness" deleted4.3 NodePort類型的Service
在之前的樣例中,創建的Service的ip地址只有集群內部才可以訪問,如果希望將Service暴露給集群外部使用,那么就要使用到另外一種類型的Service,稱為NodePort類型。NodePort的工作原理其實就是將service的端口映射到Node的一個端口上,然后就可以通過NodeIp:NodePort來訪問service了。
創建service-nodeport.yaml
apiVersion: v1
kind: Service
metadata:name: service-nodeportnamespace: dev
spec:selector:app: nginx-podtype: NodePort # service類型ports:- port: 80nodePort: 30002 # 指定綁定的node的端口(默認的取值范圍是:30000-32767), 如果不指定,會默認分配targetPort: 80# 創建service
[root@k8s-master01 ~]# kubectl apply -f deployment-nginx-nodeport.yaml
service/service-nodeport created
?
?
# 查看service
[root@k8s-master01 ~]# kubectl -n dev get svc -o wide
NAME ? ? ? ? ? ? ? TYPE ? ? ? CLUSTER-IP ? ? EXTERNAL-IP ? PORT(S) ? ? ?  AGE ? SELECTOR
service-nodeport ? NodePort ? 10.10.25.194 ? <none> ? ? ? ?80:30002/TCP ? 29s ? app=nginx-pod
?
# 接下來可以通過電腦主機的瀏覽器去訪問集群中任意一個nodeip的30002端口,即可訪問到pod
#刪除service
[root@k8s-master01 ~]# kubectl delete -n dev svc service-nodeport
service "service-nodeport" deleted
4.4 LoadBalancer類型的Service
LoadBalancer和NodePort很相似,目的都是向外部暴露一個端口,區別在于LoadBalancer會在集群的外部再來做一個負載均衡設備,而這個設備需要外部環境支持的,外部服務發送到這個設備上的請求,會被設備負載之后轉發到集群中。
4.5 ExternalName類型的Service
ExternalName類型的Service用于引入集群外部的服務,它通過externalName屬性指定外部一個服務的地址,然后在集群內部訪問此service就可以訪問到外部的服務了。
創建service-externalname.yaml
apiVersion: v1
kind: Service
metadata:name: service-externalname
spec:type: ExternalName # service類型externalName: www.baidu.com ?# 創建service
[root@k8s-master01 ~]# kubectl apply -f deployment-nginx-externalname.yaml
service/service-externalname created
[root@k8s-master01 ~]# kubectl -n dev get svc -o wide
NAME ? ? ? ? ? ? ? ? ? TYPE ? ? ? ? ? CLUSTER-IP ? EXTERNAL-IP ? ? PORT(S) ? AGE ? SELECTOR
service-externalname ? ExternalName ? <none> ? ? ? www.baidu.com ? <none> ?  7s ?  <none>
[root@k8s-master01 ~]# kubectl describe -n dev svc
Name: ? ? ? ? ? ?  service-externalname
Namespace: ? ? ? ? dev
Labels: ? ? ? ? ?  <none>
Annotations: ? ? ? <none>
Selector: ? ? ? ?  <none>
Type: ? ? ? ? ? ?  ExternalName
IP Families: ? ? ? <none>
IP: ? ? ? ? ? ? ? ?
IPs: ? ? ? ? ? ? ? <none>
External Name: ? ? www.baidu.com
Session Affinity:  None
Events: ? ? ? ? ?  <none>
?
# 域名解析
[root@k8s-master01 ~]# dig @10.10.0.10 service-externalname.dev.svc.cluster.local
?
; <<>> DiG 9.11.4-P2-RedHat-9.11.4-26.P2.el7_9.15 <<>> @10.10.0.10 service-externalname.dev.svc.cluster.local
; (1 server found)
;; global options: +cmd
;; Got answer:
;; WARNING: .local is reserved for Multicast DNS
;; You are currently testing what happens when an mDNS query is leaked to DNS
;; ->>HEADER<<- opcode: QUERY, status: NOERROR, id: 33580
;; flags: qr aa rd; QUERY: 1, ANSWER: 4, AUTHORITY: 0, ADDITIONAL: 1
;; WARNING: recursion requested but not available
?
;; OPT PSEUDOSECTION:
; EDNS: version: 0, flags:; udp: 4096
;; QUESTION SECTION:
;service-externalname.dev.svc.cluster.local. IN A
?
;; ANSWER SECTION:
service-externalname.dev.svc.cluster.local. 5 IN CNAME www.baidu.com.
www.baidu.com.      5   IN  CNAME   www.a.shifen.com.
www.a.shifen.com.   5   IN  A   39.156.66.18
www.a.shifen.com.   5   IN  A   39.156.66.14
?
;; Query time: 127 msec
;; SERVER: 10.10.0.10#53(10.10.0.10)
;; WHEN: 四 1月 25 15:04:37 CST 2024
;; MSG SIZE  rcvd: 247


——線性表(順序存儲和鏈式存儲))
)

微服務篇-參考回答)


(日更))


)


