【HTML5】【AJAX的幾種封裝方法詳解】
AJAX (Asynchronous JavaScript and XML) 封裝是為了簡化重復的異步請求代碼,提高開發效率和代碼復用性。下面我將介紹幾種常見的 AJAX 封裝方式。
方法1. 基于原生 XMLHttpRequest 的封裝
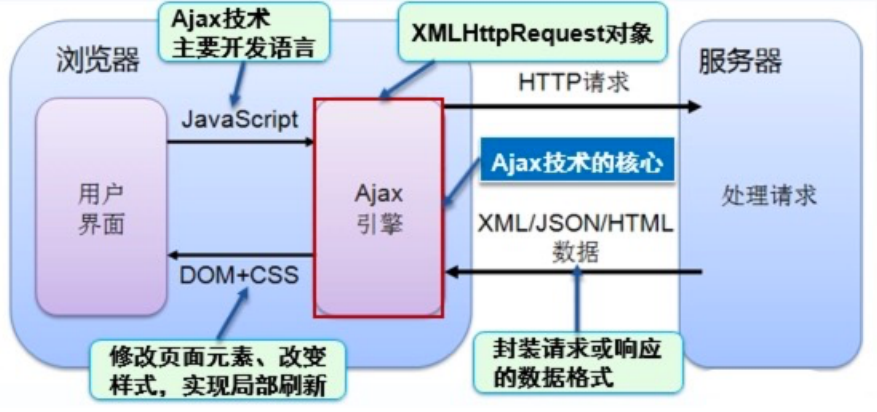
XMLHttpRequest。其主要特點如下:
- 實現動態不刷新,通過異步?式,提升?戶體驗,優化了瀏覽器和服務器之間的傳輸。
- 把?部分原本由服務器負擔的?作轉移到客戶端,利?客戶端閑置的資源進?處理,減輕服務器和帶寬的負擔,節約空間和成本。
- ?刷新更新??,?戶不?再像以前?樣在服務器處理數據時,只能在死板的?屏前焦急的等待。AJAX使?XMLHttpRequest對象發送請求并得到服務器響應,在不需要重新載?整個??的情況下,就可以通過DOM及時將更新的內容顯示在??上。
/*** 基于原生XHR的AJAX封裝* @param {Object} options 配置對象* @param {string} options.url 請求地址* @param {string} [options.method='GET'] 請求方法* @param {Object} [options.data=null] 請求數據* @param {Object} [options.headers={}] 請求頭* @param {function} [options.success] 成功回調* @param {function} [options.error] 失敗回調*/
function ajax(options) {const xhr = new XMLHttpRequest();const method = options.method || 'GET';let url = options.url;let data = options.data || null;// 處理GET請求的查詢參數if (method === 'GET' && data) {const params = new URLSearchParams();for (const key in data) {params.append(key, data[key]);}url += '?' + params.toString();data = null;}xhr.open(method, url, true);// 設置請求頭if (options.headers) {for (const key in options.headers) {xhr.setRequestHeader(key, options.headers[key]);}}xhr.onreadystatechange = function() {if (xhr.readyState === 4) {if (xhr.status >= 200 && xhr.status < 300) {let response = xhr.responseText;try {response = JSON.parse(response);} catch (e) {}options.success && options.success(response);} else {options.error && options.error(xhr.status, xhr.statusText);}}};xhr.onerror = function() {options.error && options.error(-1, 'Network Error');};// 發送請求if (data && typeof data === 'object') {xhr.setRequestHeader('Content-Type', 'application/json');xhr.send(JSON.stringify(data));} else {xhr.send(data);}
}// 使用示例
ajax({url: '/api/user',method: 'POST',data: { name: 'John', age: 30 },headers: {'Authorization': 'Bearer token123'},success: function(response) {console.log('Success:', response);},error: function(status, statusText) {console.error('Error:', status, statusText);}
});
方法2. 基于 Fetch API 的封裝
/*** 基于Fetch API的AJAX封裝* @param {string} url 請求地址* @param {Object} [options={}] 請求配置* @returns {Promise} 返回Promise對象*/
function fetchAjax(url, options = {}) {const defaultOptions = {method: 'GET',headers: {'Content-Type': 'application/json'},credentials: 'same-origin', // 攜帶cookie...options};// 處理GET請求的查詢參數if (defaultOptions.method === 'GET' && defaultOptions.body) {const params = new URLSearchParams();for (const key in defaultOptions.body) {params.append(key, defaultOptions.body[key]);}url += '?' + params.toString();delete defaultOptions.body;}// 處理非GET請求的body數據if (defaultOptions.body && typeof defaultOptions.body === 'object') {defaultOptions.body = JSON.stringify(defaultOptions.body);}return fetch(url, defaultOptions).then(async response => {const data = await response.json().catch(() => ({}));if (!response.ok) {const error = new Error(response.statusText);error.response = response;error.data = data;throw error;}return data;});
}// 使用示例
fetchAjax('/api/user', {method: 'POST',body: { name: 'John', age: 30 },headers: {'Authorization': 'Bearer token123'}
})
.then(data => console.log('Success:', data))
.catch(err => console.error('Error:', err));
方法 3. 基于 Axios 風格的封裝
class Ajax {constructor(baseURL = '', timeout = 10000) {this.baseURL = baseURL;this.timeout = timeout;this.interceptors = {request: [],response: []};}request(config) {// 處理請求攔截器let chain = [this._dispatchRequest, undefined];this.interceptors.request.forEach(interceptor => {chain.unshift(interceptor.fulfilled, interceptor.rejected);});this.interceptors.response.forEach(interceptor => {chain.push(interceptor.fulfilled, interceptor.rejected);});let promise = Promise.resolve(config);while (chain.length) {promise = promise.then(chain.shift(), chain.shift());}return promise;}_dispatchRequest(config) {return new Promise((resolve, reject) => {const xhr = new XMLHttpRequest();let url = config.baseURL ? config.baseURL + config.url : config.url;let data = config.data;// 處理GET請求參數if (config.method === 'GET' && data) {const params = new URLSearchParams();for (const key in data) {params.append(key, data[key]);}url += '?' + params.toString();data = null;}xhr.timeout = config.timeout || 10000;xhr.open(config.method, url, true);// 設置請求頭if (config.headers) {for (const key in config.headers) {xhr.setRequestHeader(key, config.headers[key]);}}xhr.onload = function() {if (xhr.status >= 200 && xhr.status < 300) {let response = xhr.responseText;try {response = JSON.parse(response);} catch (e) {}resolve({data: response,status: xhr.status,statusText: xhr.statusText,headers: xhr.getAllResponseHeaders()});} else {reject(new Error(`Request failed with status code ${xhr.status}`));}};xhr.onerror = function() {reject(new Error('Network Error'));};xhr.ontimeout = function() {reject(new Error('Timeout'));};// 發送請求if (data && typeof data === 'object') {xhr.setRequestHeader('Content-Type', 'application/json');xhr.send(JSON.stringify(data));} else {xhr.send(data);}});}get(url, config = {}) {return this.request({...config,method: 'GET',url});}post(url, data, config = {}) {return this.request({...config,method: 'POST',url,data});}// 添加攔截器useRequestInterceptor(fulfilled, rejected) {this.interceptors.request.push({ fulfilled, rejected });return this.interceptors.request.length - 1;}useResponseInterceptor(fulfilled, rejected) {this.interceptors.response.push({ fulfilled, rejected });return this.interceptors.response.length - 1;}// 移除攔截器ejectRequestInterceptor(id) {if (this.interceptors.request[id]) {this.interceptors.request.splice(id, 1);}}ejectResponseInterceptor(id) {if (this.interceptors.response[id]) {this.interceptors.response.splice(id, 1);}}
}// 使用示例
const api = new Ajax('https://api.example.com');// 添加請求攔截器
api.useRequestInterceptor(config => {config.headers = config.headers || {};config.headers['Authorization'] = 'Bearer token123';return config;
});// 添加響應攔截器
api.useResponseInterceptor(response => {console.log('Response:', response);return response.data;
}, error => {console.error('Error:', error);return Promise.reject(error);
});// 發起請求
api.get('/user/123').then(data => console.log('User data:', data)).catch(err => console.error('Error:', err));api.post('/user', { name: 'John', age: 30 }).then(data => console.log('Created user:', data)).catch(err => console.error('Error:', err));
4. 封裝要點總結
統一接口:提供一致的調用方式,如get(), post()等方法
參數處理:
GET請求自動拼接查詢參數
POST請求自動處理Content-Type
攔截器機制:支持請求/響應攔截
錯誤處理:統一錯誤處理邏輯
Promise支持:返回Promise便于鏈式調用
超時處理:設置合理的請求超時時間
擴展性:支持自定義配置和攔截器
5. 實際項目中的增強功能
1.自動重試機制:
function withRetry(fn, retries = 3, delay = 1000) {return function(...args) {return new Promise((resolve, reject) => {function attempt(retryCount) {fn(...args).then(resolve).catch(err => {if (retryCount < retries) {setTimeout(() => attempt(retryCount + 1), delay);} else {reject(err);}});}attempt(0);});};
}// 使用示例
const ajaxWithRetry = withRetry(ajax, 3, 1000);
2.請求取消功能:
function createCancelToken() {let cancel;const token = new Promise((resolve, reject) => {cancel = reject;});return { token, cancel };
}// 在請求中檢查取消token
function ajaxWithCancel(options) {const { token, cancel } = createCancelToken();const xhr = new XMLHttpRequest();const promise = new Promise((resolve, reject) => {// ...正常請求邏輯// 檢查取消token.catch(err => {xhr.abort();reject(err);});});return { promise, cancel };
}
3.請求緩存:
const cache = new Map();function cachedAjax(options) {const cacheKey = JSON.stringify(options);if (cache.has(cacheKey)) {return Promise.resolve(cache.get(cacheKey));}return ajax(options).then(response => {cache.set(cacheKey, response);return response;});
}
根據項目需求選擇合適的封裝方式,小型項目可使用簡單封裝,大型項目建議使用成熟的庫如Axios。
)

:Python復刻「崩壞星穹鐵道」嗷嗚嗷嗚事務所---源碼級解析該小游戲背后的算法與設計模式【純原創】)


)


)


