????????如果你用過 Spring Boot,一定對 “引入依賴就能用” 的體驗印象深刻 —— 加個spring-boot-starter-web就有了 Web 環境,這個是 SpringBoot 的自動裝配(Auto-Configuration)機制。
自動裝配的核心注解
????????自動裝配的邏輯看似復雜,其實核心流程只有 3 步:觸發自動裝配 → 加載配置類 → 條件篩選組件。
1. 第一步:觸發自動裝配 ——@SpringBootApplication 注解。
????????Spring Boot 應用的啟動類上,都會有一個@SpringBootApplication注解,比如:
@SpringBootApplication
public class SpringBootDemoApplication {public static void main(String[] args) {SpringApplication.run(SpringBootDemoApplication.class, args);}
}
????????這個注解是 “組合注解”,它的核心功能來自其中的 **@EnableAutoConfiguration**注解,觸發了自動裝配的整個流程。
@Target(ElementType.TYPE)
@Retention(RetentionPolicy.RUNTIME)
@Documented
@Inherited
// 1. 開啟自動配置(核心)
@EnableAutoConfiguration
// 2. 掃描當前包及子包的Bean(如@Controller、@Service)
@ComponentScan(excludeFilters = { ... })
// 3. 允許在啟動類上定義Bean(如@Bean)
@SpringBootConfiguration
public @interface SpringBootApplication {// 省略屬性...
}
其中,@EnableAutoConfiguration 是自動裝配的 “總開關”,它又依賴兩個關鍵機制:?
- @Import(AutoConfigurationImportSelector.class):導入一個 “配置選擇器”,負責加載自動配置類;?
- SpringFactoriesLoader:Spring 的一個工具類,負責從指定文件中加載配置類列表。
@Target({ElementType.TYPE})
@Retention(RetentionPolicy.RUNTIME)
@Documented
@Inherited
@AutoConfigurationPackage
@Import({AutoConfigurationImportSelector.class})
public @interface EnableAutoConfiguration {String ENABLED_OVERRIDE_PROPERTY = "spring.boot.enableautoconfiguration";Class<?>[] exclude() default {};String[] excludeName() default {};
}
2. 第二步:加載配置類 —— 從 META-INF/spring.factories 中加載配置
????????AutoConfigurationImportSelector的核心作用,是通過SpringFactoriesLoader,加載classpath 下所有 META-INF/spring.factories 文件中配置的 “自動配置類”。
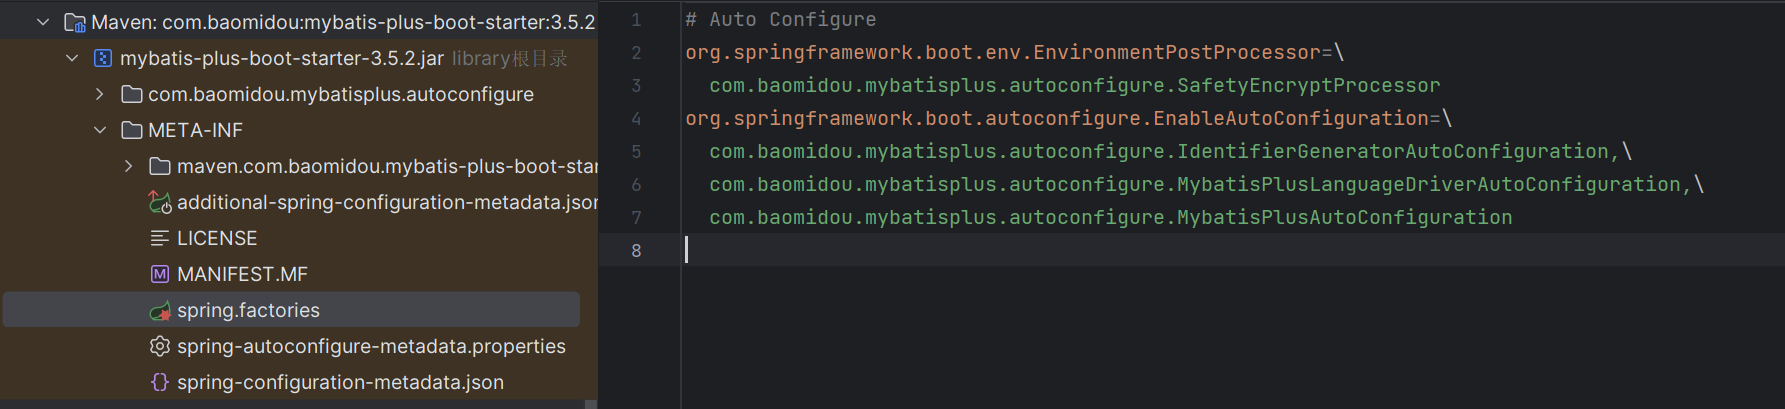
? ? ? ? (1)什么是 spring.factories??
????????這是一個鍵值對格式的配置文件,Spring Boot 的核心 starter(如mybatis-pus)中就自帶這個文件,路徑在:mybatis-plus-boot-starter\3.5.2\mybatis-plus-boot-starter-3.5.2.jar!\META-INF\spring.factories:
(2)AutoConfigurationImportSelector 的工作流程?
當應用啟動時,AutoConfigurationImportSelector會執行以下操作:?
? ? ? ? 1、調用selectImports()方法,觸發配置類加載;?
// 方法作用:選擇需要導入的自動配置類,返回類的全限定名數組
public String[] selectImports(AnnotationMetadata annotationMetadata) {// 第一步:判斷自動裝配是否啟用// isEnabled方法會檢查@EnableAutoConfiguration注解的啟用狀態if (!this.isEnabled(annotationMetadata)) {// 如果未啟用,返回空數組(NO_IMPORTS是Spring定義的空數組常量)return NO_IMPORTS;} else {// 第二步:獲取自動配置條目(核心邏輯)// 該方法會加載、篩選并確定最終需要生效的配置類AutoConfigurationEntry autoConfigurationEntry = this.getAutoConfigurationEntry(annotationMetadata);return StringUtils.toStringArray(autoConfigurationEntry.getConfigurations());}
}
? ? ? ? 2、調用getAutoConfigurationEntry()方法
protected AutoConfigurationEntry getAutoConfigurationEntry(AnnotationMetadata annotationMetadata) {if (!this.isEnabled(annotationMetadata)) {return EMPTY_ENTRY;} // 獲取 @EnableAutoConfiguration 注解的屬性(如 exclude、excludeName 等)AnnotationAttributes attributes = this.getAttributes(annotationMetadata);// 加載所有候選自動配置類(數據源:META-INF/spring.factories)// 調用我們之前解析過的 getCandidateConfigurations 方法,獲取原始候選配置類列表List<String> configurations = this.getCandidateConfigurations(annotationMetadata, attributes);configurations = this.removeDuplicates(configurations);
spring.autoconfigure.excludeSet<String> exclusions = this.getExclusions(annotationMetadata, attributes);this.checkExcludedClasses(configurations, exclusions);configurations.removeAll(exclusions);
@ConditionalOnClass、@ConditionalOnBean)configurations = this.getConfigurationClassFilter().filter(configurations);this.fireAutoConfigurationImportEvents(configurations, exclusions);return new AutoConfigurationEntry(configurations, exclusions);
}
? ? ? ? 3、調用getCandidateConfigurations()方法
protected List<String> getCandidateConfigurations(AnnotationMetadata metadata, AnnotationAttributes attributes) {// 第一個參數:指定加載的工廠類類型(這里是EnableAutoConfiguration.class)// 第二個參數:類加載器(用于讀取類路徑下的資源)List<String> configurations = SpringFactoriesLoader.loadFactoryNames(this.getSpringFactoriesLoaderFactoryClass(),  // 返回EnableAutoConfiguration.classthis.getBeanClassLoader()                    // 獲取當前的類加載器);// 如果為空,拋出異常提示(通常是因為找不到META-INF/spring.factories文件)Assert.notEmpty(configurations, "No auto configuration classes found in META-INF/spring.factories. " +"If you are using a custom packaging, make sure that file is correct.");return configurations;
}protected Class<?> getSpringFactoriesLoaderFactoryClass() {return EnableAutoConfiguration.class;
}
3. 第三步:條件篩選@Conditiona
加載到自動配置類后,Spring Boot 并不是無條件地啟用所有配置,而是通過條件注解進行篩選。
常用的條件注解有:
@ConditionalOnClass:當類路徑中存在指定類時生效@ConditionalOnMissingClass:當類路徑中不存在指定類時生效@ConditionalOnBean:當容器中存在指定 Bean 時生效@ConditionalOnMissingBean:當容器中不存在指定 Bean 時生效@ConditionalOnProperty:當指定的屬性有特定值時生效@ConditionalOnWebApplication:當應用是 Web 應用時生效
例如:
@Configuration
@ConditionalOnClass(RedisOperations.class)
@EnableConfigurationProperties(RedisProperties.class)
@Import({ LettuceConnectionConfiguration.class, JedisConnectionConfiguration.class })
public class RedisAutoConfiguration {// 配置內容...
}
自定義自動配置
1、定義我們需要裝配的類
結構:
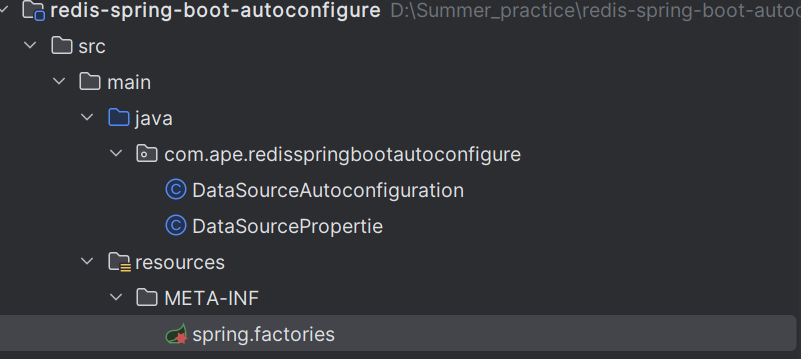
DataSourceAutoconfiguration類
@Configuration
@EnableConfigurationProperties(DataSourcePropertie.class) // 批量注入
public class DataSourceAutoconfiguration {@Bean()public DataSource dataSource(DataSourcePropertie dataSourcePropertie) {try {ComboPooledDataSource comboPooledDataSource = new ComboPooledDataSource();comboPooledDataSource.setJdbcUrl(dataSourcePropertie.getJdbcUrl());comboPooledDataSource.setDriverClass(dataSourcePropertie.getDriverName());comboPooledDataSource.setUser(dataSourcePropertie.getUsernames());comboPooledDataSource.setPassword(dataSourcePropertie.getPasswords());return comboPooledDataSource;} catch (PropertyVetoException e) {throw new RuntimeException(e);}}
}
DataSourcePropertie
@ConfigurationProperties(prefix = "datasouce")// 注入前綴為datasouce
public class DataSourcePropertie {private String jdbcUrl = "jdbc:mysql://localhost:3306/summer_practice";private String driverName = "com.mysql.cj.jdbc.Driver";private String usernames = "root1";private String passwords = "1234561";public String getJdbcUrl() {return jdbcUrl;}public void setJdbcUrl(String jdbcUrl) {this.jdbcUrl = jdbcUrl;}public String getDriverName() {return driverName;}public void setDriverName(String driverName) {this.driverName = driverName;}public String getUsernames() {return usernames;}public void setUsernames(String usernames) {this.usernames = usernames;}public String getPasswords() {return passwords;}public void setPasswords(String passwords) {this.passwords = passwords;}
}
spring.factories
org.springframework.boot.autoconfigure.EnableAutoConfiguration=\com.ape.redisspringbootautoconfigure.DataSourceAutoconfigurationpom.xml
</properties><dependencies><dependency><groupId>mysql</groupId><artifactId>mysql-connector-java</artifactId><version>8.0.30</version></dependency><!--c3p0--><dependency><groupId>c3p0</groupId><artifactId>c3p0</artifactId><version>0.9.1.2</version></dependency><dependency><groupId>org.springframework.boot</groupId><artifactId>spring-boot-starter-web</artifactId></dependency></dependencies>2、配置咋們的啟動類(我們只需要在pom.xml中導入需要裝配類的坐標)
結構:
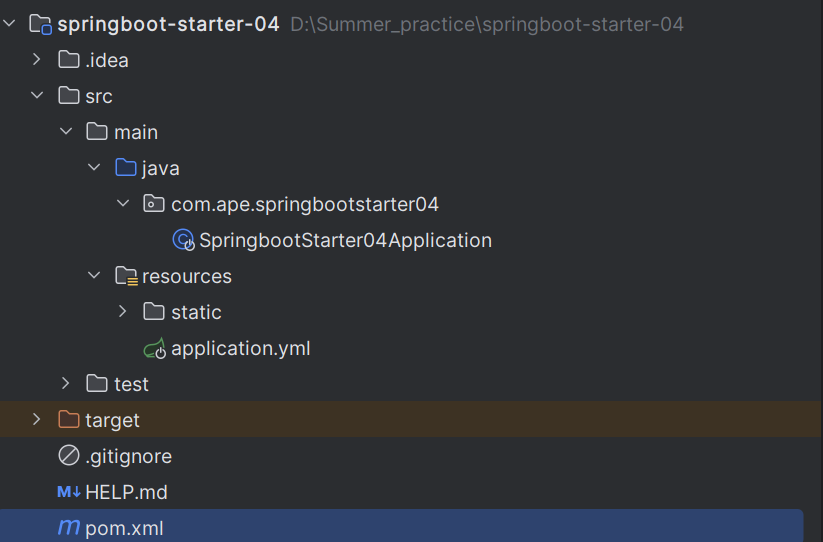
pom.xml
<dependency><groupId>com.ape</groupId><artifactId>redis-spring-boot-autoconfigure</artifactId><version>0.0.1-SNAPSHOT</version></dependency><dependency><groupId>org.springframework.boot</groupId><artifactId>spring-boot-starter-web</artifactId></dependency><dependency><groupId>org.springframework.boot</groupId><artifactId>spring-boot-starter-test</artifactId><scope>test</scope></dependency>
3、在啟動類中就可以拿到我們自定義的配置類
@SpringBootApplication
public class SpringbootStarter04Application {public static void main(String[] args) {ConfigurableApplicationContext context = SpringApplication.run(SpringbootStarter04Application.class, args);DataSource bean = context.getBean(DataSource.class);System.out.println(bean);}}
4、配置文件(可選)
? ? ? ? 由于我們在需要裝配的類中添@EnableConfigurationProperties(DataSourcePropertie.class)該注解,所以我們可以在啟動類中配置yml文件來替換需要裝配的類的數據,從而實現動態的改變其中的數據。
yml
datasouce:usernames: rootpasswords: 123456總結
????????Spring Boot 的自動裝配機制通過@EnableAutoConfiguration注解、SpringFactoriesLoader加載機制以及條件注解,實現了基于約定的自動配置,極大地簡化了 Spring 應用的開發。允許我們通過自定義配置來覆蓋默認行為,可以實現個性化定制。


- 基本類型 PART2)

)
:分部積分法)


)


![[每周一更]-(第157期):深入理解Go語言的垃圾回收機制:調優與監控](http://pic.xiahunao.cn/[每周一更]-(第157期):深入理解Go語言的垃圾回收機制:調優與監控)
)