一、k8s的部署
1.1.集群環境初始化
1.1.1.所有主機禁用swap
[root@k8s- ~]# systemctl mask dev-nvme0n1p3.swap
[root@k8s- ~]# swapoff -a
[root@k8s- ~]# systemctl status dev-nvme0n1p3.swap
[root@k8s- ~]# vim /etc/fstab 內容:
注釋swap
1.1.2.安裝k8s部署工具
[root@k8s-master ~]# dnf install kubelet-1.30.0 kubeadm-1.30.0 kubectl-1.30.0 -y#設置kubectl命令自動補全功能
[root@k8s-master ~]# dnf install bash-completion -y
[root@k8s-master ~]# echo "source <(kubectl completion bash)" >> ~/.bashrc
[root@k8s-master ~]# source  ~/.bashrc
1.1.2.所有節點安裝cri-docker
[root@k8s-master ~]# dnf install libcgroup-0.41-19.el8.x86_64.rpm \
> cri-dockerd-0.3.14-3.el8.x86_64.rpm -y[root@k8s-master ~]# vim /lib/systemd/system/cri-docker.service編輯內容:#指定網絡插件名稱及基礎容器鏡像
ExecStart=/usr/bin/cri-dockerd --container-runtime-endpoint fd:// --network-plugin=cni --pod-infra-container-image=reg.timinglee.org/k8s/pause:3.9[root@k8s-master ~]# systemctl daemon-reload
[root@k8s-master ~]# systemctl start cri-docker
[root@k8s-master ~]# ll /var/run/cri-dockerd.sock
將該配置文件拷貝給其他兩臺主機:
[root@k8s-master ~]# scp /lib/systemd/system/cri-docker.service root:/172.25.254.10:/lib/systemd/system/cri-docker.service
[root@k8s-master ~]# scp /lib/systemd/system/cri-docker.service root:/172.25.254.20:/lib/systemd/system/cri-docker.service
1.1.3.在master節點拉取K8S所需鏡像
#拉取k8s集群所需要的鏡像
[root@k8s-master ~]# kubeadm config images pull --image-repository registry.aliyuncs.com/google_containers --kubernetes-version v1.30.0 --cri-socket=unix:///var/run/cri-dockerd.sock?#上傳鏡像到harbor倉庫
[root@k8s-master ~]# docker images | awk '/google/{ print $1":"$2}' \| awk -F "/" '{system("docker tag "$0" reg.gaoyingjie.org/k8s/"$3)}'?[root@k8s-master ~]# docker images | awk '/k8s/{system("docker push "$1":"$2)}' 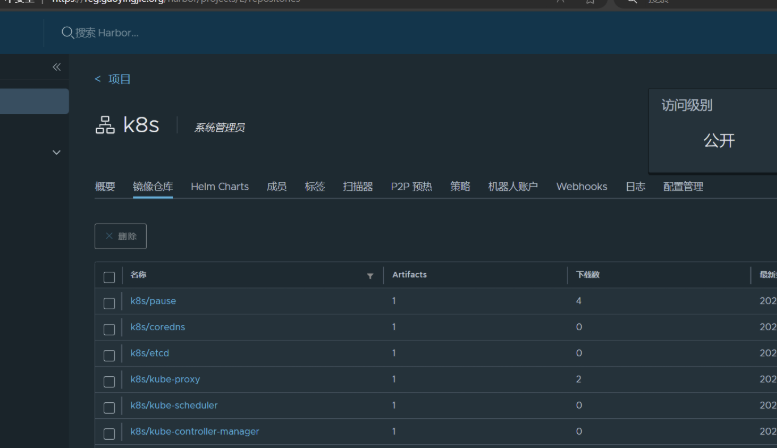
1.1.4.集群初始化
[root@k8s-master ~]# systemctl enable --now  kubelet.service
[root@k8s-master ~]# systemctl status kubelet.service#執行初始化命令
[root@k8s-master ~]# kubeadm init --pod-network-cidr=10.244.0.0/16 \
--image-repository reg.gaoyingjie.org/k8s \
--kubernetes-version v1.30.0 \
--cri-socket=unix:///var/run/cri-dockerd.sock#指定集群配置文件變量[root@k8s-master ~]# echo "export KUBECONFIG=/etc/kubernetes/admin.conf" >> ~/.bash_profile?
#當前節點沒有就緒,因為還沒有安裝網絡插件,容器沒有運行
[root@k8s-master ~]# kubectl get node[root@k8s-master ~]# kubectl get pod -A
1.1.5.其他兩臺主機加入集群
[root@k8s-master ~]# kubeadm token create --print-join-command kubeadm join 172.25.254.100:6443 --token 5hwptm.zwn7epa6pvatbpwf --discovery-token-ca-cert-hash [root@k8s-node1 ~]# kubeadm reset --cri-socket=unix:///var/run/cri-dockerd.sock
[root@k8s-node1 ~]# kubeadm join 172.25.254.100:6443 --token baujlw.w4xhwevafprh8uk9 --discovery-token-ca-cert-hash sha256:f05eb014ffdee15265806a1bc7a54270d8b28cccf90b88cb2b2910fe3aaab05f --cri-socket=unix:///var/run/cri-dockerd.sock[root@k8s-node2 ~]# kubeadm reset --cri-socket=unix:///var/run/cri-dockerd.sock
[root@k8s-node2 ~]# kubeadm join 172.25.254.100:6443 --token baujlw.w4xhwevafprh8uk9 --discovery-token-ca-cert-hash sha256:f05eb014ffdee15265806a1bc7a54270d8b28cccf90b88cb2b2910fe3aaab05f --cri-socket=unix:///var/run/cri-dockerd.sock1.1.6.安裝flannel網絡插件
#注意關閉防火墻,并且seinux的狀態都是disabled#現在鏡像:
[root@k8s-master ~]# docker pull docker.io/flannel/flannel:v0.25.5
[root@k8s-master ~]# docker pull docker.io/flannel/flannel-cni-plugin:v1.5.1-flannel1?#上傳鏡像到倉庫[root@k8s-master ~]# docker tag flannel/flannel:v0.25.5 reg.gaoyingjie.org/flannel/flannel:v0.25.5
[root@k8s-master ~]# docker push reg.gaoyingjie.org/flannel/flannel:v0.25.5?#編輯kube-flannel.yml 修改鏡像下載位置
[root@k8s-master ~]# vim kube-flannel.yml#需要修改以下幾行
[root@k8s-master ~]# grep -n image kube-flannel.yml
146:        image: reg.timinglee.org/flannel/flannel:v0.25.5
173:        image: reg.timinglee.org/flannel/flannel-cni-plugin:v1.5.1-flannel1
184:        image: reg.timinglee.org/flannel/flannel:v0.25.5#安裝flannel網絡插件
[root@k8s-master ~]# kubectl apply -f kube-flannel.yml
1.1.7.查看所有node的狀態
都是ready說明k8s集群已經完成。
[root@k8s-master ~]# kubectl get nodes
NAME                       STATUS   ROLES           AGE   VERSION
k8s-master.timinglee.org   Ready    control-plane   98m   v1.30.0
k8s-node1.timinglee.org    Ready    <none>          21m   v1.30.0
k8s-node2.timinglee.org    Ready    <none>          21m   v1.30.0
三、pod的管理和優化
3、pod的生命周期
(1)、INIT容器
init容器可以獨立于Pod應用容器運行,init容器必須在應用容器啟動前完成,它可以檢測某個自定義任務是否完成,若沒有完成,則會一直檢測直到完成為止,若該任務完成后,init容器則會啟動,當init容器啟動后應用容器才會并行啟動。也就是說,因此 Init 容器提供了一種機制來阻塞或延遲應用容器的啟動,直到滿足了一組先決條件。一旦前置條件滿足,Pod內的所有的應用容器會并行啟動
[root@k8s-master ~]# vim pod.yml
[root@k8s-master ~]# kubectl apply -f pod.yml
pod/initpod created
[root@k8s-master ~]# kubectl get pods
NAME      READY   STATUS     RESTARTS      AGE
initpod   0/1     Init:0/1   0             43s     #可以看到status沒有running
nginx1    1/1     Running    1 (40h ago)   2d
[root@k8s-master ~]# kubectl logs pod/initpod init-myservice
wating for myservice
wating for myservice
wating for myservice
wating for myservice
wating for myservice
wating for myservice
wating for myservice
wating for myservice
[root@k8s-master ~]# kubectl exec -it pods/initpod -c init-myservice -- /bin/sh
/ #
/ # touch testdfile
/ # ls
bin        etc        lib        proc       sys        tmp        var
dev        home       lib64      root       testdfile  usr
/ # exit
[root@k8s-master ~]# kubectl get pods
NAME      READY   STATUS     RESTARTS      AGE
initpod   0/1     Init:0/1   0             2m47s     #建立文件后init容器已經running
nginx1    1/1     Running    1 (40h ago)   2d
2、探針
(1)、存活探針
配置文件內容:
apiVersion: v1
kind: Pod
metadata:labels:name: initpodname: initpod
spec:containers:- image: myapp:v1name: myapplivenessProbe:tcpSocket:                ##檢測端口存在性port: 8080initalDelaySeconds: 3        #容器啟動后要等待多少秒后就探針開始工作,默認是 0periodSeconds: 1             #執行探測的時間間隔,默認為 10s 如果監測成功,每1s檢測一次timeoutSeconds: 1            #探針執行檢測請求后,如果檢測失敗,等待響應的超時時間,默認為1s
四、k8s的控制器
1、replicaset
-
ReplicaSet 確保任何時間都有指定數量的 Pod 副本在運行
-
雖然 ReplicaSets 可以獨立使用,但今天它主要被Deployments 用作協調 Pod 創建、刪除和更新的機制
#生成yml文件
[root@k8s-master ~]# kubectl create deployment replicaset --image myapp:v1 --dry-run=client -o yaml > replicaset.yml?
apiVersion: apps/v1
kind: ReplicaSet
metadata:name: replicaset #指定pod名稱,一定小寫,如果出現大寫報錯
spec:replicas: 2 #指定維護pod數量為2selector: #指定檢測匹配方式matchLabels: #指定匹配方式為匹配標簽app: myapp #指定匹配的標簽為app=myapptemplate: #模板,當副本數量不足時,會根據下面的模板創建pod副本metadata:labels:app: myappspec:containers:- image: myapp:v1name: myapp2、deployment控制器
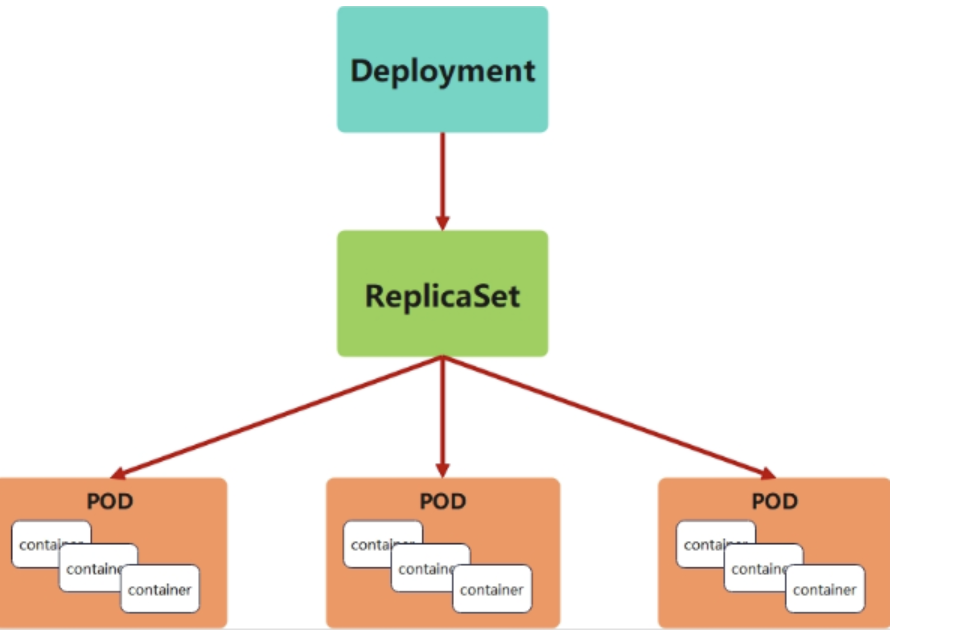
-
Deployment控制器并不直接管理pod,而是通過管理ReplicaSet來間接管理Pod
-
Deployment管理ReplicaSet,ReplicaSet管理Pod
-
主要用來:創建Pod和ReplicaSet、滾動更新和回滾、擴容和縮容、暫停與恢復
#生成yaml文件
[root@k8s-master ~]# kubectl create deployment deployment --image myapp:v1  --dry-run=client -o yaml > deployment.yml
apiVersion: apps/v1
kind: Deployment
metadata:name: deployment
spec:replicas: 4selector:matchLabels:app: myapptemplate:metadata:labels:app: myappspec:containers:- image: myapp:v1name: myapp更新鏡像和修改資源沒有觸發更新
#恢復后開始觸發更新
[root@k8s2 pod]# kubectl rollout resume deployment deployment-example[root@k8s2 pod]# kubectl rollout history  deployment deployment-example
deployment.apps/deployment-example
REVISION  CHANGE-CAUSE
3         <none>
4         <none>
5         <none>
3、daemonset控制器
DaemonSet 確保全部(或者某些)節點上運行一個 Pod 的副本。當有節點加入集群時, 也會為他們新增一個 Pod ,當有節點從集群移除時,這些 Pod 也會被回收。刪除 DaemonSet 將會刪除它創建的所有 Pod
DaemonSet 的典型用法:
在每個節點上運行集群存儲 DaemonSet,例如 glusterd、ceph。
在每個節點上運行日志收集 DaemonSet,例如 fluentd、logstash。
在每個節點上運行監控 DaemonSet,例如 Prometheus Node Exporter、zabbix agent等
一個簡單的用法是在所有的節點上都啟動一個 DaemonSet,將被作為每種類型的 daemon 使用
一個稍微復雜的用法是單獨對每種 daemon 類型使用多個 DaemonSet,但具有不同的標志, 并且對不同硬件類型具有不同的內存、CPU 要求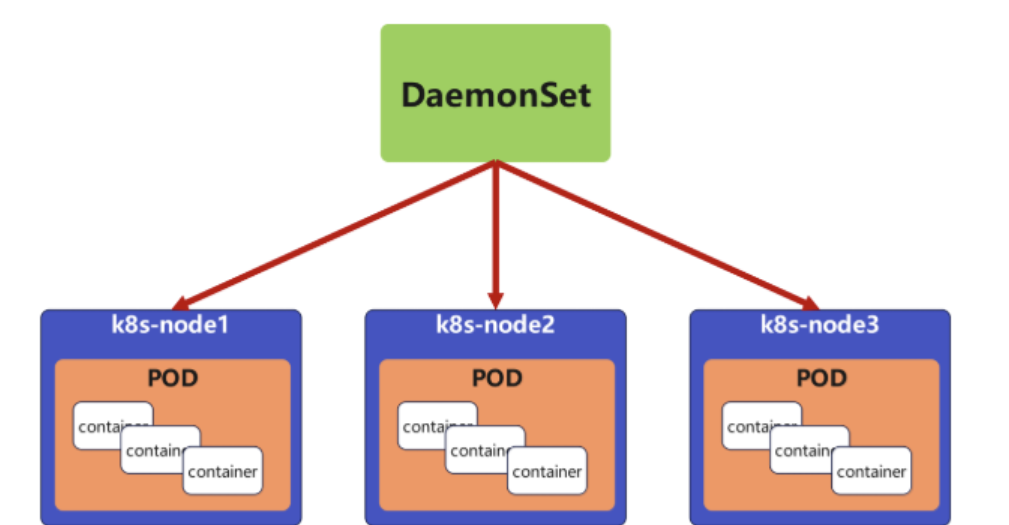
[root@k8s2 pod]# cat daemonset-example.yml
apiVersion: apps/v1
kind: DaemonSet
metadata:name: daemonset-example
spec:selector:matchLabels:app: nginxtemplate:metadata:labels:app: nginxspec:tolerations:		#對于污點節點的容忍- effect: NoScheduleoperator: Existscontainers:- name: nginximage: nginx[root@k8s-master ~]# kubectl get pods  -o wide
NAME              READY   STATUS    RESTARTS   AGE   IP            NODE         NOMINATED NODE   READINESS GATES
daemonset-87h6s   1/1     Running   0          47s   10.244.0.8    k8s-master   <none>           <none>
daemonset-n4vs4   1/1     Running   0          47s   10.244.2.38   k8s-node2    <none>           <none>
daemonset-vhxmq   1/1     Running   0          47s   10.244.1.40   k8s-node1    <none>           <none>
4、job控制器
Job,主要用于負責批量處理(一次要處理指定數量任務)短暫的一次性(每個任務僅運行一次就結束)任務。
Job特點如下:
-
當Job創建的pod執行成功結束時,Job將記錄成功結束的pod數量
-
當成功結束的pod達到指定的數量時,Job將完成執行
前提:上傳perl鏡像到harbor:用來計算。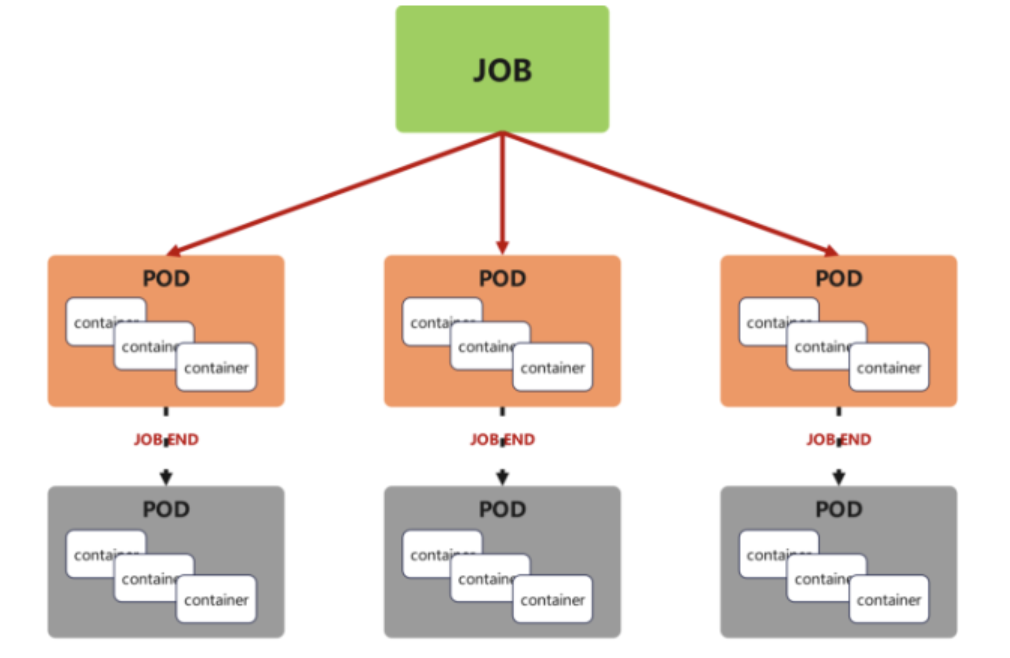
[root@k8s-master ~]# kubectl create job testjob --image perl:5.34.0 --dry-run=client -o yaml > job.yml
配置文件內容
apiVersion: batch/v1
kind: Job
metadata:creationTimestamp: nullname: testjob
spec:completions: 6        #一共完成任務數為6parallelism: 2        #每次并行完成2個backoffLimit: 4        #運行失敗后嘗試4重新運行template:spec:containers:- image: perl:5.34.0name: testjobcommand: ["perl",  "-Mbignum=bpi", "-wle", "print bpi(2000)"]restartPolicy: Never        #關閉后不自動重啟
5、cronjob控制器
-
Cron Job 創建基于時間調度的 Jobs。
-
CronJob控制器以Job控制器資源為其管控對象,并借助它管理pod資源對象。
-
CronJob可以以類似于Linux操作系統的周期性任務作業計劃的方式控制其運行時間點及重復運行的方式。
-
CronJob可以在特定的時間點(反復的)去運行job任務。
生成cronjob的yml文件
[root@k8s-master ~]# kubectl create cronjob testcronjob --image busyboxplus:latest --schedule="* * * * *" --restart Never --dry-run=client -o yaml > cronjob.yml
apiVersion: batch/v1 kind: CronJob metadata:creationTimestamp: nullname: testcronjob spec:schedule: '* * * * *'jobTemplate:spec:template:spec:containers:- image: busyboxplus:latestname: testcronjobcommand: ["/bin/sh","-c","date;echo Hello from the Kubernetes cluster"]restartPolicy: Never五、k8s的微服務
-
Service是一組提供相同服務的Pod對外開放的接口。
-
借助Service,應用可以實現服務發現和負載均衡。
-
service默認只支持4層負載均衡能力,沒有7層功能。(可以通過Ingress實現)
-
5.1、ipvs模式?
-
Service 是由 kube-proxy 組件,加上 iptables 來共同實現的
kube-proxy 通過 iptables 處理 Service 的過程,需要在宿主機上設置相當多的 iptables 規則,如果宿主機有大量的Pod,不斷刷新iptables規則,會消耗大量的CPU資源
IPVS模式的service,可以使K8s集群支持更多量級的Pod
簡而言之:微服務默認使用iptables調度,意味著增減pod時,策略都需要刷新,大量消耗資源,所以使用ipvs模式。
(1)、安裝ipvsadm
[root@k8s-所有節點 ]yum install ipvsadm –y(2)、修改master節點的代理配置
[root@k8s-master ~]# kubectl -n kube-system edit cm kube-proxymetricsBindAddress: ""mode: "ipvs" #設置kube-proxy使用ipvs模式nftables:?(3)、重啟pod
在pod運行時配置文件中采用默認配置,當改變配置文件后已經運行的pod狀態不會變化,所以要重啟pod。
[root@k8s-master ~]# kubectl -n kube-system get  pods   | awk '/kube-proxy/{system("kubectl -n kube-system delete pods "$1)}'[root@k8s-master ~]# ipvsadm -Ln
[root@k8s-master services]# kubectl get svc gaoyingjie
NAME         TYPE        CLUSTER-IP      EXTERNAL-IP   PORT(S)   AGE
gaoyingjie   ClusterIP   10.108.100.16   <none>        80/TCP    43m
5.2、建立微服務
(1)、ClusterIP
-
clusterip模式只能在集群內訪問,并對集群內的pod提供健康檢測和自動發現功能
根據標簽將pod的ip加入Endpoints中,通過services的ip在集群內部訪問,若標簽不一致,則該pod會被驅逐出Endpoints。
也就是所有pod的IP直接解析到services的虛擬ip上,services的ip是由ipvs模式下kube-proxy生成的kube-ipvs0網卡分配的。#clusterip類型 [root@k8s-master services]# kubectl create deployment gaoyingjie --image myapp:v1 --replicas 2 --dry-run=client -o yaml > services.yaml [root@k8s-master services]# kubectl expose deployment timinglee --port 80 --target-port 80 --dry-run=client -o yaml >> services.yaml[root@k8s-master services]# vim services.yaml apiVersion: apps/v1 kind: Deployment metadata:labels:app: gaoyingjiename: gaoyingjie spec:replicas: 2selector:matchLabels:app: gaoyingjietemplate:metadata:labels:app: gaoyingjiespec:containers:- image: myapp:v1name: myapp---apiVersion: v1 kind: Service metadata:labels:app: gaoyingjiename: gaoyingjie spec:ports:- port: 80protocol: TCPtargetPort: 80selector:app: gaoyingjie #標簽type:ClusterIP[root@k8s-master services]# kubectl apply -f services.yaml deployment.apps/gaoyingjie created service/gaoyingjie created[root@k8s-master services]# kubectl get svc NAME TYPE CLUSTER-IP EXTERNAL-IP PORT(S) AGE gaoyingjie ClusterIP 10.108.100.16 <none> 80/TCP 9s kubernetes ClusterIP 10.96.0.1 <none> 443/TCP 59d nginx-svc ClusterIP None <none> 80/TCP 3d18h[root@k8s-master services]# kubectl get pods --show-labels NAME READY STATUS RESTARTS AGE LABELS gaoyingjie-74f5f4bf55-56t47 1/1 Running 0 53m app=gaoyingjie,pod-template-hash=74f5f4bf55 gaoyingjie-74f5f4bf55-vrh5w 1/1 Running 0 53m app=gaoyingjie,pod-template-hash=74f5f4bf55自動發現是指當有新的pod創建時,會自動識別pod的標簽,若符合標簽就將該pod的ip加入到endpoints中,進行ipvs調度,示例如下:
#新建pod名為testpod
[root@k8s-master services]# kubectl run testpod --image myapp:v1
pod/testpod created#查看新pod的ip 是10.244.36.121
[root@k8s-master services]# kubectl get pods -o wide
NAME                          READY   STATUS    RESTARTS   AGE    IP               NODE        NOMINATED NODE   READINESS GATES
gaoyingjie-74f5f4bf55-56t47   1/1     Running   0          64m    10.244.36.120    k8s-node1   <none>           <none>
gaoyingjie-74f5f4bf55-vrh5w   1/1     Running   0          64m    10.244.169.150   k8s-node2   <none>           <none>
testpod                       1/1     Running   0          105s   10.244.36.121    k8s-node1   <none>           <none>#查看pod的標簽,此時testpod的標簽與其他兩個不一樣
[root@k8s-master services]# kubectl get pods --show-labels
NAME                          READY   STATUS    RESTARTS   AGE   LABELS
gaoyingjie-74f5f4bf55-56t47   1/1     Running   0          63m   app=gaoyingjie,pod-template-hash=74f5f4bf55
gaoyingjie-74f5f4bf55-vrh5w   1/1     Running   0          63m   app=gaoyingjie,pod-template-hash=74f5f4bf55
testpod                       1/1     Running   0          21s   run=testpod#更改testpod標簽
[root@k8s-master services]# kubectl label pod testpod app=gaoyingjie --overwrite
pod/testpod labeled#查看testpod的標簽
[root@k8s-master services]# kubectl get pods --show-labels
NAME                          READY   STATUS    RESTARTS   AGE   LABELS
gaoyingjie-74f5f4bf55-56t47   1/1     Running   0          64m   app=gaoyingjie,pod-template-hash=74f5f4bf55
gaoyingjie-74f5f4bf55-vrh5w   1/1     Running   0          64m   app=gaoyingjie,pod-template-hash=74f5f4bf55
testpod                       1/1     Running   0          79s   app=gaoyingjie,run=testpod#查看services的endpoints,可以看到testpod的ip:10.244.121已經加入endpoints
[root@k8s-master services]# kubectl describe svc gaoyingjie
Name:              gaoyingjie
Namespace:         default
Labels:            app=gaoyingjie
Annotations:       <none>
Selector:          app=gaoyingjie
Type:              ClusterIP
IP Family Policy:  SingleStack
IP Families:       IPv4
IP:                10.108.100.16
IPs:               10.108.100.16
Port:              <unset>  80/TCP
TargetPort:        80/TCP
Endpoints:         10.244.169.150:80,10.244.36.120:80,10.244.36.121:80
Session Affinity:  None
Events:            <none>
services使用集群自帶?DNS解析,因為當services重新啟動時候ip會改變,所以集群內部的溝通都是通過域名進行的,如下:
#查看dns
[root@k8s-master services]# kubectl -n kube-system get svc
NAME           TYPE        CLUSTER-IP     EXTERNAL-IP   PORT(S)                  AGE
calico-typha   ClusterIP   10.98.254.47   <none>        5473/TCP                 52d
kube-dns       ClusterIP   10.96.0.10     <none>        53/UDP,53/TCP,9153/TCP   59d#service創建后集群DNS提供解析
[root@k8s-master services]# dig gaoyingjie.default.svc.cluster.local @10.96.0.10
......
;; ANSWER SECTION:                                                #解析到clusterip上
gaoyingjie.default.svc.cluster.local. 30 IN A	10.108.100.16     #將10.108.100.16 解析為gaoyingjie.default.svc.cluster.local.
......#進入集群內部
[root@k8s-master services]# kubectl run busybox --image busyboxplus:latest
[root@k8s-master services]# kubectl exec -it pods/busybox -- /bin/sh
/ # curl gaoyingjie.default.svc.cluster.local.
Hello MyApp | Version: v1 | <a href="hostname.html">Pod Name</a>
/ # nslookup gaoyingjie.default.svc.cluster.local.
Server:    10.96.0.10
Address 1: 10.96.0.10 kube-dns.kube-system.svc.cluster.local
Name:      gaoyingjie
Address 1: 10.108.100.16  gaoyingjie.default.svc.cluster.local  #也可以看到DNS解析到clusterip上#可以看到用域名gaoyingjie.default.svc.cluster.local.進行訪問
ClusterIP 的特殊模式-headless
原有模式是當進行交流時,DNS通過services名稱先解析到services的cluster IP,然后services用ipvs對所代理的pod進行路由與負載均衡。headless無頭服務,kube-proxy并不會給services分配 Cluster IP(services的ip), 而且平臺也不會為它們進行負載均衡和路由,集群訪問通過dns解析直接指向到業務pod上的IP,所有的調度有dns單獨完成。相當于把后端pod的ip直接暴露出來。
如果后端的pod重建后名稱和ip發生變化后,DNS如何解析到每個pod的ip上?請看后續statefulset控制器。
[root@k8s-master services]# vim headless.yml
[root@k8s-master services]# kubectl apply -f headless.yml #可以看到clusterips是none
[root@k8s-master services]# kubectl get svc -o wide
NAME         TYPE        CLUSTER-IP   EXTERNAL-IP   PORT(S)   AGE     SELECTOR
gaoyingjie   ClusterIP   None         <none>        80/TCP    20s     app=gaoyingjie
kubernetes   ClusterIP   10.96.0.1    <none>        443/TCP   59d     <none>[root@k8s-master services]# kubectl describe svc gaoyingjie
Name:              gaoyingjie
Namespace:         default
Labels:            app=gaoyingjie
Annotations:       <none>
Selector:          app=gaoyingjie
Type:              ClusterIP
IP Family Policy:  SingleStack
IP Families:       IPv4
IP:                None                            #clusterips是<none>
IPs:               None
Port:              <unset>  80/TCP
TargetPort:        80/TCP
Endpoints:         10.244.169.153:80,10.244.36.122:80
Session Affinity:  None
Events:            <none>#查看pod的ip
[root@k8s-master services]# kubectl get pods -o wide
NAME                          READY   STATUS    RESTARTS   AGE    IP               NODE        NOMINATED NODE   READINESS GATES
busybox                       1/1     Running   0          141m   10.244.169.152   k8s-node2   <none>           <none>
gaoyingjie-74f5f4bf55-g2nb2   1/1     Running   0          7s     10.244.36.122    k8s-node1   <none>           <none>
gaoyingjie-74f5f4bf55-hlqxv   1/1     Running   0          7s     10.244.169.153   k8s-node2   <none>           <none>#查看
[root@k8s-master services]# dig  gaoyingjie.default.svc.cluster.local @10.96.0.10
......
;; ANSWER SECTION:
gaoyingjie.default.svc.cluster.local. 30 IN A	10.244.169.153    #直接解析到pod上
gaoyingjie.default.svc.cluster.local. 30 IN A	10.244.36.122
......#開啟容器進入集群內部,查看services,也可以看到直接解析到pod的ip上
/ # nslookup gaoyingjie
Server:    10.96.0.10
Address 1: 10.96.0.10 kube-dns.kube-system.svc.cluster.local
Name:      gaoyingjie
Address 1: 10.244.36.122 10-244-36-122.gaoyingjie.default.svc.cluster.local    #解析到pod的ip上
Address 2: 10.244.169.153 10-244-169-153.gaoyingjie.default.svc.cluster.local
(2)、NodePoints
通過ipvs暴漏端口從而使外部主機通過master節點的對外ip:<port>來訪問pod業務,也就是說,將services的clusterip暴露出一個端口供其他主機使用。
- ?
#nodeport類型
[root@k8s-master services]# vim nodeport.yml
[root@k8s-master services]# kubectl apply -f nodeport.yml #可以看出暴露出的端口是31998
[root@k8s-master services]# kubectl get svc -o wide
NAME         TYPE        CLUSTER-IP      EXTERNAL-IP   PORT(S)        AGE   SELECTOR
gaoyingjie   NodePort    10.111.32.111   <none>        80:31998/TCP   24s   app=gaoyingjie
kubernetes   ClusterIP   10.96.0.1       <none>        443/TCP        60d   <none>#在另一臺主機上訪問該微服務
[root@docker-harbor harbor]# curl 172.25.254.100:31998
Hello MyApp | Version: v1 | <a href="hostname.html">Pod Name</a>
5.3、Ingress-nginx
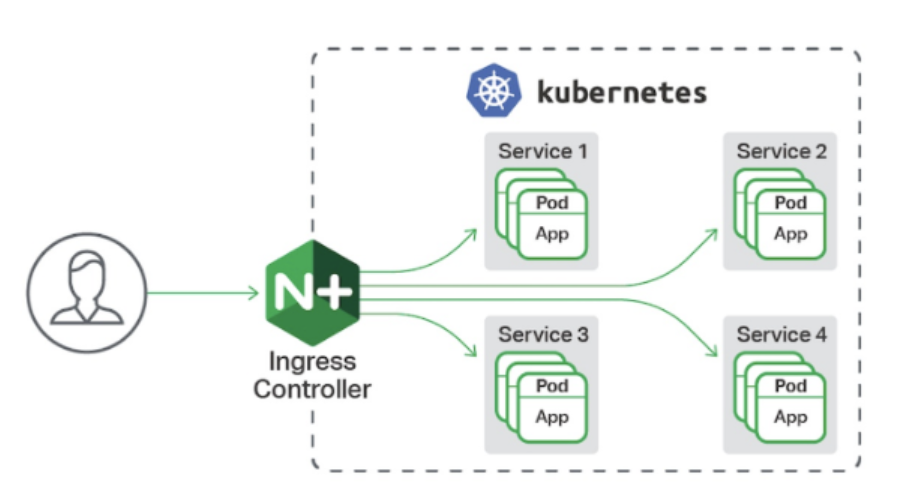
-
前情提要:loadbalancer類型中,裸金屬主機中用metalLB為每個services分配外部ip,而在真實的業務中,對外ip是是需要收費的,若每個services都需要一個對外ip則會花費昂貴,所以就產生了ingress-nginx控制器。
service只支持四層負載,也就是對ip端口的處理,不能對請求業務、動靜分離等進行處理。
ingress-nginx支持七層負載,支持動靜分離。
一種全局的、為了代理不同后端 Service 而設置的負載均衡服務,支持7層
Ingress由兩部分組成:Ingress controller和Ingress服務
Ingress Controller 會根據你定義的 Ingress 對象,提供對應的代理能力。
業界常用的各種反向代理項目,比如 Nginx、HAProxy、Envoy、Traefik 等,都已經為Kubernetes 專門維護了對應的 Ingress Controller。
6.4.1 部署ingress
下載部署文件(自備文件)
上傳ingress所需鏡像到harbor
[root@yifanhu ~]# docker tag reg.timinglee.org/ingress-nginx/controller:v1.11.2 reg.timinglee.org/ingress-nginx/controller:v1.11.2
[root@yifanhu ~]# docker tag reg.timinglee.org/ingress-nginx/kube-webhook-certgen:v1.4.3 reg.timinglee.org/ingress-nginx/kube-webhook-certgen:v1.4.3
[root@yifanhu ~]# docker push reg.timinglee.org/ingress-nginx/controller:v1.11.2
The push refers to repository [reg.timinglee.org/ingress-nginx/controller]
[root@yifanhu ~]# docker push reg.timinglee.org/ingress-nginx/kube-webhook-certgen:v1.4.3
The push refers to repository [reg.timinglee.org/ingress-nginx/kube-webhook-certgen]
安裝ingress
[root@yifanhu ~]# kubectl -n ingress-nginx get pods
NAME                                       READY   STATUS      RESTARTS   AGE
ingress-nginx-admission-create-r4mq7       0/1     Completed   0          11s
ingress-nginx-admission-patch-72xsg        0/1     Completed   1          11s
ingress-nginx-controller-bb7d8f97c-jttq6   0/1     Running     0          11s
[root@yifanhu ~]# kubectl -n ingress-nginx get svc
NAME                                 TYPE        CLUSTER-IP       EXTERNAL-IP   PORT(S)                      AGE
ingress-nginx-controller             NodePort    10.97.52.210     <none>        80:30602/TCP,443:30149/TCP   30s
ingress-nginx-controller-admission   ClusterIP   10.100.179.101   <none>        443/TCP                      30s修改微服務為Loadbalancer
[root@k8s-master ~]# kubectl -n ingress-nginx edit svc ingress-nginx-controller
49   type: LoadBalancer
[root@yifanhu ~]# kubectl -n ingress-nginx get services
NAME                                 TYPE           CLUSTER-IP       EXTERNAL-IP   PORT(S)                      AGE
ingress-nginx-controller             LoadBalancer   10.97.52.210     <pending>     80:30602/TCP,443:30149/TCP   2m51s
ingress-nginx-controller-admission   ClusterIP      10.100.179.101   <none>        443/TCP                      2m51s
測試ingress
#生成yaml文件
[root@k8s-master ~]# kubectl create ingress webcluster --rule '*/=timinglee-svc:80' --dry-run=client -o yaml > timinglee-ingress.yml[root@k8s-master ~]# vim timinglee-ingress.yml
aapiVersion: networking.k8s.io/v1
kind: Ingress
metadata:name: test-ingress
spec:ingressClassName: nginxrules:- http:paths:- backend:service:name: timinglee-svcport:number: 80path: /pathType: Prefix	[root@yifanhu ~]# kubectl apply -f timinglee-ingress.yml
ingress.networking.k8s.io/test-ingress created
[root@yifanhu ~]# kubectl get ingress
NAME           CLASS   HOSTS   ADDRESS         PORTS   AGE
test-ingress   nginx   *       172.25.254.20   80      21m
[root@yifanhu ~]# kubectl -n ingress-nginx get svc
NAME                                 TYPE           CLUSTER-IP       EXTERNAL-IP     PORT(S)                      AGE
ingress-nginx-controller             LoadBalancer   10.97.52.210     172.25.254.50   80:30602/TCP,443:30149/TCP   28m
ingress-nginx-controller-admission   ClusterIP      10.100.179.101   <none>          443/TCP [root@yifanhu ~]# for i in {1..5};do curl 172.25.254.50/hostname.html;done
<html>
<head><title>503 Service Temporarily Unavailable</title></head>
<body>
(2)、Ingress基于路徑的訪問
根據訪問路徑的不同調度到不同的service上。
[root@k8s-master ingress]# vim ingress2.yml
...
metadata:annotations:nginx.ingress.kubernetes.io/rewrite-target: /     #訪問路徑后加任何內容都被定向到/name: webcluster
#當外界訪問www.gaoyingjie.org/v1時,實際是訪問網頁的首發目錄,也就是/usr/share/nginx/html/v1,所以就導致找不到頁面404報錯,因此需要重定向到根目錄。
...
[root@k8s-master ingress]# kubectl apply -f ingress2.yml
ingress.networking.k8s.io/webcluster created
[root@k8s-master ingress]# kubectl get ingress
NAME         CLASS   HOSTS                ADDRESS   PORTS   AGE
webcluster   nginx   www.gaoyingjie.org             80      6s
[root@k8s-master ingress]# kubectl get svc
NAME         TYPE        CLUSTER-IP       EXTERNAL-IP   PORT(S)   AGE
kubernetes   ClusterIP   10.96.0.1        <none>        443/TCP   62d
myapp-v1     ClusterIP   10.104.22.5      <none>        80/TCP    3h4m
myapp-v2     ClusterIP   10.104.144.174   <none>        80/TCP    3h4m#測試
[root@docker-harbor ~]# echo 172.25.254.50 www.gaoyingjie.org >> /etc/hosts
#當訪問路徑為v1時,ingress會調度到myapp-v1上(myapp-v1是一個services的名字),同理訪問v2調度到2上
[root@docker-harbor ~]# curl www.gaoyingjie.org/v1
Hello MyApp | Version: v2 | <a href="hostname.html">Pod Name</a>
[root@docker-harbor ~]# curl www.gaoyingjie.org/v2
Hello MyApp | Version: v2 | <a href="hostname.html">Pod Name</a>#nginx.ingress.kubernetes.io/rewrite-target: / 的功能實現
[root@docker-harbor ~]# curl www.gaoyingjie.org/v2/bbb
Hello MyApp | Version: v1 | <a href="hostname.html">Pod Name</a>
[root@docker-harbor ~]# curl www.gaoyingjie.org/v1/bbb
Hello MyApp | Version: v2 | <a href="hostname.html">Pod Name</a>
[root@docker-harbor ~]# curl www.gaoyingjie.org/v1/adavc
Hello MyApp | Version: v1 | <a href="hostname.html">Pod Name</a>
(3)、Ingress基于域名的訪問
根據訪問域名的不同調度到不同的service上。
[root@k8s-master ingress]# vim ingress3.yml [root@k8s-master ingress]# kubectl apply -f ingress3.yml
ingress.networking.k8s.io/webcluster unchanged
[root@k8s-master ingress]# kubectl describe ingress webcluster
Name:             webcluster
Labels:           <none>
Namespace:        default
Address:          172.25.254.10
Ingress Class:    nginx
Default backend:  <default>
Rules:Host                   Path  Backends----                   ----  --------myapp1.gaoyingjie.org  /   myapp-v1:80 (10.244.169.173:80,10.244.36.80:80)myapp2.gaoyingjie.org  /   myapp-v2:80 (10.244.169.181:80,10.244.36.81:80)
Annotations:             nginx.ingress.kubernetes.io/rewrite-target: /
Events:Type    Reason  Age                    From                      Message----    ------  ----                   ----                      -------Normal  Sync    3m26s (x2 over 3m55s)  nginx-ingress-controller  Scheduled for sync#測試
[root@docker-harbor ~]# echo 172.25.254.50 myapp1.gaoyingjie.org myapp2.gaoyingjie.org >> /etc/hosts
[root@docker-harbor ~]# curl myapp1.gaoyingjie.org
Hello MyApp | Version: v1 | <a href="hostname.html">Pod Name</a>
[root@docker-harbor ~]# curl myapp2.gaoyingjie.org
Hello MyApp | Version: v2 | <a href="hostname.html">Pod Name</a>
?(4)、Ingress的tls加密訪問
#生成證書和key
[root@k8s-master ingress]# openssl req -newkey rsa:2048 -nodes -keyout tls.key -x509 -days 365 -subj "/CN=nginxsvc/O=nginxsvc" -out tls.crt
[root@k8s-master ingress]# ls
deploy.yaml   ingress2.yml  ingress-nginx-1.11.2.tar.gz  myapp:v2.yml  tls.key
ingress1.yml  ingress3.yml  myapp:v1.yml                 tls.crt#將證書和key寫入集群資源,secret是集群用來保存敏感資源的一種配置文件。
[root@k8s-master ingress]# kubectl create secret tls web-tls-secret --key tls.key --cert tls.crt
secret/web-tls-secret created
[root@k8s-master ingress]# kubectl get secrets
NAME             TYPE                             DATA   AGE
docker-auth      kubernetes.io/dockerconfigjson   1      49d
docker-login     kubernetes.io/dockerconfigjson   1      3d22h
web-tls-secret   kubernetes.io/tls                2      7s[root@k8s-master ingress]# vim ingress4.yml
...
spec:tls:                            #https加密- hosts:- myapp-tls.gaoyingjie.org    #當訪問該域名時要加httpssecretName: web-tls-secret    #讀取secret配置文件ingressClassName: nginx
...
[root@k8s-master ingress]# kubectl apply -f ingress4.yml
ingress.networking.k8s.io/webcluster created
[root@k8s-master ingress]# kubectl get ingress webcluster
NAME         CLASS   HOSTS                      ADDRESS   PORTS     AGE
webcluster   nginx   myapp-tls.gaoyingjie.org             80, 443   12s#測試
[root@docker-harbor ~]# echo 172.25.254.50 myapp-tls.gaoyingjie.org >> /etc/hosts
[root@docker-harbor ~]# curl -k https://myapp-tls.gaoyingjie.org
Hello MyApp | Version: v1 | <a href="hostname.html">Pod Name</a>
六、k8s的存儲
6.1、Configmap
(1)、congifmap的創建方式
[root@k8s-master storage]# kubectl create  configmap userlist  --from-literal name=gyj --from-literal age=23
configmap/userlist created
[root@k8s-master storage]# kubectl describe cm userlist
Name:         userlist
Namespace:    default
Labels:       <none>
Annotations:  <none>Data
====
age:
----
23
name:
----
gyjBinaryData
====Events:  <none>
[root@k8s-master storage]#
[root@k8s-master storage]# kubectl create cm configmap2 --from-file /etc/resolv.conf
configmap/configmap2 created
[root@k8s-master storage]# kubectl describe cm configmap2
Name: configmap2
Namespace: default
Labels: <none>
Annotations: <none>Data
====
resolv.conf:
----
# Generated by NetworkManager
nameserver 114.114.114.114BinaryData
====Events: <none>[root@k8s-master storage]# mkdir test
[root@k8s-master storage]# cp /etc/hosts /etc/rc.d/rc.local /root/storage/test/
[root@k8s-master storage]# kubectl create cm configmap2 --from-file test/
configmap/configmap2 created
[root@k8s-master storage]# kubectl describe cm configmap2
Name: configmap2
Namespace: default
Labels: <none>
Annotations: <none>Data
====
hosts:
----
127.0.0.1 localhost localhost.localdomain localhost4 localhost4.localdomain4
::1 localhost localhost.localdomain localhost6 localhost6.localdomain6
172.25.254.100 k8s-master
172.25.254.10 k8s-node1
172.25.254.20 k8s-node2
172.25.254.250 reg.gaoyingjie.orgrc.local:
----
#!/bin/bash
# THIS FILE IS ADDED FOR COMPATIBILITY PURPOSES
#
# It is highly advisable to create own systemd services or udev rules
# to run scripts during boot instead of using this file.
#
# In contrast to previous versions due to parallel execution during boot
# this script will NOT be run after all other services.
#
# Please note that you must run 'chmod +x /etc/rc.d/rc.local' to ensure
# that this script will be executed during boot.touch /var/lock/subsys/local
mount /dev/cdrom /rhel9/BinaryData
====Events: <none>[root@k8s-master storage]# kubectl create cm configmap3 --from-literal db_host=172.25.254.100 --from-literal db_port=3306 --dry-run=client -o yaml > configmap3.yaml
[root@k8s-master storage]# vim configmap3.yaml
[root@k8s-master storage]# kubectl apply -f configmap3.yaml
configmap/configmap3 created
[root@k8s-master storage]# kubectl describe configmaps configmap3
Name: configmap3
Namespace: default
Labels: <none>
Annotations: <none>Data
====
db_port:
----
3306
db_host:
----
172.25.254.100BinaryData
====Events: <none>(2)、configmap的使用方式
-
使用configmap 填充環境變量
[root@k8s-master storage]# vim testpod1.yml
[root@k8s-master storage]# kubectl apply -f testpod1.yml
pod/configmap-pod created
[root@k8s-master storage]# kubectl get pods
NAME            READY   STATUS      RESTARTS   AGE
configmap-pod   0/1     Completed   0          7s
test            1/1     Running     0          5m51s
[root@k8s-master storage]# kubectl logs pods/configmap-pod
KUBERNETES_SERVICE_PORT=443
KUBERNETES_PORT=tcp://10.96.0.1:443
HOSTNAME=configmap-pod
SHLVL=1
HOME=/
KUBERNETES_PORT_443_TCP_ADDR=10.96.0.1
PATH=/usr/local/sbin:/usr/local/bin:/usr/sbin:/usr/bin:/sbin:/bin
KUBERNETES_PORT_443_TCP_PORT=443
KUBERNETES_PORT_443_TCP_PROTO=tcp
key1=172.25.254.100
key2=3306
KUBERNETES_PORT_443_TCP=tcp://10.96.0.1:443
KUBERNETES_SERVICE_PORT_HTTPS=443
PWD=/
KUBERNETES_SERVICE_HOST=10.96.0.1
[root@k8s-master storage]#
[root@k8s-master storage]# vim testpod1.yml apiVersion: v1 kind: Pod metadata:labels:run: configmap-podname: configmap-pod spec:containers:- image: busyboxplus:latestname: configmap-podcommand:- /bin/sh- -c- envenvFrom:- configMapRef:name: configmap3restartPolicy: Never[root@k8s-master storage]# kubectl apply -f testpod1.yml pod/configmap-pod created [root@k8s-master storage]# kubectl logs pods/configmap-pod KUBERNETES_PORT=tcp://10.96.0.1:443 KUBERNETES_SERVICE_PORT=443 HOSTNAME=configmap-pod SHLVL=1 HOME=/ db_port=3306 KUBERNETES_PORT_443_TCP_ADDR=10.96.0.1 PATH=/usr/local/sbin:/usr/local/bin:/usr/sbin:/usr/bin:/sbin:/bin KUBERNETES_PORT_443_TCP_PORT=443 KUBERNETES_PORT_443_TCP_PROTO=tcp KUBERNETES_PORT_443_TCP=tcp://10.96.0.1:443 KUBERNETES_SERVICE_PORT_HTTPS=443 PWD=/ KUBERNETES_SERVICE_HOST=10.96.0.1 db_host=172.25.254.100#在pod命令行中使用變量 [root@k8s-master ~]# vim testpod3.yml apiVersion: v1 kind: Pod metadata:labels:run: testpodname: testpod spec:containers:- image: busyboxplus:latestname: testpodcommand:- /bin/sh- -c- echo ${db_host} ${db_port} #變量調用需envFrom:- configMapRef:name: lee4-configrestartPolicy: Never#查看日志 [root@k8s-master ~]# kubectl logs pods/testpod 172.25.254.100 3306 -
通過數據卷使用configmap
-
聲明一個卷并掛載,把configmap里的鍵變為掛載目錄下的文件名字、把值變為文件內容。
[root@k8s-master storage]# vim testpod2.yml apiVersion: v1
kind: Pod
metadata:labels:run: testpodname: testpod
spec:containers:- image: busyboxplus:latestname: testpodcommand:- /bin/sh- -c- sleep 1000000volumeMounts:- name: config-volumemountPath: /configvolumes:- name: config-volumeconfigMap:name: configmap3       #配置文件restartPolicy: Never
-
利用configmap填充pod的配置文件
舉例:當容器運行nginx時,nginx的配置文件可以放在configmap(通過文件創建configmap),修改配置時可以直接修改configmap文件內容,就不用修改每個pod的nginx配置文件
#建立配置文件模板
[root@k8s-master ~]# vim nginx.conf
server {listen 8000;server_name _;root /usr/share/nginx/html;index index.html;
}
#利用nging模板文件生成cm(通過文件創立cm)
root@k8s-master ~]# kubectl create cm nginx-conf --from-file nginx.conf #通過nginx.conf 這個文件創建名為nginx-conf的cm
configmap/nginx-conf created
[root@k8s-master ~]# kubectl describe cm nginx-conf
Name: nginx-conf
Namespace: default
Labels: <none>
Annotations: <none>Data
====
nginx.conf: #該cm的鍵
----
server { #該cm的值listen 8000;server_name _;root /usr/share/nginx/html;index index.html;
}BinaryData
====Events: <none>#建立nginx控制器文件
[root@k8s-master ~]# kubectl create deployment nginx --image nginx:latest --replicas 1 --dry-run=client -o yaml > nginx.yml#設定nginx.yml中的卷
[root@k8s-master ~]# vim nginx.yml
[root@k8s-master ~]# cat nginx.yml
apiVersion: apps/v1
kind: Deployment
metadata:labels:app: nginxname: nginx
spec:replicas: 1selector:matchLabels:app: nginxtemplate:metadata:labels:app: nginxspec:containers:- image: nginx:latestname: nginxvolumeMounts:- name: config-volumemountPath: /etc/nginx/conf.d #掛載目錄,在該目錄下cm的鍵成為文件名,值成為文件內容volumes:- name: config-volumeconfigMap:name: nginx-conf #cm名字6.2、secrets
Secret 對象類型用來保存敏感信息,例如密碼、OAuth 令牌和 ssh key。
敏感信息放在 secret 中比放在 Pod 的定義或者容器鏡像中來說更加安全和靈活
Pod 可以用兩種方式使用 secret:
作為 volume 中的文件被掛載到 pod 中的一個或者多個容器里。
當 kubelet 為 pod 拉取鏡像時使用。
Secret的類型:
Service Account:Kubernetes 自動創建包含訪問 API 憑據的 secret,并自動修改 pod 以使用此類型的 secret。
Opaque:使用base64編碼存儲信息,可以通過base64 --decode解碼獲得原始數據,因此安全性弱。
kubernetes.io/dockerconfigjson:用于存儲docker registry的認證信息
(1)、secrets的創建
[root@k8s-master secrets]# echo -n gaoyingjie > username.txt
[root@k8s-master secrets]# echo -n gyj > username.txt
[root@k8s-master secrets]# kubectl create secret generic userlist --from-file username.txt --from-file ^C
[root@k8s-master secrets]# echo -n gaoyingjie > username.txt
[root@k8s-master secrets]# echo -n gaoyingjie > password.txt
[root@k8s-master secrets]# kubectl create secret generic userlist --from-file username.txt --from-file password.txt
secret/userlist created
[root@k8s-master secrets]# kubectl get secrets userlist -o yaml
apiVersion: v1
data:password.txt: Z2FveWluZ2ppZQ==           #username已加密username.txt: Z2FveWluZ2ppZQ==           #password已加密
kind: Secret
metadata:creationTimestamp: "2024-09-15T11:54:24Z"name: userlistnamespace: defaultresourceVersion: "200519"uid: 4a144911-0b46-4e1e-95b1-13b403cac262
type: Opaque
#將要存儲的username和password用base64加密
[root@k8s-master secrets]# echo -n gaoyingjie | base64
Z2FveWluZ2ppZQ==
[root@k8s-master secrets]# echo -n gyj | base64
Z3lq#生成secrets配置文件
[root@k8s-master secrets]# kubectl create secret generic userlist --dry-run=client -o yaml > userlist.yml
[root@k8s-master secrets]# vim userlist.yml #配置文件內容
apiVersion: v1
kind: Secret
metadata:creationTimestamp: nullname: userlist
type: Opaque
data:username: Z2FveWluZ2ppZQ==password: Z3lq[root@k8s-master secrets]# kubectl apply -f userlist.yml
secret/userlist created
[root@k8s-master secrets]# kubectl get secrets
NAME TYPE DATA AGE
docker-login kubernetes.io/dockerconfigjson 1 4d9h
userlist Opaque 2 10s
#查看
[root@k8s-master secrets]# kubectl describe secrets userlist
Name: userlist
Namespace: default
Labels: <none>
Annotations: <none>Type: OpaqueData
====
username: 10 bytes
password: 3 bytes[root@k8s-master secrets]# kubectl get secrets userlist -o yaml
apiVersion: v1
data:password: Z3lqusername: Z2FveWluZ2ppZQ==
kind: Secret
metadata:annotations:kubectl.kubernetes.io/last-applied-configuration: |{"apiVersion":"v1","data":{"password":"Z3lq","username":"Z2FveWluZ2ppZQ=="},"kind":"Secret","metadata":{"annotations":{},"creationTimestamp":null,"name":"userlist","namespace":"default"},"type":"Opaque"}creationTimestamp: "2024-09-15T12:02:45Z"name: userlistnamespace: defaultresourceVersion: "201277"uid: 3ef997b4-aed7-4b2a-b05d-15064df95bae
type: Opaque將Secret掛載到Volume中
[root@yifanhu ~]# echo -n timinglee | base64
dGltaW5nbGVl
[root@yifanhu ~]# echo -n lee | base64
bGVl
[root@yifanhu ~]# kubectl create secret generic userlist --dry-run=client -o yaml > userlist.yml
[root@yifanhu ~]# vim userlist.yml
[root@yifanhu ~]# cat userlist.yml
apiVersion: v1
kind: Secret
metadata:creationTimestamp: nullname: userlist
type: Opaque
data:username: dGltaW5nbGVlpassword: bGVl
[root@yifanhu ~]# kubectl apply -f userlist.yml
Warning: resource secrets/userlist is missing the kubectl.kubernetes.io/last-applied-configuration annotation which is required by kubectl apply. kubectl apply should only be used on resources created declaratively by either kubectl create --save-config or kubectl apply. The missing annotation will be patched automatically.
secret/userlist configured
[root@yifanhu ~]# kubectl describe secrets userlist
Name:         userlist
Namespace:    default
Labels:       <none>
Annotations:  <none>Type:  OpaqueData
====
password:      3 bytes
password.txt:  3 bytes
username:      9 bytes
username.txt:  9 bytes
6.3、volumes配置管理
容器中文件在磁盤上是臨時存放的,這給容器中運行的特殊應用程序帶來一些問題
當容器崩潰時,kubelet將重新啟動容器,容器中的文件將會丟失,因為容器會以干凈的狀態重建。
當在一個 Pod 中同時運行多個容器時,常常需要在這些容器之間共享文件。
Kubernetes 卷具有明確的生命周期與使用它的 Pod 相同
卷比 Pod 中運行的任何容器的存活期都長,在容器重新啟動時數據也會得到保留
當一個 Pod 不再存在時,卷也將不再存在。
Kubernetes 可以支持許多類型的卷,Pod 也能同時使用任意數量的卷。
卷不能掛載到其他卷,也不能與其他卷有硬鏈接。 Pod 中的每個容器必須獨立地指定每個卷的掛載位置。
(1)、emptyDir卷
功能:
當Pod指定到某個節點上時,首先創建的是一個emptyDir卷,并且只要 Pod 在該節點上運行,卷就一直存在。卷最初是空的。 盡管 Pod 中的容器掛載 emptyDir 卷的路徑可能相同也可能不同,但是這些容器都可以讀寫 emptyDir 卷中相同的文件。 當 Pod 因為某些原因被從節點上刪除時,emptyDir 卷中的數據也會永久刪除
emptyDir 的使用場景:
緩存空間,例如基于磁盤的歸并排序。
耗時較長的計算任務提供檢查點,以便任務能方便地從崩潰前狀態恢復執行。
在 Web 服務器容器服務數據時,保存內容管理器容器獲取的文件。
[root@k8s-master ~]# mkdir volumes
[root@k8s-master volumes]# vim pod1.yml
apiVersion: v1
kind: Pod
metadata:name: vol1    #pod的名字
spec:containers:- image: busyboxplus:latest        #開啟的鏡像name: vm1                        #名字command:                    - /bin/sh- -c- sleep 30000000volumeMounts:- mountPath: /cache            #掛載目錄name: cache-vol            #指定的卷的名字- image: nginx:latestname: vm2volumeMounts:- mountPath: /usr/share/nginx/html
#掛載目錄,在該目錄下存儲的內容就是存儲到cache-vol卷中,同樣,在該目錄下存儲的內容,可以在busyboxplus的掛載目錄/cache下可以看到。name: cache-volvolumes:                          #聲明卷- name: cache-vol                 #卷的名字emptyDir:                       #卷的類型medium: Memory                #卷的設備:內存    sizeLimit: 100Mi              #大小[root@k8s-master volumes]# kubectl describe pod vol1
#進入容器查看
[root@k8s-master volumes]# kubectl exec -it pods/vol1 -c vm1 -- /bin/sh
/ # ls
bin dev home lib64 media opt root sbin tmp var
cache etc lib linuxrc mnt proc run sys usr
/ # cd cache/
/cache # echo gaoyingjie > index.html
/cache # ls
index.html
/cache # curl localhost #basybox和nginx在一個pod內,共享網絡棧,所以可以curl localhost
gaoyingjie
/cache # /cache # dd if=/dev/zero of=bigfile bs=1M count=99 #卷設置了100M 測試
99+0 records in
99+0 records out
/cache # dd if=/dev/zero of=bigfile bs=1M count=100
100+0 records in
99+1 records out
/cache # dd if=/dev/zero of=bigfile bs=1M count=101 #超過100則沒有空間
dd: writing 'bigfile': No space left on device
101+0 records in
99+1 records out
/cache # (2)、hostpath卷
功能:hostPath 卷能將主機節點文件系統上的文件或目錄掛載到您的 Pod 中,不會因為pod關閉而被刪除。也就是將該pod的一些資源存在本機上。
hostPath 的一些用法
運行一個需要訪問 Docker 引擎內部機制的容器,掛載 /var/lib/docker 路徑。
在容器中運行 cAdvisor(監控) 時,以 hostPath 方式掛載 /sys。
允許 Pod 指定給定的 hostPath 在運行 Pod 之前是否應該存在,是否應該創建以及應該以什么方式存在
hostPath的安全隱患
具有相同配置(例如從 podTemplate 創建)的多個 Pod 會由于節點上文件的不同而在不同節點上有不同的行為。
當 Kubernetes 按照計劃添加資源感知的調度時,這類調度機制將無法考慮由 hostPath 使用的資源。
基礎主機上創建的文件或目錄只能由 root 用戶寫入。您需要在 特權容器 中以 root 身份運行進程,或者修改主機上的文件權限以便容?能夠寫入 hostPath 卷。
(3)、nfs卷
NFS 卷允許將一個現有的 NFS 服務器上的目錄掛載到 Kubernetes 中的 Pod 中。這對于在多個 Pod 之間共享數據或持久化存儲數據非常有用
例如,如果有多個容器需要訪問相同的數據集,或者需要將容器中的數據持久保存到外部存儲,NFS 卷可以提供一種方便的解決方案。
意義:用另外一臺主機做存儲,k8s集群和集群數據資源不在同一臺主機上,實現了存儲分離。
準備工作:
4臺主機都要安裝nfs,175.25.254.250是nfs服務器,其他主機是為了訪問nfs服務器。
[root@docker-harbor ~]# dnf install nfs-utils -y
[root@docker-harbor rhel9]# systemctl enable --now nfs-server.service
[root@docker-harbor rhel9]# systemctl status nfs-server.service
#編輯策略文件
[root@docker-harbor ~]# vim /etc/exports
/nfsdata   *(rw,sync,no_root_squash)
#rw:讀寫,sync:數據完完整性同步,async:實時性同步,no_root_squash:設置權限,欣慰nfsdata是需要root權限[root@docker-harbor ~]# exportfs -rv
exporting *:/nfsdata
#關閉火墻后查看,每臺主機都能看到
[root@docker-harbor ~]# showmount -e 172.25.254.250
Export list for 172.25.254.250:
/nfsdata *
[root@k8s-master ~]# showmount -e 172.25.254.250
Export list for 172.25.254.250:
/nfsdata *
部署nfs卷:
[root@k8s-master volumes]# vim pod3.yml
apiVersion: v1
kind: Pod
metadata:name: vol1
spec:containers:- image: nginx:latestname: vm1volumeMounts:- mountPath: /usr/share/nginx/html        #卷掛載目錄name: cache-volvolumes:                                    #聲明卷- name: cache-vol                           #卷的名稱nfs:                                      #使用的是nfs卷server: 172.25.254.250                  #nfs服務器的ip,就是掛載點ippath: /nfsdata                          #nfs共享出來的目錄#pod開啟后會將/usr/share/nginx/html下的內容掛載到nfs服務器的/nfsdata目錄下[root@k8s-master volumes]# kubectl apply -f pod3.yml
pod/vol1 created
[root@k8s-master volumes]# kubectl describe pod vol1 #nfsdata目錄下還沒有內容,所以訪問nginx的首發目錄是403
[root@k8s-master volumes]# curl 10.244.36.87
<html>
<head><title>403 Forbidden</title></head>
<body>
<center><h1>403 Forbidden</h1></center>
<hr><center>nginx/1.27.1</center>
</body>
</html>
#進入nfsdata的目錄下寫入內容
[root@docker-harbor ~]# cd /nfsdata/
[root@docker-harbor nfsdata]# echo gaoyingjie > index.html
[root@docker-harbor nfsdata]# ls
index.html#再次查看,可以看到網頁內容了
[root@k8s-master volumes]# curl 10.244.36.87
gaoyingjie(4)、持久卷
靜態pv卷:
管理員手動建立pv,然后才能建立pvc,pod才能使用pvc申請pv。
[root@k8s-master pvc]# vim pv.yml
apiVersion: v1
kind: PersistentVolume
metadata:name: pv1        #pv的名字
spec:                capacity:storage: 5Gi        #pv的大小volumeMode: Filesystem        #文件系統accessModes:- ReadWriteOnce        #訪問模式:單點讀寫persistentVolumeReclaimPolicy: Retain      #回收模式:保留storageClassName: nfs        #存儲類為nfsnfs:path: /nfsdata/pv1           #訪問路徑,將pv1的存儲數據掛載到該目錄下server: 172.25.254.250---
apiVersion: v1
kind: PersistentVolume
metadata:name: pv2
spec:capacity:storage: 15GivolumeMode: FilesystemaccessModes:- ReadWriteMany            #多點讀寫persistentVolumeReclaimPolicy: RetainstorageClassName: nfsnfs:path: /nfsdata/pv2server: 172.25.254.250
---
apiVersion: v1
kind: PersistentVolume
metadata:name: pv3
spec:capacity:storage: 25GivolumeMode: FilesystemaccessModes:- ReadOnlyMangy            #多點只讀persistentVolumeReclaimPolicy: RetainstorageClassName: nfsnfs:path: /nfsdata/pv3server: 172.25.254.250[root@k8s-master pvc]# kubectl apply -f pv.yml
persistentvolume/pv1 unchanged
persistentvolume/pv2 unchanged
persistentvolume/pv3 created
[root@k8s-master pvc]# kubectl get pv
\NAME   CAPACITY   ACCESS MODES   RECLAIM POLICY   STATUS      CLAIM   STORAGECLASS   VOLUMEATTRIBUTESCLASS   REASON   AGE
pv1    5Gi        RWO            Retain           Available           nfs            <unset>                          37s
pv2    15Gi       RWX            Retain           Available           nfs            <unset>                          37s
pv3    25Gi       ROX            Retain           Available           nfs            <unset>
[root@k8s-master pvc]# vim pvc.yml
apiVersion: v1
kind: PersistentVolumeClaim
metadata:name: pvc1 #名字可以隨機,只看pvc的訪問模式和請求大小這兩個是否有匹配的pv
spec:storageClassName: nfsaccessModes:- ReadWriteOnce #pv和pvc的方式必須一致resources:requests:storage: 1Gi #pvc1的請求大小比pv小,不能超過pv的大小---
apiVersion: v1
kind: PersistentVolumeClaim
metadata:name: pvc2
spec:storageClassName: nfsaccessModes:- ReadWriteManyresources:requests:storage: 10Gi---
apiVersion: v1
kind: PersistentVolumeClaim
metadata:name: pvc3
spec:storageClassName: nfsaccessModes:- ReadOnlyManyresources:requests:storage: 15Gi[root@k8s-master pvc]# kubectl apply -f pvc.yml
persistentvolumeclaim/pvc1 created
persistentvolumeclaim/pvc2 created
persistentvolumeclaim/pvc3 created
[root@k8s-master pvc]# kubectl get pvc
NAME STATUS VOLUME CAPACITY ACCESS MODES STORAGECLASS VOLUMEATTRIBUTESCLASS AGE
pvc1 Bound pv1 5Gi RWO nfs <unset> 10s
pvc2 Bound pv2 15Gi RWX nfs <unset> 10s
pvc3 Bound pv3 25Gi ROX nfs <unset> 10s[root@k8s-master pvc]# vim pod1.yml
apiVersion: v1
kind: Pod
metadata:name: gaoyingjie
spec:containers:- image: nginxname: nginxvolumeMounts:- mountPath: /usr/share/nginx/html #pv1掛載到該目錄下,該目錄最終訪問的就是pv1的內容name: vol1volumes: #聲明卷- name: vol1persistentVolumeClaim: #持久卷請求,用請求使用卷pv1claimName: pvc1[root@k8s-master pvc]# kubectl apply -f pod1.yml
pod/gaoyingjie created
[root@k8s-master pvc]# kubectl get pods
NAME READY STATUS RESTARTS AGE
gaoyingjie 1/1 Running 0 10s
[root@k8s-master pvc]# kubectl describe pods gaoyingjie #pv1中沒有內容時,訪問不到
[root@k8s-master pvc]# kubectl get pods -o wide
NAME READY STATUS RESTARTS AGE IP NODE NOMINATED NODE READINESS GATES
gaoyingjie 1/1 Running 0 6m8s 10.244.36.88 k8s-node1 <none> <none>
[root@k8s-master pvc]# curl 10.244.36.88
<html>
<head><title>403 Forbidden</title></head>
<body>
<center><h1>403 Forbidden</h1></center>
<hr><center>nginx/1.27.1</center>
</body>
</html>#在pv1中寫入內容
[root@docker-harbor nfsdata]# echo gaoyingjie > pv1/index.html
#可以看到寫入的內容
[root@k8s-master pvc]# curl 10.244.36.88
gaoyingjie
#也可以進入容器中,看到pv1的內容已掛載到/usr/share/nginx/html/目錄下
[root@k8s-master pvc]# kubectl exec -it pods/gaoyingjie -- /bin/bash
root@gaoyingjie:/# cd /usr/share/nginx/html/
root@gaoyingjie:/usr/share/nginx/html# ls
index.html
root@gaoyingjie:/usr/share/nginx/html# cat index.html
gaoyingjie6.4、存儲類
StorageClass提供了一種描述存儲類(class)的方法,不同的class可能會映射到不同的服務質量等級和備份策略或其他策略等。
每個 StorageClass 都包含 provisioner、parameters 和 reclaimPolicy 字段, 這些字段會在StorageClass需要動態分配 PersistentVolume 時會使用到
動態pv:
創建pvc的時候會調用存儲類去自動創建目錄,如果沒有指定存儲類則調用默認存儲類(前提是有默認存儲類,沒有則pvc狀態顯示pending)。簡而言之,就是幫助pvc自動生成pv目錄。
[root@k8s-master storageclass]# vim rbac.yml
apiVersion: v1
kind: Namespace
metadata:name: nfs-client-provisioner        #名命空間
---
apiVersion: v1
kind: ServiceAccount
metadata:name: nfs-client-provisionernamespace: nfs-client-provisioner
---
kind: ClusterRole
apiVersion: rbac.authorization.k8s.io/v1
metadata:name: nfs-client-provisioner-runner
rules:- apiGroups: [""]resources: ["nodes"]verbs: ["get", "list", "watch"]- apiGroups: [""]resources: ["persistentvolumes"]verbs: ["get", "list", "watch", "create", "delete"]- apiGroups: [""]resources: ["persistentvolumeclaims"]verbs: ["get", "list", "watch", "update"]- apiGroups: ["storage.k8s.io"]resources: ["storageclasses"]verbs: ["get", "list", "watch"]- apiGroups: [""]resources: ["events"]verbs: ["create", "update", "patch"]
---
kind: ClusterRoleBinding
apiVersion: rbac.authorization.k8s.io/v1
metadata:name: run-nfs-client-provisioner
subjects:- kind: ServiceAccountname: nfs-client-provisionernamespace: nfs-client-provisioner
roleRef:kind: ClusterRolename: nfs-client-provisioner-runnerapiGroup: rbac.authorization.k8s.io
---
kind: Role
apiVersion: rbac.authorization.k8s.io/v1
metadata:name: leader-locking-nfs-client-provisionernamespace: nfs-client-provisioner
rules:- apiGroups: [""]resources: ["endpoints"]verbs: ["get", "list", "watch", "create", "update", "patch"]
---
kind: RoleBinding
apiVersion: rbac.authorization.k8s.io/v1
metadata:name: leader-locking-nfs-client-provisionernamespace: nfs-client-provisioner
subjects:- kind: ServiceAccountname: nfs-client-provisionernamespace: nfs-client-provisioner
roleRef:kind: Rolename: leader-locking-nfs-client-provisionerapiGroup: rbac.authorization.k8s.io[root@k8s-master storageclass]# kubectl apply -f rbac.yml
namespace/nfs-client-provisioner created
serviceaccount/nfs-client-provisioner created
clusterrole.rbac.authorization.k8s.io/nfs-client-provisioner-runner created
clusterrolebinding.rbac.authorization.k8s.io/run-nfs-client-provisioner created
role.rbac.authorization.k8s.io/leader-locking-nfs-client-provisioner created
rolebinding.rbac.authorization.k8s.io/leader-locking-nfs-client-provisioner created#查看rbac信息
[root@k8s-master storageclass]# kubectl -n nfs-client-provisioner get sa
NAME                     SECRETS   AGE
default                  0         18s
nfs-client-provisioner   0         19s
(2)、存儲分配器所用的控制器
[root@k8s-master storageclass]# vim deployment.yml
apiVersion: apps/v1
kind: Deployment
metadata:name: nfs-client-provisionerlabels:app: nfs-client-provisionernamespace: nfs-client-provisioner            #命名空間
spec:replicas: 1strategy:type: Recreateselector:matchLabels:app: nfs-client-provisionertemplate:metadata:labels:app: nfs-client-provisionerspec:serviceAccountName: nfs-client-provisionercontainers:- name: nfs-client-provisionerimage: sig-storage/nfs-subdir-external-provisioner:v4.0.2volumeMounts:- name: nfs-client-rootmountPath: /persistentvolumesenv:- name: PROVISIONER_NAMEvalue: k8s-sigs.io/nfs-subdir-external-provisioner        #標簽- name: NFS_SERVERvalue: 172.25.254.250- name: NFS_PATH                    #通過該變量識別nfs的地址和內容value: /nfsdatavolumes:- name: nfs-client-rootnfs:server: 172.25.254.250            #nfs服務器的ippath: /nfsdata                    #nfs的共享目錄#上傳鏡像到鏡像倉庫
[root@docker-harbor ~]# docker load  -i nfs-subdir-external-provisioner-4.0.2.tar
1a5ede0c966b: Loading layer  3.052MB/3.052MB
ad321585b8f5: Loading layer  42.02MB/42.02MB
Loaded image: registry.k8s.io/sig-storage/nfs-subdir-external-provisioner:v4.0.2[root@docker-harbor ~]# docker tag registry.k8s.io/sig-storage/nfs-subdir-external-provisioner:v4.0.2 reg.gaoyingjie.org/sig-storage/nfs-subdir-external-provisioner:v4.0.2[root@docker-harbor ~]# docker push reg.gaoyingjie.org/sig-storage/nfs-subdir-external-provisioner:v4.0.2
The push refers to repository [reg.gaoyingjie.org/sig-storage/nfs-subdir-external-provisioner]
ad321585b8f5: Pushed
1a5ede0c966b: Pushed
v4.0.2: digest: sha256:f741e403b3ca161e784163de3ebde9190905fdbf7dfaa463620ab8f16c0f6423 size: 739[root@k8s-master storageclass]# kubectl apply -f deployment.yml
[root@k8s-master storageclass]# kubectl get -n nfs-client-provisioner deployments.apps
(3)、創建存儲類
[root@k8s-master storageclass]# vim class.ymlapiVersion: storage.k8s.io/v1
kind: StorageClass
metadata:name: nfs-client
provisioner: k8s-sigs.io/nfs-subdir-external-provisioner
parameters:archiveOnDelete: "false"         #若是“true”,當刪除該類的時候,會對nfs存儲目錄進行打包,false則不會打包[root@k8s-master storageclass]# kubectl apply -f class.yml
[root@k8s-master storageclass]# kubectl get -n nfs-client-provisioner storageclasses.storage.k8s.io
(4)、創建pvc
[root@k8s-master storageclass]# vim pvc.ymlkind: PersistentVolumeClaim
apiVersion: v1
metadata:name: test-claim
spec:storageClassName: nfs-clientaccessModes:- ReadWriteManyresources:requests:storage: 1G[root@k8s-master storageclass]# kubectl apply -f pvc.yml
persistentvolumeclaim/test-claim created
[root@k8s-master storageclass]# kubectl get pvc
(5)、創建測試pod
將名為nfs-pvc的pv卷掛載到/mnt,名為test-claim的pvc調用存儲類。存儲類是動態的,它通過deployment控制器在nfs服務器端建立一個動態目錄(類似default-test-claim-pvc-10b58d9a-c212-4f01-b5c3-b6428d42ba1b )。
[root@k8s-master storageclass]# vim pod.ymlkind: Pod
apiVersion: v1
metadata:name: test-pod
spec:containers:- name: test-podimage: busybox            #運行了busybox的容器command:- "/bin/sh"             #動作args:                     #參數- "-c"                    - "touch /mnt/SUCCESS && exit 0 || exit 1"    #會寫到pvc所創建的目錄中volumeMounts:- name: nfs-pvc        #定義pv卷的名稱mountPath: "/mnt"restartPolicy: "Never"        #執行一次就退出,不會進行讀寫volumes:- name: nfs-pvc                  #最終會把名為nfs-pvc的pv卷掛載到/mnt,名為test-claim的pvc調用存儲類。存儲類是動態的,它通過deployment控制器建立一個動態目錄(default-test-claim-pvc-10b58d9a-c212-4f01-b5c3-b6428d42ba1b )persistentVolumeClaim:claimName: test-claim        #使用的pvc名稱為test-claim[root@k8s-master storageclass]# kubectl apply -f pod.yml
pod/test-pod created[root@k8s-master storageclass]# kubectl get pods
(6)、默認存儲類
[root@k8s-master storageclass]# vim pvc.yml kind: PersistentVolumeClaim
apiVersion: v1
metadata:name: test-claim
spec:#storageClassName: nfs-client 刪除accessModes:- ReadWriteManyresources:requests:storage: 1G[root@k8s-master storageclass]# kubectl apply -f pvc.yml
persistentvolumeclaim/test-claim created
[root@k8s-master storageclass]# kubectl get pvc
[root@k8s-master storageclass]# kubectl edit sc nfs-clientstorageclass.kubernetes.io/is-default-class: "true"[root@k8s-master storageclass]# kubectl get sc[root@k8s-master storageclass]# kubectl apply -f pvc.yml
persistentvolumeclaim/test-claim created
[root@k8s-master storageclass]# kubectl get pvc
NAME STATUS VOLUME CAPACITY ACCESS MODES STORAGECL
test-claim Bound pvc-3b3c6e40-7b8b-4c41-811a-3e081af9866b 1G RWX nfs-clien七、k8s的網絡通信
7.1、flannel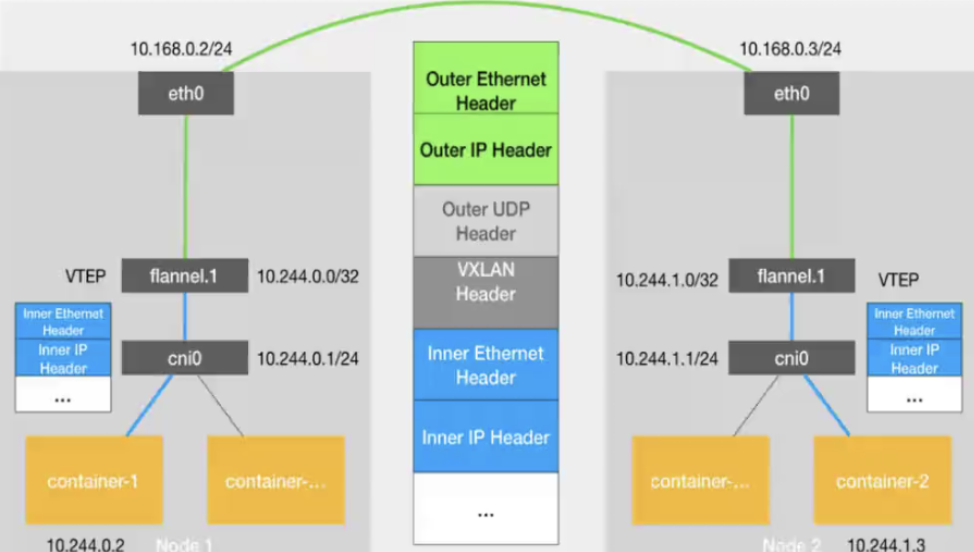
當容器發送IP包,通過veth pair 發往cni網橋,再路由到本機的flannel.1設備進行處理。
VTEP設備之間通過二層數據幀進行通信,源VTEP設備收到原始IP包后,在上面加上一個目的MAC地址,封裝成一個內部數據幀,發送給目的VTEP設備。
內部數據楨,并不能在宿主機的二層網絡傳輸,Linux內核還需要把它進一步封裝成為宿主機的一個普通的數據幀,承載著內部數據幀通過宿主機的eth0進行傳輸。
Linux會在內部數據幀前面,加上一個VXLAN頭,VXLAN頭里有一個重要的標志叫VNI,它是VTEP識別某個數據楨是不是應該歸自己處理的重要標識。
flannel.1設備只知道另一端flannel.1設備的MAC地址,卻不知道對應的宿主機地址是什么。在linux內核里面,網絡設備進行轉發的依據,來自FDB的轉發數據庫,這個flannel.1網橋對應的FDB信息,是由flanneld進程維護的。
linux內核在IP包前面再加上二層數據幀頭,把目標節點的MAC地址填進去,MAC地址從宿主機的ARP表獲取。
此時flannel.1設備就可以把這個數據幀從eth0發出去,再經過宿主機網絡來到目標節點的eth0設備。目標主機內核網絡棧會發現這個數據幀有VXLAN Header,并且VNI為1,Linux內核會對它進行拆包,拿到內部數據幀,根據VNI的值,交給本機flannel.1設備處理,flannel.1拆包,根據路由表發往cni網橋,最后到達目標容器。
7.2、calico
calico網絡插件官網:
Install Calico networking and network policy for on-premises deployments | Calico Documentation
將calico上傳到私人鏡像倉庫:部署私人倉庫請看Harbor部署docker私人倉庫-CSDN博客
(1)、部署calico
[root@k8s-master network]# vim calico.yaml
4835           image: calico/cni:v3.28.1
4835           image: calico/cni:v3.28.1
4906           image: calico/node:v3.28.1
4932           image: calico/node:v3.28.1
5160           image: calico/kube-controllers:v3.28.1
5249         - image: calico/typha:v3.28.14973             - name: CALICO_IPV4POOL_VXLAN
4974               value: "Never"4999             - name: CALICO_IPV4POOL_CIDR
5000               value: "10.244.0.0/16"
5001             - name: CALICO_AUTODETECTION_METHOD
5002               value: "interface=eth0"[root@k8s-master network]# kubectl apply -f calico.yaml
[root@k8s-master network]# kubectl -n kube-system get pods
測試
[root@k8s-master calico]# kubectl run  web --image myapp:v1
pod/web created
[root@k8s-master calico]# kubectl get pods  -o wide
NAME   READY   STATUS    RESTARTS   AGE   IP               NODE        NOMINATED NODE   READINESS GATES
web    1/1     Running   0          5s    10.244.169.129   k8s-node2   <none>           <none>
[root@k8s-master calico]# curl  10.244.169.129
Hello MyApp | Version: v1 | <a href="hostname.html">Pod Name</a>
八、k8s的調度
-
調度是指將未調度的Pod自動分配到集群中的節點的過程
-
調度器通過 kubernetes 的 watch 機制來發現集群中新創建且尚未被調度到 Node 上的 Pod
-
調度器會將發現的每一個未調度的 Pod 調度到一個合適的 Node 上來運行
8.1、常用調度方法
(1)、nodename
[root@k8s-master scheduler]# kubectl run testpod --image myapp:v1 --dry-run=client -o yaml > nodename.yml
[root@k8s-master scheduler]# kubectl apply -f nodename.yml
pod/testpod created
[root@k8s-master scheduler]# kubectl get pods
NAME      READY   STATUS    RESTARTS   AGE
testpod   1/1     Running   0          3s[root@k8s-master scheduler]# kubectl get pods -o wide
NAME      READY   STATUS    RESTARTS   AGE     IP              NODE        NOMINATED NODE   READINESS GATES
testpod   1/1     Running   0          6m14s   10.244.36.103   k8s-node1   <none>           <none>#testpod在node1節點上
修改配置指定到node2上:
[root@k8s-master scheduler]# vim nodename.yml
[root@k8s-master scheduler]# kubectl apply -f nodename.yml[root@k8s-master scheduler]# kubectl get pods -o wide
NAME      READY   STATUS    RESTARTS   AGE   IP               NODE        NOMINATED NODE   READINESS GATES
testpod   1/1     Running   0          4s    10.244.169.167   k8s-node2   <none>           <none>#testpod在node2上
(2)、Nodeselector
通過標簽控制節點調度,給節點添加標簽,讓調度器根據標簽調度pod所在的節點,更加靈活。
- 通過命令添加標簽:
- 通過配置文件進行調度設置
[root@k8s-master scheduler]# vim nodeselector.yml[root@k8s-master scheduler]# kubectl apply -f nodeselector.yml
pod/testpod created
[root@k8s-master scheduler]# kubectl get pod -o wide
NAME      READY   STATUS    RESTARTS   AGE   IP              NODE        NOMINATED NODE   READINESS GATES
testpod   1/1     Running   0          3s    10.244.36.104   k8s-node1   <none>           <none>#testpod運行在了有disktype=ssd標簽的node1節點上
8.2、affinity親和與反親和
- 上述兩種調度算法只是簡單的將pod約束到固定的節點上,親和與反親和擴展了想約束的類型
-
(1)、nodeAffinity-節點親和
-
那個節點服務指定條件就在那個節點運行
requiredDuringSchedulingIgnoredDuringExecution 必須滿足,但不會影響已經調度
preferredDuringSchedulingIgnoredDuringExecution 傾向滿足,在無法滿足情況下也會調度pod,IgnoreDuringExecution 表示如果在Pod運行期間Node的標簽發生變化,導致親和性策略不能滿足,則繼續運行當前的Pod。
匹配規則 功能 ln label 的值在列表內 Notln label 的值不在列表內 Gt label 的值大于設置的值,不支持Pod親和性 Lt label 的值小于設置的值,不支持pod親和性 Exists 設置的label 存在 DoesNotExist 設置的 label 不存在
[root@k8s-master scheduler]# vim nodeaffinity.yml
[root@k8s-master scheduler]# kubectl apply -f nodeaffinity.yml #因為配置文件的匹配規則是operator: IN
#pod在有disktype=ssd標簽的node1節點上
[root@k8s-master scheduler]# kubectl get pods -o wide
NAME            READY   STATUS    RESTARTS   AGE   IP              NODE        NOMINATED NODE   READINESS GATES
node-affinity   1/1     Running   0          12s   10.244.36.105   k8s-node1   <none>           <none>#如果匹配規則是operator: NotIn
#則pod在沒有disktype=ssd標簽的node2節點上
[root@k8s-master scheduler]# kubectl get pods -o wide
NAME            READY   STATUS    RESTARTS   AGE   IP               NODE        NOMINATED NODE   READINESS GATES
node-affinity   1/1     Running   0          2s    10.244.169.171   k8s-node2   <none>           <none>
(2)、pod親和與反親和
pod之間的親和性
podAffinity 主要解決POD可以和哪些POD部署在同一個節點中的問題
podAntiAffinity主要解決POD不能和哪些POD部署在同一個節點中的問題。它們處理的是Kubernetes集群內部POD和POD之間的關系。
Pod 間親和與反親和在與更高級別的集合(例如 ReplicaSets,StatefulSets,Deployments 等)一起使用時
Pod 間親和與反親和需要大量的處理,這可能會顯著減慢大規模集群中的調度。
podAffinity親和示例:
[root@k8s-master scheduler]# vim podaffinity.yml
[root@k8s-master scheduler]# kubectl apply -f podaffinity.yml
deployment.apps/nginx-deployment created#所有節點都在node1[root@k8s-master scheduler]# kubectl get pods -o wide
NAME                               READY   STATUS    RESTARTS   AGE   IP              NODE        NOMINATED NODE   READINESS GATES
nginx-deployment-658496fff-72b4j   1/1     Running   0          20s   10.244.36.106   k8s-node1   <none>           <none>
nginx-deployment-658496fff-jb7ck   1/1     Running   0          20s   10.244.36.107   k8s-node1   <none>           <none>
nginx-deployment-658496fff-lnzkz   1/1     Running   0          20s   10.244.36.108   k8s-node1   <none>           <none>
podAntiAffinity反親和示例:
[root@k8s-master scheduler]# kubectl apply -f podantiaffinity.yml
deployment.apps/nginx-deployment created#因為配置文件設置的是反親和podantiaffinity
#三個pod占據不同節點,只有兩個節點,所喲最后一個pod狀態為pendding
[root@k8s-master scheduler]# kubectl get pods -o wide
NAME                                READY   STATUS    RESTARTS   AGE   IP               NODE        NOMINATED NODE   READINESS GATES
nginx-deployment-5f5fc7b8b9-4s94m   1/1     Running   0          10s   10.244.36.109    k8s-node1   <none>           <none>
nginx-deployment-5f5fc7b8b9-cbpww   1/1     Running   0          10s   10.244.169.172   k8s-node2   <none>           <none>
nginx-deployment-5f5fc7b8b9-jzpqh   0/1     Pending   0          10s   <none>           <none>      <none>           <none>
九、k8s的認證授權
9.1、ServiceAccount
服務賬戶控制器(Service account controller)
服務賬戶管理器管理各命名空間下的服務賬戶
每個活躍的命名空間下存在一個名為 “default” 的服務賬戶
服務賬戶準入控制器(Service account admission controller)
相似pod中 ServiceAccount默認設為 default。
保證 pod 所關聯的 ServiceAccount 存在,否則拒絕該 pod。
如果pod不包含ImagePullSecrets設置那么ServiceAccount中的ImagePullSecrets 被添加到pod中
將掛載于 /var/run/secrets/kubernetes.io/serviceaccount 的 volumeSource 添加到 pod 下的每個容器中
將一個包含用于 API 訪問的 token 的 volume 添加到 pod 中
(1)、建立sa
#建立一個名為gaoyingjie的sa認證
[root@k8s-master ~]# kubectl create sa gaoyingjie#可以看到就默認的default,也有新建的名為gaoyingjie的sa
[root@k8s-master ~]# kubectl describe sa
Name:                default
Namespace:           default
Labels:              <none>
Annotations:         <none>
Image pull secrets:  <none>
Mountable secrets:   <none>
Tokens:              <none>
Events:              <none>Name:                gaoyingjie
Namespace:           default
Labels:              <none>
Annotations:         <none>
Image pull secrets:  <none>
Mountable secrets:   <none>
Tokens:              <none>
Events:              <none>
[root@k8s-master ~]#
(2)、建立secrets
- ?
#建立名為docker-login的secrets
#正是在前文k8s存儲中的secrtes配置文件
[root@k8s-master ~]# kubectl create secret docker-registry docker-login --docker-username admin --docker-password gyj --docker-server reg.gaoyingjie.org [root@k8s-master ~]# kubectl describe secrets docker-login
Name:         docker-login
Namespace:    default
Labels:       <none>
Annotations:  <none>Type:  kubernetes.io/dockerconfigjsonData
====
.dockerconfigjson:  123 bytes
(3)、 將secrets注入
-
(pod默認的sa是default,所以也可以將secrets注入到default中。不同的命名空間都有一個default)
此步驟通俗來講就是,secrets是定義授權用戶拉取私人倉庫鏡像規則的配置文件,然后讓sa讀取這個配置文件,所以就可以拉取私人倉庫里的鏡像了。
[root@k8s-master ~]# kubectl edit sa gaoyingjie #可以看到image的拉取授權為名為docker-login的secrtes配置文件[root@k8s-master ~]# kubectl describe sa gaoyingjie
Name:                gaoyingjie
Namespace:           default
Labels:              <none>
Annotations:         <none>
Image pull secrets:  docker-login
Mountable secrets:   <none>
Tokens:              <none>
Events:              <none>
(4)、pod綁定sa
[root@k8s-master auth]# vim example1.yml
[root@k8s-master auth]# kubectl apply -f example1.yml
pod/testpod created#可以看到該pod的狀態是running
[root@k8s-master auth]# kubectl get pods
NAME      READY   STATUS    RESTARTS   AGE
testpod   1/1     Running   0          6m39s
9.2、UserAccount
[root@k8s-master ~]# cd /etc/kubernetes/pki/etcd/
[root@k8s-master etcd]# ls
ca.crt  healthcheck-client.crt  peer.crt  server.crt
ca.key  healthcheck-client.key  peer.key  server.key
[root@k8s-master etcd]# cd ..
#都是集群用戶的認證證書
[root@k8s-master pki]# ls
apiserver.crt                 ca.key                  gaoyingjie.crt
apiserver-etcd-client.crt     ca.srl                  gaoyingjie.csr
apiserver-etcd-client.key     etcd                    gaoyingjie.key
apiserver.key                 front-proxy-ca.crt      sa.key
apiserver-kubelet-client.crt  front-proxy-ca.key      sa.pub
apiserver-kubelet-client.key  front-proxy-client.crt
ca.crt                        front-proxy-client.key
(1)、集群用戶建立
#建立集群用戶的認證證書[root@k8s-master auth]# cd /etc/kubernetes/pki/
#建立密鑰
[root@k8s-master pki]# openssl genrsa -out gaoyingjie.key 2048
#認證請求
[root@k8s-master pki]# openssl req  -new -key gaoyingjie.key -out gaoyingjie.csr -subj "/CN=gaoyingjie"
#用認證請求生成證書
[root@k8s-master pki]# openssl x509 -req  -in gaoyingjie.csr -CA ca.crt -CAkey ca.key -CAcreateserial  -out gaoyingjie.crt -days 365
Certificate request self-signature ok#查看證書
[root@k8s-master pki]# openssl x509 -in gaoyingjie.crt -text -noout
#建立用戶,其中set-credentials timinglee 指定用戶名稱 ,--client-certificate 指定證書,--client-key 指定key,-embed-certs=true 把這個動作寫入文件里 [root@k8s-master pki]# kubectl config set-credentials gaoyingjie --client-certificate /etc/kubernetes/pki/gaoyingjie.crt --client-key /etc/kubernetes/pki/gaoyingjie.key --embed-certs=true#為用戶創建集群的安全上下文 root@k8s-master pki]# kubectl config set-context gaoyingjie@kubernetes --cluster kubernetes --user gaoyingjie Context "gaoyingjie@kubernetes" created.#切換用戶,用戶在集群中只有用戶身份沒有授權 [root@k8s-master ~]# kubectl config use-context gaoyingjie@kubernetes Switched to context "gaoyingjie@kubernetes".#沒有授權所以不能查看pod [root@k8s-master ~]# kubectl get pods Error from server (Forbidden): pods is forbidden: User "gaoyingjie" cannot list resource "pods" in API group "" in the namespace "default"#切換會集群管理 [root@k8s-master ~]# kubectl config use-context kubernetes-admin@kubernetes Switched to context "kubernetes-admin@kubernetes".#如果需要刪除用戶 [root@k8s-master pki]# kubectl config delete-user gaoyingjie deleted user gaoyingjie from /etc/kubernetes/admin.conf(2)、集群用戶rbac授權
rbac:Role Based Access Control,基于角色訪問控制授權,對用戶功能權限聲明的一種方式。——常用的授權方式。
RBAC只有授權,沒有拒絕授權,所以只需要定義允許該用戶做什么即可
RBAC的三個基本概念
Subject:被作用者,它表示k8s中的三類主體, user, group, serviceAccount
Role:角色,它其實是一組規則,定義了一組對 Kubernetes API 對象的操作權限。
RoleBinding:定義了“被作用者”和“角色”的綁定關系
RBAC包括四種類型:Role、ClusterRole、RoleBinding、ClusterRoleBinding
Role 和 ClusterRole
Role是一系列的權限的集合,Role只能授予單個namespace 中資源的訪問權限。
ClusterRole 跟 Role 類似,但是可以在集群中全局使用。
Kubernetes 還提供了四個預先定義好的 ClusterRole 來供用戶直接使用
cluster-amdin、admin、edit、view
簡而言之:role是被定義好的資源授權規則,rolebanding賦予用戶某個role,使用戶可以使用role的授權資源。
@role授權
創建role:#生成role的yaml文件 [root@k8s-master rbac]# kubectl create role myrole --dry-run=client --verb=get --resource pods -o yaml > myrole.yml#更改文件內容 [root@k8s-master rbac]# vim myrole.yml apiVersion: rbac.authorization.k8s.io/v1 kind: Role metadata:creationTimestamp: nullname: myrole #role的名字為myrole rules: - apiGroups:- ""resources: #授權的資源是pod,也就是說這個role可以控制pod- podsverbs: #可以對pod的控制包括以下動作- get- watch- list- create- update- path- delete#創建role [root@k8s-master rbac]# kubectl apply -f myrole.yml [root@k8s-master rbac]# kubectl describe role myrolerolebanding 角色綁定:
[root@k8s-master rbac]# kubectl config use-context gaoyingjie@kubernetes
Switched to context "gaoyingjie@kubernetes".#可以看到gaoyingjie用戶可以創建pod,也可以查看當前命名空間的pod
[root@k8s-master rbac]# kubectl run  testpod --image myapp:v1
pod/testpod created
[root@k8s-master rbac]# kubectl get pods
NAME      READY   STATUS    RESTARTS   AGE
testpod   1/1     Running   0          5s
@clusterrole授權
#建立集群角色
#myclusterrole 名稱,--resource=deployment  可以控制的資源是控制器,--verb get 對控制器的動作
[root@k8s-master rbac]# kubectl create clusterrole myclusterrole --resource=deployment --verb get --dry-run=client -o yaml > myclusterrole.yml[root@k8s-master rbac]# vim myclusterrole.yml
apiVersion: rbac.authorization.k8s.io/v1
kind: ClusterRole
metadata:name: myclusterrole
rules:
- apiGroups:- appsresources:- deployments            #可以控制的資源是控制器verbs:                   #對控制器的動作- get- list- watch- create- update- path- delete
- apiGroups:- ""resources:               #可以控制的資源是pod- podsverbs:                   #對pod的動作- get- list- watch- create- update- path- delete
- apiGroups:- ""resources:               #可以控制的資源是service- servicesverbs:                   #對service的動作- get- list- watch- create- update- path- delete[root@k8s-master rbac]# kubectl apply -f myclusterrole.yml
clusterrole.rbac.authorization.k8s.io/myclusterrole created#查看集群role
[root@k8s-master rbac]# kubectl describe clusterrole myclusterrole
Name:         myclusterrole
Labels:       <none>
Annotations:  <none>
PolicyRule:Resources         Non-Resource URLs  Resource Names  Verbs---------         -----------------  --------------  -----pods              []                 []              [get list watch create update path delete]services          []                 []              [get list watch create update path delete]deployments.apps  []                 []              [get list watch create update path delete]
建立clusterrole綁定:
#建立集群角色與用戶綁定
#綁定clusterrole與gaoyingjie用戶,將clusterrole所聲明的規則賦予用戶使用,該clusterrole是沒有命名空間的
[root@k8s-master rbac]#  kubectl create clusterrolebinding  clusterrolebind-myclusterrole --clusterrole myclusterrole  --user gaoyingjie --dry-run=client -o yaml > clusterrolebind-myclusterrole.yml
[root@k8s-master rbac]# vim clusterrolebind-myclusterrole.yml
apiVersion: rbac.authorization.k8s.io/v1
kind: ClusterRoleBinding
metadata:name: clusterrolebind-myclusterrole
roleRef:apiGroup: rbac.authorization.k8s.iokind: ClusterRolename: myclusterrole
subjects:
- apiGroup: rbac.authorization.k8s.iokind: Username: gaoyingjie[root@k8s-master rbac]# kubectl apply -f myclusterrole.yml
clusterrole.rbac.authorization.k8s.io/myclusterrole configured[root@k8s-master rbac]# kubectl describe clusterrolebindings.rbac.authorization.k8s.io clusterrolebind-myclusterrole
Name:         clusterrolebind-myclusterrole
Labels:       <none>
Annotations:  <none>
Role:Kind:  ClusterRoleName:  myclusterrole
Subjects:Kind  Name        Namespace----  ----        ---------User  gaoyingjie
切換用戶測試:
#查看所有pod
[root@k8s-master rbac]# kubectl get pods -A
NAMESPACE                NAME                                       READY   STATUS    RESTARTS        AGE
default                  testpod                                    1/1     Running   0               39m
kube-system              calico-kube-controllers-6849cb478c-828tr   1/1     Running   58 (18h ago)    52d
kube-system              calico-node-2rq47                          1/1     Running   15
......#查看控制器
[root@k8s-master rbac]# kubectl get deployments.apps -A
NAMESPACE                NAME                      READY   UP-TO-DATE   AVAILABLE   AGE
kube-system              calico-kube-controllers   1/1     1            1           52d
kube-system              calico-typha              1/1     1            1           52d
kube-system              coredns                   2/2     2            2           58d
nfs-client-provisioner   nfs-client-provisioner    1/1     1            1           3d#查看微服務
[root@k8s-master rbac]# kubectl get svc -A
NAMESPACE     NAME           TYPE        CLUSTER-IP     EXTERNAL-IP   PORT(S)                  AGE
default       kubernetes     ClusterIP   10.96.0.1      <none>        443/TCP                  58d
default       nginx-svc      ClusterIP   None           <none>        80/TCP                   3d
kube-system   calico-typha   ClusterIP   10.98.254.47   <none>        5473/TCP                 52d
kube-system   kube-dns       ClusterIP   10.96.0.10     <none>        53/UDP,53/TCP,9153/TCP   58d
)
:分部積分法)


)


![[每周一更]-(第157期):深入理解Go語言的垃圾回收機制:調優與監控](http://pic.xiahunao.cn/[每周一更]-(第157期):深入理解Go語言的垃圾回收機制:調優與監控)
)
)


)