項目中使用的設計模式
- 請列舉幾個項目中常用的設計模式
- 什么是設計模式,在項目中使用了那些設計模式
- 動態代理模式
- JDK動態代理
- CGLIB動態代理
- 單例模式
- 懶漢式(非線程安全)
- 餓漢式
- 懶漢式(線程安全)
- 工廠模式
- 觀察者模式
- 裝飾器模式
請列舉幾個項目中常用的設計模式
????單例模式(Singleton pattern)用于Runtime,Calendar和其他的一些類中。工廠模式(Factory pattern)被用于各種不可變的類如 Boolean,像Boolean.valueOf,觀察者模式(Observer pattern)被用于 Swing 和很多的事件監聽中。裝飾器設計模式(Decorator design pattern)被用于多個 Java IO 類中。
什么是設計模式,在項目中使用了那些設計模式
????設計模式是軟件開發人員在軟件開發過程中面臨的一般問題的解決方案。這些解決方案是眾多軟件開發人員經過相當長的一段時間的試驗和錯誤總結出來的。設計模式是代碼可用性的延伸
????設計模式分類:創建型模式,結構型模式,行為型模式
動態代理模式
????代理模式分為靜態代理與動態代理,靜態代理不做過多解釋(項目中不常用),動態代理分為JDK動態代理與CGLIB動態代理,Spring2.x之前使用的代理模式為JDK動態代理,但仍需要定義接口才能實現功能,有一定的局限性,因此在Spring2.x之后,采用了CGLIB動態代理技術。
JDK動態代理
/*** 接口*/
public interface Target {public String  execute();
}
/*** 實現類*/
public class TargetImpl implements Target {@Overridepublic String execute() {System.out.println("Target execute");return "execute";}
}
import java.lang.reflect.InvocationHandler;
import java.lang.reflect.Method;/*** 代理類*/
public class DynamicProxyHandler implements InvocationHandler {private Target target;public DynamicProxyHandler(Target target) {this.target = target;}@Overridepublic Object invoke(Object proxy, Method method, Object[] args) throws Throwable {System.out.println("======before======");Object result = method.invoke(target, args);System.out.println("======after======");return result;}
}
import java.lang.reflect.Proxy;/*** 測試類*/
public class DynamicProxyTest {public static void main(String[] args) {Target target = new TargetImpl();DynamicProxyHandler handler = new DynamicProxyHandler(target);Target proxy = (Target) Proxy.newProxyInstance(TargetImpl.class.getClassLoader(), TargetImpl.class.getInterfaces(), handler);String result = proxy.execute();System.out.println(result);}
}
輸出結果為
======before======
Target execute
======after======
execute
CGLIB動態代理
????CGLib采用了非常底層的字節碼技術,也就是ASM 字節碼操作框架,在運行時動態生成被代理類的子類字節碼。該子類重寫了父類(被代理類)的所有飛final方法。因此CGLIB的局限性也在于此,被代理類不能繼承其他類或被final修飾的類。JDK動態代理與CGLib動態代理均是實現Spring AOP的基礎。
/*** 目標類*/
public class Target {public String execute() {String message = "======test======";System.out.println(message);return message;}
}
import net.sf.cglib.proxy.MethodInterceptor;
import net.sf.cglib.proxy.MethodProxy;import java.lang.reflect.Method;/*** 通用代理類*/
public class MyMethodInterceptor implements MethodInterceptor {@Overridepublic Object intercept(Object o, Method method, Object[] objects, MethodProxy methodProxy) throws Throwable {System.out.println("======MethodInterceptor start======");// 使用invokeSuper而不是invoke,避免無限遞歸Object result = methodProxy.invokeSuper(o, objects);System.out.println("======MethodInterceptor end======");return result;}
}
import net.sf.cglib.proxy.Enhancer;/*** 測試類*/
public class CgLibTest {public static void main(String[] args) {System.out.println("***************");CgLibTest test = new CgLibTest();Target proxyTarget = (Target) test.createProxy(Target.class);String res = proxyTarget.execute();System.out.println(res);}public Object createProxy(Class targetClass) {Enhancer enhancer = new Enhancer();enhancer.setSuperclass(targetClass);enhancer.setCallback(new MyMethodInterceptor());return enhancer.create();}
}
輸出結果為
***************
======MethodInterceptor start======
======test======
======MethodInterceptor end======
======test======
代理類的對象生成過程由Enhancer類實現,大概步驟如下:
- 生成代理類Class的二進制字節碼;
- 通過Class。forName加載二進制字節碼,生成Class對象;
- 通過反射機制獲取實例構造,并初始代理類對象。
單例模式
????單例模式是Java中最簡單的設計模式之一。這種類型的設計模式屬于創建型模式,它提供了一種創建對象的最佳方式。意圖:保證一個類僅有一個實例,并提供一個訪問它的全局訪問點。主要解決:一個全局使用的類頻繁的創建與銷毀。單利模式主要分為懶漢與餓漢,他倆的區別在于創建對象的時機,一個是當你調用類的getInstance()方法時,才會初始化對象,而另一個在類初始化時,就會創建對象,他倆只會創建同一個對象。
懶漢式(非線程安全)
public class Singleton {private static Singleton instance;// 私有化構造方法private Singleton() {}// 提供一個對象,全局僅創建一次public static synchronized Singleton getInstance() {if (instance == null) {instance = new Singleton();}return instance;}
}
餓漢式
public class Singleton {private static Singleton instance = new Singleton();// 私有化構造方法private Singleton() {}public static Singleton getInstance() {return instance;}
}
懶漢式(線程安全)
public class Singleton {// 確保可見性與有序性private static volatile Singleton instance = null;// 構造方法私有化private Singleton() {}// 雙重校驗鎖 + volatilepublic static Singleton getInstance(){if (instance == null) {synchronized (Singleton.class) {// 避免CPU切換到另一個線程創建對象,創建完再切換回來if (instance == null) {instance = new Singleton();}}}return instance;}
}
工廠模式
????工廠模式是Java中最場景的設計模式之一。這種類型的設計模式屬于創建者模式,它提供了一種創建對象的最佳方式。意圖:定義一個創建對象的接口,讓其子類自己決定實例化哪一個工廠類,工廠模式使其創建過程延遲到子類進行。主要解決:主要解決接口選擇的問題。
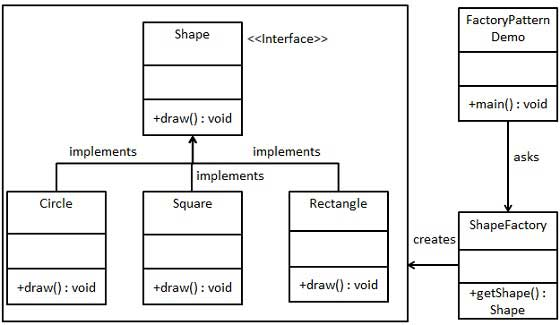
步驟1:創建一個接口
Shapa.java
public interface Shape {void draw();
}
步驟2:創建實現接口的實體類Rectangle.java、
public class Rectangle implements Shape {@Overridepublic void draw() {System.out.println("Inside Rectangle::draw() method");}
}
Square.java
public class Square implements Shape{@Overridepublic void draw() {System.out.println("Inside Square::draw() method.");}
}
Circle.java
public class Circle implements Shape {@Overridepublic void draw() {System.out.println("Inside Circle::draw() method.");}
}
步驟3:創建一個工廠,生成基于給定信息的實體類對象。
ShapeFactory.java
public class ShapeFactory {// 使用getShape() 方法獲取形狀類型的對象public Shape getShape(String shapeType) {if (shapeType == null) {return null;}shapeType = shapeType.toLowerCase(Locale.ROOT);switch (shapeType){case "circle":return new Circle();case "rectangle":return new Rectangle();case "square":return new Square();default: return null;}}
}
步驟4:使用該工廠,通過傳遞類型信息來獲取實體類的對象。
FactoryPatternDemo.java
public class FactoryPatternDemo {public static void main(String[] args) {ShapeFactory shapeFactory = new ShapeFactory();// 獲取Circle對象,并調用它的draw方法Shape shape1 = shapeFactory.getShape("CIRCLE");shape1.draw();// 獲取Rectangle對象,并調用它的draw方法Shape shape2 = shapeFactory.getShape("RECTANGLE");shape2.draw();// 獲取Square對象,并調用它的draw方法Shape shape3 = shapeFactory.getShape("SQUARE");shape3.draw();}
}
步驟5:驗證輸出結果
Inside Circle::draw() method.
Inside Rectangle::draw() method
Inside Square::draw() method.
觀察者模式
????觀察者模式屬于行為模式。當對象間存在一對多的關系時,則使用觀察者模式。比如,當一個對象被修改時,則會自動通知它的依賴對象。意圖:定義對象間的一種一對多的依賴關系,當一個對象的狀態發生改變時,所有依賴于它的對象都會得到通知并被自動更新。主要解決:一個對象狀態改變給其他對象通知的問題,而且要考慮到易用性和低耦合,保證高度的協作。
????實現:觀察者模式使用三個類Subject、Observer和Client。Subject對象帶有綁定觀察者到Client對象和從Client對象解綁觀察者的方法。

步驟1:創建Subject類
Subject.java
public class Subject {private List<Observer> observers = new ArrayList<>();private int state;public int getState() {return state;}public void setState(int state){this.state = state;notifyAllObservers();}public void attach(Observer observer) {observers.add(observer);}public void notifyAllObservers() {for(Observer observer : observers) {observer.update();}}
}
步驟2:創建Observer類
Observer.java
public abstract class Observer {protected Subject subject;public abstract void update();
}
步驟3:創建實體觀察者類:
BinaryObserver.java
public class BinaryObserver extends Observer{public BinaryObserver(Subject subject){this.subject = subject;this.subject.attach(this);}@Overridepublic void update() {System.out.println("Binary String" + Integer.toBinaryString(subject.getState()));}
}
OctalObserver.java
public class OctalObserver extends Observer{public OctalObserver(Subject subject){this.subject = subject; this.subject.attach(this);}@Overridepublic void update() {System.out.println("Octal String: " + Integer.toOctalString(subject.getState()));}
}
HexaObserver.java
public class HexaObserver extends Observer{public HexaObserver(Subject subject){this.subject = subject; this.subject.attach(this);}@Overridepublic void update() {System.out.println("Hex String: " + Integer.toHexString(subject.getState()).toUpperCase());}
}
步驟4:使用SUbject和實體類觀察者對象
ObserverPatternDemo.java
public class ObserverPatternDemo {public static void main(String[] args) {Subject subject = new Subject();new BinaryObserver(subject);new OctalObserver(subject);new HexaObserver(subject);System.out.println("First state change: 15");subject.setState(15);System.out.println("------------");System.out.println("Second state change: 10");subject.setState(10);}
}
步驟5:驗證結果
First state change: 15
Binary String: 1111
Octal String: 17
Hex String: F
------------
Second state change: 10
Binary String: 1010
Octal String: 12
Hex String: A
裝飾器模式
????裝飾器模式允許向一個現有的對象添加新功能,同時又不改變其結構。這種類型的設計模式屬于結構型模式,它是作為現有的一個類包裝。意圖:動態代給一個對象添加一些額外的職責。就增加功能來說,裝飾器模式相比生成子類更為靈活。主要解決:一般的,我們為了拓展一個類經常使用繼承方式實現,由于繼承為類引入靜態特征,并且隨著擴展功能的增多,子類會很膨脹。
????實現:我們將創建一個Shape接口和實現Shape接口的實體類。然后我們創建一個實現了Shape接口的抽象裝飾類ShapeDecorator,并且把Shape對象作為它的實例變量。
RedShapeDecorator是實現了ShapeDecorator的實體類;
DecoratorPatternDemo是我們的演示類使用RedShapeDecorator來裝飾Shape對象。
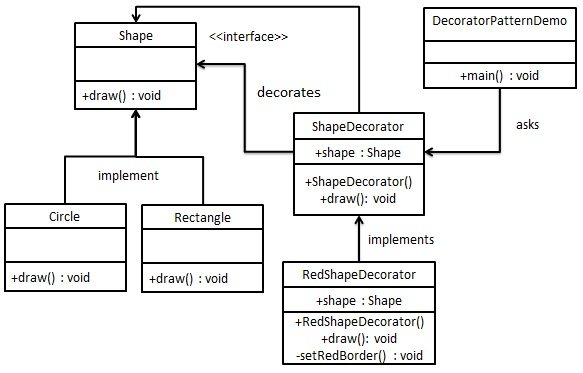
步驟1:創建一個接口:
Shape.java
public interface Shape {void draw();
}
步驟2:創建實現接口的實體類
Rectangle.java
public class Rectangle implements Shape{@Overridepublic void draw() {System.out.println("Shape: Rectangle");}
}
Circle.java
public class Circle implements Shape{@Overridepublic void draw() {System.out.println("Shape Circle");}
}
步驟3:創建實現了Shape接口的抽象裝飾類
ShapeDecorator.java
public abstract class ShapeDecorator implements Shape{protected Shape decoratorShape;public ShapeDecorator(Shape decoratorShape){this.decoratorShape = decoratorShape;}@Overridepublic void draw(){decoratorShape.draw();}
}
步驟4:創建擴展了ShapeDecorator類的實體裝飾類
RedShapeDecorator.java
public class RedShapeDecorator extends ShapeDecorator{public RedShapeDecorator(Shape decoratorShape) {super(decoratorShape);}@Overridepublic void draw(){decoratorShape.draw();setRedBorder(decoratorShape);}private void setRedBorder(Shape decoratorShape){System.out.println("Border Color: Red");}
}
步驟5:使用RedShape來裝飾Shape對象
DecoratorPatternDemo.java
public class DecoratorPatternDemo {public static void main(String[] args) {Shape circle = new Circle();Shape redCircle = new RedShapeDecorator(new Circle());Shape redRectangle = new RedShapeDecorator(new Rectangle());System.out.println("Circle with normal border");circle.draw();System.out.println("\nCircle of red border");redCircle.draw();System.out.println("\nRectangle of red border");redRectangle.draw();}
}
步驟6:驗證結果
Circle with normal border
Shape CircleCircle of red border
Shape Circle
Border Color: RedRectangle of red border
Shape: Rectangle
Border Color: Red

信息)


)

基于PHP和Vue的網上購物平臺)

—— 表單)
提升特征多樣性,同時減少參數和計算量)

)
)
