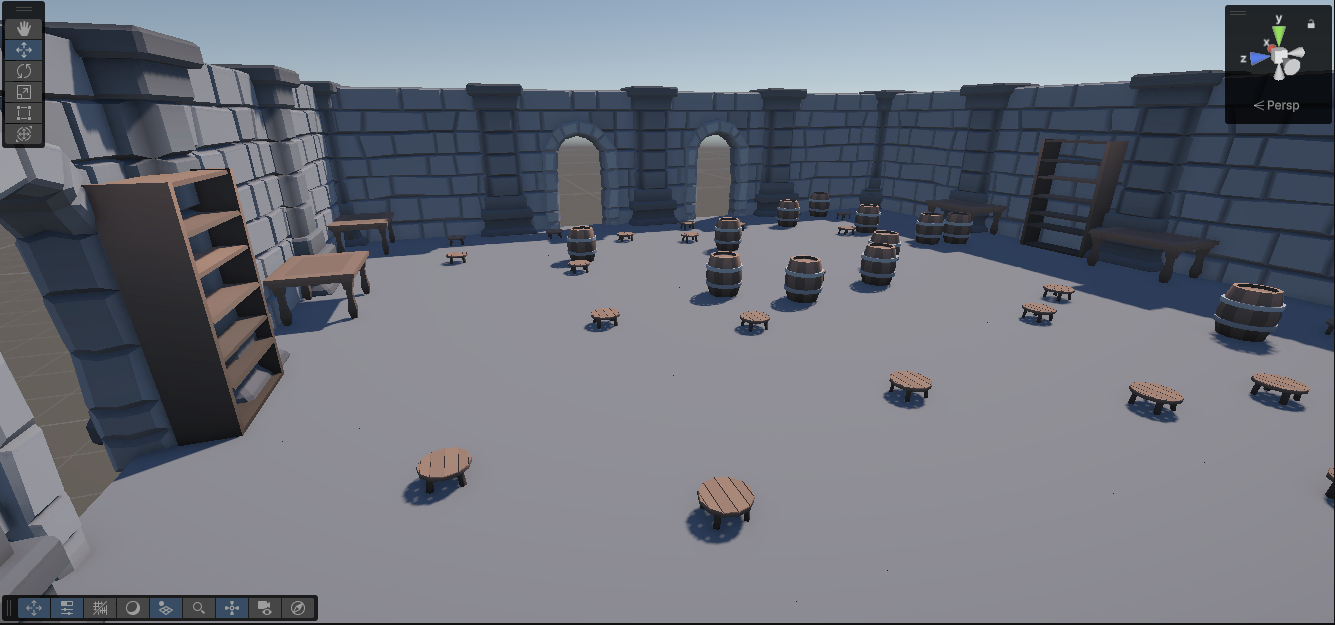
最終效果
文章目錄
- 最終效果
- 前言
- 1、理解程序生成的核心概念
- 2、種子值的核心作用
- 3、程序生成的實際應用
- 4、主流程序生成技術概覽
- 5、選擇合適的技術
- 實戰
- 1、素材
- 2、生成一面墻變換矩陣數據
- 3、渲染墻壁
- 4、加點隨機不同的墻壁效果
- 5、繪制四面墻壁
- 4、在四個角落生成支柱
- 5、生成地板
- 6、墻壁接縫生成支柱
- 7、為每個實例生成GameObject
- 8、生成碰撞體
- 9、放置隨機物品
- 10、設置隨機種子
- 源碼
- 參考
- 專欄推薦
- 完結
前言
1、理解程序生成的核心概念
程序生成(Procedural Generation)常被誤解為隨機生成,但二者有本質區別。程序生成是通過預設規則系統來創造內容,雖然結果可能看似不可預測,但實際上是確定性的。這種技術讓我們能夠精確控制輸出內容的類型和特征。
2、種子值的核心作用
種子(Seed)是程序生成中的關鍵概念:
-
作為隨機數生成的起點值
-
保證生成結果的可重復性
-
相同的種子必然產生相同的輸出序列
實際上,計算機中的"隨機"函數是偽隨機的確定性算法,通過對種子值進行數學變換來產生看似隨機的序列。這種設計確保了結果的可靠性。
如果使用相同的種子,每次都會得到相同的隨機值序列,這對于創建可重復的輸出很有用。
3、程序生成的實際應用
程序生成在內容創作中(特別是游戲開發)有著廣泛應用,其實現可分為兩個層面:
-
數據生成層 - 使用算法創造原始數據
-
內容呈現層 - 將數據轉化為可視/可交互內容
4、主流程序生成技術概覽
| 技術 | 典型應用場景 | 特點 |
|---|---|---|
| 基于語法的生成 | 建筑、城市生成 | 使用規則系統定義結構 |
| L-Systems | 植物、樹木生成 | 遞歸應用規則生成復雜形態 |
| 波函數坍縮 | 地形、圖案生成 | 通過約束傳播生成連貫結構 |
| 細胞自動機 | 地形、紋理生成 | 基于簡單規則產生復雜行為 |
| 噪聲函數 | 自然地形、紋理 | 產生有機的隨機模式 |
| 二元空間分區 | 室內空間劃分 | 遞歸分割空間創建布局 |
5、選擇合適的技術
沒有放之四海而皆準的解決方案,開發者應該:
- 廣泛了解各種生成技術
- 將其視為工具箱中的不同工具
- 通過經驗積累培養技術選型能力
實戰
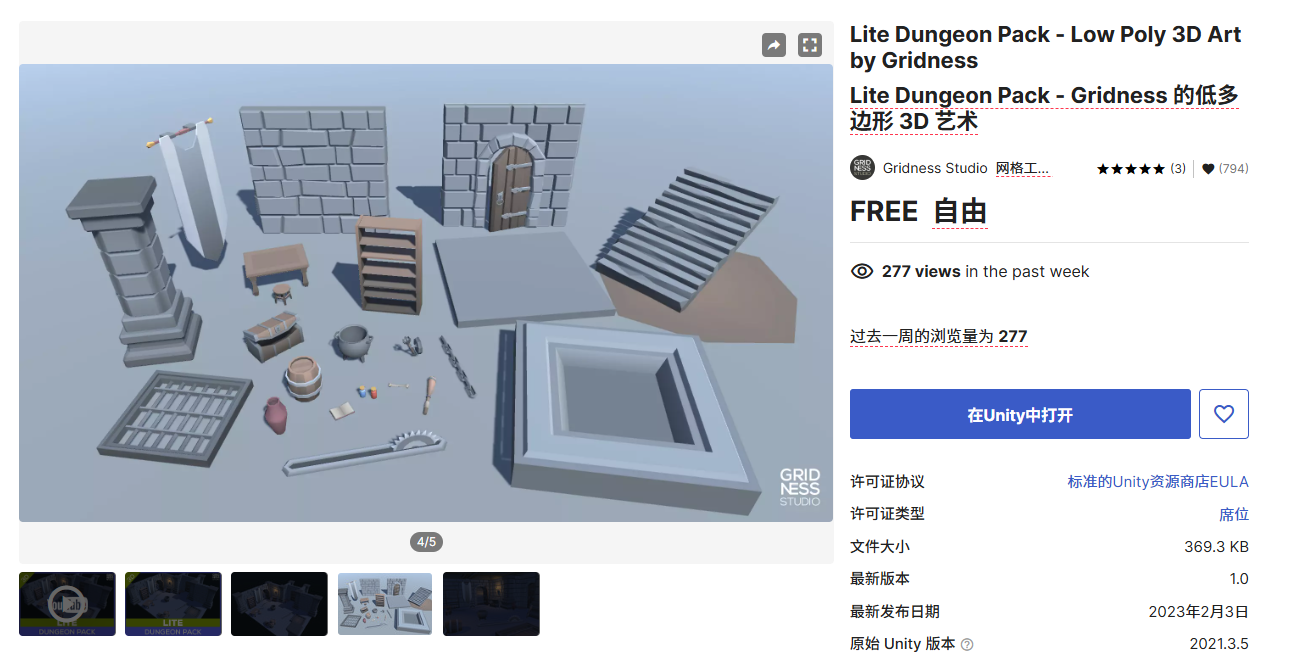
1、素材
https://assetstore.unity.com/packages/3d/environments/dungeons/lite-dungeon-pack-low-poly-3d-art-by-gridness-242692
2、生成一面墻變換矩陣數據
//生成地牢函數
public class GenerateDungeon : MonoBehaviour
{[Header("房間尺寸(X為寬度,Y為長度)")]public Vector2 roomSize = new Vector2(10, 10);[Header("墻壁生成相關")]public Mesh wallMesh; // 普通墻壁網格public Material wallMaterial; // 墻壁材質List<Matrix4x4> _wallMatricesN; // 普通墻壁變換矩陣列表void Start(){CreateWalls();}// 創建墻面物體的函數void CreateWalls(){// 初始化存儲墻面變換矩陣的列表_wallMatricesN = new List<Matrix4x4>();// 計算需要的墻面數量:房間寬度除以單面墻寬度,至少1面墻int wallCount = Mathf.Max(1, (int)(roomSize.x / wallMesh.bounds.size.x));// 計算每面墻的縮放比例:使墻面正好填滿房間寬度float scale = (roomSize.x / wallCount) / wallMesh.bounds.size.x;// 循環生成每面墻的變換矩陣for (int i = 0; i < wallCount; i++){// 計算墻面位置:// 1. 從房間左邊界開始(-roomSize.x/2)// 2. 加上半面墻寬度(wallSize.x*scale/2)// 3. 加上當前墻的偏移量(i*scale*wallSize.x)// Y軸位置為房間上邊界(+roomSize.y/2)Vector3 position = transform.position +new Vector3(-roomSize.x / 2 + wallMesh.bounds.size.x * scale / 2 +i * scale * wallMesh.bounds.size.x,0,+roomSize.y / 2);// 使用父物體的旋轉Quaternion rotation = transform.rotation;// 設置縮放:X軸按計算比例縮放,Y和Z軸保持原大小Vector3 scaleVec = new Vector3(scale, 1, 1);// 創建變換矩陣(位置/旋轉/縮放)Matrix4x4 matrix = Matrix4x4.TRS(position, rotation, scaleVec);// 將矩陣添加到列表_wallMatricesN.Add(matrix);}}
}
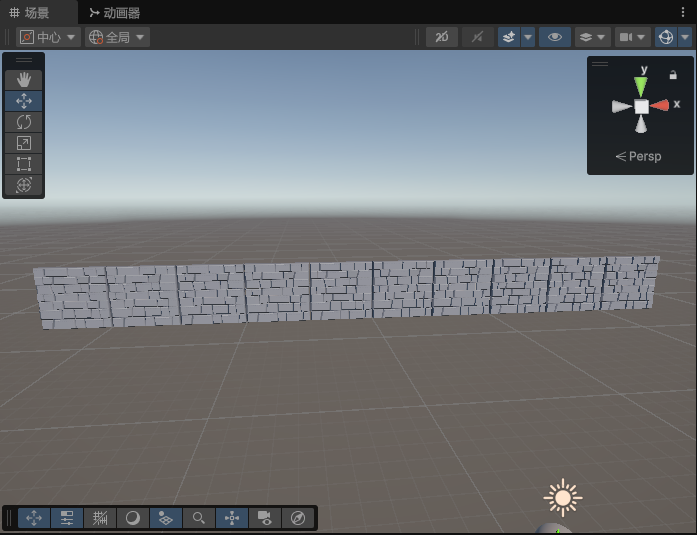
3、渲染墻壁
在 Unity 中,Graphics.DrawMeshInstanced 是一種高性能的渲染技術,特別適用于需要繪制大量相同或相似網格(如地牢墻壁、植被、子彈等)的場景。
void Update()
{RenderWalls();
}// 渲染墻面物體的函數
void RenderWalls()
{// 渲染普通墻體if (_wallMatricesN != null && _wallMatricesN.Count > 0){Graphics.DrawMeshInstanced(wallMesh,0,wallMaterial,_wallMatricesN.ToArray(),_wallMatricesN.Count);}
}
效果
4、加點隨機不同的墻壁效果
public Mesh wallMeshB; // 特殊墻壁網格
List<Matrix4x4> _wallMatricesNB; // 特殊墻壁變換矩陣列表void CreateWalls()
{// 初始化列表,用于存儲不同類型墻壁的變換矩陣_wallMatricesN = new List<Matrix4x4>();   // 普通墻壁_wallMatricesNB = new List<Matrix4x4>();  // 類型B墻壁// 計算沿x軸需要放置的墻壁數量,至少為1面墻int wallCount = Mathf.Max(1, (int)(roomSize.x / wallMesh.bounds.size.x));// 計算墻壁的縮放比例,使墻壁正好填滿房間的x軸長度float scale = (roomSize.x / wallCount) / wallMesh.bounds.size.x;// 循環創建每一面墻壁for (int i = 0; i < wallCount; i++){// 計算墻壁位置:從房間左側開始,等間距排列var t = transform.position = new Vector3(-roomSize.x / 2 + wallMesh.bounds.size.x * scale / 2 + i * scale * wallMesh.bounds.size.x, // x位置0,                                                                 // y位置-roomSize.y / 2);                                                  // z位置// 使用當前物體的旋轉var r = transform.rotation;// 設置縮放:x軸根據計算的比例縮放,y和z保持原樣var s = new Vector3(scale, 1, 1);// 創建變換矩陣(位置、旋轉、縮放)var mat = Matrix4x4.TRS(t, r, s);// 隨機決定墻壁類型(0或1)var rand = Random.Range(0, 2);// 根據隨機數將墻壁分配到不同的列表if (rand < 1){_wallMatricesN.Add(mat);   // 類型0 - 普通墻壁}else if (rand < 2){_wallMatricesNB.Add(mat);  // 類型1 - B類墻壁}}
}// 渲染墻面物體的函數
void RenderWalls()
{// 。。。// 渲染B類型墻體if (_wallMatricesNB != null && _wallMatricesNB.Count > 0){Graphics.DrawMeshInstanced(wallMeshB,0,wallMaterial,_wallMatricesNB.ToArray(),_wallMatricesNB.Count);}
}
效果
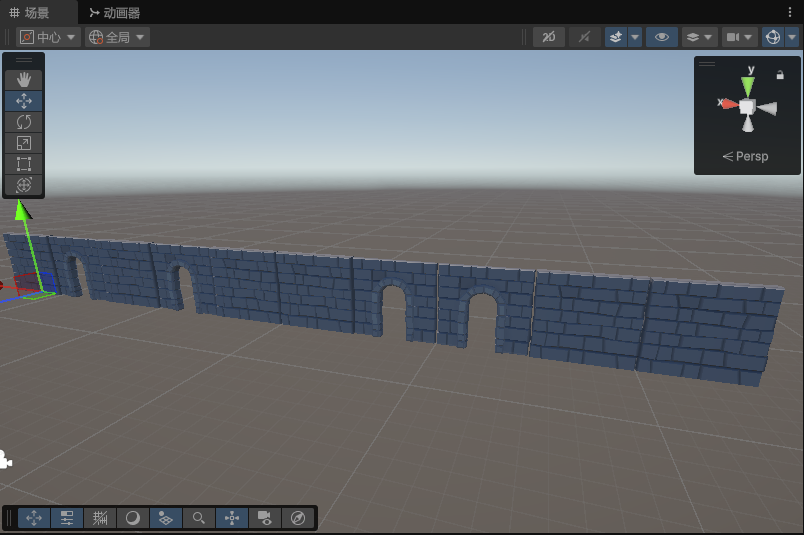
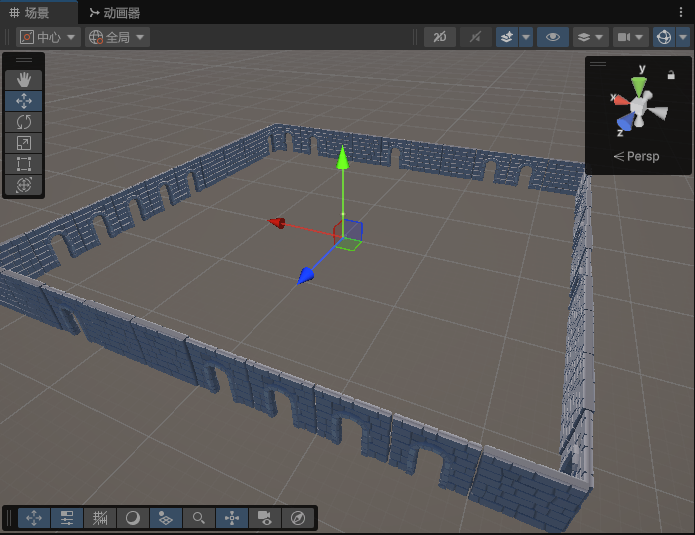
5、繪制四面墻壁
每面墻壁的生成非常類似,我們可以把生成單面墻壁進行封裝
// 創建所有墻壁
void CreateWalls()
{_wallMatricesN = new List<Matrix4x4>();_wallMatricesNB = new List<Matrix4x4>();// 生成四條邊的墻體CreateWallEdge(Vector3.forward, roomSize.y / 2, false);    // 北墻CreateWallEdge(Vector3.back, roomSize.y / 2, false);       // 南墻CreateWallEdge(Vector3.right, roomSize.x / 2, true);      // 東墻CreateWallEdge(Vector3.left, roomSize.x / 2, true);       // 西墻
}// 創建單邊墻體
void CreateWallEdge(Vector3 direction, float offset, bool isVertical)
{// 確定墻體方向Vector3 axis = isVertical ? Vector3.up : Vector3.zero;float rotationAngle = isVertical ? 90f : 0f;Vector2 size = isVertical ? new Vector2(roomSize.y, 0) : new Vector2(roomSize.x, 0);// 計算墻體數量和縮放比例int wallCount = Mathf.Max(1, (int)(size.x / wallMesh.bounds.size.x));float scale = (size.x / wallCount) / wallMesh.bounds.size.x;// 創建該邊的所有墻體for (int i = 0; i < wallCount; i++){// 計算墻體位置Vector3 position = transform.position + direction * offset;if (isVertical){position += Vector3.forward * (-size.x / 2 + wallMesh.bounds.size.x * scale / 2 + i * scale * wallMesh.bounds.size.x);}else{position += Vector3.right * (-size.x / 2 + wallMesh.bounds.size.x * scale / 2 + i * scale * wallMesh.bounds.size.x);}// 設置旋轉和縮放Quaternion rotation = transform.rotation * Quaternion.AngleAxis(rotationAngle, axis);Vector3 scaleVec = new Vector3(scale, 1, 1);// 創建變換矩陣Matrix4x4 matrix = Matrix4x4.TRS(position, rotation, scaleVec);// 隨機分配墻體類型if (Random.Range(0, 2) == 0)_wallMatricesN.Add(matrix);else_wallMatricesNB.Add(matrix);}
}
效果
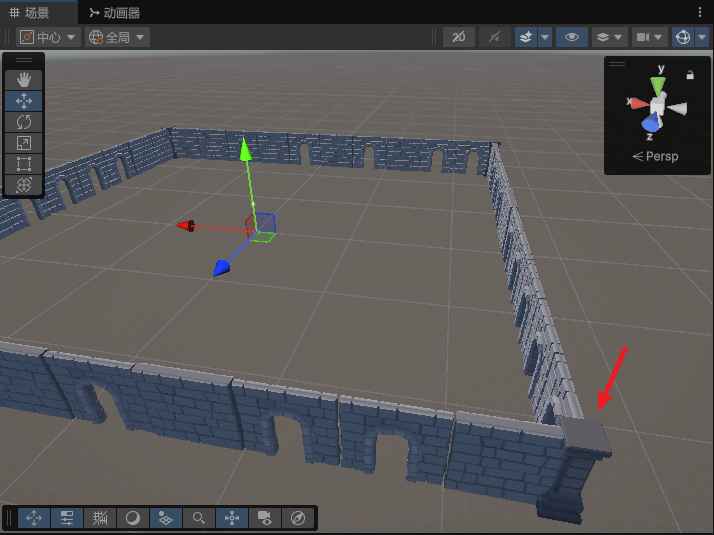
4、在四個角落生成支柱
#region 支柱生成相關
[Header("支柱生成相關")]
public Mesh pillarMesh; // 支柱網格
public Material pillarMaterial; // 支柱材質
List<Matrix4x4> _pillarMatrices; // 支柱變換矩陣列表//在四個角落添加支柱
void CreatePillars()
{_pillarMatrices = new List<Matrix4x4>();// 定義房間四個角落的位置Vector3[] corners = new Vector3[]{new Vector3(-roomSize.x/2, 0, -roomSize.y/2), // 西南角new Vector3(-roomSize.x/2, 0, roomSize.y/2),  // 西北角new Vector3(roomSize.x/2, 0, -roomSize.y/2),  // 東南角new Vector3(roomSize.x/2, 0, roomSize.y/2)    // 東北角};// 為每個角落創建支柱foreach (Vector3 corner in corners){Vector3 position = transform.position + corner;Quaternion rotation = transform.rotation;Vector3 scale = Vector3.one; // 支柱默認縮放Matrix4x4 matrix = Matrix4x4.TRS(position, rotation, scale);_pillarMatrices.Add(matrix);}
}// 渲染支柱
void RenderPillars()
{if (_pillarMatrices != null && _pillarMatrices.Count > 0){Graphics.DrawMeshInstanced(pillarMesh,0,pillarMaterial,_pillarMatrices.ToArray(),_pillarMatrices.Count);}
}#endregion
效果
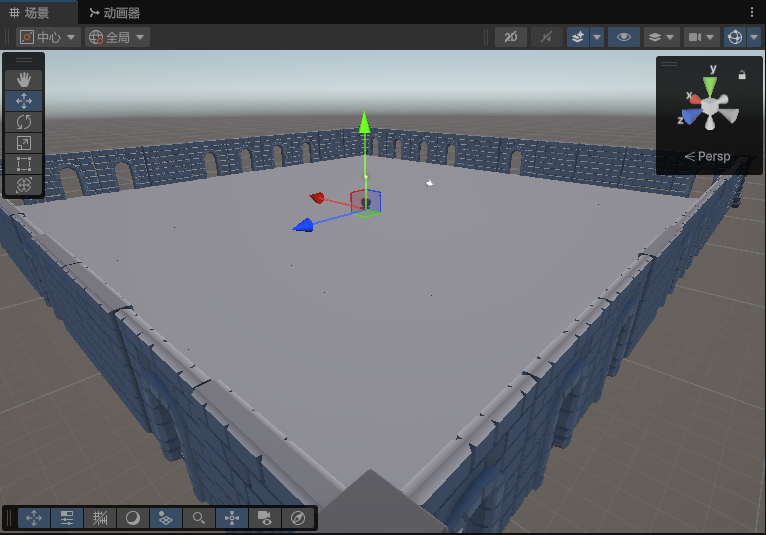
5、生成地板
生成地板可以使用兩種模式——縮放方式和平鋪方式,具體選擇其一即可
#region  地板生成相關
[Header("地板生成相關")]
public Mesh floorMesh; // 地板網格
public Material floorMaterial; // 地板材質
List<Matrix4x4> _floorMatrices; // 地板變換矩陣列表// 創建地板(縮放方式)
void createFloorScale()
{_floorMatrices = new List<Matrix4x4>();// 計算地板位置(房間中心)Vector3 position = transform.position;Quaternion rotation = transform.rotation;// 根據房間尺寸縮放地板Vector3 scale = new Vector3(roomSize.x, 1, roomSize.y);Matrix4x4 matrix = Matrix4x4.TRS(position, rotation, scale);_floorMatrices.Add(matrix);
}// 創建地板(平鋪方式)
void CreateFloorTile()
{_floorMatrices = new List<Matrix4x4>();// 獲取地板網格的原始尺寸float floorWidth = floorMesh.bounds.size.x;float floorLength = floorMesh.bounds.size.z;// 計算X軸和Z軸需要的地板數量int floorCountX = Mathf.Max(1, Mathf.CeilToInt(roomSize.x / floorWidth));int floorCountZ = Mathf.Max(1, Mathf.CeilToInt(roomSize.y / floorLength)); // 注意:RoomSize.y對應的是Z軸長度// 計算實際縮放比例(使地板正好鋪滿房間)float scaleX = (roomSize.x / floorCountX) / floorWidth;float scaleZ = (roomSize.y / floorCountZ) / floorLength;// 起始位置(左下角)Vector3 startPos = transform.position + new Vector3(-roomSize.x / 2 + floorWidth * scaleX / 2, 0, -roomSize.y / 2 + floorLength * scaleZ / 2);// 平鋪地板for (int x = 0; x < floorCountX; x++){for (int z = 0; z < floorCountZ; z++){// 計算每塊地板的位置Vector3 position = startPos + new Vector3(x * floorWidth * scaleX,0,z * floorLength * scaleZ);// 保持默認旋轉Quaternion rotation = transform.rotation;// 設置縮放(保持Y軸不變)Vector3 scale = new Vector3(scaleX, 1, scaleZ);// 創建變換矩陣Matrix4x4 matrix = Matrix4x4.TRS(position, rotation, scale);_floorMatrices.Add(matrix);}}
}// 渲染地板
void RenderFloor()
{if (_floorMatrices != null && _floorMatrices.Count > 0){Graphics.DrawMeshInstanced(floorMesh,0,floorMaterial,_floorMatrices.ToArray(),_floorMatrices.Count);}
}
#endregion
效果
6、墻壁接縫生成支柱
#region 墻壁接縫支柱
[Header("墻壁接縫支柱")]
public Mesh junctionPillarMesh; // 接縫支柱網格
public Material junctionPillarMaterial; // 接縫支柱材質
List<Matrix4x4> _junctionPillarMatrices; // 接縫支柱變換矩陣void AddWallJunctionPillars()
{if (junctionPillarMesh == null) return;_junctionPillarMatrices = new List<Matrix4x4>();// 獲取墻體網格尺寸(假設所有墻體網格尺寸相同)float wallWidth = wallMesh.bounds.size.x;// 計算水平和垂直墻體的數量int horizontalWallCount = Mathf.Max(1, (int)(roomSize.x / wallWidth));int verticalWallCount = Mathf.Max(1, (int)(roomSize.y / wallWidth));// 計算墻體縮放比例float hScale = (roomSize.x / horizontalWallCount) / wallWidth;float vScale = (roomSize.y / verticalWallCount) / wallWidth;// 添加南北墻的接縫支柱(東西走向的墻)for (int i = 1; i < horizontalWallCount; i++){// 北墻接縫float xPos = -roomSize.x / 2 + i * wallWidth * hScale;AddPillar(transform.position + new Vector3(xPos, 0, roomSize.y / 2));// 南墻接縫AddPillar(transform.position + new Vector3(xPos, 0, -roomSize.y / 2));}// 添加東西墻的接縫支柱(南北走向的墻)for (int i = 1; i < verticalWallCount; i++){// 東墻接縫float zPos = -roomSize.y / 2 + i * wallWidth * vScale;AddPillar(transform.position + new Vector3(roomSize.x / 2, 0, zPos));// 西墻接縫AddPillar(transform.position + new Vector3(-roomSize.x / 2, 0, zPos));}
}// 在指定位置添加支柱
void AddPillar(Vector3 position, float scaleMultiplier = 1f)
{Quaternion rotation = transform.rotation;Vector3 scale = Vector3.one * scaleMultiplier;_junctionPillarMatrices.Add(Matrix4x4.TRS(position, rotation, scale));
}// 渲染接縫支柱
void RenderJunctionPillars()
{if (_junctionPillarMatrices != null && _junctionPillarMatrices.Count > 0){Graphics.DrawMeshInstanced(junctionPillarMesh,0,junctionPillarMaterial,_junctionPillarMatrices.ToArray(),_junctionPillarMatrices.Count);}
}
#endregion
效果,這里我沒有特殊支柱的素材,就還有用四個角落的支柱代替好了

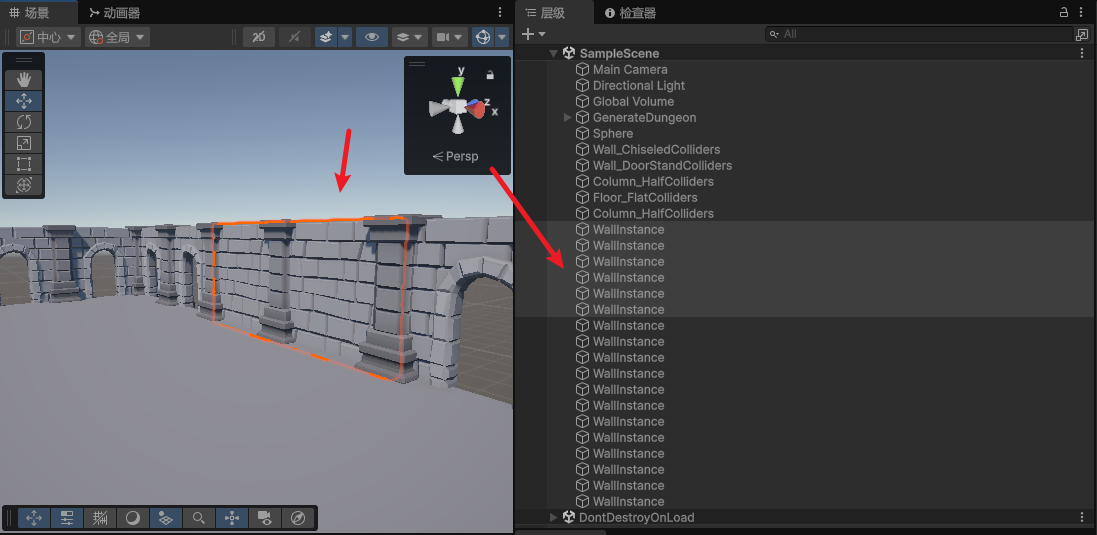
7、為每個實例生成GameObject
這個一般只在需要的使用,如果你想更靈活的操作自己的對象,比如實現可破壞的墻壁效果等等,這里我以墻體為例,其他大家自行擴展即可,方法都一樣。
#region 為每個實例生成GameObject
// 修改后的創建方法示例(以墻體為例)
List<GameObject> _wallInstances = new List<GameObject>();void CreateWallsWithColliders()
{// 銷毀舊實例(如果存在)foreach (var wall in _wallInstances) Destroy(wall);_wallInstances.Clear();// 生成帶碰撞體的墻體foreach (var matrix in _wallMatricesN){GameObject wall = new GameObject("WallInstance");wall.transform.SetPositionAndRotation(matrix.GetPosition(), matrix.rotation);wall.transform.localScale = matrix.lossyScale;// 添加網格組件MeshFilter filter = wall.AddComponent<MeshFilter>();filter.mesh = wallMesh;MeshRenderer renderer = wall.AddComponent<MeshRenderer>();renderer.material = wallMaterial;// 添加碰撞體(根據需求選擇類型)MeshCollider collider = wall.AddComponent<MeshCollider>();collider.sharedMesh = wallMesh;collider.convex = false; // 對于靜態墻體設為false_wallInstances.Add(wall);}
}
#endregion
效果
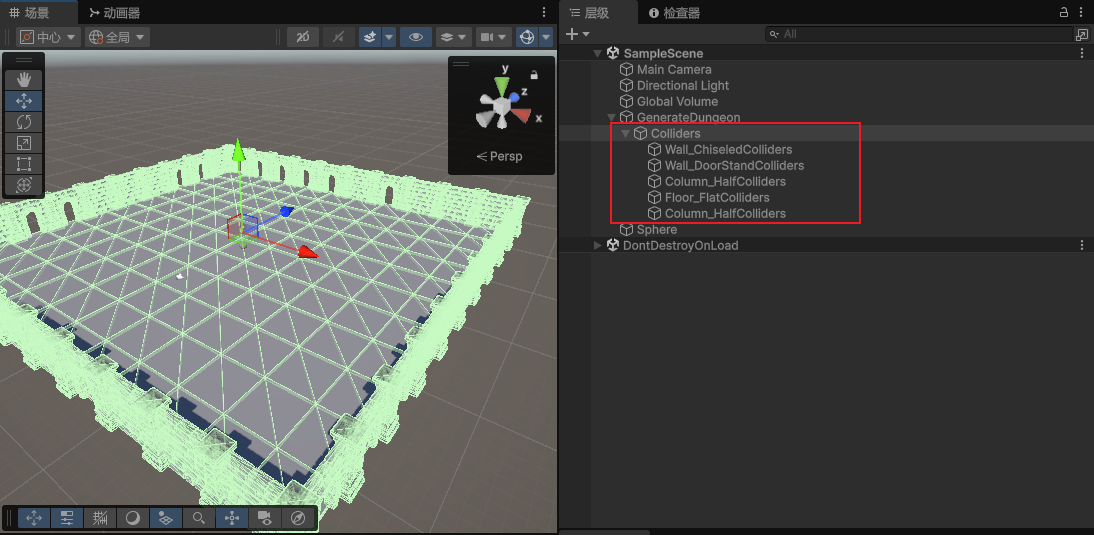
8、生成碰撞體
#region 碰撞體生成
private GameObject _collidersParent;void CreateCombinedCollider(List<Matrix4x4> matrices, Mesh mesh)
{if (mesh == null) return;if (_collidersParent == null){_collidersParent = new GameObject("Colliders");_collidersParent.transform.SetParent(transform);}// 合并所有網格CombineInstance[] combines = new CombineInstance[matrices.Count];for (int i = 0; i < matrices.Count; i++){combines[i].mesh = mesh;combines[i].transform = matrices[i];}Mesh combinedMesh = new Mesh();combinedMesh.CombineMeshes(combines);// 創建碰撞體父物體GameObject colliderGameObject = new GameObject(mesh.name + "Colliders");colliderGameObject.transform.SetParent(_collidersParent.transform);MeshCollider collider = colliderGameObject.AddComponent<MeshCollider>();collider.sharedMesh = combinedMesh;
}
#endregion
效果
9、放置隨機物品
放置隨機物品就比較復雜了,不過我加了很多詳細的注釋,大家可以查看理解。
新增道具配置類
using UnityEngine;// 道具配置類
[System.Serializable]
public class DungeonProp
{public GameObject prefab; // 預制體public enum PositionType { Wall, Corner, Middle, Anywhere }// 放置位置類型public PositionType positionType; // 放置位置類型[Range(0, 1)] public float spawnProbability; // 生成概率(0~1)public int minCount; // 最小數量public int maxCount; // 最大數量public Vector3 offset; //放置偏移量public bool randomRotation; // 是否隨機旋轉
}
編寫道具放置系統邏輯,我這里使用了OBB (SAT) (有向包圍盒),精準的檢測物品是否相交,且保持良好的性能。
不了解什么是OBB的可以參考:【unity知識】unity使用AABB(軸對齊包圍盒)和OBB(定向包圍盒)優化碰撞檢測
#region 道具放置系統
[Header("道具放置系統")]
public DungeonProp[] dungeonProps; // 可放置的道具配置
private float _wallThickness; // 墻體一半厚度
private GameObject _propsParent; //父物體// 放置道具
void PlaceProps()
{if (dungeonProps == null || dungeonProps.Length == 0) return;_wallThickness = wallMesh.bounds.extents.z;// 計算實際可用區域(考慮墻體厚度)float usableWidth = roomSize.x - 2 * _wallThickness;float usableHeight = roomSize.y - 2 * _wallThickness;// 計算房間邊界(考慮墻體厚度)float minX = transform.position.x - usableWidth / 2;float maxX = transform.position.x + usableWidth / 2;float minZ = transform.position.z - usableHeight / 2;float maxZ = transform.position.z + usableHeight / 2;// 創建道具父物體if (_propsParent == null){_propsParent = new GameObject("PropsParent");_propsParent.transform.SetParent(transform);} // 存儲已放置物體的OBB信息List<OBB> placedOBBs = new List<OBB>();foreach (var prop in dungeonProps){// 計算實際要放置的數量int count = Random.Range(prop.minCount, prop.maxCount + 1);for (int i = 0; i < count; i++){// 根據概率決定是否生成if (Random.value > prop.spawnProbability) continue;Vector3 position = Vector3.zero;Quaternion rotation = Quaternion.identity;Vector3 halfExtents = Vector3.zero;// 根據位置類型確定位置和朝向switch (prop.positionType){case DungeonProp.PositionType.Wall:if (!TryFindWallPosition(prop.prefab, minX, maxX, minZ, maxZ,out position, out rotation, out halfExtents))continue;break;case DungeonProp.PositionType.Corner:if (!TryFindCornerPosition(prop.prefab, minX, maxX, minZ, maxZ,out position, out rotation, out halfExtents))continue;break;case DungeonProp.PositionType.Middle:if (!TryFindMiddlePosition(prop.prefab, minX, maxX, minZ, maxZ,out position, out rotation, out halfExtents))continue;break;case DungeonProp.PositionType.Anywhere:if (!TryFindAnyPosition(prop.prefab, minX, maxX, minZ, maxZ,out position, out rotation, out halfExtents))continue;break;}// 應用隨機旋轉if (prop.randomRotation){rotation = Quaternion.Euler(0, Random.Range(0, 360), 0);}// 檢查碰撞并放置道具if (!CheckOverlap(position, halfExtents, rotation, placedOBBs)){GameObject propInstance = Instantiate(prop.prefab, position + prop.offset, rotation);propInstance.transform.SetParent(_propsParent.transform);placedOBBs.Add(new OBB(){center = position,extents = halfExtents,rotation = rotation});}}}
}// 嘗試在墻邊放置道具
bool TryFindWallPosition(GameObject prefab, float minX, float maxX, float minZ, float maxZ,out Vector3 position, out Quaternion rotation, out Vector3 halfExtents)
{position = Vector3.zero;rotation = Quaternion.identity;halfExtents = Vector3.zero;// 獲取預制體大小Bounds bounds = GetPrefabBounds(prefab);if (bounds.size == Vector3.zero) return false;//獲取包圍盒(Bounds)的半尺寸halfExtents = bounds.extents;// 隨機選擇一面墻int wallIndex = Random.Range(0, 4);switch (wallIndex){case 0: // 北墻 (z最大)position = new Vector3(Random.Range(minX + halfExtents.x, maxX - halfExtents.x),0,maxZ - halfExtents.z);rotation = Quaternion.Euler(0, 180, 0); // 面朝南break;case 1: // 南墻 (z最小)position = new Vector3(Random.Range(minX + halfExtents.x, maxX - halfExtents.x),0,minZ + halfExtents.z);rotation = Quaternion.identity; // 面朝北break;case 2: // 東墻 (x最大)position = new Vector3(maxX - halfExtents.z,0,Random.Range(minZ + halfExtents.x, maxZ - halfExtents.x));rotation = Quaternion.Euler(0, 270, 0); // 面朝西break;case 3: // 西墻 (x最小)position = new Vector3(minX + halfExtents.z,0,Random.Range(minZ + halfExtents.x, maxZ - halfExtents.x));rotation = Quaternion.Euler(0, 90, 0); // 面朝東break;}return true;
}// 嘗試在角落放置道具
bool TryFindCornerPosition(GameObject prefab, float minX, float maxX, float minZ, float maxZ,out Vector3 position, out Quaternion rotation, out Vector3 halfExtents)
{position = Vector3.zero;rotation = Quaternion.identity;halfExtents = Vector3.zero;// 獲取預制體大小Bounds bounds = GetPrefabBounds(prefab);if (bounds.size == Vector3.zero) return false;//獲取包圍盒(Bounds)的半尺寸halfExtents = bounds.extents;// 隨機選擇一個墻角int cornerIndex = Random.Range(0, 4);float cornerOffset = _wallThickness + Mathf.Max(halfExtents.x, halfExtents.z);switch (cornerIndex){case 0: // 西北角position = new Vector3(minX + cornerOffset,0,maxZ - cornerOffset);rotation = Quaternion.Euler(0, 225, 0); // 面向東南break;case 1: // 東北角position = new Vector3(maxX - cornerOffset,0,maxZ - cornerOffset);rotation = Quaternion.Euler(0, 315, 0); // 面向西南break;case 2: // 西南角position = new Vector3(minX + cornerOffset,0,minZ + cornerOffset);rotation = Quaternion.Euler(0, 135, 0); // 面向東北break;case 3: // 東南角position = new Vector3(maxX - cornerOffset,0,minZ + cornerOffset);rotation = Quaternion.Euler(0, 45, 0); // 面向西北break;}return true;
}// 嘗試在中間區域放置道具
bool TryFindMiddlePosition(GameObject prefab, float minX, float maxX, float minZ, float maxZ,out Vector3 position, out Quaternion rotation, out Vector3 halfExtents)
{position = Vector3.zero;rotation = Quaternion.identity;halfExtents = Vector3.zero;// 獲取預制體大小Bounds bounds = GetPrefabBounds(prefab);if (bounds.size == Vector3.zero) return false;//獲取包圍盒(Bounds)的半尺寸halfExtents = bounds.extents;// 中間區域(避開墻邊)float safeMargin = Mathf.Max(halfExtents.x, halfExtents.z) * 2;position = new Vector3(Random.Range(minX + safeMargin, maxX - safeMargin),0,Random.Range(minZ + safeMargin, maxZ - safeMargin));return true;
}// 嘗試在任意位置放置道具
bool TryFindAnyPosition(GameObject prefab, float minX, float maxX, float minZ, float maxZ,out Vector3 position, out Quaternion rotation, out Vector3 halfExtents)
{// 50%概率放在墻邊,25%概率放在墻角,25%概率放在中間float rand = Random.value;if (rand < 0.5f)return TryFindWallPosition(prefab, minX, maxX, minZ, maxZ, out position, out rotation, out halfExtents);else if (rand < 0.75f)return TryFindCornerPosition(prefab, minX, maxX, minZ, maxZ, out position, out rotation, out halfExtents);elsereturn TryFindMiddlePosition(prefab, minX, maxX, minZ, maxZ, out position, out rotation, out halfExtents);
}// 獲取預制體的包圍盒
Bounds GetPrefabBounds(GameObject prefab)
{Renderer renderer = prefab.GetComponentInChildren<Renderer>();if (renderer != null) return renderer.bounds;// 如果預制體沒有渲染器,嘗試使用碰撞器Collider collider = prefab.GetComponentInChildren<Collider>();if (collider != null) return collider.bounds;// 默認大小return new Bounds(Vector3.zero, Vector3.one * 0.5f);
}/// <summary>
/// 檢查新物體是否與已放置物體發生OBB重疊
/// </summary>
/// <param name="position">新物體的中心位置</param>
/// <param name="halfExtents">新物體的半尺寸</param>
/// <param name="rotation">新物體的旋轉</param>
/// <param name="existingOBBs">已放置物體的OBB列表</param>
/// <returns>true表示有重疊,false表示無重疊</returns>
bool CheckOverlap(Vector3 position, Vector3 halfExtents, Quaternion rotation, List<OBB> existingOBBs)
{// 創建新物體的OBBOBB newOBB = new OBB(){center = position,    // 設置中心點extents = halfExtents, // 設置半尺寸rotation = rotation   // 設置旋轉};// 遍歷所有已放置物體的OBBforeach (var obb in existingOBBs){// 如果與任一已放置物體相交,返回trueif (newOBB.Intersects(obb))return true;}// 沒有發現重疊return false;
}
#endregion
}
配置數據
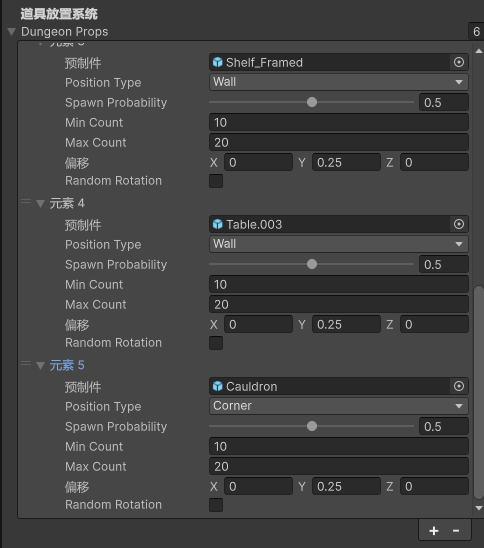
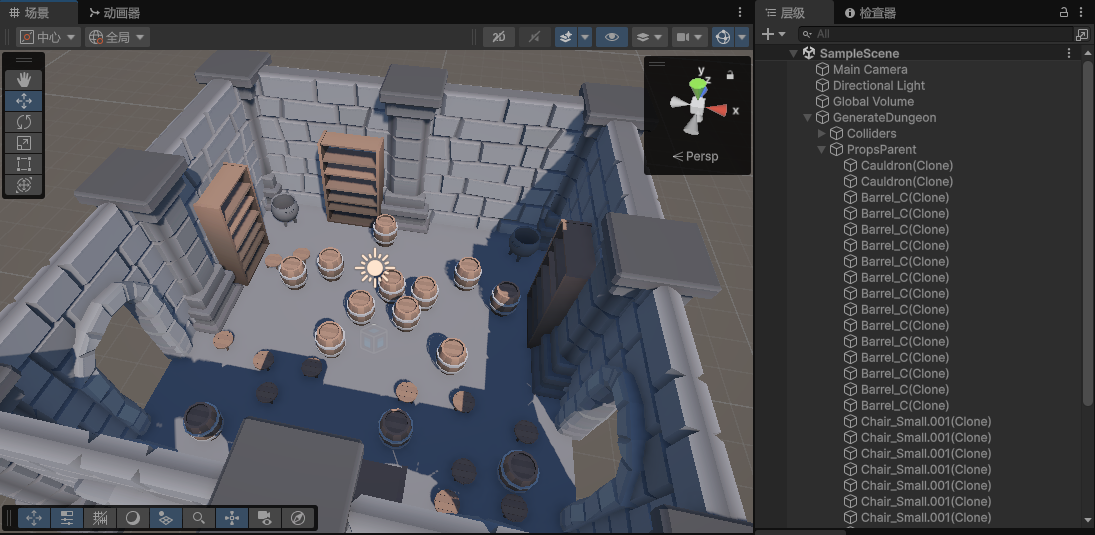
效果,實現在不同位置,按概率生成不同物品
10、設置隨機種子
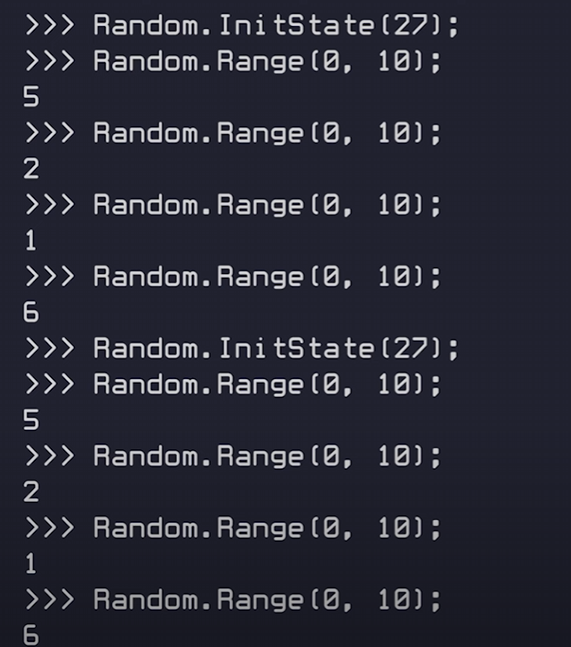
Random.InitState 是 Unity 引擎中用于初始化隨機數生成器的方法,它的作用是設定隨機數生成的種子(Seed),從而控制隨機序列的起始點。它的核心作用是:
-
確定性隨機:使用相同的種子時,Random 產生的隨機數序列會完全一致。
Random.InitState(123); // 初始化種子為123
Debug.Log(Random.Range(0, 100)); // 固定輸出某個值(如42)
每次運行程序,只要種子是 123,第一個 Random.Range(0, 100) 必定返回相同的值。
-
取消真正的隨機性:默認情況下,Unity 使用系統時間作為種子,結果不可預測。而 InitState 會覆蓋這一行為,使隨機結果可重現。
所以我們可以給我們的項目添加隨機種子功能
[Header("隨機種子")]
[SerializeField] private int _seed; // 隨機種子
[SerializeField] private bool _useSeed; // 是否使用指定種子void Start()
{// 初始化隨機種子if (_useSeed){Random.InitState(_seed); // 使用指定的種子}else{int randomSeed = Random.Range(1, 1000000); // 生成隨機種子Random.InitState(randomSeed);Debug.Log(randomSeed); // 輸出種子以便重現}//...
}
我們使用相同的種子,一直會生成相同的地牢
源碼
https://gitee.com/unity_data/unity6-urpgeneration-dungeon
參考
https://www.youtube.com/watch?v=PhLcNhK9aro
專欄推薦
| 地址 |
|---|
| 【unity游戲開發入門到精通——C#篇】 |
| 【unity游戲開發入門到精通——unity通用篇】 |
| 【unity游戲開發入門到精通——unity3D篇】 |
| 【unity游戲開發入門到精通——unity2D篇】 |
| 【unity實戰】 |
| 【制作100個Unity游戲】 |
| 【推薦100個unity插件】 |
| 【實現100個unity特效】 |
| 【unity框架/工具集開發】 |
| 【unity游戲開發——模型篇】 |
| 【unity游戲開發——InputSystem】 |
| 【unity游戲開發——Animator動畫】 |
| 【unity游戲開發——UGUI】 |
| 【unity游戲開發——聯網篇】 |
| 【unity游戲開發——優化篇】 |
| 【unity游戲開發——shader篇】 |
| 【unity游戲開發——編輯器擴展】 |
| 【unity游戲開發——熱更新】 |
| 【unity游戲開發——網絡】 |
完結
好了,我是向宇,博客地址:https://xiangyu.blog.csdn.net,如果學習過程中遇到任何問題,也歡迎你評論私信找我。
贈人玫瑰,手有余香!如果文章內容對你有所幫助,請不要吝嗇你的點贊評論和關注,你的每一次支持都是我不斷創作的最大動力。當然如果你發現了文章中存在錯誤或者有更好的解決方法,也歡迎評論私信告訴我哦!


基于PHP和Vue的網上購物平臺)

—— 表單)
提升特征多樣性,同時減少參數和計算量)

)
)


![[激光原理與應用-168]:光源 - 常見光源的分類、特性及應用場景的詳細解析,涵蓋技術原理、優缺點及典型應用領域](http://pic.xiahunao.cn/[激光原理與應用-168]:光源 - 常見光源的分類、特性及應用場景的詳細解析,涵蓋技術原理、優缺點及典型應用領域)
