目錄
?1. 傳遞單個參數
1.1 關于參數名的問題
2. 傳遞多個參數
2.1 關于參數順序的問題
2.2 關于基本類型與包裝類的問題
3. 使用對象傳參
4. 后端參數重命名問題
4.1 關于@RequestPara注解
?1. 傳遞單個參數
現創建Spring MVC項目,.java文件內容如下:
package com.example.demo.controller;import org.springframework.web.bind.annotation.RequestMapping;
import org.springframework.web.bind.annotation.RestController;@RequestMapping("/Para")
@RestController
public class ParaController {@RequestMapping("/M1")public String m1(String name){return "Parameter has Received: Name:"+name;}
}
運行啟動類,使用Postman向目標地址發送一個GET請求,將待傳參數置于query string中,發送的請求與得到的響應如下::

1.1 關于參數名的問題
請注意:客戶端傳遞給服務器的參數應與服務器創建的參數名相同;
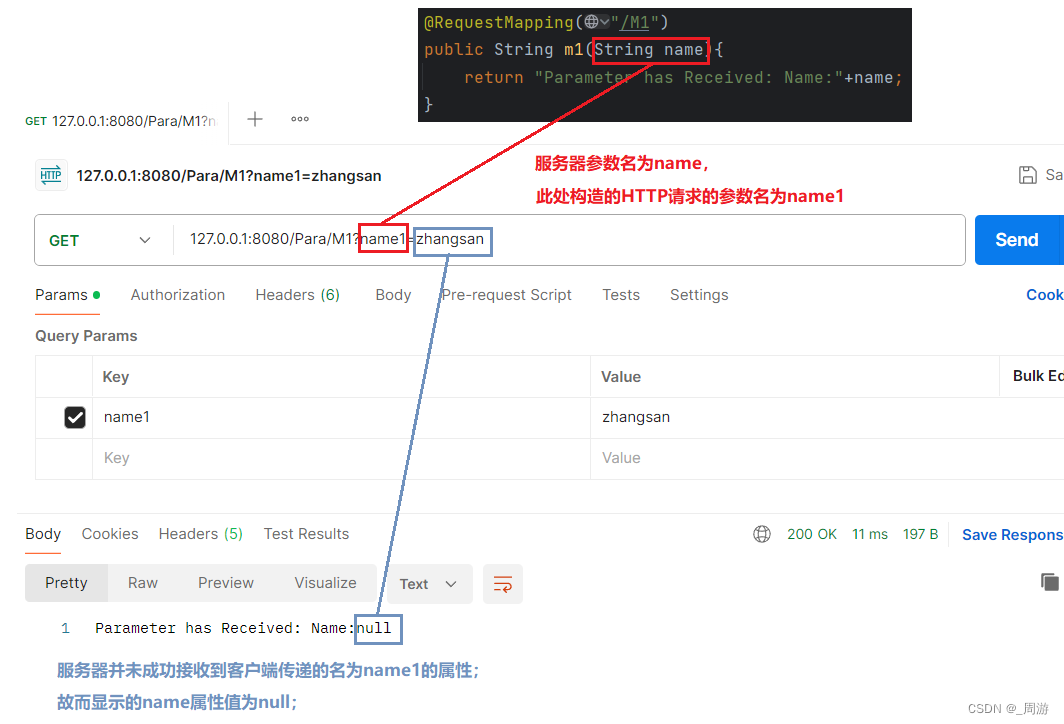
對于傳遞單個參數的底層邏輯就是從請求的參數中獲取參數名為name的值,并給name賦值;
2. 傳遞多個參數
在Spring MVC項目的.java文件內容如下:
package com.example.demo.controller;import org.springframework.web.bind.annotation.RequestMapping;
import org.springframework.web.bind.annotation.RestController;@RequestMapping("/Para")
@RestController
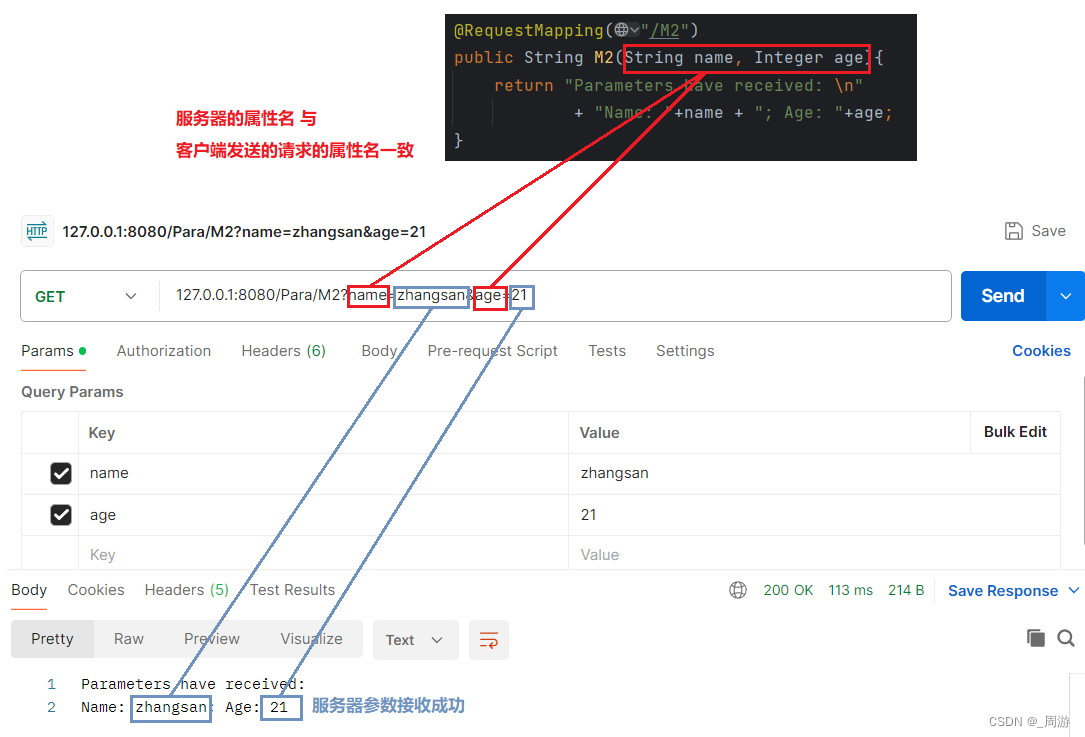
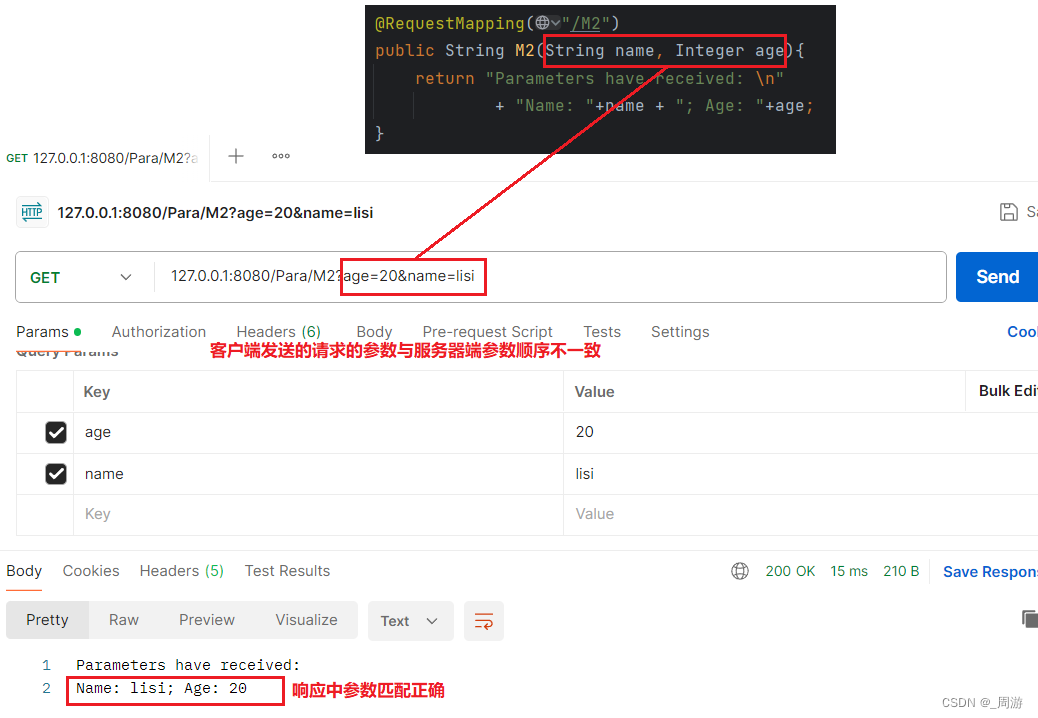
public class ParaController {@RequestMapping("/M2")public String M2(String name, Integer age){return "Parameters have received: \n"+ "Name: "+name + "; Age: "+age;}
}
運行啟動類后,構造HTTP請求并發送,詳情如下:
2.1 關于參數順序的問題
注:多個參數傳參,與參數的順序無關,僅與參數名是否匹配有關;
2.2 關于基本類型與包裝類的問題
現以基本類型 int 與 包裝類Integer 為例:
現Spring MVC項目的.java文件內容如下:
package com.example.demo.controller;import org.springframework.web.bind.annotation.RequestMapping;
import org.springframework.web.bind.annotation.RestController;@RequestMapping("/Para")
@RestController@RequestMapping("/M3")public String M3(String name, int age){return "Parameters have received: \n"+ "Name: "+name + "; Age: "+age;}
}
示例1:當 int 型參數有具體傳參時:
運行啟動類,構造HTTP請求并發送,詳情如下:?

可見接收正常,返回正常;
示例2:當 int 型參數沒有具體傳參時:
啟動運行類,構造HTTP請求并發送,詳情如下:
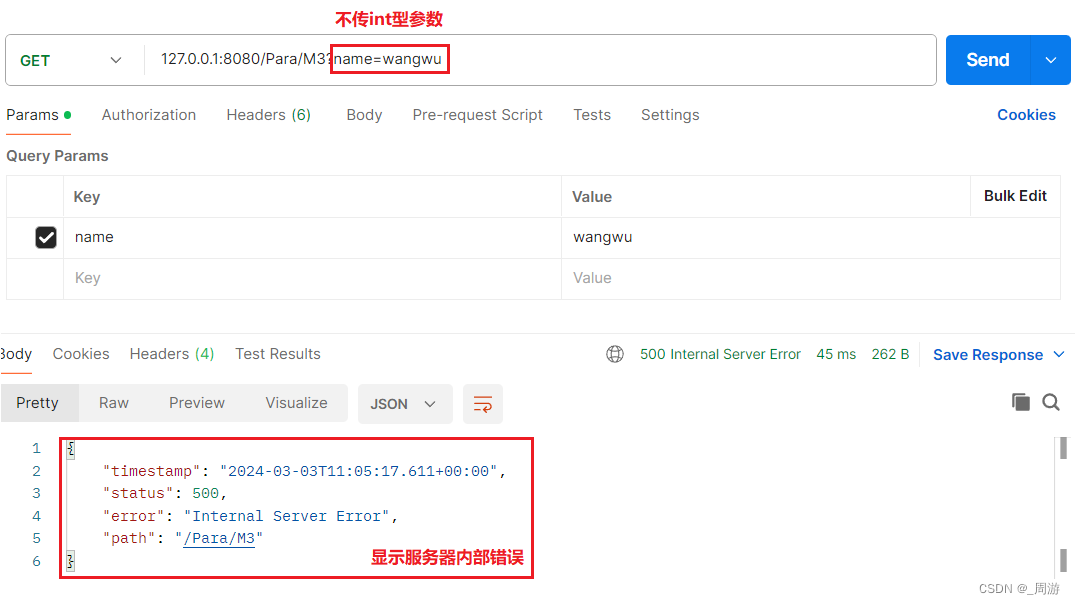
查看報錯信息如下:
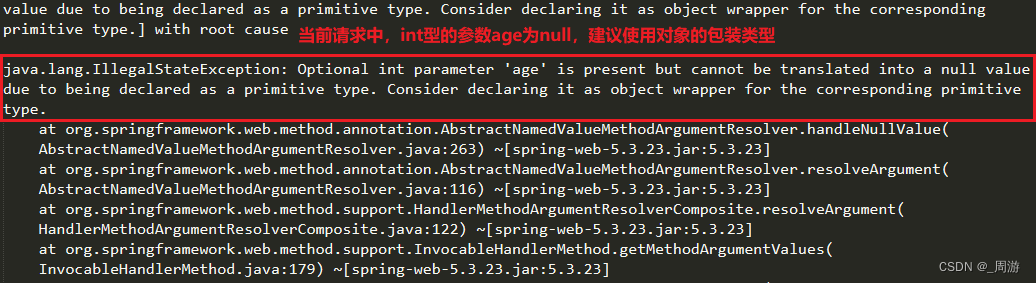
建議:在開發中盡量使用包裝類,如果使用基本類型的參數,必須要傳值;
關于包裝類的問題,可查看數據結構專欄包裝類與泛型一文,鏈接如下:
【數據結構】_包裝類與泛型-CSDN博客![]() https://blog.csdn.net/m0_63299495/article/details/136436372
https://blog.csdn.net/m0_63299495/article/details/136436372
3. 使用對象傳參
如上文所述,當傳遞的參數個數與類型不同時,就需要頻繁修改。
這于前后端配合是非常不便的,在Spring MVC項目中,常使用對象進行傳參:
現創建 Person class, 令目錄如下:
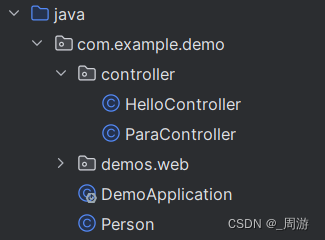
Person.java文件內容如下:
package com.example.demo;public class Person {Integer id;String name;Integer age;public Integer getId() {return id;}public void setId(Integer id) {this.id = id;}public String getName() {return name;}public void setName(String name) {this.name = name;}public Integer getAge() {return age;}public void setAge(Integer age) {this.age = age;}@Overridepublic String toString() {return "Person{" +"id=" + id +", name='" + name + '\'' +", age=" + age +'}';}
}
ParaController.java內容如下:
package com.example.demo.controller;import com.example.demo.Person;
import org.springframework.web.bind.annotation.RequestMapping;
import org.springframework.web.bind.annotation.RestController;@RequestMapping("/Para")
@RestController
public class ParaController {@RequestMapping("/M4")public String M4(Person person){return "Parameters have received: \n"+ person.toString();}
}
使用postman構造并發送請求,詳情如下:?

在spring項目開發中,通常使用對象對要傳遞的參數組進行封裝,這樣可以簡化接口邏輯。
也方便使用一些邏輯進行默認值的設定;
4. 后端參數重命名問題
在前后端配合時,也有可能會出現對于前端傳遞的參數名(如name),在后端需要進行修改的問題(如username,articlename等等),此時可以使用@RequestParm注解對后端參數重命名:
現.java文件內容如下:
package com.example.demo.controller;import com.example.demo.Person;
import org.springframework.web.bind.annotation.RequestMapping;
import org.springframework.web.bind.annotation.RequestParam;
import org.springframework.web.bind.annotation.RestController;@RequestMapping("/Para")
@RestController
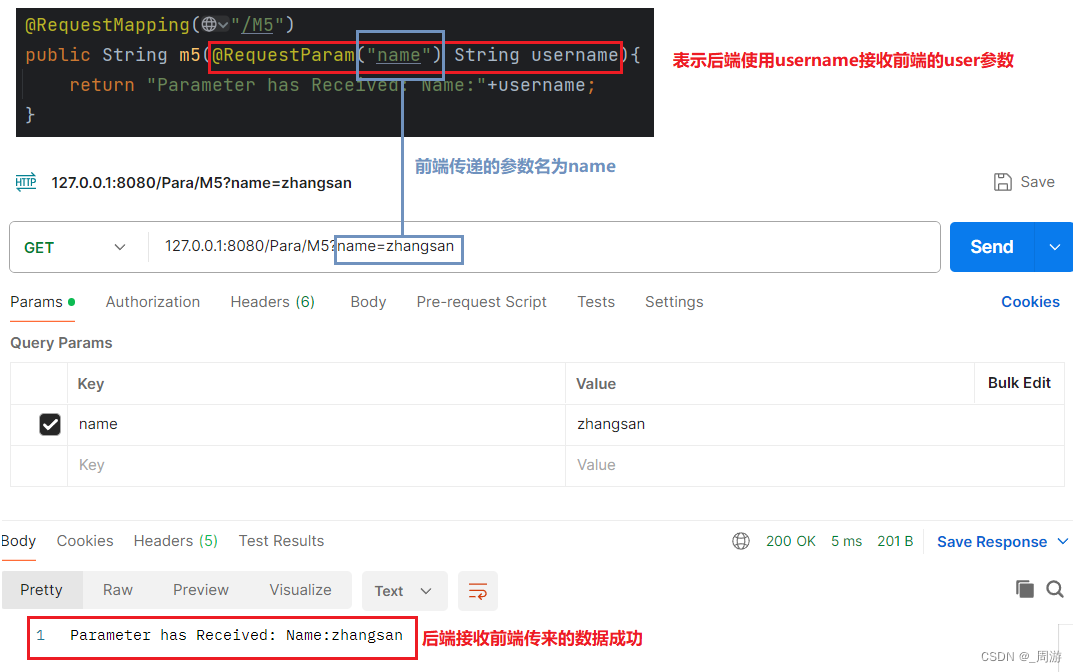
public class ParaController {@RequestMapping("/M5")public String m5(@RequestParam("name") String username){return "Parameter has Received: Name:"+username;}
}
運行啟動類,構造HTTP請求并發送,詳情如下:
示例1:前端使用name,后端使用username:
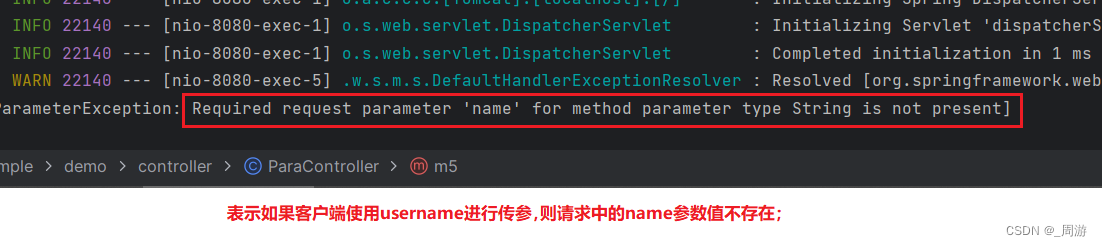
示例2:前端與后端均使用username:
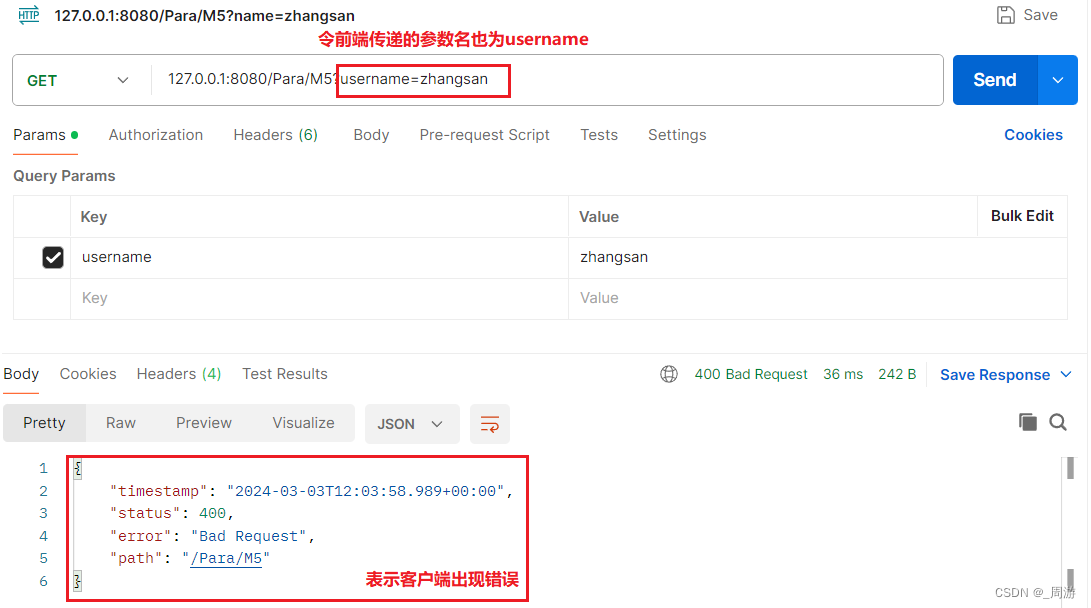
查看日志警告信息:?
?
4.1 關于@RequestPara注解
Ctrl+左鍵點擊查看@RequestPara注解源碼:
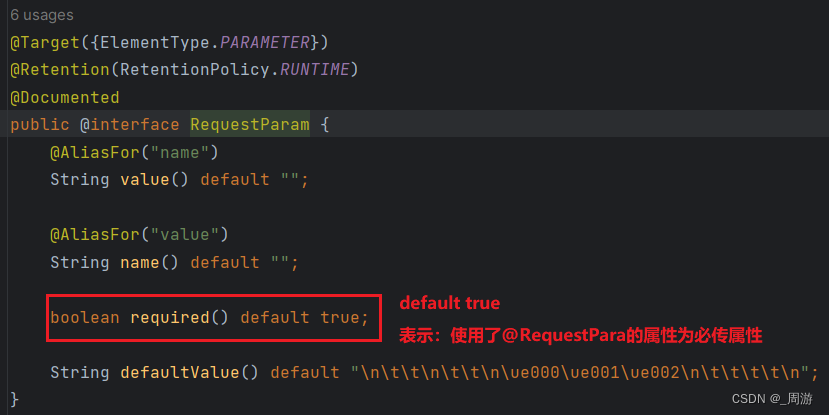
可見@RequestPara注解默認情況為:
當后端使用@RequestPara注解對后端參數進行重命名時,默認該屬性為必傳屬性;
可以修改為false,取消其必傳限制:
package com.example.demo.controller;import com.example.demo.Person;
import org.springframework.web.bind.annotation.RequestMapping;
import org.springframework.web.bind.annotation.RequestParam;
import org.springframework.web.bind.annotation.RestController;@RequestMapping("/Para")
@RestController
public class ParaController {@RequestMapping("/M5")public String m5(@RequestParam(value = "name",required = false) String username){return "Parameter has Received: Name:"+username;}
}
此時再構造請求發送給服務器:


:Flink基于Kubernetes部署(7)-Kubernetes 集群搭建-3)


![[AutoSar]BSW_Com08 CAN driver 模塊介紹及參數配置說明 (二)](http://pic.xiahunao.cn/[AutoSar]BSW_Com08 CAN driver 模塊介紹及參數配置說明 (二))


)


