文章介紹
?????? Qualcomm?Neural Processing SDK (以下簡稱SNPE)支持Caffe、ONNX、PyTorch和TensorFlow等不同ML框架的算子。對于某些特定的不支持的算子,我們介紹一種算子等效替換的方法來完成模型轉換。本案例來源于https://github.com/quic/qidk/tree/master/Model-Enablement/Model-Conversion-Layer-Replacement
以PyTorch? MobilenetV3模型轉換SNPE DLC的過程為例子,介紹如何使用等效算子替換的方法達成不支持算子的轉換
前置條件
- SNPE-2.7.x-在PC上下載并設置好SNPE
相關步驟參考Snapdragon Neural Processing Engine SDK: SNPE Setup
- python version 3.6.x and 3.8.x
- Torch version 1.10
- 安裝pip install jupyter
- 一臺Linux機器
- 高通Snapdragon 安卓手機,推薦Snapdragon? 8 Gen 2系列手機
特別注意:Qualcomm?Neural Processing SDK需要python 3.6版本,型號repo需要python 3.8版本。因此,建議使用兩個不同的虛擬環境。
操作步驟:
一、獲取模型
1. 運行以下命令獲取模型:
cd generatedModels
?wget https://download.pytorch.org/models/mobilenet_v3_large-8738ca79.pth
2. 現在,我們將使用MobileNetV3的Pytorch模型來獲得ONNX模型。我們通常建議使用這種方法從pytorch模型生成dlc,方法是先轉換為onnx,然后再轉換為dlc。
運行getModel.py生成ONNX文件:
python getModel.py
cd ..
3. 這將生成ONNX模型可以在generatedModels/ONNX/文件夾中找到。
4. 現在,我們可以將ONNX模型轉換為DLC
?
二、模型轉換錯誤信息
1. 注意:在繼續操作之前,請確保generatedModels/ONNX/mobilenet_v3.ONNX文件存在。
2. 使用Qualcomm?Neural Processing SDK檢查模型到dlc的轉換
snpe-onnx-to-dlc -i generatedModels/ONNX/mobilenet_v3.onnx -o generatedModels/ONNX/mobilenet_v3.dlc

3. 以上,我們可以看到“onnx_hardsigmoid”轉換沒有注冊,這里將用我們自己的自定義harsigmoid實現來更改。
三、替換架構-Harsigmoid
1. 找到模型源文件。
<python3.8-packages>/torchvision/models/mobilenetv3.py。
2. 搜索Hardsigmoid的調用/實現。
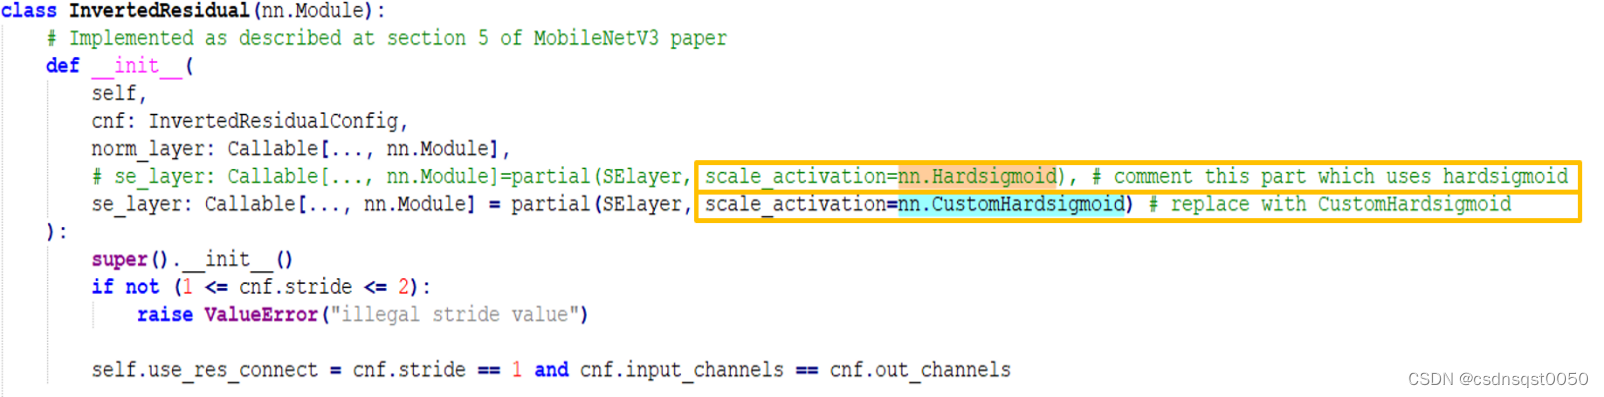
3. 對該行進行注釋,并使用新的CustomHardsigmoid調用添加新的代碼行。
4. 正如我們所看到的,Hardsigmoid是從nn模塊調用為nn.Hardsigmoid。因此,我們找到<python3.8_path>/site packages/torch/nn/dir來編寫我們自己的CustomHardsigmoid實現。
5. Hardsigmoid是一個激活函數。因此,它位于nn/modules/activation.py文件中。
6. 在__all__變量中添加``CustomHardsigmoid```,即要定義的自定義函數的名稱。

7. 在nn/modules/activation.py中實現您自己的CustomHardsigmoid。注意:SDK沒有nn.Hardsigmoid的轉換。因此,我們將以與SDK兼容的方式定義Hardsigmoid。
Hardsigmoid可以表示為- torch.clamp((input*0.167+0.5),0,1)
8. 參考如下CustomHardsigmoid的實現代碼
https://github.com/quic/qidk/blob/master/Model-Enablement/Model-Conversion-Layer-Replacement/class/CustomHardsigmoid.py
class CustomHardsigmoid(Module):
??? __constants__ = ['inplace']
??? inplace: bool
??? def __init__(self, inplace : bool = False)->None:???
??????? super().__init__()
??????? self.inplace = inplace
??? def forward(self, input: Tensor, inplace: bool = False) -> Tensor:
??????? return torch.clamp((input*0.167+0.5), 0, 1)
9. 我們已經定義了自己的實現,現在我們將查找nn.Hardsigmoid的所有依賴項
10. 在同一torc/nn/modules/目錄中,在__init__.py文件中添加CustomHarsigmoid調用。然后保存后繼續操作

11. 到MobileNetV3目錄,并使用新實現的Customhardsigmoid層轉儲模型。
python generatedModels/getModel.py
?
四、再次轉換,分析錯誤
1. 將具有新實現的CustomHardsigmoid層的ONNX模型轉換為dlc
? snpe-onnx-to-dlc -i generatedModels/ONNX/mobilenet_v3.onnx -o generatedModels/ONNX/mobilenet_v3.dlc
Error :

2. 我們得到了一個新的框架錯誤,說“onnx_hadswish”轉換沒有注冊,我們現在將來更改hardswish的實現。
五、替換架構-Hardswish
1. 找到模型源文件。
<python3.8-packages>/torchvision/models/mobilenetv3.py
2. 搜索Hardswish的調用/實現
Occurrence-1

Occurrence-2

Occurrence-3

Occurrence-4

3. 注釋所有這些行,并使用新的CustomHardswish調用添加新的代碼行。
4. 正如我們所看到的,Hardswish是從nn模塊調用為nn.Hardswish的,因此,我們將到<python3.8_path>/site packages/torch/nn/目錄來編寫我們自己的CustomHardswish實現。
5. Hardswish是一個激活函數。因此,它位于nn/modules/activation.py文件中。
6. 在__all__變量中添加``CustomHardswish```,即要定義的自定義函數的名稱。

7. 在nn/modules/activation.py中實現您自己的CustomHardswish。注意:SDK沒有nn.Hardswish的轉換。因此,我們將以與SDK兼容的方式定義Hardsigmoid。
Hardswish可以定義為一個簡化的表達式- input*torch.clamp(input+3, min=0, max=6)/6
8. 參考CustomHardswish的實現代碼
https://github.com/quic/qidk/blob/master/Model-Enablement/Model-Conversion-Layer-Replacement/class/CustomHardswish.py
class CustomHardswish(Module):
??? __constants__ = ['inplace']
??? inplace: bool
??? def __init__(self, inplace : bool = False) -> None:
??????? super().__init__()
??????? self.inplace = inplace
??? def forward(self, input: Tensor) -> Tensor:
??????? return input*torch.clamp(input+3, min=0,max=6)/6
9. 我們已經定義了自己的實現,現在我們將查找nn.Hardswish的所有依賴項。
10. 在同一torch/nn/modules/目錄中,在__init.py文件中添加CustomHarswish調用,保存修改,繼續下一步操作

11. 到MobileNetV3目錄,并使用新實現的Customhardswish層轉儲模型。
?? python generatedModels/getModel.py
?六、再次轉換DLC
1. 將具有新實現的CustomHardswish以及CustomHardsigmoid層的ONNX模型轉換為dlc
snpe-onnx-to-dlc -i generatedModels/ONNX/mobilenet_v3.onnx -o generatedModels/ONNX/mobilenet_v3.dlc
2. 現在,我們可以使用snpe-onx-to-dlc將ONNX模型轉換為dlc。

最后我們完成了DLC模型的轉換
作者:高通工程師,戴忠忠(Zhongzhong Dai)
基礎篇-管程)


)

的自動化檢測和分期)
)


)
)


)


