文章目錄
- 概念
- Android 多線程
- 繼承 Thread
- 繼承 Runable 接口
- 匿名類
- 異步消息處理
- AsyncTask
- 使用服務
- 框架
- 啟動/停止服務
- 綁定/解綁服務
- 服務的生命周期
- 前臺服務
- IntentService
- 完整版下載示例
- 下載過程的回調接口:DownloadListener
- 繼承 AsyncTask 實現下載功能:DownloadTask
- 服務:DownloadService
- 活動:ServiceActivity
- AndroidManifest.xml 權限聲明
概念
服務(Service)用于執行無需和用戶交互但需要長期運行的任務,其不是獨立進程,而是依賴于創建服務時所在的應用程序進程。應用程序進程死亡時,所有依賴于該進程的服務也都將停止運行。
Android 多線程
服務不會自動開啟線程,因此為了防止主線程被阻塞,應該在服務內部手動創建子線程。
通常有三種線程的使用方式:
繼承 Thread
新建一個類繼承 Thread ,然后重寫 run() 方法:
public class MyThread extends Thread{@Overridepublic void run() {// 處理耗時邏輯}
}
啟動線程:
// new出實例,然后調用start方法
// 這樣run()方法中代碼就會在子線程中運行了
new MyThread().start();
繼承 Runable 接口
使用繼承的方式耦合性有點高(如父類添加新方法所有子類都要跟著添加),更多時候使用 Runnable接口 定義線程來降低耦合:
public class MyThread implements Runnable{@Overridepublic void run() {// 處理耗時邏輯}
}
啟動線程:
MyThread myThread = new MyThread();
// 使用接收一個Runnable參數的 Thread() 構造方法來 new 一個匿名類
// 接著調用start方法,run()方法中代碼就會在子線程中運行了
new Thread(myThread).start();
匿名類
無需專門定義一個類實現 Runnable接口,而是在代碼中需要用到的地方創建匿名類,直接啟動子線程執行耗時操作:
new Thread(new Runnable() {@Overridepublic void run() {// 處理耗時邏輯}}).start();
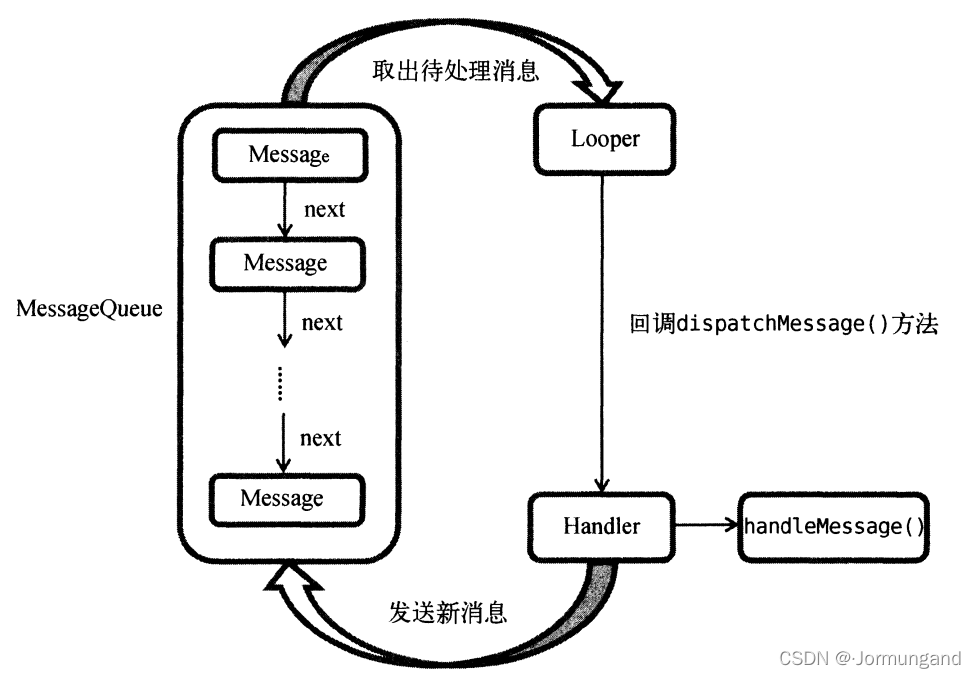
異步消息處理
這一點在上一篇博客中有深刻體會,不使用 runOnUiThread 跳回主線程,而是在子線程中直接操作 UI 的話會報錯:Only the original thread that created a view hierarchy can touch its views。
runOnUiThread() 方法其實就是一個異步消息處理機制的接口封裝,異步消息處理主要由四部分組成:
Message
線程間傳遞的消息,可以攜帶少量信息。通過字段來攜帶數據,如:
- waht: 用戶自定義的消息代碼,每個
handler各自包含自己的消息代碼,所以不用擔心自定義的消息跟其他handler有沖突。 - arg1、arg2: 如果只需要存儲幾個整型數據,arg1、arg2 是
setData()的低成本替代品。 - obj: Object對象。當使用 Message對象 在線程間傳遞消息時,如果它包含一個 Parcelable 的結構類(不是由應用程序實現的類),此字段必須為非空(
non-null)。其他的數據傳輸則使用setData(Bundle)方法。
Handler
用于 發送(使用 sendMessage() 方法) 和 處理(使用handleMessage() 方法) 消息。
MessageQueue
消息隊列,存放所有通過 Handler 發送的消息。每個線程中只會有一個 MessageQueue 對象。
Looper
每個線程中的 MessageQueue 的管家,調用 Looper.loop() 方法后,會進入一個無限循環中,每當發現 MessageQueue 中存在一條消息,就把它取出,并傳遞到 Handler.handleMessage() 方法中。每個線程中只會有一個 Looper 對象。
異步消息處理機制流程如圖:
- 主線程中創建一個 Handler對象,并重寫
handleMessage()方法。
// 隱式的Looper會導致操作丟失、程序崩潰和紊亂情況、Handler非期望等問題// 因此安卓11不允許使用無參數的Handler構造方法// 如果非得用隱式,用Looper.myLooper()作為參數// 否則可以使用Looper.getMainLooper()作為參數private Handler handler = new Handler(Looper.getMainLooper()){@Overridepublic void handleMessage(@NonNull Message msg) {switch (msg.what){// WHAT_CODE是自定義的what字段值case WHAT_CODE:// 執行UI操作break;}}}
關于ANDROID 11推薦使用的 Handler 構造方法詳見
- 子線程需要進行 UI操作 時,創建一個 Message對象,并通過
Handler.sendMessage()方法發送出去。
Message message = new Message();
message.what = WHAT_CODE;
handler.sendMessage(message);
- 該條消息會被添加到 MessageQueue 隊列中等待被 Looper 取出并分發回
Handler.handleMessage()方法中。 - 由于 Handler對象 是在主線程中創建的,因此
Handler.handleMessage()方法中的 UI操作 也是在主線程中運行的。
AsyncTask
其原理也是基于異步消息處理機制,只是 Android 做好了封裝。AsyncTask 是抽象類,繼承時可以為其指定三個泛型參數:
- Params: 可在后臺任務中使用。
- Progress: 后臺任務執行時,如果需要在界面上顯示當前進度,使用該參數指定的泛型作為進度單位。
- Result: 任務執行完畢后,若需要對結果進行返回,則使用該參數指定的泛型作為返回值類型。
舉個例子:
class DownloadTask extends AsyncTask<Void, Integer, Boolean>{
}
上述自定義的 DownloadTask 三個參數的意義分別是:
- Void: 執行時無需將傳入參數給后臺任務。
- Integer: 使用整型數據作為進度顯示單位。
- Boolean: 使用布爾型數據來反饋執行結果
自定義類繼承 AsyncTask 時,常需要被重寫的方法有:
class DownloadTask extends AsyncTask<Void, Integer, Boolean>{@Overrideprotected void onPreExecute() {progressDialog.show(); // 顯示進度對話框}// 執行具體耗時任務@Overrideprotected Boolean doInBackground(Void... voids) {try{while (true){// 假設doDownload方法已實現,該方法用于計算下載速度并返回int downloadPercent = doDownload();// 當后臺計算仍在運行時,可以從doInBackground調用此方法在Ul線程上發布更新;// 對該方法的每次調用都將觸發UI線程上onProgressUpdate的執行;// 如果任務已取消,則不會調用onProgressUpdate。publishProgress(downloadPercent);if(downloadPercent >= 100){break;}}} catch (Exception e){return false;}// 下載完成后返回布爾型變量,調用onPostExecute方法return true;}// 進行UI操作@Overrideprotected void onProgressUpdate(Integer... values) {// 更新下載速度progressDialog.setMessage("Downloaded" + values[0] + "%");}// 執行后臺任務的收尾工作@Overrideprotected void onPostExecute(Boolean aBoolean) {progressDialog.dismiss();// 根據下載結果彈出對應提示if (aBoolean) {Toast.makeText(context, "download succeeded", Toast.LENGTH_LONG).show();}else{Toast.makeText(context, "download failed", Toast.LENGTH_LONG).show();}}
}
- onPreExecute: 在后臺任務開始執行之前調用,用于界面上的初始化操作,如顯示一個進度條對話框。
- doInBackground: 該方法中所有代碼都在子線程中運行,可在此處理所有的耗時任務。任務一旦完成可以通過
return語句將結果返回(如果 AsyncTask 第三個泛型參數指定的是 Void,則可以不返回執行結果)。該方法不可以進行 UI操作,如果要更新 UI元素,可以調用publishProgress(Progress... values)方法來完成。 - onProgressUpdate: 每次調用
publishProgress(Progress... values)方法都會觸發該方法執行,該方法的參數是后臺任務中傳遞過來的,在這里可以進行UI操作,利用參數對界面元素進行更新。 - onPostExecute: 在 doInBackground 方法執行
return語句后調用,可以利用返回的數據執行UI操作。
啟動 DownloadTask 任務只需編寫以下代碼:
new DownloadTask().execute();
使用服務
框架
創建服務,框架如下:
public class MyService extends Service {public MyService() {}// Service中唯一的抽象方法,必須在子類中實現@Overridepublic IBinder onBind(Intent intent) {// TODO: Return the communication channel to the service.throw new UnsupportedOperationException("Not yet implemented");}// 服務創建時調用@Overridepublic void onCreate() {super.onCreate();}// 每次服務啟動時調用@Overridepublic int onStartCommand(Intent intent, int flags, int startId) {return super.onStartCommand(intent, flags, startId);}// 服務銷毀時調用@Overridepublic void onDestroy() {super.onDestroy();}
}
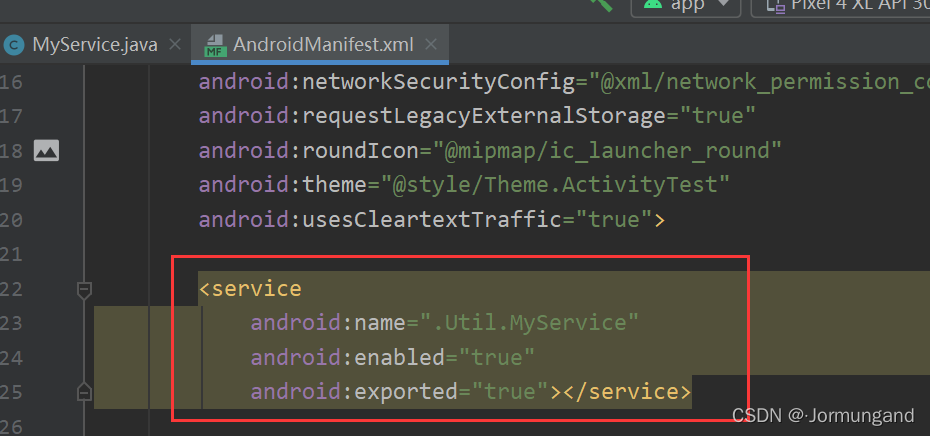
每一個服務都需要在 AndroidManifest.xml 中注冊才能生效:
啟動/停止服務
啟動服務的目的是讓服務一直在后臺運行。
活動布局文件:
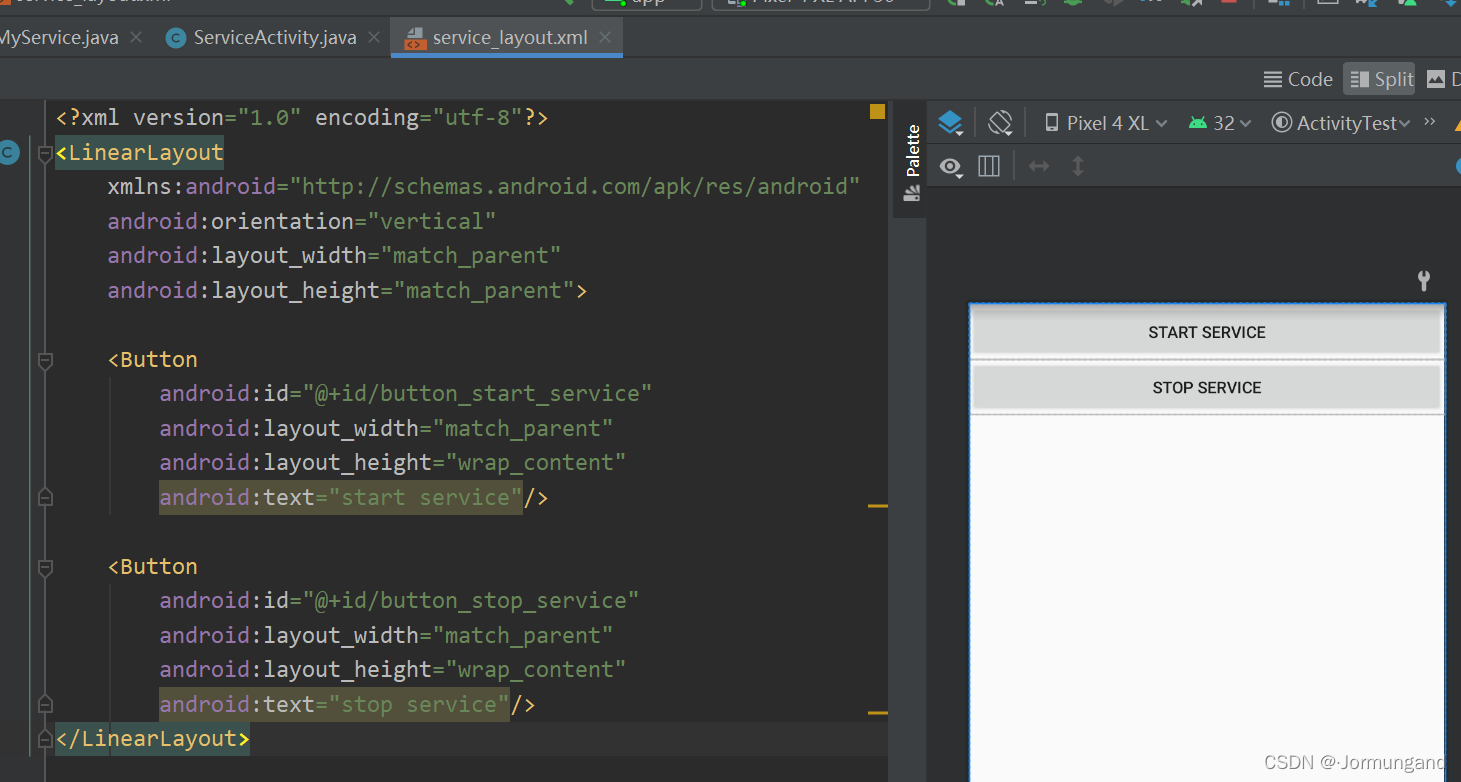
一個按鈕用來啟動服務,另一個用來終止服務。
活動文件:
public class ServiceActivity extends AppCompatActivity implements View.OnClickListener {@Overrideprotected void onCreate(Bundle savedInstanceState) {super.onCreate(savedInstanceState);setContentView(R.layout.service_layout);Button button_start_service = findViewById(R.id.button_start_service);button_start_service.setOnClickListener(this);Button button_stop_service = findViewById(R.id.button_stop_service);button_stop_service.setOnClickListener(this);}@Overridepublic void onClick(View v) {switch (v.getId()){case R.id.button_start_service:Intent startIntent = new Intent(this, MyService.class);startService(startIntent);break;case R.id.button_stop_service:Intent stopIntent = new Intent(this, MyService.class);stopService(stopIntent);break;}}
}
除了通過 startService() 和 stopService() 來 啟動/停止 服務,還可以在 MyService 中調用 stopSelf() 方法讓服務停止。
綁定/解綁服務
綁定服務的目的是讓服務和活動可以進行通信。
public class MyService extends Service {private static final String TAG = "MyService";// 用來和活動進行通信private DownloadBinder mBinder = new DownloadBinder();// Service中唯一的抽象方法,必須在子類中實現@Overridepublic IBinder onBind(Intent intent) {return mBinder;}public class DownloadBinder extends Binder{public void startDownload(){Log.e(TAG, "startDownload: ");}public int getProgress(){Log.e(TAG, "getProgress: ");return 0;}}
}
service 的 onCreate/onStartCommand/onStart 生命周期相關的方法總是在 主線程 上執行的,如果 bindService 在主線程上阻塞的話。service 就無法執行上述生命周期相關的方法,完成初始化工作。因為 綁定服務要在子線程上執行,因此綁定完成后必須通過 ServiceConnection 來回調到主線程。
public class ServiceActivity extends AppCompatActivity implements View.OnClickListener {private MyService.DownloadBinder downloadBinder;// 匿名類private ServiceConnection connection = new ServiceConnection(){// 成功綁定時調用@Overridepublic void onServiceConnected(ComponentName name, IBinder service) {// 向下轉型生成實例downloadBinder = (MyService.DownloadBinder) service;// 此時可以調用DownloadBinder的任何public方法downloadBinder.startDownload();downloadBinder.getProgress();}// 解綁時調用@Overridepublic void onServiceDisconnected(ComponentName name) {}};@Overrideprotected void onCreate(Bundle savedInstanceState) {super.onCreate(savedInstanceState);setContentView(R.layout.service_layout);Button button_bind = findViewById(R.id.button_bind);button_bind.setOnClickListener(this);Button button_unbind = findViewById(R.id.button_unbind);button_unbind.setOnClickListener(this);}@Overridepublic void onClick(View v) {switch (v.getId()){case R.id.button_bind:Intent bindIntent = new Intent(this,  MyService.class);bindService(bindIntent, connection, BIND_AUTO_CREATE); // 綁定服務break;case R.id.button_unbind:unbindService(connection); // 解綁服務break;}}
}
- bindService: 綁定活動與服務,該方法接受三個參數:
- Intent 對象
- ServiceConnection 實例
- 標志位:
BIND_AUTO_CREATE表示綁定后自動創建服務。此時 MyService 的onCreate()方法會執行,onStartCommand()方法不會執行。
- unbindService: 該方法解綁活動與服務,接受一個參數:ServiceConnection 實例。
PS:任何一個服務在整個應用程序范圍內都是通用的,意味著可以和多個活動綁定(綁定服務是異步的),綁定后都獲得相同的 DownloadBinder 實例。
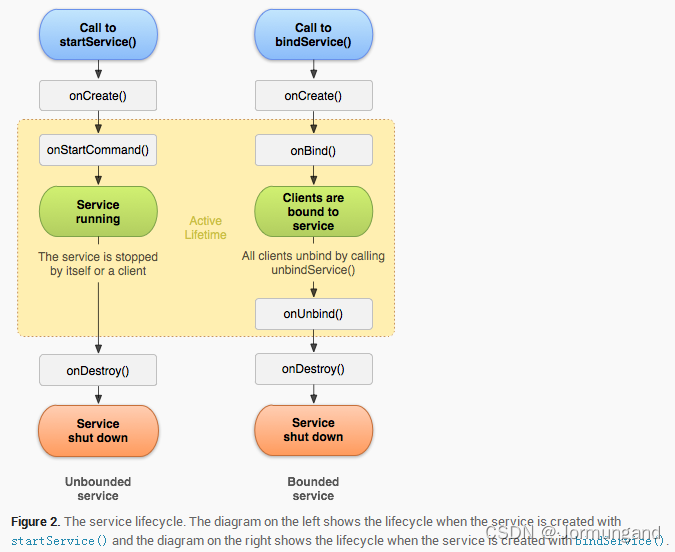
服務的生命周期
- Context 的
startService()方法結束后會立刻回調 服務 的onStartCommand()方法。(如果此前服務還未創建過,會先調用 服務 的onCreate()方法)。 - Context 的
stopService()方法 或 服務 的stopSelf()方法 可以停止服務。值得一提的是:- 在 服務 的
onStartCommond()方法 里面調用stopSelf()方法 時,服務不會馬上停止,而是在onStartCommond()方法 執行結束才會停止。 - 調用
stopSelf()方法 之后,服務會執行onDestory()方法。 - 如果
onStartCommond()方法 中啟動一個線程,調用stopSelf()方法,線程也不會被殺死。
- 在 服務 的
- Context 的
bindService()方法可以獲取一個服務的持久連接,結束后回調 服務 的onBind()方法。調用方通過onBind()返回的 IBinder 實例和 服務 進行通信。
PS:一個服務只要被啟動(startService)或被綁定(bindService),就會一直處于運行狀態,想要停止運行時,服務必須處于 停止(stopService) + 解綁(unbindService) 的狀態,服務才能被銷毀。
前臺服務
系統內存不足時,可能會回收正在運行的后臺服務;而前臺服務可以一直保持運行,避免被回收。前臺服務和普通服務的最大區別是,會一直在系統狀態欄顯示一個正在運行的圖標,下拉狀態欄可以顯示詳細信息。這其實就用到了之前通知一文的知識。
// 服務創建時調用@Overridepublic void onCreate() {super.onCreate();Log.e(TAG, "onCreate executed");Intent intent = new Intent(this, ServiceActivity.class);PendingIntent pi = PendingIntent.getActivity(this, 0, intent, 0);String id = "1";NotificationManager manager = (NotificationManager)getSystemService(Context.NOTIFICATION_SERVICE);if(Build.VERSION.SDK_INT >= android.os.Build.VERSION_CODES.O){String name = getString(R.string.app_name);// 創建通知通道// 第一個參數要和NotificationCompat.Builder的channelId一樣// 第三個參數是通知的重要程度NotificationChannel notificationChannel = new NotificationChannel(id, name,NotificationManager.IMPORTANCE_HIGH);manager.createNotificationChannel(notificationChannel);}Notification notification = new NotificationCompat.Builder(this, id).setContentTitle("天氣").setContentText("天氣內容").setWhen(System.currentTimeMillis()).setSmallIcon(R.mipmap.cloud).setLargeIcon(BitmapFactory.decodeResource(getResources(), R.mipmap.cloud))// 點擊通知后執行的意圖.setContentIntent(pi).build();// 不使用NotificationManager.notify()顯示// 而使用startForeground顯示startForeground(1, notification);}
PS:實現通知的代碼都是之前介紹過的,唯一不同的就是顯示通知是通過 startForeground() 方法,而非 NotificationManager.notify() 方法。
IntentService
通常在 onStartCommand() 方法中開啟子線程來執行耗時邏輯,并在子線程中邏輯處理完畢后調用 stopSelf() 方法來自動結束服務:
// 每次服務啟動時調用@Overridepublic int onStartCommand(Intent intent, int flags, int startId) {Log.e(TAG, "onStartCommand executed");new Thread(new Runnable() {@Overridepublic void run() {stopSelf();}}).start();return super.onStartCommand(intent, flags, startId);}
而 Android 提供了 IntentService 類來封裝上面的邏輯,我們可以通過繼承它來實現自定義類以滿足所需功能:
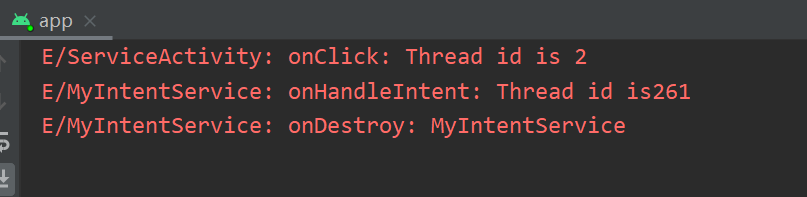
public class MyIntentService extends IntentService {private static final String TAG = "MyIntentService";//  name用于命名工作線程,僅對調試很重要public MyIntentService() {super("MyIntentService");}@Overrideprotected void onHandleIntent(@Nullable Intent intent) {Log.e(TAG, "onHandleIntent: Thread id is" + Thread.currentThread().getId());}@Overridepublic void onDestroy() {super.onDestroy();Log.e(TAG, "onDestroy: MyIntentService");}
}
在活動中通過按鈕調用它:

點擊按鈕后的輸出結果:
完整版下載示例
下載過程的回調接口:DownloadListener
// 回調接口,監聽下載過程中的各種狀態
public interface DownloadListener {void onProgress(int progress); // 當前下載進度void onSuccess(); // 下載成功void onFailed(); // 失敗void onPaused(); // 暫停void onCanceled(); // 取消下載
}
繼承 AsyncTask 實現下載功能:DownloadTask
DownloadTask 實現了具體的下載功能。
// 自實現的下載任務的異步消息處理機制
public class DownloadTask extends AsyncTask<String, Integer, Integer> {private static final String TAG = "DownloadTask";public static final int TYPE_SUCCESS = 0;public static final int TYPE_FAILED = 1;public static final int TYPE_PAUSED= 2;public static final int TYPE_CANCELED = 3;private final DownloadListener listener;Context context;private boolean isCanceled = false;private boolean isPaused = false;private int lastProgress; // 上一次的下載進度public DownloadTask(DownloadListener listener, Context context){this.listener = listener;this.context = context;}// 執行具體耗時任務——下載邏輯@Overrideprotected Integer doInBackground(String... strings) {Log.e(TAG, "doInBackground: 下載開始");Log.e(TAG, "子線程 id is " + Thread.currentThread().getId());InputStream inputStream = null;// RandomAccessFile的一個重要使用場景就是網絡請求中的多線程下載及斷點續傳RandomAccessFile savedFile = null;File file = null;try{long downloadedLength = 0; // 已下載的文件長度String downloadUrl = strings[0]; // 從傳入的參數中得到欲下載資源的URL// lastIndexOf返回downloadUrl最后一次出現“/”的索引位置,截取該“/”到結尾的部分作為fileNameString fileName = downloadUrl.substring(downloadUrl.lastIndexOf("/"));// 下載目錄為SD卡的Download目錄/*String directory = Environment.getExternalStoragePublicDirectory(Environment.DIRECTORY_DOWNLOADS).getPath();*/// /Android/data/com.example.activitytest/files/DocumentsString directory = context.getExternalFilesDir(Environment.DIRECTORY_DOWNLOADS).getPath();file = new File(directory + fileName);Log.e(TAG, "doInBackground file: " + file);// 文件存在則說明上次的下載行為被中斷了// 此時需要用downloadedLength記錄已下載的字節數,輔助完成斷點續傳功能if(file.exists()){downloadedLength = file.length();Log.e(TAG, "doInBackground: file exists, downloadedLength: " + downloadedLength);}else {Log.e(TAG, "doInBackground: file not exists, downloadedLength: " + downloadedLength);}long contentLength = getContentLength(downloadUrl); // 待下載文件總長度if(contentLength == 0){ // 長度為0說明文件有問題Log.e(TAG, "doInBackground: contentLength == 0");return TYPE_FAILED;}else if (contentLength == downloadedLength){// 已下載字節和文件總字節相等,說明下載已完成Log.e(TAG, "doInBackground: 下載過了");return TYPE_SUCCESS;}OkHttpClient client = new OkHttpClient();Request request = new Request.Builder()// 斷點下載,指定從哪個字節開始下載.addHeader("RANGE", "bytes=" + downloadedLength + "-").url(downloadUrl).build();Response response = client.newCall(request).execute();if(response != null){Log.e(TAG, "服務器的確認報文");inputStream = response.body().byteStream(); // 字節輸入流Log.e(TAG, "doInBackground inputStream: " + inputStream);savedFile = new RandomAccessFile(file, "rw");Log.e(TAG, "doInBackground saveFile: " + savedFile);savedFile.seek(downloadedLength); // 跳過已下載字節Log.e(TAG, "斷點重續 over");byte[] bArray = new byte[1024];int total = 0; // 已讀字節int len; // 讀入緩沖區的字節總數// 不斷將網絡數據寫入本地while ((len = inputStream.read(bArray)) != -1){Log.e(TAG, "doInBackground: 不斷將網絡數據寫入本地");if (isCanceled) {return TYPE_CANCELED;} else if (isPaused) {return  TYPE_PAUSED;} else {total += len;savedFile.write(bArray, 0, len);Log.e(TAG, "doInBackground: total: " + total + " len: " + len+ " contentLength: " + contentLength);// 計算已下載的百分比int progress = (int) ((total + downloadedLength) * 100 / contentLength);// 當后臺計算仍在運行時,可以從doInBackground調用此方法在Ul線程上發布更新;// 對該方法的每次調用都將觸發UI線程上onProgressUpdate的執行;// 如果任務已取消,則不會調用onProgressUpdate。publishProgress(progress);int tmp = 100;Log.e(TAG, "doInBackground: 計算下載百分比已完成,progress:"+ progress + " " + tmp);}}response.body().close();Log.e(TAG, "doInBackground: 下載已完成");return  TYPE_SUCCESS;}} catch (Exception e){e.printStackTrace();} finally {try {if (inputStream != null) {inputStream.close();}if (savedFile != null) {savedFile.close();}if(isCanceled && file != null){boolean res = file.delete();Log.e(TAG, "doInBackground: file.delete() is res: " + res);}} catch (Exception e){e.printStackTrace();}}return  TYPE_FAILED;}private long getContentLength(String downloadUrl) throws IOException {OkHttpClient client = new OkHttpClient();Request request = new Request.Builder().url(downloadUrl).build();Response response = client.newCall(request).execute();if (response != null && response.isSuccessful()) {long contentLength = response.body().contentLength();response.close();Log.e(TAG, "getContentLength: contentLength: " + contentLength);return contentLength;}return 0;}// 進行UI操作——更新下載進度@Overrideprotected void onProgressUpdate(Integer... values) {// 更新下載速度int progress = values[0];if (progress > lastProgress){// 調用DownloadListener的onProgress通知下載進度的更新listener.onProgress(progress);lastProgress = progress;}}// 執行后臺任務的收尾工作——通知下載結果@Overrideprotected void onPostExecute(Integer integer) {switch (integer){case TYPE_SUCCESS:listener.onSuccess();break;case TYPE_FAILED:listener.onFailed();break;case TYPE_PAUSED:listener.onPaused();break;case TYPE_CANCELED:listener.onCanceled();break;}}// 暫停下載,修改 isPaused 標記public void pauseDownload(){isPaused = true;}// 取消下載,修改 isCanceled 標記public void cancelDownload(){isCanceled = true;}
}
doInBackground
doInBackground的 參數 strings 是 AsyncTask 模板的 第一個參數,從strings[0]中我們可得到傳入的下載資源的url。- 解析
url得到了 待下載文件 的 文件名,然后將文件下載到Environment.DIRECTORY_DOWNLOADS(也就是 /storage/emulated/0/Android/data/com.example.activitytest/files/Download/<文件名>)目錄下。 - 下載過程中用到了斷點續傳功能,HTTP 的 Header 中的 RANGE 參數就是為標識斷點續傳功能而存在的。而 RandomAccessFile 類型的一個重要使用場景就是網絡請求中的多線程下載及斷點續傳。
關于RandomAccessFile詳見本文
關于HTTP斷點續傳詳見本文 - 通過文件流不斷從網絡讀取數據寫到本地,在此期間還需判斷用戶有無觸發暫停或取消操作。
onProgressUpdate
和上一次下載進度相比,有變化則回調 DownloadListener.onProgress() 方法 通知下載進度更新。
onPostExecute
根據 AsyncTask 模板的第三個參數 Integer 對應的狀態參數來進行回調。
服務:DownloadService
DownloadService 保證 DownloadTask 能夠一直在后臺運行。
public class DownloadService extends Service {private static final String TAG = "DownloadService";private DownloadTask downloadTask;private String downloadUrl;// 匿名類實例private final DownloadListener listener = new DownloadListener() {@Overridepublic void onProgress(int progress) {getNotificationManager().notify(1, getNotification("Downloading...", progress));}@Overridepublic void onSuccess() {downloadTask = null;// 下載成功時將前臺服務通知關閉stopForeground(true);// 創建一個下載成功的通知getNotificationManager().notify(1, getNotification("Download Success", -1));Toast.makeText(DownloadService.this, "Download Success",Toast.LENGTH_LONG).show();}@Overridepublic void onFailed() {downloadTask = null;// 下載失敗時將前臺服務通知關閉stopForeground(true);// 創建一個下載失敗的通知getNotificationManager().notify(1, getNotification("Download Failed", -1));Toast.makeText(DownloadService.this, "Download Failed",Toast.LENGTH_LONG).show();}@Overridepublic void onPaused() {downloadTask = null;Toast.makeText(DownloadService.this, "Download Paused",Toast.LENGTH_LONG).show();}@Overridepublic void onCanceled() {downloadTask = null;Toast.makeText(DownloadService.this, "Download Canceled",Toast.LENGTH_LONG).show();}};// 和活動通信private final DownloadBinder mBinder = new DownloadBinder();@Overridepublic IBinder onBind(Intent intent) {return mBinder;}public class DownloadBinder extends Binder {public void startDownload(String url){if (downloadTask == null) {downloadUrl = url;downloadTask = new DownloadTask(listener, DownloadService.this);downloadTask.execute(downloadUrl); // execute通過url開啟下載Log.e(TAG, "startDownload: downloadTask 已執行");// 前臺顯示startForeground(1, getNotification("Downloading...", 0));Toast.makeText(DownloadService.this, "Downloading...",Toast.LENGTH_LONG).show();Log.e(TAG, "startDownload: 通知已顯示");}Log.e(TAG, "startDownload: over");}public void pauseDownload(){if(downloadTask != null){downloadTask.pauseDownload();}Log.e(TAG, "getProgress: pauseDownload over");}public void cancelDownload(){if(downloadTask != null){downloadTask.cancelDownload();}else {if (downloadUrl != null) {// 取消下載時需刪除文件String fileName = downloadUrl.substring(downloadUrl.lastIndexOf("/"));String directory = DownloadService.this.getExternalFilesDir(Environment.DIRECTORY_DOWNLOADS).getPath();File file = new File(directory + fileName);if (file.exists()){boolean res = file.delete();Log.e(TAG, "cancelDownload: file.delete() is res: " + res);}// 并關閉通知getNotificationManager().cancel(1);stopForeground(true);Toast.makeText(DownloadService.this, "Canceled",Toast.LENGTH_LONG).show();}}Log.e(TAG, "cancelDownload: cancelDownload over");}}private NotificationManager getNotificationManager() {Log.e(TAG, "getNotificationManager: 生成通知管理器已完成");return (NotificationManager) getSystemService(NOTIFICATION_SERVICE);}private Notification getNotification(String title, int progress) {String id = "1"; // NotificationCompat.Builder 和 NotificationChannel 的 id 參數if(Build.VERSION.SDK_INT >= android.os.Build.VERSION_CODES.O){String name = getString(R.string.app_name);NotificationChannel notificationChannel = new NotificationChannel(id, name,NotificationManager.IMPORTANCE_HIGH);notificationChannel.enableLights(true);notificationChannel.setLightColor(Color.RED);notificationChannel.setShowBadge(true);notificationChannel.setLockscreenVisibility(Notification.VISIBILITY_PRIVATE);// 通知更新時聲音關掉,避免每次更新進度都會彈出提示音notificationChannel.setSound(null, null);getNotificationManager().createNotificationChannel(notificationChannel);}Intent intent = new Intent(this, ServiceActivity.class);PendingIntent pi = PendingIntent.getActivity(this, 0, intent, 0);NotificationCompat.Builder builder = new NotificationCompat.Builder(this, id);builder.setSmallIcon(R.mipmap.download);builder.setLargeIcon(BitmapFactory.decodeResource(getResources(), R.mipmap.download));builder.setContentIntent(pi);builder.setContentTitle(title);if (progress > 0) { // >0時才有顯示下載進度的需求builder.setContentText(progress + "%");// 第三個參數表述是否適用模糊進度條builder.setProgress(100, progress, false);Log.e(TAG, "getNotification: 顯示下載進度");}Log.e(TAG, "getNotification: 生成通知已完成");return builder.build();}
}
- 實現了下載過程的回調接口 DownloadTask 的匿名類實例
- 通過 DownloadBinder 讓 DownloadService 和 活動 通信,活動中通過點擊按鈕來調用這里的函數(
startDownload()、pauseDownload()、cancelDownload())。其實例mBinder通過onBind()方法返回,onBind()方法 在bindService()方法 調用后被回調。 - 安卓 8.0 版本以上使用 Notification 時要添加 NotificationChannel。
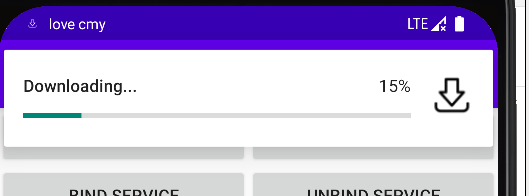
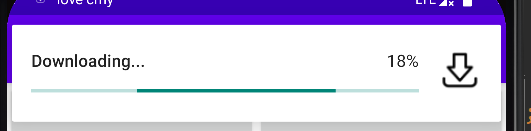
NotificationCompat.Builder.setProgress(100, progress, false);第一個參數:傳入通知的最大進度;第二個參數:傳入通知的當前進度;第三個參數:是否使用模糊進度條。
不使用模糊進度條:
使用模糊進度條:
活動:ServiceActivity
public class ServiceActivity extends AppCompatActivity implements View.OnClickListener {private static final String TAG = "ServiceActivity";private DownloadService.DownloadBinder downloadBinder;// 作為 bindService 的第二個參數private final ServiceConnection connection = new ServiceConnection() {@Overridepublic void onServiceConnected(ComponentName name, IBinder service) {// 生成實例,以便服務和活動的通信downloadBinder = (DownloadService.DownloadBinder) service;}@Overridepublic void onServiceDisconnected(ComponentName name) {}};@Overrideprotected void onCreate(Bundle savedInstanceState) {super.onCreate(savedInstanceState);setContentView(R.layout.service_layout);Button button_start_download = findViewById(R.id.button_start_download);button_start_download.setOnClickListener(this);Button button_pause_download = findViewById(R.id.button_pause_download);button_pause_download.setOnClickListener(this);Button button_cancel_download = findViewById(R.id.button_cancel_download);button_cancel_download.setOnClickListener(this);Intent intent = new Intent(this, DownloadService.class);startService(intent); // 啟動服務bindService(intent, connection, BIND_AUTO_CREATE); // 綁定服務if (ContextCompat.checkSelfPermission(ServiceActivity.this,Manifest.permission.WRITE_EXTERNAL_STORAGE) != PackageManager.PERMISSION_GRANTED) {ActivityCompat.requestPermissions(ServiceActivity.this, new String[]{ Manifest.permission.WRITE_EXTERNAL_STORAGE }, 1);}else {Log.e(TAG, "擁有權限,無需授權");}}@Overridepublic void onClick(View v) {if (downloadBinder == null) {return;}switch (v.getId()){case R.id.button_start_download:Log.e(TAG, "主線程 id is " + Thread.currentThread().getId());String url = "https://dl.hdslb.com/mobile/latest/android64/iBiliPlayer-bili.apk?t=1647227157000";downloadBinder.startDownload(url);break;case R.id.button_pause_download:downloadBinder.pauseDownload();break;case R.id.button_cancel_download:downloadBinder.cancelDownload();break;}}@Overridepublic void onRequestPermissionsResult(int requestCode, String[] permissions, int[] grantResults) {switch (requestCode){case 1:if (grantResults.length > 0 && grantResults[0] != PackageManager.PERMISSION_GRANTED){Toast.makeText(this, "拒絕權限將無法使用程序", Toast.LENGTH_LONG).show();finish();}Log.e(TAG, "已完成申請授權");break;}}@Overrideprotected void onDestroy() {super.onDestroy();unbindService(connection); // 解綁服務,防止內存泄漏}
}
- 在綁定成功時在
ServiceConnection.onServiceConnected()方法中生成 DownloadService.DownloadBinder 的實例,以便于活動和服務之間進行通信。 - 啟動服務保證 DownloadTask 能夠一直在后臺運行,綁定服務讓 ServiceActivity 和 DownloadTask 能夠進行通信。
- 活動銷毀時注意解綁服務,以避免內存泄漏。
AndroidManifest.xml 權限聲明
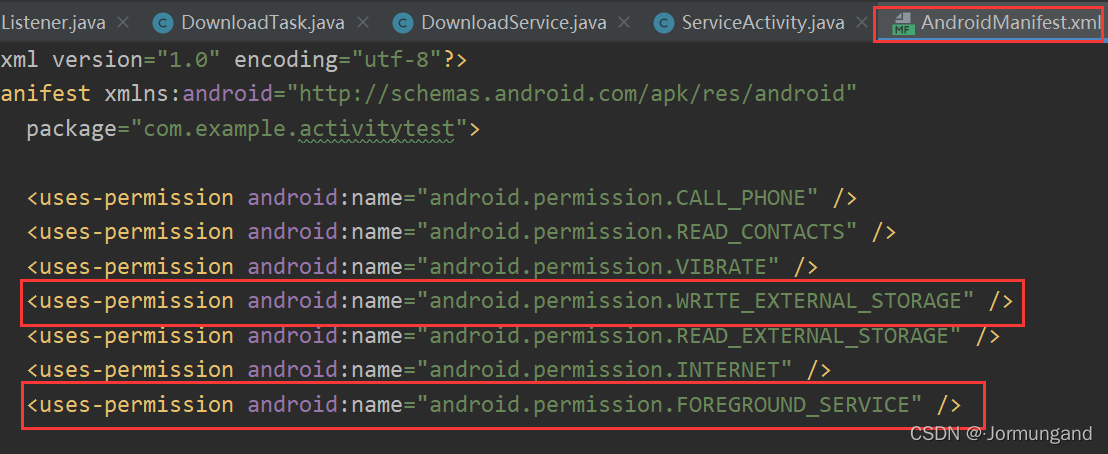
- WRITE_EXTERNAL_STORAGE: 允許寫入外部存儲目錄。
- INTERNET: 網絡訪問權限。
- FOREGROUND_SERVICE: 前臺服務權限。


| 百度提供的 Android定位SDK)

曲線)


