Docker搭建MySQL主從復制
- 主從服務器上分別安裝Docker
1.1 Docker 要求 CentOS 系統的內核版本高于 3.10
[root@localhost ~]# uname -r
3.10.0-693.el7.x86_64
1.2 確保 yum 包更新到最新。
[root@localhost ~]# sudo yum update
Loaded plugins: fastestmirror, langpacks
Loading mirror speeds from cached hostfile* base: mirrors.cqu.edu.cn* extras: mirrors.cqu.edu.cn* updates: mirrors.cqu.edu.cn
base                                                                                                                                             | 3.6 kB  00:00:00
docker-ce-stable                                                                                                                                 | 3.5 kB  00:00:00
extras                                                                                                                                           | 2.9 kB  00:00:00
updates                                                                                                                                          | 2.9 kB  00:00:00
1.3 安裝需要的軟件包, yum-util 提供yum-config-manager功能,另外兩個是devicemapper驅動依賴的
[root@localhost ~]# sudo yum install -y yum-utils device-mapper-persistent-data lvm2
Loaded plugins: fastestmirror, langpacks
Loading mirror speeds from cached hostfile* base: mirrors.cqu.edu.cn* extras: mirrors.cqu.edu.cn* updates: mirrors.cqu.edu.cn
Package yum-utils-1.1.31-52.el7.noarch already installed and latest version
Package device-mapper-persistent-data-0.8.5-1.el7.x86_64 already installed and latest version
Package 7:lvm2-2.02.185-2.el7_7.2.x86_64 already installed and latest version
Nothing to do
1.4 設置yum源
[root@localhost ~]# sudo yum-config-manager --add-repo https://download.docker.com/linux/centos/docker-ce.repo
Loaded plugins: fastestmirror, langpacks
adding repo from: https://download.docker.com/linux/centos/docker-ce.repo
grabbing file https://download.docker.com/linux/centos/docker-ce.repo to /etc/yum.repos.d/docker-ce.repo
repo saved to /etc/yum.repos.d/docker-ce.repo
1.5 安裝docker
[root@localhost ~]#  sudo yum install docker-ce
Loaded plugins: fastestmirror, langpacks
Loading mirror speeds from cached hostfile* base: mirrors.cqu.edu.cn* extras: mirrors.cqu.edu.cn* updates: mirrors.cqu.edu.cn
Package 3:docker-ce-19.03.8-3.el7.x86_64 already installed and latest version
Nothing to do
1.6 啟動docker并設置docker自動啟動
[root@localhost ~]# sudo systemctl start docker
[root@localhost ~]# sudo systemctl enable docker
1.7 檢測docker是否安裝成功
[root@localhost ~]# docker version Client: Docker Engine - CommunityVersion: 19.03.8API version: 1.40Go version: go1.12.17Git commit: afacb8bBuilt: Wed Mar 11 01:27:04 2020OS/Arch: linux/amd64Experimental: falseServer: Docker Engine - CommunityEngine:Version: 19.03.8API version: 1.40 (minimum version 1.12)Go version: go1.12.17Git commit: afacb8bBuilt: Wed Mar 11 01:25:42 2020OS/Arch: linux/amd64Experimental: falsecontainerd:Version: 1.2.13GitCommit: 7ad184331fa3e55e52b890ea95e65ba581ae3429runc:Version: 1.0.0-rc10GitCommit: dc9208a3303feef5b3839f4323d9beb36df0a9dddocker-init:Version: 0.18.0GitCommit: fec3683 - docker更換國內阿里倉庫,并下載安裝MySQL
2.1 docker更換國內阿里倉庫
sudo mkdir -p /etc/docker
sudo tee /etc/docker/daemon.json <<-'EOF'
{"registry-mirrors": ["https://rdwyjupq.mirror.aliyuncs.com"]
}
EOF
sudo systemctl daemon-reload
sudo systemctl restart docker
2.2 安裝MySQL
? 2.2.1 下載MySQL
[root@localhost ~]# docker pull mysql
Using default tag: latest
latest: Pulling from library/mysql
c499e6d256d6: Pull complete
22c4cdf4ea75: Pull complete
6ff5091a5a30: Pull complete
2fd3d1af9403: Pull complete
0d9d26127d1d: Pull complete
54a67d4e7579: Pull complete
fe989230d866: Pull complete
3a808704d40c: Pull complete
826517d07519: Pull complete
69cd125db928: Pull complete
b5c43b8c2879: Pull complete
1811572b5ea5: Pull complete
Digest: sha256:b69d0b62d02ee1eba8c7aeb32eba1bb678b6cfa4ccfb211a5d7931c7755dc4a8
Status: Downloaded newer image for mysql:latest
docker.io/library/mysql:latest
? 2.2.2 查看MySQL鏡像
[root@localhost ~]# docker images
REPOSITORY          TAG                 IMAGE ID            CREATED             SIZE
mysql               latest              9228ee8bac7a        4 days ago          547MB
? 2.2.3 創建MySQL的掛載文件目錄(日志、數據、配置)
[root@localhost ~]# mkdir -p /root/mysql/data /root/mysql/logs /root/mysql/conf? 2.2.4 先啟動容器(為了復制配置文件)(這種做法顯得多余,但是Docker不是很精通的我沒想到更好的辦法,請各位大神指導)
[root@localhost conf]# docker run -d -p 3306:3306 --name mysql -e MYSQL_ROOT_PASSWORD="123456" mysql
05d161e69f3b2e3e4ebaa50f822934599a31e7ade330e1440a68aec9e404f7ae
? 2.2.5 復制配置文件
[root@localhost conf]# docker cp mysql:/etc/mysql/my.cnf /root/mysql/conf/? 2.2.6 停止并刪容器
[root@localhost conf]# docker stop mysql
mysql
[root@localhost conf]# docker rm mysql
mysql
? 2.2.7 重新啟動容器(加上掛載)
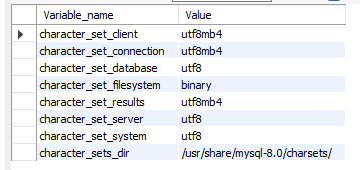
[root@localhost conf]# docker run --name mysql -p 3306:3306 -e MYSQL_ROOT_PASSWORD=123456 --mount type=bind,src=/root/mysql/conf/my.cnf,dst=/etc/mysql/my.cnf --mount ty
pe=bind,src=/root/mysql/data,dst=/var/lib/mysql --mount type=bind,src=/root/mysql/logs,dst=/logs --restart=on-failure:3 -d mysql64824c7e84ceb3513b65a375c55f2c53bc653f95b119008296122b13ff632ba1
? 2.2.8 進入MySQL查詢現有字符集,結果都是utf8mb4
show variables like '%char%';? 2.2.9 在掛載的配置文件更改字符集
character-set-server=utf8default-character-set=utf8default-character-set=utf8? 2.2.10 重啟docker容器,并查看字符集已經更改,證明掛載的配置文件有效
- 搭建主從復制數據庫
3.1 配置主Master庫
? 3.1.1 進入主庫掛載配置文件my.cnf,加入以下配置并重啟docker容器
[mysqld]
## 同一局域網內注意要唯一
server-id=100
## 開啟二進制日志功能,可以隨便取(關鍵)
log-bin=mysql-bin
? 3.1.2 在主Master庫執行語句
CREATE USER 'slave'@'%' IDENTIFIED BY '123456';
GRANT REPLICATION SLAVE, REPLICATION CLIENT ON *.* TO 'slave'@'%';
? 為防止后面出現報錯[Authentication plugin 'caching_sha2_password' cannot be loaded],執行下面語句
ALTER USER 'slave'@'%' IDENTIFIED BY 'password' PASSWORD EXPIRE NEVER;   #修改加密規則
ALTER USER 'slave'@'%' IDENTIFIED WITH mysql_native_password BY 'password';   #更新一下用戶的密碼
FLUSH PRIVILEGES;
alter user 'slave'@'%' identified by '123456';
最后執行語句獲取File, Position
show master status;3.2 配置從Slave庫
? 3.2.1 進入從庫掛載配置文件my.cnf,加入以下配置并重啟docker容器
[mysqld]
## 設置server_id,注意要唯一
server-id=101
## 開啟二進制日志功能,以備Slave作為其它Slave的Master時使用
log-bin=mysql-slave-bin
## relay_log配置中繼日志
relay_log=edu-mysql-relay-bin
? 3.2.2 鏈接主從庫,在從庫執行語句
change master to master_host='192.168.47.128', master_user='slave', master_password='123456', master_port=3306, master_log_file='mysql-bin.000001', master_log_pos= 5938, master_connect_retry=30;master_host :Master的地址
master_port:Master的端口號,指的是容器的端口號
master_user:用于數據同步的用戶
master_password:用于同步的用戶的密碼
master_log_file:指定 Slave 從哪個日志文件開始復制數據,即上文中提到的 File 字段的值
master_log_pos:從哪個 Position 開始讀,即上文中提到的 Position 字段的值
master_connect_retry:如果連接失敗,重試的時間間隔,單位是秒,默認是60秒
? 3.2.3 查看主從同步狀態
show slave status ;

? 正常情況下,SlaveIORunning 和 SlaveSQLRunning 都是No,因為我們還沒有開啟主從復制過程。
3.2.4 開啟主從復制 start slave;重新查看主從同步狀態, 這時SlaveIORunning 和 SlaveSQLRunning 都是Yes,如果你的SlaveIORunning 和 SlaveSQLRunning 其中一個是Connecting或者No,就證明配置有錯,查看Last_IO_Error報錯的詳細信息
通過下面命令,刪除已經配置的主從鏈接信息,重新進行配置
stop slave;reset master; 3.2.5 測試主從復制,最簡單的方式是在主庫建立個新庫,這時,從庫會自動同步


![[TimLinux] JavaScript 元素動態顯示](http://pic.xiahunao.cn/[TimLinux] JavaScript 元素動態顯示)


...)

![[微信小程序] 當動畫(animation)遇上延時執行函數(setTimeout)出現的問題](http://pic.xiahunao.cn/[微信小程序] 當動畫(animation)遇上延時執行函數(setTimeout)出現的問題)
