劃痕實驗 遷移面積自動統計
If you want to use Google Colaboratory to perform your data analysis, for building data pipelines and data visualizations, here is the beginners’ guide to migrate from one tool to the other.
如果您想使用Google Colaboratory進行數據分析,以建立數據管道和數據可視化,這是初學者指南,可以從一種工具遷移到另一種工具。
為什么要遷移? (Why migrate?)
To be honest, I came to using Colab, since I needed an iOS-friendly tool without a long installation adventure. The iOS version of Colab — actually, the iOS version of any browser — has a couple of problems, but I am currently quite satisfied.
老實說,我之所以開始使用Colab,是因為我需要一個iOS友好型工具,而無需進行長時間的安裝。 iOS版的Colab(實際上是任何瀏覽器的iOS版)都有兩個問題,但我目前非常滿意。
The article is based upon my MacOS experience with Colab and the screenshots are also originate from MacOS.
本文基于我對Colab的MacOS經驗,并且屏幕截圖也來自MacOS。
創建一個Google帳戶 (Create a Google account)
This is the first step, since you are going to work in a part of a Google ecosystem. Google Colaboratory (further referred to as Colab) runs in a cloud. You will use it in a browser.
這是第一步,因為您將要在Google生態系統的一部分中工作。 Google合作實驗室(又稱為Colab)在云中運行。 您將在瀏覽器中使用它。
下載谷歌瀏覽器 (Download Google Chrome)
Although the ultimate part of the world population is using Chrome (just kidding!), I still want to add this notion here. To access your Colab working space, you will need to log in to your Google account every time.
盡管世界人口的最終部分是使用Chrome(開個玩笑!),但我仍然想在此添加這個概念。 要訪問您的Colab工作空間,您每次都需要登錄到您的Google帳戶。
In Chrome, you can stay logged and manage other spaces that you can integrate with Colab.
在Chrome中,您可以保持登錄狀態并管理可以與Colab集成的其他空間。
首次訪問Colab (Access Colab for the first time)
You will need to open the following URL in your browser:
您將需要在瀏覽器中打開以下URL:
https://colab.research.google.com/
https://colab.research.google.com/
Or just type the “google colab” in the Google search engine.
或者,只需在Google搜索引擎中輸入“ google colab”。
After you’ve created any Colab files (I’ll go through it in the next step) you will be also able to access your working space from Google Drive.
創建任何Colab文件后(我將在下一步中進行介紹),您還可以從Google云端硬盤訪問您的工作空間。
上傳您的Jupyter筆記本 (Upload your Jupyter notebooks)
With Colab, you are not using your Jupyter notebooks locally. You will need to add them to your Google Drive. You’ll get a Google Drive automatically when you create your Google account.
使用Colab,您將不會在本地使用Jupyter筆記本。 您需要將它們添加到您的Google云端硬盤。 創建Google帳戶后,您會自動獲得一個Google云端硬盤。

The first two are the official documentation.
前兩個是官方文檔。
Exactly, you do not need to convert your notebooks at all!
確實,您根本不需要轉換筆記本!
Colab is built upon Jupyter and the format is the same. Pretty cool, if you decide to get back to the local Jupyter again!
Colab基于Jupyter構建,并且格式相同。 如果您決定再次回到當地的Jupyter,那就太酷了!
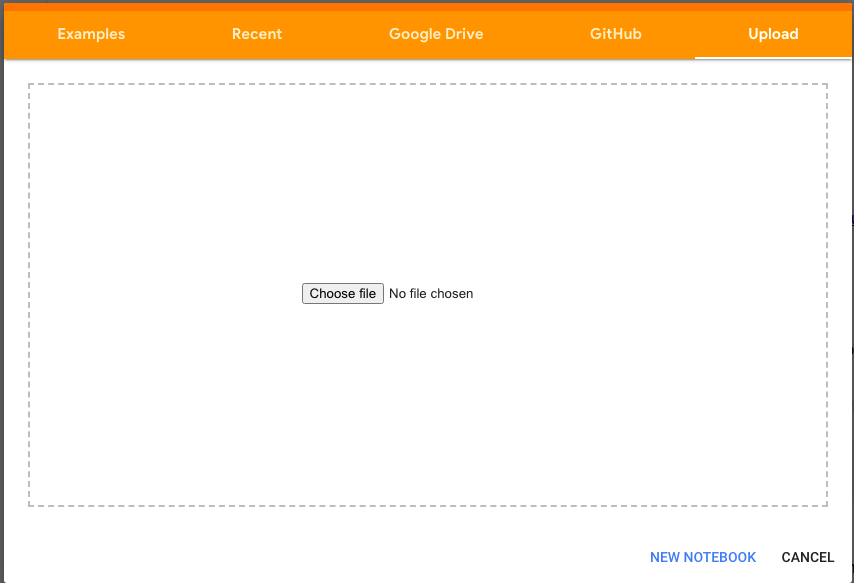
An upload form will appear each time you’ll open the Colab URL.
每次您打開Colab URL時,都會出現一個上傳表單。
再次訪問Colab (Access Colab again)
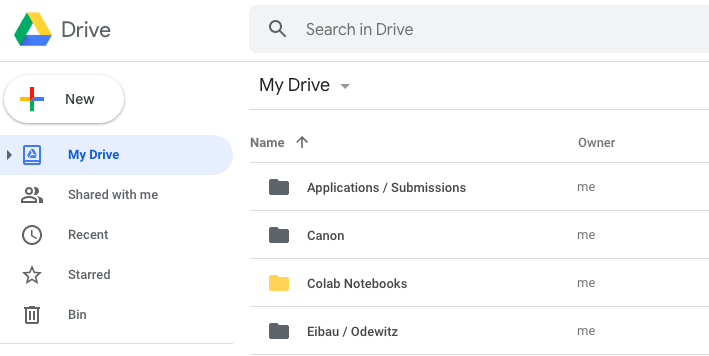
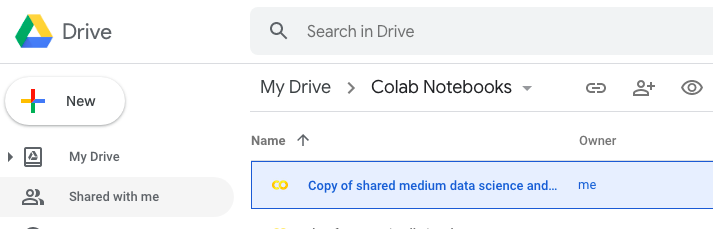
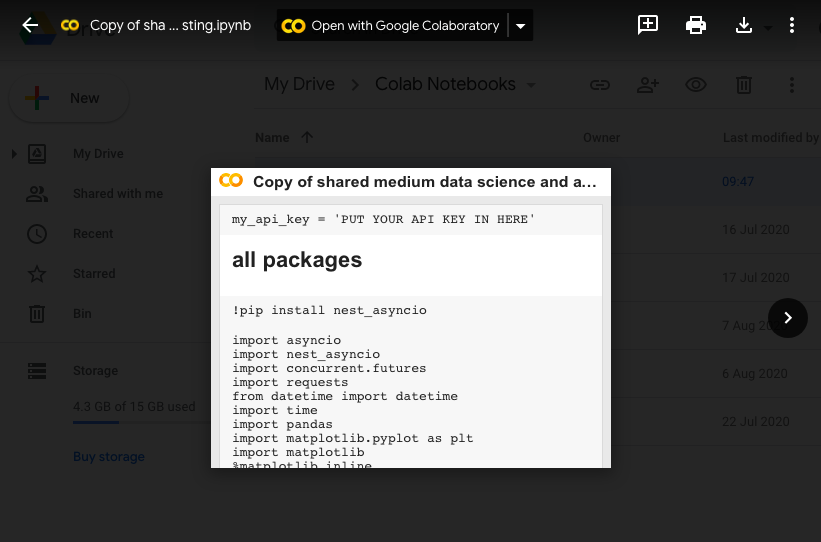
As I mentioned before, once you have any notebooks in there, a Colab folder will be automatically created in your Google Drive. The icon will have a yellow color. You can go to the folder, open it, double-click on a notebook, and then on “Open with Google Colaboratory”:
如前所述,一旦您有任何筆記本,就會在Google云端硬盤中自動創建一個Colab文件夾。 圖標將顯示為黃色。 您可以轉到文件夾,將其打開,雙擊筆記本,然后單擊“使用Google Colaboratory打開”:
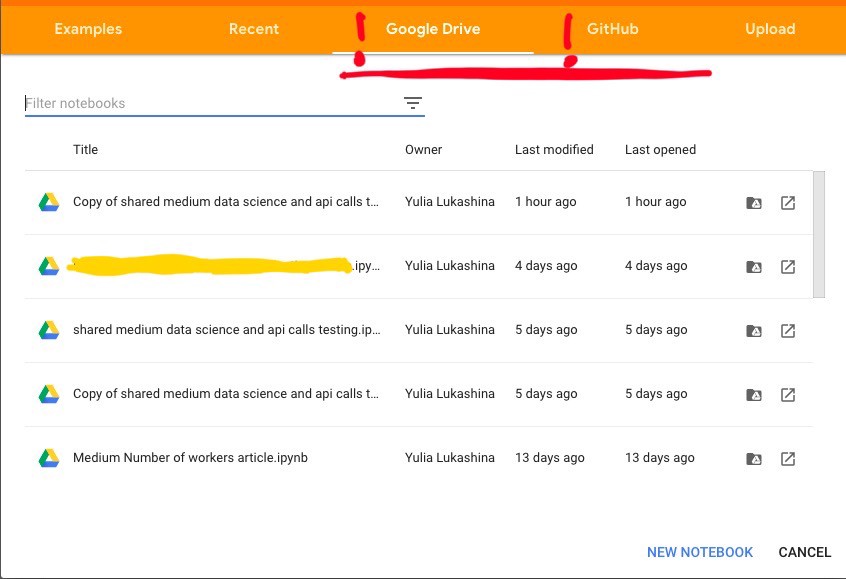
If you entry point in the Colab URL, then the list of your recently used notebooks will pop up. You can switch to uploading notebooks, or pick them from you Google Drive, or even from you GitHub. Read more on GitHub here.
如果您在Colab URL中輸入入口,則將彈出您最近使用過的筆記本的列表。 您可以切換到上傳筆記本,也可以從Google云端硬盤甚至是GitHub中選擇筆記本。 了解更多關于GitHub上這里 。
開始工作 (Start working)
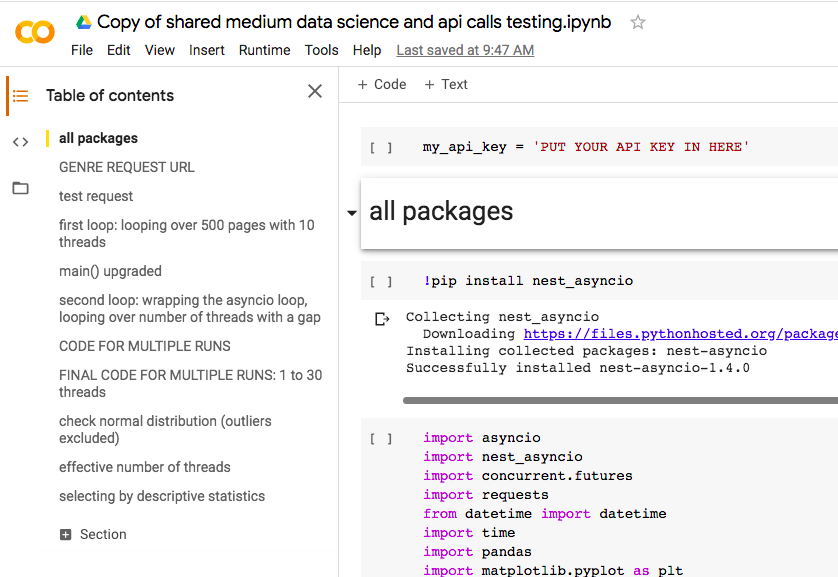
The interface is pretty much the same. You access the usual features through the panel atop of the notebook.
界面幾乎相同。 您可以通過筆記本頂部的面板訪問常規功能。

You have a table of the contents on the left side and an overview of your files.
您在左側有一個目錄表,并提供了文件概述。
But …
但是...
安裝套件 (Installing packages)
You’ll soon notice that the import command sometimes fails.
您很快就會注意到,導入命令有時會失敗。
Colab has pandas, but for less popular packages you’ll need a pip installation. Since you do not have access to the respective Terminal, — remember, Colab runs in a cloud! — you’ll have to type the command inside the notebook.
Colab有熊貓,但是對于不太受歡迎的軟件包,您需要安裝pip。 由于您無權訪問各自的終端,請記住,Colab在云中運行! —您必須在筆記本電腦中鍵入命令。
And put an exclamation mark before pip:
并在點子前加上一個感嘆號:
!pip install nest_asyncioimport nest_asyncioDo not forget to import the packages you’ve installed.
不要忘記導入已安裝的軟件包。
插入外部數據 (Inserting external data)
從本地硬盤上傳 (Upload from your local hard drive)
You’ll have to use a native workaround to import data from the files stored on your PC locally.
您必須使用本機解決方法從本地存儲在PC中的文件中導入數據。
You will have to use an upload package that Google created for you.
您將必須使用Google為您創建的上傳包。
Just go ahead and run the code to be asked to select your files:
只需繼續運行并運行要求您選擇文件的代碼即可:
from google.colab import filesuploaded = files.upload()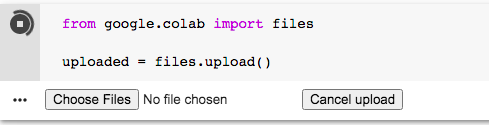
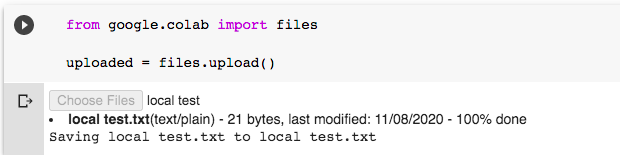
Then you can refer to this file in your code, for instance:
然后,您可以在代碼中引用此文件,例如:
with open(‘local test.txt’, ‘r’, newline=’\r\n’) as f: print(f.read().splitlines())
You can replace read().splitlines()) with any other method you prefer.
您可以使用您喜歡的任何其他方法替換read()。splitlines())。
If you want to upload the next one, you can just re-run the upload code.
如果您要上傳下一個,只需重新運行上傳代碼即可。
Of course, you can upload .CSV and easily turn it into a data frame:
當然,您可以上傳.CSV并將其輕松轉換為數據框:

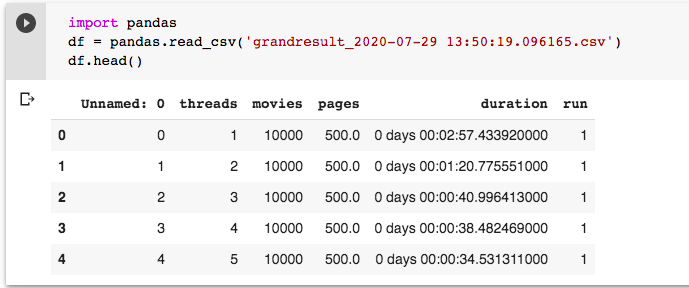
In this regard, there is no difference between handling the files in Jupyter and in Colab. In Colab you only add the native import command to call the pop-up window to access your file system from the notebook.
在這方面,在Jupyter和Colab中處理文件沒有區別。 在Colab中,您僅添加本機導入命令來調用彈出窗口以從筆記本計算機訪問文件系統。
連接到Google云端硬盤 (Connect to Google Drive)
Basically, you can import/export data from/to Google Drive in the form of either TXT or CSV. You do not have to install a Google Drive app. You are going to connect to it in the browser.
基本上,您可以使用TXT或CSV格式從Google云端硬盤導入數據/將數據導出到Google云端硬盤。 您不必安裝Google云端硬盤應用。 您將在瀏覽器中連接到它。
from google.colab import drivedrive.mount(‘/content/drive’)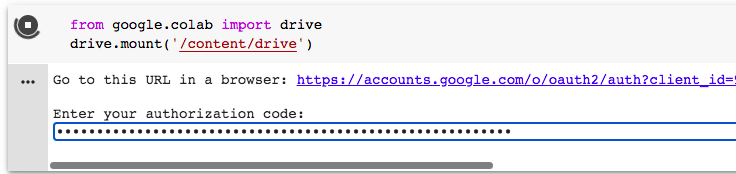
Click on the URL, click “Allow” and then copy the authorization code. Paste the code into the long cell and click “Enter”. The connection is there.
單擊URL,單擊“允許”,然后復制授權代碼。 將代碼粘貼到長單元格中,然后單擊“ Enter”。 連接在那里。
You can read more about it in the official documentation.
您可以在官方文檔中了解更多信息。
The same open command works to insert data from a file stored in the Drive. You only need to add the Google Drive path:
相同的open命令可從存儲在驅動器中的文件中插入數據。 您只需要添加Google云端硬盤路徑:

使用Google云端硬盤 (Use Google Drive Sheets)
Google developed a python package to read data from Google Sheets.
Google開發了一個python包來從Google表格中讀取數據。
!pip install — upgrade gspreadfrom google.colab import authauth.authenticate_user()import gspreadfrom oauth2client.client import GoogleCredentialsgc = gspread.authorize(GoogleCredentials.get_application_default())worksheet = gc.open(‘grandresult_2020–07–29 13:50:19.096165’).sheet1rows = worksheet.get_all_values()grandresult = pandas.DataFrame.from_records(rows)You install it over the “cloud” pip, then get an authorization to use Sheets. Be carefully, this connection and the previous one (that you launch with drive.mount) are separated.
您通過“云”點安裝它,然后獲得使用表格的授權。 請注意,此連接與上一個連接(使用drive.mount啟動)分開。
You pick up your file and then the first sheet: “sheet1” stands for the sheet number one and not a name of your sheet!
您先提取文件,然后提取第一個工作表:“ sheet1”代表工作表編號1,而不是工作表名稱!
You can directly start with pandas.
您可以直接從熊貓開始。
通過Python本機包獲取數據 (Fetching data by means of Python native packages)
If you download data from an API request, or parse an HTML with a BeautifulSoup, or any other native Python package, then it works in a usual way.
如果您從API請求中下載數據,或者使用BeautifulSoup或任何其他本機Python包解析HTML,那么它通常會起作用。
匯出資料 (Exporting data)
作為.TXT (As .TXT)
You can either export data by replacing the read command with the write command and adding a download line like that:
您可以通過將read命令替換為write命令并添加如下下載行來導出數據:
df = df.to_string() #to convert your data frame into .TXT filewith open(‘local test.txt’, ‘w’) as f: f.write(df)files.download(‘local text.txt’)作為.CSV (As .CSV)
Or you can download a .CSV:
或者,您可以下載.CSV:
df.to_csv(‘local test.csv’)files.download(‘local test.csv’)作為Google表格 (As a Google Sheet)
This code snippet allows to save a data frame into a Google Sheet:
此代碼段允許將數據框保存到Google表格中:
from gspread_dataframe import set_with_dataframegc.create(‘Title of your Google Sheet’)sheet = gc.open(‘Title of your Google Sheet’).sheet1set_with_dataframe(‘Title of your Google Sheet’, df)iOS和數據導入/導出 (iOS and data import/export)
We do not have the usual file path to save anything in the iOS file system. This makes exporting your data for storing it locally a ghost feature.
我們沒有通常的文件路徑將任何內容保存在iOS文件系統中。 這使得導出數據以將其存儲在本地成為重影功能。
In general, if you download any file from Safari on an iOS device, you’ll have to access the saved files directly from the Safari by clicking on the icon:
通常,如果您在iOS設備上從Safari下載任何文件,則必須直接通過以下圖標從Safari訪問保存的文件:
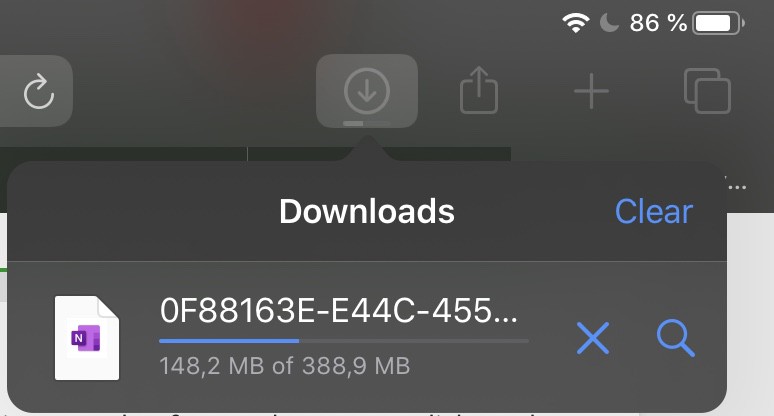
Although many recent iOS devices do have a file browser, in my case, I could not find the data I’ve exported from a Colab notebook as a .CSV.
盡管最近的許多iOS設備確實具有文件瀏覽器,但就我而言,我找不到從Colab筆記本中導出為.CSV的數據。
So, I stick to the Google Sheet or TXT method.
因此,我堅持使用Google Sheet或TXT方法。
為什么實際上叫Colab? (Why is it actually called Colab?)
Now, I want to mention a couple of features that were supposed to make Colab a better breed.
現在,我想談談一些應該使Colab成為更好品種的功能。
- You can use it instead of arranging a server to run complex pipelines in the Jupyter notebook format. 您可以使用它代替安排服務器以Jupyter筆記本格式運行復雜的管道。
- You can access it from everywhere, as long as you have a network coverage. 只要您具有網絡覆蓋范圍,就可以從任何地方訪問它。
- For some data manipulations, it is faster, even without a Pro membership. 對于某些數據操作,即使沒有Pro成員身份,它也更快。
But, mainly, it was designed to let more than one person to work on the same notebook and communicate with co-workers without leaving the notebook and involving some additional communication channel.
但是,主要是,它的設計目的是讓一個以上的人可以在同一個筆記本上工作并與同事進行交流,而不必離開筆記本并涉及一些其他的交流渠道。
評論細胞 (Commenting on the cells)
This small icon stands for the commenting function. You can leave comments for your co-workers, but you do not have to include them into the code with # on the beginning or create an additional text cell.
這個小圖標代表注釋功能。 您可以為同事留下評論,但不必將其包含在代碼中,并以#開頭或創建其他文本單元格。
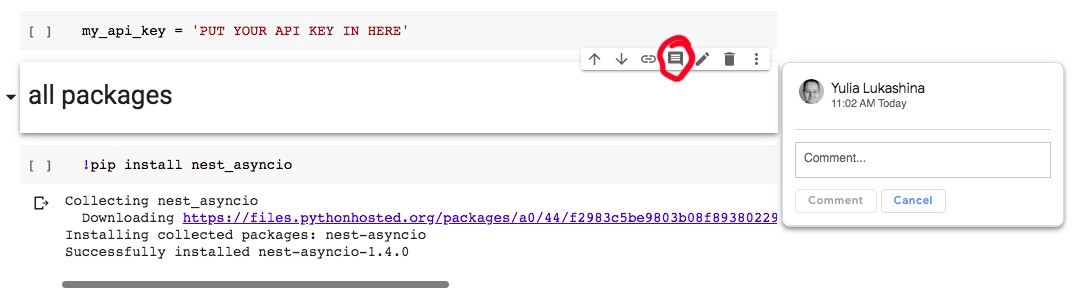
You can edit and delete your comments. After the issues you were asking about in your note were solved press “Resolve” to hide the comment thread.
您可以編輯和刪除您的評論。 解決了您在便箋中詢問的問題后,請按“解決”以隱藏評論主題。
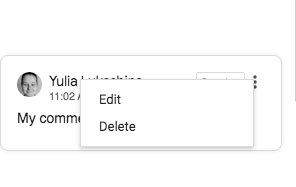

This is easier if you just want to leave a note that is only a temporary one and does not belong into the final code.
如果您只想留下一個暫時的注釋,并且不屬于最終代碼,則這樣會更容易。
另一個精美的UI功能:更改主題 (Another fancy UI feature: changing the theme)
It got more complicated with the packages, but there is a compensation for it: you do not need any inline command to switch the color theme!
這些軟件包變得更加復雜,但是有一個補償:您不需要任何內聯命令來切換顏色主題!
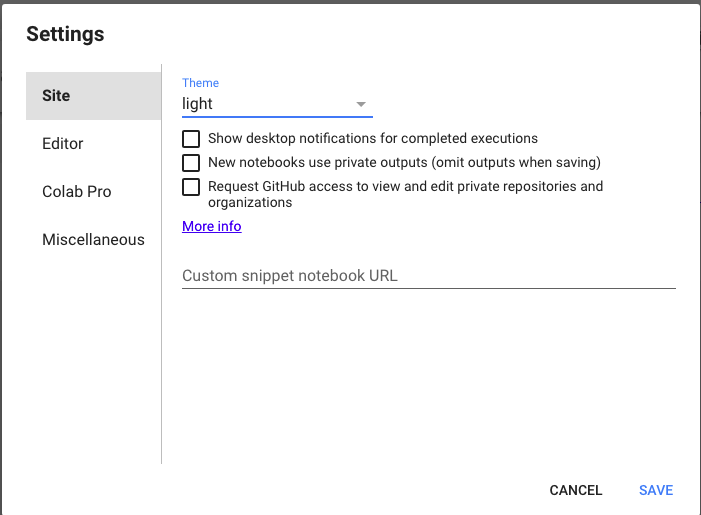
Unfortunately, only three themes — dark, light, and adaptive — are currently available. Less choice, less doubts!
不幸的是,目前只有三個主題:黑暗,明亮和自適應。 更少的選擇,更少的疑問!
改變語言 (Changing the language)
The last feature I had to refer to quite often, especially, while writing this manual.
我不得不經常參考的最后一個功能,特別是在編寫本手冊時。
A Colab notebook will be shown in your local language, regardless of the language you’ve set for your entire Google profile.
無論您為整個Google個人資料設置了哪種語言,都會以您的本地語言顯示Colab筆記本。
There is one single button in Colab, always in the same place, under the “Help” section in the top panel:
在Colab中,只有一個按鈕始終位于同一位置,位于頂部面板的“幫助”部分下:
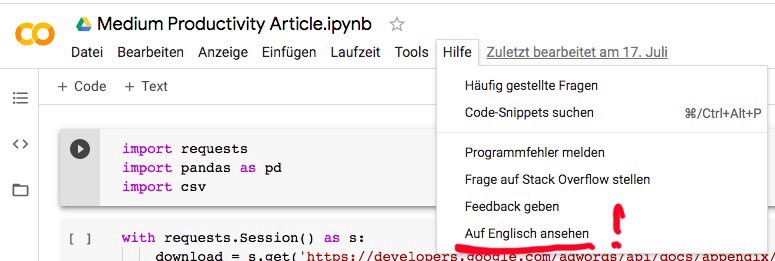
It is always the last one in the drop down.
它始終是下拉列表中的最后一個。
簡短的后記 (A short afterword)
You will definitely discover even more interesting features and new horizons in using Colab. I’ll stop here, since this is the ultimate list I found important so far.
使用Colab一定會發現更多有趣的功能和新視野。 我將在這里停止,因為這是到目前為止我發現很重要的最終清單。
翻譯自: https://medium.com/swlh/migrating-from-jupyter-to-colaboratory-2888332d57a7
劃痕實驗 遷移面積自動統計
本文來自互聯網用戶投稿,該文觀點僅代表作者本人,不代表本站立場。本站僅提供信息存儲空間服務,不擁有所有權,不承擔相關法律責任。 如若轉載,請注明出處:http://www.pswp.cn/news/388518.shtml 繁體地址,請注明出處:http://hk.pswp.cn/news/388518.shtml 英文地址,請注明出處:http://en.pswp.cn/news/388518.shtml
如若內容造成侵權/違法違規/事實不符,請聯系多彩編程網進行投訴反饋email:809451989@qq.com,一經查實,立即刪除!相關文章
)
英法德三門語言同時達到c1,【分享】插翅而飛的孩子(轉載)

數據庫建表賦予權限語句

day03 基本數據類型

美國移民局的I797表原件和I129表是什么呢

數據開放 數據集_除開放式清洗之外:敘述是開放數據門戶的未來嗎?

單選按鈕android服務器,android – 如何在radiogroup中將單選按鈕設置...


string 轉化 xml,并找到指定節點及節點值

ios android 交互 區別,很多人不承認:iOS的返回交互,對比Android就是反人類。

Servlet+JSP

正態分布高斯分布泊松分布_正態分布:將數據轉換為高斯分布

BABOK - 開篇:業務分析知識體系介紹


黑蘋果 wifi android,動動手指零負擔讓你的黑蘋果連上Wifi

洛谷——P2018 消息傳遞

axios異步請求數據的簡單使用

float在html語言中的用法,float屬性值包括

它們是什么以及為什么我們不需要它們

LoadRunner8.1破解漢化過程
)