springboot中集成shiro相對簡單,只需要兩個類:一個是shiroConfig類,一個是CustonRealm類。
ShiroConfig類:
顧名思義就是對shiro的一些配置,相對于之前的xml配置。包括:過濾的文件和權限,密碼加密的算法,其用注解等相關功能。
CustomRealm類:
自定義的CustomRealm繼承AuthorizingRealm。并且重寫父類中的doGetAuthorizationInfo(權限相關)、doGetAuthenticationInfo(身份認證)這兩個方法。
最基本的配置:
shiroConfig配置:
package com.cj.shirodemo.config;import org.apache.shiro.authc.credential.HashedCredentialsMatcher;
import org.apache.shiro.mgt.DefaultSecurityManager;
import org.apache.shiro.mgt.SecurityManager;
import org.apache.shiro.spring.LifecycleBeanPostProcessor;
import org.apache.shiro.spring.security.interceptor.AuthorizationAttributeSourceAdvisor;
import org.apache.shiro.spring.web.ShiroFilterFactoryBean;
import org.apache.shiro.web.mgt.DefaultWebSecurityManager;
import org.springframework.aop.framework.autoproxy.DefaultAdvisorAutoProxyCreator;
import org.springframework.beans.factory.annotation.Autowired;
import org.springframework.context.annotation.Bean;
import org.springframework.context.annotation.Configuration;
import org.springframework.context.annotation.DependsOn;import java.util.LinkedHashMap;
import java.util.Map;/*** 描述:** @author caojing* @create 2019-01-27-13:38*/
@Configuration
public class ShiroConfig {@Bean(name = "shiroFilter")public ShiroFilterFactoryBean shiroFilter(SecurityManager securityManager) {ShiroFilterFactoryBean shiroFilterFactoryBean = new ShiroFilterFactoryBean();shiroFilterFactoryBean.setSecurityManager(securityManager);shiroFilterFactoryBean.setLoginUrl("/login");shiroFilterFactoryBean.setUnauthorizedUrl("/notRole");Map<String, String> filterChainDefinitionMap = new LinkedHashMap<>();// <!-- authc:所有url都必須認證通過才可以訪問; anon:所有url都都可以匿名訪問-->filterChainDefinitionMap.put("/webjars/**", "anon");filterChainDefinitionMap.put("/login", "anon");filterChainDefinitionMap.put("/", "anon");filterChainDefinitionMap.put("/front/**", "anon");filterChainDefinitionMap.put("/api/**", "anon");filterChainDefinitionMap.put("/admin/**", "authc");filterChainDefinitionMap.put("/user/**", "authc");//主要這行代碼必須放在所有權限設置的最后,不然會導致所有 url 都被攔截 剩余的都需要認證filterChainDefinitionMap.put("/**", "authc");shiroFilterFactoryBean.setFilterChainDefinitionMap(filterChainDefinitionMap);return shiroFilterFactoryBean;}@Beanpublic SecurityManager securityManager() {DefaultWebSecurityManager defaultSecurityManager = new DefaultWebSecurityManager();defaultSecurityManager.setRealm(customRealm());return defaultSecurityManager;}@Beanpublic CustomRealm customRealm() {CustomRealm customRealm = new CustomRealm();return customRealm;}
}
shiroConfig 也不復雜,基本就三個方法。再說這三個方法之前,我想給大家說一下shiro的三個核心概念:
Subject: 代表當前正在執行操作的用戶,但Subject代表的可以是人,也可以是任何第三方系統帳號。當然每個subject實例都會被綁定到SercurityManger上。
SecurityManger:SecurityManager是Shiro核心,主要協調Shiro內部的各種安全組件,這個我們不需要太關注,只需要知道可以設置自定的Realm。
Realm:用戶數據和Shiro數據交互的橋梁。比如需要用戶身份認證、權限認證。都是需要通過Realm來讀取數據。
shiroFilter方法:
這個方法看名字就知道了:shiro的過濾器,可以設置登錄頁面(setLoginUrl)、權限不足跳轉頁面(setUnauthorizedUrl)、具體某些頁面的權限控制或者身份認證。
注意:這里是需要設置SecurityManager(setSecurityManager)。
默認的過濾器還有:anno、authc、authcBasic、logout、noSessionCreation、perms、port、rest、roles、ssl、user過濾器。
具體的大家可以查看package org.apache.shiro.web.filter.mgt.DefaultFilter。這個類,常用的也就authc、anno。
securityManager 方法:
查看源碼可以知道 securityManager是一個接口類,我們可以看下它的實現類:
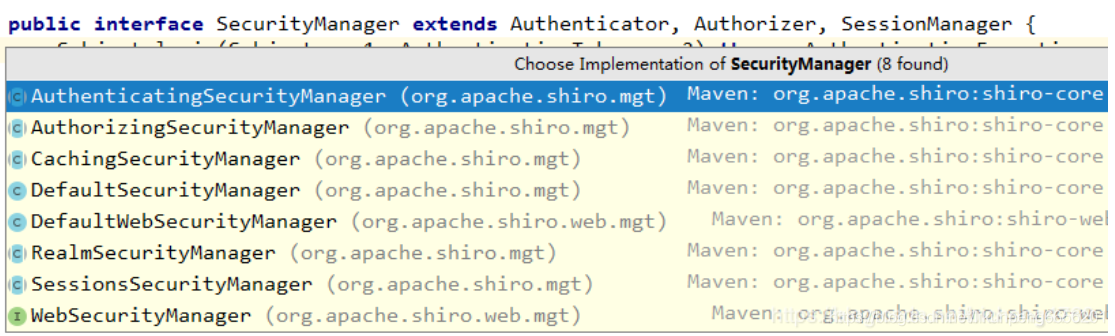
具體怎么實現的,感興趣的同學可以看下。由于項目是一個web項目,所以我們使用的是DefaultWebSecurityManager ,然后設置自己的Realm。
CustomRealm 方法:
將 customRealm的實例化交給spring去管理,當然這里也可以利用注解的方式去注入。
customRealm配置:
package com.cj.shirodemo.config;import org.apache.shiro.SecurityUtils;
import org.apache.shiro.authc.*;
import org.apache.shiro.authz.AuthorizationInfo;
import org.apache.shiro.authz.SimpleAuthorizationInfo;
import org.apache.shiro.realm.AuthorizingRealm;
import org.apache.shiro.subject.PrincipalCollection;
import org.apache.shiro.util.ByteSource;
import org.springframework.context.annotation.Bean;
import org.springframework.context.annotation.Configuration;
import org.springframework.stereotype.Component;import java.util.HashSet;
import java.util.Set;/*** 描述:** @author caojing* @create 2019-01-27-13:57*/
public class CustomRealm extends AuthorizingRealm {@Overrideprotected AuthorizationInfo doGetAuthorizationInfo(PrincipalCollection principalCollection) {String username = (String) SecurityUtils.getSubject().getPrincipal();SimpleAuthorizationInfo info = new SimpleAuthorizationInfo();Set<String> stringSet = new HashSet<>();stringSet.add("user:show");stringSet.add("user:admin");info.setStringPermissions(stringSet);return info;}/*** 這里可以注入userService,為了方便演示,我就寫死了帳號了密碼* private UserService userService;* <p>* 獲取即將需要認證的信息*/@Overrideprotected AuthenticationInfo doGetAuthenticationInfo(AuthenticationToken authenticationToken) throws AuthenticationException {System.out.println("-------身份認證方法--------");String userName = (String) authenticationToken.getPrincipal();String userPwd = new String((char[]) authenticationToken.getCredentials());//根據用戶名從數據庫獲取密碼String password = "123";if (userName == null) {throw new AccountException("用戶名不正確");} else if (!userPwd.equals(password )) {throw new AccountException("密碼不正確");}return new SimpleAuthenticationInfo(userName, password,getName());}
}
說明:
自定義的Realm類繼承AuthorizingRealm類,并且重載doGetAuthorizationInfo和doGetAuthenticationInfo兩個方法。
doGetAuthorizationInfo: 權限認證,即登錄過后,每個身份不一定,對應的所能看的頁面也不一樣。
doGetAuthenticationInfo:身份認證。即登錄通過賬號和密碼驗證登陸人的身份信息。
controller類:
新建一個HomeIndexController類,加入如下代碼:
@RequestMapping(value = "/login", method = RequestMethod.GET)@ResponseBodypublic String defaultLogin() {return "首頁";}@RequestMapping(value = "/login", method = RequestMethod.POST)@ResponseBodypublic String login(@RequestParam("username") String username, @RequestParam("password") String password) {// 從SecurityUtils里邊創建一個 subjectSubject subject = SecurityUtils.getSubject();// 在認證提交前準備 token(令牌)UsernamePasswordToken token = new UsernamePasswordToken(username, password);// 執行認證登陸try {subject.login(token);} catch (UnknownAccountException uae) {return "未知賬戶";} catch (IncorrectCredentialsException ice) {return "密碼不正確";} catch (LockedAccountException lae) {return "賬戶已鎖定";} catch (ExcessiveAttemptsException eae) {return "用戶名或密碼錯誤次數過多";} catch (AuthenticationException ae) {return "用戶名或密碼不正確!";}if (subject.isAuthenticated()) {return "登錄成功";} else {token.clear();return "登錄失敗";}}測試:
我們可以使用postman進行測試:

ok 身份認證是沒問題了,我們再來考慮如何加入權限。
利用注解配置權限:
其實,我們完全可以不用注解的形式去配置權限,因為在之前已經加過了:DefaultFilter類中有perms(類似于perms[user:add])這種形式的。但是試想一下,這種控制的粒度可能會很細,具體到某一個類中的方法,那么如果是配置文件配,是不是每個方法都要加一個perms?但是注解就不一樣了,直接寫在方法上面,簡單快捷。
很簡單,主需要在config類中加入如下代碼,就能開啟注解:
@Beanpublic LifecycleBeanPostProcessor lifecycleBeanPostProcessor() {return new LifecycleBeanPostProcessor();}/*** ** 開啟Shiro的注解(如@RequiresRoles,@RequiresPermissions),需借助SpringAOP掃描使用Shiro注解的類,并在必要時進行安全邏輯驗證* ** 配置以下兩個bean(DefaultAdvisorAutoProxyCreator(可選)和AuthorizationAttributeSourceAdvisor)即可實現此功能* * @return*/@Bean@DependsOn({"lifecycleBeanPostProcessor"})public DefaultAdvisorAutoProxyCreator advisorAutoProxyCreator() {DefaultAdvisorAutoProxyCreator advisorAutoProxyCreator = new DefaultAdvisorAutoProxyCreator();advisorAutoProxyCreator.setProxyTargetClass(true);return advisorAutoProxyCreator;}@Beanpublic AuthorizationAttributeSourceAdvisor authorizationAttributeSourceAdvisor() {AuthorizationAttributeSourceAdvisor authorizationAttributeSourceAdvisor = new AuthorizationAttributeSourceAdvisor();authorizationAttributeSourceAdvisor.setSecurityManager(securityManager());return authorizationAttributeSourceAdvisor;}重復剛才的登錄步驟,登錄成功后,postman 輸入localhost:8080/user/show

確實是沒有權限。方法上是 @RequiresPermissions(“user:list”),而customRealm中是 user:show、user:admin。我們可以調整下方法上的權限改為user:show。調試一下,發現成功了。
這里有一個問題:當沒有權限時,系統會報錯,而沒有跳轉到對應的沒有權限的頁面,也就是setUnauthorizedUrl這個方法沒起作用,這個問題,下一篇會給出解決方案-。-
密碼采用加密方式進行驗證:
其實上面的功能已經基本滿足我們的需求了,但是唯一一點美中不足的是,密碼都是采用的明文方式進行比對的。那么shiro是否提供給我們一種密碼加密的方式呢?答案是肯定。
shiroConfig中加入加密配置:
@Bean(name = "credentialsMatcher")public HashedCredentialsMatcher hashedCredentialsMatcher() {HashedCredentialsMatcher hashedCredentialsMatcher = new HashedCredentialsMatcher();// 散列算法:這里使用MD5算法;hashedCredentialsMatcher.setHashAlgorithmName("md5");// 散列的次數,比如散列兩次,相當于 md5(md5(""));hashedCredentialsMatcher.setHashIterations(2);// storedCredentialsHexEncoded默認是true,此時用的是密碼加密用的是Hex編碼;false時用Base64編碼hashedCredentialsMatcher.setStoredCredentialsHexEncoded(true);return hashedCredentialsMatcher;}customRealm初始化的時候耶需要做一些改變:
@Beanpublic CustomRealm customRealm() {CustomRealm customRealm = new CustomRealm();// 告訴realm,使用credentialsMatcher加密算法類來驗證密文customRealm.setCredentialsMatcher(hashedCredentialsMatcher());customRealm.setCachingEnabled(false);return customRealm;}流程是這樣的,用戶注冊的時候,程序將明文通過加密方式加密,存到數據庫的是密文,登錄時將密文取出來,再通過shiro將用戶輸入的密碼進行加密對比,一樣則成功,不一樣則失敗。
我們可以看到這里的加密采用的是MD5,而且是加密兩次(MD5(MD5))。
shiro提供了SimpleHash類幫助我們快速加密:
public static String MD5Pwd(String username, String pwd) {// 加密算法MD5// salt鹽 username + salt// 迭代次數String md5Pwd = new SimpleHash("MD5", pwd,ByteSource.Util.bytes(username + "salt"), 2).toHex();return md5Pwd;}也就是說注冊的時候調用一下上面的方法得到密文之后,再存入數據庫。
在CustomRealm進行身份認證的時候我們也需要作出改變:
System.out.println("-------身份認證方法--------");String userName = (String) authenticationToken.getPrincipal();String userPwd = new String((char[]) authenticationToken.getCredentials());//根據用戶名從數據庫獲取密碼String password = "2415b95d3203ac901e287b76fcef640b";if (userName == null) {throw new AccountException("用戶名不正確");} else if (!userPwd.equals(userPwd)) {throw new AccountException("密碼不正確");}//交給AuthenticatingRealm使用CredentialsMatcher進行密碼匹配return new SimpleAuthenticationInfo(userName, password,ByteSource.Util.bytes(userName + "salt"), getName());這里唯一需要注意的是:你注冊的加密方式和設置的加密方式還有Realm中身份認證的方式都是要一模一樣的。
本文中的加密 :MD5兩次、salt=username+salt加密。
![[pytorch、學習] - 5.3 多輸入通道和多輸出通道](http://pic.xiahunao.cn/[pytorch、學習] - 5.3 多輸入通道和多輸出通道)


![[pytorch、學習] - 5.4 池化層](http://pic.xiahunao.cn/[pytorch、學習] - 5.4 池化層)


![[pytorch、學習] - 5.5 卷積神經網絡(LeNet)](http://pic.xiahunao.cn/[pytorch、學習] - 5.5 卷積神經網絡(LeNet))


![[pytorch、學習] - 5.6 深度卷積神經網絡(AlexNet)](http://pic.xiahunao.cn/[pytorch、學習] - 5.6 深度卷積神經網絡(AlexNet))


 UVA - 519)
![[pytorch、學習] - 5.7 使用重復元素的網絡(VGG)](http://pic.xiahunao.cn/[pytorch、學習] - 5.7 使用重復元素的網絡(VGG))


![[pytorch、學習] - 5.8 網絡中的網絡(NiN)](http://pic.xiahunao.cn/[pytorch、學習] - 5.8 網絡中的網絡(NiN))

