
?作者簡介:大家好,我是Leo,熱愛Java后端開發者,一個想要與大家共同進步的男人😉😉
🍎個人主頁:Leo的博客
💞當前專欄: Java從入門到精通
?特色專欄: MySQL學習
🥭本文內容:SSpringSecurity6 | 自定義登錄頁面
📚個人知識庫 :知識庫,歡迎大家訪問
學習參考 :
- 講師:孫帥老師
- 課程:孫哥說SpringSecurity6
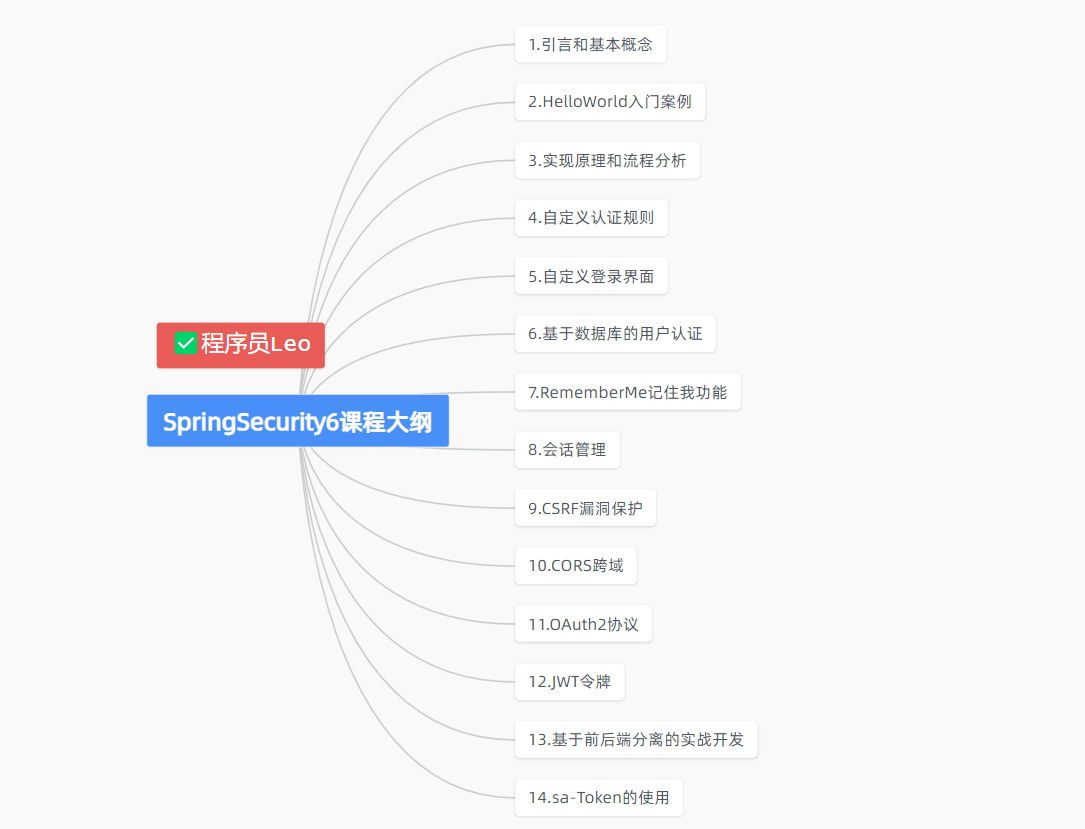
1.前言
大家好,我是Leo哥🫣🫣🫣,接到上一節,我們學習通過SpringSecurity的一些自定義配置來完成我們自定義認證規則的一些需求。這篇文章我們主要來介紹一下如何自定義我的登錄頁面。好了,話不多說讓我們開始吧😎😎😎。
2.環境配置
首先先說明一下我們的環境配置和技術要求,我們還是會創建一個新的SpringBoot工程,對其進行一些自定義配置。
因為我們要自定義我們的登錄頁面,所以我們這里會用到一種后端模版引擎–>Thyemleaf。如果對Thyemleaf還不了解的同學,可以參考我這篇文章。
3.自定義登錄頁面
3.1 導入依賴
在我們的pom.xml文件中導入ThymeLeaf依賴。
<dependency><groupId>org.springframework.boot</groupId><artifactId>spring-boot-starter-thymeleaf</artifactId>
</dependency>
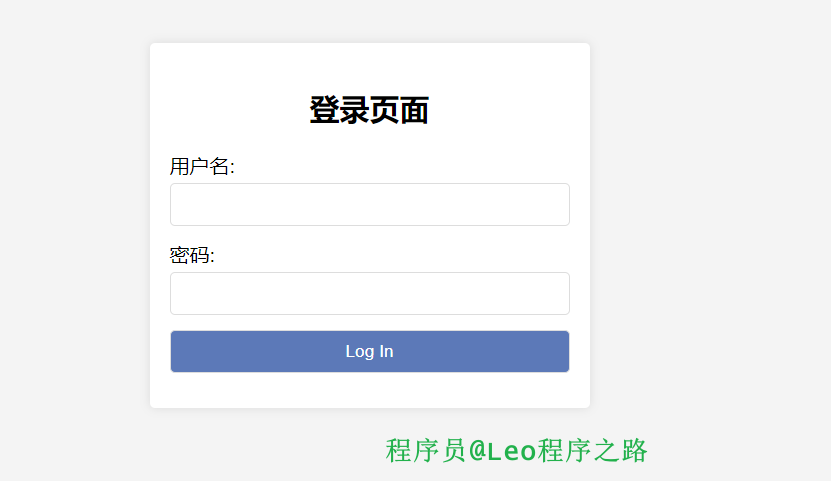
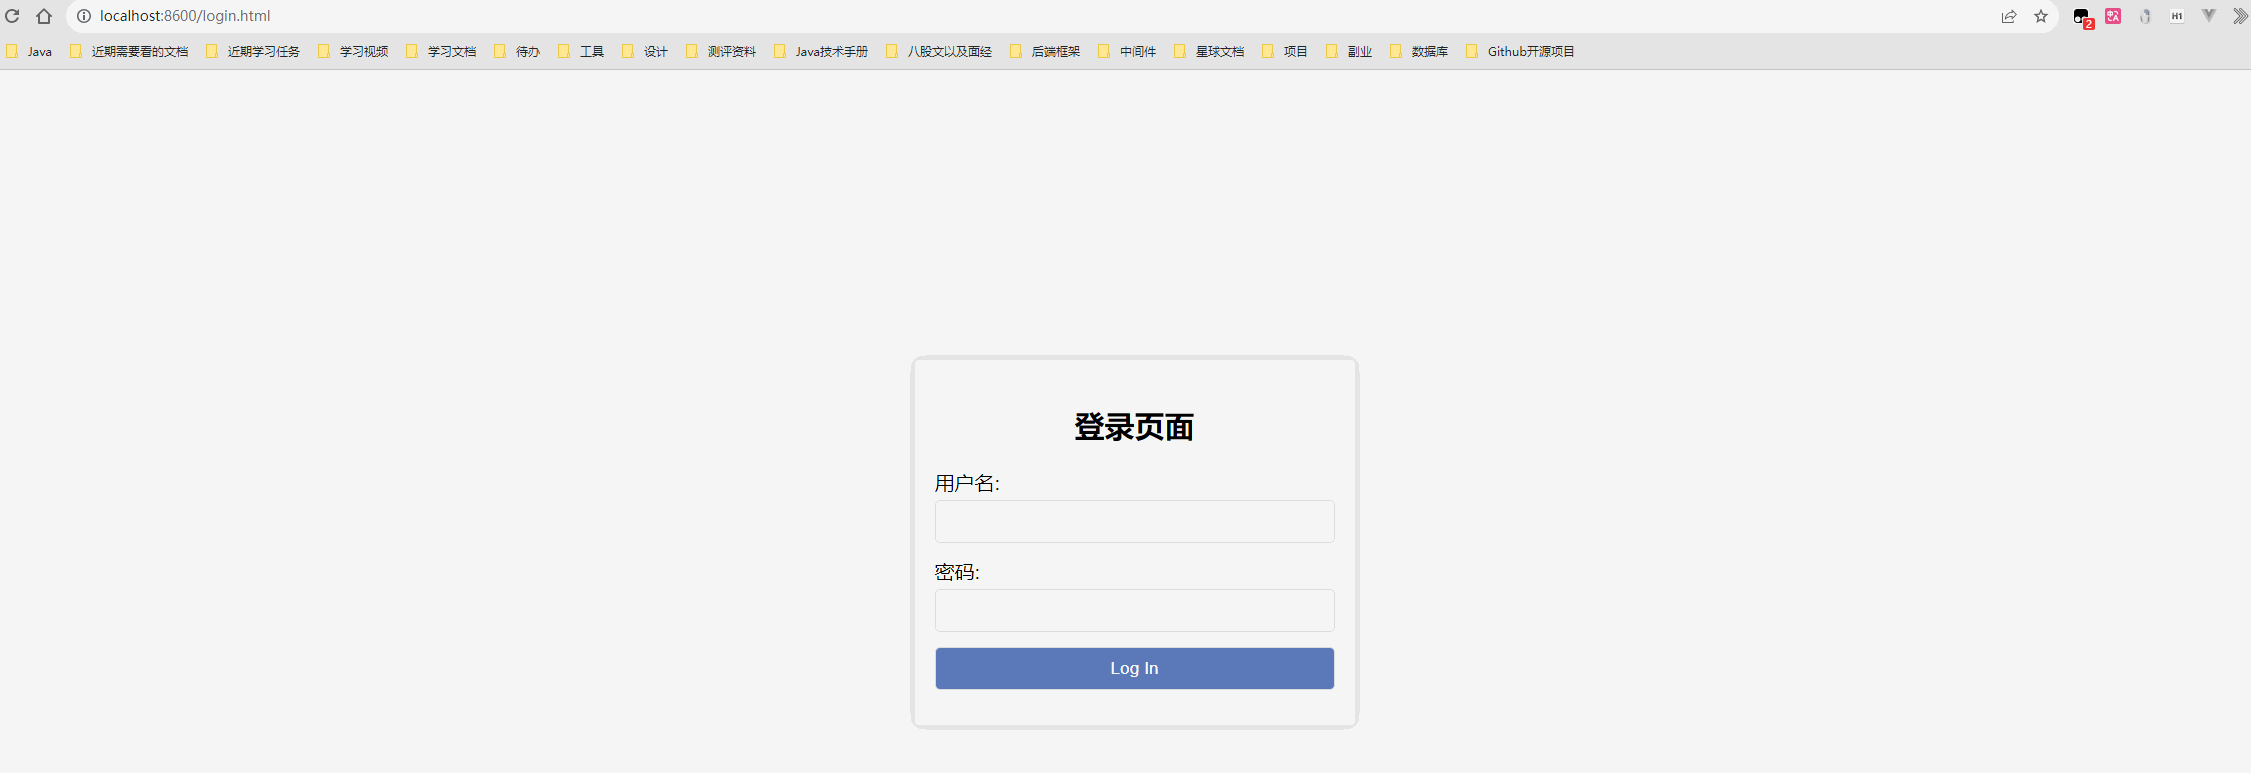
3.2 創建login.html
并制定xml:th的映射,這里是為了可以在HTML中使用ThymeLeaf語法。
<!DOCTYPE html>
<html lang="en" xml:th="http://www.thymeleaf.org">
<head><meta charset="UTF-8"><meta name="viewport" content="width=device-width, initial-scale=1.0"><title>Login Page</title><style>body {font-family: Arial, sans-serif;background-color: #f4f4f4;margin: 0;padding: 0;display: flex;justify-content: center;align-items: center;height: 100vh;}.login-container {background-color: #fff;padding: 20px;border-radius: 5px;box-shadow: 0 0 10px rgba(0, 0, 0, 0.1);}.form-group {margin-bottom: 15px;}.form-group label {display: block;margin-bottom: 5px;}.form-group input {width: 100%;padding: 10px;border: 1px solid #ddd;border-radius: 5px;box-sizing: border-box; /* ensures padding doesn't affect width */}.form-group input[type="submit"] {background-color: #5c79b8;color: white;cursor: pointer;}.form-group input[type="submit"]:hover {background-color: #4cae97;}</style>
</head>
<body>
<div class="login-container"><h2>登錄頁面</h2><form><div class="form-group"><label for="username">用戶名:</label><input type="text" id="username" name="name" required></div><div class="form-group"><label for="password">密碼:</label><input type="password" id="password" name="passwd" required></div><div class="form-group"><input type="submit" value="Log In"></div></form>
</div>
</body>
</html>
簡單在瀏覽器,看看我們簡易的登錄界面吧。
3.3 配置
那我們如何將他配置為我們SpringSecurity的登錄頁面呢,通過以下配置。
首先我們在后端編寫一個controller請求,也就是返回我們自定義的登錄頁面。
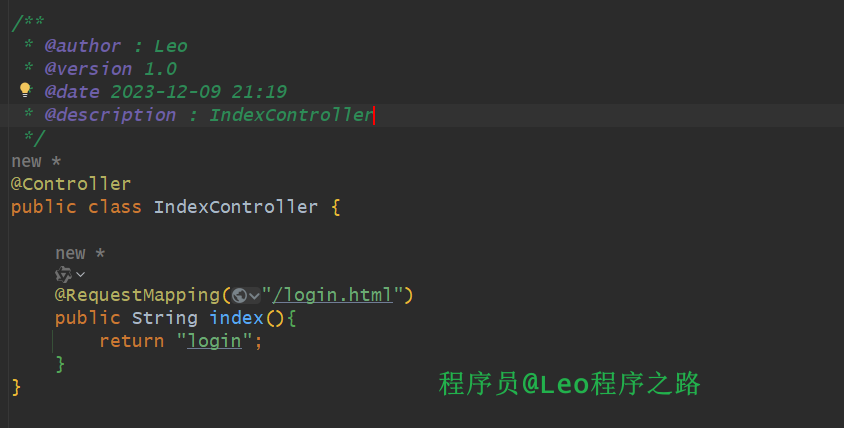
注意:這里一定不要寫成@RestController了,因為我們不需要向前端返回JSON數據哈。
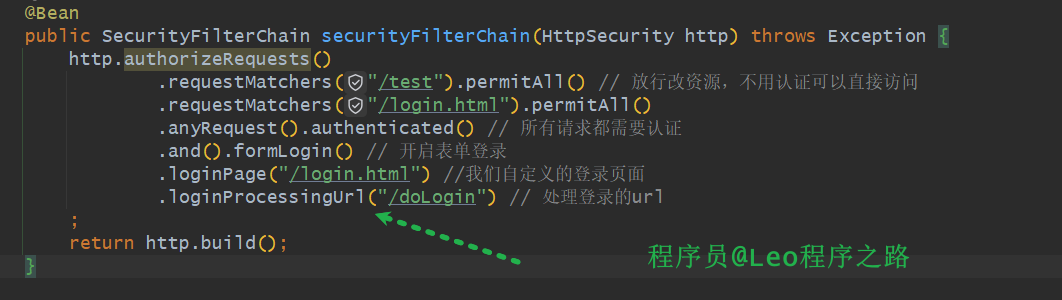
然后我們在SpringSecurity的配置類進行配置我們的自定義登錄頁面。
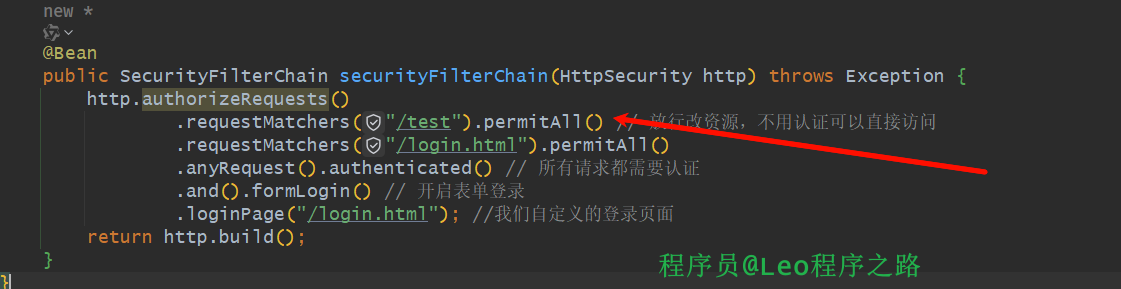
然后啟動項目,訪問hello接口。
但是我們發現一個問題,此時我們輸入我們的用戶名和密碼卻不能登錄,而是會在瀏覽器進行刷新,我們接著往下看。
那么是怎么回事呢,此時我們需要回顧一下我們之前學習的知識,也就是我能當時查看表單登錄的整合流程。
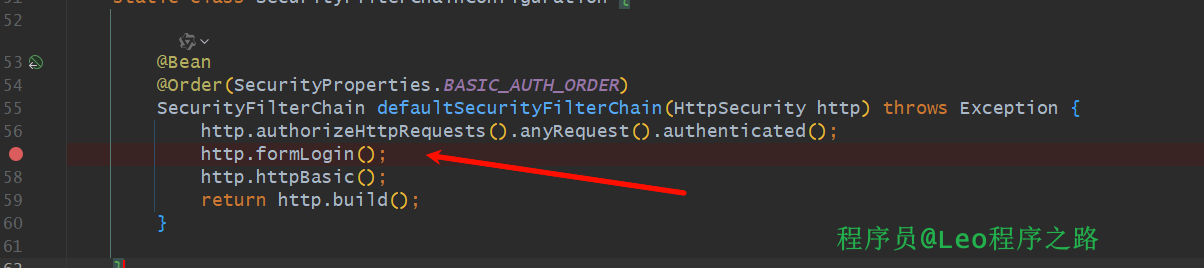
他會調用 HttpSecurity 類的 formLogin() 方法,在該方法中創建 FormLoginConfigurer 類的實例,并指定處理認證的 Filter 進行認證:

然后又去new了一個FormLoginConfigurer(),然后去調用父類的構造方法區new這個類

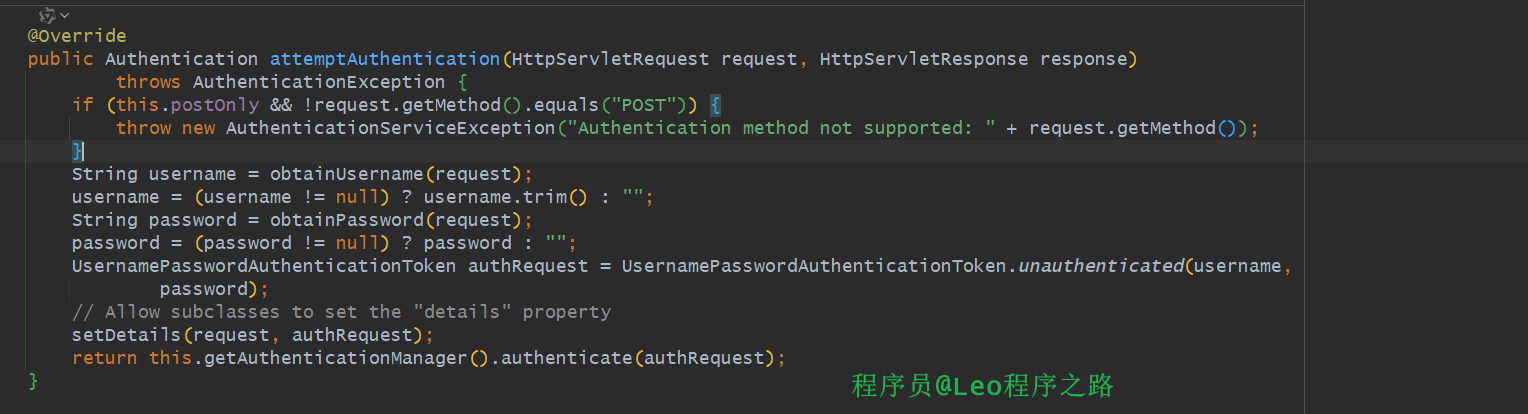
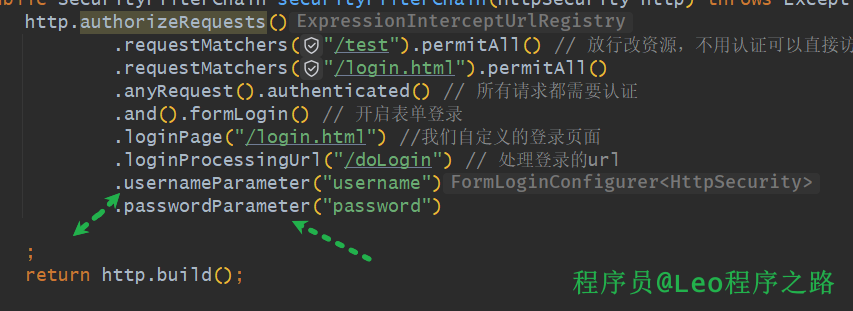
我們在UsernamePasswordAuthenticationFilter類中中的**attemptAuthentication()**方法中可以看到他的一些要求。
首先必須是POST請求,然后用戶名的屬性必須是username,密碼的屬性是password。
按照上面的解讀,我們來按照規則改善一下我們的登錄頁面。
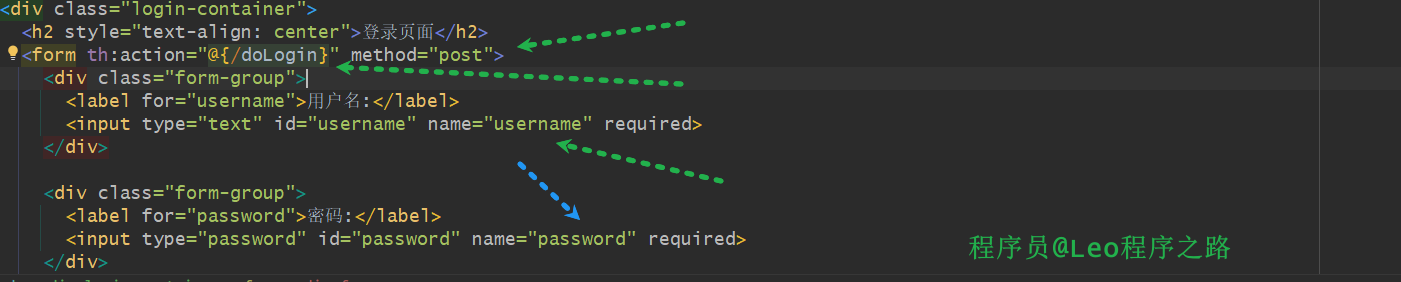
還需要對我們的配置類做一些改變,這里的登錄的url要和我們前端請求的保持一致。
然后啟動項目,再次訪問。

當然還有另外一種方式實現是通過Java配置類的方式,而不是更改name屬性值。我們這里簡單介紹一下。
4.總結
以上便是本文的全部內容,本人才疏學淺,文章有什么錯誤的地方,歡迎大佬們批評指正!我是Leo,一個在互聯網行業的小白,立志成為更好的自己。
如果你想了解更多關于Leo,可以關注公眾號-程序員Leo,后面文章會首先同步至公眾號。


 快速安裝anaconda;5秒安裝anaconda)
國際高爾夫旅游文化博覽會 暨國際商界峰層·全球華人高爾夫精英巡回賽 全國潁商自貿港行盛大啟幕)


)

一些題11)


![[英語學習][11][Word Power Made Easy]的精讀與翻譯優化](http://pic.xiahunao.cn/[英語學習][11][Word Power Made Easy]的精讀與翻譯優化)


