環境:
- three.js 0.159.0
一、基礎知識
geometry:決定物體的幾何形狀、輪廓;material:決定物體呈現的色彩、光影特性、貼圖皮膚;mesh:場景中的物體,由geometry和materia組成;texture:貼圖,用于將一個jpg等格式的圖片貼到material上面(當然,material也可以不貼texture);
另外,如果material上是定義的color,那么說明,物體是自發光的,不需要燈光就能看到,
而materia如果整個是靠texture貼上去的,則需要光照才能看到它,最簡單的是用環境光。
另外,對于一張圖片,無論它有多大或多小,左下角是(0,0),右上角是(1,1),這就是uv,寬用u表示,高用v表示。
另外,無論一個物體形狀有多復雜,其表面也可以分割成很多三角面。
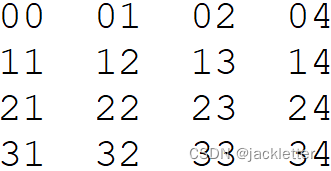
下面使用的示例圖片如下:
二、簡單實例
<!DOCTYPE html>
<html lang="en"><head><meta charset="UTF-8"><meta name="viewport" content="width=device-width, initial-scale=1.0"><title>Document</title><style>* {margin: 0;padding: 0;box-sizing: border-box;}</style><script type="importmap">{"imports": {"three": "https://unpkg.com/three@0.159.0/build/three.module.js","three/addons/": "https://unpkg.com/three@0.159.0/examples/jsm/"}}</script>
</head><body><script type="module">import * as THREE from 'three';import { OrbitControls } from 'three/addons/controls/OrbitControls.js';let camera, scene, renderer;//基礎對象camera = new THREE.PerspectiveCamera(45, window.innerWidth / window.innerHeight, 0.1, 10000);camera.position.set(50, 50, 50);camera.updateProjectionMatrix();renderer = new THREE.WebGLRenderer();renderer.setPixelRatio(window.devicePixelRatio);renderer.setSize(window.innerWidth, window.innerHeight);document.body.appendChild(renderer.domElement);const controls = new OrbitControls(camera, renderer.domElement);controls.minDistance = 5;controls.maxDistance = 300;controls.update()scene = new THREE.Scene();// 環境光const light = new THREE.AmbientLight(0x404040); // soft white lightscene.add(light);//坐標軸const axesHelper = new THREE.AxesHelper(5);scene.add(axesHelper);//準備geometry//點位var position = [10, 10, 0,10, 0, 0,0, 0, 0]//貼圖var uvs = [1, 1,1, 0,0, 0,]        //構造geometrylet geometry = new THREE.BufferGeometry();geometry.setAttribute('position', new THREE.Float32BufferAttribute(position, 3));geometry.setAttribute('uv', new THREE.Float32BufferAttribute(uvs, 2));//加載貼圖const texture = new THREE.TextureLoader().load('number.png');texture.wrapS = texture.wrapT = THREE.RepeatWrapping;texture.repeat.set(1, 1);//準備materialconst material = new THREE.MeshBasicMaterial({side: THREE.DoubleSide,map: texture,transparent: true,opacity: 0.7,});//組成meshconst mesh = new THREE.Mesh(geometry, material);scene.add(mesh);function animate() {requestAnimationFrame(animate);renderer.render(scene, camera);}animate();</script>
</body></html>
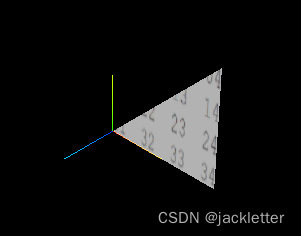
效果如下:
三、探索貼圖原理
先說上面示例:
- position 表達了三個點位的坐標和順序(看向
-z軸,逆時針),此時面的法方向是 (0,0,-1); - uv 表達了position每個點位在貼圖上的點;
- 又因為,將material設為了透明和雙面渲染,所以我們看向
-z軸也是可以看到效果的(我們默認看到的效果其實是背面,可以將上面的side: THREE.DoubleSide,注釋掉試試);
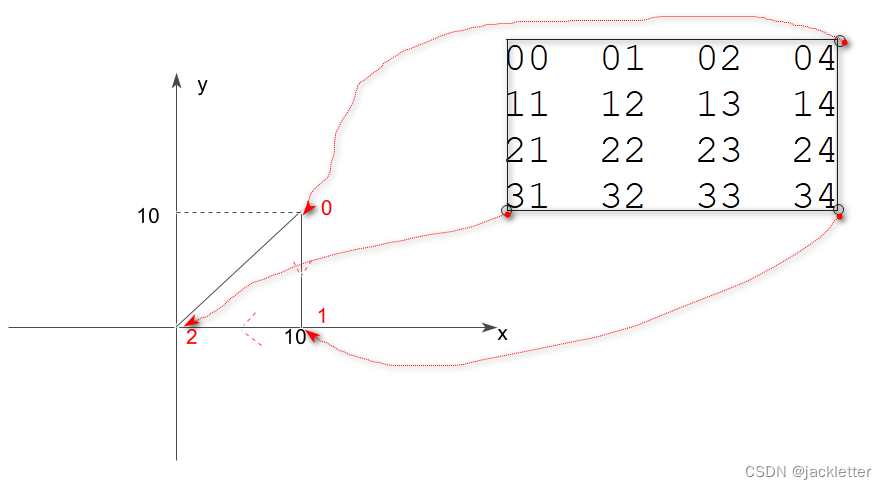
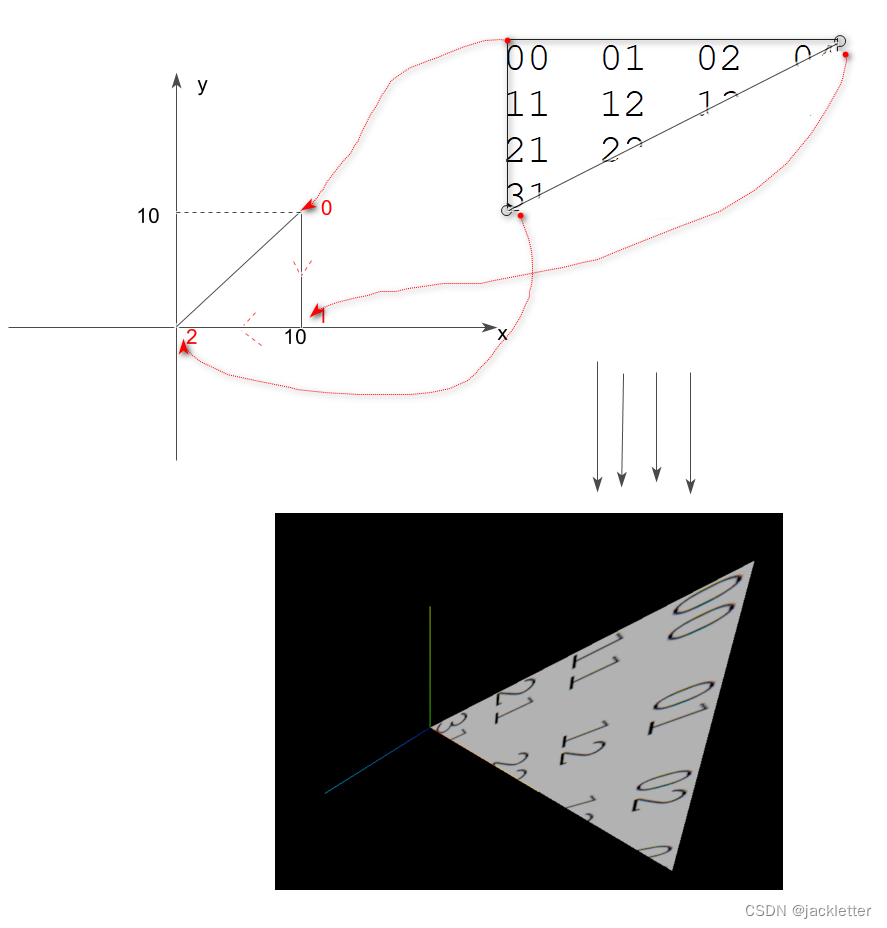
這里是否有一個疑問:怎么知道貼圖的正面是朝向哪的呢?為什么這里是朝向+z軸,而不是-z軸呢?
其實,因為position和uv,webgl的插值計算只能將貼圖的正面朝向
+z軸,如下圖示意:
四、考慮index作用
上面只是3個點位,所以僅用position和uv即可表達,但如果有很多點位,再這么寫的話position會很多,而且很多都是重復的,
比如:立方體有8個點位,如果每個面分成兩個三角面,那么總共需要24 = 6*2*3個點位坐標(每個3角面要3個點)。
此時使用index的寫法:
position:8個點位
index: 列出每個三角面的點位序號, 共計 24 個元素
uv:和position一一對應
將上面示例中geometry部分改造如下:
//準備geometry
//點位
var position = [10, 10, 0,10, 0, 0,0, 0, 0,0, 10, 0,
]
//貼圖
var uvs = [1, 1,1, 0,0, 0,0, 1,
]
//點位序號
var index = [0, 1, 2,0, 2, 3,
]
//構造geometry
let geometry = new THREE.BufferGeometry();
geometry.setIndex(index);
geometry.setAttribute('position', new THREE.Float32BufferAttribute(position, 3));
geometry.setAttribute('uv', new THREE.Float32BufferAttribute(uvs, 2));
此時,我們看到的效果:
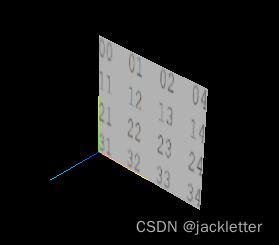
可以看到,我們僅用了4個點位,便描述了兩個3角面。
五、看一個特殊的示例
<!DOCTYPE html>
<html lang="en"><head><meta charset="UTF-8"><meta name="viewport" content="width=device-width, initial-scale=1.0"><title>Document</title><style>* {margin: 0;padding: 0;box-sizing: border-box;}</style><script type="importmap">{"imports": {"three": "https://unpkg.com/three@0.159.0/build/three.module.js","three/addons/": "https://unpkg.com/three@0.159.0/examples/jsm/"}}</script>
</head><body><script type="module">import * as THREE from 'three';import { OrbitControls } from 'three/addons/controls/OrbitControls.js';let camera, scene, renderer;//基礎對象camera = new THREE.PerspectiveCamera(45, window.innerWidth / window.innerHeight, 0.1, 10000);camera.position.set(50, 50, 50);camera.updateProjectionMatrix();renderer = new THREE.WebGLRenderer();renderer.setPixelRatio(window.devicePixelRatio);renderer.setSize(window.innerWidth, window.innerHeight);document.body.appendChild(renderer.domElement);const controls = new OrbitControls(camera, renderer.domElement);controls.minDistance = 5;controls.maxDistance = 300;controls.update()scene = new THREE.Scene();// 環境光const light = new THREE.AmbientLight(0x404040); // soft white lightscene.add(light);//坐標軸const axesHelper = new THREE.AxesHelper(5);scene.add(axesHelper);//準備geometry//點位var position = [10, 10, 0,10, 0, 0,0, 0, 0,]//貼圖var uvs = [0, 1,1, 1,0, 0,]//點位序號var index = [0, 1, 2]//構造geometrylet geometry = new THREE.BufferGeometry();geometry.setIndex(index);geometry.setAttribute('position', new THREE.Float32BufferAttribute(position, 3));geometry.setAttribute('uv', new THREE.Float32BufferAttribute(uvs, 2));//加載貼圖const texture = new THREE.TextureLoader().load('number.png');texture.wrapS = texture.wrapT = THREE.RepeatWrapping;texture.repeat.set(1, 1);//準備materialconst material = new THREE.MeshBasicMaterial({side: THREE.DoubleSide,map: texture,transparent: true,opacity: 0.7,});//組成meshconst mesh = new THREE.Mesh(geometry, material);scene.add(mesh);function animate() {requestAnimationFrame(animate);renderer.render(scene, camera);}animate();</script>
</body></html>
效果如下:
六、最后看一個用立方體實現全景圖預覽的效果
效果圖如下:

代碼下載請看博文頂部。。。


)


)


