Uniapp中自帶的地圖組件對支持的地圖服務略有局限,同時,該組件在樣式布局上層級過高且無法控制,無法滿足部分高度自定義化的需求。故引入renderjs視圖層工具搭配OpenLayers框架對地圖功能進行實現,但由于renderjs的限制,只支持App端與H5端。
一、renderjs
renderjs是一個運行在視圖層的js,可對DOM元素進行操作。它比WXS更加強大但只支持app-vue和web(H5)。
renderjs的主要作用有:
- 大幅降低邏輯層和視圖層的通訊損耗,提供高性能視圖交互能力;
- 在視圖層操作dom,運行 for web 的 js庫。
renderjs相關的更多信息見Uniapp官網介紹。
二、OpenLayers
OpenLayers 是一個開源的 JavaScript 庫,用于在 Web 瀏覽器中顯示和交互地圖數據。它支持多種地理數據源(如 WMS、WFS、GeoJSON 等),并提供豐富的功能,如地圖渲染、圖層控制、坐標轉換和用戶交互(縮放、平移、標記等)。
主要應用場景在:
- Web GIS 系統:構建地理信息展示與分析平臺。
- 數據可視化:疊加業務數據(如熱力圖、軌跡)。
- 自定義地圖:整合第三方地圖服務或離線瓦片。
OpenLayers 官網:https://openlayers.org/
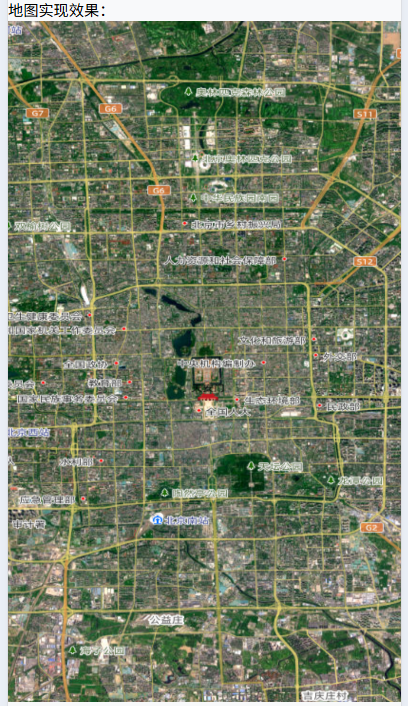
三、Uniapp展示天地圖
1.依賴下載
npm install ol
2.引入OpenLayers相關方法
此時,需要借助renderjs對Openlayers進行處理,另起一個script 標簽<script module="ol" lang="renderjs"> ... </script>包裹相關內容。
<script module="ol" lang="renderjs">
import {Map,View
} from 'ol';
import TileLayer from 'ol/layer/Tile';
import Tile from 'ol/layer/Tile';
import VectorSource from 'ol/source/Vector';
import {Vector as VectorLayer,
} from 'ol/layer';
import {defaults as defaultControls,
} from 'ol/control';
</script>
3.初始化天地圖
頁面中建立一個id為map的塊級元素供后續操作,其中map_page類需要設置好寬度與高度。
<template><view><view id="map" class="map_page"></view></view>
</template>
使用renderjs操作OpenLayers對天地圖進行展示。
<script module="ol" lang="renderjs">
import {Map,View
} from 'ol';
import TileLayer from 'ol/layer/Tile';
import Tile from 'ol/layer/Tile';
import VectorSource from 'ol/source/Vector';
import {Vector as VectorLayer,
} from 'ol/layer';
import XYZ from 'ol/source/XYZ'
import {defaults as defaultControls,
} from 'ol/control';export default {name: 'gis-map',data() {return {//地圖對象map: null, // 地圖渲染控件vectorSource: null,vectorLayer: null,}},mounted() {this.initMap()},methods: {/*** 初始化地圖*/initMap() {this.vectorSource = new VectorSource();this.vectorLayer = new VectorLayer({source: this.vectorSource,});// 引入天地圖瓦片資源let source = new XYZ({url: 'http://t0.tianditu.gov.cn/img_w/wmts?SERVICE=WMTS&REQUEST=GetTile&VERSION=1.0.0&LAYER=img&STYLE=default&TILEMATRIXSET=w&FORMAT=tiles&TILEMATRIX={z}&TILEROW={y}&TILECOL={x}&tk=**這里用你申請的密鑰**',})let tileLayer = new Tile({title: '天地圖',source: source,})// 標注圖層(行政區名稱,道路)瓦片資源let sourceMark = new XYZ({url: "http://t0.tianditu.com/DataServer?T=cta_w&tk=**這里用你申請的密鑰**&x={x}&y={y}&l={z}",})let tileMark = new Tile({title: '標注圖層',source: sourceMark,})// 地鐵路線圖層// let sourceSubway = new XYZ({// 	url: '******'// })// let tileSubway = new Tile({// 	title: '地鐵路線圖層',// 	source: sourceSubway,// })// 地圖實例this.map = new Map({controls: defaultControls({attribution: false,zoom: false,rotate: false,}),target: 'map', // 對應頁面里 id 為 map 的元素layers: [tileLayer, tileMark], //若有其他圖層如tileSubway,則可放進數組中進行初始化處理view: new View({// 地圖視圖projection: 'EPSG:4326', // 坐標系,有EPSG:4326和EPSG:3857center: [116.39, 39.92], // 中心坐標zoom: 12, // 地圖縮放級別(打開頁面時默認級別)minZoom: 1, // 地圖縮放最小級別maxZoom: 18,enableRotation: false, //禁用旋轉}),})},}
}
</script>
實現效果如下:
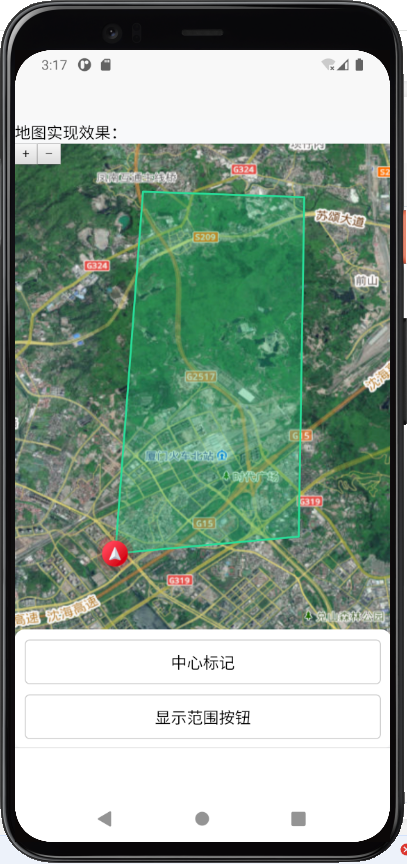
4.在地圖中添加標記點與多邊形
預覽效果:
4.1 renderjs方法調用
4.1.1 點擊調用
頁面中點擊按鈕調用renderjs中的方法,使用ol.方法名的方式進行調用,其中ol取標簽<script module="ol" lang="renderjs">中module定義的名稱,可調用的方法則需在methods: {...}內。
以示例中的按鈕為例,點擊按鈕調用定位中心標記點: @click="ol.handleCenterIcon"。
<view class="btn-area_item" @click="ol.handleCenterIcon">中心標記
</view>
此處需要特別注意在APP端可能出現點擊后調用無效的問題,主要原因可能有:
- 寫法不符合“僅支持內聯事件”的限制;
- 節點被其它組件(slot、v-if、自定義組件、三方組件)重新包裹,導致編譯期找不到模塊前綴。
其根本原因是:事件指令被編譯器識別失敗時,框架不會把點擊消息派發到 renderjs 層。
App 端 renderjs “無法點擊” 99% 都是寫法或節點被轉包導致編譯器沒有生成視圖層事件綁定,只要嚴格遵循:行內綁定、模塊前綴、裸節點,三條規則,點擊事件即可在 Android、iOS 真機正常調用renderjs 里的方法。
4.1.2 監聽值變化時調用
在相關塊級元素的節點上綁定監聽數據與監聽變化的目標方法。以示例中的gps值獲取為例,監聽設備gps值變化并調用renderjs中的getGps()方法:
<view id="map" class="map_x" :style="{height:mapHeightStr}" :gps="deviceGps" :change:gps="ol.getGps">
</view>
其中:gps=綁定需要監聽的目標值,:change:gps=綁定監聽后調用的方法。getGps()方法中則可接收新舊值,如getGps(newValue, oldValue)。
4.2 繪制標記點與多邊形范圍
4.2.1 繪制標記點圖標
目前在renderjs中需要使用圖標等圖片資源時,無法直接使用圖標的路徑進行處理,需要將圖標資源轉化為base64后再引入使用,以當前處理的方式為例:在地圖組件文件夾內創建一個resource.js文件,在文件中定義好圖標資源的名稱,如const localtion = ""data:image/png;base64,iVBORw0KG...";,最后再統一export供renderjs進行使用。
繪制圖標的主要方法如下:
// 定位中心點
handleCenterIcon() {let vectorSource = new VectorSource();// 全局定義,方便后續進行其他操作,如清除等this.iconLayer = new VectorLayer({source: vectorSource,})// 添加圖層this.map.addLayer(this.iconLayer)// 設置圖片位置this.iconFeature = new Feature({geometry: new Point([this.gps.lng, this.gps.lat]),});// 設置圖標的資源與放大倍率this.iconFeature.setStyle(new Style({image: new Icon({src: imgs.navUp,scale: 0.5,}),}));// 將圖片Feature添加到Sourcethis.iconLayer.getSource().addFeature(this.iconFeature)
}
此時,圖標即可添加到地圖上,但此時的圖標不會隨著地圖的縮放而變化比例,針對實際的使用場景,需監聽地圖縮放,從而改變圖標的顯示比例。
監聽地圖縮放并改變圖標顯示比例的方法如下:
// 監聽地圖縮放,處理中心圖標的相對大小
zoomChange() {let that = this// 監聽縮放this.map.getView().on("change:resolution", function(res) {// 縮放大小let autoZoom = res.target.values_.zoom;that.realZoom = autoZoom;// 存在圖標時,獲取圖標的顯示倍率并按比例調整if (that.iconFeature) {let style = that.iconFeature.getStyle()style.getImage().setScale(autoZoom / 20);that.iconFeature.setStyle(style)}})
}
以上監聽方法可以在地圖初始化完成后進行調用。
4.2.2 繪制多邊形范圍
在繪制多邊形時需要使用坐標數組,需根據業務實際提供的坐標,使用fromLonLat進行統一處理,并設置坐標系為EPSG:4326或EPSG:3857等其他坐標系。
// 循環轉換坐標點
for (let i = 0; i < len; i++) {let point = fromLonLat([path[i].lng, path[i].lat], 'EPSG:4326')finalPath.push(point)
}
4326 是“經緯度(度)”,3857 是“Web 墨卡托(米)”;
| 坐標系 | EPSG 編碼 | 單位 | 用途特點 | 天地圖服務中的標識 |
|---|---|---|---|---|
| WGS84 經緯度 | EPSG:4326 | 度 | 全球通用,適合存儲與計算,適合 GPS 原始坐標、OGC WFS/WMS 查詢 | TILEMATRIXSET=c |
| Web 墨卡托投影 | EPSG:3857 | 米 | 網絡地圖通用,適合瓦片拼接、前端展示 | TILEMATRIXSET=w |
兩坐標系在 OpenLayers 中的互轉:
import {fromLonLat, toLonLat} from 'ol/proj';
// EPSG:4326 → EPSG:3857
const webMercator = fromLonLat([116.391, 39.907]);
// EPSG:3857 → EPSG:4326
const lonLat = toLonStr(webMercator);
繪制多邊形范圍的方法如下:
// 繪制任務路徑范圍
handlePolygon() {// 測試用路徑let path = [{lng: 118.050,lat: 24.621},{lng: 118.083,lat: 24.624},{lng: 118.084,lat: 24.685},{lng: 118.055,lat: 24.686},];let finalPath = [];let len = path.length;// 無路徑時直接返回,不渲染if (len == 0) {return false}// 循環轉換坐標系for (let i = 0; i < len; i++) {let point = fromLonLat([path[i].lng, path[i].lat], 'EPSG:4326');finalPath.push(point);}// 配置多邊形let polygon = new Polygon([finalPath]);let polygonFeature = new Feature({geometry: polygon,});let source = new VectorSource({features: [polygonFeature]});// 配置多邊形樣式let geoLayer = new VectorLayer({source: source,style: new Style({stroke: new Stroke({color: '#28dd98',width: 2}),// 描邊fill: new Fill({color: '#25C67A50',})//填充范圍顏色})});this.geoLayerValue = geoLayer;this.map.addLayer(geoLayer);
}
4.3完整示例
<template><view><view id="map" class="map_x" :style="{height:mapHeightStr}" :gps="deviceGps" :change:gps="ol.getGps"></view><view class="btn-area"><view class="btn-area_item" @click="ol.handleCenterIcon">中心標記</view><view class="btn-area_item" @click="ol.handlePolygon">顯示范圍按鈕</view></view></view>
</template><script>export default {props: {mapHeight: {type: [Number, String],default: 220}},data() {return {deviceGps: null}},computed: {mapHeightStr() {function isNumber(val) {return typeof val === 'number' && Number.isFinite(val);}if (isNumber(this.mapHeight)) {return this.mapHeight + 'px'} else {return this.mapHeight}}},mounted() {this.getDeviceGps()},methods: {// 獲取手機當前定位getDeviceGps(isShowTip = false) {let that = thisif (isShowTip) {wx.showLoading({title: '獲取當前定位中...'})}try {uni.getLocation({type: 'wgs84',geocode: true, //設置該參數為true可直接獲取經緯度及城市信息success: function(res) {wx.hideLoading()// 此時先賦值時間戳,強制使坐標發生改變,從而觸發監聽方法that.deviceGps = {lng: new Date().getTime(),lat: new Date().getTime()}// 模擬中點坐標let gps = {lat: 24.621, // res.latitude,lng: 118.050 //res.longitude}that.deviceGps = gpsthat.$emit("initGps", gps)},fail: function() {wx.hideLoading()uni.showToast({title: '獲取地址失敗,將導致部分功能不可用',icon: 'none'});}});} catch (err) {wx.hideLoading()}},}}
</script>
<script module="ol" lang="renderjs">import {imgs} from "./resource.js"import {Map,View} from 'ol';import TileLayer from 'ol/layer/Tile';import Tile from 'ol/layer/Tile';import VectorSource from 'ol/source/Vector';import {Vector as VectorLayer,} from 'ol/layer';import XYZ from 'ol/source/XYZ'import {defaults as defaultControls,} from 'ol/control';// 轉化經緯度import {transform,fromLonLat} from 'ol/proj';// 繪制形狀import {LineString,Point,Polygon,Circle as CircleGeo} from 'ol/geom';import Feature from 'ol/Feature';import {Fill,Stroke,Style,Icon,Circle,Text} from 'ol/style'export default {name: 'gis-map',data() {return {map: null, //地圖對象gps: null, //當前定位// 地圖渲染控件vectorSource: null,vectorLayer: null,iconLayer: null,geoLayerValue: null}},mounted() {this.initMap()},methods: {/*** 初始化地圖*/initMap() {this.vectorSource = new VectorSource();this.vectorLayer = new VectorLayer({source: this.vectorSource,});// 引入天地圖let source = new XYZ({url: '***你的天地圖資源地址***',})let tileLayer = new Tile({title: '天地圖',source: source,})// 標注圖層(行政區名稱,道路)let sourceMark = new XYZ({url: '***你的天地圖資源地址***',})let tileMark = new Tile({title: '標注圖層',source: sourceMark,})// 地圖實例this.map = new Map({controls: defaultControls({attribution: false,zoom: true,rotate: false,}),target: 'map', // 對應頁面里 id 為 map 的元素layers: [tileLayer, tileMark], view: new View({// 地圖視圖projection: 'EPSG:4326', // 坐標系,有EPSG:4326和EPSG:3857center: [118.050, 24.621], // 中心坐標zoom: 12, // 地圖縮放級別(打開頁面時默認級別)minZoom: 1, // 地圖縮放最小級別maxZoom: 18,enableRotation: false, //禁用旋轉}),})// 啟動地圖縮放監聽this.zoomChange()},// 調整中心點changeMapCenter(gps, zoom = 12) {if (this.map) {let view = this.map.getView();view.setZoom(zoom);view.setCenter([gps.lng, gps.lat],"EPSG:4326");this.map.render();}},// 接收GPS數據getGps(newValue, oldValue) {console.log("接收GPS數據", newValue);if (newValue != undefined) {this.gps = newValueif (this.map) {this.changeMapCenter(this.gps, 15)} else {this.initMap()}}},// 繪制中心點圖標handleCenterIcon() {if (this.iconLayer) {// 移除圖層this.map.removeLayer(this.iconLayer)this.iconLayer = null}let vectorSource = new VectorSource();this.iconLayer = new VectorLayer({source: vectorSource,})// 添加圖層this.map.addLayer(this.iconLayer)// 設置圖片位置this.iconFeature = new Feature({geometry: new Point([this.gps.lng, this.gps.lat]),});this.iconFeature.setStyle(new Style({image: new Icon({src: imgs.navUp,scale: 0.5,}),}));// 將圖片Feature添加到Sourcethis.iconLayer.getSource().addFeature(this.iconFeature)},// 監聽地圖縮放,處理中心圖標的相對大小zoomChange() {let that = thisthis.map.getView().on("change:resolution", function(res) {let autoZoom = res.target.values_.zoom;that.realZoom = autoZoom;// console.log("縮放事件", autoZoom, that.pointIconList);if (that.iconFeature) {let style = that.iconFeature.getStyle()style.getImage().setScale(autoZoom / 20);that.iconFeature.setStyle(style)}})},// 繪制任務路徑范圍handlePolygon() {if (this.geoLayerValue) {this.map.removeLayer(this.geoLayerValue);this.geoLayerValue = null;}let path = [{lng: 118.050,lat: 24.621},{lng: 118.083,lat: 24.624},{lng: 118.084,lat: 24.685},{lng: 118.055,lat: 24.686},];let finalPath = [];let len = path.length;if (len == 0) {return false}// 循環轉換坐標系for (let i = 0; i < len; i++) {let point = fromLonLat([path[i].lng, path[i].lat], 'EPSG:4326');finalPath.push(point);}// 配置多邊形let polygon = new Polygon([finalPath]);let polygonFeature = new Feature({geometry: polygon,});let source = new VectorSource({features: [polygonFeature]})let geoLayer = new VectorLayer({source: source,style: new Style({stroke: new Stroke({color: '#28dd98',width: 2}),fill: new Fill({color: '#25C67A50',})})})this.geoLayerValue = geoLayer;this.map.addLayer(geoLayer);},}}
</script>
5.其他地圖操作方法
在Uniapp環境中,OpenLayers的操作與在Web端中的使用方法基本一致,在此不再贅述,可參考文章OpenLayers學習記錄或OpenLayers 官網。
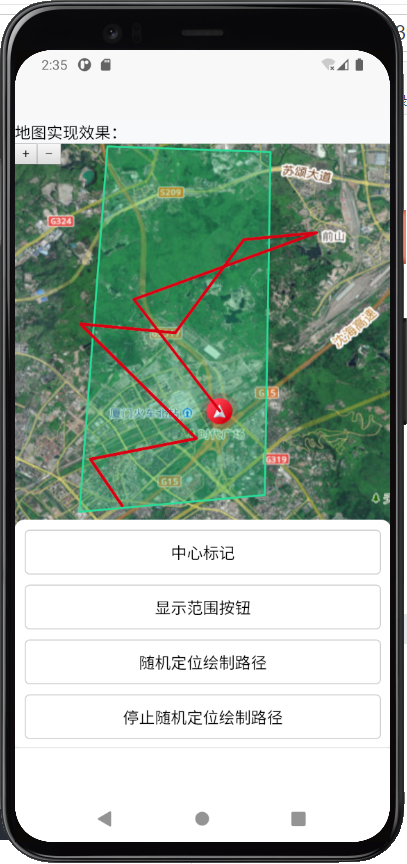
四、設備定位軌跡處理
在實際應用場景中,根據設備的實時位置繪制軌跡路線也較為常見,但由于renderjs的限制,以下僅僅介紹App端與H5端可實現的方案。
預覽效果:
1.設備定位監聽方法
在App端,可使用plus.geolocation.watchPosition(successCB, errorCB, option)方法對設備定位進行定時查詢。
const watchPosition = plus.geolocation.watchPosition(function(pos) {console.log("==當前定位數據==", JSON.stringify(pos.coords));// 獲取當前定位的同時,更新中心點位置與方向console.log("==當前方向==", pos.coords.heading);console.log("==當前經緯度==", pos.coords.longitude, pos.coords.latitude);
}, function(error) {console.error(`地理信息報錯ERROR: ${error.message}`);
}, {enableHighAccuracy: true,timeout: 20000,maximumAge: 10000
});
其中返回的pos對象數據有:
| 屬性 | 描述 |
|---|---|
| coords.latitude | 十進制數的緯度 |
| coords.longitude | 十進制數的經度 |
| coords.accuracy | 位置精度 |
| coords.altitude | 海拔,海平面以上以米計 |
| coords.altitudeAccuracy | 位置的海拔精度 |
| coords.heading | 方向,從正北開始以度計 |
| coords.speed | 速度,以米/每秒計 |
| timestamp | 響應的日期/時間 |
其中option可配置的參數有:
| 屬性 | 描述 |
|---|---|
| enableHighAccuracy | 是否使用其最高精度:1. false,默認值,設備會通過更快響應、更少的電量等方法來盡可能的節約資源t;2.true,這會導致較慢的響應時間或者增加電量消耗(比如對于支持 gps 的移動設備來說) |
| timeout | 限制返回時間 |
| maximumAge | 可以返回多長時間(單位毫秒)內的緩存位置 |
在H5端上,也可以使用navigator.geolocation.watchPosition(success, error, options)方法,其返回參數與配置參數同上。
2.繪制軌跡方法
使用LineString()傳入軌跡數組(格式為:[[經度,緯度],[經度,緯度]…])進行處理。
handleAddPath() {let line = [[118.05, 24.63],[118.050, 24.64],[118.05, 24.65]];let lineString = new LineString(line);let pathFeature = new Feature(lineString);const source = new VectorSource({features: [pathFeature]})// 創建路徑實例this.pathLayer = new VectorLayer({source: source,style: new Style({fill: new Fill({ //填充路徑顏色color: 'rgba(255,255,255,0.5)'}),stroke: new Stroke({color: '#d70f19',width: 3})})})this.map.addLayer(this.pathLayer)console.log("路徑渲染完成", this.distance);
},
3.軌跡路徑長度計算
使用2.繪制軌跡方法中的lineString 進行計算。
handlePathLength(lineString) {let length = lineString.getLength({projection: 'EPSG:4326' // 確定坐標系類型})let output = ''output = Math.round(length * 1000) / 10 //km 保留一位小數console.log("路徑距離", output);return output
}
4.監聽陀螺儀判斷設備指北方向
下載依賴
npm i kompas
創建Kompas實例后監聽方向,并設置箭頭圖標的方向:
// 陀螺儀變化監聽,改變中心箭頭方向
const compass = new Kompas();
compass.watch();
compass.on('heading', function(heading) {console.log("陀螺儀變化", heading);let style = that.iconFeature.getStyle()style.getImage().setRotation(Math.PI / 180 * heading);that.iconFeature.setStyle(style)
});
上述方法非主流設備監聽方法,可能存在問題,需謹慎使用。歡迎大佬們指正!也歡迎討論相關可行的解決方案!
5.完整示例
<template><view><view id="map" class="map_x" :style="{height:mapHeightStr}" :gps="deviceGps" :change:gps="ol.getGps"></view><view class="btn-area"><view class="btn-area_item" @click="ol.handleCenterIcon">中心標記</view><view class="btn-area_item" @click="ol.handlePolygon">顯示范圍按鈕</view><view class="btn-area_item" @click="ol.handleStart">隨機定位繪制路徑</view><view class="btn-area_item" @click="ol.handleStop">停止隨機定位繪制路徑</view></view></view>
</template><script>export default {props: {mapHeight: {type: [Number, String],default: 220},// 地圖多邊形路徑mapPathLatLan: {type: Array,default: () => {return []}},// 點坐標pointLatLng: {type: Array,default: () => {return []}},},data() {return {deviceGps: null}},computed: {mapHeightStr() {function isNumber(val) {return typeof val === 'number' && Number.isFinite(val);}if (isNumber(this.mapHeight)) {return this.mapHeight + 'px'} else {return this.mapHeight}}},mounted() {this.getDeviceGps()},methods: {// 獲取手機當前定位getDeviceGps(isShowTip = false) {let that = thisif (isShowTip) {wx.showLoading({title: '獲取當前定位中...'})}try {uni.getLocation({type: 'wgs84',geocode: true, //設置該參數為true可直接獲取經緯度及城市信息success: function(res) {wx.hideLoading()that.deviceGps = {lng: new Date().getTime(),lat: new Date().getTime()}let gps = {lat:  res.latitude,lng: res.longitude}that.deviceGps = gpsthat.$emit("initGps", gps)},fail: function() {wx.hideLoading()uni.showToast({title: '獲取地址失敗,將導致部分功能不可用',icon: 'none'});}});} catch (err) {wx.hideLoading()}},emitDistance(distance) {this.$emit("changeDistance", distance)},showToast(title) {uni.showToast({icon: 'none',title: title})},}}
</script>
<script module="ol" lang="renderjs">import {imgs} from "./resource.js"import {Map,View} from 'ol';import TileLayer from 'ol/layer/Tile';import Tile from 'ol/layer/Tile';import VectorSource from 'ol/source/Vector';import {Vector as VectorLayer,} from 'ol/layer';import XYZ from 'ol/source/XYZ'import {defaults as defaultControls,} from 'ol/control';// 轉化經緯度import {transform,fromLonLat} from 'ol/proj';// 繪制形狀import {LineString,Point,Polygon,Circle as CircleGeo} from 'ol/geom';import Feature from 'ol/Feature';import {Fill,Stroke,Style,Icon,Circle,Text} from 'ol/style';import Kompas from 'kompas';export default {name: 'gis-map',data() {return {map: null, //地圖對象gps: null, //當前定位,// 巡檢線條路徑patrolPath: [],// 巡檢距離distance: 0,// 地圖渲染控件vectorSource: null,vectorLayer: null,iconLayer: null,iconFeature: null,geoLayerValue: null,// 監聽方法watchPosition: null,}},mounted() {this.initMap()},methods: {/*** 初始化地圖*/initMap() {this.vectorSource = new VectorSource();this.vectorLayer = new VectorLayer({source: this.vectorSource,});// 引入天地圖let source = new XYZ({url: '***你的天地圖資源地址***',})let tileLayer = new Tile({title: '天地圖',source: source,})// 標注圖層(行政區名稱,道路)let sourceMark = new XYZ({url:  '***你的天地圖資源地址***',})let tileMark = new Tile({title: '標注圖層',source: sourceMark,})// 地圖實例this.map = new Map({controls: defaultControls({attribution: false,zoom: true,rotate: false,}),target: 'map', // 對應頁面里 id 為 map 的元素layers: [tileLayer, tileMark], //tileSubwayview: new View({// 地圖視圖projection: 'EPSG:4326', // 坐標系,有EPSG:4326和EPSG:3857center: [118.050, 24.621], // 中心坐標zoom: 12, // 地圖縮放級別(打開頁面時默認級別)minZoom: 1, // 地圖縮放最小級別maxZoom: 18,enableRotation: false, //禁用旋轉}),})// 啟動地圖縮放監聽this.zoomChange();},// 調整中心點changeMapCenter(gps, zoom = 12) {if (this.map) {let view = this.map.getView();view.setZoom(zoom);view.setCenter([gps.lng, gps.lat],"EPSG:4326");this.map.render();}},// 接收GPS數據getGps(newValue, oldValue) {console.log("接收GPS數據", newValue);if (newValue != undefined) {this.gps = newValueif (this.map) {this.changeMapCenter(this.gps, 15)} else {this.initMap()}}},// 定位中心點handleCenterIcon() {this.removeIcon()let vectorSource = new VectorSource();this.iconLayer = new VectorLayer({source: vectorSource,})// 添加圖層this.map.addLayer(this.iconLayer)// 設置圖片位置// #ifdef APPthis.iconFeature = new Feature({geometry: new Point([this.gps.lng, this.gps.lat]),});// #endif// H5端測試使用,實際生產環境與APP相同// #ifdef H5this.iconFeature = new Feature({geometry: new Point([118.050, 24.621]),});// #endifthis.iconFeature.setStyle(new Style({image: new Icon({src: imgs.navUp,scale: 0.5,}),}));// 將圖片Feature添加到Sourcethis.iconLayer.getSource().addFeature(this.iconFeature)},// 移除圖標removeIcon() {if (this.iconLayer) {// 移除圖層this.map.removeLayer(this.iconLayer)this.iconLayer = null}},// 監聽地圖縮放,處理中心圖標的相對大小zoomChange() {let that = thisthis.map.getView().on("change:resolution", function(res) {let autoZoom = res.target.values_.zoom;that.realZoom = autoZoom;// console.log("縮放事件", autoZoom, that.pointIconList);if (that.iconFeature) {let style = that.iconFeature.getStyle()style.getImage().setScale(autoZoom / 20);that.iconFeature.setStyle(style)}})},// 繪制任務路徑范圍handlePolygon() {if (this.geoLayerValue) {this.map.removeLayer(this.geoLayerValue);}let path = [{lng: 118.050,lat: 24.621},{lng: 118.083,lat: 24.624},{lng: 118.084,lat: 24.685},{lng: 118.055,lat: 24.686},];let finalPath = [];let len = path.length;if (len == 0) {return false}// 循環轉換坐標點for (let i = 0; i < len; i++) {let point = fromLonLat([path[i].lng, path[i].lat], 'EPSG:4326');finalPath.push(point);}// 配置多邊形let polygon = new Polygon([finalPath]);let polygonFeature = new Feature({geometry: polygon,});let source = new VectorSource({features: [polygonFeature]})let geoLayer = new VectorLayer({source: source,style: new Style({stroke: new Stroke({color: '#28dd98',width: 2}),fill: new Fill({color: '#25C67A50',})})})this.geoLayerValue = geoLayer;this.map.addLayer(geoLayer);},// 時間開始/暫停/結束handleStart() {console.log("開始繪制路徑")if (this.iconFeature) {// H5端測試使用// #ifdef H5// 存儲定位數據this.patrolPath.unshift([118.050, 24.621]);// #endifthis.handleCenterPoint()} else {this.$ownerInstance.callMethod('showToast', '請先點擊中心標記');}},handleStop() {console.log("停止繪制路徑")// #ifdef APPplus.geolocation.clearWatch(this.watchPosition)// #endif// 測試用,清除隨機模擬定時器clearInterval(this.watchPosition)this.watchPosition = null},// 間隔10秒監聽定位路徑變化handleCenterPoint() {let that = this;let step = 0.01;// 模擬定位路徑變化this.watchPosition = setInterval(() => {const coords = [118.050 + step * Math.random(), 24.621 + step * Math.random()];step = step + 0.01;console.log("==當前定位==", coords[0], coords[1]);this.changeMapCenter({lng: coords[0],lat: coords[1]}, 15)// 動態改變當前定位圖標let newGeometry = new Point(coords);that.iconFeature.setGeometry(newGeometry)that.$ownerInstance.callMethod('emitPath', coords);// 存儲定位數據that.patrolPath.unshift(coords);// 畫路徑that.handleAddPath()}, 1000 * 10)return false// --------------------------------------------// 實際生產環境使用,以下需要真機執行const source = new VectorSource();this.watchPosition = plus.geolocation.watchPosition(function(pos) {console.log("==當前定位數據==", JSON.stringify(pos.coords));// 獲取當前定位的同時,更新中心點位置與方向if (pos.coords.heading) {let style = that.iconFeature.getStyle()style.getImage().setRotation(Math.PI / 180 * (pos.coords.heading || 1));that.iconFeature.setStyle(style)}const coords = [pos.coords.longitude, pos.coords.latitude];// 動態改變當前定位圖標let newGeometry = new Point(coords);that.iconFeature.setGeometry(newGeometry)// 存儲定位數據that.patrolPath.unshift(coords);// 繪制路徑that.handleAddPath()}, function(error) {console.error(`地理信息報錯ERROR: ${error.message}`);uni.showToast({icon: 'none',title: "定位數據獲取異常,將自動重試中"})plus.geolocation.clearWatch(that.watchPosition)setTimeout(() => {that.handleCenterPoint()}, 1500);}, {enableHighAccuracy: true,timeout: 20000,maximumAge: 10000});// 陀螺儀變化監聽,改變中心箭頭方向const compass = new Kompas();compass.watch();compass.on('heading', function(heading) {console.log("陀螺儀變化", heading);let style = that.iconFeature.getStyle()style.getImage().setRotation(Math.PI / 180 * heading);that.iconFeature.setStyle(style)});},// 繪制路徑handleAddPath() {let line = this.patrolPath;let lineString = new LineString(line);let pathFeature = new Feature(lineString);const source = new VectorSource({features: [pathFeature]})this.pathLayer = new VectorLayer({source: source,style: new Style({fill: new Fill({ //填充color: 'rgba(255,255,255,0.5)'}),stroke: new Stroke({color: '#d70f19',width: 3})})})this.map.addLayer(this.pathLayer)console.log("路徑渲染完成", this.distance);// 計算距離并拋出到父組件this.distance = this.handlePathLength(lineString);this.$ownerInstance.callMethod('emitDistance', this.distance);},// 計算長度handlePathLength(line) {let length = line.getLength({projection: 'EPSG:4326'})let output = ''output = Math.round(length * 1000) / 10 + ' 'return output}}}
</script>
參考文檔
- Uniapp如何使用renderjs通信(組件通信);
- 在Uniapp中使用OpenLayers;
- OpenLayers學習記錄,持續更新…;
- H5+官網.
——內部類、匿名對象、對象拷貝時的編譯器優化和內存管理)

![[數據結構——lesson10.堆及堆的調整算法]](http://pic.xiahunao.cn/[數據結構——lesson10.堆及堆的調整算法])


算法在民航LPV-200進近中的具體實現流程)


 進程基礎)


