作者:來自 Elastic?Jeffrey Rengifo
學習如何使用 Pydantic 模式和 FastAPI 后臺任務,通過實際示例構建一個 Elasticsearch API。
想獲得 Elastic 認證嗎?查看下一期 Elasticsearch Engineer 培訓的時間!
Elasticsearch 擁有豐富的新功能,能幫助你為你的使用場景構建最佳的搜索解決方案。深入了解我們的示例筆記本,開始免費云試用,或立即在本地機器上體驗 Elastic。
從《Elasticsearch in JavaScript》這篇文章中我們了解到,你不應該將 Elasticsearch 實例暴露在互聯網上,而是應該構建一個 API 層。暴露集群的 URL、索引名稱或 API 密鑰會讓攻擊者更容易瞄準你的數據,并不必要地擴大你的攻擊面。即使你對請求進行了清洗,攻擊者仍然可以發送復雜或高負載的查詢使集群超載。因此,最好不僅隱藏集群本身,還要隱藏查詢邏輯 —— 只讓用戶控制必要的部分,比如搜索關鍵字,而不是整個查詢。
對于 JavaScript 開發者來說,可以選擇使用 Node.js,而對于 Python 開發者來說,FastAPI 是一個不錯的替代方案。FastAPI 因其簡潔性和開箱即用的高性能而受到廣泛歡迎。
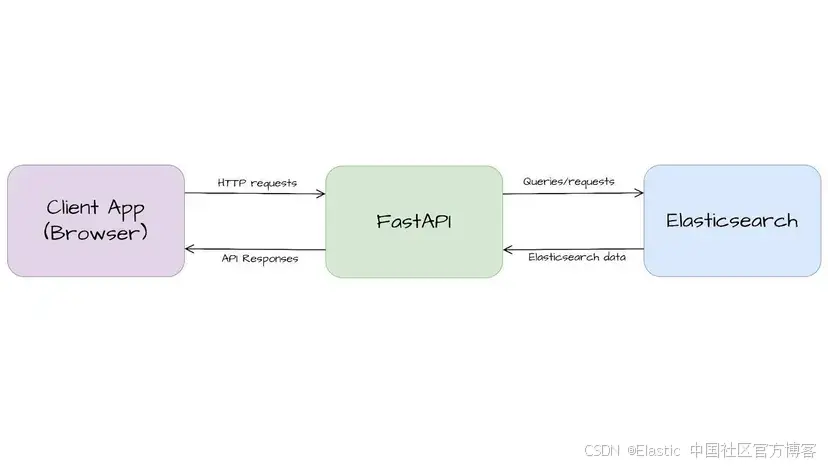
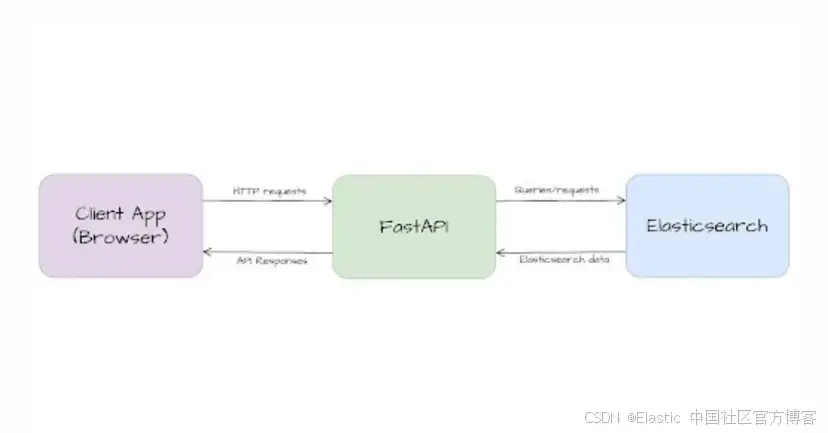
在本文中,我們將使用 FastAPI 構建 Elasticsearch 與客戶端應用程序(通常是網頁瀏覽器)之間的 API 層。然后,我們將探索一些可以通過 FastAPI 原生功能實現的常見用例。
你可以在這里找到該應用程序的筆記本。
準備數據
本文將使用一個包含獸醫就診記錄的數據集。下面是一個示例文檔:
{"owner_name": "Marco Rivera","pet_name": "Milo","species": "Cat","breed": "Siamese","vaccination_history": ["Rabies","Feline Leukemia"],"visit_details": "Slight eye irritation, prescribed eye drops."
}
首先,我們需要安裝 Elasticsearch 客戶端,以便能夠查詢我們的集群:
pip install elasticsearch現在,我們導入 Elasticsearch 客戶端、helpers 和 getpass,用于從終端捕獲環境變量。
from elasticsearch import Elasticsearch, helpers
from getpass import getpassos.environ["ELASTICSEARCH_ENDPOINT"] = getpass("Elasticsearch endpoint: ")
os.environ["ELASTICSEARCH_API_KEY"] = getpass("Elasticsearch api-key: ")
我們定義索引名稱,并使用 Elasticsearch 端點和 API 密鑰初始化 Elasticsearch 客戶端。
ES_INDEX = "vet-visits"es_client = Elasticsearch(hosts=[os.environ["ELASTICSEARCH_ENDPOINT"]],api_key=os.environ["ELASTICSEARCH_API_KEY"],
)
然后我們來創建映射:
es_client.indices.create(index=ES_INDEX,body={"mappings": {"properties": {"breed": {"type": "keyword"},"owner_name": {"type": "text","fields": {"keyword": {"type": "keyword"}},},"pet_name": {"type": "text","fields": {"keyword": {"type": "keyword"}},},"species": {"type": "keyword"},"vaccination_history": {"type": "keyword"},"visit_details": {"type": "text"},}}},)最后,下載數據集并將其放在腳本所在的同一文件夾。然后,我們可以使用 Bulk API 將數據導入 Elasticsearch:
def build_data(ndjson_file, index_name):with open(ndjson_file, "r") as f:for line in f:doc = json.loads(line)yield {"_index": index_name, "_source": doc}try:success, errors = helpers.bulk(es_client, build_data("vet-visits.ndjson", ES_INDEX))print(f"{success} documents indexed successfully")if errors:print("Errors during indexing:", errors)
except Exception as e:print(f"Error: {str(e)}")
如果一切順利,你應該會看到以下信息:
10 documents indexed successfully現在,數據已導入 Elasticsearch 并準備好使用。接下來,我們將構建 API 來展示 FastAPI 的功能。
Hello, world!
開始之前,我們只需要安裝 FastAPI 和用于服務器創建的 Uvicorn,Pydantic 用于模式處理,以及 Elasticsearch 用于存儲和搜索數據。
pip install fastapi uvicorn elasticsearch pydantic -q我們先導入庫并創建 FastAPI 服務器實例。
import asyncio
import json
import os
from typing import Listimport uvicorn
from fastapi import BackgroundTasks, Body, FastAPI, HTTPException, Response
from pydantic import BaseModelapp = FastAPI()
然后,我們可以創建一個 ping 端點來檢查服務器狀態。
@app.get("/ping")
async def ping():try:health = await es_client.cluster.health()return {"status": "success","message": "Connected to Elasticsearch","cluster_status": health["status"],"number_of_nodes": health["number_of_nodes"],"active_shards": health["active_shards"],}except Exception as e:status_code = getattr(e, "status_code", 500)raise HTTPException(status_code=status_code,detail=f"Error connecting to Elasticsearch: {str(e)}",)
請求:
curl -XGET "http://localhost:8000/ping"響應:
{"status":"success","message":"Connected to Elasticsearch","cluster_status":"green","number_of_nodes":4,"active_shards":172}@app.post("/search")
async def search(query: dict = Body(...)):try:result = await es_client.search(index=ES_INDEX, body=query)return resultexcept Exception as e:status_code = getattr(e, "status_code", 500)raise HTTPException(status_code=status_code, detail=str(e))我們將嘗試使用 match_phrase 搜索牙齒清潔的就診記錄:
請求:
curl -X POST "http://localhost:8000/search" \-H "Content-Type: application/json" \-d '{"query": {"match_phrase": {"visit_details": "dental cleaning"}},"size": 10}'響應:
{"took": 1,"timed_out": false,"_shards": {"total": 1,"successful": 1,"skipped": 0,"failed": 0},"hits": {"total": {"value": 1,"relation": "eq"},"max_score": 3.5869093,"hits": [{"_index": "vet-visits","_id": "VUjqWZYB8Z9CzAyMLmyB","_score": 3.5869093,"_source": {"owner_name": "Leo Martínez","pet_name": "Simba","species": "Cat","breed": "Maine Coon","vaccination_history": ["Rabies","Feline Panleukopenia"],"visit_details": "Dental cleaning. Minor tartar buildup removed."}}]}
}
輸入和響應的類型定義
FastAPI 的一個關鍵特性是與 Pydantic 的集成,用于數據模式處理,允許你使用類型注解定義類,并自動進行數據驗證。在大多數情況下,給數據加類型對構建健壯穩定的應用至關重要。它還能實現模型復用,使代碼更易讀、維護和文檔化。
不過,嚴格的類型和模式限制在需要處理高度動態或不可預測的數據結構時可能不太適用。
接下來,我們把搜索端點的請求和響應改成類型定義。
我們可以創建類來驗證字段類型(field types)、設置默認值(default values)、定義枚舉(enums)和列表(lists)等。這里我們將為用戶請求和 Elasticsearch 響應創建類,并應用部分這些概念。
現在,用戶只需發送搜索詞,和可選的結果數量限制,就會返回包含 owner_name 和 visit_details 的命中列表。
# Pydantic classes# Pydantic class for the request
class SearchRequest(BaseModel):term: strsize: int = 10# Pydantic class for the response
class SearchResponse(BaseModel):hits: List[SearchHit]total: int# Class to format for hits
class SearchHit(BaseModel):owner_name: str = ""visit_details: str = ""
現在這個端點對用戶來說更簡單,對我們來說更安全,因為用戶只能控制查詢的一部分,而不是全部。
@app.post("/search", response_model=SearchResponse)
async def search_v3(request: SearchRequest):try:query = {"query": {"match_phrase": {"visit_details": request.term}},"size": request.size,}result = await es_client.search(index=ES_INDEX, body=query)hits = result["hits"]["hits"]results = []for hit in hits:source = hit.get("_source", {})results.append(SearchHit(owner_name=source["owner_name"],visit_details=source["visit_details"],))return SearchResponse(hits=results, total=len(results))except Exception as e:status_code = getattr(e, "status_code", 500)raise HTTPException(status_code=status_code, detail=str(e))
讓用戶完全訪問 _search 查詢體被認為是安全風險,因為惡意用戶可能發送超載集群的查詢。采用這種方式,用戶只能設置 match_phrase 子句內的內容,使端點更安全。
響應也是如此。我們可以返回更簡潔的結果,隱藏 _id、_score、_index 等字段。
請求:
curl -X POST "http://localhost:8000/search" \-H "Content-Type: application/json" \-d '{"term": "dental cleaning"}'響應:
{"hits":[{"owner_name":"Leo Martínez","visit_details":"Dental cleaning. Minor tartar buildup removed."}],"total":1}后臺任務
FastAPI 的另一個功能是支持后臺任務。利用后臺任務,你可以立即返回結果給用戶,同時在后臺繼續執行任務。這個功能對長時間運行的任務特別有用。
在 Elasticsearch 中,我們使用 wait_for_completion=false 參數獲取任務 ID 并關閉連接,而不是等待任務完成。然后可以用 tasks API 查詢任務狀態。一些示例有 _reindex、_update_by_query 和 _delete_by_query。
假設你想讓用戶觸發基于字段值刪除幾百萬條文檔的操作,并在完成后通知他們。你可以結合 FastAPI 的后臺任務和 Elasticsearch 的 wait_for_completion 實現。
我們先創建一個函數,每隔 2 秒查詢 tasks API 檢查任務狀態。
async def check_task(es_client, task_id):try:while True:status = await es_client.tasks.get(task_id=task_id)if status.get("completed", False):print(f"Task {task_id} completed.")# Here you can add the logic to send the notificationbreakawait asyncio.sleep(2)except Exception as e:print(f"Error checking task {task_id}: {e}")現在,我們可以創建一個端點,接收用作過濾條件的值來刪除文檔。調用 _delete_by_query API,設置 wait_for_completion=false,并使用返回的任務 ID 創建一個后臺任務,調用我們之前寫的 check_task 方法。
background_tasks.add_task 的第一個參數是要執行的函數,后面的參數是該函數所需的參數。
# Background task endpoint
@app.post("/delete-by-query")
async def delete_by_query(request: SearchRequest = Body(...), background_tasks: BackgroundTasks = None
):try:body = {"query": {"term": {"pet_name.keyword": request.term}}}response = await es_client.delete_by_query(index=ES_INDEX, body=body, wait_for_completion=False)task_id = response.get("task")if task_id:background_tasks.add_task(check_task, es_async_client, task_id)return Response(status_code=200,content=json.dumps({"message": "Delete by query. The response will be send by email when the task is completed.","task_id": task_id,}),media_type="application/json",)except Exception as e:status_code = getattr(e, "status_code", 500)raise HTTPException(status_code=status_code, detail=str(e))
下面是刪除所有 pet_name.keyword 字段中包含 “Buddy” 文檔的示例:
curl -X POST "http://localhost:8000/delete-by-query" \-H "Content-Type: application/json" \-d '{"term": "Buddy"}'響應:
{"message": "Delete by query. The response will be send by email when the task is completed.", "task_id": "191ALShERbucSkcFTGpOCg:34822095"}后臺日志:
INFO:     127.0.0.1:58804 - "POST /delete-by-query HTTP/1.1" 200 OK
Task 191ALShERbucSkcFTGpOCg:34822095 completed.
運行 API
添加以下代碼塊,將服務器暴露在 8000 端口:
if __name__ == "__main__":uvicorn.run(app, host="0.0.0.0", port=8000)使用以下命令運行 FastAPI 應用:
uvicorn app:app --reload總結
FastAPI 讓構建安全且簡潔的 Elasticsearch API 層變得簡單。它內置類型檢查、異步支持和后臺任務,能輕松處理常見用例,且開銷不大。
這些示例只是起點——你可以根據需要添加認證、分頁,甚至 websockets。關鍵是保持集群安全,API 清晰且易于維護。
原文:Building Elasticsearch APIs with FastAPI - Elasticsearch Labs
![[2025CVPR-目標檢測方向]FSHNet:一種用于3D物體檢測的全稀疏混合網絡。](http://pic.xiahunao.cn/[2025CVPR-目標檢測方向]FSHNet:一種用于3D物體檢測的全稀疏混合網絡。)


 視頻教程 - 主頁-微博點贊量Top6實現)

機器學習小白入門YOLOv:YOLOv8-cls 模型微調實操)


)
——鏈接預測在社交網絡分析中的應用)


