之前學習了Nacos,用于發現并注冊、管理項目里所有的微服務,而OpenFeign簡化微服務之間的通信,而為了使得前端可以使用微服務項目里的每一個微服務的接口,就應該將所有微服務的接口管理起來方便前端調用,所以有了網關。
前端調用后端微服務項目的接口時,不需要指定每一個接口具體的地址,只需要將請求發送到后端的網關即可。
網關介紹
網關是網絡的關口,負責請求的路由、轉發、身份校驗 。

網關模塊的配置
1、新建一個maven空模塊,配置一下依賴
<dependencies>
......<!-- 其它依賴 --><!--網關-->
<dependency>  <groupId>org.springframework.cloud</groupId>  <artifactId>spring-cloud-starter-gateway</artifactId>
</dependency> <!--nocos discovery-->
<dependency>  <groupId>com.alibaba.cloud</groupId>  <artifactId>spring-cloud-starter-alibaba-nacos-discovery</artifactId>
</dependency>  <!--負載均衡-->
<dependency>  <groupId>org.springframework.cloud</groupId>  <artifactId>spring-cloud-starter-loadbalancer</artifactId>
</dependency>  </dependencies>
<build>  <finalName>${project.artifactId}</finalName>  <plugins>  <plugin>  <groupId>org.springframework.boot</groupId>  <artifactId>spring-boot-maven-plugin</artifactId>  </plugin>  </plugins>
</build>
2、創建com.<XXX項目名稱>.gateway包,報下名新建配置類
@SpringBootApplication
public class GatewayApplication {public static void main(String[] args) {SpringApplication.run(GatewayApplication.class, args);}
}
3、在靜態資源目錄下新建application.yaml文件,配置網關相關屬性
server:port: 8080  # 網關服務的端口號,指定網關運行在 8080 端口
spring:application:name: gateway # 應用名稱,注冊到 Nacos 的服務名稱cloud:nacos:server-addr: 192.168.52.128:8848 # Nacos 服務器地址,配置 Nacos 注冊中心地址gateway:routes: # 路由配置- id: item-service # 路由 ID,唯一標識,可以隨便命名uri: lb://item-service # 目標服務地址,即從注冊中心獲取 item-service 的地址predicates: # 斷言,即路由轉發的規則- Path=/items/**,/search/** # 匹配 /items/ 開頭的和 /search/ 開頭的請求到 item-service 服務獲取響應- id: user-service uri: lb://user-service predicates: - Path=/items/**,/search/** 4、最后啟動整個項目的時候也要把網關啟動
由下圖可見網關的效果有了

?網關的登錄校驗

網關過濾器有兩種,分別是:
- GatewayFilter: 路由過濾器,作用于任意指定的路由;默認不生效,要配置到路由后生效。
- GlobalFilter: 全局過濾器,作用范圍是所有路由;聲明后自動生效。
網關加公共依賴XXX-common實現請求的校驗
1、網關過濾器過濾請求(Filters文件夾)
@Component // 將該類標記為Spring組件,使其成為Spring容器管理的Bean
@RequiredArgsConstructor // Lombok注解,自動生成一個包含所有final字段的構造函數
public class AuthGlobalFilter implements GlobalFilter, Ordered {// 依賴注入JwtTool,用于JWT的解析和驗證private final JwtTool jwtTool;// 依賴注入AuthProperties,包含認證相關的配置信息,如排除路徑等private final AuthProperties authProperties;// AntPathMatcher用于路徑匹配,判斷請求路徑是否在排除路徑中private final AntPathMatcher antPathMatcher = new AntPathMatcher();@Overridepublic Mono<Void> filter(ServerWebExchange exchange, GatewayFilterChain chain) {// 1. 獲取當前請求對象ServerHttpRequest request = exchange.getRequest();// 2. 判斷請求路徑是否需要登錄攔截if (isExclude(request.getPath().toString())) {// 如果路徑在排除列表中,直接放行,不進行攔截return chain.filter(exchange);}// 3. 從請求頭中獲取tokenString token = null;List<String> headers = request.getHeaders().get("authorization");if (headers != null && !headers.isEmpty()) {token = headers.get(0); // 獲取第一個authorization頭,通常為Bearer Token}// 4. 校驗并解析tokenLong userId = null;try {// 使用JwtTool解析token,獲取用戶IDuserId = jwtTool.parseToken(token);} catch (UnauthorizedException e) {// 如果token無效或解析失敗,攔截請求并返回401 Unauthorized狀態碼ServerHttpResponse response = exchange.getResponse();response.setStatusCode(HttpStatus.UNAUTHORIZED);return response.setComplete(); // 結束請求處理}// 打印用戶ID(通常用于調試,生產環境中不建議直接打印敏感信息)System.out.println("userId = " + userId);String userInfo = userId.toString();// 將用戶信息存入請求頭ServerWebExchange swe = exchange.mutate().request(builder -> builder.header("user-info", userInfo)).build();// 5. 如果token有效,繼續執行后續的過濾器鏈return chain.filter(swe);}// 判斷請求路徑是否在排除路徑列表中private boolean isExclude(String path) {for (String pathPattern : authProperties.getExcludePaths()) {// 使用AntPathMatcher進行路徑匹配if (antPathMatcher.match(pathPattern, path)) {return true; // 如果匹配到排除路徑,返回true}}return false; // 否則返回false}@Overridepublic int getOrder() {// 返回過濾器的執行順序,0表示最高優先級return 0;}
}
?過濾器里涉及的一些依賴
// jwt校驗工具
@Component
public class JwtTool {private final JWTSigner jwtSigner;public JwtTool(KeyPair keyPair) {this.jwtSigner = JWTSignerUtil.createSigner("rs256", keyPair);}public String createToken(Long userId, Duration ttl) {// 1.生成jwsreturn JWT.create().setPayload("user", userId).setExpiresAt(new Date(System.currentTimeMillis() + ttl.toMillis())).setSigner(jwtSigner).sign();}/*** 解析token** @param token token* @return 解析刷新token得到的用戶信息*/public Long parseToken(String token) {// 1.校驗token是否為空if (token == null) {throw new UnauthorizedException("未登錄");}// 2.校驗并解析jwtJWT jwt;try {jwt = JWT.of(token).setSigner(jwtSigner);} catch (Exception e) {throw new UnauthorizedException("無效的token", e);}// 2.校驗jwt是否有效if (!jwt.verify()) {// 驗證失敗throw new UnauthorizedException("無效的token");}// 3.校驗是否過期try {JWTValidator.of(jwt).validateDate();} catch (ValidateException e) {throw new UnauthorizedException("token已經過期");}// 4.數據格式校驗Object userPayload = jwt.getPayload("user");if (userPayload == null) {// 數據為空throw new UnauthorizedException("無效的token");}// 5.數據解析try {return Long.valueOf(userPayload.toString());} catch (RuntimeException e) {// 數據格式有誤throw new UnauthorizedException("無效的token");}}
}// 攔截器攔截
@Data
@Component
@ConfigurationProperties(prefix = "hm.auth")
public class AuthProperties {private List<String> includePaths;private List<String> excludePaths;
}
2、網關的yaml文件里配置不需要校驗直接放行的請求?
hm:jwt: #解析jwt密鑰文件location: classpath:hmall.jksalias: hmallpassword: hmall123tokenTTL: 30mauth:excludePaths:- /search/**- /users/login- /items/**- /hi3、由于每一個微服務都導入了XX-common模塊的依賴,所以在XX-common模塊里配置并注冊攔截器,攔截所有發送到每個微服務里的請求,用于將請求頭里用戶信息存入線程池。
public class UserInfoInterceptor implements HandlerInterceptor {@Overridepublic boolean preHandle(HttpServletRequest request, HttpServletResponse response, Object handler) throws Exception {// 1. 獲取登錄用戶信息String userInfo = request.getHeader("user-info"); // 從請求頭里獲取// 2. 判斷是否獲取了用戶,如果有,存入ThreadLocalif (StrUtil.isNotBlank(userInfo)) {UserContext.setUser(Long.valueOf(userInfo));}// 3. 放行return true;}@Overridepublic void afterCompletion(HttpServletRequest request, HttpServletResponse response, Object handler, Exception ex) throws Exception {// 清理用戶UserContext.removeUser();}
}
?4、注冊XX-common模塊里的攔截器
@Configuration
@ConditionalOnClass(DispatcherServlet.class) // 使得網關不去生效改攔截器
public class MvcConfig implements WebMvcConfigurer {@Overridepublic void addInterceptors(InterceptorRegistry registry) {registry.addInterceptor(new UserInfoInterceptor());// 默認攔截所有的請求,目的是為了將每一個請求里包含的用戶信息存入線程池}
}
5、配置靜態資源文件夾下的spring.factories文件,取保每個微服務可以讀取到XX-common模塊里的攔截器
org.springframework.boot.autoconfigure.EnableAutoConfiguration=\com.hmall.common.config.MyBatisConfig,\com.hmall.common.config.MvcConfig,\com.hmall.common.config.JsonConfigOpenFeign傳遞用戶信息
使用OpenFeign時,一個微服務發送給另一個微服務的請求也要攜帶用戶信息到請求頭里,要和網關發送給微服務的請求一樣。所有要在公共api模塊里加攔截器,使得每一個請求的請求頭里添加用戶信息。
寫到OpenFeign的配置類里,且微服務的啟動類加上@EnableFeignClients(basePackages = "com.hmall.api.client",?defaultConfiguration = DefaultFeignConfig.class)的注解
 // 寫到OpenFeign的配置類里,且微服務的啟動類加上
// @EnableFeignClients(basePackages = "com.hmall.api.client",
//  defaultConfiguration = DefaultFeignConfig.class)的注解
@Bean // 聲明為一個Bean,可以被Spring容器管理public RequestInterceptor userInfoRequestInterceptor() {return new RequestInterceptor() {@Overridepublic void apply(RequestTemplate template) {// 獲取當前用戶的IDLong userId = UserContext.getUser(); // 導入XXX-common模塊里的線程池// 如果用戶ID不為空,則添加到請求頭中if (userId != null) { // 確保每一個微服務之間發送的請求也攜帶user-info到請求頭里// 將用戶ID添加到請求頭中,key為"user-info"System.out.println("將用戶ID添加到請求頭中,key為user-info,id為" + userId);template.header("user-info", userId.toString());}}};}
nacos共享配置
由于每一個微服務的yaml文件里有多個共同的配置信息,所有可以將其抽取出來的配置共同使用nacos注冊中心配置。

?每一個微服務里導入如下依賴即可實現。
<!-- nacos配置管理 -->
<dependency>  <groupId>com.alibaba.cloud</groupId>  <artifactId>spring-cloud-starter-alibaba-nacos-config</artifactId>
</dependency>
<!-- 讀取bootstrap文件 -->
<dependency>  <groupId>org.springframework.cloud</groupId>  <artifactId>spring-cloud-starter-bootstrap</artifactId>
</dependency>
nacos里共同配置的信息()${XXX:YY}表示如果讀取不到XXX則默認為YY
# 數據庫和mybatis
spring:datasource:url: jdbc:mysql://${hm.db.host:192.168.52.128}:${hm.db.port:3306}/${hm.db.database}?useUnicode=true&characterEncoding=UTF-8&autoReconnect=true&serverTimezone=Asia/Shanghaidriver-class-name: com.mysql.cj.jdbc.Driverusername: ${hm.db.un:root}password: ${hm.db.pw:123}
mybatis-plus:configuration:default-enum-type-handler: com.baomidou.mybatisplus.core.handlers.MybatisEnumTypeHandlerglobal-config:db-config:update-strategy: not_nullid-type: auto# 日志記錄
logging:level:com.hmall: debugpattern:dateformat: HH:mm:ss:SSSfile:path: "logs/${spring.application.name}"# swagger配置
knife4j:enable: trueopenapi:title: ${hm.swagger.title:黑馬商城接口文檔}description: ${hm.swagger.desc:黑馬商城接口文檔}email: zhanghuyi@itcast.cnconcat: 虎哥url: https://www.itcast.cnversion: v1.0.0group:default:group-name: defaultapi-rule: packageapi-rule-resources:- ${hm.swagger.package}
拉取nacos里的配置文件到本地微服務(以下為bootstrap.yaml文件)
spring: main: additional-properties: --add-opens=java.base/java.lang.invoke=ALL-UNNAMED application: # 應用程序名稱,用于標識該服務,在Nacos或其他服務注冊中心中可用到 name: cart-service cloud: nacos: # Nacos的服務地址,用于連接到Nacos服務器 server-addr: localhost:8848 # nacos地址 config: # 配置文件的格式,這里指定為YAML格式 file-extension: yaml # 定義共享配置文件列表,這些配置將從Nacos服務器加載 shared-configs: # 一定對應好nacos里的Data ID- data-id: shared-jdbc.yaml # JDBC共享配置文件 - data-id: shared-log.yaml # 日志共享配置文件 - data-id: shared-swagger.yaml # Swagger共享配置文件 nacos配置里的變量在本地微服務里配置好(以下為application.yaml文件)
server:port: 8082
feign:okhttp:enabled: true
hm:db:database: hm-cartswagger:title: "黑馬城市購物車服務接口文檔"package: com.hmall.cart.controller
配置熱更新
配置熱更新:修改配置文件里的配置的時候,不需要重新啟動微服務項目配置就可以生效配置。
具體應用實例
需求:購買車的限定數量目前是寫死在業務中的,將其改為讀取配置文件屬性,并將配置置交給Nacos管理,實現熱更新。

首先在nocas配置要限定數量所在的微服務的yaml文件
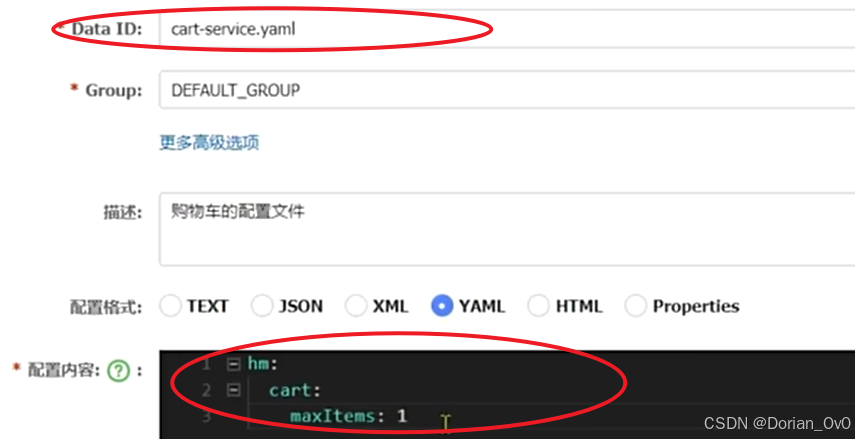
之后在對應的微服務里添加config文件?
@Data
@Component
@ConfigurationProperties(prefix = "hm.cart") // 對應yaml文件里的配置
public class CartProperties {private Integer maxItems;
}
最后在業務文件里面就可以去使用了
private final CartProperties cartProperties; // 導入依賴
......private void checkCartsFull(Long userId) {int count = lambdaQuery().eq(Cart::getUserId, userId).count();if (count >= cartProperties.getMaxItems()) {throw new BizIllegalException(StrUtil.format("用戶購物車課程不能超過{}", cartProperties.getMaxItems()));}}
......)


)


![系統會把原先的對話狀態堆棧從 [“assistant“] 更新為 [“assistant“, “update_flight“]這個更新的處理過程](http://pic.xiahunao.cn/系統會把原先的對話狀態堆棧從 [“assistant“] 更新為 [“assistant“, “update_flight“]這個更新的處理過程)

![Windows 萬興恢復專家 Wondershare Recoverit-v13.5.7.9-[電腦數據恢復工具]](http://pic.xiahunao.cn/Windows 萬興恢復專家 Wondershare Recoverit-v13.5.7.9-[電腦數據恢復工具])