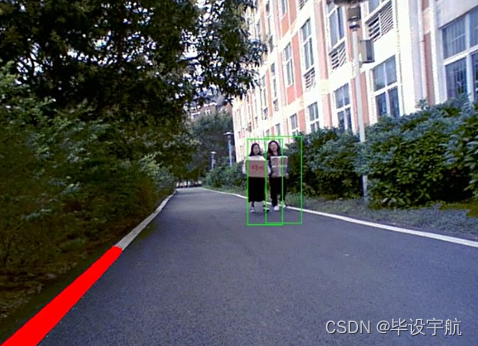
基于樹莓派的智能小車,用攝像頭實現識別道路中的車道線識別、行人檢測與車輛檢測。

?
本項目旨在開發一套基于攝像頭的智能道路環境感知系統,該系統能夠實時識別道路中的車道線、行人與車輛,為自動駕駛汽車、智能交通管理以及輔助駕駛系統提供關鍵的視覺信息。系統集成先進的計算機視覺技術和深度學習算法,確保在復雜多變的交通環境中實現高精度的目標檢測與分類。
關鍵技術組件:
-
車道線識別模塊:
- 技術方法:采用基于圖像處理和機器學習的方法,如Canny邊緣檢測、Hough變換、深度神經網絡(如U-Net、Faster R-CNN)等,以準確檢測和追蹤車道線。
- 功能:實時識別車道線位置,支持車道偏離預警、自動車道保持等功能。
-
行人檢測模塊:
- 技術方法:利用深度學習模型,如YOLOv5/v8、SSD或RetinaNet,這些模型在行人檢測任務中表現出色,能夠快速準確地識別出畫面中的行人。
- 功能:提前預警可能的碰撞風險,支持行人避讓策略,提高道路安全。
-
車輛檢測模塊:
- 技術方法:同樣采用先進的深度學習模型,這些模型經過大規模車輛數據集訓練,能夠有效區分不同類型的車輛(轎車、卡車、摩托車等)。
- 功能:實現對周圍車輛的精確跟蹤,支持自適應巡航控制、緊急制動輔助等功能。
-
圖像處理與預處理:
- 內容:包括圖像去噪、曝光補償、白平衡調整、圖像增強等,確保輸入到模型的圖像質量,優化檢測效果。
-
硬件平臺:
- 攝像頭:高分辨率、寬動態范圍的攝像頭,安裝于車輛前方,可覆蓋較寬視野。
- 計算單元:高性能GPU或專用AI芯片,用于加速深度學習模型的推理。
-
軟件架構:
- 實時操作系統:確保系統的低延遲響應和穩定運行。
- 算法集成框架:如TensorFlow、PyTorch或OpenCV,便于模型部署和更新。
-
數據處理與融合:
- 多傳感器融合:雖然本項目主要依賴攝像頭,但在高級應用中,可與雷達、激光雷達(LiDAR)數據融合,提高環境感知的魯棒性和精度。
項目應用:
- 自動駕駛汽車:為自動駕駛系統提供基礎視覺信息,提升安全性和自主駕駛能力。
- 智能交通系統:改善交通流管理,減少交通事故,提升交通效率。
- 輔助駕駛系統:在傳統車輛中增加智能輔助功能,如盲點監測、交叉路口警報等。
該項目展現了現代智能交通技術的發展方向,通過攝像頭的智能化應用,為未來的交通安全和效率提升奠定堅實的基礎。
?
?

車道線識別 (使用OpenCV)
import cv2
import numpy as npdef detect_lane_lines(image):# 圖像預處理gray = cv2.cvtColor(image, cv2.COLOR_BGR2GRAY)blur = cv2.GaussianBlur(gray, (5, 5), 0)edges = cv2.Canny(blur, 50, 150)# 使用霍夫變換檢測直線lines = cv2.HoughLinesP(edges, rho=1, theta=np.pi/180, threshold=50, minLineLength=50, maxLineGap=10)if lines is not None:for line in lines:x1, y1, x2, y2 = line.reshape(4)cv2.line(image, (x1, y1), (x2, y2), (0, 255, 0), 2)return image# 加載測試圖像
image_path = 'path_to_your_test_image.jpg'
image = cv2.imread(image_path)
lane_detected_image = detect_lane_lines(image)
cv2.imshow('Lane Detection', lane_detected_image)
cv2.waitKey(0)
cv2.destroyAllWindows()
?
行人檢測 (使用YOLOv5)
首先確保你已經安裝了torch和下載了YOLOv5模型。
import torch
from PIL import Imagedef detect_pedestrians(image_path, model_path='yolov5s.pt'):model = torch.hub.load('ultralytics/yolov5', 'custom', path=model_path)img = Image.open(image_path)results = model(img)results.show()  # 顯示檢測結果detect_pedestrians('path_to_your_test_image.jpg')
?
車輛檢測 (使用TensorFlow和預訓練模型)
確保安裝了tensorflow和相關的模型庫。
import tensorflow as tf
from object_detection.utils import label_map_util
from object_detection.utils import visualization_utils as viz_utils
import numpy as np
import cv2def detect_vehicles(image_path, model_path, label_map_path):# 加載模型和標簽映射detection_model = tf.saved_model.load(model_path)category_index = label_map_util.create_category_index_from_labelmap(label_map_path, use_display_name=True)# 加載并預處理圖像img = cv2.imread(image_path)image_np_expanded = np.expand_dims(img, axis=0)# 運行檢測input_tensor = tf.convert_to_tensor(image_np_expanded)detections = detection_model(input_tensor)# 可視化結果num_detections = int(detections.pop('num_detections'))detections = {key: value[0, :num_detections].numpy()for key, value in detections.items()}detections['num_detections'] = num_detections# 濾除置信度低的框detection_threshold = 0.5boxes = detections['detection_boxes']scores = detections['detection_scores']classes = detections['detection_classes'].astype(np.int64)indices = np.where(scores > detection_threshold)[0]boxes = boxes[indices]scores = scores[indices]classes = classes[indices]viz_utils.visualize_boxes_and_labels_on_image_array(img,boxes,classes,scores,category_index,use_normalized_coordinates=True,min_score_thresh=detection_threshold,line_thickness=8)cv2.imshow('Vehicle Detection', img)cv2.waitKey(0)cv2.destroyAllWindows()# 示例用法
detect_vehicles('path_to_your_test_image.jpg', 'path_to_your_saved_model_directory', 'path_to_your_label_map.pbtxt')
請根據實際情況調整模型路徑、標簽文件路徑等,并確保已下載相關模型和依賴庫。上述代碼僅提供了基本框架,具體實現時還需考慮性能優化、模型選擇與微調等問題。


)
:JVM虛擬機調優分析與實戰)


)


