Arduino - Button - Long Press Short Press Arduino - 按鈕 - 長按短按
Arduino - Button - Long Press Short Press
We will learn: 我們將學習:
- How to detect the button’s short press
如何檢測按鈕的短按 - How to detect the button’s long press
如何檢測按鈕的長按 - How to detect both the button’s long press and short press
如何檢測按鈕的長按和短按 - Long press and short press with debouncing
長按和短按帶去彈跳
In the first three parts, we learn how to detect in principle.
在前三部分中,我們學習了如何原則上進行檢測。
In the last part, we learn how to detect in practical use by applying the debounce. See why do we need to debounce for button. Without debouncing, we may detect wrong the button short press.
在最后一部分中,我們將學習如何通過應用去抖動來檢測實際使用中的檢測。看看為什么我們需要為按鈕去抖動。如果不去抖動,我們可能會檢測到錯誤的按鈕短按。
Hardware Required 所需硬件
| 1 | × | Arduino UNO or Genuino UNO Arduino UNO 或 Genuino UNO | |
|---|---|---|---|
| 1 | × | USB 2.0 cable type A/B USB 2.0 電纜 A/B 型 | |
| 1 | × | Push Button 按鈕 | |
| 1 | × | (Optional) Panel-mount Push Button (可選)面板安裝按鈕 | |
| 1 | × | Breadboard 面包板 | |
| 1 | × | Jumper Wires 跳線 | |
| 1 | × | (Optional) 9V Power Adapter for Arduino (可選)用于Arduino的9V電源適配器 | |
| 1 | × | (Recommended) Screw Terminal Block Shield for Arduino Uno (推薦)用于Arduino Uno的螺釘接線端子屏蔽層 | |
| 1 | × | (Optional) Transparent Acrylic Enclosure For Arduino Uno (可選)Arduino Uno透明亞克力外殼 |
About Button 關于按鈕
If you do not know about button (pinout, how it works, how to program …), learn about them in the following tutorials:
如果您不了解按鈕(引腳排列、工作原理、如何編程等),請在以下教程中了解它們:
- Arduino - Button tutorial
Arduino - 按鈕教程
Wiring Diagram 接線圖
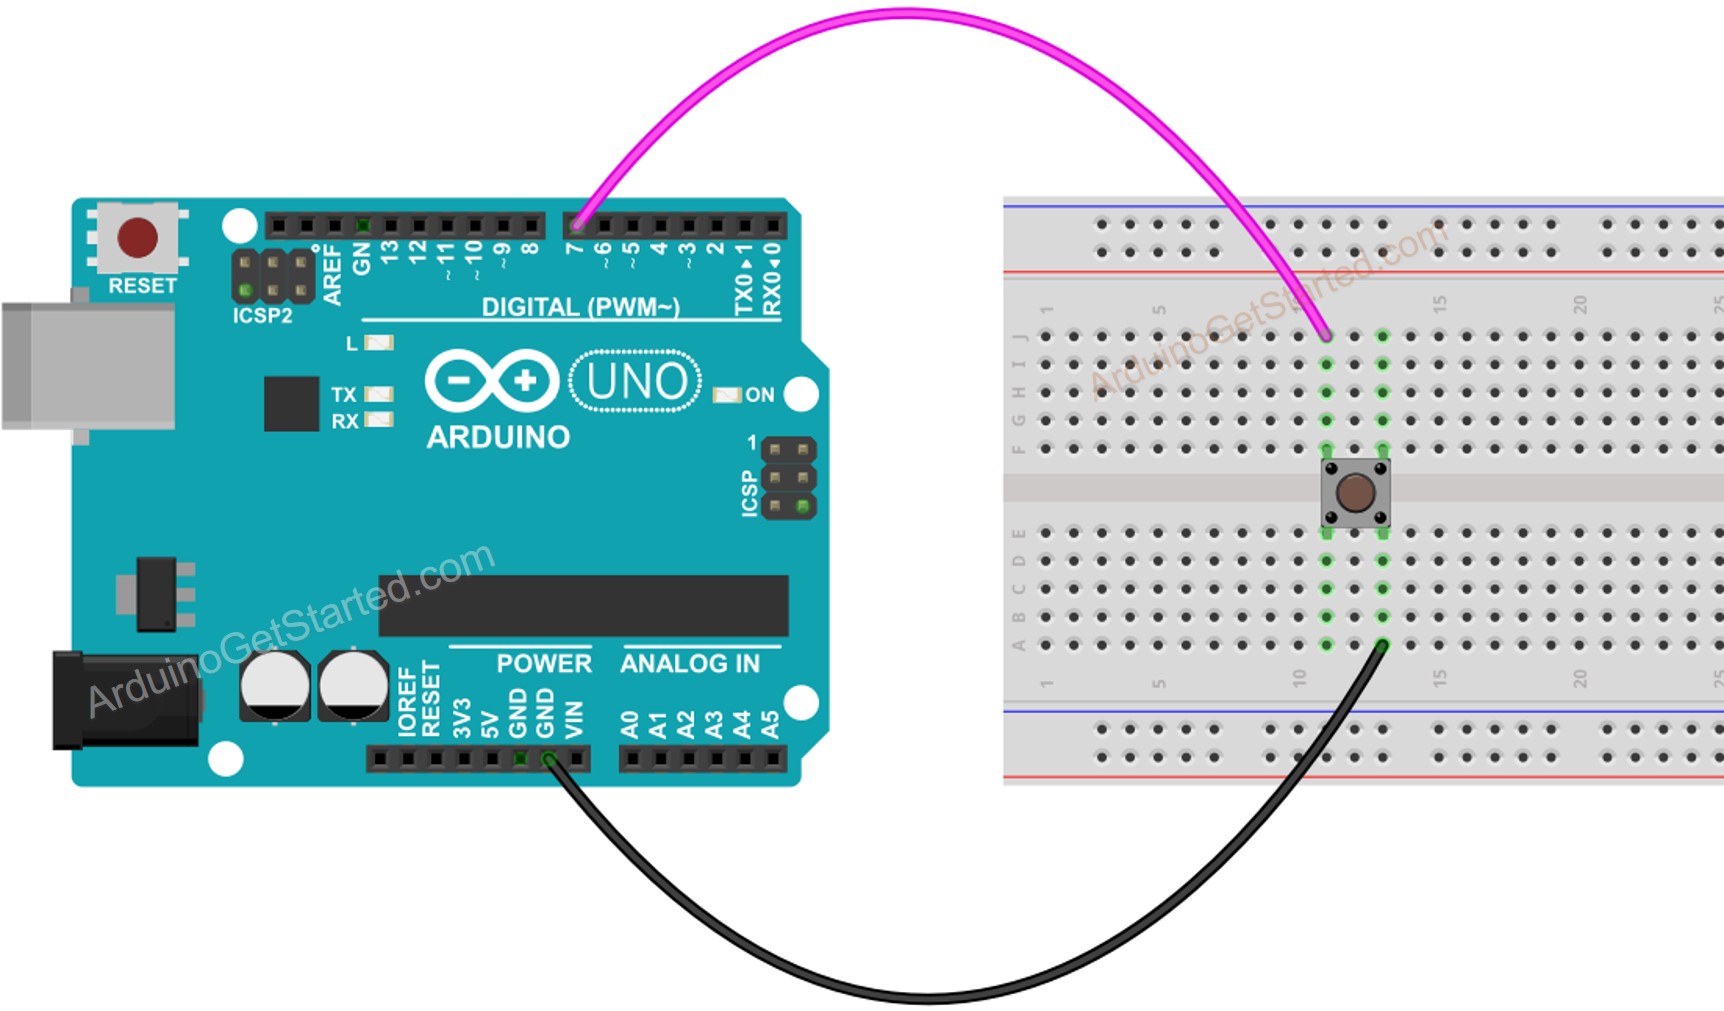
In this tutorial, we will use the internal pull-up resistor. Therefore, the state of the button is HIGH when normal and LOW when pressed.
在本教程中,我們將使用內部上拉電阻。因此,按鈕的狀態在正常時為高電平,按下時為低電平。
How To Detect Short Press 如何檢測短按
We measure the time duration between the pressed and released events. If the duration is shorter than a defined time, the short press event is detected.
我們測量按下和發布事件之間的持續時間。如果持續時間短于定義的時間,則檢測短按事件。
Let’s see step by step:
讓我們一步一步地看:
- Define how long the maximum of short press lasts
定義短按的最大持續時間
const int SHORT_PRESS_TIME = 500; // 500 milliseconds
- Detect the button is pressed and save the pressed time
檢測按鈕是否被按下并保存按下時間
if(lastState == HIGH && currentState == LOW)pressedTime = millis();
- Detect the button is released and save the released time
檢測按鈕已釋放并保存釋放時間
if(lastState == LOW && currentState == HIGH)releasedTime = millis();
- Calculate press duration and
計算按壓持續時間和
long pressDuration = releasedTime - pressedTime;
- Determine the short press by comparing the press duration with the defined short press time.
通過將按壓持續時間與定義的短按壓時間進行比較來確定短按。
if( pressDuration < SHORT_PRESS_TIME ) Serial.println("A short press is detected");
Arduino Code for detecting the short press 用于檢測短按的Arduino代碼
/** Created by ArduinoGetStarted.com** This example code is in the public domain** Tutorial page: https://arduinogetstarted.com/tutorials/arduino-button-long-press-short-press*/// constants won't change. They're used here to set pin numbers:
const int BUTTON_PIN = 7; // the number of the pushbutton pin
const int SHORT_PRESS_TIME = 500; // 500 milliseconds// Variables will change:
int lastState = LOW;  // the previous state from the input pin
int currentState;     // the current reading from the input pin
unsigned long pressedTime  = 0;
unsigned long releasedTime = 0;void setup() {Serial.begin(9600);pinMode(BUTTON_PIN, INPUT_PULLUP);
}void loop() {// read the state of the switch/button:currentState = digitalRead(BUTTON_PIN);if(lastState == HIGH && currentState == LOW)        // button is pressedpressedTime = millis();else if(lastState == LOW && currentState == HIGH) { // button is releasedreleasedTime = millis();long pressDuration = releasedTime - pressedTime;if( pressDuration < SHORT_PRESS_TIME )Serial.println("A short press is detected");}// save the the last statelastState = currentState;
}
Quick Steps 快速步驟
- Upload the above code to Arduino via Arduino IDE
通過Arduino IDE將上述代碼上傳到Arduino - Press the button shortly several times.
短按按鈕幾次。 - See the result on Serial Monitor
在串行監視器上查看結果
※ NOTE THAT: ※ 注意事項:
The Serial Monitor may show several short press detection for one press. This is the normal behavior of the button. This behavior is called the “chattering phenomenon”. The issue will be solved in the last part of this tutorial.
串行監視器可能會顯示一次按下的幾次短按檢測。這是按鈕的正常行為。這種行為被稱為“顫動現象”。該問題將在本教程的最后一部分解決。
How To Detect Long Press 如何檢測長按
There are two use cases for detecting the long press.
檢測長按有兩個用例。
- The long-press event is detected right after the button is released
釋放按鈕后立即檢測到長按事件 - The long-press event is detected during the time the button is being pressed, even the button is not released yet.
在按下按鈕期間檢測到長按事件,甚至按鈕尚未松開。
In the first use case, We measure the time duration between the pressed and released events. If the duration is longer than a defined time, the long-press event is detected.
在第一個用例中,我們測量按下和發布事件之間的持續時間。如果持續時間超過定義的時間,則檢測長按事件。
In the second use case, After the button is pressed, We continuously measure the pressing time and check the long-press event until the button is released. During the time button is being pressed. If the duration is longer than a defined time, the long-press event is detected.
在第二個用例中,按下按鈕后,我們連續測量按下時間并檢查長按事件,直到釋放按鈕。在按下時間按鈕期間。如果持續時間超過定義的時間,則檢測長按事件。
Arduino Code for detecting long press when released Arduino代碼,用于在釋放時檢測長按
/** Created by ArduinoGetStarted.com** This example code is in the public domain** Tutorial page: https://arduinogetstarted.com/tutorials/arduino-button-long-press-short-press*/// constants won't change. They're used here to set pin numbers:
const int BUTTON_PIN = 7; // the number of the pushbutton pin
const int LONG_PRESS_TIME  = 1000; // 1000 milliseconds// Variables will change:
int lastState = LOW;  // the previous state from the input pin
int currentState;     // the current reading from the input pin
unsigned long pressedTime  = 0;
unsigned long releasedTime = 0;void setup() {Serial.begin(9600);pinMode(BUTTON_PIN, INPUT_PULLUP);
}void loop() {// read the state of the switch/button:currentState = digitalRead(BUTTON_PIN);if(lastState == HIGH && currentState == LOW)        // button is pressedpressedTime = millis();else if(lastState == LOW && currentState == HIGH) { // button is releasedreleasedTime = millis();long pressDuration = releasedTime - pressedTime;if( pressDuration > LONG_PRESS_TIME )Serial.println("A long press is detected");}// save the the last statelastState = currentState;
}
Quick Steps 快速步驟
- Upload the above code to Arduino via Arduino IDE
通過Arduino IDE將上述代碼上傳到Arduino - Press and release the button after one second.
一秒鐘后按下并松開按鈕。 - See the result on Serial Monitor
在串行監視器上查看結果
The long-press event is only detected right after the button is released
只有在釋放按鈕后才能檢測到長按事件
Arduino Code for detecting long press during pressing 用于在按壓過程中檢測長按的Arduino代碼
/** Created by ArduinoGetStarted.com** This example code is in the public domain** Tutorial page: https://arduinogetstarted.com/tutorials/arduino-button-long-press-short-press*/// constants won't change. They're used here to set pin numbers:
const int BUTTON_PIN = 7; // the number of the pushbutton pin
const int LONG_PRESS_TIME  = 1000; // 1000 milliseconds// Variables will change:
int lastState = LOW;  // the previous state from the input pin
int currentState;     // the current reading from the input pin
unsigned long pressedTime  = 0;
bool isPressing = false;
bool isLongDetected = false;void setup() {Serial.begin(9600);pinMode(BUTTON_PIN, INPUT_PULLUP);
}void loop() {// read the state of the switch/button:currentState = digitalRead(BUTTON_PIN);if(lastState == HIGH && currentState == LOW) {        // button is pressedpressedTime = millis();isPressing = true;isLongDetected = false;} else if(lastState == LOW && currentState == HIGH) { // button is releasedisPressing = false;}if(isPressing == true && isLongDetected == false) {long pressDuration = millis() - pressedTime;if( pressDuration > LONG_PRESS_TIME ) {Serial.println("A long press is detected");isLongDetected = true;}}// save the the last statelastState = currentState;
}
Quick Steps 快速步驟
- Upload the above code to Arduino via Arduino IDE
通過Arduino IDE將上述代碼上傳到Arduino - Press and release the button after several seconds.
幾秒鐘后按下并松開按鈕。 - See the result on Serial Monitor
在串行監視器上查看結果
How To Detect Both Long Press and Short Press 如何檢測長按和短按
Short Press and Long Press after released 發布后短按和長按
/** Created by ArduinoGetStarted.com** This example code is in the public domain** Tutorial page: https://arduinogetstarted.com/tutorials/arduino-button-long-press-short-press*/// constants won't change. They're used here to set pin numbers:
const int BUTTON_PIN = 7; // the number of the pushbutton pin
const int SHORT_PRESS_TIME = 1000; // 1000 milliseconds
const int LONG_PRESS_TIME  = 1000; // 1000 milliseconds// Variables will change:
int lastState = LOW;  // the previous state from the input pin
int currentState;     // the current reading from the input pin
unsigned long pressedTime  = 0;
unsigned long releasedTime = 0;void setup() {Serial.begin(9600);pinMode(BUTTON_PIN, INPUT_PULLUP);
}void loop() {// read the state of the switch/button:currentState = digitalRead(BUTTON_PIN);if(lastState == HIGH && currentState == LOW)        // button is pressedpressedTime = millis();else if(lastState == LOW && currentState == HIGH) { // button is releasedreleasedTime = millis();long pressDuration = releasedTime - pressedTime;if( pressDuration < SHORT_PRESS_TIME )Serial.println("A short press is detected");if( pressDuration > LONG_PRESS_TIME )Serial.println("A long press is detected");}// save the the last statelastState = currentState;
}
Quick Steps 快速步驟
- Upload the above code to Arduino via Arduino IDE
通過Arduino IDE將上述代碼上傳到Arduino - Long and short press the button.
長按和短按按鈕。 - See the result on Serial Monitor
在串行監視器上查看結果
※ NOTE THAT: ※ 注意事項:
The Serial Monitor may show several short press detection when long press. This is the normal behavior of the button. This behavior is called the “chattering phenomenon”. The issue will be solved in the last part of this tutorial.
長按時,串行監視器可能會顯示幾次短按檢測。這是按鈕的正常行為。這種行為被稱為“顫動現象”。該問題將在本教程的最后一部分解決。
Short Press and Long Press During pressing 短按和長按 按壓過程中
/** Created by ArduinoGetStarted.com** This example code is in the public domain** Tutorial page: https://arduinogetstarted.com/tutorials/arduino-button-long-press-short-press*/// constants won't change. They're used here to set pin numbers:
const int BUTTON_PIN = 7; // the number of the pushbutton pin
const int SHORT_PRESS_TIME = 1000; // 1000 milliseconds
const int LONG_PRESS_TIME  = 1000; // 1000 milliseconds// Variables will change:
int lastState = LOW;  // the previous state from the input pin
int currentState;     // the current reading from the input pin
unsigned long pressedTime  = 0;
unsigned long releasedTime = 0;
bool isPressing = false;
bool isLongDetected = false;void setup() {Serial.begin(9600);pinMode(BUTTON_PIN, INPUT_PULLUP);
}void loop() {// read the state of the switch/button:currentState = digitalRead(BUTTON_PIN);if(lastState == HIGH && currentState == LOW) {        // button is pressedpressedTime = millis();isPressing = true;isLongDetected = false;} else if(lastState == LOW && currentState == HIGH) { // button is releasedisPressing = false;releasedTime = millis();long pressDuration = releasedTime - pressedTime;if( pressDuration < SHORT_PRESS_TIME )Serial.println("A short press is detected");}if(isPressing == true && isLongDetected == false) {long pressDuration = millis() - pressedTime;if( pressDuration > LONG_PRESS_TIME ) {Serial.println("A long press is detected");isLongDetected = true;}}// save the the last statelastState = currentState;
}
Quick Steps 快速步驟
- Upload the above code to Arduino via Arduino IDE
通過Arduino IDE將上述代碼上傳到Arduino - Long and short press the button.
長按和短按按鈕。 - See the result on Serial Monitor
在串行監視器上查看結果
※ NOTE THAT: ※ 注意事項:
The Serial Monitor may show several short press detection when long press. This is the normal behavior of the button. This behavior is called the “chattering phenomenon”. The issue will be solved in the last part of this tutorial.
長按時,串行監視器可能會顯示幾次短按檢測。這是按鈕的正常行為。這種行為被稱為“顫動現象”。該問題將在本教程的最后一部分解決。
Long Press and Short Press with Debouncing 長按和短按帶去彈跳
It is very important to debounce the button in many applications.
在許多應用中,對按鈕進行去抖動非常重要。
Debouncing is a little complicated, especially when using multiple buttons. To make it much easier for beginners, we created a library, called ezButton.
去抖動有點復雜,尤其是在使用多個按鈕時。為了讓初學者更容易,我們創建了一個名為 ezButton 的庫。
We will use this library in below codes
我們將在下面的代碼中使用這個庫
Short Press and Long Press with debouncing after released 短按和長按,釋放后去彈跳
/** Created by ArduinoGetStarted.com** This example code is in the public domain** Tutorial page: https://arduinogetstarted.com/tutorials/arduino-button-long-press-short-press*/#include <ezButton.h>const int SHORT_PRESS_TIME = 1000; // 1000 milliseconds
const int LONG_PRESS_TIME  = 1000; // 1000 millisecondsezButton button(7);  // create ezButton object that attach to pin 7;unsigned long pressedTime  = 0;
unsigned long releasedTime = 0;void setup() {Serial.begin(9600);button.setDebounceTime(50); // set debounce time to 50 milliseconds
}void loop() {button.loop(); // MUST call the loop() function firstif(button.isPressed())pressedTime = millis();if(button.isReleased()) {releasedTime = millis();?    long pressDuration = releasedTime - pressedTime;?    if( pressDuration < SHORT_PRESS_TIME )
?      Serial.println("A short press is detected");?    if( pressDuration > LONG_PRESS_TIME )
?      Serial.println("A long press is detected");}
}
Quick Steps 快速步驟
- Install ezButton library. See How To
安裝 ezButton 庫。了解操作方法 - Upload the above code to Arduino via Arduino IDE
通過Arduino IDE將上述代碼上傳到Arduino - Long and short press the button.
長按和短按按鈕。 - See the result on Serial Monitor
在串行監視器上查看結果
Short Press and Long Press with debouncing During Pressing 短按和長按,按壓過程中去彈跳
/** Created by ArduinoGetStarted.com** This example code is in the public domain** Tutorial page: https://arduinogetstarted.com/tutorials/arduino-button-long-press-short-press*/#include <ezButton.h>const int SHORT_PRESS_TIME = 1000; // 1000 milliseconds
const int LONG_PRESS_TIME  = 1000; // 1000 millisecondsezButton button(7);  // create ezButton object that attach to pin 7;unsigned long pressedTime  = 0;
unsigned long releasedTime = 0;
bool isPressing = false;
bool isLongDetected = false;void setup() {Serial.begin(9600);button.setDebounceTime(50); // set debounce time to 50 milliseconds
}void loop() {button.loop(); // MUST call the loop() function firstif(button.isPressed()){pressedTime = millis();isPressing = true;isLongDetected = false;}if(button.isReleased()) {isPressing = false;releasedTime = millis();long pressDuration = releasedTime - pressedTime;if( pressDuration < SHORT_PRESS_TIME )Serial.println("A short press is detected");}if(isPressing == true && isLongDetected == false) {long pressDuration = millis() - pressedTime;if( pressDuration > LONG_PRESS_TIME ) {Serial.println("A long press is detected");isLongDetected = true;}}
}
Quick Steps 快速步驟
- Install ezButton library. See How To
安裝 ezButton 庫。了解操作方法 - Upload the above code to Arduino via Arduino IDE
通過Arduino IDE將上述代碼上傳到Arduino - Long and short press the button.
長按和短按按鈕。 - See the result on Serial Monitor
在串行監視器上查看結果
Video Tutorial 視頻教程
We are considering to make the video tutorials. If you think the video tutorials are essential, please subscribe to our YouTube channel to give us motivation for making the videos.
我們正在考慮制作視頻教程。如果您認為視頻教程是必不可少的,請訂閱我們的 YouTube 頻道,為我們制作視頻提供動力。
Why Needs Long Press and Short Press 為什么需要長按和短按
- To save the number of buttons. A single button can keep two or more functionalities. For example, short press for changing operation mode, long press for turn off the device.
保存按鈕數量。一個按鈕可以保留兩個或多個功能。例如,短按可更改操作模式,長按可關閉設備。 - Use of long press to reduce the short press by accident. For example, some kinds of devices use the button for factory reset. If the button is pressed by accident, it is dangerous. To avoid it, the device is implemented to be factory reset only when the button is long-press (e.g over 5 seconds)
使用長按減少意外短按。例如,有些設備使用按鈕進行出廠重置。如果意外按下按鈕,就會造成危險。為了避免這種情況,設備只有在長按按鈕(例如超過 5 秒)時才能進行出廠重置。


)


函數——打印輸出)