學習文檔
官網的k8s上關于scheduler的文檔基本可以分為這兩部分
介紹 scheduler 的基本概念
介紹 scheduler 的配置 KubeSchedulerConfiguration 的參數
介紹 scheduler 的命令行參數
調度框架解析
Scheduling-framework 解析
kube-scheduler 選擇 node 通過下面這兩步
-
過濾(Filtering)
-
打分(Scoring)
為了提高 kube-scheduler 的效率,我們其實沒有必要遍歷集群中所有的node之后再挑選出一個合適的node進行容器的調度,這里 KubeSchedulerConfiguration 提供了一個參數
apiVersion: kubescheduler.config.k8s.io/v1alpha1
kind: KubeSchedulerConfiguration
algorithmSource:provider: DefaultProvider...percentageOfNodesToScore: 50
percentageOfNodesToScore 就表示在集群中需要進行評分的node的比例,這里指定為 50 表示只需要掃描比較集群中一半的node即可
為了讓所有的node都接受公平性調度,scheduler 調度節點按照輪詢的策略進行,比如下面這些node
Zone 1: Node 1, Node 2, Node 3, Node 4
Zone 2: Node 5, Node 6
Scheduler 計算的策略是按照 node1 -> node5 -> node2 -> node6 -> node3 -> node4 來進行的
第一次篩選如果只到node6,則下次篩選會從 node3 進行,依次循環往復遍歷到每個節點
Kube-schedluer 的參數,介紹幾個關鍵的參數
--secure-port int     Default: 10259    # 默認的啟動端口
--config string     # 配置文件的路徑(指定KubeSchedulerConfiguration的路徑)
配置參數
Kube-scheduler 的配置統一配置在 KubeSchedulerConfiguration 中
參考官方的一個模板
apiVersion: kubescheduler.config.k8s.io/v1beta2
kind: KubeSchedulerConfiguration
profiles:- schedulerName: multipoint-schedulerplugins:# Disable the default QueueSort pluginqueueSort:enabled:- name: 'CustomQueueSort'disabled:- name: 'DefaultQueueSort'# Enable custom Filter pluginsfilter:enabled:- name: 'CustomPlugin1'- name: 'CustomPlugin2'- name: 'DefaultPlugin2'disabled:- name: 'DefaultPlugin1'# Enable and reorder custom score pluginsscore:enabled:- name: 'DefaultPlugin2'weight: 1- name: 'DefaultPlugin1'weight: 3
調度框架
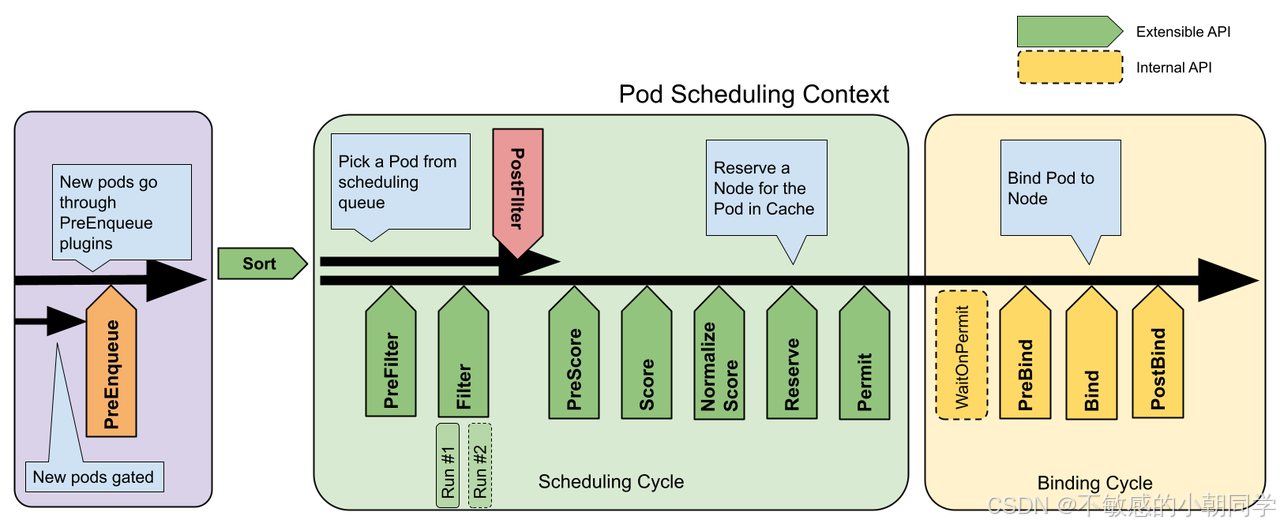
調度框架由一個個的插件組成,每個pod的調度模塊分為兩個部分 scheduling cycle 和 binding cycle
調度循環為一個 pod 選擇合適的 node,而綁定循環來執行調度循環選擇好的決策
scheduling cycle 和 binding cycle 共同組成了 scheduling context
注意:scheduling cycle 所屬的 plugins 必須是線性運行的,一個接著一個運行;而 binding cycle 所屬的 plugins 是可以并行執行的
整體架構如下
基本流程
編寫一個自定義的 scheduler 可分為如下
-
編寫插件
-
部署scheduler到集群里面
-
配置使用的插件列表
-
下發pod驗證
自己部署一個scheduler
clone倉庫
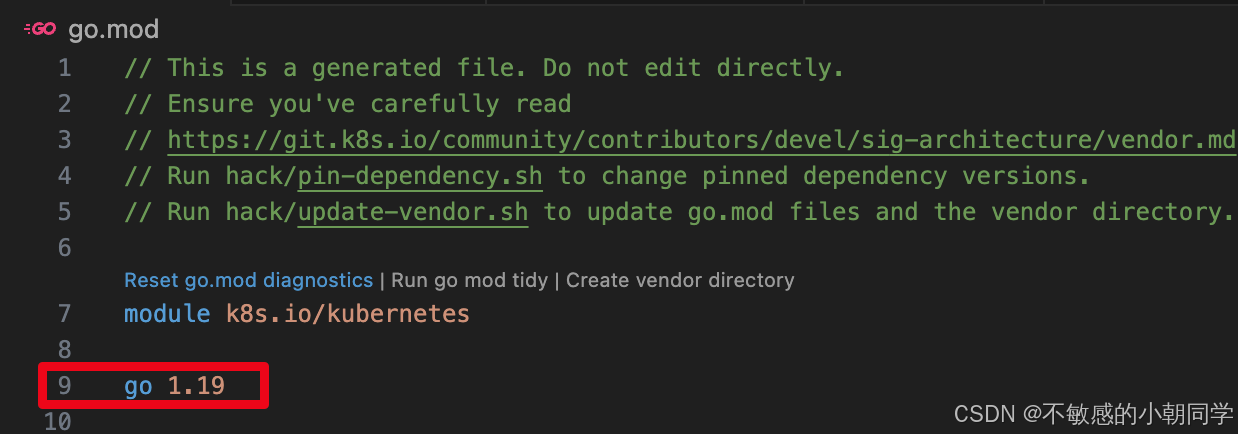
我們去 k8s 官網 clone 好對應版本的 k8s 集群的代碼倉庫

比如我的版本是1.23
檢查編譯是否能夠通過
Clone 下來之后執行 makefile,注意這里的go版本不要高于當前你編譯使用的go版本
開始編譯
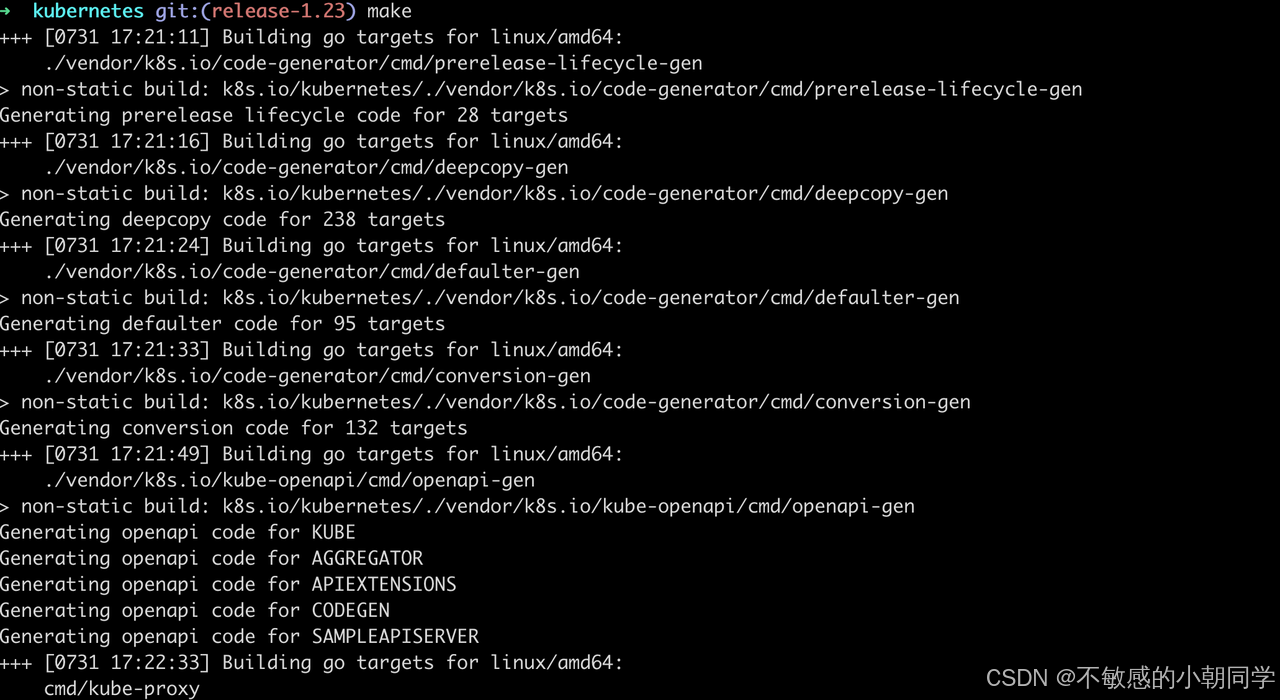
出現下面這個標識未報錯則編譯成功
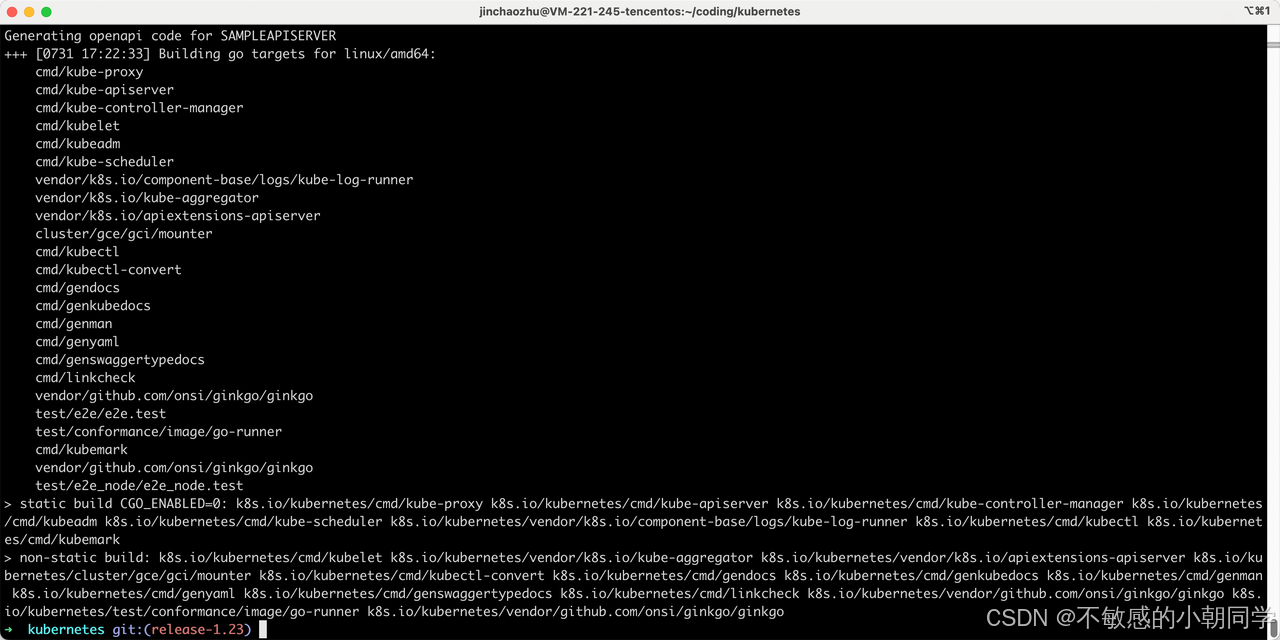
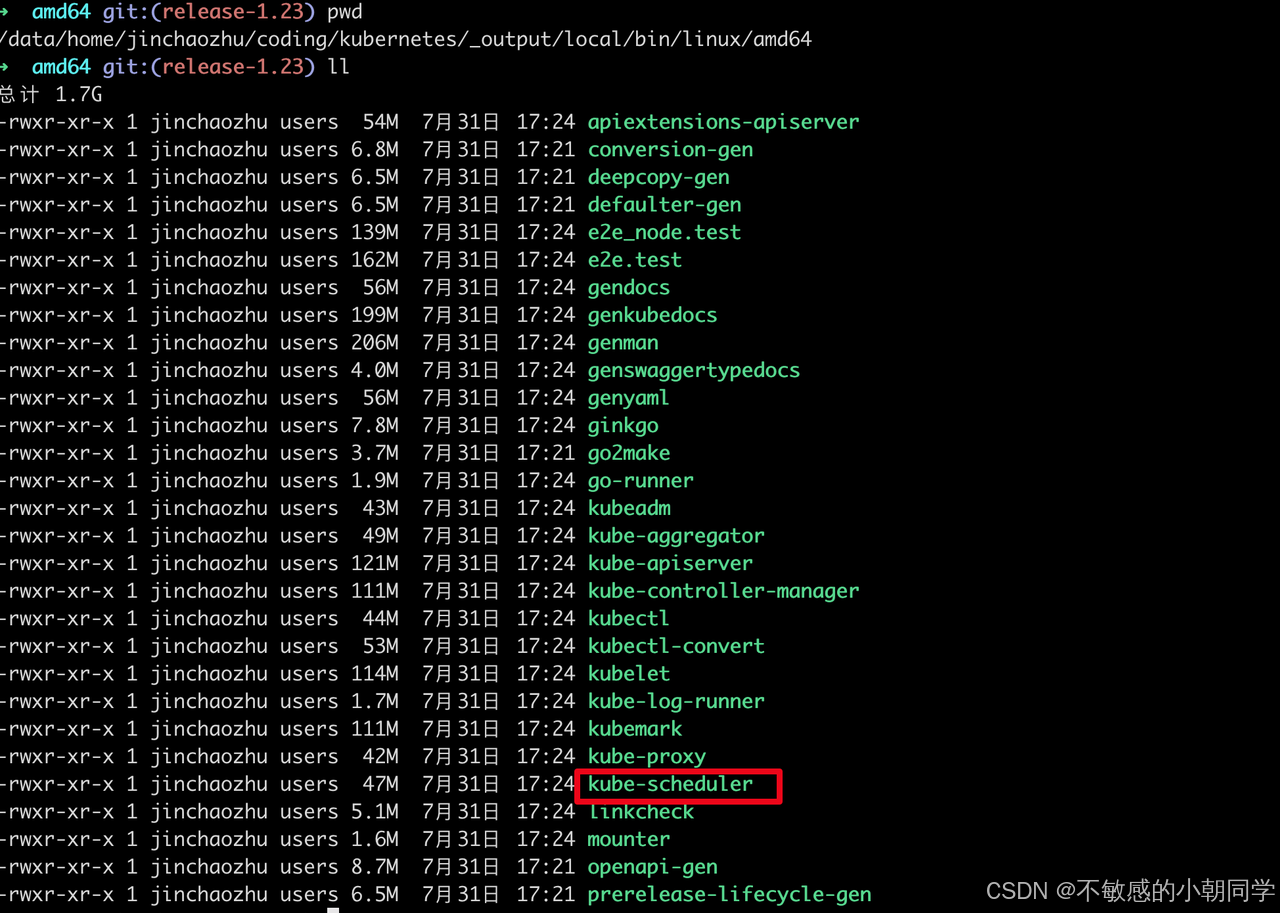
進入到 編譯后的產物的目錄,找到對應的二進制文件 kube-scheduler 即代表成功
構建鏡像
編寫DockerFile
FROM busybox
ADD ./_output/local/bin/linux/amd64/kube-scheduler /usr/local/bin/kube-scheduler
推送到自己的鏡像倉庫

查看遠程倉庫是否有該鏡像
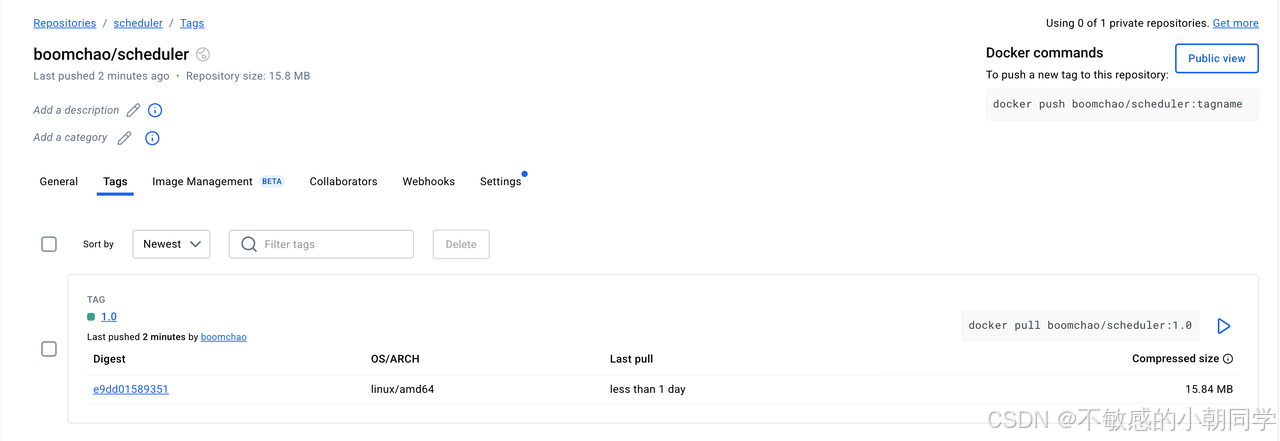
鏡像已經上傳成功
部署自定義的scheduler
部署自定義的scheduler
apiVersion: v1
kind: ServiceAccount
metadata:name: my-schedulernamespace: kube-system
---
apiVersion: rbac.authorization.k8s.io/v1
kind: ClusterRoleBinding
metadata:name: my-scheduler-as-kube-scheduler
subjects:
- kind: ServiceAccountname: my-schedulernamespace: kube-system
roleRef:kind: ClusterRolename: system:kube-schedulerapiGroup: rbac.authorization.k8s.io
---
apiVersion: rbac.authorization.k8s.io/v1
kind: ClusterRoleBinding
metadata:name: my-scheduler-as-volume-scheduler
subjects:
- kind: ServiceAccountname: my-schedulernamespace: kube-system
roleRef:kind: ClusterRolename: system:volume-schedulerapiGroup: rbac.authorization.k8s.io
---
apiVersion: rbac.authorization.k8s.io/v1
kind: RoleBinding
metadata:name: my-scheduler-extension-apiserver-authentication-readernamespace: kube-system
roleRef:kind: Rolename: extension-apiserver-authentication-readerapiGroup: rbac.authorization.k8s.io
subjects:
- kind: ServiceAccountname: my-schedulernamespace: kube-system
---
apiVersion: v1
kind: ConfigMap
metadata:name: my-scheduler-confignamespace: kube-system
data:my-scheduler-config.yaml: |apiVersion: kubescheduler.config.k8s.io/v1beta2kind: KubeSchedulerConfigurationprofiles:- schedulerName: my-schedulerleaderElection:leaderElect: false
---
apiVersion: apps/v1
kind: Deployment
metadata:labels:component: schedulertier: control-planename: my-schedulernamespace: kube-system
spec:selector:matchLabels:component: schedulertier: control-planereplicas: 1template:metadata:labels:component: schedulertier: control-planeversion: secondspec:serviceAccountName: my-schedulercontainers:- command:- /usr/local/bin/kube-scheduler- --config=/etc/kubernetes/my-scheduler/my-scheduler-config.yamlimage: boomchao/scheduler:1.0livenessProbe:httpGet:path: /healthzport: 10259scheme: HTTPSinitialDelaySeconds: 15name: kube-second-schedulerreadinessProbe:httpGet:path: /healthzport: 10259scheme: HTTPSresources:requests:cpu: '0.1'securityContext:privileged: falsevolumeMounts:- name: config-volumemountPath: /etc/kubernetes/my-schedulerhostNetwork: falsehostPID: falsevolumes:- name: config-volumeconfigMap:name: my-scheduler-config
注意配置在cm里面的 KubeSchedulerConfiguration 的版本
apiVersion: kubescheduler.config.k8s.io/v1beta2    # 這里版本需要注意
kind: KubeSchedulerConfiguration
profiles:- schedulerName: my-scheduler    # 我們自定義的scheduler名稱
leaderElection:leaderElect: false
太高的版本可能報錯如下

因為我們用的是 release-1.23 版本
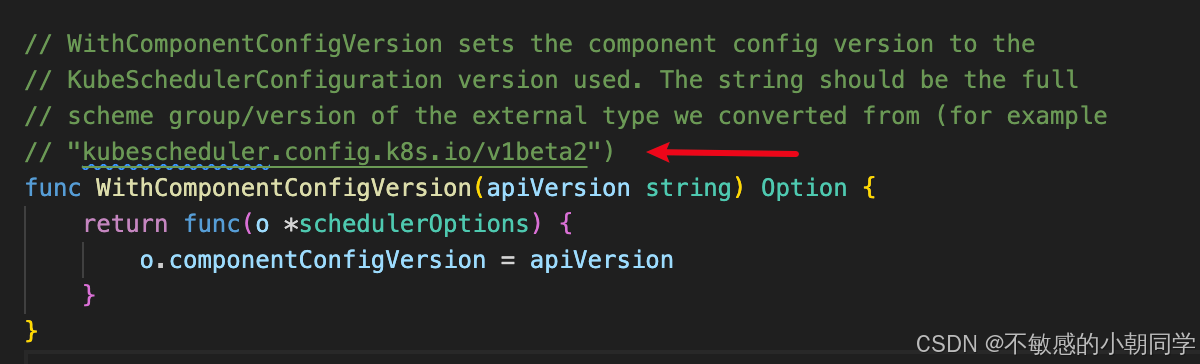
用其他版本 alpha 或者 v1 很可能識別不出來
部署成功后查看日志
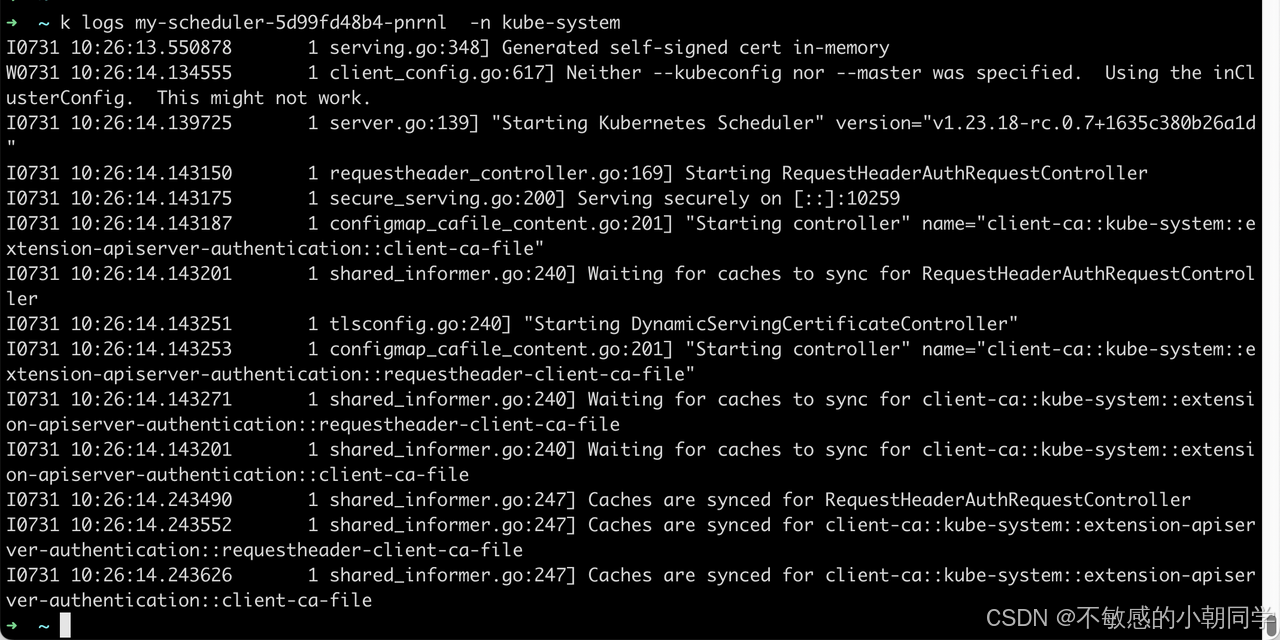
部署成功
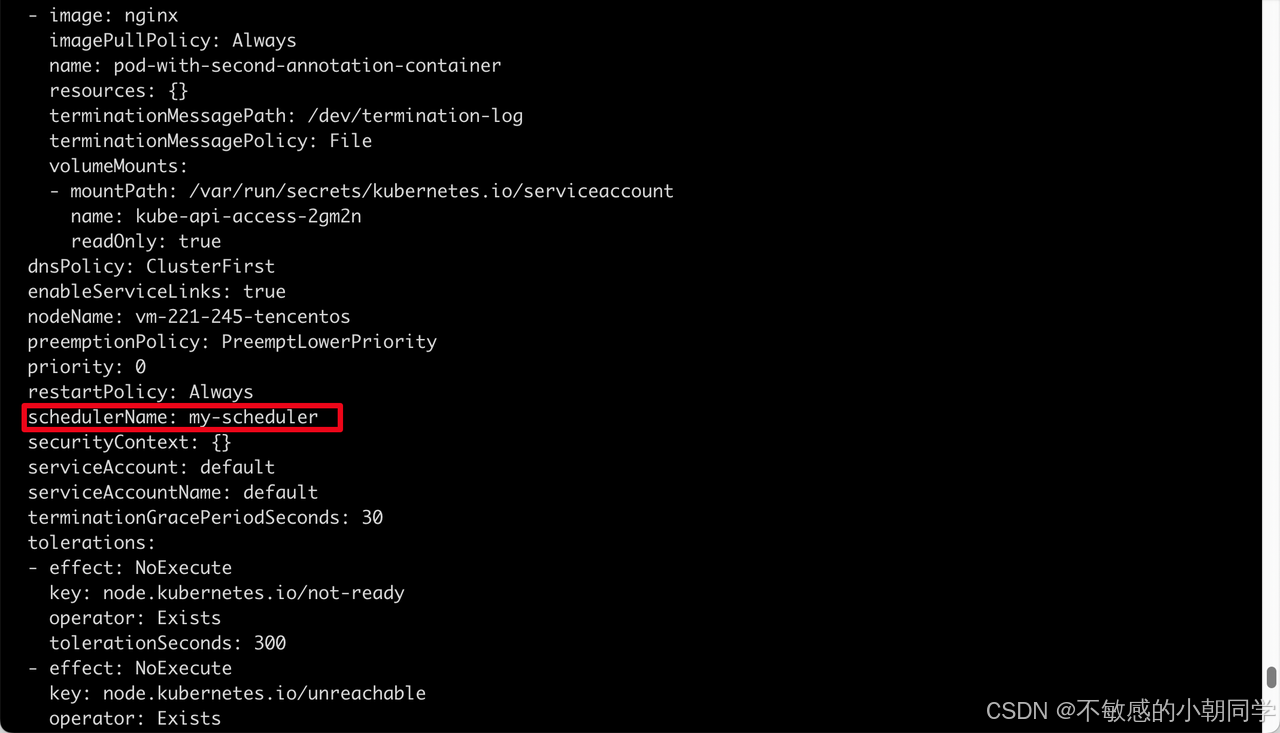
嘗試部署一個pod使用我們自定義的調度器
apiVersion: v1
kind: Pod
metadata:name: annotation-second-schedulerlabels:name: multischeduler-example
spec:schedulerName: my-schedulercontainers:- name: pod-with-second-annotation-containerimage: nginx
部署成功后查看pod上的對應的調度器的名稱,可以看到是我們自定義的 scheduler
插件解析
基本概念
區分三個概念
-
Profiles:配置的調度策略
-
Extension points:細分的調度策略,比如有
- queueSort:用來對 pending 的 pod(也就是待調度的pod)進行排序
- preFilter:預過濾,用來在過濾之前對集群或者node做提前處理
- filter:過濾,用來篩選出具體的 node 進行 pod 的派發
- postFilter: 后過濾,主要用來應對篩選不成功的情況,也就是沒有任何一個 pod 能夠匹配上 node
- score:打分,用來對上面篩選出的 node 進行打分,分數最高的 node 將會承擔起運行pod的任務
- bind:將 pod 綁定到具體的 node 上
-
plugins:用來實現上面具體的調度策略,每個 plugin 必定屬于某一個特定的 Extension-points
注意上面的 Extension points,每個Extension point的特性是不同的,比如
- queueSort 就只支持一個plugin
- filter 就支持多個 plugin 依次執行
- postFilter 只要有一個 plugin 對 pod 執行結果是 schedulable,剩余的插件便不會繼續執行
- bind 插件用來將pod與node對應,只要一個bind插件處理了pod,其他多余的bind插件便不會再執行
所有的 Extension points 參考 Scheduler Configuration
插件接口
插件的API接口如下
type Plugin interface {Name() string
}type QueueSortPlugin interface {PluginLess(*PodInfo, *PodInfo) bool
}type PreFilterPlugin interface {PluginPreFilter(CycleState, *v1.Pod) *Status
}
所有的插件都需要先定位到具體作用的位置(也就是調度過程中的哪個 extension-point ),比如是在 queueSort 階段階段就只需要實現上面的 QueueSortPlugin 接口即可;在 PreFilter 階段只需要實現 上面的 PreFilterPlugin 接口即可
編寫的插件必須統一注冊到原始的 Registry 這個 map 里面
type PluginFactory = func(runtime.Unknown, FrameworkHandle) (Plugin, error)type Registry map[string]PluginFactoryfunc NewRegistry() Registry {return Registry{fooplugin.Name: fooplugin.New,barplugin.Name: barplugin.New,// New plugins are registered here.}
}
實際編寫自定義插件的時候,只需要在啟動參數指定即可,指定了之后便會自動注冊到這個map里面,比如
import (scheduler "k8s.io/kubernetes/cmd/kube-scheduler/app"
)func main() {command := scheduler.NewSchedulerCommand(scheduler.WithPlugin("example-plugin1", ExamplePlugin1),scheduler.WithPlugin("example-plugin2", ExamplePlugin2))if err := command.Execute(); err != nil {fmt.Fprintf(os.Stderr, "%v\n", err)os.Exit(1)}
}
查看代碼 scheduler.WithPlugin,實際調用的還是 Register 方法將其注冊到總的map里面

配置文件啟用插件
配置文件怎么配置插件開啟,每個插件都對應 KubeSchedulerConfiguration 中的一個配置項,對應結構體如下
type KubeSchedulerConfiguration struct {// ... other fieldsPlugins      PluginsPluginConfig []PluginConfig
}type Plugins struct {QueueSort      []PluginPreFilter      []PluginFilter         []PluginPostFilter     []PluginPreScore       []PluginScore          []PluginReserve        []PluginPermit         []PluginPreBind        []PluginBind           []PluginPostBind       []Plugin
}type Plugin struct {Name   stringWeight int // Only valid for Score plugins
}type PluginConfig struct {Name stringArgs runtime.Unknown
}
特別要注意上面的 Plugin.Weight 字段,這個字段只有 score 插件才會有這個分數
默認開啟的一些插件
QueueSort
// Less is the function used by the activeQ heap algorithm to sort pods.
// It sorts pods based on their priority. When priorities are equal, it uses
// PodQueueInfo.timestamp.
func (pl *PrioritySort) Less(pInfo1, pInfo2 *framework.QueuedPodInfo) bool {p1 := corev1helpers.PodPriority(pInfo1.Pod)p2 := corev1helpers.PodPriority(pInfo2.Pod)return (p1 > p2) || (p1 == p2 && pInfo1.Timestamp.Before(pInfo2.Timestamp))
}
可以看到 queuSort 的實現是先比較優先級,優先級高的先調度;否則優先級一樣則按照時間順序來進行的,默認越早創建的pod越早進行調度
Filter
NodeName 插件實現了 Filter
// Filter invoked at the filter extension point.
func (pl *NodeName) Filter(ctx context.Context, _ *framework.CycleState, pod *v1.Pod, nodeInfo *framework.NodeInfo) *framework.Status {if nodeInfo.Node() == nil {return framework.NewStatus(framework.Error, "node not found")}if !Fits(pod, nodeInfo) {return framework.NewStatus(framework.UnschedulableAndUnresolvable, ErrReason)}return nil
}
比較 pod 的名字是否和 node 的名字相同
Score
ScorePlugin 我們仔細看其實現的接口
type ScorePlugin interface {Plugin// Score is called on each filtered node. It must return success and an integer// indicating the rank of the node. All scoring plugins must return success or// the pod will be rejected.Score(ctx context.Context, state *CycleState, p *v1.Pod, nodeName string) (int64, *Status)// ScoreExtensions returns a ScoreExtensions interface if it implements one, or nil if does not.ScoreExtensions() ScoreExtensions
}// ScoreExtensions is an interface for Score extended functionality.
type ScoreExtensions interface {// NormalizeScore is called for all node scores produced by the same plugin's "Score"// method. A successful run of NormalizeScore will update the scores list and return// a success status.NormalizeScore(ctx context.Context, state *CycleState, p *v1.Pod, scores NodeScoreList) *Status
}
Score 方法用來衡量指標具體的維度值,而 NormalizeScore 方法用來返回維度值具體的分數(1-100)
我們看一個具體的實現
// Score invoked at the Score extension point.
// The "score" returned in this function is the matching number of pods on the `nodeName`,
// it is normalized later.
func (pl *SelectorSpread) Score(ctx context.Context, state *framework.CycleState, pod *v1.Pod, nodeName string) (int64, *framework.Status) {.......// 獲取節點信息nodeInfo, err := pl.sharedLister.NodeInfos().Get(nodeName)if err != nil {return 0, framework.AsStatus(fmt.Errorf("getting node %q from Snapshot: %w", nodeName, err))}// 返回節點上的pod的數量count := countMatchingPods(pod.Namespace, s.selector, nodeInfo)return int64(count), nil
}// NormalizeScore invoked after scoring all nodes.
// For this plugin, it calculates the score of each node
// based on the number of existing matching pods on the node
// where zone information is included on the nodes, it favors nodes
// in zones with fewer existing matching pods.
func (pl *SelectorSpread) NormalizeScore(ctx context.Context, state *framework.CycleState, pod *v1.Pod, scores framework.NodeScoreList) *framework.Status {if skipSelectorSpread(pod) {return nil}countsByZone := make(map[string]int64, 10)maxCountByZone := int64(0)maxCountByNodeName := int64(0)// 按照節點的地域來進行分數的區分;更新每個區域的pod的數量for i := range scores {if scores[i].Score > maxCountByNodeName {maxCountByNodeName = scores[i].Score}nodeInfo, err := pl.sharedLister.NodeInfos().Get(scores[i].Name)if err != nil {return framework.AsStatus(fmt.Errorf("getting node %q from Snapshot: %w", scores[i].Name, err))}zoneID := utilnode.GetZoneKey(nodeInfo.Node())if zoneID == "" {continue}countsByZone[zoneID] += scores[i].Score}for zoneID := range countsByZone {if countsByZone[zoneID] > maxCountByZone {maxCountByZone = countsByZone[zoneID]}}haveZones := len(countsByZone) != 0maxCountByNodeNameFloat64 := float64(maxCountByNodeName)maxCountByZoneFloat64 := float64(maxCountByZone)MaxNodeScoreFloat64 := float64(framework.MaxNodeScore)// 計算最終的分數// 1. 先對分數進行規范化// 2. 計算每個節點的最終分數,考慮到節點的Pod數量和節點所屬區域內的pod總數量// 3. 二次平衡節點分數和區域分數for i := range scores {// initializing to the default/max node score of maxPriorityfScore := MaxNodeScoreFloat64if maxCountByNodeName > 0 {fScore = MaxNodeScoreFloat64 * (float64(maxCountByNodeName-scores[i].Score) / maxCountByNodeNameFloat64)}// If there is zone information present, incorporate itif haveZones {nodeInfo, err := pl.sharedLister.NodeInfos().Get(scores[i].Name)if err != nil {return framework.AsStatus(fmt.Errorf("getting node %q from Snapshot: %w", scores[i].Name, err))}zoneID := utilnode.GetZoneKey(nodeInfo.Node())if zoneID != "" {zoneScore := MaxNodeScoreFloat64if maxCountByZone > 0 {zoneScore = MaxNodeScoreFloat64 * (float64(maxCountByZone-countsByZone[zoneID]) / maxCountByZoneFloat64)}fScore = (fScore * (1.0 - zoneWeighting)) + (zoneWeighting * zoneScore)}}scores[i].Score = int64(fScore)}return nil
}
zoneWeight 的值為 2/3,也即代表著節點所屬區域分數權重占比2/3,節點本身pod數量的分數權重占比 1/3
Bind
對應代碼如下
// New creates a DefaultBinder.
func New(_ runtime.Object, handle framework.Handle) (framework.Plugin, error) {return &DefaultBinder{handle: handle}, nil
}// Bind binds pods to nodes using the k8s client.
func (b DefaultBinder) Bind(ctx context.Context, state *framework.CycleState, p *v1.Pod, nodeName string) *framework.Status {klog.V(3).InfoS("Attempting to bind pod to node", "pod", klog.KObj(p), "node", nodeName)binding := &v1.Binding{ObjectMeta: metav1.ObjectMeta{Namespace: p.Namespace, Name: p.Name, UID: p.UID},Target:     v1.ObjectReference{Kind: "Node", Name: nodeName},}err := b.handle.ClientSet().CoreV1().Pods(binding.Namespace).Bind(ctx, binding, metav1.CreateOptions{})if err != nil {return framework.AsStatus(err)}return nil
}// Handle provides data and some tools that plugins can use. It is
// passed to the plugin factories at the time of plugin initialization. Plugins
// must store and use this handle to call framework functions.
type Handle interface {....// IterateOverWaitingPods acquires a read lock and iterates over the WaitingPods map.IterateOverWaitingPods(callback func(WaitingPod))// GetWaitingPod returns a waiting pod given its UID.GetWaitingPod(uid types.UID) WaitingPod// RejectWaitingPod rejects a waiting pod given its UID.// The return value indicates if the pod is waiting or not.RejectWaitingPod(uid types.UID) bool// ClientSet returns a kubernetes clientSet.ClientSet() clientset.Interface// KubeConfig returns the raw kube config.KubeConfig() *restclient.Config// EventRecorder returns an event recorder.EventRecorder() events.EventRecorderSharedInformerFactory() informers.SharedInformerFactory....
}
代碼也很直觀,選擇好node之后,將這個pod 的 NodeName 字段與傳入的參數做綁定
這里我們注意一個參數就是 state *framework.CycleState 另外一個就是構造參數傳入的 framework.Handle
CyCleState 其實就是為當前的scheduling context提供一個上下文,因為binding cycles是可以并行執行的,插件可以通過這個參數來區分是否在處理正確的請求;其次是可以通過這個變量在不同的 extension-point 之間傳遞一些必要的信息,類似于golang直接上下文傳遞的 context.WithValue
framework.Handle 的主要作用就是里面提供了訪問k8s的API,比如 clientset,informer,以及提供接口用于 approve/deny pending 的 pod
一次完整的Scheduling-context流程
查看 scheduler 的方法
// Run begins watching and scheduling. It starts scheduling and blocked until the context is done.
func (sched *Scheduler) Run(ctx context.Context) {sched.SchedulingQueue.Run()wait.UntilWithContext(ctx, sched.scheduleOne, 0)sched.SchedulingQueue.Close()
}
可以看到整體調用流程就是啟動一個隊列,然后循環執行 schedule 過程,一直等待 ctx 結束然后關閉隊列 這三個步驟即可
Kube-scheduler 整個調度流程大概如下
啟動隊列
- 定義一個優先隊列
- 從 informer 里面獲取相關的 pod 事件
- 塞入隊列
- 供下游 scheduler 處理
源碼分析
// Profiles are required to have equivalent queue sort plugins.
lessFn := profiles[c.profiles[0].SchedulerName].QueueSortFunc()
podQueue := internalqueue.NewSchedulingQueue(lessFn,c.informerFactory,.......
)
可以看到定義的 QueueSort 插件主要是用在了這個隊列上
Scheduler 會啟動一個 pod 的 Informer 然后觸發 eventHandler 之后就會入隊
func addAllEventHandlers(sched *Scheduler,informerFactory informers.SharedInformerFactory,dynInformerFactory dynamicinformer.DynamicSharedInformerFactory,gvkMap map[framework.GVK]framework.ActionType,
) {// scheduled pod cacheinformerFactory.Core().V1().Pods().Informer().AddEventHandler(cache.FilteringResourceEventHandler{FilterFunc: func(obj interface{}) bool {.....},// 這里添加到scheduler的緩存中Handler: cache.ResourceEventHandlerFuncs{AddFunc:    sched.addPodToCache,        UpdateFunc: sched.updatePodInCache,DeleteFunc: sched.deletePodFromCache,},},)// unscheduled pod queueinformerFactory.Core().V1().Pods().Informer().AddEventHandler(cache.FilteringResourceEventHandler{FilterFunc: func(obj interface{}) bool {......},// 這里添加到scheduler的隊列中Handler: cache.ResourceEventHandlerFuncs{AddFunc:    sched.addPodToSchedulingQueue,UpdateFunc: sched.updatePodInSchedulingQueue,DeleteFunc: sched.deletePodFromSchedulingQueue,},},).....
}
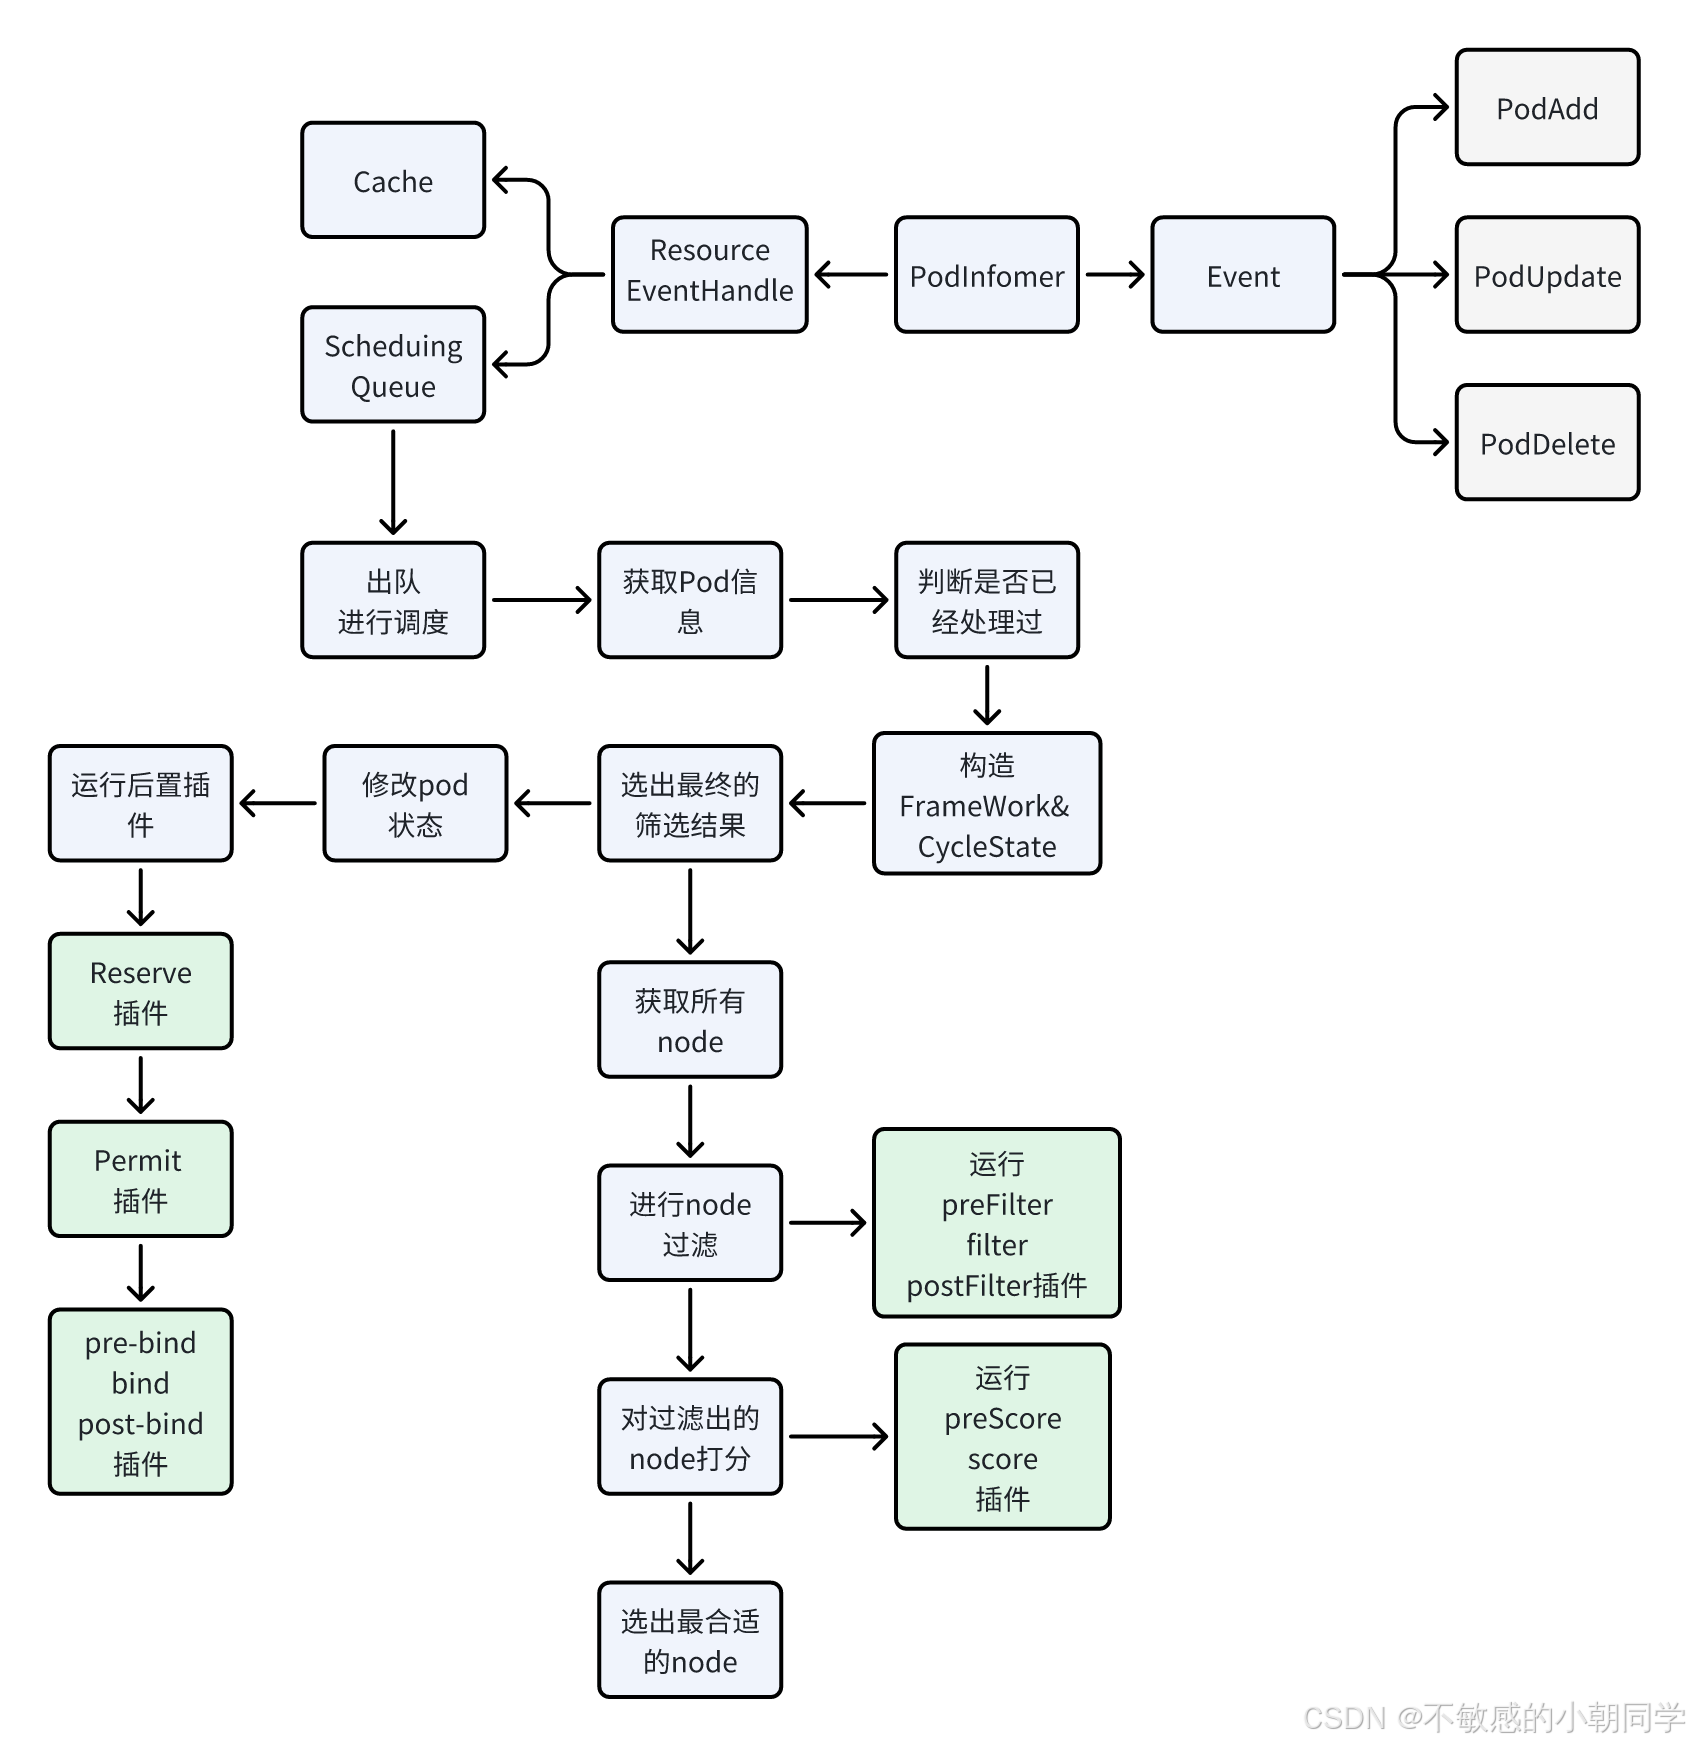
開啟調度流程
-
獲取待調度的 pod
-
判斷該pod是否是被刪除的或者是AssumePod
-
為每個 pod 構造 Framework 以及 CycleState
-
進行節點的篩選獲取最終的結果(也就是這個pod應該調度到具體哪個 node 上)
-
找到所有可行的node
- 運行 preFilter, filter,postFilter 等插件
-
對上面的Node進行打分
- 運行 preScore, score 等插件
-
按照分數選中最合適的node
-
-
修改 pod 的狀態為 Assume,表示已經執行過 score 階段了,避免被二次操作
-
運行后置插件
- 運行 reserve 插件
- 運行 permit 插件
- 異步執行綁定插件,執行 prebind、bind、postBind 等插件
具體是怎么應用插件的呢,我們來以一個 filter 插件來進行舉例
// 主方法執行
feasibleNodes, diagnosis, err := g.findNodesThatFitPod(ctx, extenders, fwk, state, pod)func (g *genericScheduler) findNodesThatFitPod(ctx context.Context, extenders []framework.Extender, fwk framework.Framework, state *framework.CycleState, pod *v1.Pod) ([]*v1.Node, framework.Diagnosis, error) {...// 獲取所有的node信息allNodes, err := g.nodeInfoSnapshot.NodeInfos().List()if err != nil {return nil, diagnosis, err}.......// 挑選合適的nodefeasibleNodes, err := g.findNodesThatPassFilters(ctx, fwk, state, pod, diagnosis, allNodes)if err != nil {return nil, diagnosis, err}feasibleNodes, err = findNodesThatPassExtenders(extenders, pod, feasibleNodes, diagnosis.NodeToStatusMap)if err != nil {return nil, diagnosis, err}return feasibleNodes, diagnosis, nil
}
仔細查看 findNodesThatPassFilters 代碼
func (g *genericScheduler) findNodesThatPassFilters(........nodes []*framework.NodeInfo) ([]*v1.Node, error) {numNodesToFind := g.numFeasibleNodesToFind(int32(len(nodes)))// Create feasible list with enough space to avoid growing it// and allow assigning.feasibleNodes := make([]*v1.Node, numNodesToFind)....checkNode := func(i int) {// We check the nodes starting from where we left off in the previous scheduling cycle,// this is to make sure all nodes have the same chance of being examined across pods.nodeInfo := nodes[(g.nextStartNodeIndex+i)%len(nodes)]// 運行所有的過濾插件,這里會記錄狀態status := fwk.RunFilterPluginsWithNominatedPods(ctx, state, pod, nodeInfo)if status.Code() == framework.Error {errCh.SendErrorWithCancel(status.AsError(), cancel)return}// 如果運行成功才會把結果記錄到下面的兩個變量// 一個是可用的node數量加1// 一個是添加到可用的nodeSlice中if status.IsSuccess() {length := atomic.AddInt32(&feasibleNodesLen, 1)if length > numNodesToFind {cancel()atomic.AddInt32(&feasibleNodesLen, -1)} else {feasibleNodes[length-1] = nodeInfo.Node()}} else {....}}.........feasibleNodes = feasibleNodes[:feasibleNodesLen]if err := errCh.ReceiveError(); err != nil {statusCode = framework.Errorreturn nil, err}return feasibleNodes, nil
}
參考文檔
https://kubernetes.io/docs/tasks/extend-kubernetes/configure-multiple-schedulers/
https://v1-29.docs.kubernetes.io/docs/reference/scheduling/config/#multiple-profiles


--鏈表01)


(下篇))
 :哈希表(Hash Table)中的一個關鍵性能指標)
原理)


Digit Recognizer 手寫數字識別)